Body Segmentation with MediaPipe and TensorFlow.js

Posted by Ivan Grishchenko, Valentin Bazarevsky, Ahmed Sabie, Jason Mayes, Google

With the rise in interest around health and fitness, we have seen a growing number of TensorFlow.js users take their first steps in 2021 with our existing body related ML models, such as face mesh, body pose, and hand pose estimation.

Today we are launching two new highly optimized body segmentation models that are both accurate and fast as part of our updated body-segmentation and pose APIs in TensorFlow.js.

First is the BlazePose GHUM pose estimation model that now has additional support for segmentation. This model is part of our unified pose-detection API offering that can perform full body segmentation and 3D pose estimation simultaneously as shown in the animation below. It’s well suited for bodies in full view further away from the camera accurately capturing the feet and legs regions for example.

Try out the live demo!

The second model we are releasing is Selfie Segmentation that is well suited for cases where someone is directly in front of a webcam on a video call (<2 meters). This model that is part of our unified body-segmentation API can have higher accuracy across the upper body as shown in the animation below, but may be less accurate for the lower body in some situations.

Try out the live demo!

Both of these new models could enable a whole host of creative applications orientated around the human body that could drive next generation web apps. For example, the BlazePose GHUM Pose model may power services like digitally teleporting your presence anywhere in the world, estimating body measurements for a virtual tailor, or creating special effects for music videos and more, the possibilities are endless. In contrast the Selfie Segmentation model could enable user friendly features on web based video calls like the demo above where you can change or blur the background accurately.

Prior to this launch, many of our users may have tried our BodyPix model, which was state of the art when it launched. With today’s release, our two new models offer a much higher FPS and fidelity across devices for a variety of use cases.

Body Segmentation API Installation

The body-segmentation API provides two runtimes for the Selfie Segmentation model, namely the MediaPipe runtime and TensorFlow.js runtime.

To install the API and runtime library, you can either use the <script> tag in your html file or use NPM.

Through script tag:


<script src="https://cdn.jsdelivr.net/npm/@tensorflow/tfjs-backend-webgl">
<script src="https://cdn.jsdelivr.net/npm/@tensorflow-models/body-segmentation">

<!-- Optional: Include below scripts if you want to use TensorFlow.js runtime. -->
<script src="https://cdn.jsdelivr.net/npm/@tensorflow/tfjs-converter">

<!-- Optional: Include below scripts if you want to use MediaPipe runtime. -->
<script src="https://cdn.jsdelivr.net/npm/@mediapipe/selfie_segmentation">

Through NPM:

yarn add @tensorflow/tfjs-core @tensorflow/tfjs-backend-webgl
yarn add @tensorflow-models/body-segmentation

# Run below commands if you want to use TensorFlow.js runtime.
yarn add @tensorflow/tfjs-converter

# Run below commands if you want to use MediaPipe runtime.
yarn add @mediapipe/selfie_segmentation

To reference the API in your JS code, it depends on how you installed the library.

If installed through script tag, you can reference the library through the global namespace bodySegmentation.

If installed through NPM, you need to import the libraries first:

import '@tensorflow/tfjs-backend-core';
import '@tensorflow/tfjs-backend-webgl';
import * as bodySegmentation from '@tensorflow-models/body-segmentation';

// Uncomment the line below if you want to use TensorFlow.js runtime.
// import '@tensorflow/tfjs-converter';

// Uncomment the line below if you want to use MediaPipe runtime.
// import '@mediapipe/selfie_segmentation';

Try it yourself!

First, you need to create a segmenter:

const model = bodySegmentation.SupportedModels.MediaPipeSelfieSegmentation; // or 'BodyPix'

const segmenterConfig = {
runtime: 'mediapipe', // or 'tfjs'
modelType: 'general' // or 'landscape'
};

segmenter = await bodySegmentation.createSegmenter(model, segmenterConfig);

Choose a modelType that fits your application needs, there are two options for you to choose from: general, and landscape. From landscape to general, the accuracy increases while the inference speed decreases. Please try our live demo to compare different configurations.

Once you have a segmenter, you can pass in a video stream, static image, or TensorFlow.js tensors to segment people:

const video = document.getElementById('video');
const people = await segmenter.segmentPeople(video);

How to use the output?

The people result above represents an array of the found segmented people in the image frame. However, each model has its own semantics for a given segmentation.

For Selfie Segmentation, the array will be exactly of length 1, where the single segmentation corresponds to all people in the image frame. For each segmentation, it contains maskValueToLabel and mask properties detailed below.

The mask field stores an object which provides access to the underlying results of the segmentation. You can then utilize the provided asynchronous conversion functions such as toCanvasImageSource, toImageData, and toTensor depending on the desired output type that you want for efficiency.

It should be noted that different models have different internal representations of data. Therefore converting from one form to another may be expensive. In the name of efficiency, you can call getUnderlyingType to determine what form the segmentation is in already so you may choose to keep it in the same form for faster results.

The semantics of the RGBA values of the mask are as follows: the image mask is the same size as the input image, where green and blue channels are always set to 0. Different red values denote different body parts (see maskValueToLabel key below). Different alpha values denote the probability of a pixel being a body part pixel (0 being lowest probability and 255 being highest).

maskValueToLabel maps pixel’s red channel value to the segmented part name for that pixel. This is not necessarily the same across different models (for example SelfieSegmentation will always return ‘person’ since it does not distinguish individual body parts, whereas a model like BodyPix would return the name of individual body parts that it can distinguish for each segmented pixel). See below output snippet for example:

[
{
maskValueToLabel: (maskValue: number) => { return 'person' },
mask: {
toCanvasImageSource(): ...
toImageData(): ...
toTensor(): ...
getUnderlyingType(): ...
}
}
]

We also provide an optional utility function that you can use to render the result of the segmentation. Use the toBinaryMask function to convert the segmentation to an ImageData object.

This function takes 5 parameters, the last 4 being optional:

  1. Segmentation results from segmentPeople call above.
  2. Foreground color – an object representing the RGBA values to use for rendering foreground pixels.
  3. Background color – object with RGBA values for background pixels
  4. Draw Contour – boolean value if to draw a contour line around the body of the found person.
  5. Foreground threshold – at what point a pixel should be considered a foreground pixel vs background pixel. This is a floating point value from 0 to 1.

Once you have the imageData object from toBinaryMask you can use the drawMask function to render it to a canvas of your choice.

Example code for using these two functions is shown below:

const foregroundColor = {r: 0, g: 0, b: 0, a: 0};
const backgroundColor = {r: 0, g: 0, b: 0, a: 255};
const drawContour = true;
const foregroundThreshold = 0.6;

const backgroundDarkeningMask = await bodySegmentation.toBinaryMask(people, foregroundColor, backgroundColor, drawContour, foregroundThreshold);

const opacity = 0.7;
const maskBlurAmount = 3; // Number of pixels to blur by.
const canvas = document.getElementById('canvas');

const people = await bodySegmentation.drawMask(canvas, video, backgroundDarkeningMask, opacity, maskBlurAmount);

Pose Detection API Usage

To load and use the BlazePose GHUM model please reference the unified Pose API documentation. This model has three outputs:

  1. 2D keypoints
  2. 3D keypoints
  3. Segmentation for each found pose.

If you need to grab the segmentation from the pose results, you can simply grab a reference to that pose’s segmentation property a shown:

const poses = await detector.estimatePoses(video);
const firstSegmentation = poses.length > 0 ? poses[0].segmentation : null;


Models deep dive

BlazePose GHUM and MediaPipe Selfie Segmentation models segment the prominent humans in the frame. Both run in real-time across laptops and smartphones but vary in intended applications as discussed at the start of this blog. Selfie Segmentation focuses on selfie effects and conferencing for closeup cases (< 2m) where as BlazePose GHUM specializes in full-body cases like yoga, fitness, dance and works up to 4 meters from the camera.

Selfie Segmentation

Selfie Segmentation model predicts binary segmentation mask of foreground with humans. The pipeline is structured to run entirely on GPU, from image acquisition over neural network inference to rendering the segmented result on the screen. It avoids slow CPU-GPU syncs and achieves the maximum performance. Variations of the model are powering background replacement in Google Meet and a more general model is now available in TensorFlow.js and MediaPipe.

BlazePose GHUM 2D landmarks and body segmentation

BlazePose GHUM model now provides a body segmentation mask in addition to 2D and 3D landmarks introduced earlier. Having a single model that predicts both outputs gives us two gains. First, it allows outputs to supervise and improve each other as landmarks give semantic structure while segmentation focuses on edges. Second, it guarantees that predicted mask and points belong to the same person, which is hard to achieve with separate models. As BlazePose GHUM model runs only on the ROI crop of a person (vs. full image), segmentation mask quality depends only on the effective resolution within the ROI and doesn’t change a lot when moving closer or further from the camera.

Conference

ASL

Yoga

Dance

HIIT

BlazePose GHUM (full)

95.50%

96.52%

94.73%

94.55%

95.16%

Selfie Segmentation (256×256)

97.60%

97.88%

80.66%

86.33%

85.53%

BlazePose GHUM and Selfie Segmentation IOUs across different domains

MediaPipe and TensorFlow.js runtime

There are some pros and cons of using each runtime. As shown in the performance tables below, the MediaPipe runtime provides faster inference speed on desktop, laptop and android phones. The TensorFlow.js runtime provides faster inference speed on iPhones and iPads.

FPS numbers here are the time taken to perform the inference through the model and wait for the GPU and CPU to sync. This is done to ensure the GPU has fully finished for benchmarking purposes, but for pure-GPU production pipelines no waiting is needed, so your numbers may be higher still. For pure GPU pipeline, if you are using the MediaPipe runtime, just use await mask.toCanvasImageSource(), and if you are using the TF.js runtime, reference this example on how to use texture directly to stay on GPU for rendering effects.

Benchmarks

Selfie segmentation model

MacBook Pro 15” 2019. 

Intel core i9. 

AMD Radeon Pro Vega 20 Graphics.

(FPS)

iPhone 11

(FPS – CPU Only for MediaPipe)

Pixel 6 Pro

(FPS)

Desktop PC 

Intel i9-10900K. Nvidia GTX 1070 GPU.

(FPS)

MediaPipe Runtime

With WASM & GPU Accel.

125 | 130

31 |  21

35 | 33

185 | 225

TFJS Runtime

With WebGL backend.

74 | 45

42 | 30

25 | 23

80 | 62

Inference speed of Selfie Segmentation across different devices and runtimes. The first number in each cell is for the landscape model, and the second number is for the general model.

BlazePose GHUM model

MacBook Pro 15” 2019. 

Intel core i9. 

AMD Radeon Pro Vega 20 Graphics.

(FPS)

iPhone 11

(FPS – CPU Only for MediaPipe)

Pixel 6 Pro

(FPS)

Desktop PC 

Intel i9-10900K. Nvidia GTX 1070 GPU.

(FPS)

MediaPipe Runtime

With WASM & GPU Accel

70 | 59 | 31

8 | 5 | 1

22 | 19 | 10

123 | 112 |  70

TFJS Runtime

With WebGL backend.

42 | 36 | 22

14 | 12 | 8

12 | 10 | 6

35  | 33 | 26

Inference speed of BlazePose GHUM full body segmentation across different devices and runtimes. The first number in each cell is the lite model, second number is the full model, and third number is the heavy version of the model. Note that the segmentation output can be turned off by setting enableSegmentation to false in the model parameters, which would increase the model performance.

Looking to the future

We are constantly working on new features and quality improvements of our tech (for instance this is the third BlazePose GHUM update in the last year after initial 2D release and consequent 3D update), so expect new exciting updates in the near future.

Acknowledgements

We would like to acknowledge our colleagues who participated in or sponsored creating Selfie Segmentation, BlazePose GHUM and building the APIs: Siargey Pisarchyk, Tingbo Hou, Artsiom Ablavatski, Karthik Raveendran, Eduard Gabriel Bazavan, Andrei Zanfir, Cristian Sminchisescu, Chuo-Ling Chang, Matthias Grundmann, Michael Hays, Tyler Mullen, Na Li, Ping Yu.

Read More

Renovations to Stream About: Taiwan Studio Showcases Architectural Designs Using Extended Reality

Interior renovations have never looked this good.

TCImage, a studio based in Taipei, is showcasing compelling landscape and architecture designs by creating realistic 3D graphics and presenting them in virtual, augmented, and mixed reality — collectively known as extended reality, or XR.

For clients to get a better understanding of the designs, TCImage produces high-quality, 3D visualizations of the projects and puts them in a virtual environment. This lets users easily review and engage with the model in full scale, so they can get to the final design faster.

To keep up with client expectations and deliver quality content, the team at TCImage needs advanced tools and technologies that help them make design concepts feel like a reality.

With NVIDIA RTX technology, CloudXR, Deep Learning Super Sampling (DLSS) and NVIDIA Omniverse, TCImage is at the forefront of delivering stunning renders and XR experiences that allow clients to be virtually transported to the renovation of their dreams.

Bringing Design Details to Life With RTX

To make the realistic details stand out in a design, its CEO Leo Chou and his team must create all 3D visuals in high resolution. During the design process, the team uses popular applications like Autodesk 3ds Max, Autodesk Revit, Trimble SketchUp and Unreal Engine 4. Chou initially tried using a consumer-level PC to render 3D graphics, but it would take up to three hours just to render a single frame of a 4K image.

Now, with an enterprise-grade PC powered by an NVIDIA RTX 6000 graphics card, he can render the same 4K frame within 30 minutes. NVIDIA RTX provides Chou with enhanced efficiency and performance, which allow him to achieve real-time rendering of final images.

“I was thrilled by the performance of RTX technology — it’s more powerful, allowing me to establish a competitive edge in the industry by making real-time ray tracing come true,” said Chou.

Looking Around Unbound With CloudXR

To show off these dazzling 3D visuals to customers, TCImage uses CloudXR.

With this extended reality streaming technology, Chou and his team can share projects inside an immersive and seamless experience, allowing them to efficiently communicate project designs to customers. The team can also present their designs from any location, as they can stream the untethered XR experiences from the cloud.

Built on RTX technology, CloudXR enables TCImage to stream high-resolution, real-time graphics and provide a more interactive experience for clients. NVIDIA DLSS also improves the XR experience by rendering more frames per second, which is especially helpful during the design review process.

With NVIDIA DLSS, TCImage can tap into the power of AI to boost frame rates and create sharp images for the XR environment. This helps the designers and clients see a preview of the 3D model with minimal latency as the user moves and rotates inside the environment.

“By using NVIDIA CloudXR, I can freely and easily present my projects, artwork and portfolio to customers anytime, anywhere while maintaining the best quality of content,” said Chou. “I can even edit the content in real time, based on the customers’ requirements.”

According to Chou, TCImage clients who have experienced the improved workflow were impressed by how much time and cost savings the new technology has provided. It’s also created more business opportunities for the firm.

Designing Buildings in Virtual Worlds

TCImage has started to explore design workflows in the virtual world with NVIDIA Omniverse, a platform for 3D simulation and design collaboration. In addition to using real-time ray tracing and DLSS in Omniverse, Chou played around with optimizing his virtual scenes with the Omniverse Create and Omniverse View applications.

“Omniverse is flexible enough to integrate with major graphics software, as well as allow instantaneous content updates and changes without any extra effort by our team,” said Chou.

In Omniverse Create, Chou can enhance creative workflows by connecting to leading applications to produce architectural designs. He also uses existing materials in Omniverse, such as grass brush samples, to create exterior landscapes and vegetation.

And with Omniverse View, Chou uses lighting tools such as Sun Study, which allows him to review designs with accurate sunlight.

Learn more about TCImage and check out Chou’s recent tutorial in Omniverse:

The post Renovations to Stream About: Taiwan Studio Showcases Architectural Designs Using Extended Reality appeared first on The Official NVIDIA Blog.

Read More

Train Spotting: Startup Gets on Track With AI and NVIDIA Jetson to Ensure Safety, Cost Savings for Railways

Preventable train accidents like the 1985 disaster outside Tel Aviv in which a train collided with a school bus, killing 19 students and several adults, motivated Shahar Hania and Elen Katz to help save lives with technology.

They founded Rail Vision, an Israeli startup that creates obstacle-detection and classification systems for the global railway industry

The systems use advanced electro-optic sensors to alert train drivers and railway control centers when a train approaches potential obstacles — like humans, vehicles, animals or other objects — in real time, and in all weather and lighting conditions.

Rail Vision is a member of NVIDIA Inception — a program designed to nurture cutting-edge startups — and an NVIDIA Metropolis partner. The company uses the NVIDIA Jetson AGX Xavier edge AI platform, which provides GPU-accelerated computing in a compact and energy-efficient module, and the NVIDIA TensorRT software development kit for high-performance deep learning inference.

Pulling the Brakes in Real Time

A train’s braking distance — or the distance a train travels between when its brakes are pulled and when it comes to a complete stop — is usually so long that by the time a driver spots a railway obstacle, it could be too late to do anything about it.

For example, the braking distance for a train traveling 100 miles per hour is 800 meters, or about a half-mile, according to Hania. Rail Vision systems can detect objects on and along tracks from up to two kilometers, or 1.25 miles, away.

By sending alerts, both visual and acoustic, of potential obstacles in real time, Rail Vision systems give drivers over 20 seconds to respond and make decisions on braking.

The systems can also be integrated with a train’s infrastructure to automatically apply brakes when an obstacle is detected, even without a driver’s cue.

“Tons of deep learning inference possibilities are made possible with NVIDIA GPU technology,” Hania said. “The main advantage of using the NVIDIA Jetson platform is that there are lots of goodies inside — compressors, modules for optical flow — that all speed up the embedding process and make our systems more accurate.”

Boosting Maintenance, in Addition to Safety

In addition to preventing accidents, Rail Vision systems help save operational time and costs spent on railway maintenance — which can be as high as $50 billion annually, according to Hania.

If a railroad accident occurs, four to eight hours are typically spent handling the situation — which prevents other trains from using the track, said Hania.

Rail Vision systems use AI to monitor the tracks and prevent such workflow slow-downs, or quickly alert operators when they do occur — giving them time to find alternate routes or plans of action.

The systems are scalable and deployable for different use cases — with some focused solely on these maintenance aspects of railway operations.

Watch a Rail Vision system at work.

The post Train Spotting: Startup Gets on Track With AI and NVIDIA Jetson to Ensure Safety, Cost Savings for Railways appeared first on The Official NVIDIA Blog.

Read More

Run AutoML experiments with large parquet datasets using Amazon SageMaker Autopilot.

Starting today, you can use Amazon SageMaker Autopilot to tackle regression and classification tasks on large datasets up to 100 GB. Additionally, you can now provide your datasets in either CSV or Apache Parquet content types.

Businesses are generating more data than ever. A corresponding demand is growing for generating insights from these large datasets to shape business decisions. However, successfully training state-of-the-art machine learning (ML) algorithms on these large datasets can be challenging. Autopilot automates this process and provides a seamless experience for running automated machine learning (AutoML) on large datasets up to 100 GB.

Autopilot subsamples your large datasets automatically to fit the maximum supported limit while preserving the rare class in case of class imbalance. Class imbalance is an important problem to be aware of in ML, especially when dealing with large datasets. Consider a fraud detection dataset where only a small fraction of transactions is expected to be fraudulent. In this case, Autopilot subsamples only the majority class, non-fraudulent transactions, while preserving the rare class, fraudulent transactions.

When you run an AutoML job using Autopilot, all relevant information for subsampling is stored in Amazon CloudWatch. Navigate to the log group for /aws/sagemaker/ProcessingJobs, search for the name of your AutoML job, and choose the CloudWatch log stream that includes -db- in its name.

Many of our customers prefer the Parquet content type to store their large datasets. This is generally due to its compressed nature, support for advanced data structures, efficiency, and low-cost operations. This data can often reach up to tens or even hundreds of GBs. Now, you can directly bring these Parquet datasets to Autopilot. You can either use our API or navigate to Amazon SageMaker Studio to create an Autopilot job with a few clicks. You can specify the input location of your Parquet dataset as a single file or multiple files specified as a manifest file. Autopilot automatically detects the content type of your dataset, parses it, extracts meaningful features, and trains multiple ML algorithms.

You can get started using our sample notebook for running AutoML using Autopilot on Parquet datasets.


About the Authors

H. Furkan Bozkurt, Machine Learning Engineer, Amazon SageMaker Autopilot.

Valerio Perrone, Applied Science Manager, Amazon SageMaker Autopilot.

Read More

Controlling Neural Networks with Rule Representations

Deep neural networks (DNNs) provide more accurate results as the size and coverage of their training data increases. While investing in high-quality and large-scale labeled datasets is one path to model improvement, another is leveraging prior knowledge, concisely referred to as “rules” — reasoning heuristics, equations, associative logic, or constraints. Consider a common example from physics where a model is given the task of predicting the next state in a double pendulum system. While the model may learn to estimate the total energy of the system at a given point in time only from empirical data, it will frequently overestimate the energy unless also provided an equation that reflects the known physical constraints, e.g., energy conservation. The model fails to capture such well-established physical rules on its own. How could one effectively teach such rules so that DNNs absorb the relevant knowledge beyond simply learning from the data?

In “Controlling Neural Networks with Rule Representations”, published at NeurIPS 2021, we present Deep Neural Networks with Controllable Rule Representations (DeepCTRL), an approach used to provide rules for a model agnostic to data type and model architecture that can be applied to any kind of rule defined for inputs and outputs. The key advantage of DeepCTRL is that it does not require retraining to adapt the rule strength. At inference, the user can adjust rule strength based on the desired operation point of accuracy. We also propose a novel input perturbation method, which helps generalize DeepCTRL to non-differentiable constraints. In real-world domains where incorporating rules is critical — such as physics and healthcare — we demonstrate the effectiveness of DeepCTRL in teaching rules for deep learning. DeepCTRL ensures that models follow rules more closely while also providing accuracy gains at downstream tasks, thus improving reliability and user trust in the trained models. Additionally, DeepCTRL enables novel use cases, such as hypothesis testing of the rules on data samples and unsupervised adaptation based on shared rules between datasets.

The benefits of learning from rules are multifaceted:

  • Rules can provide extra information for cases with minimal data, improving the test accuracy.
  • A major bottleneck for widespread use of DNNs is the lack of understanding the rationale behind their reasoning and inconsistencies. By minimizing inconsistencies, rules can improve the reliability of and user trust in DNNs.
  • DNNs are sensitive to slight input changes that are human-imperceptible. With rules, the impact of these changes can be minimized as the model search space is further constrained to reduce underspecification.

Learning Jointly from Rules and Tasks
The conventional approach to implementing rules incorporates them by including them in the calculation of the loss. There are three limitations of this approach that we aim to address: (i) rule strength needs to be defined before learning (thus the trained model cannot operate flexibly based on how much the data satisfies the rule); (ii) rule strength is not adaptable to target data at inference if there is any mismatch with the training setup; and (iii) the rule-based objective needs to be differentiable with respect to learnable parameters (to enable learning from labeled data).

DeepCTRL modifies canonical training by creating rule representations, coupled with data representations, which is the key to enable the rule strength to be controlled at inference time. During training, these representations are stochastically concatenated with a control parameter, indicated by α, into a single representation. The strength of the rule on the output decision can be improved by increasing the value of α. By modifying α at inference, users can control the behavior of the model to adapt to unseen data.

DeepCTRL pairs a data encoder and rule encoder, which produce two latent representations, which are coupled with corresponding objectives. The control parameter α is adjustable at inference to control the relative weight of each encoder.

Integrating Rules via Input Perturbations
Training with rule-based objectives requires the objectives to be differentiable with respect to the learnable parameters of the model. There are many valuable rules that are non-differentiable with respect to input. For example, “higher blood pressure than 140 is likely to lead to cardiovascular disease” is a rule that is hard to be combined with conventional DNNs. We also introduce a novel input perturbation method to generalize DeepCTRL to non-differentiable constraints by introducing small perturbations (random noise) to input features and constructing a rule-based constraint based on whether the outcome is in the desired direction.

Use Cases
We evaluate DeepCTRL on machine learning use cases from physics and healthcare, where utilization of rules is particularly important.

  • Improved Reliability Given Known Principles in Physics
  • We quantify reliability of a model with the verification ratio, which is the fraction of output samples that satisfy the rules. Operating at a better verification ratio could be beneficial, especially if the rules are known to be always valid, as in natural sciences. By adjusting the control parameter α, a higher rule verification ratio, and thus more reliable predictions, can be achieved.

    To demonstrate this, we consider the time-series data generated from double pendulum dynamics with friction from a given initial state. We define the task as predicting the next state of the double pendulum from the current state while imposing the rule of energy conservation. To quantify how much the rule is learned, we evaluate the verification ratio.

    DeepCTRL enables controlling a model’s behavior after learning, but without retraining. For the example of a double pendulum, conventional learning imposes no constraints to ensure the model follows physical laws, e.g., conservation of energy. The situation is similar for the case of DeepCTRL where the rule strength is low. So, the total energy of the system predicted at time t+1 ( blue) can sometimes be greater than that measured at time t (red), which is physically disallowed (bottom left). If rule strength in DeepCTRL is high, the model may follow the given rule but lose accuracy (discrepancy between red and blue is larger; bottom right). If rule strength is between the two extremes, the model may achieve higher accuracy (blue curve is close to red) and follow the rule properly (blue curve is lower than red one).

    We compare the performance of DeepCTRL on this task to conventional baselines of training with a fixed rule-based constraint as a regularization term added to the objective, λ. The highest of these regularization coefficients provides the highest verification ratio (shown by the green line in the second graph below), however, the prediction error is slightly worse than that of λ = 0.1 (orange line). We find that the lowest prediction error of the fixed baseline is comparable to that of DeepCTRL, but the highest verification ratio of the fixed baseline is still lower, which implies that DeepCTRL could provide accurate predictions while following the law of energy conservation. In addition, we consider the benchmark of imposing the rule-constraint with Lagrangian Dual Framework (LDF) and demonstrate two results where its hyperparameters are chosen by the lowest mean absolute error (LDF-MAE) and the highest rule verification ratio (LDF-Ratio) on the validation set. The performance of the LDF method is highly sensitive to what the main constraint is and its output is not reliable (black and pink dashed lines).

    Experimental results for the double pendulum task, showing the task-based mean absolute error (MAE), which measures the discrepancy between the ground truth and the model prediction, versus DeepCTRL as a function of the control parameter α. TaskOnly doesn’t have a rule constraint and Task & Rule has different rule strength (λ). LDF enforces rules by solving a constraint optimization problem.
    As above, but showing the verification ratio from different models.
    Experimental results for the double pendulum task showing the current and predicted energy at time t and t + 1, respectively.

    Additionally, the figures above illustrate the advantage DeepCTRL has over conventional approaches. For example, increasing the rule strength λ from 0.1 to 1.0 improves the verification ratio (from 0.7 to 0.9), but does not improve the mean absolute error. Arbitrarily increasing λ will continue to drive the verification ratio closer to 1, but will result in worse accuracy. Thus, finding the optimal value of λ will require many training runs through the baseline model, whereas DeepCTRL can find the optimal value for the control parameter α much more quickly.

  • Adapting to Distribution Shifts in Healthcare
  • The strengths of some rules may differ between subsets of the data. For example, in disease prediction, the correlation between cardiovascular disease and higher blood pressure is stronger for older patients than younger patients. In such situations, when the task is shared but data distribution and the validity of the rule differ between datasets, DeepCTRL can adapt to the distribution shifts by controlling α.

    Exploring this example, we focus on the task of predicting whether cardiovascular disease is present or not using a cardiovascular disease dataset. Given that higher systolic blood pressure is known to be strongly associated with cardiovascular disease, we consider the rule: “higher risk if the systolic blood pressure is higher”. Based on this, we split the patients into two groups: (1) unusual, where a patient has high blood pressure, but no disease or lower blood pressure, but has disease; and (2) usual, where a patient has high blood pressure and disease or low blood pressure, but no disease.

    We demonstrate below that the source data do not always follow the rule, and thus the effect of incorporating the rule can depend on the source data. The test cross entropy, which indicates classification accuracy (lower cross entropy is better), vs. rule strength for source or target datasets with varying usual / unusual ratio are visualized below. The error monotonically increases as α → 1 because the enforcement of the imposed rule, which doesn’t accurately reflect the source data, becomes more strict.

    Test cross entropy vs. rule strength for a source dataset with usual / unusual ratio of 0.30.

    When a trained model is transferred to the target domain, the error can be reduced by controlling α. To demonstrate this, we show three domain-specific datasets, which we call Target 1, 2, and 3. In Target 1, where the majority of patients are from the usual group, as α is increased, the rule-based representation has more weight and the resultant error decreases monotonically.

    As above, but for a Target dataset (1) with a usual / unusual ratio of 0.77.

    When the ratio of usual patients is decreased in Target 2 and 3, the optimal α is an intermediate value between 0 and 1. These demonstrate the capability to adapt the trained model via α.

    As above, but for Target 2 with a usual / unusual ratio of 0.50.
    As above, but for Target 3 with a usual / unusual ratio of 0.40.

Conclusions
Learning from rules can be crucial for constructing interpretable, robust, and reliable DNNs. We propose DeepCTRL, a new methodology used to incorporate rules into data-learned DNNs. DeepCTRL enables controllability of rule strength at inference without retraining. We propose a novel perturbation-based rule encoding method to integrate arbitrary rules into meaningful representations. We demonstrate three use cases of DeepCTRL: improving reliability given known principles, examining candidate rules, and domain adaptation using the rule strength.

Acknowledgements
We greatly appreciate the contributions of Jinsung Yoon, Xiang Zhang, Kihyuk Sohn and Tomas Pfister.

Read More

Use a web browser plugin to quickly translate text with Amazon Translate

Web browsers can be a single pane of glass for organizations to interact with their information—all of the tools can be viewed and accessed on one screen so that users don’t have to switch between applications and interfaces. For example, a customer call center might have several different applications to see customer reviews, social media feeds, and customer data. Each one of these applications are interacted with through web browsers. If the information is in a language that the user doesn’t speak, however, a separate application often needs to be pulled up to translate text. Web browser plugins enable customization of this user experience.

Amazon Translate is a neural machine translation service that delivers fast, high-quality, affordable, and customizable language translation. Neural machine translation is a form of language translation automation that uses deep learning models to deliver more accurate and more natural sounding translation than traditional statistical and rule-based translation algorithms. As of writing this post, Amazon Translate supports 75 languages and 5,550 language pairs. For the latest list, see the Amazon Translate Developer Guide.

With the Amazon Translate web browser plugin, you can simply click a button and have an entire web page translated to whatever language you prefer. This browser plugin works in Chromium-based and Firefox-based browsers.

This post shows how you can use a browser plugin to quickly translate web pages with neural translation with Amazon Translate.

Overview of solution

To use the plugin, install it into a browser on your workstation. To translate a web page, activate the plugin, which authenticates to Amazon Translate using AWS Identity and Access Management (IAM), sends the text of the page you wish to translate to the Amazon Translate service, and returns the translated text to be displayed in the web browser. The browser plugin also enables caching of translated pages. When caching is enabled, translations requested for a webpage are cached to your local machine by their language pairs. Caching improves the speed of the translation of the page and reduces the number of requests made to the Amazon Translate service, potentially saving time and money.

To install and use the plugin, complete the following steps:

  1. Set up an IAM user and credentials.
  2. Install the browser plugin.
  3. Configure the browser plugin.
  4. Use the plugin to translate text.

The browser plugin is available on GitHub.

Prerequisites

For this walkthrough, you should have the following prerequisites:

  • An AWS account
  • A compatible web browser
  • The privileges to create IAM users to authenticate to Amazon Translate

For more information about how Amazon Translate interacts with IAM, see Identity and Access Management for Amazon Translate.

Set up an IAM user and credentials

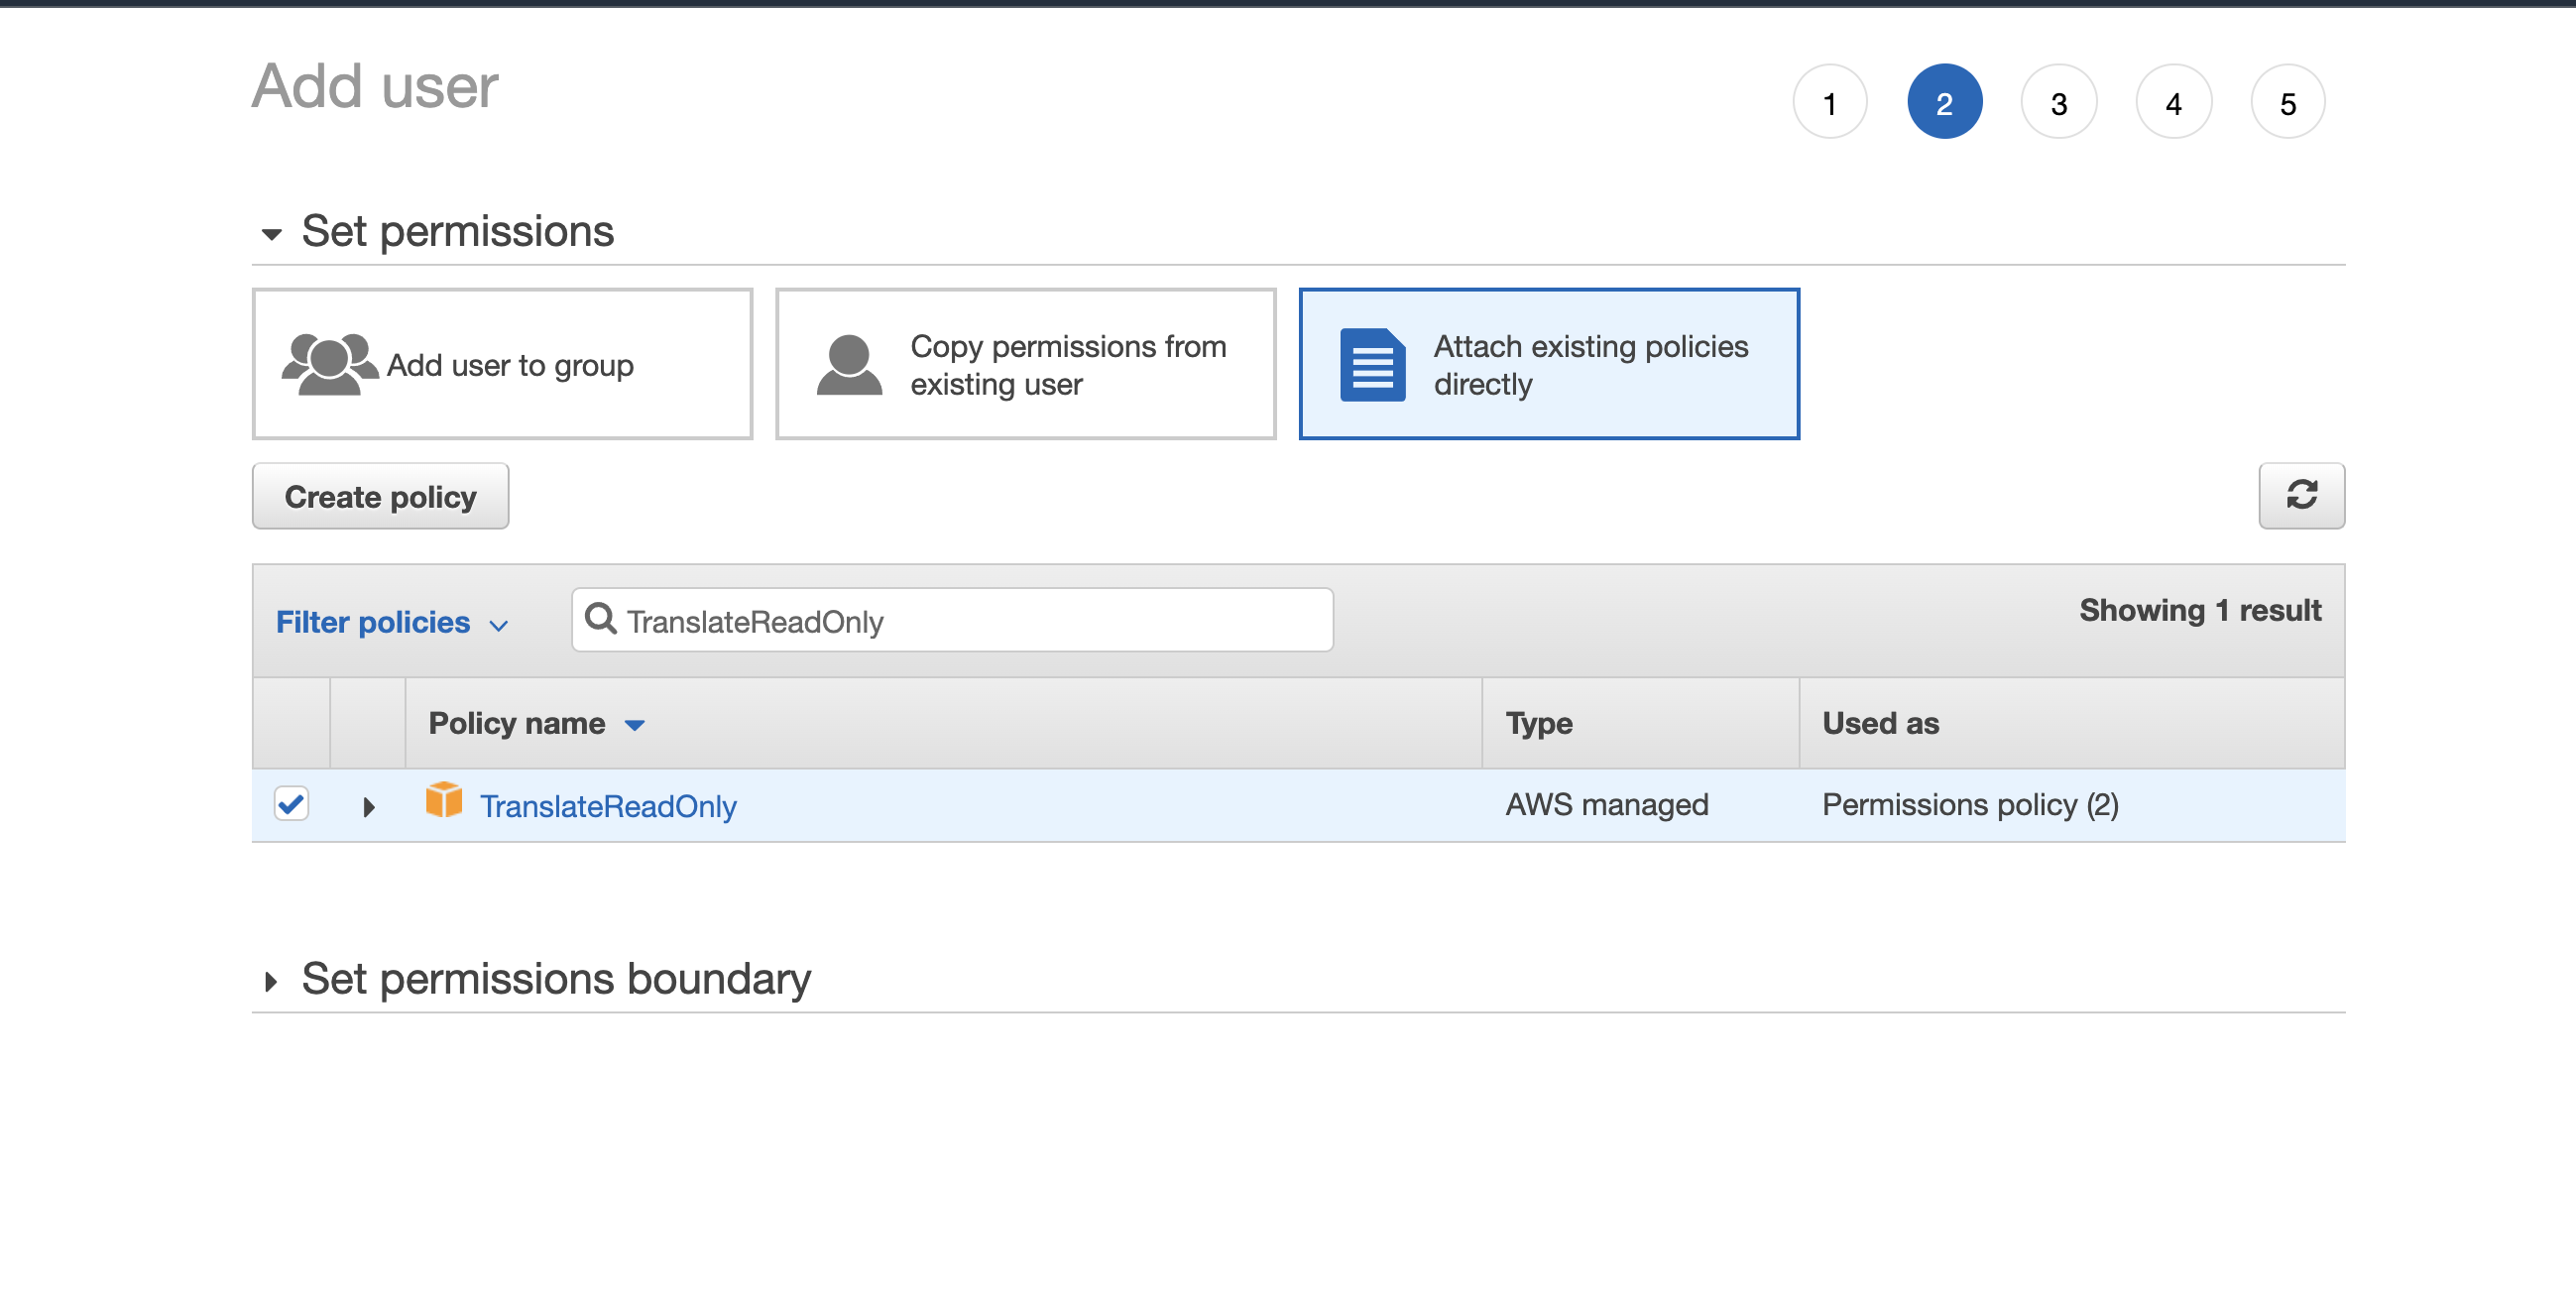
The browser plugin needs to be configured with credentials to access Amazon Translate. IAM is configured with an AWS-managed policy called TranslateReadOnly. This policy allows API calls to Amazon Translate. To set up a read-only IAM user, complete the following steps:

  1. On the IAM console, choose Users in the navigation pane under Access management.
  2. Choose Add users.
  3. For User name, enter TranslateBrowserPlugin.
  4. Choose Next: Permissions.
  5. To add permissions, choose Attach existing policies directly and choose the policy TranslateReadOnly.
  6. Choose Next: Tags.
  7. Optionally, give the user a tag, and choose Next: Review.
  8. Review the new role and choose Create user.
  9. Choose Download .csv and save the credentials locally.

Although these credentials only provide the most restrictive access to Amazon Translate, you should take extreme care with these credentials so they’re not shared with unintended entities. AWS or Amazon will not be responsible if our customers share their credentials.

Install the browser plugin

The web browser plugin is supported in all Chromium-based browsers. To install the plugin in Chrome, complete the following steps:

  1. Download the extension.zip file from GitHub.
  2. Unzip the file on your local machine.
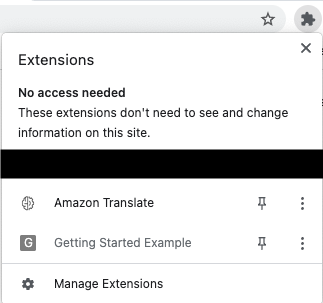
  3. In Chrome, choose the extensions icon.
  4. Choose Manage Extensions.
  5. Toggle Developer mode on.
  6. Choose Load Unpacked and point to the extension folder that you just unzipped.

Configure the plugin

To configure the plugin, complete the following steps:

  1. In your browser, choose the extensions toolbar and choose Amazon Translate, the newly installed plugin.

You can choose the pin icon for easier access later.

  1. Choose Extension Settings.
  2. For AWS Region, enter the Region closest to you.
  3. For AWS Access Key ID, enter the AWS access key from the spreadsheet you downloaded.
  4. For AWS Secret Access Key, enter the secret access key from the spreadsheet.
  5. Select the check box to enable caching.
  6. Choose Save Settings.

Use the plugin with Amazon Translate

Now the plugin is ready to be used.

  1. To get started, open a web page in a browser to be translated. For this post, we use the landing page for Amazon Translate in German.
  2. Open the browser plugin and choose Amazon Translate in the browser extension list as you did earlier.
  3. For the source language, choose Auto for Amazon Translate to use automatic language detection, and choose your target language.
  4. Choose Translate..

The plugin sends the text to Amazon Translate and translates the page contents to English.

Cost

Amazon Translate is priced at $15 per million characters prorated by number of characters ($0.000015 per character).

You also get 2 million characters per month for 12 months for free, starting from the date on which you create your first translation request. For more information, see Amazon Translate pricing.

The Amazon Translate landing page we translated has about 8,000 characters, making the translation cost about $0.12. With the caching feature enabled, subsequent calls to translate the page for the language pair use the local cached copy, and don’t require calls to Amazon Translate.

Conclusion

Amazon Translate provides neural network translation for 75 languages and 5,550 language pairs. You can integrate Amazon Translate into a browser plugin, to seamlessly integrate translation into an application workflow. We look forward to hearing how using this plugin helps accelerate your translation workloads! Learn more about Amazon Translate by on the Amazon Translate Developer Guide, or AWS blog.


About the Authors

Andrew Stacy is a Front-end Developer with AWS Professional Services. Andrew enjoys creating delightful user experiences for customers through UI/UX development and design. When off the clock, Andrew enjoys playing with his kids, writing code, trying craft beverages, or building things around the house.

Ron Weinstein is a Solutions Architect specializing in Artificial Intelligence and Machine Learning in AWS Public Sector. Ron loves working with his customers on how AI/ML can accelerate and transform their business. When not at work, Ron likes the outdoors and spending time with his family.

Read More

How Smart Hospital Technology Can Help Cut Down on Medical Errors

Despite the feats of modern medicine, as many as 250,000 Americans die from medical errors each year — more than 6 times the number killed in car accidents.

Smart hospital AI can help avoid some of these fatalities in healthcare, just as computer vision-based driver assistance systems can improve road safety, according to AI leader Fei-Fei Li.

Whether through surgical instrument omission, a wrong drug prescription or a patient safety issue when clinicians aren’t present, “there’s just all kinds of errors that could be introduced, unintended, despite protocols that have been put together to avoid them,” said Li, computer science professor and co-director of the Stanford Institute for Human-Centered Artificial Intelligence, in a talk at the recent NVIDIA GTC. “Humans are still humans.”

By endowing healthcare spaces with smart sensors and machine learning algorithms, Li said, clinicians can help cut down medical errors and provide better patient care.

“We have to make sense of what we sense” with sensor data, said Li. “This brings in machine learning and deep learning algorithms that can turn sensed data into medical insights that are really important to keep our patients safe.”

To hear from other experts in deep learning and medicine, register free for the next GTC, running online March 21-24. GTC features talks from dozens of healthcare researchers and innovators harnessing AI for smart hospitals, drug discovery, genomics and more.

Sensor Solutions Bring Ambient Intelligence to Clinicians

Li’s interest in AI for healthcare delivery was sparked a decade ago when she was caring for a sick parent.

“The more I spent my time in ICUs and hospital rooms and even at home caring for my family, the more I saw the analogy between self-driving technology and healthcare delivery,” she said.

Her vision of sensor-driven “ambient intelligence,” outlined in a Nature paper, covers both the hospital and the home. It offers insights in operating rooms as well as the daily living spaces of individuals with chronic disease.

For example, ICU patients need a certain amount of movement to help their recovery. To ensure that patients are getting the right amount of mobility, researchers are developing smart sensor systems to automatically tag patient movements and understand their mobility levels while in critical care.

Another project used depth sensors and convolutional neural networks to assess whether clinicians were properly using hand sanitizer when entering and exiting patient rooms.

Outside of the hospital, as the global population continues to age, wearable sensors can help ensure seniors are aging healthily by monitoring mobility, sleep and medicine compliance.

The next challenge, Li said, is advancing computer vision to classify more complex human movement.

“We’re not content with these coarse activities like walking and sleeping,” she said. “What’s more important clinically are fine-grained activities.”

Protecting Patient, Caregiver Privacy 

When designing smart hospital technology, Li said, it’s important that developers prioritize privacy and security of patients, clinicians and caretakers.

“From a computer vision point of view, blurring and masking has become more and more important when it comes to human signals,” she said. “These are really important ways to mitigate private information and personal identity from being inadvertently leaked.”

In the field of data privacy, Li said, federated learning is another promising solution to protect confidential information.

Throughout the process of developing AI for healthcare, she said, developers must take a multi-stakeholder approach, involving patients, clinicians, bioethicists and government agencies in a collaborative environment.

“At the end of the day, healthcare is about humans caring for humans,” said Li. “This technology should not replace our caretakers, replace our families or replace our nurses and doctors. It’s here to augment and enhance humanity and give more dignity back to our patients.”

Watch the full talk on NVIDIA On-Demand, and sign up for GTC to learn about the latest in AI and healthcare.

The post How Smart Hospital Technology Can Help Cut Down on Medical Errors appeared first on The Official NVIDIA Blog.

Read More