Immersive view now in Maps — plus more updates

Google Maps helps over one billion people navigate and explore. And over the past few years, our investments in AI have supercharged the ability to bring you the most helpful information about the real world, including when a business is open and how crowded your bus is. Today at Google I/O, we announced new ways the latest advancements in AI are transforming Google Maps — helping you explore with an all-new immersive view of the world, find the most fuel-efficient route, and use the magic of Live View in your favorite third-party apps.

A more immersive, intuitive map

Google Maps first launched to help people navigate to their destinations. Since then, it’s evolved to become much more — it’s a handy companion when you need to find the perfect restaurant or get information about a local business. Today — thanks to advances in computer vision and AI that allow us to fuse together billions of Street View and aerial images to create a rich, digital model of the world — we’re introducing a whole new way to explore with Maps. With our new immersive view, you’ll be able to experience what a neighborhood, landmark, restaurant or popular venue is like — and even feel like you’re right there before you ever set foot inside. So whether you’re traveling somewhere new or scoping out hidden local gems, immersive view will help you make the most informed decisions before you go.

Say you’re planning a trip to London and want to figure out the best sights to see and places to eat. With a quick search, you can virtually soar over Westminster to see the neighborhood and stunning architecture of places, like Big Ben, up close. With Google Maps’ helpful information layered on top, you can use the time slider to check out what the area looks like at different times of day and in various weather conditions, and see where the busy spots are. Looking for a spot for lunch? Glide down to street level to explore nearby restaurants and see helpful information, like live busyness and nearby traffic. You can even look inside them to quickly get a feel for the vibe of the place before you book your reservation.

The best part? Immersive view will work on just about any phone and device. It starts rolling out in Los Angeles, London, New York, San Francisco and Tokyo later this year with more cities coming soon.

Immersive view lets you explore and understand the vibe of a place before you go

An update on eco-friendly routing

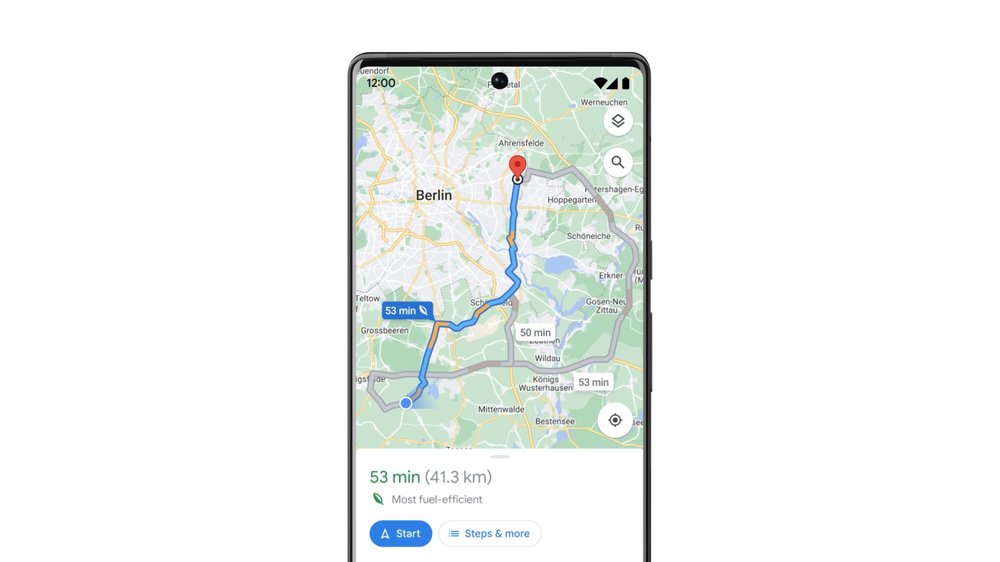
In addition to making places easier to explore, we want to help you get there more sustainably. We recently launched eco-friendly routing in the U.S. and Canada, which lets you see and choose the most fuel-efficient route when looking for driving directions — helping you save money on gas. Since then, people have used it to travel 86 billion miles, saving more than an estimated half a million metric tons of carbon emissions — equivalent to taking 100,000 cars off the road. We’re on track to double this amount as we expand to more places, like Europe.

Still image of eco-friendly routing on Google Maps

Eco-friendly routing has helped save more than an estimated half a million metric tons of carbon emissions

The magic of Live View — now in your favorite apps

Live View helps you find your way when walking around, using AR to display helpful arrows and directions right on top of your world. It’s especially helpful when navigating tricky indoor areas, like airports, malls and train stations. Thanks to our AI-based technology called global localization, Google Maps can point you where you need to go in a matter of seconds. As part of our efforts to bring the helpfulness of Google Maps to more places, we’re now making this technology available to developers at no cost with the new ARCore Geospatial API.

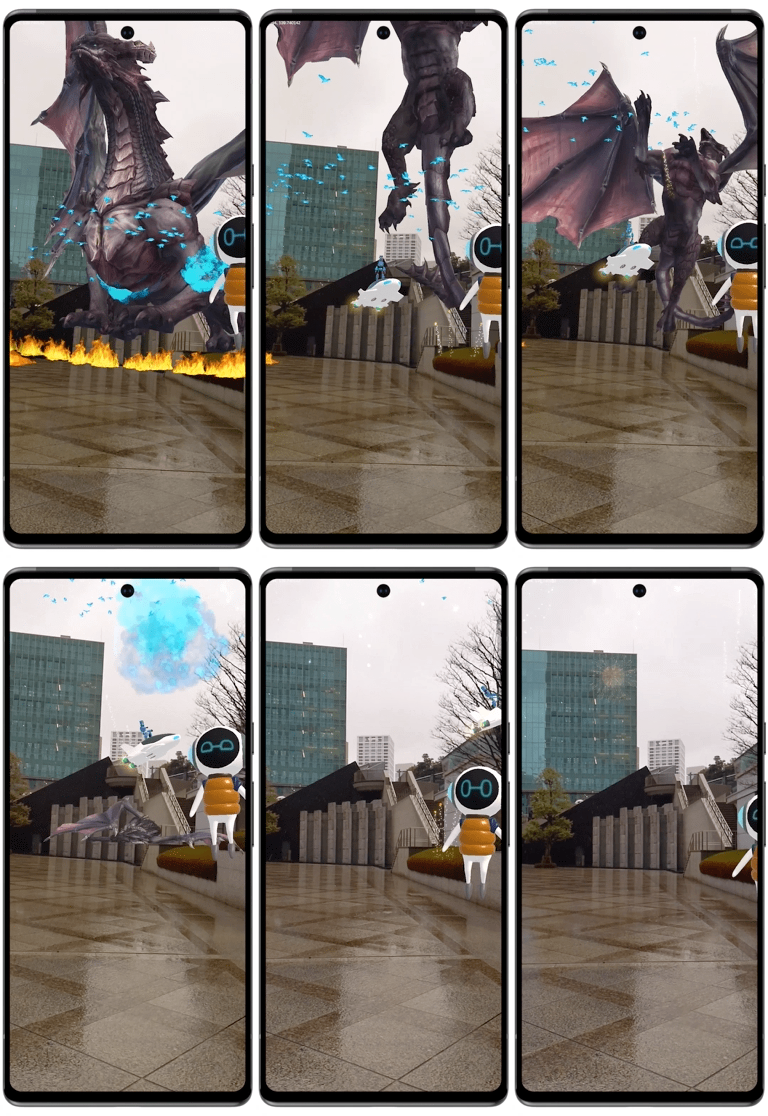
Developers are already using the API to make apps that are even more useful and provide an easy way to interact with both the digital and physical worlds at once. Shared electric vehicle company Lime is piloting the API in London, Paris, Tel Aviv, Madrid, San Diego, and Bordeaux to help riders park their e-bikes and e-scooters responsibly and out of pedestrians’ right of way. Telstra and Accenture are using it to help sports fans and concertgoers find their seats, concession stands and restrooms at Marvel Stadium in Melbourne. DOCOMO and Curiosity are building a new game that lets you fend off virtual dragons with robot companions in front of iconic Tokyo landmarks, like the Tokyo Tower. The new Geospatial API is available now to ARCore developers, wherever Street View is available.

DOCOMO and Curiosity game showing an AR dragon, alien and spaceship interacting on top of a real-world image, powered by the ARCore Geospatial API.

Live View technology is now available to ARCore developers around the world

AI will continue to play a critical role in making Google Maps the most comprehensive and helpful map possible for people everywhere.

Read More

Google Translate learns 24 new languages

For years, Google Translate has helped break down language barriers and connect communities all over the world. And we want to make this possible for even more people — especially those whose languages aren’t represented in most technology. So today we’ve added 24 languages to Translate, now supporting a total of 133 used around the globe.

Over 300 million people speak these newly added languages — like Mizo, used by around 800,000 people in the far northeast of India, and Lingala, used by over 45 million people across Central Africa. As part of this update, Indigenous languages of the Americas (Quechua, Guarani and Aymara) and an English dialect (Sierra Leonean Krio) have also been added to Translate for the first time.

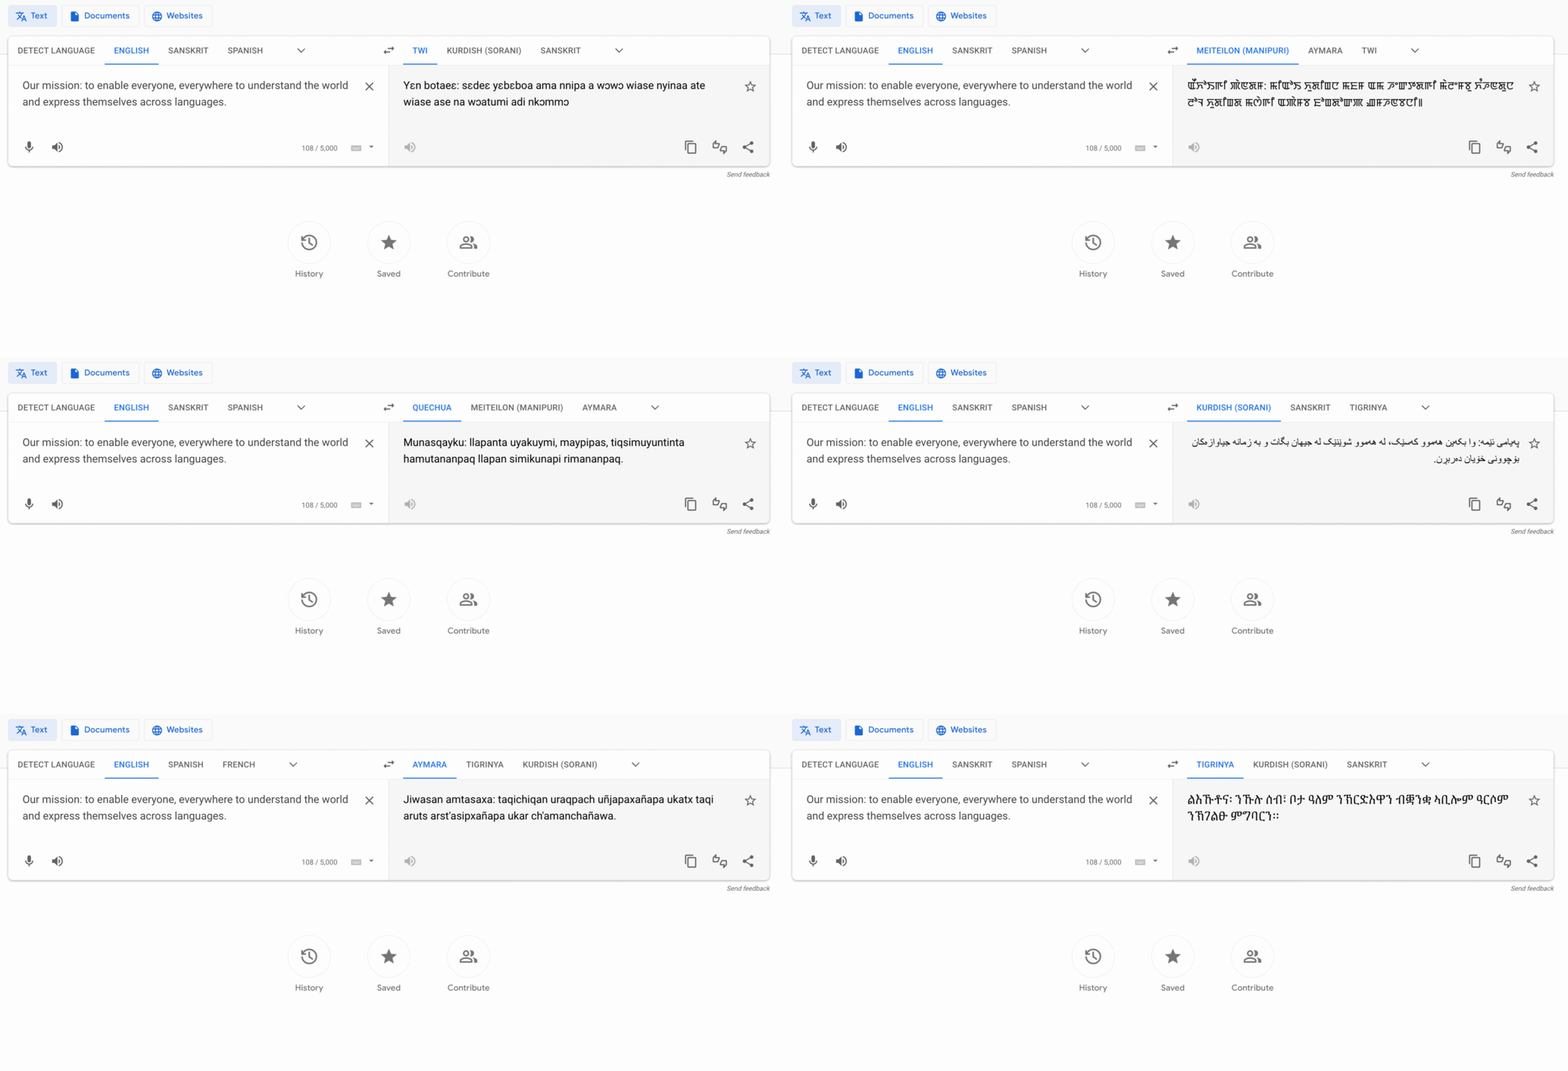
The Google Translate bar translates the phrase "Our mission: to enable everyone, everywhere to understand the world and express themselves across languages" into different languages.

Translate’s mission translated into some of our newly added languages

Here’s a complete list of the new languages now available in Google Translate:

  • Assamese, used by about 25 million people in Northeast India
  • Aymara, used by about two million people in Bolivia, Chile and Peru
  • Bambara, used by about 14 million people in Mali
  • Bhojpuri, used by about 50 million people in northern India, Nepal and Fiji
  • Dhivehi, used by about 300,000 people in the Maldives
  • Dogri, used by about three million people in northern India
  • Ewe, used by about seven million people in Ghana and Togo
  • Guarani, used by about seven million people in Paraguay and Bolivia, Argentina and Brazil
  • Ilocano, used by about 10 million people in northern Philippines
  • Konkani, used by about two million people in Central India
  • Krio, used by about four million people in Sierra Leone
  • Kurdish (Sorani), used by about eight million people, mostly in Iraq
  • Lingala, used by about 45 million people in the Democratic Republic of the Congo, Republic of the Congo, Central African Republic, Angola and the Republic of South Sudan
  • Luganda, used by about 20 million people in Uganda and Rwanda
  • Maithili, used by about 34 million people in northern India
  • Meiteilon (Manipuri), used by about two million people in Northeast India
  • Mizo, used by about 830,000 people in Northeast India
  • Oromo, used by about 37 million people in Ethiopia and Kenya
  • Quechua, used by about 10 million people in Peru, Bolivia, Ecuador and surrounding countries
  • Sanskrit, used by about 20,000 people in India
  • Sepedi, used by about 14 million people in South Africa
  • Tigrinya, used by about eight million people in Eritrea and Ethiopia
  • Tsonga, used by about seven million people in Eswatini, Mozambique, South Africa and Zimbabwe
  • Twi, used by about 11 million people in Ghana

This is also a technical milestone for Google Translate. These are the first languages we’ve added using Zero-Shot Machine Translation, where a machine learning model only sees monolingual text — meaning, it learns to translate into another language without ever seeing an example. While this technology is impressive, it isn’t perfect. And we’ll keep improving these models to deliver the same experience you’re used to with a Spanish or German translation, for example. If you want to dig into the technical details, check out our Google AI blog post and research paper.

We’re grateful to the many native speakers, professors and linguists who worked with us on this latest update and kept us inspired with their passion and enthusiasm. If you want to help us support your language in a future update, contribute evaluations or translations through Translate Contribute.

Read More

A closer look at the research to help AI see more skin tones

Today at I/O we released the Monk Skin Tone (MST) Scale in partnership with Harvard professor and sociologist Dr. Ellis Monk. The MST Scale, developed by Dr. Monk, is a 10-shade scale designed to be more inclusive of the spectrum of skin tones in our society. We’ll be incorporating the MST Scale into various Google products over the coming months, and we are openly releasing the scale so that anyone can use it for research and product development.

The MST Scale is an important next step in a collective effort to improve skin tone inclusivity in technology. For Google, it will help us make progress in our commitment to image equity and improving representation across our products. And in releasing the MST Scale for all to use, we hope to make it easier for others to do the same, so we can learn and evolve together.

Addressing skin tone equity in technology poses an interesting research challenge because it isn’t just a technical question, it’s also a social one. Making progress requires the combined expertise of a wide range of people — from academics in the social sciences who have spent years studying social inequality and skin tone stratification through their research, to product and technology users, who provide necessary nuance and feedback borne of their lived experiences, to ethicists and civil rights activists, who guide on application frameworks to ensure we preserve and honor the social nuances. The ongoing and iterative work from this wider community has led us to the knowledge and understanding that we have today, and will be key to the continued path forward.

Teams within Google have been contributing to this body of work for years now. Here’s a deeper look at how Googlers have been thinking about and working on skin tone representation efforts, particularly as it relates to the MST Scale — and what might come next.

Building technology that sees more people

“Persistent inequities exist globally due to prejudice or discrimination against individuals with darker skin tones, also known as colorism,” says Dr. Courtney Heldreth, a social psychologist and user experience (UX) researcher in Google’s Responsible AI Human-Centered Technology UX (RAI-HCT UX) department, which is part of Google Research. “The academic literature demonstrates that skin tone plays a significant role in how people are treated across a wide variety of outcomes including health, wealth, well-being, and more.” And one example of colorism is when technology doesn’t see skin tone accurately, potentially exacerbating existing inequities.

Machine learning, a type of AI, is the bedrock of so many products we use every day. Cameras use ML for security reasons, to unlock a phone or register that someone is at the door. ML helps categorize your photos by similar faces, or adjust the brightness on a picture.

To do this well, engineers and researchers need diverse training datasets to train models, and to extensively test the resulting models across a diverse range of images. Importantly, in order to ensure that datasets used to develop technologies relating to understanding people are more inclusive, we need a scale that represents a wide range of skin tones.

“If you’re saying, I tested my model for fairness to make sure it works well for darker skin tones, but you’re using a scale that doesn’t represent most people with those skin tones, you don’t know how well it actually works,” says Xango Eyeé, a Product Manager working on Responsible AI.

“If not developed with intention, the skin tone measure we use to understand whether our models are fair and representative can affect how products are experienced by users. Downstream, these decisions can have the biggest impacts on people who are most vulnerable to unfair treatment, people with darker skin tones,” Dr. Heldreth says.

Eyeé and Dr. Heldreth are both core members of Google’s research efforts focused on building more skin tone equity into AI development, a group that includes an interdisciplinary set of product managers, researchers and engineers who specialize in computer vision and social psychology. The team also works across Google with image equity teams building more representation into products like cameras, photos, and emojis.

“We take a human-centered approach to understanding how AI can influence and help people around the world,” Dr. Heldreth says, “focusing on improving inclusivity in AI, to ensure that technology reflects and empowers globally and culturally diverse communities, especially those who are historically marginalized and underserved.” A more inclusive skin tone scale is a core part of this effort.

The team operates with a guiding objective: To keep improving technology so that it works well for more people. Doing that has involved two major tasks: “The first was figuring out what was already built and why it wasn’t working,” Eyeé says. “And the second was figuring out what we needed to build instead.”

A social-technical approach

“Skin tone is something that changes the physical properties of images, and it’s something that affects people’s lived experiences — and both of these things can impact how a piece of technology performs,” Dr. Susanna Ricco says. Dr. Ricco, a software engineer on Google Research’s Perception team, leads a group that specializes in finding new ways to make sure Google’s computer vision systems work well for more users, regardless of their backgrounds or how they look. To make sure that tech works across skin tones, we need to intentionally test and improve it across a diverse range. “To do that, we need a scale that doesn’t leave skin tones out or over-generalize,” she says.

“There’s the physics side of things — how well a sensor responds to a person’s skin tone,” Dr. Ricco says. “Then there’s the social side of things: We know that skin tone correlates with life experiences, so we want to make sure we’re looking at fairness from this perspective, too. Ultimately what matters is, does this work for me? — and not just me, the person who’s making this technology, but me, as in anyone who comes across it.”

“Developing a scale for this isn’t just an AI or technology problem, but a social-technical problem,” Dr. Heldreth says. “It’s important that we understand how skin tone inequality can show up in the technology we use and importantly, do our best to avoid reproducing the colorism that exists. Fairness is contextual and uniquely experienced by each individual, so it’s important to center this problem on the people who will ultimately be affected by the choices we make. Therefore, doing this right requires us to take a human-centered approach because this is a human problem.”

“Connecting the technical to the human is the challenge here,” Dr. Ricco says. “The groups we test should be influenced by the ways in which individuals experience technology differently, not purely decided based on mathematical convenience.”

If it sounds like an intricate process, that’s because it is. “Our goal is not to tackle all of this complexity at once, but instead learn deeply about what each piece of research is telling us and put together the puzzle pieces,” Dr. Heldreth says.

Ten circles in a row, ranging from dark to light.

The Monk Skin Tone Scale

The Monk Skin Tone Scale

The team knew piecing together that puzzle, and particularly thinking about how to define a range of skin tones, would be a wider effort that extended beyond Google.

So over the last year, they partnered with Dr. Monk to learn about and further test the scale for technology use cases. Dr. Monk’s research focuses on how factors such as skin tone, race and ethnicity affect inequality. He has been surveying people about the kinds of ways that skin tone has played a role in their lives for a decade. “If you talk to people of color, if you ask them, ‘How does your appearance matter in your everyday life? How does your skin color, your hair, how do they impact your life?’ you find it really does matter,” he says.

Dr. Monk began this research in part to build on the most prominently used skin tone scale, the Fitzpatrick Scale. Created in 1975 and made up of six broad shades, it was meant to be a jumping off point for medically categorizing skin type. The technology industry widely adopted it and applied it to skin tones and it became the standard. It’s what most AI systems use to measure skin tone.

In comparison, the MST Scale is composed of 10 shades — a number chosen so as not to be too limiting, but also not too complex.

It’s not just about this precise numeric value of skin tone. It’s about giving people something they can see themselves in. Dr. Ellis Monk

Together, the team and Dr. Monk surveyed thousands of adults in the United States to learn if people felt more represented by the MST Scale compared to other scales that have been used in both the machine learning and beauty industries. “Across the board, people felt better represented by the MST Scale than the Fitzpatrick Scale,” Eyeé says, and this was especially true for less represented demographic groups.

“What you’re looking for is that subjective moment where people can see their skin tone on the scale,” Dr. Heldreth says. “To see the results of our research demonstrate that there are other skin tone measures where more people see themselves better represented felt like we were making steps in the right direction, that we could really make a difference.”

Of course, 10 points are not as comprehensive as scales that have 16, 40 or 110 shades. And for many use cases, like makeup, more is better. What was exciting about the MST Scale survey results was that the team found, even with 10 shades, participants felt the scale was equally representative as scales from the beauty industry with larger variety. “They felt that the MST Scale was just as inclusive, even with only 10 points on it,” Eyeé says. A 10-point scale is also something that can be used during data annotation, whereas rating skin tone images using a 40-point scale would be an almost impossible task for raters to do reliably.

What is particularly exciting about this work is that it continues to highlight the importance of a sociotechnical approach to building more equitable tools and products. Skin tones are continuous, and can be defined and categorized in a number of different ways, the simplest being to pick equally spaced RGB values on a scale of light to dark brown. But taking such a technical approach leaves out the nuance of how different communities have been historically affected by colorism. A scale that is effective for measuring and reducing inconsistent experiences for more people needs to adequately reflect a wide range of skin-tones that represent a diversity of communities – this is where Dr. Monk’s expertise and research proves particularly valuable.

Over the past two years, the team has shared their research with various other departments at Google. And work has begun on building annotation — or labeling — best practices based on the MST Scale, informed by expertise in computer vision, skin tone inequality and social cognition. Since perceptions of skin tones are subjective, it’s incredibly important that the same interdisciplinary research that went into creating and validating the scale is also applied to how it is used.

What’s next

One of the first areas in which this technology will be used is Google’s image-based products. Until now, Google has largely relied on the Fitzpatrick Scale for photo AI. The MST scale is now being incorporated into products like Google Photos and Image Search, and will be expanded even more broadly in the coming months.

In addition to incorporating the MST Scale into Google products and sharing the 10 shades for anyone to use, Google and Dr. Monk are publishing their peer-reviewed research and expanding their research globally. Going through the research and peer review process has helped the team make sure their work is adding to the long history of multi-sector progress in this space and also offering new ideas in the quest for more inclusive AI.

Ultimately, we want the work to extend far beyond Google. The team is hopeful this is an industry starting point, and at the same time, they want to keep improving on it. “This is an evergreen project,” Dr. Heldreth says. “We’re constantly learning, and that’s what makes this so exciting.” The team plans to take the scale to more countries to learn how they interpret skin tone, and include those learnings in future iterations of the scale.

So the work continues. And while it’s certainly a “massive scientific challenge,” as Dr. Heldreth calls it, it’s also a very human one because it’s critical that tools we use to define skin tone ensure that more people see themselves represented and thus feel worthy of being seen. “It’s not just about this precise numeric value of skin tone,” Dr. Monk says. “It’s about giving people something they can see themselves in.”

Read More

Portrait Depth API: Turning a Single Image into a 3D Photo with TensorFlow.js

Posted by Ruofei Du, Yinda Zhang, Ahmed Sabie, Jason Mayes, Google.

A depth map is essentially an image (or image channel) that contains information relating to the distance of the surfaces of objects in the scene from a given viewpoint (in this case, the camera itself) for every pixel in that image. Depth maps are a fundamental building block for a variety of computer graphics and computer vision applications, such as augmented reality, portrait mode, and 3D reconstruction. Despite the recent advances in depth sensing capabilities with ARCore Depth API, the majority of photographs on the web are still missing associated depth maps. This, combined with users from the web community expressing a growing interest in having depth capabilities within JavaScript to enhance existing web apps such as to bring images to live, apply real time AR effects to a human face and body, or even reconstruct items for use in VR environments, helped shape the path for what you see today.

Today we are introducing the Depth API, the first depth estimation API from TensorFlow.js. With this new API, we are also introducing the first depth model for portrait, ARPortraitDepth, which estimates a depth map for a single portrait image. To demonstrate one of many possible usages of depth information, we also present a computational photography application, 3D photo, which utilizes the predicted depth and enables a 3D parallax effect on the given portrait image. Try the live demo below, everyone can easily make their social media profile photo 3D as shown below.


Try out the 3D portrait demo for yourself!

Examples generated from the 3D photo application.

ARPortraitDepth: Single Image Depth Estimation

At the core of the Portrait Depth API is a deep learning model, named ARPortraitDepth, that takes a single color portrait image as the input and produces a depth map. For the sake of computational efficiency, we adopt a light-weight U-Net architecture. As shown below, the encoder gradually downscales the image or feature map resolution by half, and the decoder increases the feature resolution to the same as the input. Deep learning features from the encoder are concatenated to the corresponding layers with the same spatial resolution in the decoders to bring high resolution signals for depth estimation. During training, we force the decoder to produce depth predictions with increasing resolutions at each layer, and add a loss for each of them with the ground truth. This empirically helps the decoder to predict accurate depth by gradually adding details.

Abundant and diverse training data is critical for the machine learning model to achieve overall decent performance, e.g. accuracy and robustness. We synthetically render pairs of color and depth images with various camera configurations, e.g. focal length, camera pose, from 3D digital humans captured by a high quality performance capture system, and run relighting augmentation with High Dynamic Range environment illumination maps to increase the realism and diversity of the color images, e.g. shadows on the face. We also collect real data using mobile phones equipped with a front facing depth sensor, e.g. Google Pixel 4, where the depth quality, as the training ground truth, is not as accurate and complete as that in our synthetic data, but the color images are effective in improving the performance of our model when running on images in the wild.

Single image depth estimation pipeline.

To enhance the robustness against background variation, in practice, we run an off-the-shelf body segmentation model with MediaPipe and TensorFlow.js before sending the image into the neural network of depth estimation.

The portrait depth model could enable a whole host of creative applications orientated around the human body that could drive next generation web apps. We refer readers to ARCore Depth Lab for more inspirations.

For the 3D photo application, we created a high-performance rendering pipeline. It first generates a segmented mask using the TensorFlow.js existing body segmentation API. Next, we pass the masked portrait into the Portrait Depth API and obtain a depth map on the GPU. Eventually, we generate a depth mesh in three.js, with vertices arranged in a regular grid and displaced by re-projecting corresponding depth values (see the figure below for generating the depth mesh). Finally, we apply texture projection to the depth mesh and rotate the camera around the z axis in a circle. Users can download the animations in GIF or WebM format.

Generating the depth mesh from the depth map for the 3D photo application.

Portrait Depth API Installation

The portrait depth API is currently offered as one variant of the new depth API.

To install the API and runtime library, you can either use the <script> tag in your html file or use NPM.

Through script tag:

<script src="https://cdn.jsdelivr.net/npm/@tensorflow/tfjs-core"></script>
<script src="https://cdn.jsdelivr.net/npm/@tensorflow/tfjs-backend-webgl"></script>
<script src="https://cdn.jsdelivr.net/npm/@tensorflow/tfjs-converter"></script>
<script src="https://cdn.jsdelivr.net/npm/@tensorflow-models/body-segmentation"></script>
<script src="https://cdn.jsdelivr.net/npm/@tensorflow-models/depth-estimation"></script>

Through NPM:

yarn add @tensorflow/tfjs-core @tensorflow/tfjs-backend-webgl
yarn add @tensorflow/tfjs-converter
yarn add @tensorflow-models/body-segmentation
yarn add @tensorflow-models/depth-estimation

To reference the API in your JS code, it depends on how you installed the library.

If installed through script tag, you can reference the library through the global namespace depthEstimation.

If installed through NPM, you need to import the libraries first:

import '@tensorflow/tfjs-backend-core';
import '@tensorflow/tfjs-backend-webgl';
import '@tensorflow/tfjs-converter';
import '@tensorflow-models/body-segmentation;
import * as depthEstimation from '@tensorflow-models/depth-estimation;

Try it yourself!

First, you need to create an estimator:

const model = depthEstimation.SupportedModels.ARPortraitDepth;

const estimatorConfig = {
minDepth: 0, // The minimum depth value outputted by the estimator.
maxDepth: 1, // The maximum depth value outputted by the estimator.

};

estimator = await depthEstimation.createEstimator(model, estimatorConfig);

Once you have an estimator, you can pass in a video stream, static image, or TensorFlow.js tensors to estimate depth:

const video = document.getElementById('video');
const depthMap = await estimator.estimateDepth(video);

How to use the output?

The depthMap result above contains depth values for each pixel in the image.

The depthMap is an object which stores the underlying depth values. You can then utilize the provided asynchronous conversion functions such as toCanvasImageSource, toArray, and toTensor depending on the desired output type that you want for efficiency.

It should be noted that different models have different internal representations of data. Therefore converting from one form to another may be expensive. In the name of efficiency, you can call getUnderlyingType to determine what form the depth map is in already so you may choose to keep it in the same form for faster results.

The semantics of the depthMap are as follows: the depth map is the same size as the input image. For array and tensor representations, there is one depth value per pixel. For CanvasImageSource, the green and blue channels are always set to 0, whereas the red channel stores the depth value.

See below output snippet for example:

  {
toCanvasImageSource(): ...
toArray(): ...
toTensor(): ...
getUnderlyingType(): ...
}

Browser Performance

Portrait Depth model

MacBook M1 Pro 2021. 

(FPS)

iPhone 13 Pro

(FPS)

Pixel 6 Pro

(FPS)

Desktop PC 

Intel i9-10900K. Nvidia GTX 1070 GPU.

(FPS)

TFJS Runtime

With WebGL backend.

51

22

5

47

Acknowledgements

We would like to acknowledge our colleagues who participated in or sponsored creating Portrait Depth API in TensorFlow.js: Na Li, Xiuxiu Yuan, Rohit Pandey, Abhishek Kar, Sergio Orts Escolano, Christoph Rhemann, Idris Aleem, Sean Fanello, Adarsh Kowdle, Ping Yu, Alex Olwal‎. We would also like to acknowledge the body segmentation model provided by MediaPipe, and The Relightables for high quality synthetic data.

Read More

Create video subtitles with Amazon Transcribe using this no-code workflow

Subtitle creation on video content poses challenges no matter how big or small the organization. To address those challenges, Amazon Transcribe has a helpful feature that enables subtitle creation directly within the service. There is no machine learning (ML) or code writing required to get started. This post walks you through setting up a no-code workflow for creating video subtitles using Amazon Transcribe within your Amazon Web Services account.

Subtitles vs. closed captions

The terms subtitles and closed captions are commonly used interchangeably, and both refer to spoken text displayed on the screen. However, a primary difference between subtitles and closed captions (based on industry and accessibility definitions) is that closed captions contain both the transcription of the spoken word as well as a description of background music or sounds occurring within the audio track for a richer accessibility experience. This post only focuses on the creation of transcribed spoken word subtitle files using automatic speech recognition (ASR) technology that don’t contain speaker identification, sound effects, or music descriptions. Amazon Transcribe supports the industry standard SubRip Text (*.srt) and Web Video Text Tracks (*.vtt) formats for subtitle creation.

The following image shows an example of subtitles toggled on within a web video player.

Example of subtitles toggled on within a web video player

Subtitles benefit video creators by extending both the reach and inclusivity of their video content. By displaying the spoken audio portion of a video on the screen, subtitles make audio/video content accessible to a larger audience, including those that are non-native language speakers and those that are in an environment where sound is inaudible.

Although the benefits of subtitles are clear, video creators have traditionally faced obstacles in the creation of subtitles. Obstacles arise due to the time-consuming and resource-intensive requirements of the traditional creation process that heavily rely on manual effort. Traditional subtitling methods are manual and can take days to weeks to complete, and therefore may not be compatible with all production schedules. Likewise, many companies utilize manual transcription services, but these processes often don’t scale and are expensive to maintain. Amazon Transcribe makes it easy for you to convert speech to text using ML-based technologies and helps video creators address these issues.

Solution overview

This post walks through a no-code workflow for generating subtitles using Amazon Simple Storage Service (Amazon S3) and Amazon Transcribe.

Amazon S3 is object storage built to store and retrieve any amount of data from anywhere. This post walks through the process to create an S3 bucket and upload an audio file. When users store data in Amazon S3, they work with resources known as buckets and objects. A bucket is a container for objects. An object is a file and any metadata that describes that file.

Amazon Transcribe is an ASR service that uses fully managed and continuously trained ML models to convert audio/video files to text. Amazon Transcribe inputs and outputs are stored in Amazon S3. Amazon Transcribe takes audio data, either a media file in an Amazon S3 bucket or a media stream, and converts it to text data. Amazon Transcribe allows you to ingest audio input, produce easy-to-read transcripts with a high degree of accuracy, customize your output for domain specific vocabulary using custom language models (CLM) and custom vocabularies, and filter content to ensure customer privacy. Customers can choose to use Amazon Transcribe for a variety of business applications, including transcription of voice-based customer service calls, generation of subtitles on audio/video content, and conduct (text based) content analysis on audio/video content. For this post, we demonstrate creating a transcription job and reviewing the job output.

If you prefer a video walkthrough, refer to the Amazon Transcribe video snacks episode Creating video subtitles without writing any code.

Prerequisites

To walk through the solution, you must have the following prerequisites:

If you don’t already have a sample audio/video file, you can create one using a video recording application on your computer or smartphone. Make sure you’re speaking clearly into the microphone to ensure the highest level of transcription quality when recording. Another option is to find a freely available download featuring spoken word, such as a podcast, or the video walkthrough provided in this post, that can be ingested by Amazon Transcribe. The recorded or downloaded file needs to be accessible on your desktop for upload to your AWS account.

Before you get started, review the Amazon Transcribe and Amazon S3 pricing pages for service pricing.

Create the S3 buckets

For this post, we create two S3 buckets to keep the input and output separated.

  1. On the Amazon S3 console, choose Create bucket.
  2. Give each bucket a globally unique name.
  3. Use the default settings to ensure compliance with the policies of your organization.
  4. Enable bucket versioning and default server-side encryption (recommended).
  5. Choose Create bucket.

The following screenshot shows the configuration for the input bucket.

Amazon Transcribe Create Bucket

The S3 bucket for input is now ready to have the audio/video file uploaded. At the time of this publication, the maximum input size for Amazon Transcribe is 2 GB. If the video file exceeds that amount or is in a format that is not natively supported by Amazon Transcribe, consider using AWS Elemental MediaConvert to create an audio-only output. This is beneficial because audio files are typically much smaller than video files and Amazon Transcribe only requires the audio track, and not the video track, to generate transcriptions and subtitles.

Upload the source file to the S3 bucket

To upload your source file, complete the following steps:

  1. On the Amazon S3 console, select your input bucket.
  2. Choose Upload.
  3. Choose the file from your desktop.
  4. Accept the default storage class and encryption settings or modify them based on the policies of your organization.
  5. Choose Upload.
    Amazon S3 Upload Screen

Create a transcription job

With the input file ready in Amazon S3, we now create a transcription job in Amazon Transcribe.

  1. On the Amazon Transcribe console, choose Transcription jobs in the navigation pane.
  2. Choose Create job.

This walkthrough largely uses default options; however, you should choose the configuration best suited to the requirements of your organization.

  1. For Name, enter in a name for this job and resulting file.
  2. For Language settings, select Specific language.
  3. For Language, choose the source language of the input file.
  4. For Model type¸ select General model.

We use the general model for this demo, but we encourage you to explore training and using custom language models for improved accuracy for specific use cases such as industry-specific terms or acronyms. For a deeper dive into custom language models, watch the Amazon Transcribe video snack Using Custom Language Models (CLM) to supercharge transcription accuracy.

  1. For Input file location on S3, choose Browse S3.
  2. Choose the input bucket and audio/video file to be transcribed.
  3. For Output data location type info, select Customer specified S3 bucket.
  4. For Output file destination on S3, choose Browse S3.
  5. Choose the newly created output bucket.

The Subtitle file format section provides the two most essential options of this entire post. You can select the *.srt and *.vtt formatted outputs as part of the Amazon Transcribe transcription job. At the time of this writing, selecting one or both doesn’t add any additional cost to the Amazon Transcribe job.

  1. For this post, select both SRT and VTT.
    Job settings under Specify job details
  2. For Specify the start index, choose 0 or 1.
    Specify the start index under Output data

This value refers to the starting number of the first subtitle in sequence. If you’re unsure which value to choose, 1 is the most common.
Specify Start Index

  1. When the settings are in place, choose Next.
  2. Configure any optional settings as per your needs.

Amazon Transcribe presents options for audio identification for channels or speakers, alternative results, PII redaction, vocabulary filtering, and custom vocabulary. For this particular post, you can skip these configuration options. For a deeper dive into job configuration options, watch the Amazon Transcribe video snacks episodes for custom vocabulary, custom language models, and vocabulary filtering.

  1. Choose Create job.
    Amazon Transcribe Job Configuration

Review the job output

The transcription job to create your video subtitles starts. The job status, as shown in the following screenshot, is displayed in the job details panel. When the job is complete, choose the output data location to locate the newly created subtitles in the S3 bucket.

Amazon Transcribe Output Example

Subtitles are identified by the *.srt or *.vtt extensions. When you select the object in the S3 bucket, you have the option to download the file.

Amazon Transcribe Destination Bucket

Because these subtitles are in plain text format, any text editor can view and edit the resulting transcription. Comparing the *.srt and *.vtt files reveals many similarities, with subtle differences.

The following is an example of *.srt format:

1
00:00:00,240 --> 00:00:04,440
Transcribing audio can be complex, time consuming and expensive.

2
00:00:04,600 --> 00:00:07,250
You either need to hire someone to do it manually,

3
00:00:07,490 --> 00:00:10,790
implement applications that are difficult to maintain, or use

4
00:00:10,790 --> 00:00:13,920
hard to integrate services that yield poor results.

5
00:00:14,540 --> 00:00:17,290
Amazon Transcribe takes a huge leap forward.

The following is an example of *.vtt format:

WEBVTT

1
00:00:00.240 --> 00:00:04.440
Transcribing audio can be complex, time consuming and expensive.

2
00:00:04.600 --> 00:00:07.250
You either need to hire someone to do it manually,

3
00:00:07.490 --> 00:00:10.790
implement applications that are difficult to maintain, or use

4
00:00:10.790 --> 00:00:13.920
hard to integrate services that yield poor results.

5
00:00:14.540 --> 00:00:17.290
Amazon Transcribe takes a huge leap forward.

The numbers indicate the order the subtitle is displayed. The timecode indicates when the subtitle is displayed. The text is the subtitle text itself.

Any changes or revisions are now possible directly within the text editor and remain compatible when saved with the *.srt or *.vtt extension. You can also preview changes on the video platform itself, inside a video editing application, or within a video player.

VLC is a popular open-source and cross-platform video player that supports *.srt and *.vtt subtitles. To automatically play subtitles over a video within VLC, place both the original video and the subtitle file in the same directory with the exact same file name before the file extension.

Directory configuration for original and sub title file

Now when you open the video file within VLC, the subtitle file should automatically detect and play back within the video player window.

Subtitles while playing the video file

Clean up

To avoid incurring future charges, empty and delete the S3 buckets used for input and output. Ensure that you have all necessary files stored as this will permanently remove all objects contained within the buckets. On the Transcribe console, select and delete any jobs that are no longer needed.

Conclusion

You have now created a complete end-to-end subtitle creation workflow to augment and accelerate your video subtitle creation process, and all without writing any code. In a manner of minutes, you created S3 storage buckets, uploaded a file to Amazon S3, and used Amazon Transcribe for subtitle creation. You can then download the resulting *.srt and *.vtt subtitle files for review, and upload them to the destination platform.

This workflow focused on audio/video subtitles created using the automatic speech recognition (ASR) technology in Amazon Transcribe specifically for video workflows. This workflow alone is not a substitute for a human-based closed captioning process, which is able to meet higher standards for accessibility, including speaker identification, sound effects, music description, and copyediting review for accuracy. You can utilize the text editing method described in this post to add these elements after the initial Amazon Transcribe job is complete. Furthermore, for more advanced browser-based subtitle creation, preview, and copyediting, you can explore deploying the Content Localization on AWS solution that is vetted by AWS Solution Architects and includes an implementation guide. This solution offers additional features such as in-browser preview and editing of subtitles, subtitle translation powered by Amazon Translate, and computer vision capabilities offered by Amazon Rekognition.

If you enjoyed this demonstration of Amazon Transcribe’s capability to create subtitles, consider taking a deeper dive into additional features and capabilities to accelerate your audio/video workflows. For additional details and code samples to support automating and scaling subtitle creation, refer to Creating video subtitles. Good luck in your exploration and developing your subtitle creation workflow.


About the Author

Jason O’Malley is a Sr. Partner Solutions Architect at AWS supporting partners architecting media, communications, and technology industry solutions. Before joining AWS, Jason spent 13 years in the media and entertainment industry at companies including Conan O’Brien’s Team Coco, WarnerMedia, and Media.Monks. Jason started his career in television production and post-production before building media workloads on AWS. When Jason isn’t creating solutions for partners and customers, he can be found adventuring with his wife and son, or reading about sustainability.

Read More
Creator Karen X. Cheng Brings Keen AI for Design ‘In the NVIDIA Studio’

Editor’s note: This post is part of our weekly In the NVIDIA Studio series, which celebrates featured artists, offers creative tips and tricks, and demonstrates how NVIDIA Studio technology accelerates creative workflows.

The future of content creation is in AI. This week In the NVIDIA Studio, discover how AI-assisted painting is bringing a new level of inspiration to the next generation of artists.

San Francisco-based creator Karen X. Cheng is on the forefront of using AI to design amazing visuals. Her innovative work produces eye-catching effects to social media videos for brands like Adobe, Beats by Dre and Instagram.

Cheng’s work bridges the gap between emerging technologies and creative imagery, and her inspiration can come from anywhere. “I usually get ideas when I’m observing things — whether that’s taking a walk or scrolling in my feed and seeing something cool,” she said. “Then, I’ll start jotting down ideas and sketching them out. I’ve got a messy notebook full of ideas.”

When inspiration hits, it’s important to have the right tools. Cheng’s ASUS Zenbook Pro Duo — an NVIDIA Studio laptop that comes equipped with up to a GeForce RTX 3080 GPU — gives her the power she needs to create anywhere.

Paired with the NVIDIA Canvas app, a free download available to anyone with an NVIDIA RTX or GeForce RTX GPU, Cheng can easily create and share photorealistic imagery. Canvas is powered by the GauGAN2 AI model and accelerated by Tensor Cores found exclusively on RTX GPUs.

“I never had much drawing skill before, so I feel like I have art superpowers.”

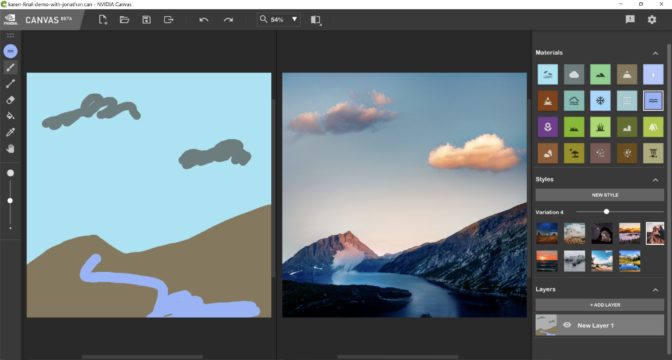
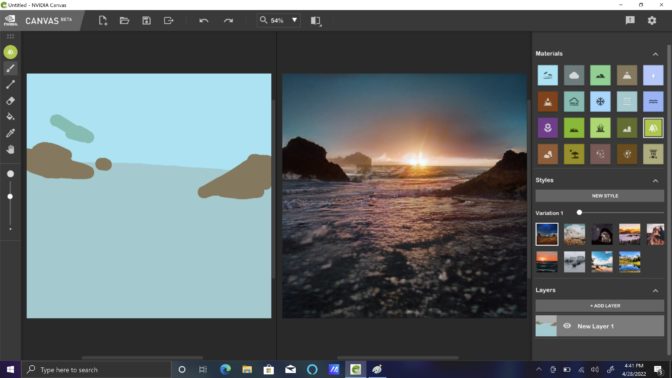
The app uses AI to interpret basic lines and shapes, translating them into realistic landscape images and textures. Artists of all skill levels can use this advanced AI to quickly turn simple brushstrokes into realistic images, speeding up concept exploration and allowing for increased iteration, while freeing up valuable time to visualize ideas.


“I’m excited to use NVIDIA Canvas to be able to sketch out the exact landscapes I’m looking for,” said Cheng. “This is the perfect sketch to communicate your vision to an art director or location scout. I never had much drawing skill before, so I feel like I have art superpowers with this thing.”

Powered by GauGAN2, Canvas turns Cheng’s scribbles into gorgeous landscapes.

Cheng plans to put these superpowers to the test in an Instagram live stream on Thursday, May 12, where she and her AI Sketchpad collaborator Don Allen Stevenson III will race to paint viewer challenges using Canvas.

The free Canvas app is updated regularly, adding new materials, styles and more.

Tune in to contribute, and download NVIDIA Canvas to see how easy it is to paint by AI.

With AI, Anything Is Possible

Empowering scribble-turn-van Gogh painting abilities is just one of the ways that NVIDIA Studio is transforming creative technology through AI.

NVIDIA Broadcast uses AI running on RTX GPUs to improve audio and video for broadcasters and live streamers. The newest version can run multiple neural networks to apply background removal, blur and auto-frame for webcams, and remove noise from incoming and outgoing sound.

3D artists can take advantage of AI denoising in Autodesk Maya and Blender software, refine color detail across high-resolution RAW images with Lightroom’s Enhance Details tool, enable smooth slow motion with retained b-frames using DaVinci Resolve’s SpeedWarp and more.

NVIDIA AI researchers are working on new models and methods to fuel the next generation of creativity. At GTC this year, NVIDIA debuted Instant NeRF technology, which uses AI models to transform 2D images into high-resolution 3D scenes, nearly instantly.

Instant NeRF is an emerging AI technology that Cheng already plans to implement. She and her collaborators have started experimenting with bringing 2D scenes to 3D life.

More AI Tools In the NVIDIA Studio

AI is being used to tackle complex and incredibly challenging problems. Creators can benefit from the same AI technology that’s applied to healthcare, automotive, robotics and countless other fields.

The NVIDIA Studio YouTube channel offers a wide range of tips and tricks, tutorials and sessions for beginning to advanced users.

CGMatter hosts Studio speedhack tutorials for beginners, showing how to use AI viewport denoising and AI render denoising in Blender.

Many of the most popular creative applications from Adobe have AI-powered features to speed up and improve the creative process.

Neural Filters in Photoshop, Auto Reframe and Scene Edit Detection in Premiere Pro, and Image to Material in Substance 3D all make creating quicker and easier through the power of AI.

Follow NVIDIA Studio on Instagram, Twitter and Facebook; access tutorials on the Studio YouTube channel; and get updates directly in your inbox by signing up for the NVIDIA Studio newsletter.

The post Creator Karen X. Cheng Brings Keen AI for Design ‘In the NVIDIA Studio’ appeared first on NVIDIA Blog.

Read More

Utilize AWS AI services to automate content moderation and compliance

The daily volume of third-party and user-generated content (UGC) across industries is increasing exponentially. Startups, social media, gaming, and other industries must ensure their customers are protected, while keeping operational costs down. Businesses in the broadcasting and media industries often find it difficult to efficiently add ratings to content pieces and formats to comply with guidelines for different markets and audiences. Other organizations in financial and healthcare services find it challenging to protect personally identifiable and health information (PII and PHI) across internal and external environments and processes.

In this post, we discuss how you can automate content moderation and compliance with artificial intelligence (AI) and machine learning (ML) to protect online communities, their users, and brands.

The need for content moderation

Content moderation is fundamental to protecting online communities, their members, and members’ personal information. There are also strong business reasons to reconsider how your organization moderates content.

The UGC platform industry is growing at 26% CAGR, and it’s expected to reach $10 billion by 2028 (Grand View Research, 2021). 79% of consumer purchase decisions are influenced by UGC (Stackla Customer Survey, 2019), 40% of consumers disengage with brands after a single exposure to toxic content, and 85% agree that brands are responsible for moderating the content shared by users online (BusinessWire, 2021).

Let’s explore other compelling reasons for content moderation across industries:

  • Social media – Prevent user exposure to inappropriate content on photo and video sharing platforms, such as gaming communities and dating applications. These protections increase community growth, session length, conversion metrics, and other responsible social media objectives and network metrics.
  • Gaming – Prevent inappropriate content such as hate speech, profanity, or bullying within in-game chat. Additionally, moderating user-generated values (such as nicknames and profiles) keeps gamers engaged and active, and without motive to leave the game’s ecosystem.
  • Brand safety – Avoid associations that increase the risk of public backlash due to an unwanted association between your brand, an ad, or content within ads.
  • Ecommerce – Keep out illegal or controversial product listings that violate compliance policies that could incur both liability and buyer and seller churn.
  • Financial services – Detect and redact PII to ensure that sensitive user data remains private. Your customers can trust your platform and increase participation, investment, and referrals.
  • Healthcare – Detect and redact PHI and other sensitive information to ensure that data remains private. Healthcare providers can remain compliant with HIPAA and other regulators to avoid fines.

Some businesses employ large teams of human moderators. In contrast, others use a reactive approach by moderating content or sensitive information users have already viewed. This approach leads to a poor user experience, high moderation costs, brand risk, and unnecessary liability. Organizations are turning to AI, ML, deep learning, and natural language processing (NLP) to gain the accuracy and efficiency needed to keep online environments, customers, and information safe—while reducing content moderation costs!

AWS AI services and solutions cover your moderation needs. They scale with your business to improve content safety, streamline moderation workflows, and increase reliability while lowering operational costs.

Content moderation using AWS AI services

Addressing your content moderation needs requires a combination of computer vision (CV), text and language transform, and other AI and ML capabilities to efficiently moderate the increasing influx of UGC and sensitive information. For example, content moderation teams can employ ML to reclaim most of the time spent moderating content and manually protecting information. They can also reduce moderation costs and safeguard the organization from risk, liability, and brand damage by integrating additional contextual analysis and human teams in the moderation workflow. You can also define granular moderation rules that meet business-specific safety and compliance guidelines. End-users expect to collaborate across media types, so the tooling and capabilities must support that rich content. You can significantly reduce complexity by using AWS AI capabilities to automate tasks, update prediction models, and integrate human review stages.

The following diagram illustrates the architecture of AWS AI services in a content moderation solution.

AWS AI services deliver critical capabilities to streamline content moderation workflows across media types. It offers ready-to-use moderation APIs and enables multi-modal capabilities, such as image, video, and text moderation.

You can use the following AWS AI services for moderation, contextual insights, and human-in-the-loop moderation:

  • Amazon Augmented AI (Amazon A2I) makes it easy to build the workflows required for human review, whether moderation runs on AWS or not.
  • Amazon Comprehend uses NLP to extract insights about the content of documents. Amazon Comprehend processes text and image files and semi-structured documents, such as Adobe PDF and Microsoft Word documents.
  • Amazon Rekognition identifies objects, people, text, scenes, and activities in images and videos. It can detect inappropriate content as well.
  • Amazon Transcribe is an automatic speech recognition (ASR) service that uses ML models to convert audio to text.
  • Amazon Translate is a text translation service that uses advanced ML technologies to provide high-quality translation on demand.

You can combine these services to mitigate the impact of unwanted content by reviewing every content piece, which proactively provides content safety for users and brands. For example, you can assess images and videos against predefined categories or from your list of prohibited terms to moderate media at scale with Amazon Rekognition. Also, you can extend your moderation capabilities to audio files with Amazon Transcribe to then derive and understand valuable insights and sentiment with Amazon Comprehend.

According to Zehong, Senior Architect at Mobisocial, “To ensure that our gaming community is a safe environment to socialize and share entertaining content, we used ML to identify content that does not comply with our community standards. We created a workflow leveraging Amazon Rekognition to flag uploaded image and video content that contains non-compliant content. Amazon Rekognition’s Content Moderation API helps us achieve the accuracy and scale to manage a community of millions of gaming creators worldwide. Since implementing Amazon Rekognition, we’ve reduced the amount of content manually reviewed by our operations team by 95% while freeing up engineering resources to focus on our core business.”

With AWS content moderation services and solutions, you can streamline and automate workflows, and decide where to integrate human moderation to bring the most value to your business. You can customize these services or use turnkey workflows to help you enable specific business needs and industry use cases, for reliable, scalable, and cost-effective cloud-based content moderation workflows without upfront commitments or expensive licenses.

Conclusion

Moderating content today is an imperative expectation from your customers. Not acting has an impact not only on your customers’ safety but on crucial business outcomes. Poor or inefficient moderation strategies lead to poor user experiences, high moderation costs, and unnecessary brand risk and liability.

Check out Content Moderation Design Patterns to learn more about how to combine AWS AI services into a multi-modal solution. For additional information about how to contact our sales and specialist teams, find an AWS Partner with content moderation expertise, or to get started for free, please visit our AWS content moderation page.


About the Authors

Lauren MullennexLauren Mullennex is a Sr. AI/ML Specialist Solutions Architect based in Denver, CO. She works with customers to help them accelerate their machine learning workloads on AWS. Her principal areas of interest are MLOps, computer vision, and NLP. In her spare time, she enjoys hiking and cooking Hawaiian cuisine.

Marvin Fernandes is a Solutions Architect at AWS, based in the New York City area. He has over 20 years of experience building and running financial services applications. He is currently working with large enterprise customers to solve complex business problems by crafting scalable, flexible, and resilient cloud architectures.

Nate Bachmeier is an AWS Senior Solutions Architect that nomadically explores New York, one cloud integration at a time. He specializes in migrating and modernizing applications. Nate is also a full-time student and has two kids.

Read More