SURE provides students from historically underrepresented communities with research experiences at top-tier universities.Read More
NVIDIA Canvas 1.4 Available With Panorama Beta This Week ‘In the NVIDIA Studio’
Editor’s note: This post is part of our weekly In the NVIDIA Studio series, which celebrates featured artists, offers creative tips and tricks, and demonstrates how NVIDIA Studio technology improves creative workflows. We’re also deep diving on new GeForce RTX 40 Series GPU features, technologies and resources, and how they dramatically accelerate content creation.
An update is now available for NVIDIA Canvas, the free beta app that harnesses the power of AI to help artists quickly turn simple brushstrokes into realistic landscapes.
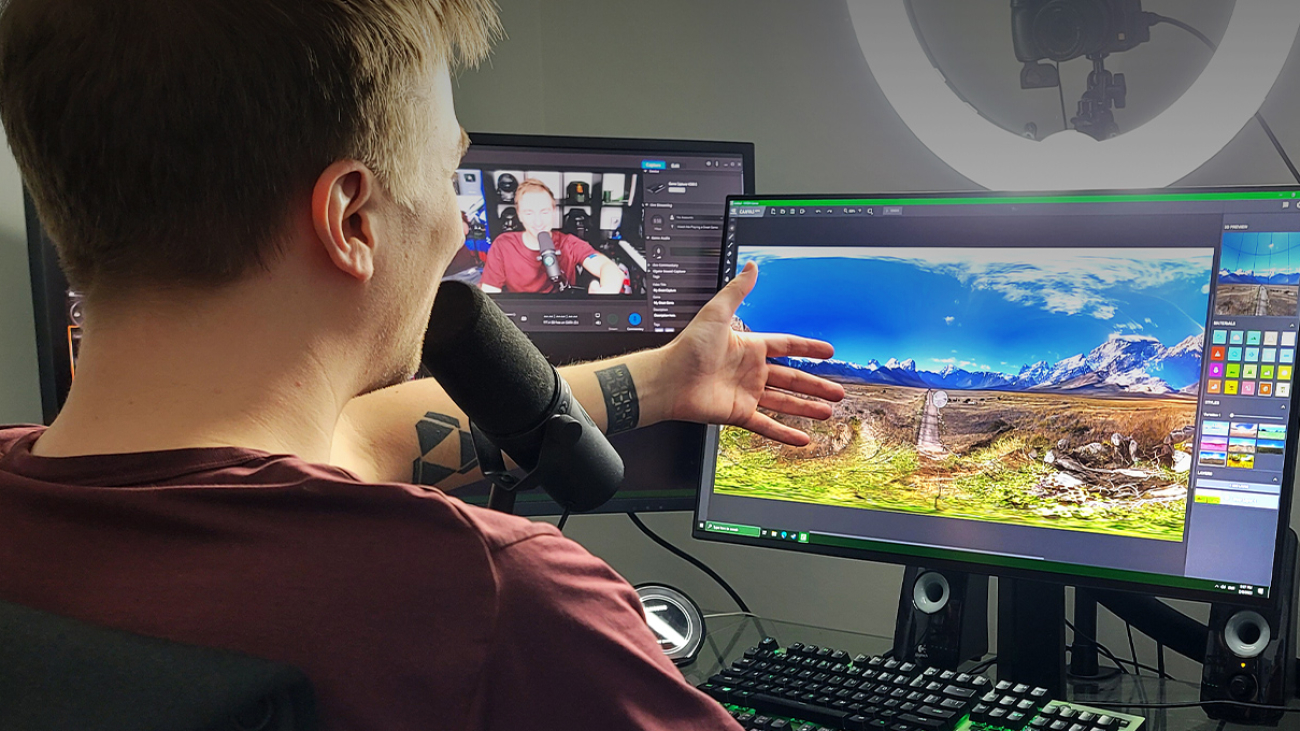
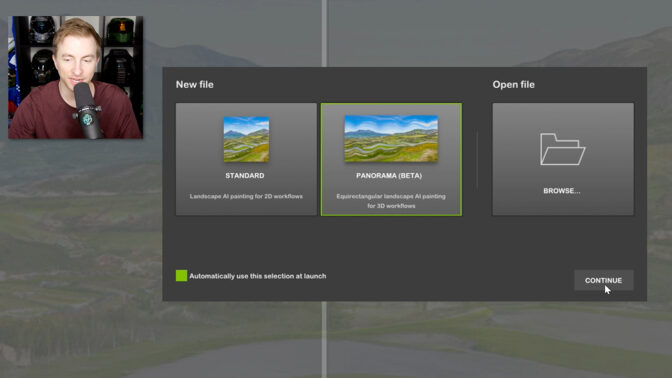
This version 1.4 update includes a new Panorama mode, which 3D artist Dan “Greenskull” Hammill explores this week In the NVIDIA Studio.
The #GameArtChallenge charges ahead with this sensationally scary The Last of Us-themed 3D animation by @Noggi29318543.
Nothing like kicking your week off with a Last of Us #GameArtChallenge submission by @Noggi29318543!
Share your game inspired art with us using #GameArtChallenge until April 30th for a chance to be featured on the Studio or @nvidiaomniverse channels!
pic.twitter.com/ticn42QMTt
— NVIDIA Studio (@NVIDIAStudio) March 13, 2023
Share game-inspired art using the #GameArtChallenge hashtag through Sunday, April 30, for a chance to be featured on the @NVIDIAStudio or @NVIDIAOmniverse channels.
Panorama Comes to Canvas
NVIDIA Canvas 1.4 adds Panorama mode, allowing for the creation of 4K equirectangular landscapes for 3D workflows. Graphic designers will be able to apply Canvas AI-generated scenes to their workflow, allowing for quick and easy iterations.
For 3D artist and AI aficionado Dan “Greenskull” Hammill, Canvas technology invokes an intentional change of tone.
“The therapeutic nature of painting a landscape asks me to slow things down and let my inner artist free,” said Greenskull. “The legendary Bob Ross is a clear inspiration for how I speak during my videos. I want the viewer to both be fascinated by the technology and relaxed by the content.”
For a recent piece, called “The Cove,” Greenskull took a few minutes to create his preferred landscape — an ocean view complete with hills, foliage, sand and darker skies for a cloudy day — with the few strokes of a digital pen in Canvas, all accelerated by his GeForce RTX 4090 GPU.

The artist refined his landscape in even more detail with an expanded selection of brush-size options included in the Canvas 1.4 release. Once satisfied with the background, Greenskull reviewed his creation. “I can look at the 3D view, review, see how it looks, and it’s looking pretty good, pretty cool,” he said.
Greenskull then uploaded his landscape into a video game within Unreal Engine 5 as the skybox or enclosed world. Now his Canvas texture makes up the background.
“This really does open up a lot of possibilities for game designers, especially indie developers who quickly want to create something and have it look genuinely unique and great,” Greenskull said.
“NVIDIA has powered both my casual and professional life for countless years. To me, NVIDIA is reliable, powerful and state of the art. If I’m going to be on top of my game, I should have the hardware that will keep up and push forward.” — Dan “Greenskull” Hammill
With his new virtual world complete, Greenskull prepared to create videos for his social media platforms.
“I hit record, run my DSLR through a capture card, record dialog through Adobe Audition, and grab a second screen capture with a separate PC,” explained Greenskull.
Greenskull then pieced everything together, syncing the primary video, secondary PC video captures and audio files. He reviewed the clips, made minor edits and exported final videos.
Using his favorite video editing app, Adobe Premiere Pro, Greenskull tapped his NVIDIA RTX 4090 GPU’s dual AV1 video encoders via the Voukoder plug-in, cutting export times in half with improved video quality.
Download the Canvas beta, free for NVIDIA and GeForce RTX GPU owners.
Check out Greenskull on TikTok.

Learn more about these latest technologies by joining us at the Game Developers Conference. And catch up on all the groundbreaking announcements in generative AI and the metaverse by watching the NVIDIA GTC keynote.
Follow NVIDIA Studio on Instagram, Twitter and Facebook. Access tutorials on the Studio YouTube channel and get updates directly in your inbox by subscribing to the Studio newsletter.
Game Like a PC: GeForce NOW Breaks Boundaries Transforming Macs Into Ultimate Gaming PCs
Disney Dreamlight Valley is streaming from Steam and Epic Games Store on GeForce NOW starting today.
It’s one of two new games this week that members can stream with beyond-fast performance using a GeForce NOW Ultimate membership. Game as if using a PC on any device — at up to 4K resolution and 120 frames per second — even on a Mac.
Game Different
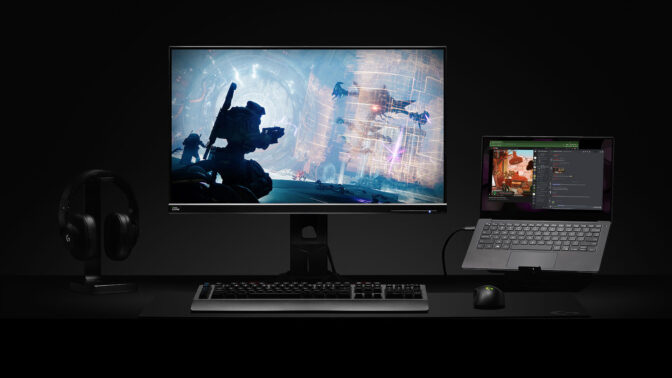
GeForce NOW gives members the unique ability to play over 1,500 games with the power of a gaming PC, on nearly any device.
The new Ultimate membership taps into next-generation NVIDIA SuperPODs that stream GeForce RTX 4080-class performance. With support for 4K resolution at up to 120 fps or high-definition gaming at 240 fps on both PCs and Macs, even Mac users can say they’re PC gamers.
“For Mac users, GeForce NOW is an opportunity to finally play the most advanced games available on the computer they love, which is exciting.” — MacStories.net
Macs with the latest Apple silicon — M2 and M1 chips — run the GeForce NOW app natively, without the need to install or run Rosetta. GeForce NOW members on a Mac get the best of PC gaming, on the system they love, without ever leaving the Apple ecosystem. This results in incredible performance from popular PC-only games without downloads, updates or patches.
“Any laptop can be a gaming laptop, even a MacBook.” — Laptop Mag
MacBook Pro 16-inch laptops with 3,456×2,234 ProMotion 120Hz refresh-rate displays enable gaming in 4K high dynamic range at up to 120 fps. With NVIDIA DLSS 3 technology, these Macs can even run graphically intense games like The Witcher 3 and Warhammer 40,000: Darktide at 4K 120 fps. MacBook Pro laptops with smaller displays and MacBook Airs with 2,560×1,664 displays transform into gaming PCs, running titles like Cyberpunk 2077 in 1440p HDR at liquid-smooth frame rates.
“NVIDIA’s GeForce NOW Ultimate changes everything. Suddenly, the Mac became a brilliant gaming platform.” — Forbes
GeForce NOW opens a world of gaming possibilities on Mac desktops — like the Mac mini, Mac Studio and iMac. Connect an ultrawide monitor and take in all the HDR cinematic game play at up to 3,840×1,600 and 120 fps in PC games such as Destiny 2 and Far Cry 6. With Macs connected to a 240Hz monitor, GeForce NOW Ultimate members can stream with the lowest latency in the cloud, enabling gaming at 240 fps in Apex Legends, Tom Clancy’s Rainbow Six Siege and nearly a dozen other competitive titles.
And it’s not just new Macs that can join in PC gaming. Any Mac system introduced in 2009 or later is fully supported.
We’ve Got Games, Say Cheers!

Help restore Disney magic to the Valley and go on an enchanting journey in Gameloft’s Disney Dreamlight Valley — a life-sim adventure game full of quests, exploration and beloved Disney and Pixar friends.
It’s one of two new games being added this week:
- Disney Dreamlight Valley (Steam and Epic Games Store)
- The Legend of Heroes: Trails to Azure (New release on Steam)
Before you start a magical weekend of gaming, we’ve got a question for you. Let us know your answer in the comments below or on Twitter and Facebook.
Which Disney character would make the best addition to your gaming squad?
—
NVIDIA GeForce NOW (@NVIDIAGFN) March 15, 2023
Peter Ma on How He’s Using AI to Found 8 Promising Signals for Alien Life
Peter Ma was bored in his high school computer science class. So he decided to teach himself something new: how to use artificial intelligence to find alien life.
That’s how he eventually became the lead author of a groundbreaking study published in Nature Astronomy.
The study reveals how Ma and his co-authors used AI to analyze a massive dataset of radio signals collected by the SETI Breakthrough Listen project.
They found eight signals that might just be technosignatures or signs of alien technology.
In this episode of the NVIDIA AI Podcast, host Noah Kravitz interviews Ma, who is now an undergraduate student at the University of Toronto.
Ma tells Kravitz how he stumbled upon this problem and how he developed an AI algorithm that outperformed traditional methods in the search for extraterrestrial intelligence.
You Might Also Like
Sequoia Capital’s Pat Grady and Sonya Huang on Generative AI
Pat Grady and Sonya Huang, partners at Sequoia Capital, to discuss their recent essay, “Generative AI: A Creative New World.” The authors delve into the potential of generative AI to enable new forms of creativity and expression, as well as the challenges and ethical considerations of this technology. They also offer insights into the future of generative AI.
Real or Not Real? Attorney Steven Frank Uses Deep Learning to Authenticate Art
Steven Frank is a partner at the law firm Morgan Lewis, specializing in intellectual property and commercial technology law. He’s also half of the husband-wife team that used convolutional neural networks to authenticate artistic masterpieces, including da Vinci’s Salvador Mundi, with AI’s help.
GANTheftAuto: Harrison Kinsley on AI-Generated Gaming Environments
Humans playing games against machines is nothing new, but now computers can develop games for people to play. Programming enthusiast and social media influencer Harrison Kinsley created GANTheftAuto, an AI-based neural network that generates a playable chunk of the classic video game Grand Theft Auto V.
Subscribe, Review and Follow NVIDIA AI on Twitter
If you enjoyed this episode, subscribe to the NVIDIA AI Podcast on your favorite podcast platform and leave a rating and review. Follow @NVIDIAAI on Twitter or email the AI Podcast team to get in touch.
Accelerated Diffusers with PyTorch 2.0
PyTorch 2.0 has just been released. Its flagship new feature is torch.compile(), a one-line code change that promises to automatically improve performance across codebases. We have previously checked on that promise in Hugging Face Transformers and TIMM models, and delved deep into its motivation, architecture and the road ahead.
As important as torch.compile() is, there’s much more to PyTorch 2.0. Notably, PyTorch 2.0 incorporates several strategies to accelerate transformer blocks, and these improvements are very relevant for diffusion models too. Techniques such as FlashAttention, for example, have become very popular in the diffusion community thanks to their ability to significantly speed up Stable Diffusion and achieve larger batch sizes, and they are now part of PyTorch 2.0.
In this post we discuss how attention layers are optimized in PyTorch 2.0 and how these optimization are applied to the popular 🧨 Diffusers library. We finish with a benchmark that shows how the use of PyTorch 2.0 and Diffusers immediately translates to significant performance improvements across different hardware.
Accelerating transformer blocks
PyTorch 2.0 includes a scaled dot-product attention function as part of torch.nn.functional. This function encompasses several implementations that can be applied depending on the inputs and the hardware in use. Before PyTorch 2.0, you had to search for third-party implementations and install separate packages in order to take advantage of memory optimized algorithms, such as FlashAttention. The available implementations are:
- FlashAttention, from the official FlashAttention project.
- Memory-Efficient Attention, from the xFormers project.
- A native C++ implementation suitable for non-CUDA devices or when high-precision is required.
All these methods are available by default, and PyTorch will try to select the optimal one automatically through the use of the new scaled dot-product attention (SDPA) API. You can also individually toggle them for finer-grained control, see the documentation for details.
Using scaled dot-product attention in diffusers
The incorporation of Accelerated PyTorch 2.0 Transformer attention to the Diffusers library was achieved through the use of the set_attn_processor method, which allows for pluggable attention modules to be configured. In this case, a new attention processor was created, which is enabled by default when PyTorch 2.0 is available. For clarity, this is how you could enable it manually (but it’s usually not necessary since diffusers will automatically take care of it):
from diffusers import StableDiffusionPipeline
from diffusers.models.cross_attention import AttnProcessor2_0

pipe = StableDiffusionPipeline.from_pretrained("runwayml/stable-diffusion-v1-5")
pipe.to("cuda")
pipe.unet.set_attn_processor(AttnProcessor2_0())

prompt = "a photo of an astronaut riding a horse on mars"
image = pipe(prompt).images[0]
Stable Diffusion Benchmark
We ran a number of tests using accelerated dot-product attention from PyTorch 2.0 in Diffusers. We installed diffusers from pip and used nightly versions of PyTorch 2.0, since our tests were performed before the official release. We also used torch.set_float32_matmul_precision('high') to enable additional fast matrix multiplication algorithms.
We compared results with the traditional attention implementation in diffusers (referred to as vanilla below) as well as with the best-performing solution in pre-2.0 PyTorch: PyTorch 1.13.1 with the xFormers package (v0.0.16) installed.
Results were measured without compilation (i.e., no code changes at all), and also with a single call to torch.compile() to wrap the UNet module. We did not compile the image decoder because most of the time is spent in the 50 denoising iterations that run UNet evaluations.
Results in float32
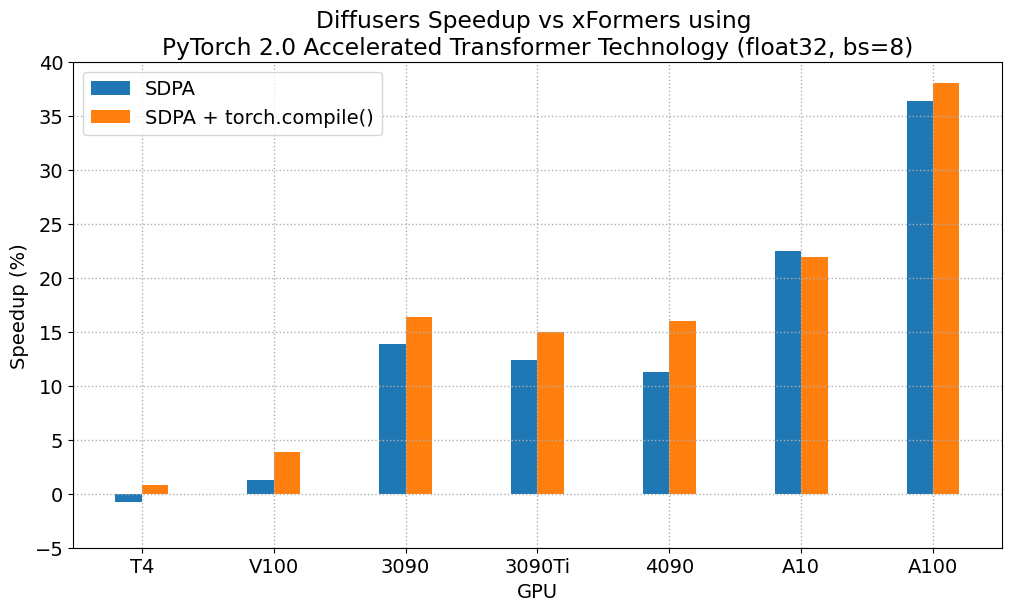
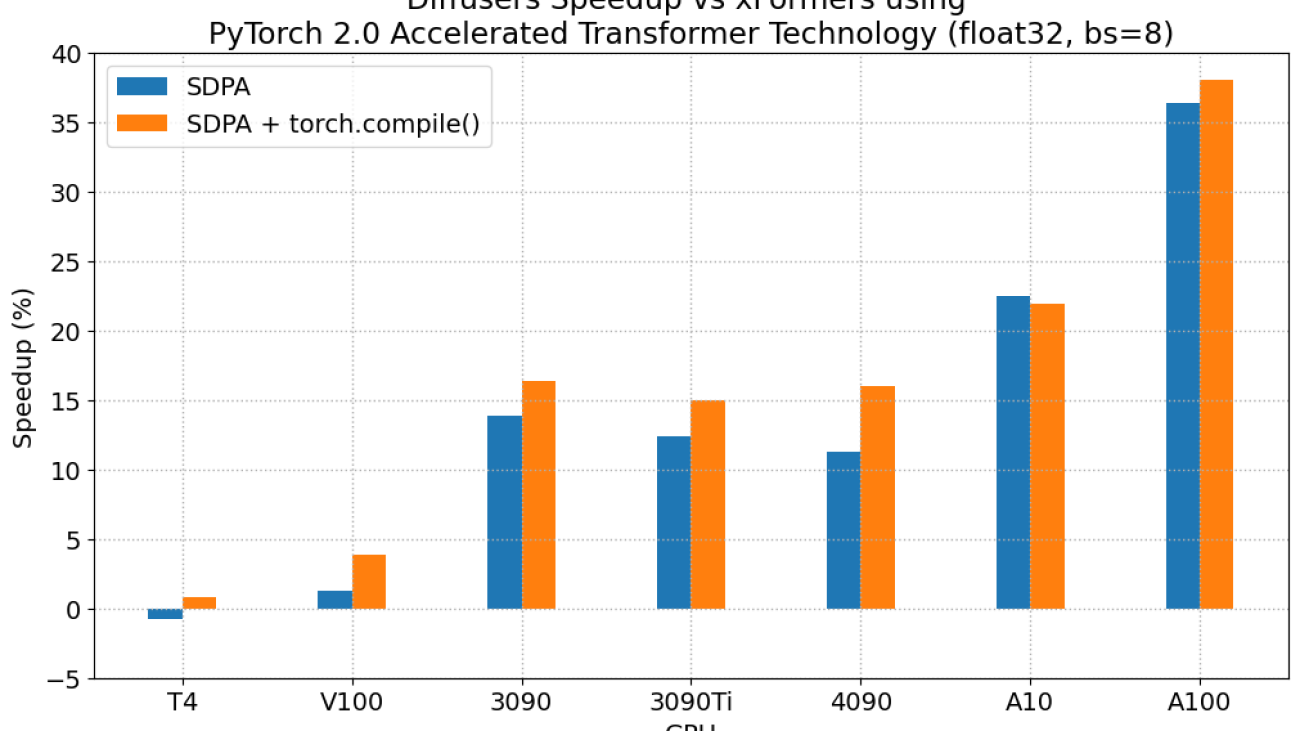
The following figures explore performance improvement vs batch size for various representative GPUs belonging to different generations. We collected data for each combination until we reached maximum memory utilization. Vanilla attention runs out of memory earlier than xFormers or PyTorch 2.0, which explains the missing bars for larger batch sizes. Similarly, A100 (we used the 40 GB version) is capable of running batch sizes of 64, but the other GPUs could only reach 32 in our tests.
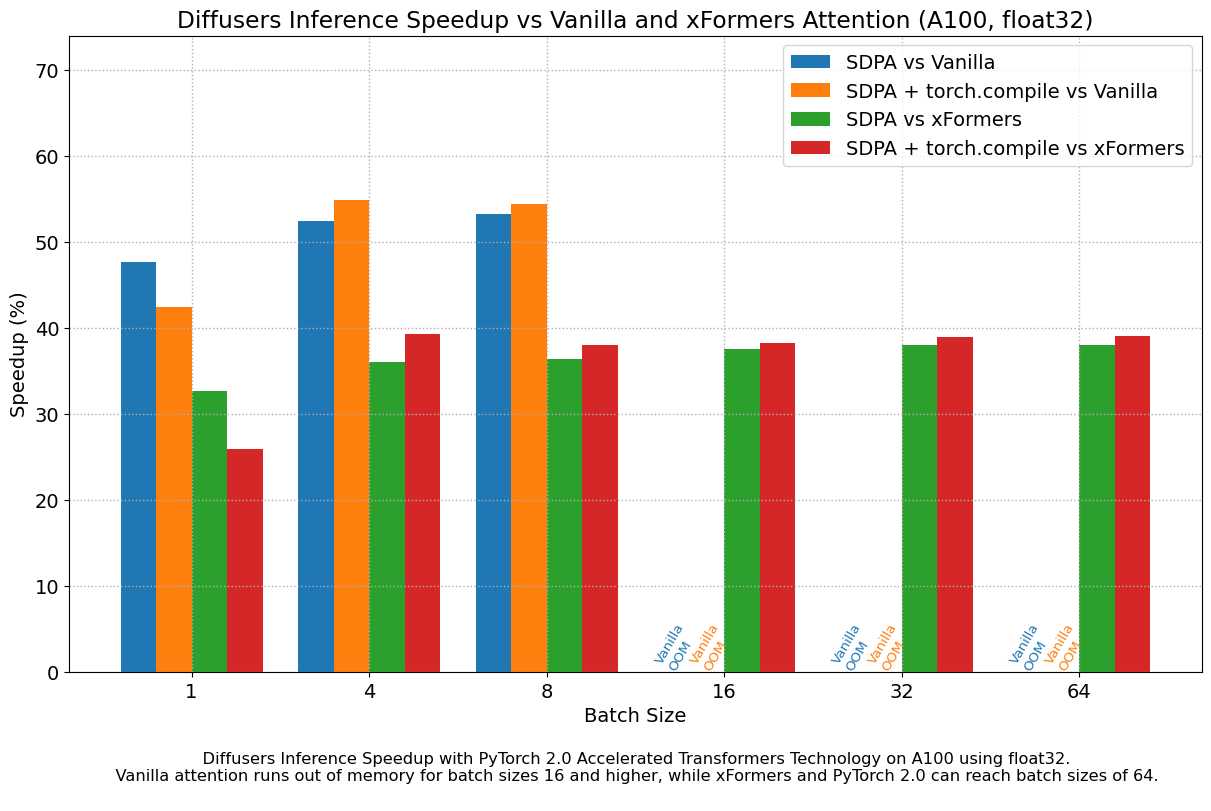
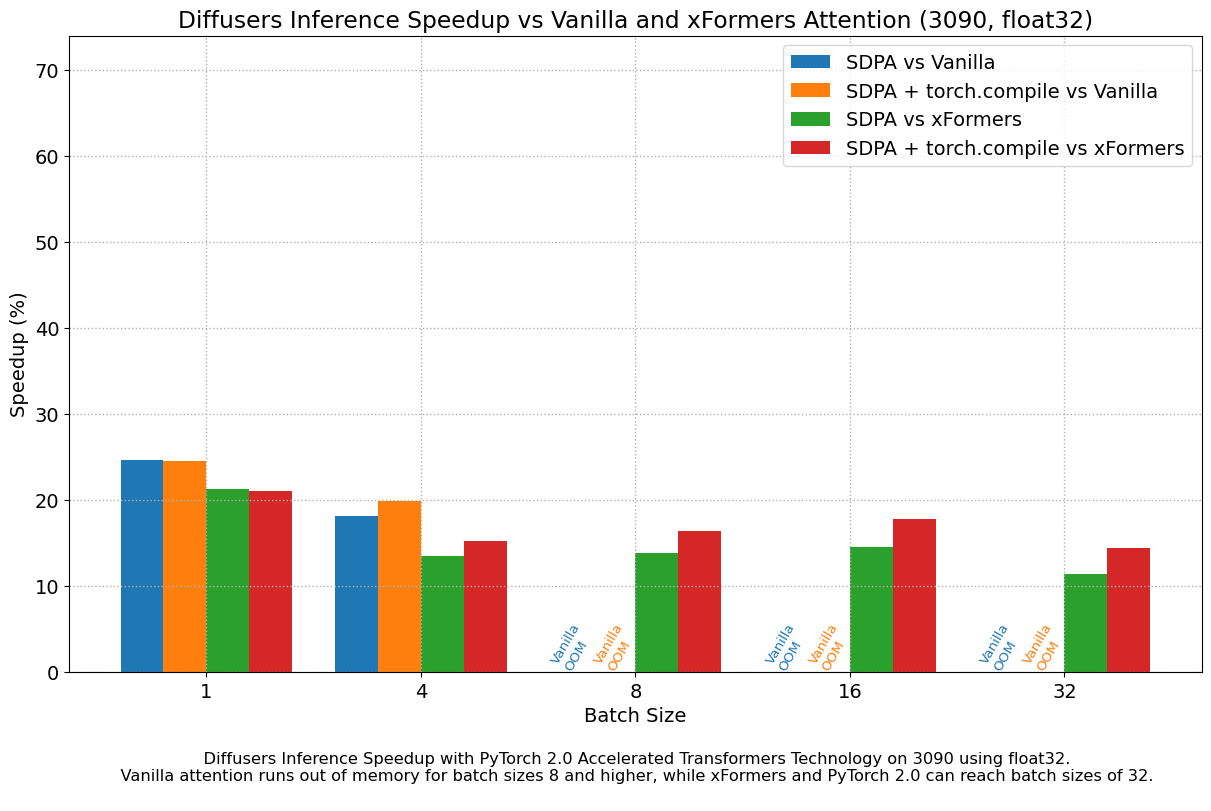
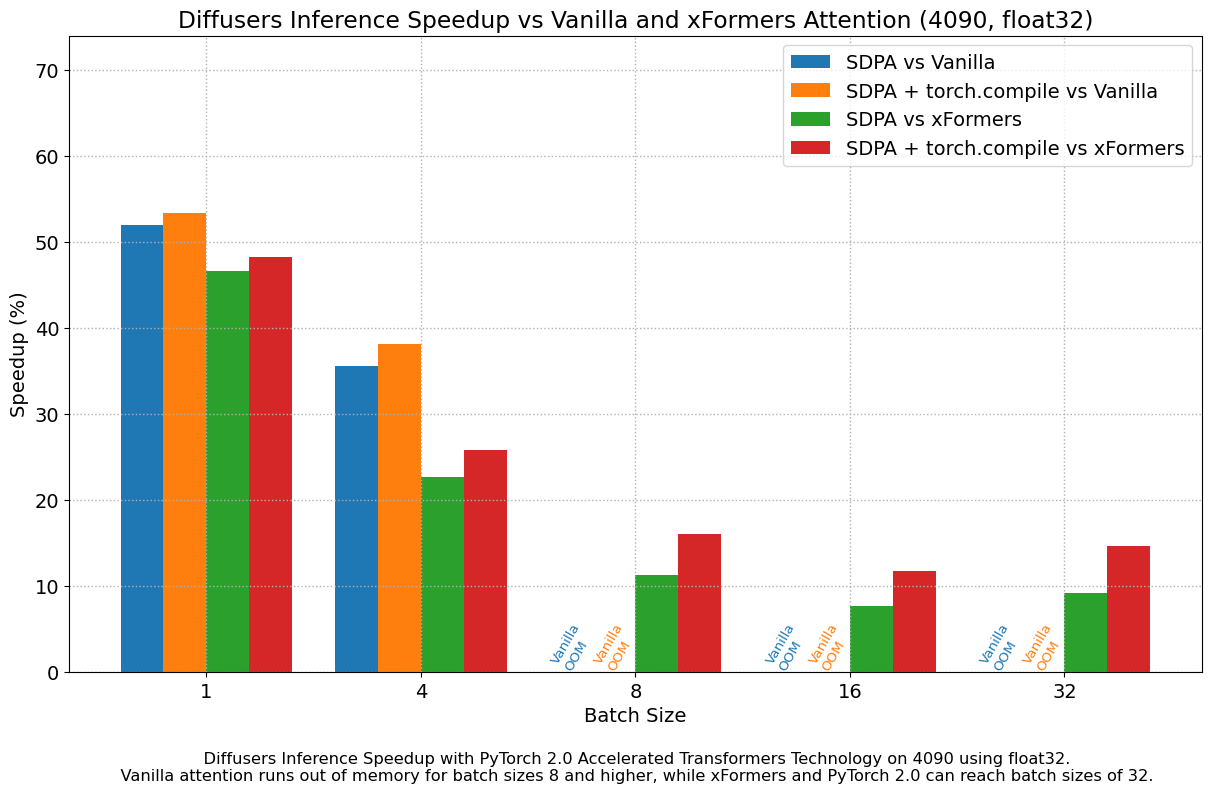
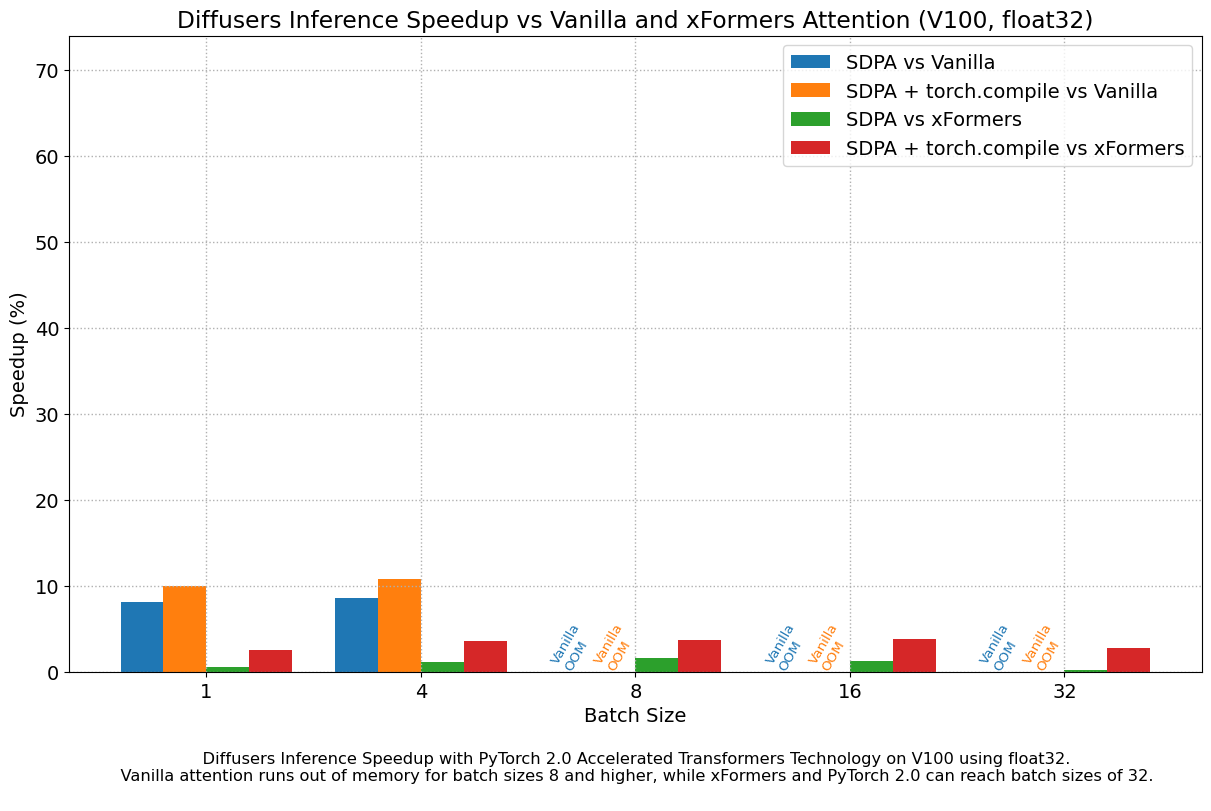
We found very significant performance improvements over vanilla attention across the board, without even using torch.compile(). An out of the box installation of PyTorch 2.0 and diffusers yields about 50% speedup on A100 and between 35% and 50% on 4090 GPUs, depending on batch size. Performance improvements are more pronounced for modern CUDA architectures such as Ada (4090) or Ampere (A100), but they are still very significant for older architectures still heavily in use in cloud services.
In addition to faster speeds, the accelerated transformers implementation in PyTorch 2.0 allows much larger batch sizes to be used. A single 40GB A100 GPU runs out of memory with a batch size of 10, and 24 GB high-end consumer cards such as 3090 and 4090 cannot generate 8 images at once. Using PyTorch 2.0 and diffusers we could achieve batch sizes of 48 for 3090 and 4090, and 64 for A100. This is of great significance for cloud services and applications, as they can efficiently process more images at a time.
When compared with PyTorch 1.13.1 + xFormers, the new accelerated transformers implementation is still faster and requires no additional packages or dependencies. In this case we found moderate speedups of up to 2% on datacenter cards such as A100 or T4, but performance was great on the two last generations of consumer cards: up to 20% speed improvement on 3090 and between 10% and 45% on 4090, depending on batch size.
When torch.compile() is used, we get an additional performance boost of (typically) 2% and 3% over the previous improvements. As compilation takes some time, this is better geared towards user-facing inference services or training.
Results in float16
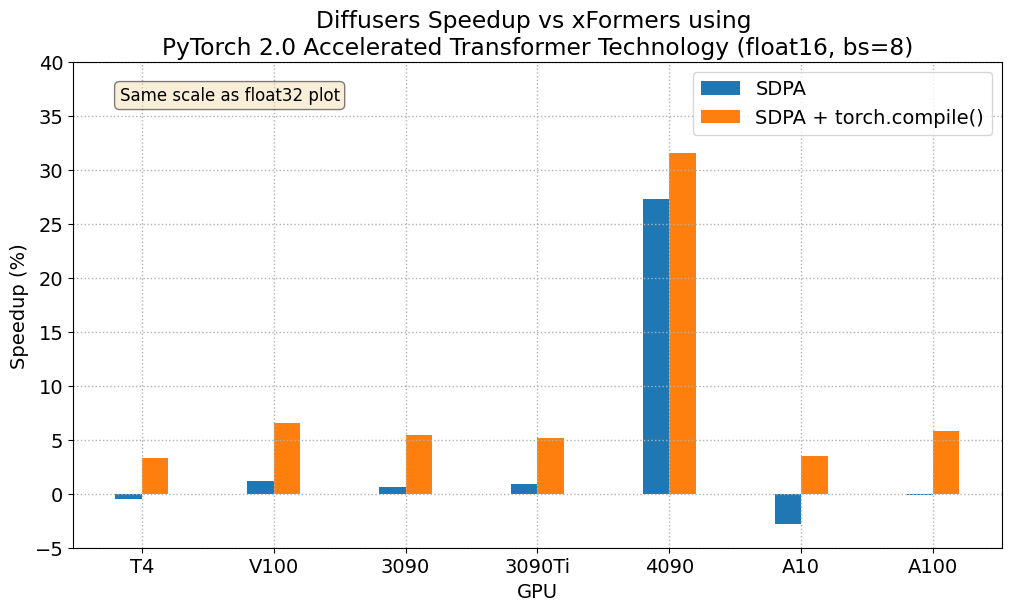
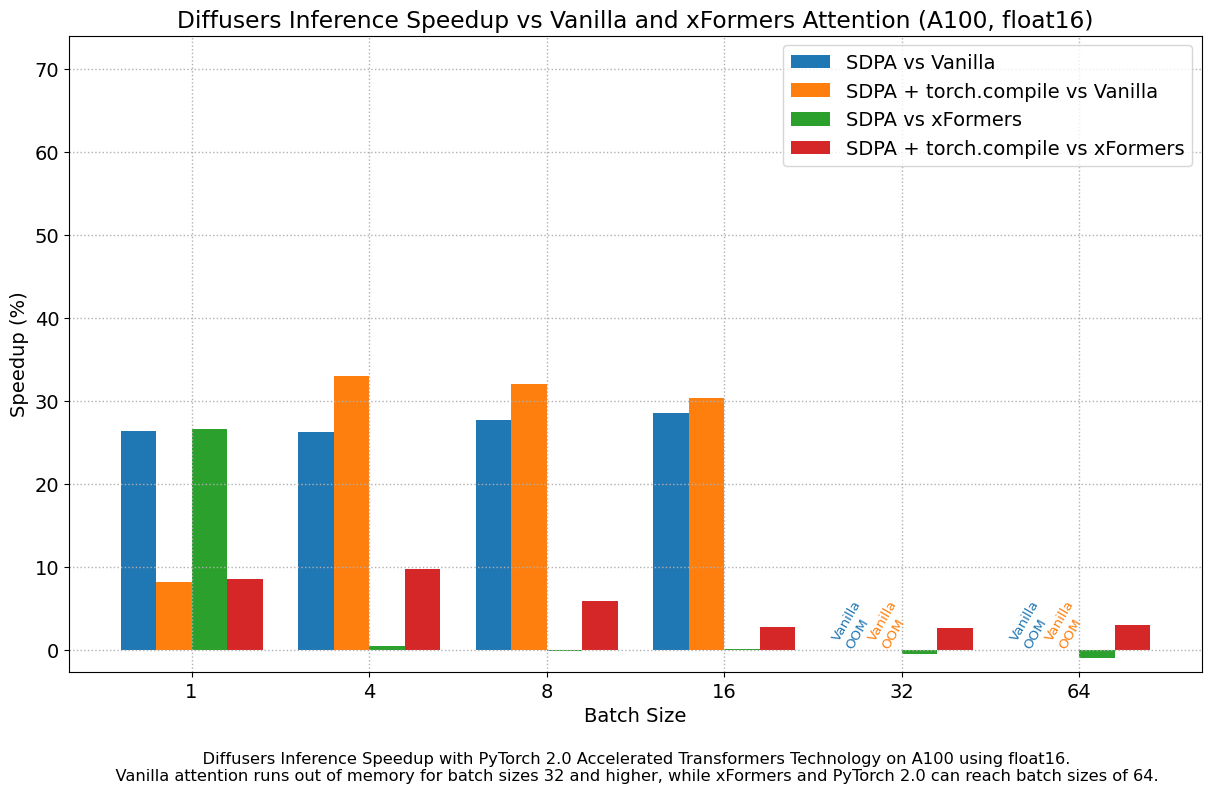
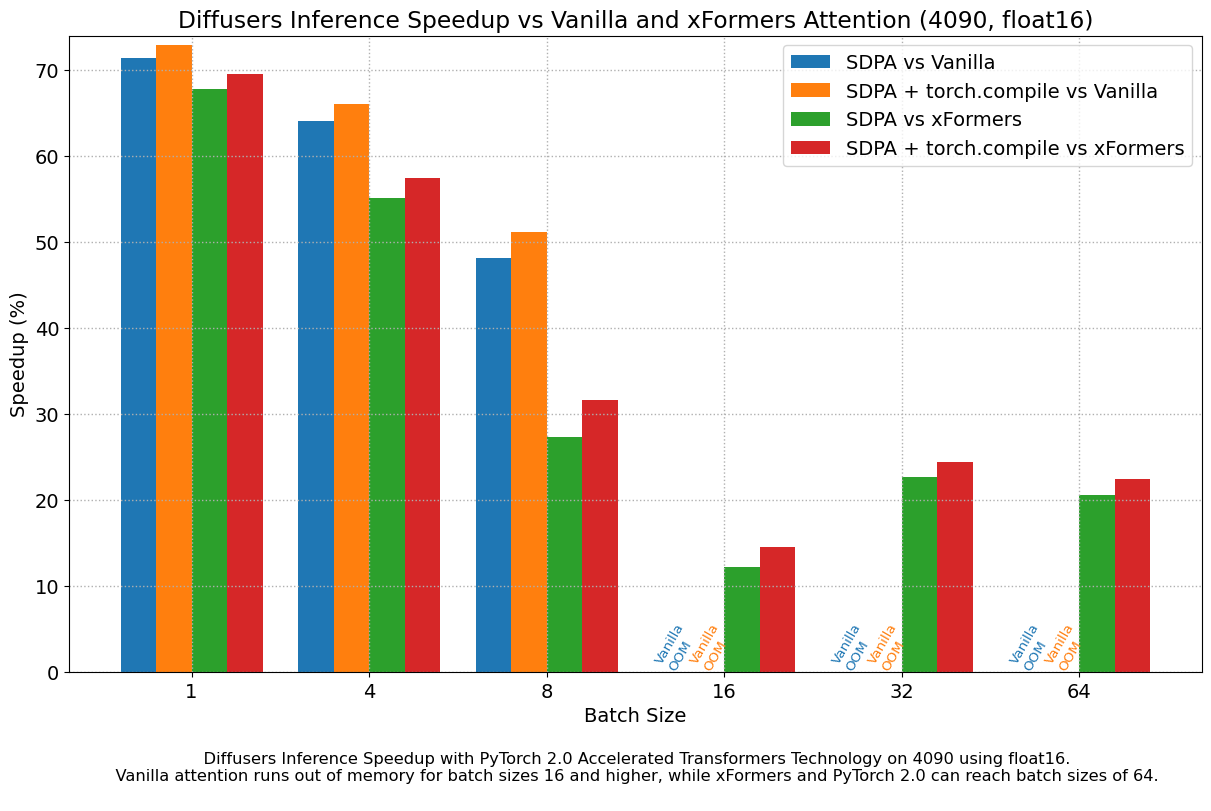
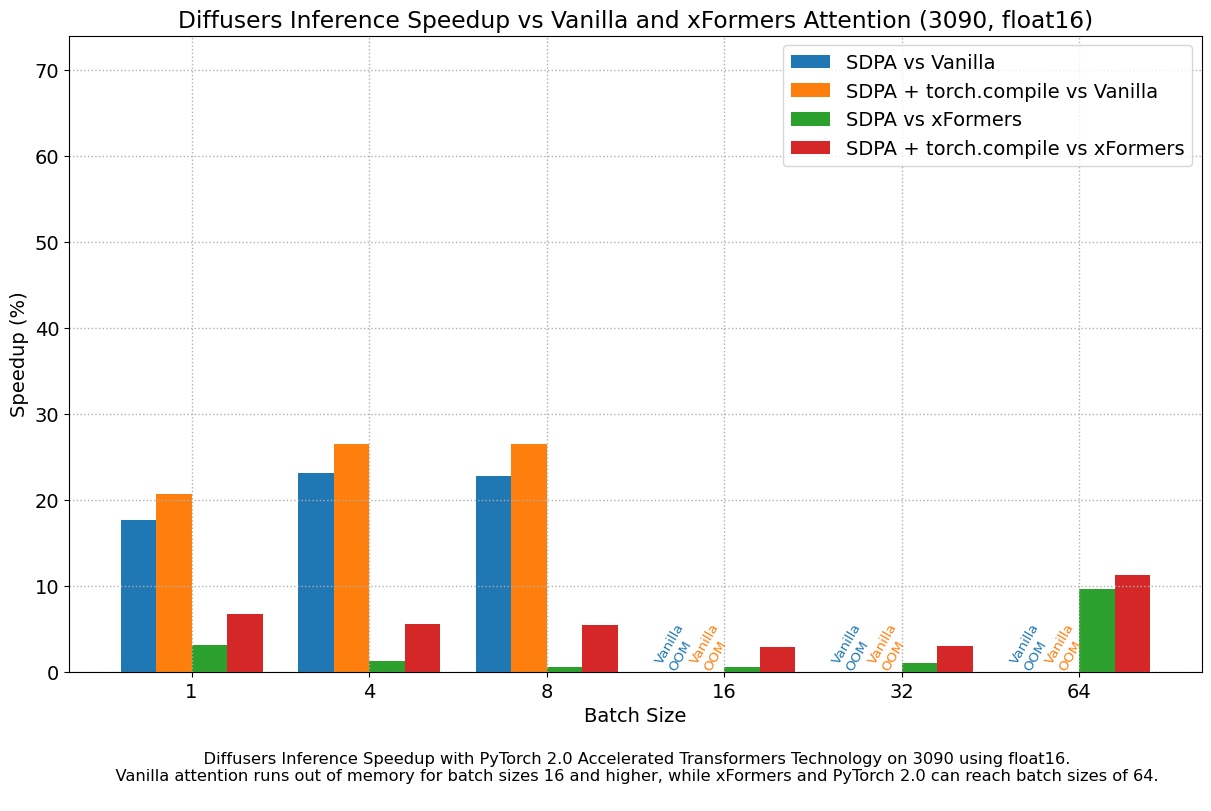
When we consider float16 inference, the performance improvements of the accelerated transformers implementation in PyTorch 2.0 are between 20% and 28% over standard attention, across all the GPUs we tested, except for the 4090, which belongs to the more modern Ada architecture. This GPU benefits from a dramatic performance improvement when using PyTorch 2.0 nightlies. With respect to optimized SDPA vs xFormers, results are usually on par for most GPUs, except again for the 4090. Adding torch.compile() to the mix boosts performance a few more percentage points across the board.
Conclusions
PyTorch 2.0 comes with multiple features to optimize the crucial components of the foundational transformer block, and they can be further improved with the use of torch.compile. These optimizations lead to significant memory and time improvements for diffusion models, and remove the need for third-party library installations.
To take advantage of these speed and memory improvements all you have to do is upgrade to PyTorch 2.0 and use diffusers >= 0.13.0.
For more examples and in-detail benchmark numbers, please also have a look at the Diffusers with PyTorch 2.0 docs.
Acknowledgement
The authors are grateful to the PyTorch team for their insights, assistance and suggestions during the elaboration of this post, and for creating such excellent software. We are particularly indebted to Hamid Shojanazeri, Grigory Sizov, Christian Puhrsch, Driss Guessous, Michael Gschwind and Geeta Chauhan.
PepsiCo Leads in AI-Powered Automation With KoiVision Platform
Global leader in convenient foods and beverages PepsiCo is deploying advanced machine vision technology from startup KoiReader Technologies, powered by the NVIDIA AI platform and GPUs, to improve efficiency and accuracy in its distribution process.
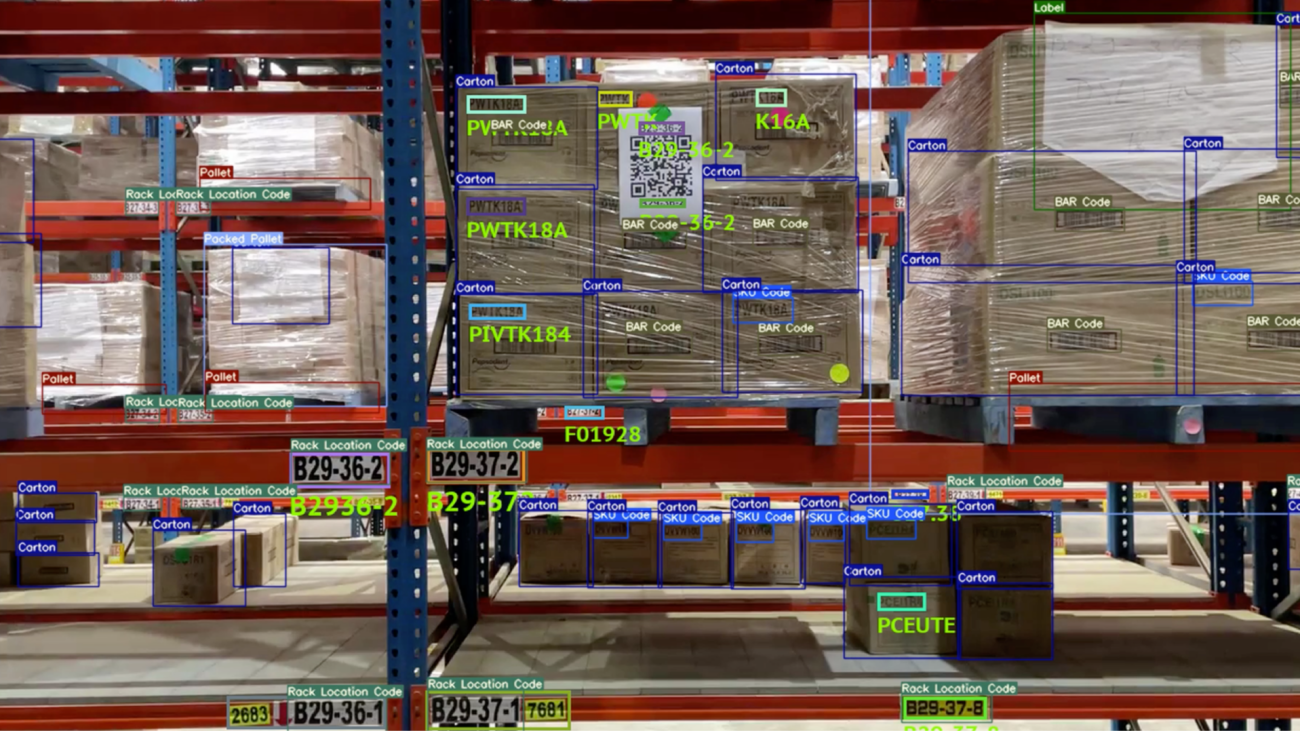
PepsiCo has identified KoiReader’s technology as a solution to enable greater efficiency in reading warehouse labels. This AI-powered innovation helps read warehouse labels and barcodes in fast-moving environments where the labels can be in any size, at any angle or even partially occluded or damaged.
This is up and running in a PepsiCo distribution center in the Dallas-Fort Worth area, with plans for broader deployment this year.
“If you find the right lever, you could dramatically improve our throughput,” said Greg Bellon, senior director of digital supply chain at PepsiCo.
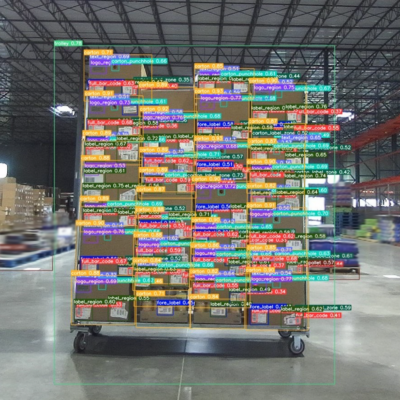
KoiReader’s technology is being used to train and run the deep learning algorithms that power PepsiCo’s AI label and barcode scanning system.
Once near-perfect accuracy was achieved, its application is being expanded to validate customer deliveries to ensure 100% accuracy of human-assisted picking operations.
At the Dallas facility where PepsiCo is testing the technology, Koi’s AutonomousOCR technology scans some of the most complex warehouse labels quickly and accurately on fast-moving conveyor belts.
It also is being investigated to assist warehouse workers as they scan pallets of soda and snacks. The same AutonomousOCR technology has also been deployed to automate yard operations as tractors and trailers enter and exit PepsiCo’s distribution center in Texas.
“KoiReader’s capability offers up the potential for many use cases — starting small and demonstrating capability is key to success,” Bellon says.
The system is already generating valuable real-time insights, Bellon reports.
Koi’s technology can accurately track regular or irregularly shaped products, with and without labels, as well as count how long it takes workers to pack boxes, how many items they are packing, and how long it takes them to retrieve items for boxes.
It acts as a real-time industrial engineering study answering many questions about the influence of people, process and technology on throughput.
A broad array of the NVIDIA stack is being used by KoiReader across its diverse solutions portfolio and customer workflows.
NVIDIA TAO Toolkit, DALI and Nsight Systems are being used to train and optimize models on large NVIDIA A6000 GPU-powered servers.
The NVIDIA DeepStream SDK, TensorRT and Triton Inference Server are used to maximize throughput and deliver real-time results on edge nodes powered by NVIDIA A5000 GPUs, and NVIDIA Jetson AGX Orin module-enabled servers for larger-scale deployments.
And every aspect of Koi’s applications are built cloud-native, using containerization, Kubernetes and microservices.
Additionally, the NVIDIA AI Enterprise software suite promises to help PepsiCo confidently scale up and manage its applications and AI deployments.
“The KoiVision Platform was built to deliver logistics, supply chain, and industrial automation for enterprise customers. Our solution suite is helping PepsiCo improve operational efficiency and accuracy in its distribution process,” said Ashutosh Prasad, founder and CEO of KoiReader.
“We’re testing out object- and activity-detection capabilities and computer vision today to figure out what kind of data we want to collect with that sort of application,” Bellon said.
Bellon said he’s excited for what’s next. “We’re going to be on a journey together,” he said.
Bring legacy machine learning code into Amazon SageMaker using AWS Step Functions
Tens of thousands of AWS customers use AWS machine learning (ML) services to accelerate their ML development with fully managed infrastructure and tools. For customers who have been developing ML models on premises, such as their local desktop, they want to migrate their legacy ML models to the AWS Cloud to fully take advantage of the most comprehensive set of ML services, infrastructure, and implementation resources available on AWS.
The term legacy code refers to code that was developed to be manually run on a local desktop, and is not built with cloud-ready SDKs such as the AWS SDK for Python (Boto3) or Amazon SageMaker Python SDK. In other words, these legacy codes aren’t optimized for cloud deployment. The best practice for migration is to refactor these legacy codes using the Amazon SageMaker API or the SageMaker Python SDK. However, in some cases, organizations with a large number of legacy models may not have the time or resources to rewrite all those models.
In this post, we share a scalable and easy-to-implement approach to migrate legacy ML code to the AWS Cloud for inference using Amazon SageMaker and AWS Step Functions, with a minimum amount of code refactoring required. You can easily extend this solution to add more functionality. We demonstrate how two different personas, a data scientist and an MLOps engineer, can collaborate to lift and shift hundreds of legacy models.
Solution overview
In this framework, we run the legacy code in a container as a SageMaker Processing job. SageMaker runs the legacy script inside a processing container. The processing container image can either be a SageMaker built-in image or a custom image. The underlying infrastructure for a Processing job is fully managed by SageMaker. No change to the legacy code is required. Familiarity with creating SageMaker Processing jobs is all that is required.
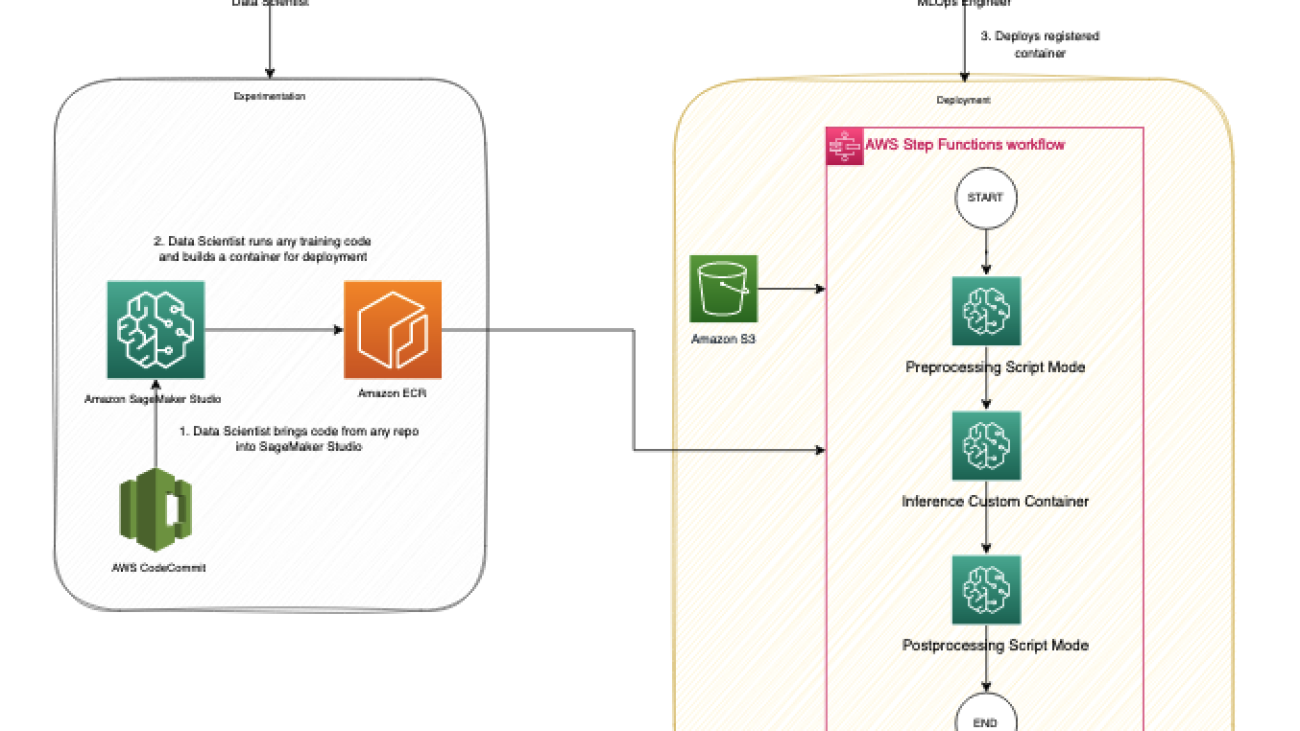
We assume the involvement of two personas: a data scientist and an MLOps engineer. The data scientist is responsible for moving the code into SageMaker, either manually or by cloning it from a code repository such as AWS CodeCommit. Amazon SageMaker Studio provides an integrated development environment (IDE) for implementing various steps in the ML lifecycle, and the data scientist uses it to manually build a custom container that contains the necessary code artifacts for deployment. The container will be registered in a container registry such as Amazon Elastic Container Registry (Amazon ECR) for deployment purposes.
The MLOps engineer takes ownership of building a Step Functions workflow that we can reuse to deploy the custom container developed by the data scientist with the appropriate parameters. The Step Functions workflow can be as modular as needed to fit the use case, or it can consist of just one step to initiate a single process. To minimize the effort required to migrate the code, we have identified three modular components to build a fully functional deployment process:
- Preprocessing
- Inference
- Postprocessing
The following diagram illustrates our solution architecture and workflow.

The following steps are involved in this solution:
- The data scientist persona uses Studio to import legacy code through cloning from a code repository, and then modularizing the code into separate components that follow the steps of the ML lifecycle (preprocessing, inference, and postprocessing).
- The data scientist uses Studio, and specifically the Studio Image Build CLI tool provided by SageMaker, to build a Docker image. This CLI tool allows the data scientist to build the image directly within Studio and automatically registers the image into Amazon ECR.
- The MLOps engineer uses the registered container image and creates a deployment for a specific use case using Step Functions. Step Functions is a serverless workflow service that can control SageMaker APIs directly through the use of the Amazon States Language.
SageMaker Processing job
Let’s understand how a SageMaker Processing job runs. The following diagram shows how SageMaker spins up a Processing job.

SageMaker takes your script, copies your data from Amazon Simple Storage Service (Amazon S3), and then pulls a processing container. The processing container image can either be a SageMaker built-in image or a custom image that you provide. The underlying infrastructure for a Processing job is fully managed by SageMaker. Cluster resources are provisioned for the duration of your job, and cleaned up when a job is complete. The output of the Processing job is stored in the S3 bucket you specified. To learn more about building your own container, refer to Build Your Own Processing Container (Advanced Scenario).
The SageMaker Processing job sets up your processing image using a Docker container entrypoint script. You can also provide your own custom entrypoint by using the ContainerEntrypoint and ContainerArguments parameters of the AppSpecification API. If you use your own custom entrypoint, you have the added flexibility to run it as a standalone script without rebuilding your images.
For this example, we construct a custom container and use a SageMaker Processing job for inference. Preprocessing and postprocessing jobs utilize the script mode with a pre-built scikit-learn container.
Prerequisites
To follow along this post, complete the following prerequisite steps:
- Create a Studio domain. For instructions, refer to Onboard to Amazon SageMaker Domain Using Quick setup.
- Create an S3 bucket.
- Clone the provided GitHub repo into Studio.
The GitHub repo is organized into different folders that correspond to various stages in the ML lifecycle, facilitating easy navigation and management:

Migrate the legacy code
In this step, we act as the data scientist responsible for migrating the legacy code.
We begin by opening the build_and_push.ipynb notebook.
The initial cell in the notebook guides you in installing the Studio Image Build CLI. This CLI simplifies the setup process by automatically creating a reusable build environment that you can interact with through high-level commands. With the CLI, building an image is as easy as telling it to build, and the result will be a link to the location of your image in Amazon ECR. This approach eliminates the need to manage the complex underlying workflow orchestrated by the CLI, streamlining the image building process.
Before we run the build command, it’s important to ensure that the role running the command has the necessary permissions, as specified in the CLI GitHub readme or related post. Failing to grant the required permissions can result in errors during the build process.
See the following code:
To streamline your legacy code, divide it into three distinct Python scripts named preprocessing.py, predict.py, and postprocessing.py. Adhere to best programming practices by converting the code into functions that are called from a main function. Ensure that all necessary libraries are imported and the requirements.txt file is updated to include any custom libraries.
After you organize the code, package it along with the requirements file into a Docker container. You can easily build the container from within Studio using the following command:
By default, the image will be pushed to an ECR repository called sagemakerstudio with the tag latest. Additionally, the execution role of the Studio app will be utilized, along with the default SageMaker Python SDK S3 bucket. However, these settings can be easily altered using the appropriate CLI options. See the following code:
Now that the container has been built and registered in an ECR repository, it’s time to dive deeper into how we can use it to run predict.py. We also show you the process of using a pre-built scikit-learn container to run preprocessing.py and postprocessing.py.
Productionize the container
In this step, we act as the MLOps engineer who productionizes the container built in the previous step.
We use Step Functions to orchestrate the workflow. Step Functions allows for exceptional flexibility in integrating a diverse range of services into the workflow, accommodating any existing dependencies that may exist in the legacy system. This approach ensures that all necessary components are seamlessly integrated and run in the desired sequence, resulting in an efficient and effective workflow solution.
Step Functions can control certain AWS services directly from the Amazon States Language. To learn more about working with Step Functions and its integration with SageMaker, refer to Manage SageMaker with Step Functions. Using the Step Functions integration capability with SageMaker, we run the preprocessing and postprocessing scripts using a SageMaker Processing job in script mode and run inference as a SageMaker Processing job using a custom container. We do so using AWS SDK for Python (Boto3) CreateProcessingJob API calls.
Preprocessing
SageMaker offers several options for running custom code. If you only have a script without any custom dependencies, you can run the script as a Bring Your Own Script (BYOS). To do this, simply pass your script to the pre-built scikit-learn framework container and run a SageMaker Processing job in script mode using the ContainerArguments and ContainerEntrypoint parameters in the AppSpecification API. This is a straightforward and convenient method for running simple scripts.
Check out the “Preprocessing Script Mode” state configuration in the sample Step Functions workflow to understand how to configure the CreateProcessingJob API call to run a custom script.
Inference
You can run a custom container using the Build Your Own Processing Container approach. The SageMaker Processing job operates with the /opt/ml local path, and you can specify your ProcessingInputs and their local path in the configuration. The Processing job then copies the artifacts to the local container and starts the job. After the job is complete, it copies the artifacts specified in the local path of the ProcessingOutputs to its specified external location.
Check out the “Inference Custom Container” state configuration in the sample Step Functions workflow to understand how to configure the CreateProcessingJob API call to run a custom container.
Postprocessing
You can run a postprocessing script just like a preprocessing script using the Step Functions CreateProcessingJob step. Running a postprocessing script allows you to perform custom processing tasks after the inference job is complete.
Create the Step Functions workflow
For quickly prototyping, we use the Step Functions Amazon States Language. You can edit the Step Functions definition directly by using the States Language. Refer to the sample Step Functions workflow.
You can create a new Step Functions state machine on the Step Functions console by selecting Write your workflow in code.

Step Functions can look at the resources you use and create a role. However, you may see the following message:
“Step Functions cannot generate an IAM policy if the RoleArn for SageMaker is from a Path. Hardcode the SageMaker RoleArn in your state machine definition, or choose an existing role with the proper permissions for Step Functions to call SageMaker.”
To address this, you must create an AWS Identity and Access Management (IAM) role for Step Functions. For instructions, refer to Creating an IAM role for your state machine. Then attach the following IAM policy to provide the required permissions for running the workflow:
The following figure illustrates the flow of data and container images into each step of the Step Functions workflow.

The following is a list of minimum required parameters to initialize in Step Functions; you can also refer to the sample input parameters JSON:
- input_uri – The S3 URI for the input files
- output_uri – The S3 URI for the output files
- code_uri – The S3 URI for script files
- custom_image_uri – The container URI for the custom container you have built
- scikit_image_uri – The container URI for the pre-built scikit-learn framework
- role – The execution role to run the job
- instance_type – The instance type you need to use to run the container
- volume_size – The storage volume size you require for the container
- max_runtime – The maximum runtime for the container, with a default value of 1 hour
Run the workflow
We have broken down the legacy code into manageable parts: preprocessing, inference, and postprocessing. To support our inference needs, we constructed a custom container equipped with the necessary library dependencies. Our plan is to utilize Step Functions, taking advantage of its ability to call the SageMaker API. We have shown two methods for running custom code using the SageMaker API: a SageMaker Processing job that utilizes a pre-built image and takes a custom script at runtime, and a SageMaker Processing job that uses a custom container, which is packaged with the necessary artifacts to run custom inference.
The following figure shows the run of the Step Functions workflow.

Summary
In this post, we discussed the process of migrating legacy ML Python code from local development environments and implementing a standardized MLOps procedure. With this approach, you can effortlessly transfer hundreds of models and incorporate your desired enterprise deployment practices. We presented two different methods for running custom code on SageMaker, and you can select the one that best suits your needs.
If you require a highly customizable solution, it’s recommended to use the custom container approach. You may find it more suitable to use pre-built images to run your custom script if you have basic scripts and don’t need to create your custom container, as described in the preprocessing step mentioned earlier. Furthermore, if required, you can apply this solution to containerize legacy model training and evaluation steps, just like how the inference step is containerized in this post.
About the Authors
 Bhavana Chirumamilla is a Senior Resident Architect at AWS with a strong passion for data and machine learning operations. She brings a wealth of experience and enthusiasm to help enterprises build effective data and ML strategies. In her spare time, Bhavana enjoys spending time with her family and engaging in various activities such as traveling, hiking, gardening, and watching documentaries.
 Shyam Namavaram is a senior artificial intelligence (AI) and machine learning (ML) specialist solutions architect at Amazon Web Services (AWS). He passionately works with customers to accelerate their AI and ML adoption by providing technical guidance and helping them innovate and build secure cloud solutions on AWS. He specializes in AI and ML, containers, and analytics technologies. Outside of work, he loves playing sports and experiencing nature with trekking.
 Qingwei Li is a Machine Learning Specialist at Amazon Web Services. He received his PhD in Operations Research after he broke his advisor’s research grant account and failed to deliver the Nobel Prize he promised. Currently, he helps customers in the financial service and insurance industry build machine learning solutions on AWS. In his spare time, he likes reading and teaching.
 Srinivasa Shaik is a Solutions Architect at AWS based in Boston. He helps enterprise customers accelerate their journey to the cloud. He is passionate about containers and machine learning technologies. In his spare time, he enjoys spending time with his family, cooking, and traveling.
6 ways Google AI is helping you sleep better
 Learn how features like Sleep Profiles, Smart Wake and cough and snore detection are powered by AI to help you get better sleep.Read More
Apple of My AI: Startup Sprouts Multitasking Farm Tool for Organics
It all started with two software engineers and a tomato farmer on a West Coast road trip.
Visiting farms to survey their needs, the three hatched a plan at an apple orchard: build a highly adaptable 3D vision AI system for automating field tasks.
Verdant, based in the San Francisco Bay Area, is developing AI that promises versatile farm assistance in the form of a tractor implement for weeding, fertilizing and spraying.
Founders Lawrence Ibarria, Gabe Sibley and Curtis Garner — two engineers from Cruise Automation and a tomato farming manager — are harnessing the NVIDIA Jetson edge AI platform and NVIDIA Metropolis SDKs such as TAO Toolkit and DeepStream for this ambitious slice of farm automation.
The startup, founded in 2018, is commercially deployed in carrot farms and in trials at apple, garlic, broccoli and lettuce farms in California’s Central Valley and Imperial Valley, as well as in Oregon.
Verdant plans to help with organic farming by lowering production costs for farmers while increasing yields and providing labor support. It employs the tractor operator, who is trained to manage the AI-driven implements. The company’s robot-as-service model, or RaaS, enables farmers to see metrics on yield improvements and reductions in chemical costs, and pay by the acre for results.
“We wanted to do something meaningful to help the environment,” said Ibarria, Verdant’s chief operating officer. “And it’s not only reducing costs for farmers, it’s also increasing their yield.”
The company recently landed more than $46 million in series A funding.
Another recent event at Verdant was hiring as its chief technology officer Frank Dellaert, who is recognized for using graphical models to solve large-scale mapping and 4D reconstruction challenges. A faculty member at Georgia Institute of Technology, Dellaert has led work at Skydio, Facebook Reality Labs and Google AI while on leave from the research university.
“One of the things that was impressed upon me when joining Verdant was how they measure performance in real-time,” remarked Dellaert. “It’s a promise to the grower, but it’s also a promise to the environment. It shows whether we do indeed save from all the chemicals being put into the field.”
Verdant is a member of NVIDIA Inception, a free program that provides startups with technical training, go-to-market support, and AI platform guidance.
Companies worldwide — Monarch Tractor, Bilberry, Greeneye, FarmWise, John Deere and many others — are building the next generation of sustainable farming with NVIDIA Jetson AI.
Working With Bolthouse Farms
Verdant is working with Bolthouse Farms, based in Bakersfield, Calif., to help its carrot-growing business transition to regenerative agriculture practices. The aim is to utilize more sustainable farming practices, including reduction of herbicides.
Verdant is starting with weeding and expanding next into precision fertilizer applications for Bolthouse.
The computation and automation from Verdant have enabled Bolthouse Farms to understand how to achieve its sustainable farming goals, according to the farm’s management team.
Riding With Jetson AGX Orin
Verdant is putting the Jetson AGX Orin system-on-module inside tractor cabs. The company says that Orin’s powerful computing and availability with ruggedized cases from vendors makes it the only choice for farming applications. Verdant is also collaborating with Jetson ecosystem partners, including RidgeRun, Leopard Imaging and others.
The module enables Verdant to create 3D visualizations showing plant treatments for the tractor operator. The company uses two stereo cameras for its field visualizations, for inference and to gather data in the field for training models on NVIDIA DGX systems running NVIDIA A100 Tensor Core GPUs back at its headquarters. DGX performance allows Verdant to use larger training datasets to get better model accuracy in inference.
“We display a model of the tractor and a 3D view of every single carrot and every single weed and the actions we are doing, so it helps customers see what the robot’s seeing and doing,” said Ibarria, noting this can all run on a single AGX Orin module, delivering inference at 29 frames per second in real time.
DeepStream-Powered Apple Vision
Verdant relies on NVIDIA DeepStream as the framework for running its core machine learning to help power its detection and segmentation. It also uses custom CUDA kernels to do a number of tracking and positioning elements of its work.
Verdant’s founder and CEO, Sibley, whose post-doctorate research was in simultaneous localization and mapping has brought this expertise to agriculture. This comes in handy to help present a logical representation of the farm, said Ibarria. “We can see things, and know when and where we’ve seen them,” he said.
This is important for apples, he said. They can be challenging to treat, as apples and branches often overlap, making it difficult to find the best path to spray them. The 3D visualizations made possible by AGX Orin allow a better understanding of the occlusion and the right path for spraying.
“With apples, when you see a blossom, you can’t just spray it when you see it, you need to wait 48 hours,” said Ibarria. “We do that by building a map, relocalizing ourselves saying, ‘That’s the blossom, I saw it two days ago, and so it’s time to spray.’”
NVIDIA TAO for 5x Model Production
Verdant relies on NVIDIA TAO Toolkit for its model building pipeline. The transfer learning capability in TAO Toolkit enables it to take off-the-shelf models and quickly refine them with images taken in the field. For example, this has made it possible to change from detecting carrots to detecting onions, in just a day. Previously, it took roughly five days to build models from scratch that achieved an acceptable accuracy level.
“One of our goals here is to leverage technologies like TAO and transfer learning to very quickly begin to operate in new circumstances,” said Dellaert.
While cutting model building production time by 5x, the company has also been able to hit 95% precision with its vision systems using these methods.
“Transfer learning is a big weapon in our armory,” he said.
MobileOne: An Improved One millisecond Mobile Backbone
Efficient neural network backbones for mobile devices are often optimized for metrics such as FLOPs or parameter count. However, these metrics may not correlate well with latency of the network when deployed on a mobile device. Therefore, we perform extensive analysis of different metrics by deploying several mobile-friendly networks on a mobile device. We identify and analyze architectural and optimization bottlenecks in recent efficient neural networks and provide ways to mitigate these bottlenecks. To this end, we design an efficient backbone MobileOne, with variants achieving an inference…Apple Machine Learning Research

