Dialogue-guided intelligent document processing with foundation models on Amazon SageMaker JumpStart

Dialogue-guided intelligent document processing with foundation models on Amazon SageMaker JumpStart

Intelligent document processing (IDP) is a technology that automates the processing of high volumes of unstructured data, including text, images, and videos. IDP offers a significant improvement over manual methods and legacy optical character recognition (OCR) systems by addressing challenges such as cost, errors, low accuracy, and limited scalability, ultimately leading to better outcomes for organizations and stakeholders.

Natural language processing (NLP) is one of the recent developments in IDP that has improved accuracy and user experience. However, despite these advances, there are still challenges to overcome. For instance, many IDP systems are not user-friendly or intuitive enough for easy adoption by users. Additionally, several existing solutions lack the capability to adapt to changes in data sources, regulations, and user requirements through continuous improvement and updates.

Enhancing IDP through dialogue involves incorporating dialogue capabilities into IDP systems. By enabling users to interact with IDP systems in a more natural and intuitive way, through multi-round dialogue by adjusting inaccurate information or adding missing information aided with task automation, these systems can become more efficient, accurate, and user-friendly.
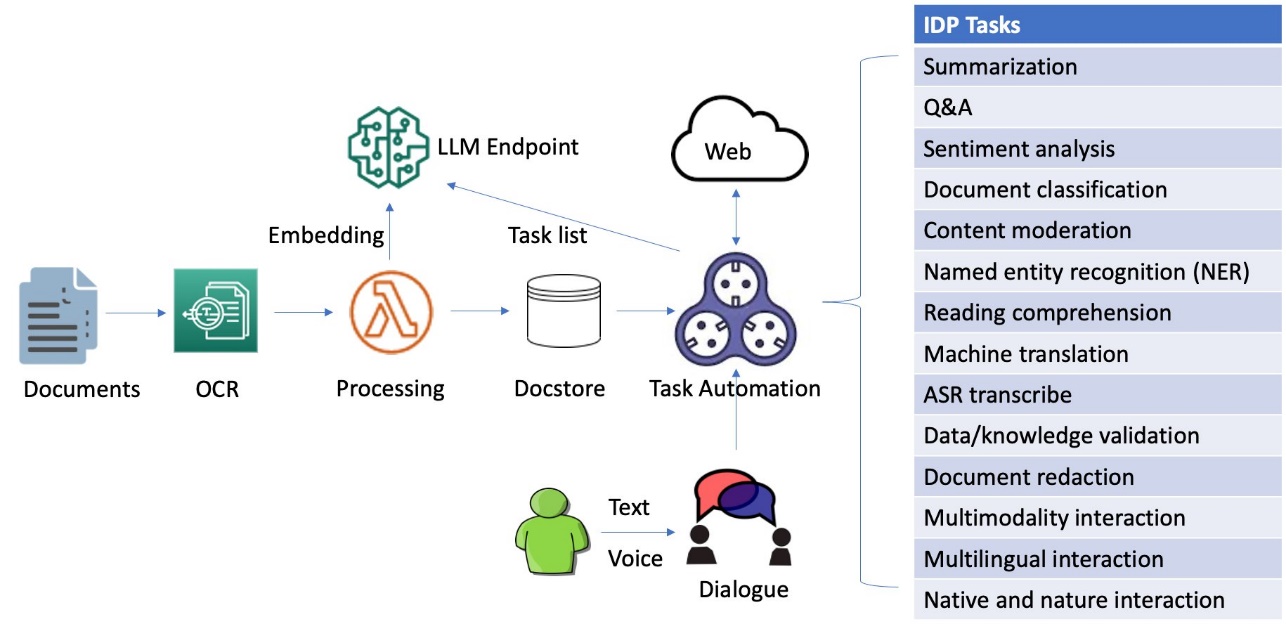
In this post, we explore an innovative approach to IDP that utilizes a dialogue-guided query solution using Amazon Foundation Models and SageMaker JumpStart.

Solution overview

This innovative solution combines OCR for information extraction, a local deployed large language model (LLM) for dialogue and autonomous tasking, VectorDB for embedding subtasks, and LangChain-based task automation for integration with external data sources to transform the way businesses process and analyze document contexts. By harnessing generative AI technologies, organizations can streamline IDP workflows, enhance user experience, and boost overall efficiency.

The following video highlights the dialogue-guided IDP system by processing an article authored by the Federal Reserve Board of Governors, discussing the collapse of Silicon Valley Bank in March 2023.

The system is capable of processing images, large PDF, and documents in other format and answering questions derived from the content via interactive text or voice inputs. If a user needs to inquire beyond the document’s context, the dialogue-guided IDP can create a chain of tasks from the text prompt and then reference external and up-to-date data sources for relevant answers. Additionally, it supports multi-round conversations and accommodates multilingual exchanges, all managed through dialogue.

Deploy your own LLM using Amazon foundation models

One of the most promising developments in generative AI is the integration of LLMs into dialogue systems, opening up new avenues for more intuitive and meaningful exchanges. An LLM is a type of AI model designed to understand and generate human-like text. These models are trained on massive amounts of data and consist of billions of parameters, allowing them to perform various language-related tasks with high accuracy. This transformative approach facilitates a more natural and productive interaction, bridging the gap between human intuition and machine intelligence. A key advantage of local LLM deployment lies in its ability to enhance data security without submitting data outside to third-party APIs. Moreover, you can fine-tune your chosen LLM with domain-specific data, resulting in a more accurate, context-aware, and natural language understanding experience.

The Jurassic-2 series from AI21 Labs, which are based on the instruct-tuned 178-billion-parameter Jurassic-1 LLM, are integral parts of the Amazon foundation models available through Amazon Bedrock. The Jurassic-2 instruct was specifically trained to manage prompts that are instructions only, known as zero-shot, without the need for examples, or few-shot. This method provides the most intuitive interaction with LLMs, and it’s the best approach to understand the ideal output for your task without requiring any examples. You can efficiently deploy the pre-trained J2-jumbo-instruct, or other Jurassic-2 models available on AWS Marketplace, into your own own virtual private cloud (VPC) using Amazon SageMaker. See the following code:

import ai21, sagemaker

# Define endpoint name
endpoint_name = "sagemaker-soln-j2-jumbo-instruct"
# Define real-time inference instance type. You can also choose g5.48xlarge or p4de.24xlarge instance types
# Please request P instance quota increase via <a href="https://console.aws.amazon.com/servicequotas/home" target="_blank" rel="noopener">Service Quotas console</a> or your account manager
real_time_inference_instance_type = ("ml.p4d.24xlarge")

# Create a Sgaemkaer endpoint then deploy a pre-trained J2-jumbo-instruct-v1 model from AWS Market Place.
model_package_arn = "arn:aws:sagemaker:us-east-1:865070037744:model-package/j2-jumbo-instruct-v1-0-20-8b2be365d1883a15b7d78da7217cdeab"
model = ModelPackage(
role=sagemaker.get_execution_role(),
model_package_arn=model_package_arn,
sagemaker_session=sagemaker.Session()
)

# Deploy the model
predictor = model.deploy(1, real_time_inference_instance_type,
endpoint_name=endpoint_name,
model_data_download_timeout=3600,
container_startup_health_check_timeout=600,
)

After the endpoint has been successfully deployed within your own VPC, you can initiate an inference task to verify that the deployed LLM is functioning as anticipated:

response_jumbo_instruct = ai21.Completion.execute(
sm_endpoint=endpoint_name,
prompt="Explain deep learning algorithms to 8th graders",
numResults=1,
maxTokens=100,
temperature=0.01 #subject to reduce “hallucination” by using common words.
)

Document processing, embedding, and indexing

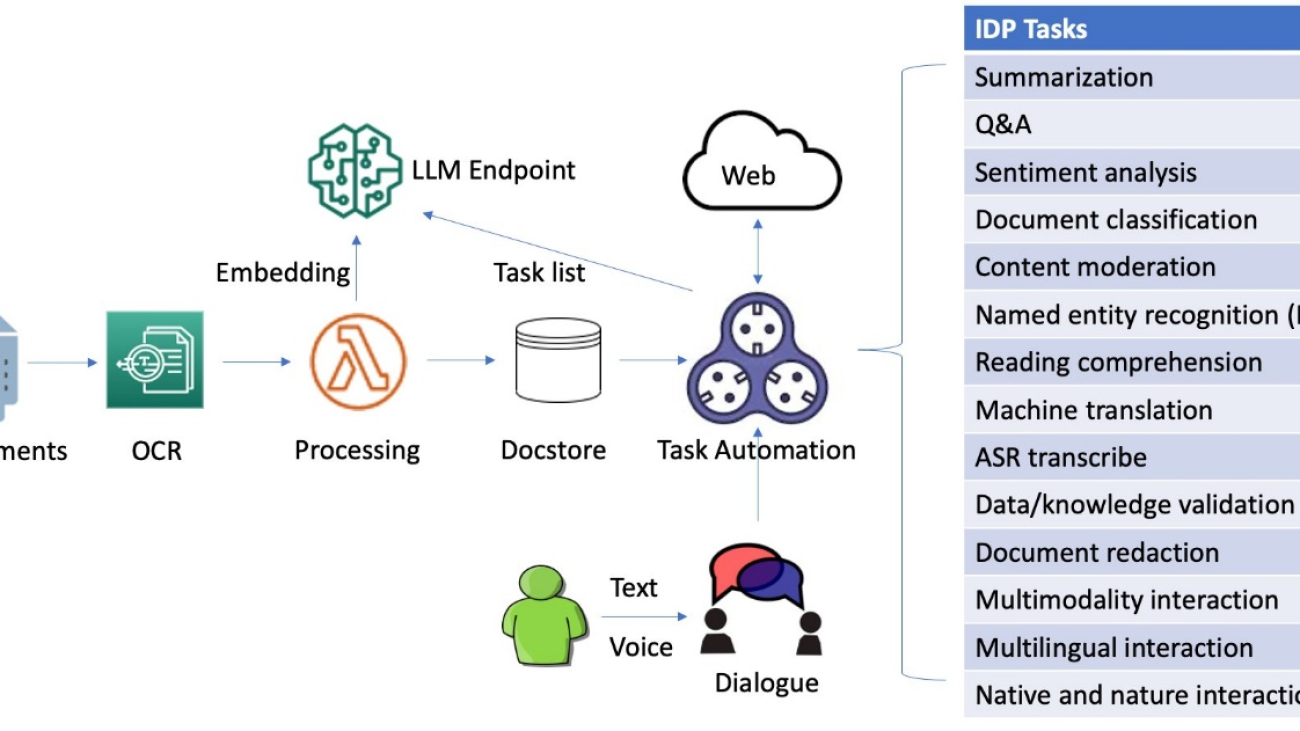
We delve into the process of building an efficient and effective search index, which forms the foundation for intelligent and responsive dialogues to guide document processing. To begin, we convert documents from various formats into text content using OCR and Amazon Textract. We then read this content and fragment it into smaller pieces, ideally around the size of a sentence each. This granular approach allows for more precise and relevant search results, because it enables better matching of queries against individual segments of a page rather than the entire document. To further enhance the process, we use embeddings such as the sentence transformers library from Hugging Face, which generates vector representations (encoding) of each sentence. These vectors serve as a compact and meaningful representation of the original text, enabling efficient and accurate semantic matching functionality. Finally, we store these vectors in a vector database for similarity search. This combination of techniques lays the groundwork for a novel document processing framework that delivers accurate and intuitive results for users. The following diagram illustrates this workflow.
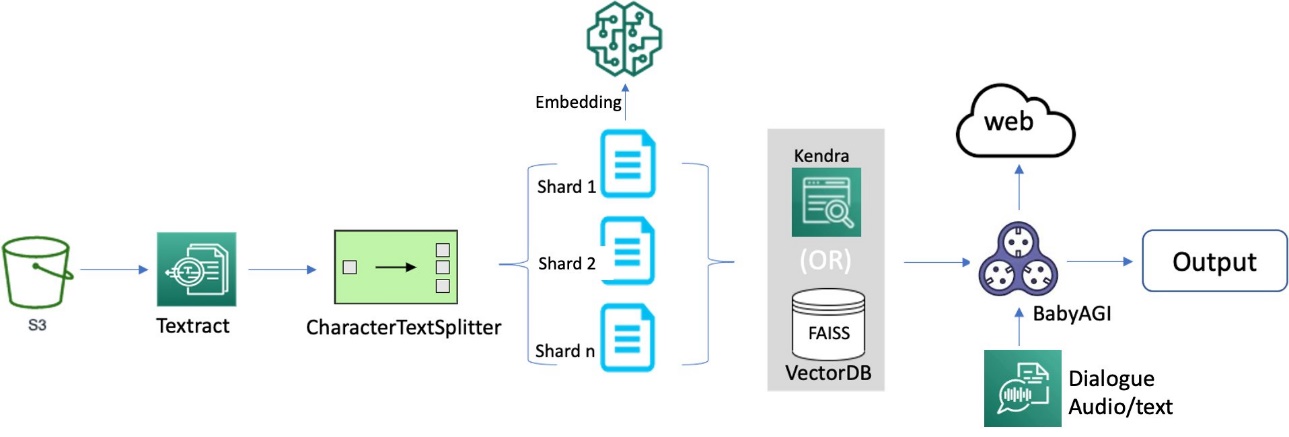
OCR serves as a crucial element in the solution, allowing for the retrieval of text from scanned documents or pictures. We can use Amazon Textract for extracting text from PDF or image files. This managed OCR service is capable of identifying and examining text in multi-page documents, including those in PDF, JPEG or TIFF formats, such as invoices and receipts. The processing of multi-page documents occurs asynchronously, making it advantageous for handling extensive, multi-page documents. See the following code:

def pdf_2_text(input_pdf_file, history):
history = history or []
key = 'input-pdf-files/{}'.format(os.path.basename(input_pdf_file.name))
try:
response = s3_client.upload_file(input_pdf_file.name, default_bucket_name, key)
except ClientError as e:
print("Error uploading file to S3:", e)
s3_object = {'Bucket': default_bucket_name, 'Name': key}
response = textract_client.start_document_analysis(
DocumentLocation={'S3Object': s3_object},
FeatureTypes=['TABLES', 'FORMS']
)
job_id = response['JobId']
while True:
response = textract_client.get_document_analysis(JobId=job_id)
status = response['JobStatus']
if status in ['SUCCEEDED', 'FAILED']:
break
time.sleep(5)

if status == 'SUCCEEDED':
with open(output_file, 'w') as output_file_io:
for block in response['Blocks']:
if block['BlockType'] in ['LINE', 'WORD']:
output_file_io.write(block['Text'] + 'n')
with open(output_file, "r") as file:
first_512_chars = file.read(512).replace("n", "").replace("r", "").replace("[", "").replace("]", "") + " [...]"
history.append(("Document conversion", first_512_chars))
return history, history

When dealing with large documents, it’s crucial to break them down into more manageable pieces for easier processing. In the case of LangChain, this means dividing each document into smaller segments, such as 1,000 tokens per chunk with an overlap of 100 tokens. To achieve this smoothly, LangChain utilizes specialized splitters designed specifically for this purpose:

from langchain.text_splitter import CharacterTextSplitter
from langchain.document_loaders import TextLoader
separator = 'n'
overlap_count = 100. # overlap count between the splits
chunk_size = 1000 # Use a fixed split unit size
loader = TextLoader(output_file)
documents = loader.load()
text_splitter = CharacterTextSplitter(separator=separator, chunk_overlap=overlap_count, chunk_size=chunk_size, length_function=len)
texts = text_splitter.split_documents(documents)

The duration needed for embedding can fluctuate based on the size of the document; for example, it could take roughly 10 minutes to finish. Although this time frame may not be substantial when dealing with a single document, the ramifications become more notable when indexing hundreds of gigabytes as opposed to just hundreds of megabytes. To expedite the embedding process, you can implement sharding, which enables parallelization and consequently enhances efficiency:

from langchain.document_loaders import ReadTheDocsLoader
from langchain.text_splitter import RecursiveCharacterTextSplitter
from sentence_transformers import SentenceTransformer
import numpy as np
import ray
from embeddings import LocalHuggingFaceEmbeddings

# Define number of splits
db_shards = 10

loader = TextLoader(output_file)
text_splitter = RecursiveCharacterTextSplitter(
chunk_size = 1000,
chunk_overlap  = 100,
length_function = len,
)

@ray.remote()
def process_shard(shard):
embeddings = LocalHuggingFaceEmbeddings('multi-qa-mpnet-base-dot-v1')
result = Chroma.from_documents(shard, embeddings)
return result

# Read the doc content and split them into chunks.
chunks = text_splitter.create_documents([doc.page_content for doc in documents], metadatas=[doc.metadata for doc in documents])
# Embed the doc chunks into vectors.
shards = np.array_split(chunks, db_shards)
futures = [process_shard.remote(shards[i]) for i in range(db_shards)]
texts = ray.get(futures)

Now that we have obtained the smaller segments, we can continue to represent them as vectors through embeddings. Embeddings, a technique in NLP, generate vector representations of text prompts. The Embedding class serves as a unified interface for interacting with various embedding providers, such as SageMaker, Cohere, Hugging Face, and OpenAI, which streamlines the process across different platforms. These embeddings are numeric portrayals of ideas transformed into number sequences, allowing computers to effortlessly comprehend the connections between these ideas. See the following code:

# Choose a SageMaker deployed local LLM endpoint for embedding
llm_embeddings = SagemakerEndpointEmbeddings(
endpoint_name=<endpoint_name>,
region_name=<region>,
content_handler=content_handler
)

After creating the embeddings, we need to utilize a vectorstore to store the vectors. Vectorstores like Chroma are specially engineered to construct indexes for quick searches in high-dimensional spaces later on, making them perfectly suited for our objectives. As an alternative, you can use FAISS, an open-source vector clustering solution for storing vectors. See the following code:

from langchain.vectorstores import Chroma
# Store vectors in Chroma vectorDB
docsearch_chroma = Chroma.from_documents(texts, llm_embeddings)
# Alternatively you can choose FAISS vectorstore
from langchain.vectorstores import FAISS
docsearch_faiss = FAISS.from_documents(texts, llm_embeddings)

You can also use Amazon Kendra to index enterprise content and produce precise answers. As a fully managed service, Amazon Kendra offers ready-to-use semantic search features for advanced document and passage ranking. With the high-accuracy search in Amazon Kendra, you can obtain the most pertinent content and documents to optimize the quality of your payload. This results in superior LLM responses compared to traditional or keyword-focused search methods. For more information, refer to Quickly build high-accuracy Generative AI applications on enterprise data using Amazon Kendra, LangChain, and large language models.

Interactive multilingual voice input

Incorporating interactive voice input into document search offers a myriad of advantages that enhance the user experience. By enabling users to verbally articulate search terms, document search becomes more natural and intuitive, making it simpler and quicker for users to find the information they need. Voice input can bolster the precision of search results, because spoken search terms are less susceptible to spelling or grammatical errors. Interactive voice input renders document search more inclusive, catering to a broader spectrum of users with different language speakers and culture background.

The Amazon Transcribe Streaming SDK enables you to perform audio-to-speech recognition by integrating directly with Amazon Transcribe simply with a stream of audio bytes and a basic handler. As an alternative, you can deploy the whisper-large model locally from Hugging Face using SageMaker, which offers improved data security and better performance. For details, refer to the sample notebook published on the GitHub repo.

# Choose ASR using a locally deployed Whisper-large model from Hugging Face
image = sagemaker.image_uris.retrieve(
framework='pytorch',
region=region,
image_scope='inference',
version='1.12',
instance_type='ml.g4dn.xlarge',
)

model_name = f'sagemaker-soln-whisper-model-{int(time.time())}'
whisper_model_sm = sagemaker.model.Model(
model_data=model_uri,
image_uri=image,
role=sagemaker.get_execution_role(),
entry_point="inference.py",
source_dir='src',
name=model_name,
)

# Audio transcribe
transcribe = whisper_endpoint.predict(audio.numpy())

The above demonstration video shows how voice commands, in conjunction with text input, can facilitate the task of document summarization through interactive conversation.

Guiding NLP tasks through multi-round conversations

Memory in language models maintains a concept of state throughout a user’s interactions. This involves processing a sequence of chat messages to extract and transform knowledge. Memory types vary, but each can be understood using standalone functions and within a chain. Memory can return multiple data points, such as recent messages or message summaries, in the form of strings or lists. This post focuses on the simplest memory form, buffer memory, which stores all prior messages, and demonstrates its usage with modular utility functions and chains.

The LangChain’s ChatMessageHistory class is a crucial utility for memory modules, providing convenient methods to save and retrieve human and AI messages by remembering all previous chat interactions. It’s ideal for managing memory externally from a chain. The following code is an example of applying a simple concept in a chain by introducing ConversationBufferMemory, a wrapper for ChatMessageHistory. This wrapper extracts messages into a variable, allowing them to be represented as a string:

from langchain.memory import ConversationBufferMemory
memory = ConversationBufferMemory(return_messages=True)

LangChain works with many popular LLM providers such as AI21 Labs, OpenAI, Cohere, Hugging Face, and more. For this example, we use a locally deployed AI21 Labs’ Jurassic-2 LLM wrapper using SageMaker. AI21 Studio also provides API access to Jurassic-2 LLMs.

from langchain import PromptTemplate, SagemakerEndpoint
from langchain.llms.sagemaker_endpoint import ContentHandlerBase
from langchain.chains.question_answering import load_qa_chain

prompt= PromptTemplate(
template=prompt_template, input_variables=["context", "question"]
)

class ContentHandler(ContentHandlerBase):
content_type = "application/json"
accepts = "application/json"
def transform_input(self, prompt: str, model_kwargs: Dict) -- bytes:
input_str = json.dumps({prompt: prompt, **model_kwargs})
return input_str.encode('utf-8')

def transform_output(self, output: bytes) -- str:
response_json = json.loads(output.read().decode("utf-8"))
return response_json[0]["generated_text"]
content_handler = ContentHandler()
llm_ai21=SagemakerEndpoint(
endpoint_name=endpoint_name,
credentials_profile_name=f'aws-credentials-profile-name',
region_name="us-east-1",
model_kwargs={"temperature":0},
content_handler=content_handler)

qa_chain = VectorDBQA.from_chain_type(
llm=llm_ai21,
chain_type='stuff',
vectorstore=docsearch,
verbose=True,
memory=ConversationBufferMemory(return_messages=True)
)

response = qa_chain(
{'query': query_input},
return_only_outputs=True
)

In the event that the process is unable to locate an appropriate response from the original documents in response to a user’s inquiry, the integration of a third-party URL or ideally a task-driven autonomous agent with external data sources significantly enhances the system’s ability to access a vast array of information, ultimately improving context and providing more accurate and current results.

With AI21’s preconfigured Summarize run method, a query can access a predetermined URL, condense its content, and then carry out question and answer tasks based on the summarized information:

# Call AI21 API to query the context of a specific URL for Q&A
ai21.api_key = "<YOUR_API_KEY>"
url_external_source = "<your_source_url>"
response_url = ai21.Summarize.execute(
source=url_external_source,
sourceType="URL" )
context = "<concate_document_and_response_url>"
question = "<query>"
response = ai21.Answer.execute(
context=context,
question=question,
sm_endpoint=endpoint_name,
maxTokens=100,
)

For additional details and code examples, refer to the LangChain LLM integration document as well as the task-specific API documents provided by AI21.

Task automation using BabyAGI

The task automation mechanism allows the system to process complex queries and generate relevant responses, which greatly improves the validity and authenticity of document processing. LangCain’s BabyAGI is a powerful AI-powered task management system that can autonomously create, prioritize, and run tasks. One of the key features is its ability to interface with external sources of information, such as the web, databases, and APIs. One way to use this feature is to integrate BabyAGI with Serpapi, a search engine API that provides access to search engines. This integration allows BabyAGI to search the web for information related to tasks, allowing BabyAGI to access a wealth of information beyond the input documents.

BabyAGI’s autonomous tasking capacity is fueled by an LLM, a vector search database, an API wrapper to external links, and the LangChain framework, allowing it to run a broad spectrum of tasks across various domains. This enables the system to proactively carry out tasks based on user interactions, streamlining the document processing pipeline that incorporates external sources and creating a more efficient, smooth experience. The following diagram illustrates the task automation process.
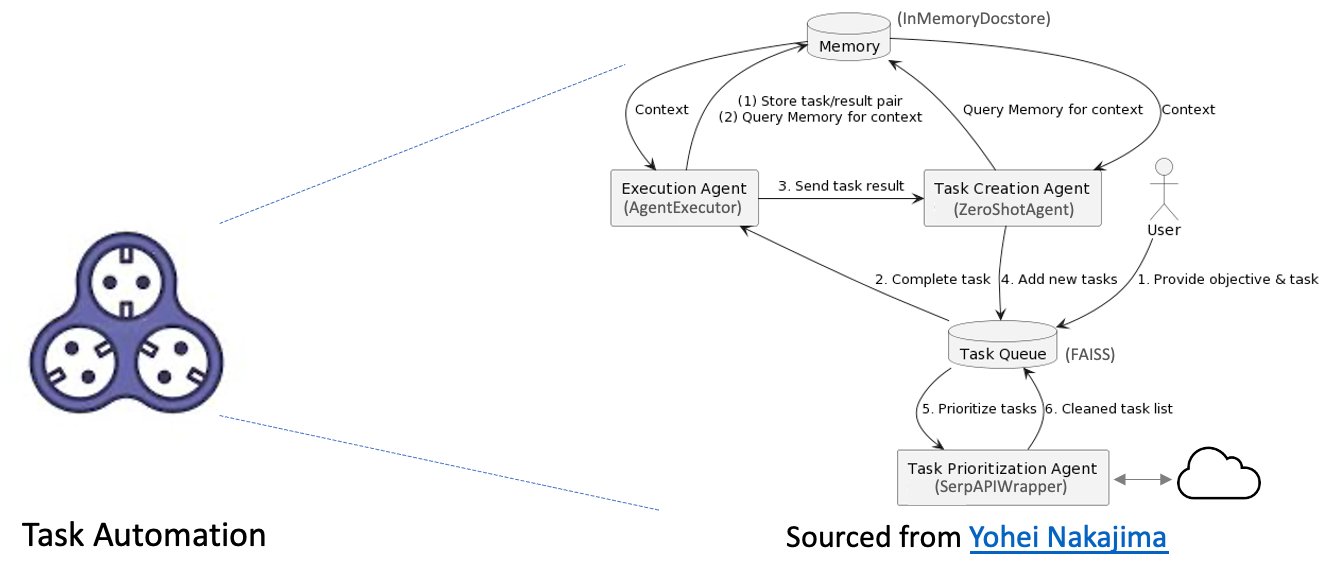
This process includes the following components:

  • Memory – The memory stores all the information that BabyAGI needs to complete its tasks. This includes the task itself, as well as any intermediate results or data that BabyAGI has generated.
  • Execution agent – The execution agent is responsible for carrying out the tasks that are stored in the memory. It does this by accessing the memory, retrieving the relevant information, and then taking the necessary steps to complete the task.
  • Task creation agent – The task creation agent is responsible for generating new tasks for BabyAGI to complete. It does this by analyzing the current state of the memory and identifying any gaps in knowledge or understanding. When a gap has been identified, the task creation agent generates a new task that will help BabyAGI fill that gap.
  • Task queue – The task queue is a list of all of the tasks that BabyAGI has been assigned. The tasks are added to the queue in the order in which they were received.
  • Task prioritization agent – The task prioritization agent is responsible for determining the order in which BabyAGI should complete its tasks. It does this by analyzing the tasks in the queue and identifying the ones that are most important or urgent. The tasks that are most important are placed at the front of the queue, and the tasks that are least important are placed at the back of the queue.

See the following code:

from babyagi import BabyAGI
from langchain.docstore import InMemoryDocstore
import faiss
# Set temperatur=0 to generate the most frequent words, instead of more “poetically free” behavior.
new_query = """
What happened to the First Republic Bank? Will the FED take the same action as it did on SVB's failure?
"""
# Enable verbose logging and use a fixed embedding size.
verbose = True
embedding_size = 1536

# Using FAISS vector cluster for vectore store
index = faiss.IndexFlatL2(embedding_size)
vectorstore = FAISS(llm_embeddings.embed_query, index, InMemoryDocstore({}), {})

# Choose 1 iteration for demo and 1>N>10 for real. If None, it will loop indefinitely
max_iterations: Optional[int] = 2

# Call bayagi class for task automation
baby_agi = BabyAGI.from_llm(
llm=llm_embedding, vectorstore=vectorstore, verbose=verbose, max_iterations=max_iterations<br />)

response = baby_agi({"objective": new_query})

Let’s examine the tasks gathered and their outcomes from a single iteration, used for demonstration purposes, to accomplish the objective in response to the user’s inquiry. BabyAGI operates through a continuous cycle of the following steps:

  1. A task creation agent formulates a new task.
  2. The new task is incorporated into the task queue.
  3. The task prioritization agent establishes the sequence in which tasks should be tackled.
  4. The run agent accomplishes the task.
  5. The task outcome is saved in the memory.
  6. The cycle repeats.

This iterative process enables BabyAGI to learn and develop over time. As it successfully completes an increasing number of tasks, BabyAGI’s knowledge and comprehension of the world expand. Consequently, it can generate and efficiently run more intricate and advanced tasks. By augmenting the iteration count, you can enhance the outcome through the reorganization of the task list, which focuses on the goal and the outcome of preceding tasks, ultimately yielding more pertinent and precise responses.

See the following example output:

*****TASK LIST*****
1: Make a todo list
*****NEXT TASK*****
1: Make a todo list
> Entering new AgentExecutor chain...
Thought: I need to research the First Republic Bank and the FED's action
Action: Search
Action Input: What happened to the First Republic Bank? Will the FED take the same 
action as it did on SVB's failure?
Observation: First Republic's failure was due to a run on deposits following the 
collapse of Silicon Valley Bank and Signature Bank. JPMorgan Chase acquired
First Republic Bank on May 1, 2023. If you had insured or uninsured money in First Republic accounts, your funds are safe and now managed by JPMorgan Chase.
Thought: I need to research the FED's action on SVB's failure
Action: Search
Action Input: What action did the FED take on SVB's failure?
Observation: The Hutchins Center explains how the Federal Reserve has responded to the 
March 2023 failures of Silicon Valley Bank and Signature Bank.
Thought: I now know the final answer
Final Answer: The FED responded to the March 2023 failures of Silicon Valley Bank and <br />Signature Bank by providing liquidity to the banking system. JPMorgan 
Chase acquired First Republic Bank on May 1, 2023, and if you had insured 
or uninsured money in First Republic accounts, your funds are safe and 
now managed by JPMorgan Chase.
> Finished chain.
*****TASK RESULT*****
The Federal Reserve responded to the March 2023 failures of Silicon Valley Bank and Signature Bank by providing liquidity to the banking system. It is unclear what action the FED will take in response to the failure of First Republic Bank.

***TASK LIST***

2: Research the timeline of First Republic Bank's failure.
3: Analyze the Federal Reserve's response to the failure of Silicon Valley Bank and Signature Bank.
4: Compare the Federal Reserve's response to the failure of Silicon Valley Bank and Signature Bank to the Federal Reserve's response to the failure of First Republic Bank.
5: Investigate the potential implications of the Federal Reserve's response to the failure of First Republic Bank.
6: Identify any potential risks associated with the Federal Reserve's response to the failure of First Republic Bank.<br />*****NEXT TASK*****

2: Research the timeline of First Republic Bank's failure.

> Entering new AgentExecutor chain...
Will the FED take the same action as it did on SVB's failure?
Thought: I should search for information about the timeline of First Republic Bank's failure and the FED's action on SVB's failure.
Action: Search
Action Input: Timeline of First Republic Bank's failure and FED's action on SVB's failure
Observation: March 20: The FDIC decides to break up SVB and hold two separate auctions for its traditional deposits unit and its private bank after failing ...
Thought: I should look for more information about the FED's action on SVB's failure.
Action: Search
Action Input: FED's action on SVB's failure
Observation: The Fed blamed failures on mismanagement and supervisory missteps, compounded by a dose of social media frenzy.
Thought: I now know the final answer.
Final Answer: The FED is likely to take similar action on First Republic Bank's failure as it did on SVB's failure, which was to break up the bank and hold two separate auctions for its traditional deposits unit and its private bank.</p><p>&gt; Finished chain.

*****TASK RESULT*****
The FED responded to the March 2023 failures of ilicon Valley Bank and Signature Bank 
by providing liquidity to the banking system. JPMorgan Chase acquired First Republic 
Bank on May 1, 2023, and if you had insured or uninsured money in First Republic 
accounts, your funds are safe and now managed by JPMorgan Chase.*****TASK ENDING*****

With BabyAGI for task automation, the dialogue-guided IDP system showcased its effectiveness by going beyond the original document’s context to address the user’s query about the Federal Reserve’s potential actions concerning the First Republic Bank’s failure, which occurred in late April 2023, 1 month after the sample publication, in comparison to SVB’s failure. To achieve this, the system generated a to-do list and completed tasks sequentially. It investigated the circumstances surrounding the First Republic Bank’s failure, pinpointed potential risks tied to the Federal Reserve’s response, and compared it to the response to SVB’s failure.

Although BabyAGI remains a work in progress, it carries the promise of revolutionizing machine interactions, inventive thinking, and problem resolution. As BabyAGI’s learning and enhancement persist, it will be capable of producing more precise, insightful, and inventive responses. By empowering machines to learn and evolve autonomously, BabyAGI could facilitate their assistance in a broad spectrum of tasks, ranging from mundane chores to intricate problem-solving.

Constraints and limitations

Dialogue-guided IDP offers a promising approach to enhancing the efficiency and effectiveness of document analysis and extraction. However, we must acknowledge its current constraints and limitations, such as the need for data bias avoidance, hallucination mitigation, the challenge of handling complex and ambiguous language, and difficulties in understanding context or maintaining coherence in longer conversations.

Additionally, it’s important to consider confabulations and hallucinations in AI-generated responses, which may lead to the creation of inaccurate or fabricated information. To address these challenges, ongoing developments are focusing on refining LLMs with better natural language understanding capabilities, incorporating domain-specific knowledge and developing more robust context-aware models. Building an LLM from scratch can be costly and time-consuming; however, you can employ several strategies to improve existing models:

  • Fine-tuning a pre-trained LLM on specific domains for more accurate and relevant outputs
  • Integrating external data sources known to be safe during inference for enhanced contextual understanding
  • Designing better prompts to elicit more precise responses from the model
  • Using ensemble models to combine outputs from multiple LLMs, averaging out errors and minimizing hallucination chances
  • Building guardrails to prevent models from veering off into undesired areas while ensuring apps respond with accurate and appropriate information
  • Conducting supervised fine-tuning with human feedback, iteratively refining the model for increased accuracy and reduced hallucination.

By adopting these approaches, AI-generated responses can be made more reliable and valuable.

The task-driven autonomous agent offers significant potential across various applications, but it is vital to consider key risks before adopting the technology. These risks include:

  • Data privacy and security breaches due to reliance on the selected LLM provider and vectorDB
  • Ethical concerns arising from biased or harmful content generation
  • Dependence on model accuracy, which may lead to ineffective task completion or undesired results
  • System overload and scalability issues if task generation outpaces completion, requiring proper task sequencing and parallel management
  • Misinterpretation of task prioritization based on the LLM’s understanding of task importance
  • The authenticity of the data it received from the web

Addressing these risks is crucial for responsible and successful application, allowing us to maximize the benefits of AI-powered language models while minimizing potential risks.

Conclusions

The dialogue-guided solution for IDP presents a groundbreaking approach to document processing by integrating OCR, automatic speech recognition, LLMs, task automation, and external data sources. This comprehensive solution enables businesses to streamline their document processing workflows, making them more efficient and intuitive. By incorporating these cutting-edge technologies, organizations can not only revolutionize their document management processes, but also bolster decision-making capabilities and considerably boost overall productivity. The solution offers a transformative and innovative means for businesses to unlock the full potential of their document workflows, ultimately driving growth and success in the era of generative AI. Refer to SageMaker Jumpstart for other solutions and Amazon Bedrock for additional generative AI models.

The authors would like to sincerely express their appreciation to Ryan Kilpatrick, Ashish Lal, and Kristine Pearce for their valuable inputs and contributions to this work. They also acknowledge Clay Elmore for the code sample provided on Github.


About the authors

Alfred Shen is a Senior AI/ML Specialist at AWS. He has been working in Silicon Valley, holding technical and managerial positions in diverse sectors including healthcare, finance, and high-tech. He is a dedicated applied AI/ML researcher, concentrating on CV, NLP, and multimodality. His work has been showcased in publications such as EMNLP, ICLR, and Public Health.

Dr. Vivek Madan is an Applied Scientist with the Amazon SageMaker JumpStart team. He got his PhD from University of Illinois at Urbana-Champaign and was a Post Doctoral Researcher at Georgia Tech. He is an active researcher in machine learning and algorithm design and has published papers in EMNLP, ICLR, COLT, FOCS, and SODA conferences.

Dr. Li Zhang is a Principal Product Manager-Technical for Amazon SageMaker JumpStart and Amazon SageMaker built-in algorithms, a service that helps data scientists and machine learning practitioners get started with training and deploying their models, and uses reinforcement learning with Amazon SageMaker. His past work as a principal research staff member and master inventor at IBM Research has won the test of time paper award at IEEE INFOCOM.

Dr. Changsha Ma is an AI/ML Specialist at AWS. She is a technologist with a PhD in Computer Science, a master’s degree in Education Psychology, and years of experience in data science and independent consulting in AI/ML. She is passionate about researching methodological approaches for machine and human intelligence. Outside of work, she loves hiking, cooking, hunting food, mentoring college students for entrepreneurship, and spending time with friends and families.

Read More

Automate document validation and fraud detection in the mortgage underwriting process using AWS AI services: Part 1

Automate document validation and fraud detection in the mortgage underwriting process using AWS AI services: Part 1

In this three-part series, we present a solution that demonstrates how you can automate detecting document tampering and fraud at scale using AWS AI and machine learning (ML) services for a mortgage underwriting use case.

This solution rides on a more significant global wave of increasing mortgage fraud, which is worsening as more people present fraudulent proofs to qualify for loans. Data suggests high-risk and suspected fraudulent mortgage activity is on the rise, noting a 52% increase in suspected fraudulent mortgage applications since 2013. (Source: Equifax)

Part 1 of this series discusses the most common challenges associated with the manual lending process. We provide concrete guidance on addressing this issue with AWS AI and ML services to detect document tampering, identify and categorize patterns for fraudulent scenarios, and integrate with business-defined rules while minimizing human expertise for fraud detection.

In Part 2, we demonstrate how to train and host a computer vision model for tampering detection and localization on Amazon SageMaker. In Part 3, we show how to automate detecting fraud in mortgage documents with an ML model and business-defined rules using Amazon Fraud Detector.

Challenges associated with the manual lending process

Organizations in the lending and mortgage industry receive thousands of applications, ranging from new mortgage applications to refinancing an existing mortgage. These documents are increasingly susceptible to document fraud as fraudsters attempt to exploit the system and qualify for mortgages in several illegal ways. To be eligible for a mortgage, the applicant must provide the lender with documents verifying their employment, assets, and debts. Changing borrowing rules and interest rates can drastically alter an applicant’s credit affordability. Fraudsters range from blundering novices to near-perfect masters when creating fraudulent loan application documents. Fraudulent paperwork includes but is not limited to altering or falsifying paystubs, inflating information about income, misrepresenting job status, and forging letters of employment and other key mortgage underwriting documents. These fraud attempts can be challenging for mortgage lenders to capture.

The significant challenges associated with the manual lending process include but not limited to:

  • The necessity for a borrower to visit the branch
  • Operational overhead
  • Data entry errors
  • Automation and time to resolution

Finally, the underwriting process, or the analysis of creditworthiness and the loan decision, takes additional time if done manually. Again, the manual consumer lending process has some advantages, such as approving a loan that requires human judgment. The solution will provide automation and risk mitigation in mortgage underwriting which will help reduce time and cost as compared to the manual process.

Solution overview

Document validation is a critical type of input for mortgage fraud decisions. Understanding the risk profile of the supporting mortgage documents and driving insights from this data can significantly improve risk decisions and is central to any underwriter’s fraud management strategy.

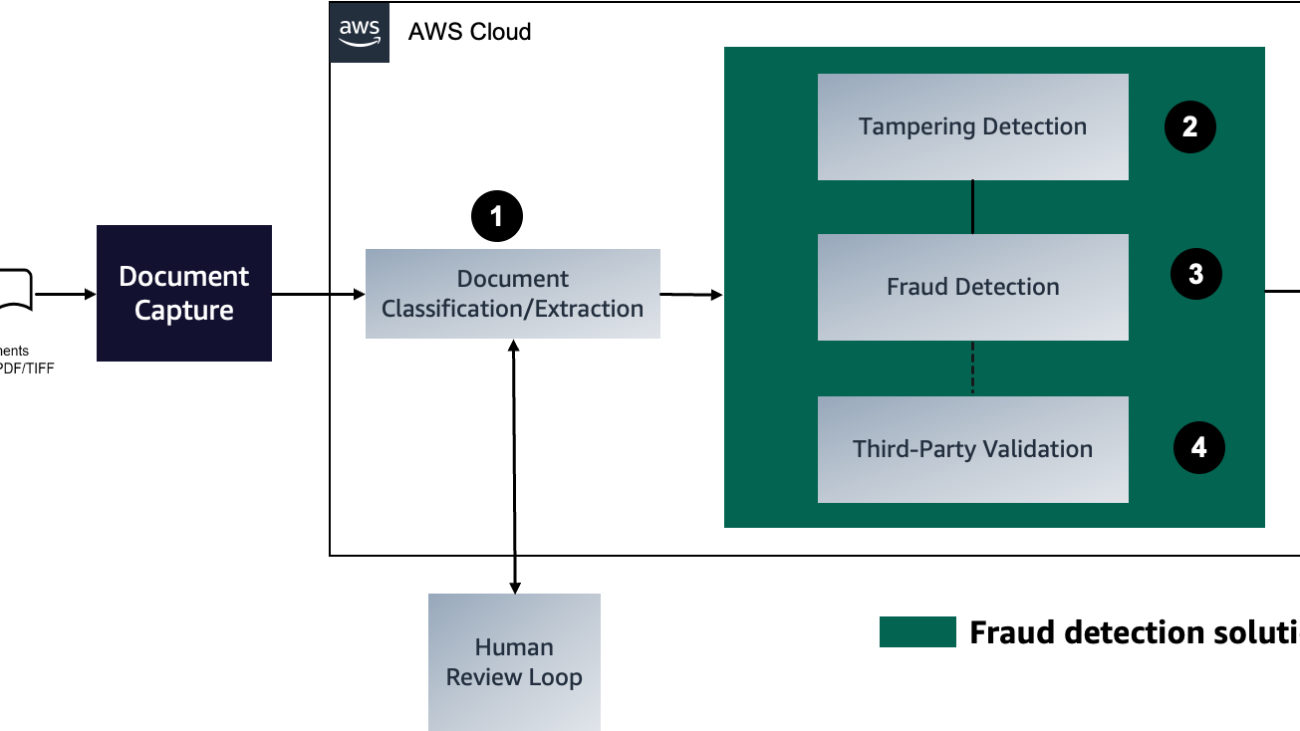
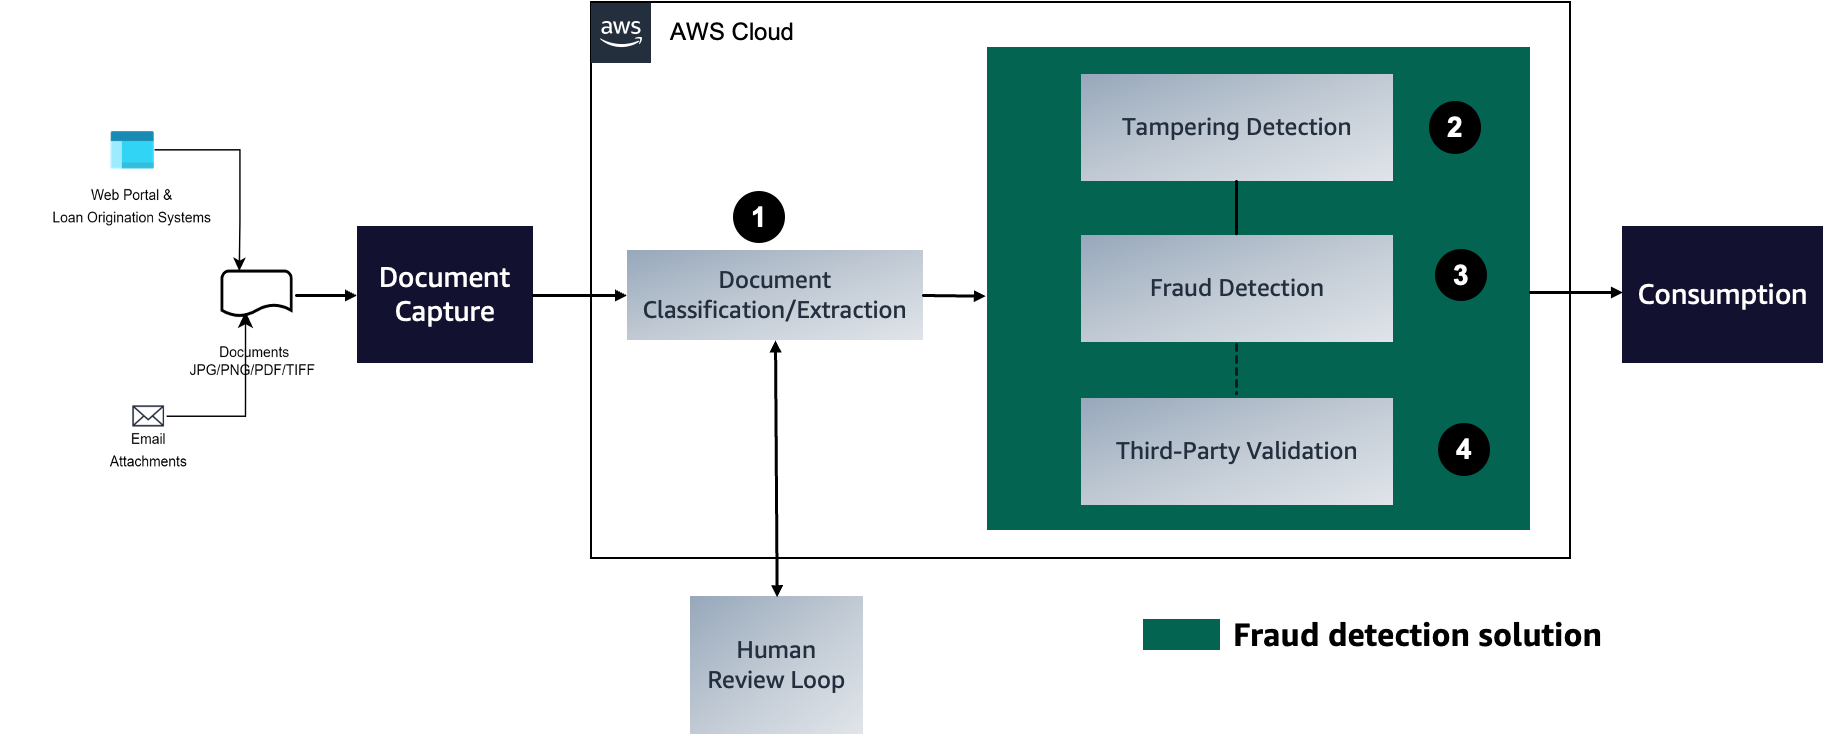
The following diagram represents each stage in a mortgage document fraud detection pipeline. We walk through each of these stages and how they aid towards underwriting accuracy (initiated with capturing documents to classify and extract required content), detecting tampered documents, and finally using an ML model to detect potential fraud classified according to business-driven rules.

Conceptual Architecture

In the following sections, we discuss the stages of the process in detail.

Document classification

With intelligent document processing (IDP), we can automatically process financial documents using AWS AI services such as Amazon Textract and Amazon Comprehend.

Additionally, we can use the Amazon Textract Analyze Lending API in processing mortgage documents. Analyze Lending uses pre-trained ML models to automatically extract, classify, and validate information in mortgage-related documents with high speed and accuracy while reducing human error. As depicted in the following figure, Analyze Lending receives a loan document and then splits it into pages, classifying them according to the type of document. The document pages are then automatically routed to Amazon Textract text processing operations for accurate data extraction and analysis.

Amazon Textract Analyze Lending API

The Analyze Lending API offers the following benefits:

  • Automated end-to-end processing of mortgage packages
  • Pre-trained ML models across a variety of document types in a mortgage application package
  • Ability to scale on demand and reduce reliance on human reviewers
  • Improved decision-making and significantly lower operating costs

Tampering detection

We use a computer vision model deployed on SageMaker for our end-to-end image forgery detection and localization solution, which means it takes a testing image as input and predicts pixel-level forgery likelihood as output.

Most research studies focus on four image forgery techniques: splicing, copy-move, removal, and enhancement. Both splicing and copy-move involve adding image content to the target (forged) image. However, the added content is obtained from a different image in splicing. In copy-move, it’s from the target image. Removal, or inpainting, removes a selected image region (for example, hiding an object) and fills the space with new pixel values estimated from the background. Finally, image enhancement is a vast collection of local manipulations, such as sharpening, brightness, and adjustment.

Depending on the characteristics of the forgery, different clues can be used as the foundation for detection and localization. These clues include JPEG compression artifacts, edge inconsistencies, noise patterns, color consistency, visual similarity, EXIF consistency, and camera model. However, real-life forgeries are more complex and often use a sequence of manipulations to hide the forgery. Most existing methods focus on image-level detection, whether or not an image is forged, and not on localizing or highlighting a forged area of the document image to aid the underwriter in making informed decisions.

We walk through the implementation details of training and hosting a computer vision model for tampering detection and localization on SageMaker in Part 2 of this series. The conceptual CNN-based architecture of the model is depicted in the following diagram. The model extracts image manipulation trace features for a testing image and identifies anomalous regions by assessing how different a local feature is from its reference features. It detects forged pixels by identifying local anomalous features as a predicted mask of the testing image.

Computer vision tampering detection

Fraud detection

We use Amazon Fraud Detector, a fully managed AI service, to automate the generation, evaluation, and detection of fraudulent activities. This is achieved by generating fraud predictions based on data extracted from the mortgage documents against ML fraud models trained with the customer’s historical (fraud) data. You can use the prediction to trigger business rules in relation to underwriting decisions.

Amazon Fraud Detector Process

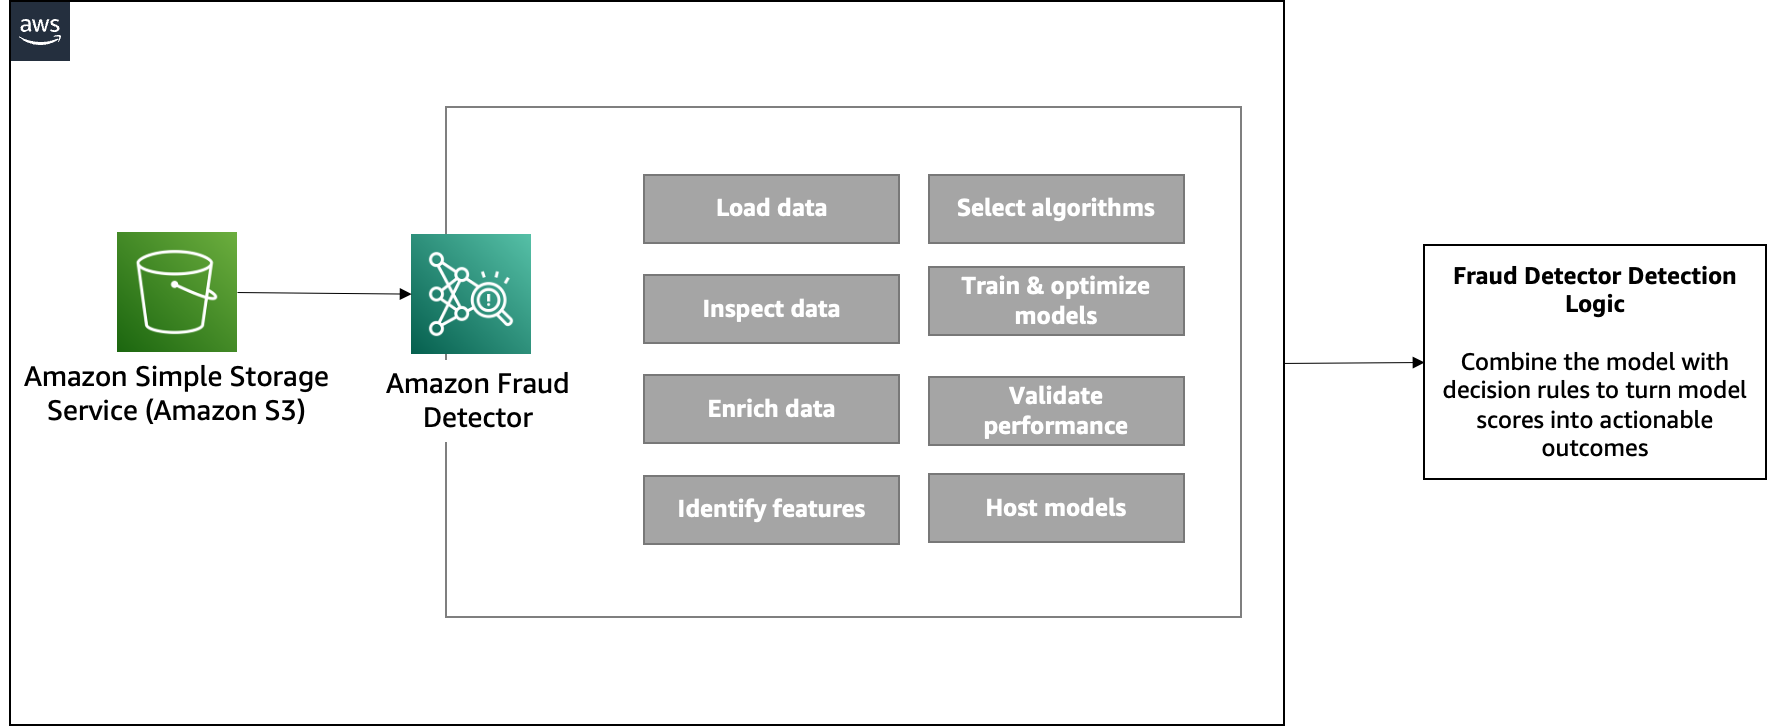
Defining the fraud prediction logic involves the following components:

  • Event types – Define the structure of the event
  • Models – Define the algorithm and data requirements for predicting fraud
  • Variables – Represent a data element associated with the fraud detection event
  • Rules – Tell Amazon Fraud Detector how to interpret the variable values during fraud prediction
  • Outcomes – The results generated from a fraud prediction
  • Detector version – Contains fraud prediction logic for the fraud detection event

The following diagram illustrates the architecture of this component.

Amazon Fraud Detector Detailed Process

After you deploy your model, you may evaluate its performance scores and metrics based on the prediction explanations. This helps identify top risk indicators and analyze fraud patterns across the data.

Third-party validation

We integrate the solution with third-party providers (via API) to validate the extracted information from the documents, such as personal and employment information. This is particularly useful to cross-validate details in addition to document tampering detection and fraud detection based on the historical pattern of applications.

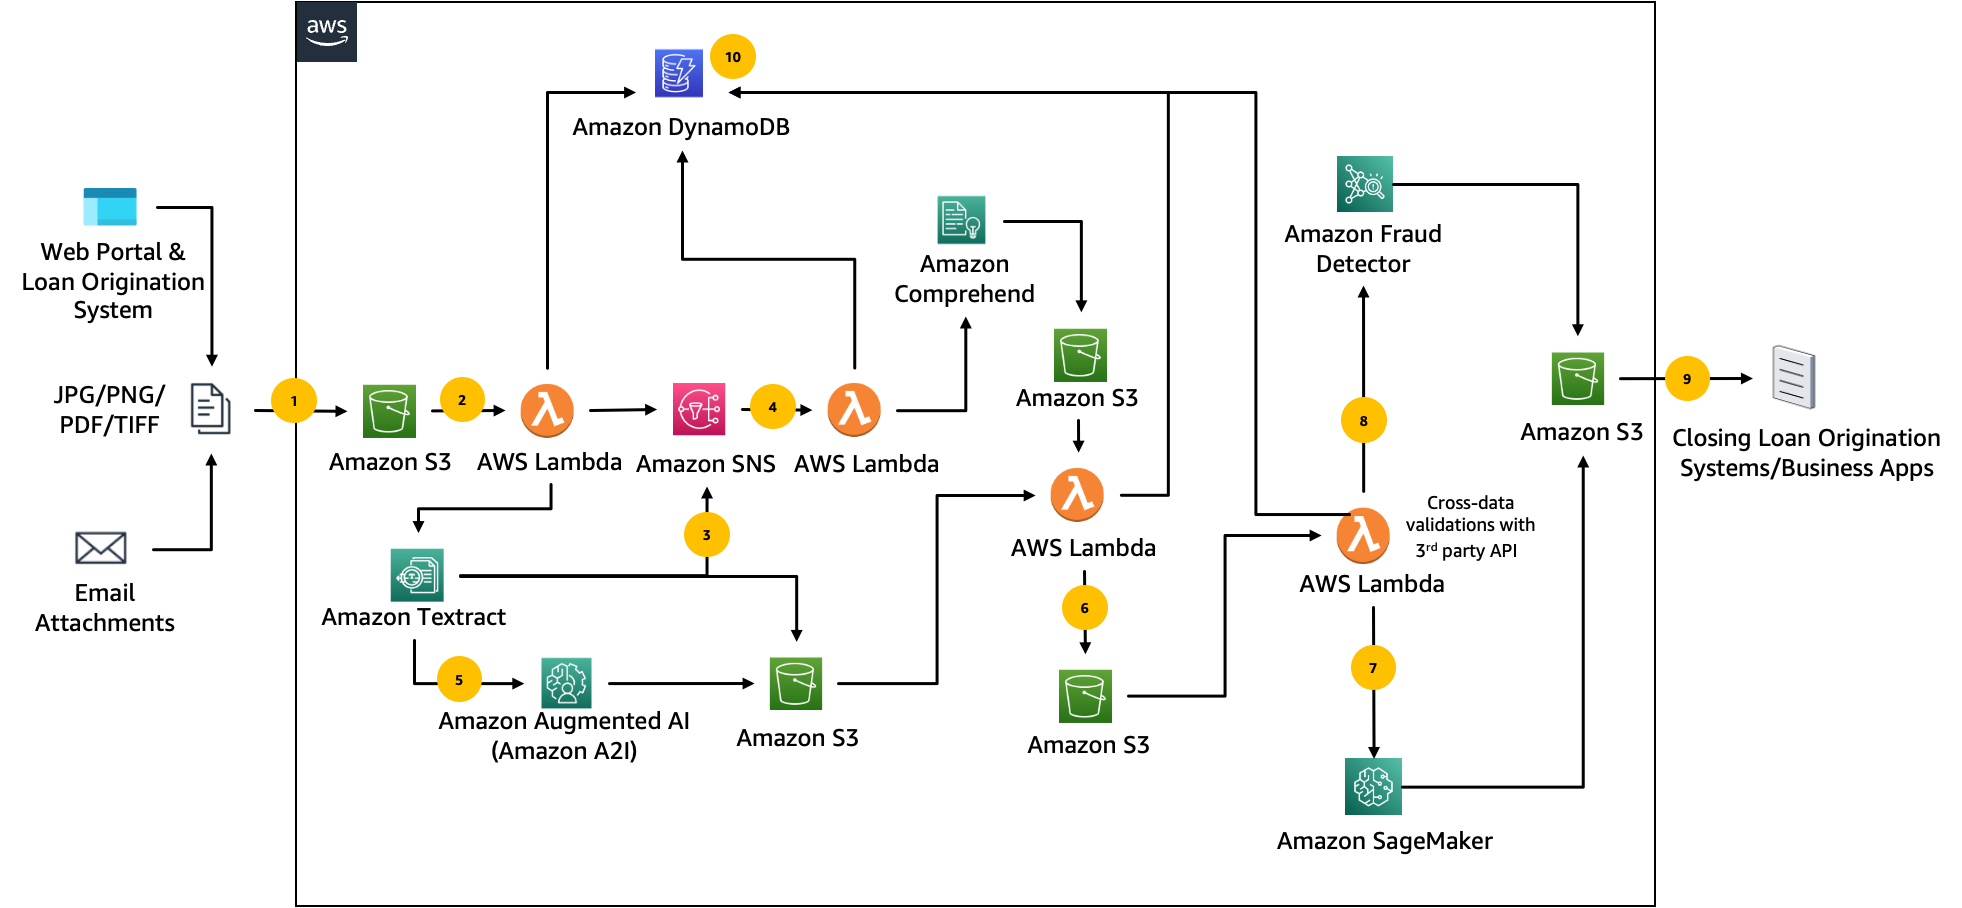
The following architecture diagram illustrates a batch-oriented fraud detection pipeline in mortgage application processing using various AWS services.

Fraud Detection End to End Architecture

The workflow includes the following steps:

  1. The user uploads the scanned documents into Amazon Simple Storage Service (Amazon S3).
  2. The upload triggers an AWS Lambda function (Invoke Document Analysis) that calls the Amazon Textract API for text extraction. Additionally, we can use the Amazon Textract Analyze Lending API to automatically extract, classify, and validate information.
  3. On completion of text extraction, a notification is sent via Amazon Simple Notification Service (Amazon SNS).
  4. The notification triggers a Lambda function (Get Document Analysis), which invokes Amazon Comprehend for custom document classification.
  5. Document analysis results that have a low confidence score to are routed to human reviewers using Amazon Augmented AI (Amazon A2I).
  6. Output from Amazon Textract and Amazon Comprehend is aggregated using a Lambda function (Analyze & Classify Document).
  7. A SageMaker inference endpoint is called for a fraud prediction mask of the input documents.
  8. Amazon Fraud Detector is called for a fraud prediction score using the data extracted from the mortgage documents.
  9. The results from Amazon Fraud Detector and the SageMaker inference endpoint are aggregated into the loan origination application.
  10. The status of the document processing job is tracked in Amazon DynamoDB.

Conclusion

This post walked through an automated solution to detect document tampering and fraud in the mortgage underwriting process using Amazon Fraud Detector and other Amazon AI and ML services. This solution allows you to detect fraudulent attempts closer to the time of fraud occurrence and helps underwriters with an effective decision-making process. The flexibility of the implementation allows you to define business-driven rules to classify and capture the fraudulent attempts customized to specific business needs.

In Part 2 of this series, we provide the implementation details for detecting document tampering using SageMaker. In Part 3, we demonstrate how to implement the solution on Amazon Fraud Detector.


About the authors


Anup Ravindranath
is a Senior Solutions Architect at Amazon Web Services (AWS) based in Toronto, Canada working with Financial Services organizations. He helps customers to transform their businesses and innovate on cloud.

Vinnie Saini is a Senior Solutions Architect at Amazon Web Services (AWS) based in Toronto, Canada. She has been helping Financial Services customers transform on cloud, with AI and ML driven solutions laid on strong foundational pillars of Architectural Excellence.

Read More

Perform batch transforms with Amazon SageMaker Jumpstart Text2Text Generation large language models

Perform batch transforms with Amazon SageMaker Jumpstart Text2Text Generation large language models

Today we are excited to announce that you can now perform batch transforms with Amazon SageMaker JumpStart large language models (LLMs) for Text2Text Generation. Batch transforms are useful in situations where the responses don’t need to be real time and therefore you can do inference in batch for large datasets in bulk. For batch transform, a batch job is run that takes batch input as a dataset and a pre-trained model, and outputs predictions for each data point in the dataset. Batch transform is cost-effective because unlike real-time hosted endpoints that have persistent hardware, batch transform clusters are torn down when the job is complete and therefore the hardware is only used for the duration of the batch job.

In some use cases, real-time inference requests can be grouped in small batches for batch processing to create real-time or near-real-time responses. For example, if you need to process a continuous stream of data with low latency and high throughput, invoking a real-time endpoint for each request separately would require more resources and can take longer to process all the requests because the processing is being done serially. A better approach would be to group some of the requests and call the real-time endpoint in batch inference mode, which processes your requests in one forward pass of the model and returns the bulk response for the request in real time or near-real time. The latency of the response will depend upon how many requests you group together and instance memory size, therefore you can tune the batch size per your business requirements for latency and throughput. We call this real-time batch inference because it combines the concept of batching while still providing real-time responses. With real-time batch inference, you can achieve a balance between low latency and high throughput, enabling you to process large volumes of data in a timely and efficient manner.

Jumpstart batch transform for Text2Text Generation models allows you to pass the batch hyperparameters through environment variables that further increase throughput and minimize latency.

JumpStart provides pretrained, open-source models for a wide range of problem types to help you get started with machine learning (ML). You can incrementally train and tune these models before deployment. JumpStart also provides solution templates that set up infrastructure for common use cases, and executable example notebooks for ML with Amazon SageMaker. You can access the pre-trained models, solution templates, and examples through the JumpStart landing page in Amazon SageMaker Studio. You can also access JumpStart models using the SageMaker Python SDK.

In this post, we demonstrate how to use the state-of-the-art pre-trained text2text FLAN T5 models from Hugging Face for batch transform and real-time batch inference.

Solution overview

The notebook showing batch transform of pre-trained Text2Text FLAN T5 models from Hugging Face in available in the following GitHub repository. This notebook uses data from the Hugging Face cnn_dailymail dataset for a text summarization task using the SageMaker SDK.

The following are the key steps for implementing batch transform and real-time batch inference:

  1. Set up prerequisites.
  2. Select a pre-trained model.
  3. Retrieve artifacts for the model.
  4. Specify batch transform job hyperparameters.
  5. Prepare data for the batch transform.
  6. Run the batch transform job.
  7. Evaluate the summarization using a ROUGE (Recall-Oriented Understudy for Gisting Evaluation) score.
  8. Perform real-time batch inference.

Set up prerequisites

Before you run the notebook, you must complete some initial setup steps. Let’s set up the SageMaker execution role so it has permissions to run AWS services on your behalf:

sagemaker_session = Session()
aws_role = sagemaker_session.get_caller_identity_arn()
aws_region = boto3.Session().region_name
sess = sagemaker.Session()

Select a pre-trained model

We use the huggingface-text2text-flan-t5-large model as a default model. Optionally, you can retrieve the list of available Text2Text models on JumpStart and choose your preferred model. This method provides a straightforward way to select different model IDs using same notebook. For demonstration purposes, we use the huggingface-text2text-flan-t5-large model:

model_id, model_version, = (
"huggingface-text2text-flan-t5-large",
"*",
)

Retrieve artifacts for the model

With SageMaker, we can perform inference on the pre-trained model, even without fine-tuning it first on a new dataset. We start by retrieving the deploy_image_uri, deploy_source_uri, and model_uri for the pre-trained model:

inference_instance_type = "ml.p3.2xlarge"

# Retrieve the inference docker container uri. This is the base HuggingFace container image for the default model above.
deploy_image_uri = image_uris.retrieve(
region=None,
framework=None, # automatically inferred from model_id
image_scope="inference",
model_id=model_id,
model_version=model_version,
instance_type=inference_instance_type,
)

# Retrieve the model uri.
model_uri = model_uris.retrieve(
model_id=model_id, model_version=model_version, model_scope="inference"
)

#Create the SageMaker model instance
model = Model(
image_uri=deploy_image_uri,
model_data=model_uri,
role=aws_role,
predictor_cls=Predictor)

Specify batch transform job hyperparameters

You may pass any subset of hyperparameters as environment variables to the batch transform job. You can also pass these hyperparameters in a JSON payload. However, if you’re setting environment variables for hyperparameters like the following code shows, then the advanced hyperparameters from the individual examples in the JSON lines payload will not be used. If you want to use hyperparameters from the payload, you may want to set the hyper_params_dict parameter as null instead.

#Specify the Batch Job Hyper Params Here, If you want to treate each example hyperparameters different please pass hyper_params_dict as None
hyper_params = {"batch_size":4, "max_length":50, "top_k": 50, "top_p": 0.95, "do_sample": True}
hyper_params_dict = {"HYPER_PARAMS":str(hyper_params)}

Prepare data for batch transform

Now we’re ready to load the cnn_dailymail dataset from Hugging Face:

cnn_test = load_dataset('cnn_dailymail','3.0.0',split='test')

We go over each data entry and create the input data in the required format. We create an articles.jsonl file as a test data file containing articles that need to be summarized as input payload. As we create this file, we append the prompt "Briefly summarize this text:" to each test input row. If you want to have different hyperparameters for each test input, you can append those hyperparameters as part of creating the dataset.

We create highlights.jsonl as the ground truth file containing highlights of each article stored in the test file articles.jsonl. We store both test files in an Amazon Simple Storage Service (Amazon S3) bucket. See the following code:

#You can specify a prompt here
prompt = "Briefly summarize this text: "
#Provide the test data and the ground truth file name
test_data_file_name = "articles.jsonl"
test_reference_file_name = 'highlights.jsonl'

test_articles = []
test_highlights =[]

# We will go over each data entry and create the data in the input required format as described above
for id, test_entry in enumerate(cnn_test):
    article = test_entry['article']
    highlights = test_entry['highlights']
    # Create a payload like this if you want to have different hyperparameters for each test input
    # payload = {"id": id,"text_inputs": f"{prompt}{article}", "max_length": 100, "temperature": 0.95}
    # Note that if you specify hyperparameter for each payload individually, you may want to ensure that hyper_params_dict is set to None instead
    payload = {"id": id,"text_inputs": f"{prompt}{article}"}
    test_articles.append(payload)
    test_highlights.append({"id":id, "highlights": highlights})

with open(test_data_file_name, "w") as outfile:
    for entry in test_articles:
        outfile.write("%sn" % json.dumps(entry))

with open(test_reference_file_name, "w") as outfile:
    for entry in test_highlights:
        outfile.write("%sn" % json.dumps(entry))

# Uploading the data        
s3 = boto3.client("s3")
s3.upload_file(test_data_file_name, output_bucket, os.path.join(output_prefix + "/batch_input/articles.jsonl"))

Run the batch transform job

When you start a batch transform job, SageMaker launches the necessary compute resources to process the data, including CPU or GPU instances depending on the selected instance type. During the batch transform job, SageMaker automatically provisions and manages the compute resources required to process the data, including instances, storage, and networking resources. When the batch transform job is complete, the compute resources are automatically cleaned up by SageMaker. This means that the instances and storage used during the job are stopped and removed, freeing up resources and minimizing cost. See the following code:

# Creating the Batch transformer object
batch_transformer = model.transformer(
    instance_count=1,
    instance_type=inference_instance_type,
    output_path=s3_output_data_path,
    assemble_with="Line",
    accept="text/csv",
    max_payload=1,
    env = hyper_params_dict
)

# Making the predications on the input data
batch_transformer.transform(s3_input_data_path, content_type="application/jsonlines", split_type="Line")

batch_transformer.wait()

The following is one example record from the articles.jsonl test file. Note that record in this file has an ID that matched with predict.jsonl file records that shows a summarized record as output from the Hugging Face Text2Text model. Similarly, the ground truth file also has a matching ID for the data record. The matching ID across the test file, ground truth file, and output file allows linking input records with output records for easy interpretation of the results.

The following is the example input record provided for summarization:

{"id": 0, "text_inputs": "Briefly summarize this text: (CNN)The Palestinian Authority officially became the 123rd member of the International Criminal Court on Wednesday, a step that gives the court jurisdiction over alleged crimes in Palestinian territories. The formal accession was marked with a ceremony at The Hague, in the Netherlands, where the court is based. The Palestinians signed the ICC's founding Rome Statute in January, when they also accepted its jurisdiction over alleged crimes committed "in the occupied Palestinian territory, including East Jerusalem, since June 13, 2014." Later that month, the ICC opened a preliminary examination into the situation in Palestinian territories, paving the way for possible war crimes investigations against Israelis. As members of the court, Palestinians may be subject to counter-charges as well. Israel and the United States, neither of which is an ICC member, opposed the Palestinians' efforts to join the body. But Palestinian Foreign Minister Riad al-Malki, speaking at Wednesday's ceremony, said it was a move toward greater justice. "As Palestine formally becomes a State Party to the Rome Statute today, the world is also a step closer to ending a long era of impunity and injustice," he said, according to an ICC news release. "Indeed, today brings us closer to our shared goals of justice and peace." Judge Kuniko Ozaki, a vice president of the ICC, said acceding to the treaty was just the first step for the Palestinians. "As the Rome Statute today enters into force for the State of Palestine, Palestine acquires all the rights as well as responsibilities that come with being a State Party to the Statute. These are substantive commitments, which cannot be taken lightly," she said. Rights group Human Rights Watch welcomed the development. "Governments seeking to penalize Palestine for joining the ICC should immediately end their pressure, and countries that support universal acceptance of the court's treaty should speak out to welcome its membership," said Balkees Jarrah, international justice counsel for the group. "What's objectionable is the attempts to undermine international justice, not Palestine's decision to join a treaty to which over 100 countries around the world are members." In January, when the preliminary ICC examination was opened, Israeli Prime Minister Benjamin Netanyahu described it as an outrage, saying the court was overstepping its boundaries. The United States also said it "strongly" disagreed with the court's decision. "As we have said repeatedly, we do not believe that Palestine is a state and therefore we do not believe that it is eligible to join the ICC," the State Department said in a statement. It urged the warring sides to resolve their differences through direct negotiations. "We will continue to oppose actions against Israel at the ICC as counterproductive to the cause of peace," it said. But the ICC begs to differ with the definition of a state for its purposes and refers to the territories as "Palestine." While a preliminary examination is not a formal investigation, it allows the court to review evidence and determine whether to investigate suspects on both sides. Prosecutor Fatou Bensouda said her office would "conduct its analysis in full independence and impartiality." The war between Israel and Hamas militants in Gaza last summer left more than 2,000 people dead. The inquiry will include alleged war crimes committed since June. The International Criminal Court was set up in 2002 to prosecute genocide, crimes against humanity and war crimes. CNN's Vasco Cotovio, Kareem Khadder and Faith Karimi contributed to this report."}

The following is the predicted output with summarization:

{'id': 0, 'generated_texts': ['The Palestinian Authority officially became a member of the International Criminal Court on Wednesday, a step that gives the court jurisdiction over alleged crimes in Palestinian territories.']}

The following is the ground truth summarization for model evaluation purposes:

{"id": 0, "highlights": "Membership gives the ICC jurisdiction over alleged crimes committed in Palestinian territories since last June .nIsrael and the United States opposed the move, which could open the door to war crimes investigations against Israelis ."}

Next, we use the ground truth and predicted outputs for model evaluation.

Evaluate the model using a ROUGE score

ROUGE, or Recall-Oriented Understudy for Gisting Evaluation, is a set of metrics and a software package used for evaluating automatic summarization and machine translation in natural language processing. The metrics compare an automatically produced summary or translation against a reference (human-produced) summary or translation or a set of references.

In the following code, we combine the predicted and original summaries by joining them on the common key id and use this to compute the ROUGE score:

# Downloading the predictions
s3.download_file(
output_bucket, output_prefix + "/batch_output/" + "articles.jsonl.out", "predict.jsonl"
)

with open('predict.jsonl', 'r') as json_file:
json_list = list(json_file)

# Creating the prediction list for the dataframe
predict_dict_list = []
for predict in json_list:
if len(predict) > 1:
predict_dict = ast.literal_eval(predict)
predict_dict_req = {"id": predict_dict["id"], "prediction": predict_dict["generated_texts"][0]}
predict_dict_list.append(predict_dict_req)

# Creating the predictions dataframe
predict_df = pd.DataFrame(predict_dict_list)

test_highlights_df = pd.DataFrame(test_highlights)

# Combining the predict dataframe with the original summarization on id to compute the rouge score
df_merge = test_highlights_df.merge(predict_df, on="id", how="left")

rouge = evaluate.load('rouge')
results = rouge.compute(predictions=list(df_merge["prediction"]),references=list(df_merge["highlights"]))
print(results)
{'rouge1': 0.32749078992945646, 'rouge2': 0.126038645005132, 'rougeL': 0.22764277967933363, 'rougeLsum': 0.28162915746368966}

Perform real-time batch inference

Next, we show you how to run real-time batch inference on the endpoint by providing the inputs as a list. We use the same model ID and dataset as earlier, except we take a few records from the test dataset and use them to invoke a real-time endpoint.

The following code shows how to create and deploy a real-time endpoint for real-time batch inference:

from sagemaker.utils import name_from_base
endpoint_name = name_from_base(f"jumpstart-example-{model_id}")
# deploy the Model. Note that we need to pass Predictor class when we deploy model through Model class,
# for being able to run inference through the sagemaker API.
model_predictor = model.deploy(
    initial_instance_count=1,
    instance_type=inference_instance_type,
    predictor_cls=Predictor,
    endpoint_name=endpoint_name
)

Next, we prepare our input payload. For this, we use the data that we prepared earlier and extract the first 10 test inputs and append the text inputs with hyperparameters that we want to use. We provide this payload to the real-time invoke_endpoint. The response payload is then returned as a list of responses. See the following code:

#Provide all the text inputs to the model as a list
text_inputs = [entry["text_inputs"] for entry in test_articles[0:10]]

# The information about the different Parameters is provided above
payload = {
"text_inputs": text_inputs,
"max_length": 50,
"num_return_sequences": 1,
"top_k": 50,
"top_p": 0.95,
"do_sample": True,
"batch_size": 4
}


def query_endpoint_with_json_payload(encoded_json, endpoint_name):
client = boto3.client("runtime.sagemaker")
response = client.invoke_endpoint(
EndpointName=endpoint_name, ContentType="application/json", Body=encoded_json
)
return response


query_response = query_endpoint_with_json_payload(
json.dumps(payload).encode("utf-8"), endpoint_name=endpoint_name
)


def parse_response_multiple_texts(query_response):
model_predictions = json.loads(query_response["Body"].read())
return model_predictions

generated_text_list = parse_response_multiple_texts(query_response)
print(*generated_text_list, sep='n')

Clean up

After you have tested the endpoint, make sure you delete the SageMaker inference endpoint and delete the model to avoid incurring charges.

Conclusion

In this notebook, we performed a batch transform to showcase the Hugging Face Text2Text Generator model for summarization tasks. Batch transform is advantageous in obtaining inferences from large datasets without requiring a persistent endpoint. We linked input records with inferences to aid in result interpretation. We used the ROUGE score to compare the test data summarization with the model-generated summarization.

Additionally, we demonstrated real-time batch inference, where you can send a small batch of data to a real-time endpoint to achieve a balance between latency and throughput for scenarios like streaming input data. Real-time batch inference helps increase throughput for real-time requests.

Try out the batch transform with Text2Text Generation models in SageMaker today and let us know your feedback!


About the authors

Hemant Singh is a Machine Learning Engineer with experience in Amazon SageMaker JumpStart and Amazon SageMaker built-in algorithms. He got his masters from Courant Institute of Mathematical Sciences and B.Tech from IIT Delhi. He has experience in working on a diverse range of machine learning problems within the domain of natural language processing, computer vision, and time series analysis.

Rachna Chadha is a Principal Solutions Architect AI/ML in Strategic Accounts at AWS. Rachna is an optimist who believes that the ethical and responsible use of AI can improve society in future and bring economic and social prosperity. In her spare time, Rachna likes spending time with her family, hiking, and listening to music.

Dr. Ashish Khetan is a Senior Applied Scientist with Amazon SageMaker built-in algorithms and helps develop machine learning algorithms. He got his PhD from University of Illinois Urbana-Champaign. He is an active researcher in machine learning and statistical inference, and has published many papers in NeurIPS, ICML, ICLR, JMLR, ACL, and EMNLP conferences.

Read More

Research Focus: Week of May 22, 2023

Research Focus: Week of May 22, 2023

Microsoft Research
Research Focus 16 | Week of May 22nd, 2023

Welcome to Research Focus, a series of blog posts that highlights notable publications, events, code/datasets, new hires and other milestones from across the research community at Microsoft.

NEW RESEARCH

Causal Reasoning and Large Language Models: Opening a New Frontier for Causality

Emre Kıcıman, Robert Ness, Amit Sharma, Chenhao Tan

Recent advances in scaling large language models (LLMs) have led to breakthroughs in AI capabilities, including writing code in programming languages, generating stories, poems, essays, and other texts, and strong performance in certain reasoning tasks. LLMs can even create plausible explanations for their outputs, and update their conclusions given new evidence.

At the same time, LLMs can make absurd claims and basic errors of logic, mathematics, and complex reasoning, which raises questions about their applicability in societally impactful domains such as medicine, science, law, and policy.

In a new paper: Causal Reasoning and Large Language Models: Opening a New Frontier for Causality, researchers from Microsoft examine the causal capabilities of LLMs. They find that LLMs, on average, can outperform state-of-the-art causal algorithms in graph discovery and counterfactual inference, and can systematize nebulous concepts like necessity and sufficiency of cause by operating solely on natural language input. They show that by capturing commonsense and domain knowledge about causal mechanisms, LLMs open new frontiers for advancing the research, practice, and adoption of causality. The researchers envision pairing LLMs alongside existing causal methods to reduce the required manual effort that has been a major impediment to widespread adoption of causal analysis. 

Spotlight: Microsoft Research Podcast

AI Frontiers: The Physics of AI with Sébastien Bubeck

What is intelligence? How does it emerge and how do we measure it? Ashley Llorens and machine learning theorist Sébastian Bubeck discuss accelerating progress in large-scale AI and early experiments with GPT-4.

NEW RESEARCH

DNA storage in thermoresponsive microcapsules for repeated random multiplexed data access

As the world generates more and more data, data storage capacity has not kept pace. Traditional long-term storage media such as hard disks or magnetic tape have limited durability and storage density. But DNA has an intrinsic capacity for information storage, durability, and high information density.

In DNA data storage, a large amount of data is stored together, and it is important to perform random access – selective retrieval of individual data files. This is achieved using polymerase chain reaction (PCR), a molecular process that can exponentially amplify a target file. However, this process can damage the data and cause errors. PCR amplification of multiple files simultaneously creates serious undesired DNA crosstalk. Currently one can only read one file at a time, but not a subset of files in a larger set.

In a recent paper: DNA storage in thermoresponsive microcapsules for repeated random multiplexed data access, researchers from Microsoft and external colleagues report on their work to develop a microcapsule-based PCR random access. By encapsulating individual files in each capsule, DNA files were physically separated, reducing undesired crosstalk. This enabled the simultaneous reading of all 25 files in the pool, without significant errors. The use of microcapsules also allowed DNA files to be recovered after random access, addressing the destructive reads problem and potentially making DNA data storage more economical.


MICROSOFT RESEARCH TALK

Human-centered AI with Ben Shneiderman, Distinguished University Professor—University of Maryland Department of Computer Science

A new synthesis is emerging that integrates AI technologies with human-computer interaction (HCI) to produce human-centered AI (HCAI). Advocates of HCAI seek to amplify, augment, and enhance human abilities, so as to empower people, build their self-efficacy, support creativity, recognize responsibility, and promote social connections. Researchers, developers, business leaders, policy makers, and others are expanding the technology-centered scope of AI to include HCAI ways of thinking.

In this recent Microsoft Research Talk: Human-Centered AI: Ensuring Human Control While Increasing Automation Ben Shneiderman discusses his HCAI framework, design metaphors, and governance structures and other ideas drawn from his award-winning new book Human-Centered AI. The talk by Shneiderman, a Distinguished University Professor in the University of Maryland Department of Computer Science, is hosted by Mary Czerwinski, Partner Researcher and Research Manager with Microsoft Research.


OPPORTUNITIES

AI and the New Future of Work – call for proposals

The Microsoft New Future of Work Initiative is now accepting proposals to fund academic projects that help maximize the impact of LLMs and related AI systems on how work gets done. This call for proposals targets work that specifically supports the use of LLMs in productivity scenarios. The program plans to distribute five $50,000 USD unrestricted awards to support creative research that redefines what work might mean in various contexts. 

For example: how can we ensure these new technologies truly accelerate productivity rather than having effects on the margins; how can LLMs achieve these gains by augmenting human labor; what is the future of a ‘document’ in a world where natural language can be so easily remixed and repurposed.  

Proposals will be accepted through June 5, 2023.

The post Research Focus: Week of May 22, 2023 appeared first on Microsoft Research.

Read More

Livestreaming Bliss: Wander Warwick’s World This Week ‘In the NVIDIA Studio’

Livestreaming Bliss: Wander Warwick’s World This Week ‘In the NVIDIA Studio’

Editor’s note: This post is part of our weekly In the NVIDIA Studio series, which celebrates featured artists, offers creative tips and tricks, and demonstrates how NVIDIA Studio technology improves creative workflows. We’re also deep diving on new GeForce RTX 40 Series GPU features, technologies and resources, and how they dramatically accelerate content creation.

The GeForce RTX 4060 Ti 8GB GPU — part of the GeForce RTX 4060 family announced last week — is now available, starting at $399, from top add-in card providers including ASUS, Colorful, Galax, GIGABYTE, INNO3D, MSI, Palit, PNY and ZOTAC, as well as from system integrators and builders worldwide.

GeForce RTX 4060 Ti 8GB is available now from a range of providers.

GeForce RTX 40 Series GPUs come backed by NVIDIA Studio technologies, including hardware acceleration for 3D, video and AI workflows; optimizations for RTX hardware in over 110 of the most popular creative apps; and exclusive Studio apps like Omniverse, Broadcast and Canvas.

Plus, enhancements for NVIDIA Studio-powered creator apps keep coming in. MAGIX VEGAS Pro software for video editing is receiving a major AI overhaul that will boost performance for all GeForce RTX users.

And prepare to be inspired by U.K.-based livestreamer Warwick, equal parts insightful and inspirational, as they share their AI-based workflow powered by a GeForce RTX GPU and the NVIDIA Broadcast app, this week In the NVIDIA Studio.

At the Microsoft Build conference today NVIDIA unveiled new tools for developers that will make it easier and faster to train and deploy advanced AI on Windows 11 PCs with RTX GPUs.

In addition, the Studio team wants to see how creators #SetTheScene, whether for an uncharted virtual world or a small interior diorama of a room.

Enter the #SetTheScene Studio community challenge. Post original environment art on Facebook, Twitter or Instagram, and use the hashtag #SetTheScene for a chance to be featured on the @NVIDIAStudio or @NVIDIAOmniverse social channels.

VEGAS Pro Gets an AI Assist Powered by RTX

NVIDIA Studio collaborated with MAGIX VEGAS Pro to accelerate AI model performance on Windows PCs with extraordinary results.

VEGAS Pro 20 update 3, released this month, increases the speed of AI effects — such as style transfer, AI upscaling and colorization — with NVIDIA RTX GPUs.

Shorter times are better. Tested on GeForce RTX 4090 GPU, Intel Core i9-12900K with UHD 770.

Style transfer, for example, uses AI to instantly bring to pieces the style of famous artists such as Picasso or van Gogh with a staggering 219% performance increase over the previous version.

Warwick’s World

As this week’s featured In the NVIDIA Studio artist would say, “Welcome to the channnnnnnel!” Warwick is a U.K.-based content streamer who enjoys coffee, Daft Punk, tabletop role-playing games and cats. Alongside their immense talent and wildly entertaining persona lies an extraordinary superpower: empathy.


Warwick, like the rest of the world, had to find new ways to connect with people during the pandemic. They decided to pursue streaming as a way to build a community. Their vision was to create a channel that provides laughter and joy, escapism during stressful times and a safe haven for love and expression.

“It’s okay not to be okay,” stressed Warwick. “I’ve lived a lot of my life being told I couldn’t feel a certain way, show emotion or let things get me down. I was told that those were weaknesses that I needed to fight, when in reality they’re our truest strengths: being true to ourselves, feeling and being honest with our emotions.”

Warwick finds inspiration in making a positive contribution to other people’s lives. The thousands of subs speak for themselves.


But there are always ways to improve the quality of streams — plus, working and streaming full time can be challenging, as “it can be tough to get all your ideas to completion,” Warwick said.

For maximum efficiency, Warwick deploys their GeForce RTX 3080 GPU, taking advantage of the seventh-generation NVIDIA encoder (NVENC) to independently encode video, which frees up the graphics card to focus on livestreaming.

“NVIDIA is highly regarded in content-creation circles. Using OBS, Adobe Photoshop and Premiere Pro is made better by GeForce GPUs!” — Warwick

“I honestly can’t get enough of it!” said the streamer. “Being able to stream with OBS Studio software using NVENC lets me play the games I want at the quality I want, with other programs running to offer quality content to my community.”

Warwick has also experimented with the NVIDIA Broadcast app, which magically transforms dorms, home offices and more into home studios. They said the Eye Contact effect had “near-magical” results.

“Whenever I need to do ad reads, I find it incredible how well Eye Contact works, considering it’s in beta!” said Warwick. “I love the other Broadcast features that are offered for content creators and beyond.”

Warwick will be a panelist on an event hosted by Top Tier Queer (TTQ), an initiative that celebrates queer advocates in the creator space.

Sponsored by NVIDIA Studio and organized by In the NVIDIA Studio artist WATCHOLLIE, the TTQ event in June will serve as an avenue for queer visibility and advocacy, as well as an opportunity to award one participant with prizes, including a GeForce RTX 3090 GPU, to help amplify their voice even further. Apply for the TTQ initiative now.

Streaming is deeply personal for Warwick. “In my streams and everything I create, I aim to inspire others to know their feelings are valid,” they said. “And because of that, I feel the community that I have really appreciates me and the space that I give them.”

Livestreamer Warwick.

Subscribe to Warwick’s Twitch channel for more content.

Follow NVIDIA Studio on Instagram, Twitter and Facebook. Access tutorials on the Studio YouTube channel and get updates directly in your inbox by subscribing to the Studio newsletter.

Read More

Index your Confluence content using the new Confluence connector V2 for Amazon Kendra

Index your Confluence content using the new Confluence connector V2 for Amazon Kendra

Amazon Kendra is a highly accurate and simple-to-use intelligent search service powered by machine learning (ML). Amazon Kendra offers a suite of data source connectors to simplify the process of ingesting and indexing your content, wherever it resides.

Valuable data in organizations is stored in both structured and unstructured repositories. An enterprise search solution should be able to pull together data across several structured and unstructured repositories to index and search on.

One such unstructured data repository is Confluence. Confluence is a team workspace that gives knowledge worker teams a place to create, capture, and collaborate on any project or idea. Team spaces help teams structure, organize, and share work, so every team member has visibility into institutional knowledge and access to the information they need.

There are two Confluence offerings:

  • Cloud – This is offered as a software as a service (SaaS) product. It’s always on, continuously updated, and highly secure.
  • Data Center (self-managed) – Here, you host Confluence on your infrastructure, which could be on premises or the cloud. This allows you to keep data within your network and manage it yourself.

We’re excited to announce that you can now use the new Amazon Kendra connector V2 for Confluence to search information stored in your Confluence account both on the cloud and your data center. In this post, we show how to index information stored in Confluence and use the Amazon Kendra intelligent search function. In addition, the ML-powered intelligent search can accurately find information from unstructured documents having natural language narrative content, for which keyword search is not very effective.

What’s new for this version

This version supports OAuth 2.0 authentication in addition to basic authentication for the Cloud edition. For the Data Center (on-premises) edition, we have added OAuth2 in addition to basic authentication and personal access tokens for showing search results based on user access rights. You can benefit from the following features:

  • You can now crawl comments in addition to spaces, pages, blogs, and attachments
  • You now have fine-grained choices for your sync scope—you can specify pages, blogs, comments, and attachments
  • You can choose to import identities (or not)
  • This version offers regex support for choosing entity titles as well as file types
  • You have the choice of multiple Sync modes

Solution overview

With Amazon Kendra, you can configure multiple data sources to provide a central place to search across your document repository. For our solution, we demonstrate how to index a Confluence repository using the Amazon Kendra connector for Confluence. The solution consists of the following steps:

  1. Choose an authentication mechanism.
  2. Configure an app on Confluence and get the connection details.
  3. Store the details in AWS Secrets Manager.
  4. Create a Confluence data source V2 via the Amazon Kendra console.
  5. Index the data in the Confluence repository.
  6. Run a sample query to test the solution.

Prerequisites

To try out the Amazon Kendra connector for Confluence, you need the following:

Choose an authentication mechanism

Choose your preferred authentication method:

  • Basic – This works on both the Cloud and Data Center editions. You need a user ID and a password to configure this method.
  • Personal access token – This option only works for the Data Center edition.
  • OAuth2 – This is more involved and works for both Cloud and Data Center editions.

Gather authentication details

In this section, we show the steps to gather your authentication details depending on your authentication method.

Basic authentication

For basic authentication with the Data Center edition, all you need is your login and password. Make sure your login has privileges to gather all content.

For Cloud edition, your user ID serves as your user login. For your password, you need to get a token. Complete the following steps:

  1. Log in to https://id.atlassian.com/manage-profile/security/api-tokens and choose Create API token.

  1. For Label, enter a name for the token.
  2. Choose Create.

  1. Copy the value and save it to use as your password.

Personal access token

This authentication method works for on premises (Data Center) only. Complete the following steps to acquire authentication details:

  1. Log in to your Confluence URL using the user ID and password that you want Amazon Kendra to use while retrieving content.
  2. Choose the profile icon and choose Settings.

  1. Choose Personal Access Tokens in the navigation pane, then choose Create token.

create token

  1. For Token name, enter a name.
  2. For Expiry date, deselect Automatic expiry.
  3. Choose Create.

  1. Copy the token and save it in a safe place.

To configure Secrets Manager, we use the login URL and this value.

OAuth2 authentication for Confluence Cloud edition

This authentication method follows the full OAuth2.0 (3LO) documentation from Confluence. We first create and configure an app on Confluence and enable it for OAuth2. The process is slightly different for the Cloud and Data Center editions. We then get an authorization token and exchange this for an access token. Finally, we get the client ID, client secret, and client code. Complete the following steps:

  1. Log in to the Confluence app.
  2. Navigate to https://developer.atlassian.com/.
  3. Next to My apps, choose Create and choose OAuth2 Integration.

  1. For Name, enter a name.
  2. Choose Create.

  1. Choose Authorization in the navigation pane.
  2. Choose Add next to your authorization type.

  1. For Callback URL, enter the URL you use to log in to Confluence.
  2. Choose Save changes.

save changess

  1. Under Authorization URL generator, choose Add APIs.

add apis

  1. Next to User identity API, choose Add, then choose Configure.

add permissions

  1. Choose Edit Scopes to configure read scopes for the app.
  2. Select View active user profile and View user profiles.

edit scopes

  1. Choose Permissions in the navigation pane.
  2. Next to Confluence API, choose Add, then choose Configure.
  3. On the Classic scopes tab, choose Edit Scopes.
  4. Select all read, search, and download scopes.
  5. Choose Save.

grannular scopes

  1. On the Granular scopes tab, choose Edit Scopes.
  2. Search for read and select all the scopes found.
  3. Choose Save.

scope choice confirmation

  1. Choose Authorization in the navigation pane.
  2. Next to your authorization type, choose Configure.

configure authorization type

You should see three URLs listed.

generated urls

  1. Copy the code for Granular Confluence API authorization URL.

The following is example code:

https://auth.atlassian.com/authorize?
audience=api.atlassian.com
&client_id=YOUR_CLIENT_ID
&scope=REQUESTED_SCOPE%20REQUESTED_SCOPE_TWO

&redirect_uri=https://YOUR_APP_CALLBACK_URL
&state=YOUR_USER_BOUND_VALUE
&response_type=code
&prompt=consent
  1. If you want to generate a refresh token so that you don’t have to repeat this process, add offline_access (or %20offline_access) to the end of all the scopes in the URL (for example, &scope=REQUESTED_SCOPE%20REQUESTED_SCOPE_TWO%20offline_access).
  2. If you’re okay generating a new token each time, just enter the URL in your browser.
  3. Choose Accept.

choose accept

You’re redirected to your Confluence home page.

  1. Inspect the browser URL and locate code=xxxxx.
  2. Copy this code and save it.

This is the authorization code that we use to exchange with the access token.

copy authorization code

  1. Return to the Atlassian developer console and choose Settings in the navigation pane.
  2. Copy the values of the client ID and secret ID and save them.

We need these values to make a call to exchange the authorization token with the access token.

postman utility

Next, we use the Postman utility to post the authorization code to get the access token. You can use alternate tools like curl to do this as well.

  1. The URL to post the authorization code is https://auth.atlassian.com/oauth/token.
  2. The JSON body to post is as follows:
    {"grant_type": "authorization_code",
    "client_id": "YOUR_CLIENT_ID",
    "client_secret": "YOUR_CLIENT_SECRET",
    "code": "YOUR_AUTHORIZATION_CODE",
    "redirect_uri": "https://YOUR_APP_CALLBACK_URL"}

The grant_type parameter is hard-coded. We collected the values for client_id and client_secret in a previous step. The value for code is the authorization code we collected earlier.

A successful response will return the access token. If you added offline access to the URL earlier, you also get a refresh token.

return response with access token

  1. Save the access token to use when setting up Secrets Manager.

If you’re generating a new token from the refresh token, the current token is valid only for 1 hour. If you need to get a new token, you can start all over again. However, if you have the refresh token, as before, use Postman to post to the following URL: https://auth.atlassian.com/oauth/token. Use the following JSON format for the body of the token:

{"grant_type": "refresh_token",
"client_id": "YOUR_CLIENT_ID",
"client_secret": "YOUR_CLIENT_SECRET",
"refresh_token": "YOUR_REFRESH_TOKEN"}

The call will return a new access token

new access token

OAuth2 authentication for Confluence Data Center edition

If using the Data Center edition with OAuth2 authentication, complete the following steps:

  1. Log in to Confluence Data Center edition.
  2. Choose the gear icon, then choose General configuration.
  3. In the navigation pane, choose Application links, then choose Create link.
  4. In the Create link pop-up window, select External application and Incoming, then choose Continue.
  5. For Name, enter a name.
  6. For Redirect URL, enter https://httpbin.org/.
  7. Choose Save.
  8. Copy and save the values for the client ID and client secret.
  9. On a separate browser tab, open the URL https://example-app.com/pkce.
  10. Choose Generate Random String and Calculate Hash.
  11. Copy the value under Code Challenge.

  12. Return to your original tab.
  13. Use the following URL to get the authorization code:
    https://<confluence url>/rest/oauth2/latest/authorize
    ?client_id=CLIENT_ID
    &redirect_uri=REDIRECT_URI
    &response_type=code
    &scope=SCOPE
    &code_challenge=CODE_CHALLENGE
    &code_challenge_method=S256

Use the client ID you copied earlier, and https://httpbin.org for the redirect URI. For CODE_CHALLENGE, enter the code you copied earlier.

  1. Choose Allow.

You’re redirected to httpbin.org.

  1. Save the code to use in the next step.

  1. To get the access token and refresh token, use a tool such as curl or Postman to post the following values to https://<your confluence URL>/rest/oauth2/latest/token:
    grant_type: authorization_code
    client_id: YOUR_CLIENT_ID
    client_secret: YOUR_CLIENT_SECRET
    code: YOUR_AUTHORIZATION_CODE
    code_verifier: CODE_VERIFIER
    redirect_uri: YOUR_REDIRECT_URL

Use the client ID, client secret, and authorization code you saved earlier. For CODE_VERIFIER, enter the value from when you generated the code challenge.

  1. Copy the access token and refresh token to use later

copy access and refresh tokens

The access token and refresh token are valid only for 1 hour. To refresh the token, post the following code to the same URL to get new values:

grant_type: refresh_token
client_id: YOUR_CLIENT_ID
client_secret: YOUR_CLIENT_SECRET
refresh_token: REFRESH_TOKEN
redirect_uri: YOUR_REDIRECT_URL

The new tokens are valid for 1 hour.

new tokens

Store Confluence credentials in Secrets Manager

To store your Confluence credentials in Secrets Manager, compete the following steps:

  1. On the Secrets Manager console, choose Store a new secret.
  2. Select Other type of secret.

other type

  1. Depending on the type of secret, enter the key-values as follows:
    • For Confluence Cloud basic authentication, enter the following key-value pairs (note that the password is not the login password, but the token you created earlier):
      "username" : "<your login username>",
      
      "password" : "<your token value>"

    • For Confluence Cloud OAuth authentication, enter the following key-value pairs:
      "confluenceAppKey" : “<your clientid>”
      
      "confluenceAppSecret" : “<your client Secret>”
      
      "confluenceAccessToken" : “<your access token>”
      
      "confluenceRefreshToken" : “<your refresh token>”

    • For Confluence Data Center basic authentication, enter the following key-value pairs:
      "username" : "<login username>"
      
      "password" : "<login password>"

    • For Confluence Data Center personal access token authentication, enter the following key-value pairs:
      "patToken" :"<your personal access token>"

    • For Confluence Data Center OAuth authentication, enter the following key-value pairs:
      "confluenceAppKey" : "<your client id>"
      
      "confluenceAppSecret" : “<your Client Secret>”
      
      "confluenceAccessToken" : “<your Access Token>"
      
      "confluenceRefreshToken" : “<your refresh token>”

  1. Choose Next.

choose next

  1. For Secret name, enter a name (for example, AmazonKendra-my-confluence-secret).
  2. Enter an optional description.
  3. Choose Next.

configure secret

  1. In the Configure rotation section, keep all settings at their defaults and choose Next.

configure rotation

  1. On the Review page, choose Store.

Configure the Amazon Kendra connector for Confluence

To configure the Amazon Kendra connector, complete the following steps:

  1. On the Amazon Kendra console, choose Create an Index.

create an index

  1. For Index name, enter a name for the index (for example, my-confluence-index).
  2. Enter an optional description.
  3. For Role name, enter an IAM role name.
  4. Configure optional encryption settings and tags.
  5. Choose Next.

specify index details

  1. In the Configure user access control section, leave the settings at their defaults and choose Next.

configure user access control

  1. In the Specify provisioning section, select Developer edition and choose Next.

specify provisioning

  1. On the review page, choose Create.

This creates and propagates the IAM role and then creates the Amazon Kendra index, which can take up to 30 minutes.

index created

Create a Confluence data source

Complete the following steps to create your data source:

  1. On the Amazon Kendra console, choose Data sources in the navigation pane.
  2. Under Confluence connector V2.0, choose Add connector.

.

  1. For Data source name, enter a name (for example, my-Confluence-data-source).
  2. Enter an optional description.
  3. Choose Next.

specify data source details

  1. Choose either Confluence Cloud or Confluence Server depending on your data source.
  2. For Authentication, choose your authentication option.
  3. Select Identity crawler is on.
  4. For IAM role¸ choose Create a new role.
  5. For Role name, enter a name (for example, AmazonKendra-my-confluence-datasource-role).
  6. Choose Next.

define access and security

For Confluence Data Center and Cloud editions, we can add additional optional information (not shown) like the VPC. For Data Center edition only, we can add additional information for the web proxy. There is also an additional authentication option if using a personal access token that is valid only for Data Center and not Cloud edition.

  1. For Sync scope, select all the content to sync.
  2. For Sync mode, select Full sync.
  3. For Frequency, choose Run on demand.
  4. Choose Next.

configure sync settings

  1. Optionally, you can set mapping fields.

Mapping fields is a useful exercise where you can substitute field names to values that are user-friendly and fit in your organization’s vocabulary.

  1. For this post, keep all defaults and choose Next.

set field mappings

  1. Review the settings and choose Add data source.
  2. To sync the data source, choose Sync now.

sync data source

A banner message appears when the sync is complete.

Test the solution

Now that you have ingested the content from your Confluence account into your Amazon Kendra index, you can test some queries. For the purposes of our test, we have created a Confluence website with two teams: team1 with the member Analyst1 and team2 with the member Analyst2.

  1. On the Amazon Kendra console, navigate to your index and choose Search indexed content.
  2. Enter a sample search query and review your search results (your results will vary based on the contents of your account).

simple search

The Confluence connector also crawls local identity information from Confluence. You can use this feature to narrow down your query by user. Confluence offers comprehensive visibility options. Users can choose their content to be seen by other users, at a space level, or by groups. When you filter your searches by users, the query returns only those documents that the user has access to at the time of ingestion.

  1. To use this feature, expand Test query with user name or groups and choose Apply user name or groups.
  2. Enter the user name of your user and choose Apply.

Note that for Confluence Data Center edition, the user name is the email ID.

apply user name or groups

Rerun your search query.

This brings you a filtered set of results. Notice we bring back just 62 results.

filtered resultw

We now go back and restrict Bob Straham to just be able to access his workspace and run the search again.

bob's results

Notice that we get just a subset of the results because the search is restricted to just Bob’s content.

When fronting Amazon Kendra with an application such as an application built using Experience Builder, you can pass the user identity (in the form of the email ID for Cloud edition or user name for Data Center edition) to Amazon Kendra to ensure that each user only sees content specific to their user ID. Alternately, you can use AWS IAM Identity Center (successor to AWS Single Sign-On) to control user context being passed to Amazon Kendra to limit queries by user.

Congratulations! You have successfully used Amazon Kendra to surface answers and insights based on the content indexed from your Confluence account.

Clean up

To avoid incurring future costs, clean up the resources you created as part of this solution. If you created a new Amazon Kendra index while testing this solution, delete it. If you only added a new data source using the Amazon Kendra connector for Confluence V2, delete that data source.

Conclusion

With the new Confluence connector V2 for Amazon Kendra, organizations can tap into the repository of information stored in their account securely using intelligent search powered by Amazon Kendra.

To learn about these possibilities and more, refer to the Amazon Kendra Developer Guide. For more information on how you can create, modify, or delete metadata and content when ingesting your data from Confluence, refer to Enriching your documents during ingestion and Enrich your content and metadata to enhance your search experience with custom document enrichment in Amazon Kendra.


About the author

Ashish Lagwankar is a Senior Enterprise Solutions Architect at AWS. His core interests include AI/ML, serverless, and container technologies. Ashish is based in the Boston, MA, area and enjoys reading, outdoors, and spending time with his family.
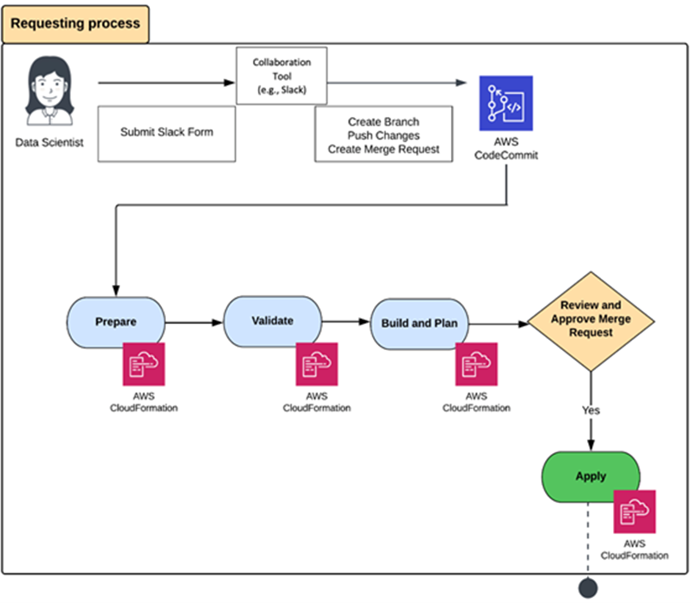
Read More

Accelerate machine learning time to value with Amazon SageMaker JumpStart and PwC’s MLOps accelerator

Accelerate machine learning time to value with Amazon SageMaker JumpStart and PwC’s MLOps accelerator

This is a guest blog post co-written with Vik Pant and Kyle Bassett from PwC.

With organizations increasingly investing in machine learning (ML), ML adoption has become an integral part of business transformation strategies. A recent PwC CEO survey unveiled that 84% of Canadian CEOs agree that artificial intelligence (AI) will significantly change their business within the next 5 years, making this technology more critical than ever. However, implementing ML into production comes with various considerations, notably being able to navigate the world of AI safely, strategically, and responsibly. One of the first steps and notably a great challenge to becoming AI powered is effectively developing ML pipelines that can scale sustainably in the cloud. Thinking of ML in terms of pipelines that generate and maintain models rather than models by themselves helps build versatile and resilient prediction systems that are better able to withstand meaningful changes in relevant data over time.

Many organizations start their journey into the world of ML with a model-centric viewpoint. In the early stages of building an ML practice, the focus is on training supervised ML models, which are mathematical representations of relationships between inputs (independent variables) and outputs (dependent variables) that are learned from data (typically historical). Models are mathematical artifacts that take input data, perform calculations and computations on them, and generate predictions or inferences.

Although this approach is a reasonable and relatively simple starting point, it isn’t inherently scalable or intrinsically sustainable due to the manual and ad hoc nature of model training, tuning, testing, and trialing activities. Organizations with greater maturity in the ML domain adopt an ML operations (MLOps) paradigm that incorporates continuous integration, continuous delivery, continuous deployment, and continuous training. Central to this paradigm is a pipeline-centric viewpoint for developing and operating industrial-strength ML systems.

In this post, we start with an overview of MLOps and its benefits, describe a solution to simplify its implementations, and provide details on the architecture. We finish with a case study highlighting the benefits realize by a large AWS and PwC customer who implemented this solution.

Background

An MLOps pipeline is a set of interrelated sequences of steps that are used to build, deploy, operate, and manage one or more ML models in production. Such a pipeline encompasses the stages involved in building, testing, tuning, and deploying ML models, including but not limited to data preparation, feature engineering, model training, evaluation, deployment, and monitoring. As such, an ML model is the product of an MLOps pipeline, and a pipeline is a workflow for creating one or more ML models. Such pipelines support structured and systematic processes for building, calibrating, assessing, and implementing ML models, and the models themselves generate predictions and inferences. By automating the development and operationalization of stages of pipelines, organizations can reduce the time to delivery of models, increase the stability of the models in production, and improve collaboration between teams of data scientists, software engineers, and IT administrators.

Solution overview

AWS offers a comprehensive portfolio of cloud-native services for developing and running MLOps pipelines in a scalable and sustainable manner. Amazon SageMaker comprises a comprehensive portfolio of capabilities as a fully managed MLOps service to enable developers to create, train, deploy, operate, and manage ML models in the cloud. SageMaker covers the entire MLOps workflow, from collecting to preparing and training the data with built-in high-performance algorithms and sophisticated automated ML (AutoML) experiments so that companies can choose specific models that fit their business priorities and preferences. SageMaker enables organizations to collaboratively automate the majority of their MLOps lifecycle so that they can focus on business results without risking project delays or escalating costs. In this way, SageMaker allows businesses to focus on results without worrying about infrastructure, development, and maintenance associated with powering industrial-strength prediction services.

SageMaker includes Amazon SageMaker JumpStart, which offers out-of-the-box solution patterns for organizations seeking to accelerate their MLOps journey. Organizations can start with pre-trained and open-source models that can be fine-tuned to meet their specific needs through retraining and transfer learning. Additionally, JumpStart provides solution templates designed to tackle common use cases, as well as example Jupyter notebooks with prewritten starter code. These resources can be accessed by simply visiting the JumpStart landing page within Amazon SageMaker Studio.

PwC has built a pre-packaged MLOps accelerator that further speeds up time to value and increases return on investment for organizations that use SageMaker. This MLOps accelerator enhances the native capabilities of JumpStart by integrating complementary AWS services. With a comprehensive suite of technical artifacts, including infrastructure as code (IaC) scripts, data processing workflows, service integration code, and pipeline configuration templates, PwC’s MLOps accelerator simplifies the process of developing and operating production-class prediction systems.

Architecture overview

The inclusion of cloud-native serverless services from AWS is prioritized into the architecture of the PwC MLOps accelerator. The entry point into this accelerator is any collaboration tool, such as Slack, that a data scientist or data engineer can use to request an AWS environment for MLOps. Such a request is parsed and then fully or semi-automatically approved using workflow features in that collaboration tool. After a request is approved, its details are used for parameterizing IaC templates. The source code for these IaC templates is managed in AWS CodeCommit. These parameterized IaC templates are submitted to AWS CloudFormation for modeling, provisioning, and managing stacks of AWS and third-party resources.

The following diagram illustrates the workflow.

After AWS CloudFormation provisions an environment for MLOps on AWS, the environment is ready for use by data scientists, data engineers, and their collaborators. The PWC accelerator includes predefined roles on AWS Identity and Access Management (IAM) that are related to MLOps activities and tasks. These roles specify the services and resources in the MLOps environment that can be accessed by various users based on their job profiles. After accessing the MLOps environment, users can access any of the modalities on SageMaker to perform their duties. These include SageMaker notebook instances, Amazon SageMaker Autopilot experiments, and Studio. You can benefit from all SageMaker features and functions, including model training, tuning, evaluation, deployment, and monitoring.

The accelerator also includes connections with Amazon DataZone for sharing, searching, and discovering data at scale across organizational boundaries to generate and enrich models. Similarly, data for training, testing, validating, and detecting model drift can source a variety of services, including Amazon Redshift, Amazon Relational Database Service (Amazon RDS), Amazon Elastic File System (Amazon EFS), and Amazon Simple Storage Service (Amazon S3). Prediction systems can be deployed in many ways, including as SageMaker endpoints directly, SageMaker endpoints wrapped in AWS Lambda functions, and SageMaker endpoints invoked through custom code on Amazon Elastic Kubernetes Service (Amazon EKS) or Amazon Elastic Compute Cloud (Amazon EC2). Amazon CloudWatch is used to monitor the environment for MLOps on AWS in a comprehensive manner to observe alarms, logs, and events data from across the complete stack (applications, infrastructure, network, and services).

The following diagram illustrates this architecture.

Case study

In this section, we share an illustrative case study from a large insurance company in Canada. It focuses on the transformative impact of the implementation of PwC Canada’s MLOps accelerator and JumpStart templates.

This client partnered with PwC Canada and AWS to address challenges with inefficient model development and ineffective deployment processes, lack of consistency and collaboration, and difficulty in scaling ML models. The implementation of this MLOps Accelerator in concert with JumpStart templates achieved the following:

  • End-to-end automation – Automation nearly halved the amount of time for data preprocessing, model training, hyperparameter tuning, and model deployment and monitoring
  • Collaboration and standardization – Standardized tools and frameworks to promote consistency across the organization nearly doubled the rate of model innovation
  • Model governance and compliance – They implemented a model governance framework to ensure that all ML models met regulatory requirements and adhered to the company’s ethical guidelines, which reduced risk management costs by 40%
  • Scalable cloud infrastructure – They invested in scalable infrastructure to effectively manage massive data volumes and deploy multiple ML models simultaneously, reducing infrastructure and platform costs by 50%
  • Rapid deployment – The prepackaged solution reduced time to production by 70%

By delivering MLOps best practices through rapid deployment packages, our client was able to de-risk their MLOps implementation and unlock the full potential of ML for a range of business functions, such as risk prediction and asset pricing. Overall, the synergy between the PwC MLOps accelerator and JumpStart enabled our client to streamline, scale, secure, and sustain their data science and data engineering activities.

It should be noted that the PwC and AWS solution is not industry specific and is relevant across industries and sectors.

Conclusion

SageMaker and its accelerators allow organizations to enhance the productivity of their ML program. There are many benefits, including but not limited to the following:

  • Collaboratively create IaC, MLOps, and AutoML use cases to realize business benefits from standardization
  • Enable efficient experimental prototyping, with and without code, to turbocharge AI from development to deployment with IaC, MLOps, and AutoML
  • Automate tedious, time-consuming tasks such as feature engineering and hyperparameter tuning with AutoML
  • Employ a continuous model monitoring paradigm to align the risk of ML model usage with enterprise risk appetite

Please contact the authors of this post, AWS Advisory Canada, or PwC Canada to learn more about Jumpstart and PwC’s MLOps accelerator.


About the Authors

Vik PantVik is a Partner in the Cloud & Data practice at PwC Canada He earned a PhD in Information Science from the University of Toronto. He is convinced that there is a telepathic connection between his biological neural network and the artificial neural networks that he trains on SageMaker. Connect with him on LinkedIn.

Kyle is a Partner in the Cloud & Data practice at PwC Canada, along with his crack team of tech alchemists, they weave enchanting MLOPs solutions that mesmerize clients with accelerated business value. Armed with the power of artificial intelligence and a sprinkle of wizardry, Kyle turns complex challenges into digital fairy tales, making the impossible possible. Connect with him on LinkedIn.

Francois ChevallierFrancois is a Principal Advisory Consultant with AWS Professional Services Canada and the Canadian practice lead for Data and Innovation Advisory. He guides customers to establish and implement their overall cloud journey and their data programs, focusing on vision, strategy, business drivers, governance, target operating models, and roadmaps. Connect with him on LinkedIn.
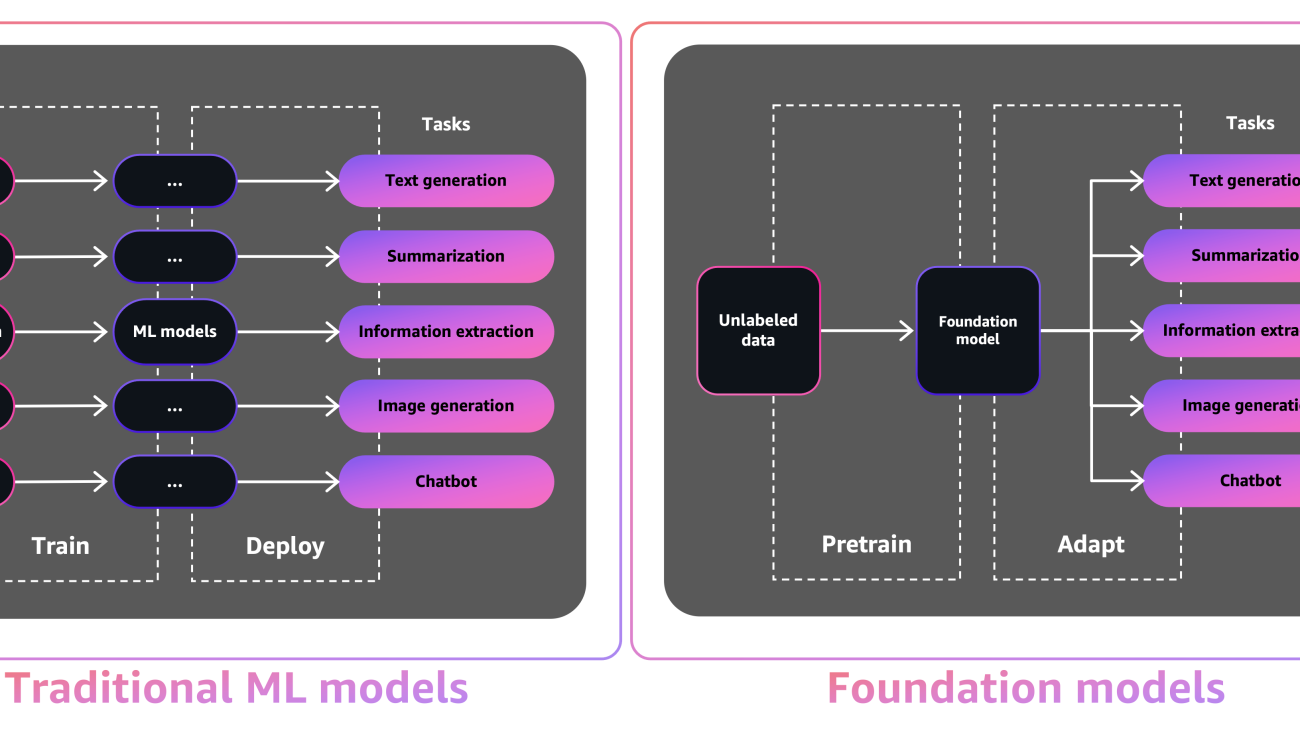
Read More

Deploy generative AI models from Amazon SageMaker JumpStart using the AWS CDK

Deploy generative AI models from Amazon SageMaker JumpStart using the AWS CDK

The seeds of a machine learning (ML) paradigm shift have existed for decades, but with the ready availability of virtually infinite compute capacity, a massive proliferation of data, and the rapid advancement of ML technologies, customers across industries are rapidly adopting and using ML technologies to transform their businesses.

Just recently, generative AI applications have captured everyone’s attention and imagination. We are truly at an exciting inflection point in the widespread adoption of ML, and we believe every customer experience and application will be reinvented with generative AI.

Generative AI is a type of AI that can create new content and ideas, including conversations, stories, images, videos, and music. Like all AI, generative AI is powered by ML models—very large models that are pre-trained on vast corpora of data and commonly referred to as foundation models (FMs).

The size and general-purpose nature of FMs make them different from traditional ML models, which typically perform specific tasks, like analyzing text for sentiment, classifying images, and forecasting trends.

With tradition ML models, in order to achieve each specific task, you need to gather labeled data, train a model, and deploy that model. With foundation models, instead of gathering labeled data for each model and training multiple models, you can use the same pre-trained FM to adapt various tasks. You can also customize FMs to perform domain-specific functions that are differentiating to your businesses, using only a small fraction of the data and compute required to train a model from scratch.

Generative AI has the potential to disrupt many industries by revolutionizing the way content is created and consumed. Original content production, code generation, customer service enhancement, and document summarization are typical use cases of generative AI.

Amazon SageMaker JumpStart provides pre-trained, open-source models for a wide range of problem types to help you get started with ML. You can incrementally train and tune these models before deployment. JumpStart also provides solution templates that set up infrastructure for common use cases, and executable example notebooks for ML with Amazon SageMaker.

With over 600 pre-trained models available and growing every day, JumpStart enables developers to quickly and easily incorporate cutting-edge ML techniques into their production workflows. You can access the pre-trained models, solution templates, and examples through the JumpStart landing page in Amazon SageMaker Studio. You can also access JumpStart models using the SageMaker Python SDK. For information about how to use JumpStart models programmatically, see Use SageMaker JumpStart Algorithms with Pretrained Models.

In April 2023, AWS unveiled Amazon Bedrock, which provides a way to build generative AI-powered apps via pre-trained models from startups including AI21 Labs, Anthropic, and Stability AI. Amazon Bedrock also offers access to Titan foundation models, a family of models trained in-house by AWS. With the serverless experience of Amazon Bedrock, you can easily find the right model for your needs, get started quickly, privately customize FMs with your own data, and easily integrate and deploy them into your applications using the AWS tools and capabilities you’re familiar with (including integrations with SageMaker ML features like Amazon SageMaker Experiments to test different models and Amazon SageMaker Pipelines to manage your FMs at scale) without having to manage any infrastructure.

In this post, we show how to deploy image and text generative AI models from JumpStart using the AWS Cloud Development Kit (AWS CDK). The AWS CDK is an open-source software development framework to define your cloud application resources using familiar programming languages like Python.

We use the Stable Diffusion model for image generation and the FLAN-T5-XL model for natural language understanding (NLU) and text generation from Hugging Face in JumpStart.

Solution overview

The web application is built on Streamlit, an open-source Python library that makes it easy to create and share beautiful, custom web apps for ML and data science. We host the web application using Amazon Elastic Container Service (Amazon ECS) with AWS Fargate and it is accessed via an Application Load Balancer. Fargate is a technology that you can use with Amazon ECS to run containers without having to manage servers or clusters or virtual machines. The generative AI model endpoints are launched from JumpStart images in Amazon Elastic Container Registry (Amazon ECR). Model data is stored on Amazon Simple Storage Service (Amazon S3) in the JumpStart account. The web application interacts with the models via Amazon API Gateway and AWS Lambda functions as shown in the following diagram.

API Gateway provides the web application and other clients a standard RESTful interface, while shielding the Lambda functions that interface with the model. This simplifies the client application code that consumes the models. The API Gateway endpoints are publicly accessible in this example, allowing for the possibility to extend this architecture to implement different API access controls and integrate with other applications.

In this post, we walk you through the following steps:

  1. Install the AWS Command Line Interface (AWS CLI) and AWS CDK v2 on your local machine.
  2. Clone and set up the AWS CDK application.
  3. Deploy the AWS CDK application.
  4. Use the image generation AI model.
  5. Use the text generation AI model.
  6. View the deployed resources on the AWS Management Console.

We provide an overview of the code in this project in the appendix at the end of this post.

Prerequisites

You must have the following prerequisites:

You can deploy the infrastructure in this tutorial from your local computer or you can use AWS Cloud9 as your deployment workstation. AWS Cloud9 comes pre-loaded with AWS CLI, AWS CDK and Docker. If you opt for AWS Cloud9, create the environment from the AWS console.

The estimated cost to complete this post is $50, assuming you leave the resources running for 8 hours. Make sure you delete the resources you create in this post to avoid ongoing charges.

Install the AWS CLI and AWS CDK on your local machine

If you don’t already have the AWS CLI on your local machine, refer to Installing or updating the latest version of the AWS CLI and Configuring the AWS CLI.

Install the AWS CDK Toolkit globally using the following node package manager command:

$ npm install -g aws-cdk-lib@latest

Run the following command to verify the correct installation and print the version number of the AWS CDK:

$ cdk --version

Make sure you have Docker installed on your local machine. Issue the following command to verify the version:

$ docker --version

Clone and set up the AWS CDK application

On your local machine, clone the AWS CDK application with the following command:

$ git clone https://github.com/aws-samples/generative-ai-sagemaker-cdk-demo.git

Navigate to the project folder:

$ cd generative-ai-sagemaker-cdk-demo

Before we deploy the application, let’s review the directory structure:

.
├── LICENSE
├── README.md
├── app.py
├── cdk.json
├── code
│   ├── lambda_txt2img
│   │   └── txt2img.py
│   └── lambda_txt2nlu
│       └── txt2nlu.py
├── construct
│   └── sagemaker_endpoint_construct.py
├── images
│   ├── architecture.png
│   ├── ...
├── requirements-dev.txt
├── requirements.txt
├── source.bat
├── stack
│   ├── __init__.py
│   ├── generative_ai_demo_web_stack.py
│   ├── generative_ai_txt2img_sagemaker_stack.py
│   ├── generative_ai_txt2nlu_sagemaker_stack.py
│   └── generative_ai_vpc_network_stack.py
├── tests
│   ├── __init__.py
│   └── ...
└── web-app
    ├── Dockerfile
    ├── Home.py
    ├── configs.py
    ├── img
    │   └── sagemaker.png
    ├── pages
    │   ├── 2_Image_Generation.py
    │   └── 3_Text_Generation.py
    └── requirements.txt

The stack folder contains the code for each stack in the AWS CDK application. The code folder contains the code for the Lambda functions. The repository also contains the web application located under the folder web-app.

The cdk.json file tells the AWS CDK Toolkit how to run your application.

This application was tested in the us-east-1 Region, but it should work in any Region that has the required services and inference instance type ml.g4dn.4xlarge specified in app.py.

Set up a virtual environment

This project is set up like a standard Python project. Create a Python virtual environment using the following code:

$ python3 -m venv .venv

Use the following command to activate the virtual environment:

$ source .venv/bin/activate

If you’re on a Windows platform, activate the virtual environment as follows:

% .venvScriptsactivate.bat

After the virtual environment is activated, upgrade pip to the latest version:

$ python3 -m pip install --upgrade pip

Install the required dependencies:

$ pip install -r requirements.txt

Before you deploy any AWS CDK application, you need to bootstrap a space in your account and the Region you’re deploying into. To bootstrap in your default Region, issue the following command:

$ cdk bootstrap

If you want to deploy into a specific account and Region, issue the following command:

$ cdk bootstrap aws://ACCOUNT-NUMBER/REGION

For more information about this setup, visit Getting started with the AWS CDK.

AWS CDK application stack structure

The AWS CDK application contains multiple stacks, as shown in the following diagram.

You can list the stacks in your AWS CDK application with the following command:

$ cdk list

GenerativeAiTxt2imgSagemakerStack
GenerativeAiTxt2nluSagemakerStack
GenerativeAiVpcNetworkStack
GenerativeAiDemoWebStack

The following are other useful AWS CDK commands:

  • cdk ls – Lists all stacks in the app
  • cdk synth – Emits the synthesized AWS CloudFormation template
  • cdk deploy – Deploys this stack to your default AWS account and Region
  • cdk diff – Compares the deployed stack with current state
  • cdk docs – Opens the AWS CDK documentation

The next section shows you how to deploy the AWS CDK application.

Deploy the AWS CDK application

The AWS CDK application will be deployed to the default Region based on your workstation configuration. If you want to force the deployment in a specific Region, set your AWS_DEFAULT_REGION environment variable accordingly.

At this point, you can deploy the AWS CDK application. First you launch the VPC network stack:

$ cdk deploy GenerativeAiVpcNetworkStack

If you are prompted, enter y to proceed with the deployment. You should see a list of AWS resources that are being provisioned in the stack. This step takes around 3 minutes to complete.

Then you launch the web application stack:

$ cdk deploy GenerativeAiDemoWebStack

After analyzing the stack, the AWS CDK will display the resource list in the stack. Enter y to proceed with the deployment. This step takes around 5 minutes.

Note down the WebApplicationServiceURL from the output to use later. You can also retrieve it on the AWS CloudFormation console, under the GenerativeAiDemoWebStack stack outputs.

Now, launch the image generation AI model endpoint stack:

$ cdk deploy GenerativeAiTxt2imgSagemakerStack

This step takes around 8 minutes. The image generation model endpoint is deployed, we can now use it.

Use the image generation AI model

The first example demonstrates how to utilize Stable Diffusion, a powerful generative modeling technique that enables the creation of high-quality images from text prompts.

  1. Access the web application using the WebApplicationServiceURL from the output of GenerativeAiDemoWebStack in your browser.
  2. In the navigation pane, choose Image Generation.
  3. The SageMaker Endpoint Name and API GW Url fields will be pre-populated, but you can change the prompt for the image description if you’d like.
  4. Choose Generate image.
  5. The application will make a call to the SageMaker endpoint. It takes a few seconds. A picture with the characteristics in your image description will be displayed.

Use the text generation AI model

The second example centers around using the FLAN-T5-XL model, which is a foundation or large language model (LLM), to achieve in-context learning for text generation while also addressing a broad range of natural language understanding (NLU) and natural language generation (NLG) tasks.

Some environments might limit the number of endpoints you can launch at a time. If this is the case, you can launch one SageMaker endpoint at a time. To stop a SageMaker endpoint in the AWS CDK app, you have to destroy the deployed endpoint stack and before launching the other endpoint stack. To turn down the image generation AI model endpoint, issue the following command:

$ cdk destroy GenerativeAiTxt2imgSagemakerStack

Then launch the text generation AI model endpoint stack:

$ cdk deploy GenerativeAiTxt2nluSagemakerStack

Enter y at the prompts.

After the text generation model endpoint stack is launched, complete the following steps:

  1. Go back to the web application and choose Text Generation in the navigation pane.
  2. The Input Context field is pre-populated with a conversation between a customer and an agent regarding an issue with the customers phone, but you can enter your own context if you’d like.
  3. Below the context, you will find some pre-populated queries on the drop-down menu. Choose a query and choose Generate Response.
  4. You can also enter your own query in the Input Query field and then choose Generate Response.

View the deployed resources on the console

On the AWS CloudFormation console, choose Stacks in the navigation pane to view the stacks deployed.

On the Amazon ECS console, you can see the clusters on the Clusters page.

On the AWS Lambda console, you can see the functions on the Functions page.

On the API Gateway console, you can see the API Gateway endpoints on the APIs page.

On the SageMaker console, you can see the deployed model endpoints on the Endpoints page.

When the stacks are launched, some parameters are generated. These are stored in the AWS Systems Manager Parameter Store. To view them, choose Parameter Store in the navigation pane on the AWS Systems Manager console.

Clean up

To avoid unnecessary cost, clean up all the infrastructure created with the following command on your workstation:

$ cdk destroy --all

Enter y at the prompt. This step takes around 10 minutes. Check if all resources are deleted on the console. Also delete the assets S3 buckets created by the AWS CDK on the Amazon S3 console as well as the assets repositories on Amazon ECR.

Conclusion

As demonstrated in this post, you can use the AWS CDK to deploy generative AI models in JumpStart. We showed an image generation example and a text generation example using a user interface powered by Streamlit, Lambda, and API Gateway.

You can now build your generative AI projects using pre-trained AI models in JumpStart. You can also extend this project to fine-tune the foundation models for your use case and control access to API Gateway endpoints.

We invite you to test the solution and contribute to the project on GitHub. Share your thoughts on this tutorial in the comments!

License summary

This sample code is made available under a modified MIT license. See the LICENSE file for more information. Also, review the respective licenses for the stable diffusion and flan-t5-xl models on Hugging Face.


About the authors

Hantzley Tauckoor is an APJ Partner Solutions Architecture Leader based in Singapore. He has 20 years’ experience in the ICT industry spanning multiple functional areas, including solutions architecture, business development, sales strategy, consulting, and leadership. He leads a team of Senior Solutions Architects that enable partners to develop joint solutions, build technical capabilities, and steer them through the implementation phase as customers migrate and modernize their applications to AWS.

Kwonyul Choi is a CTO at BABITALK, a Korean beauty care platform startup, based in Seoul. Prior to this role, Kownyul worked as Software Development Engineer at AWS with a focus on AWS CDK and Amazon SageMaker.

Arunprasath Shankar is a Senior AI/ML Specialist Solutions Architect with AWS, helping global customers scale their AI solutions effectively and efficiently in the cloud. In his spare time, Arun enjoys watching sci-fi movies and listening to classical music.

Satish Upreti is a Migration Lead PSA and Security SME in the partner organization in APJ. Satish has 20 years of experience spanning on-premises private cloud and public cloud technologies. Since joining AWS in August 2020 as a migration specialist, he provides extensive technical advice and support to AWS partners to plan and implement complex migrations.
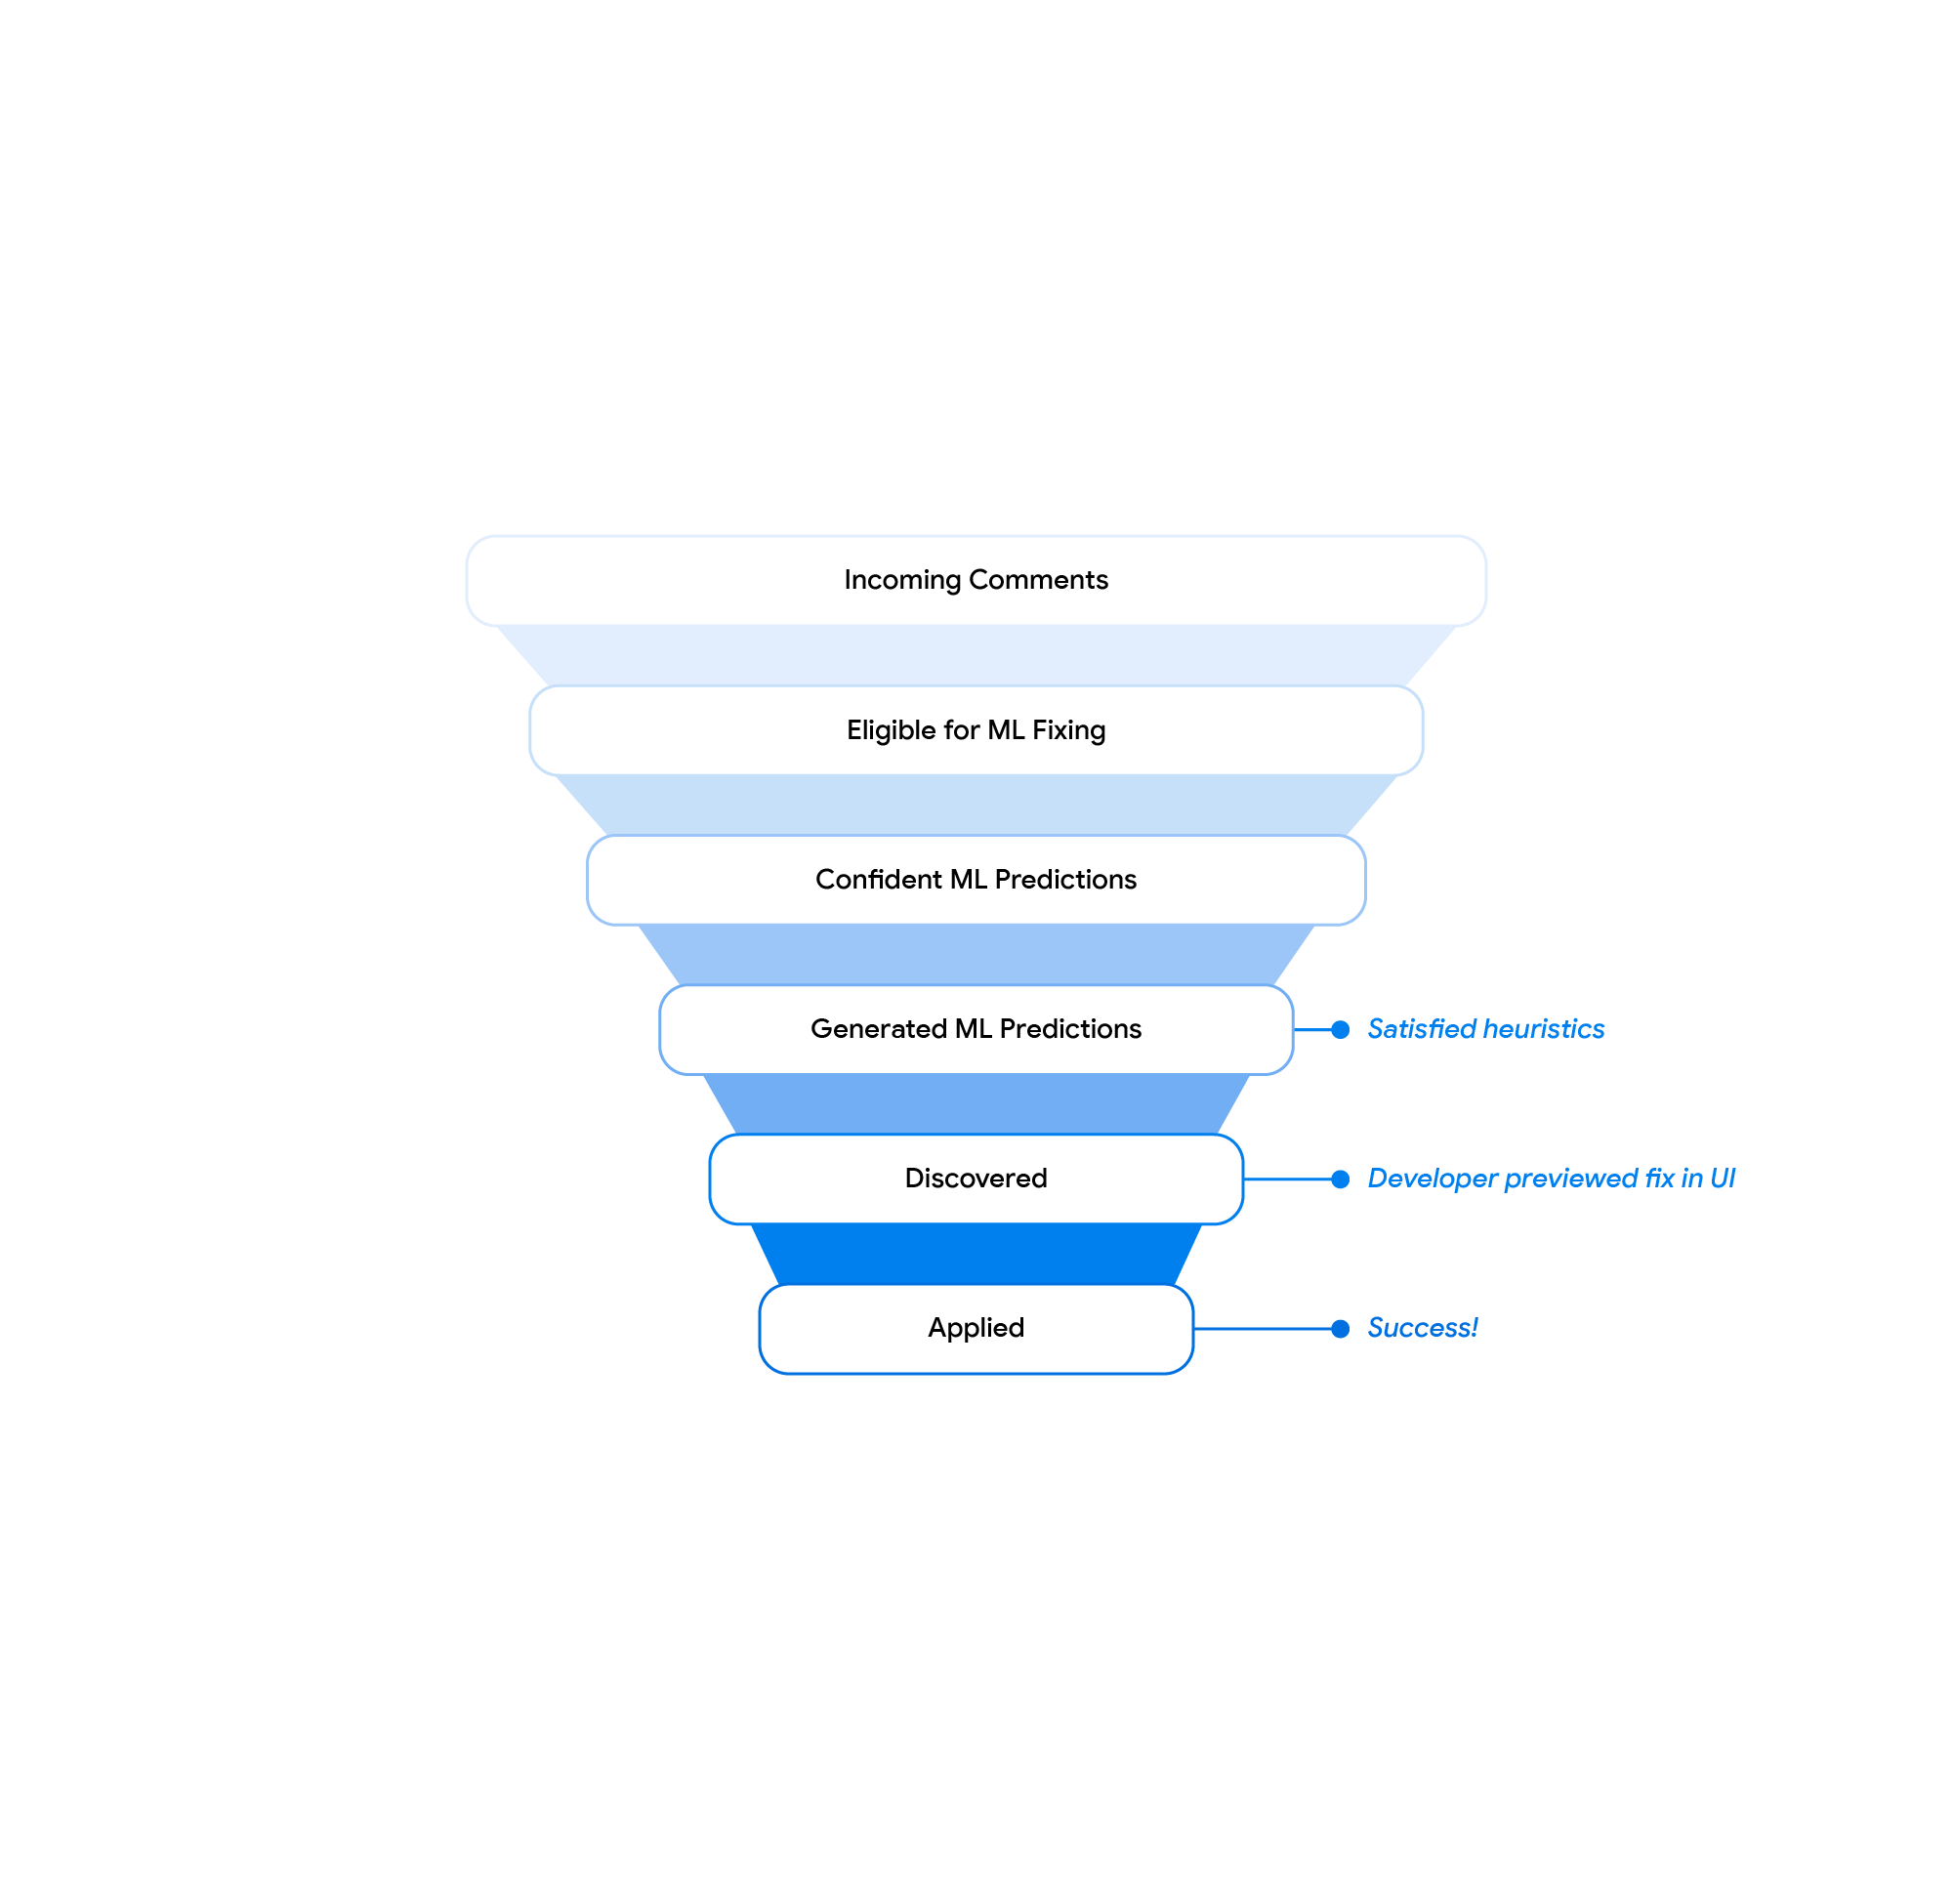

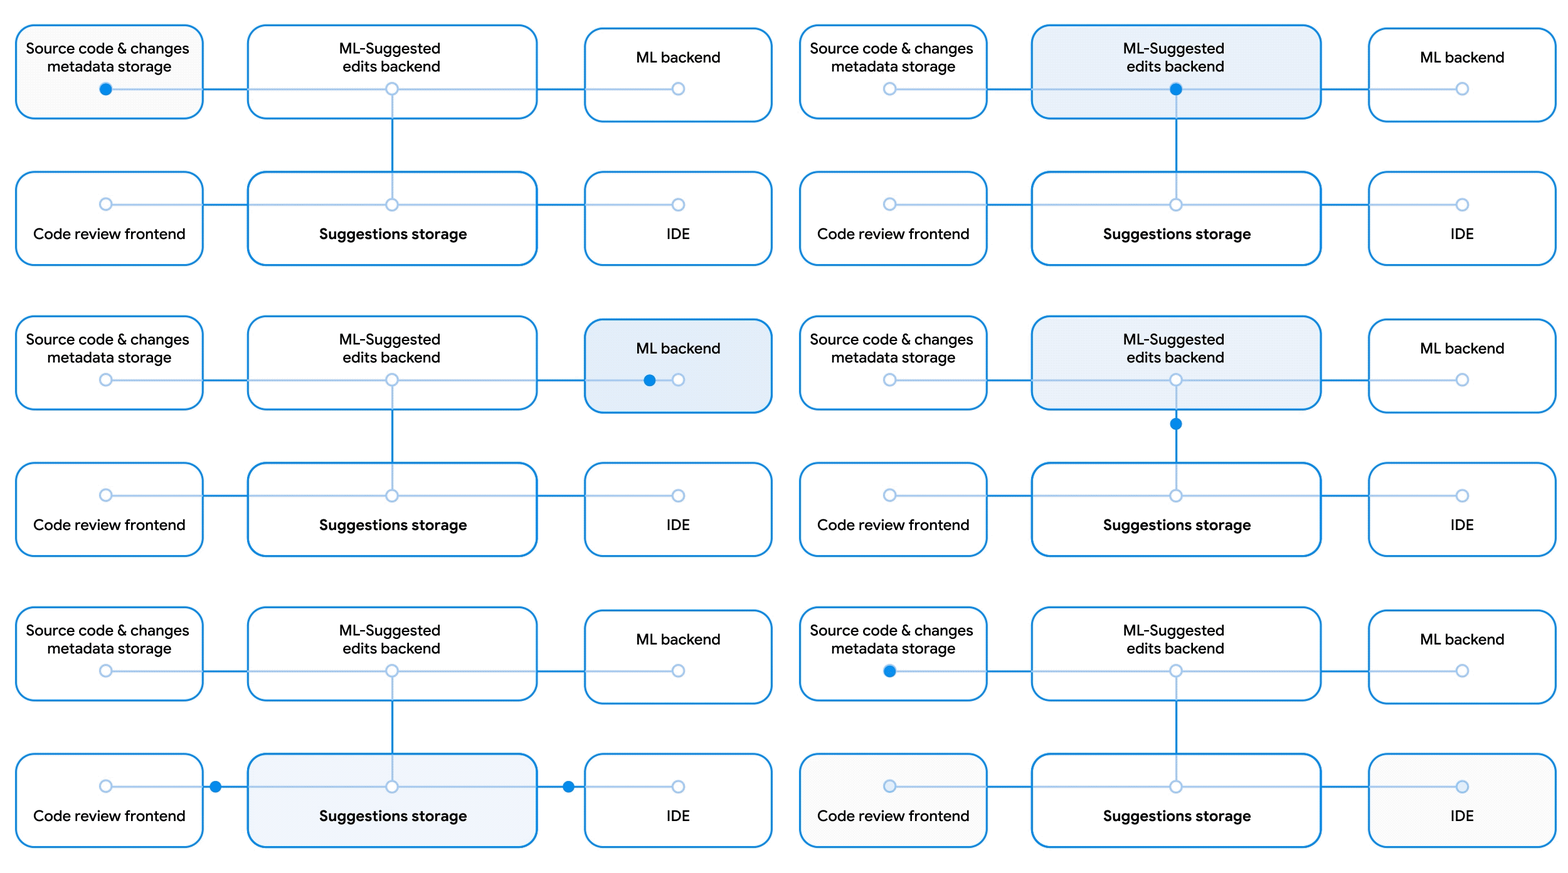
Appendix: Code walkthrough

In this section, we provide an overview of the code in this project.

AWS CDK application

The main AWS CDK application is contained in the app.py file in the root directory. The project consists of multiple stacks, so we have to import the stacks:

#!/usr/bin/env python3
import aws_cdk as cdk

from stack.generative_ai_vpc_network_stack import GenerativeAiVpcNetworkStack
from stack.generative_ai_demo_web_stack import GenerativeAiDemoWebStack
from stack.generative_ai_txt2nlu_sagemaker_stack import GenerativeAiTxt2nluSagemakerStack
from stack.generative_ai_txt2img_sagemaker_stack import GenerativeAiTxt2imgSagemakerStack

We define our generative AI models and get the related URIs from SageMaker:

from script.sagemaker_uri import *
import boto3

region_name = boto3.Session().region_name
env={"region": region_name}

#Text to Image model parameters
TXT2IMG_MODEL_ID = "model-txt2img-stabilityai-stable-diffusion-v2-1-base"
TXT2IMG_INFERENCE_INSTANCE_TYPE = "ml.g4dn.4xlarge" 
TXT2IMG_MODEL_TASK_TYPE = "txt2img"
TXT2IMG_MODEL_INFO = get_sagemaker_uris(model_id=TXT2IMG_MODEL_ID,
                                        model_task_type=TXT2IMG_MODEL_TASK_TYPE, 
                                        instance_type=TXT2IMG_INFERENCE_INSTANCE_TYPE,
                                        region_name=region_name)

#Text to NLU image model parameters
TXT2NLU_MODEL_ID = "huggingface-text2text-flan-t5-xl"
TXT2NLU_INFERENCE_INSTANCE_TYPE = "ml.g4dn.4xlarge" 
TXT2NLU_MODEL_TASK_TYPE = "text2text"
TXT2NLU_MODEL_INFO = get_sagemaker_uris(model_id=TXT2NLU_MODEL_ID,
                                        model_task_type=TXT2NLU_MODEL_TASK_TYPE,
                                        instance_type=TXT2NLU_INFERENCE_INSTANCE_TYPE,
                                        region_name=region_name)

The function get_sagemaker_uris retrieves all the model information from JumpStart. See script/sagemaker_uri.py.

Then, we instantiate the stacks:

app = cdk.App()

network_stack = GenerativeAiVpcNetworkStack(app, "GenerativeAiVpcNetworkStack", env=env)
GenerativeAiDemoWebStack(app, "GenerativeAiDemoWebStack", vpc=network_stack.vpc, env=env)

GenerativeAiTxt2nluSagemakerStack(app, "GenerativeAiTxt2nluSagemakerStack", env=env, model_info=TXT2NLU_MODEL_INFO)
GenerativeAiTxt2imgSagemakerStack(app, "GenerativeAiTxt2imgSagemakerStack", env=env, model_info=TXT2IMG_MODEL_INFO)

app.synth()

The first stack to launch is the VPC stack, GenerativeAiVpcNetworkStack. The web application stack, GenerativeAiDemoWebStack, is dependent on the VPC stack. The dependency is done through parameter passing vpc=network_stack.vpc.

See app.py for the full code.

VPC network stack

In the GenerativeAiVpcNetworkStack stack, we create a VPC with a public subnet and a private subnet spanning across two Availability Zones:

        self.output_vpc = ec2.Vpc(self, "VPC",
            nat_gateways=1,
            ip_addresses=ec2.IpAddresses.cidr("10.0.0.0/16"),
            max_azs=2,
            subnet_configuration=[
                ec2.SubnetConfiguration(name="public",subnet_type=ec2.SubnetType.PUBLIC,cidr_mask=24),
                ec2.SubnetConfiguration(name="private",subnet_type=ec2.SubnetType.PRIVATE_WITH_EGRESS,cidr_mask=24)
            ]
        )

See /stack/generative_ai_vpc_network_stack.py for the full code.

Demo web application stack

In the GenerativeAiDemoWebStack stack, we launch Lambda functions and respective API Gateway endpoints through which the web application interacts with the SageMaker model endpoints. See the following code snippet:

        # Defines an AWS Lambda function for Image Generation service
        lambda_txt2img = _lambda.Function(
            self, "lambda_txt2img",
            runtime=_lambda.Runtime.PYTHON_3_9,
            code=_lambda.Code.from_asset("code/lambda_txt2img"),
            handler="txt2img.lambda_handler",
            role=role,
            timeout=Duration.seconds(180),
            memory_size=512,
            vpc_subnets=ec2.SubnetSelection(
                subnet_type=ec2.SubnetType.PRIVATE_WITH_EGRESS
            ),
            vpc=vpc
        )
        
        # Defines an Amazon API Gateway endpoint for Image Generation service
        txt2img_apigw_endpoint = apigw.LambdaRestApi(
            self, "txt2img_apigw_endpoint",
            handler=lambda_txt2img
        )

The web application is containerized and hosted on Amazon ECS with Fargate. See the following code snippet:

        # Create Fargate service
        fargate_service = ecs_patterns.ApplicationLoadBalancedFargateService(
            self, "WebApplication",
            cluster=cluster,            # Required
            cpu=2048,                   # Default is 256 (512 is 0.5 vCPU, 2048 is 2 vCPU)
            desired_count=1,            # Default is 1
            task_image_options=ecs_patterns.ApplicationLoadBalancedTaskImageOptions(
                image=image, 
                container_port=8501,
                ),
            #load_balancer_name="gen-ai-demo",
            memory_limit_mib=4096,      # Default is 512
            public_load_balancer=True)  # Default is True

See /stack/generative_ai_demo_web_stack.py for the full code.

Image generation SageMaker model endpoint stack

The GenerativeAiTxt2imgSagemakerStack stack creates the image generation model endpoint from JumpStart and stores the endpoint name in Systems Manager Parameter Store. This parameter will be used by the web application. See the following code:

        endpoint = SageMakerEndpointConstruct(self, "TXT2IMG",
                                    project_prefix = "GenerativeAiDemo",
                                    
                                    role_arn= role.role_arn,

                                    model_name = "StableDiffusionText2Img",
                                    model_bucket_name = model_info["model_bucket_name"],
                                    model_bucket_key = model_info["model_bucket_key"],
                                    model_docker_image = model_info["model_docker_image"],

                                    variant_name = "AllTraffic",
                                    variant_weight = 1,
                                    instance_count = 1,
                                    instance_type = model_info["instance_type"],

                                    environment = {
                                        "MMS_MAX_RESPONSE_SIZE": "20000000",
                                        "SAGEMAKER_CONTAINER_LOG_LEVEL": "20",
                                        "SAGEMAKER_PROGRAM": "inference.py",
                                        "SAGEMAKER_REGION": model_info["region_name"],
                                        "SAGEMAKER_SUBMIT_DIRECTORY": "/opt/ml/model/code",
                                    },

                                    deploy_enable = True
        )
        
        ssm.StringParameter(self, "txt2img_sm_endpoint", parameter_name="txt2img_sm_endpoint", string_value=endpoint.endpoint_name)

See /stack/generative_ai_txt2img_sagemaker_stack.py for the full code.

NLU and text generation SageMaker model endpoint stack

The GenerativeAiTxt2nluSagemakerStack stack creates the NLU and text generation model endpoint from JumpStart and stores the endpoint name in Systems Manager Parameter Store. This parameter will also be used by the web application. See the following code:

        endpoint = SageMakerEndpointConstruct(self, "TXT2NLU",
                                    project_prefix = "GenerativeAiDemo",
                                    
                                    role_arn= role.role_arn,

                                    model_name = "HuggingfaceText2TextFlan",
                                    model_bucket_name = model_info["model_bucket_name"],
                                    model_bucket_key = model_info["model_bucket_key"],
                                    model_docker_image = model_info["model_docker_image"],

                                    variant_name = "AllTraffic",
                                    variant_weight = 1,
                                    instance_count = 1,
                                    instance_type = model_info["instance_type"],

                                    environment = {
                                        "MODEL_CACHE_ROOT": "/opt/ml/model",
                                        "SAGEMAKER_ENV": "1",
                                        "SAGEMAKER_MODEL_SERVER_TIMEOUT": "3600",
                                        "SAGEMAKER_MODEL_SERVER_WORKERS": "1",
                                        "SAGEMAKER_PROGRAM": "inference.py",
                                        "SAGEMAKER_SUBMIT_DIRECTORY": "/opt/ml/model/code/",
                                        "TS_DEFAULT_WORKERS_PER_MODEL": "1"
                                    },

                                    deploy_enable = True
        )
        
        ssm.StringParameter(self, "txt2nlu_sm_endpoint", parameter_name="txt2nlu_sm_endpoint", string_value=endpoint.endpoint_name)

See /stack/generative_ai_txt2nlu_sagemaker_stack.py for the full code.

Web application

The web application is located in the /web-app directory. It is a Streamlit application that is containerized as per the Dockerfile:

FROM python:3.9
EXPOSE 8501
WORKDIR /app
COPY requirements.txt ./requirements.txt
RUN pip3 install -r requirements.txt
COPY . .
CMD streamlit run Home.py 
    --server.headless true 
    --browser.serverAddress="0.0.0.0" 
    --server.enableCORS false 
    --browser.gatherUsageStats false

To learn more about Streamlit, see Streamlit documentation.

Read More

Resolving code review comments with ML

Resolving code review comments with ML

Code-change reviews are a critical part of the software development process at scale, taking a significant amount of the code authors’ and the code reviewers’ time. As part of this process, the reviewer inspects the proposed code and asks the author for code changes through comments written in natural language. At Google, we see millions of reviewer comments per year, and authors require an average of ~60 minutes active shepherding time between sending changes for review and finally submitting the change. In our measurements, the required active work time that the code author must do to address reviewer comments grows almost linearly with the number of comments. However, with machine learning (ML), we have an opportunity to automate and streamline the code review process, e.g., by proposing code changes based on a comment’s text.

Today, we describe applying recent advances of large sequence models in a real-world setting to automatically resolve code review comments in the day-to-day development workflow at Google (publication forthcoming). As of today, code-change authors at Google address a substantial amount of reviewer comments by applying an ML-suggested edit. We expect that to reduce time spent on code reviews by hundreds of thousands of hours annually at Google scale. Unsolicited, very positive feedback highlights that the impact of ML-suggested code edits increases Googlers’ productivity and allows them to focus on more creative and complex tasks.

Predicting the code edit

We started by training a model that predicts code edits needed to address reviewer comments. The model is pre-trained on various coding tasks and related developer activities (e.g., renaming a variable, repairing a broken build, editing a file). It’s then fine-tuned for this specific task with reviewed code changes, the reviewer comments, and the edits the author performed to address those comments.

An example of an ML-suggested edit of refactorings that are spread within the code.

Google uses a monorepo, a single repository for all of its software artifacts, which allows our training dataset to include all unrestricted code used to build Google’s most recent software, as well as previous versions.

To improve the model quality, we iterated on the training dataset. For example, we compared the model performance for datasets with a single reviewer comment per file to datasets with multiple comments per file, and experimented with classifiers to clean up the training data based on a small, curated dataset to choose the model with the best offline precision and recall metrics.

Serving infrastructure and user experience

We designed and implemented the feature on top of the trained model, focusing on the overall user experience and developer efficiency. As part of this, we explored different user experience (UX) alternatives through a series of user studies. We then refined the feature based on insights from an internal beta (i.e., a test of the feature in development) including user feedback (e.g., a “Was this helpful?” button next to the suggested edit).

The final model was calibrated for a target precision of 50%. That is, we tuned the model and the suggestions filtering, so that 50% of suggested edits on our evaluation dataset are correct. In general, increasing the target precision reduces the number of shown suggested edits, and decreasing the target precision leads to more incorrect suggested edits. Incorrect suggested edits take the developers time and reduce the developers’ trust in the feature. We found that a target precision of 50% provides a good balance.

At a high level, for every new reviewer comment, we generate the model input in the same format that is used for training, query the model, and generate the suggested code edit. If the model is confident in the prediction and a few additional heuristics are satisfied, we send the suggested edit to downstream systems. The downstream systems, i.e., the code review frontend and the integrated development environment (IDE), expose the suggested edits to the user and log user interactions, such as preview and apply events. A dedicated pipeline collects these logs and generates aggregate insights, e.g., the overall acceptance rates as reported in this blog post.

Architecture of the ML-suggested edits infrastructure. We process code and infrastructure from multiple services, get the model predictions and surface the predictions in the code review tool and IDE.

The developer interacts with the ML-suggested edits in the code review tool and the IDE. Based on insights from the user studies, the integration into the code review tool is most suitable for a streamlined review experience. The IDE integration provides additional functionality and supports 3-way merging of the ML-suggested edits (left in the figure below) in case of conflicting local changes on top of the reviewed code state (right) into the merge result (center).

3-way-merge UX in IDE.

Results

Offline evaluations indicate that the model addresses 52% of comments with a target precision of 50%. The online metrics of the beta and the full internal launch confirm these offline metrics, i.e., we see model suggestions above our target model confidence for around 50% of all relevant reviewer comments. 40% to 50% of all previewed suggested edits are applied by code authors.

We used the “not helpful” feedback during the beta to identify recurring failure patterns of the model. We implemented serving-time heuristics to filter these and, thus, reduce the number of shown incorrect predictions. With these changes, we traded quantity for quality and observed an increased real-world acceptance rate.

Code review tool UX. The suggestion is shown as part of the comment and can be previewed, applied and rated as helpful or not helpful.

Our beta launch showed a discoverability challenge: code authors only previewed ~20% of all generated suggested edits. We modified the UX and introduced a prominent “Show ML-edit” button (see the figure above) next to the reviewer comment, leading to an overall preview rate of ~40% at launch. We additionally found that suggested edits in the code review tool are often not applicable due to conflicting changes that the author did during the review process. We addressed this with a button in the code review tool that opens the IDE in a merge view for the suggested edit. We now observe that more than 70% of these are applied in the code review tool and fewer than 30% are applied in the IDE. All these changes allowed us to increase the overall fraction of reviewer comments that are addressed with an ML-suggested edit by a factor of 2 from beta to the full internal launch. At Google scale, these results help automate the resolution of hundreds of thousands of comments each year.

Suggestions filtering funnel.

We see ML-suggested edits addressing a wide range of reviewer comments in production. This includes simple localized refactorings and refactorings that are spread within the code, as shown in the examples throughout the blog post above. The feature addresses longer and less formally-worded comments that require code generation, refactorings and imports.

Example of a suggestion for a longer and less formally worded comment that requires code generation, refactorings and imports.

The model can also respond to complex comments and produce extensive code edits (shown below). The generated test case follows the existing unit test pattern, while changing the details as described in the comment. Additionally, the edit suggests a comprehensive name for the test reflecting the test semantics.

Example of the model’s ability to respond to complex comments and produce extensive code edits.

Conclusion and future work

In this post, we introduced an ML-assistance feature to reduce the time spent on code review related changes. At the moment, a substantial amount of all actionable code review comments on supported languages are addressed with applied ML-suggested edits at Google. A 12-week A/B experiment across all Google developers will further measure the impact of the feature on the overall developer productivity.

We are working on improvements throughout the whole stack. This includes increasing the quality and recall of the model and building a more streamlined experience for the developer with improved discoverability throughout the review process. As part of this, we are investigating the option of showing suggested edits to the reviewer while they draft comments and expanding the feature into the IDE to enable code-change authors to get suggested code edits for natural-language commands.

Acknowledgements

This is the work of many people in Google Core Systems & Experiences team, Google Research, and DeepMind. We’d like to specifically thank Peter Choy for bringing the collaboration together, and all of our team members for their key contributions and useful advice, including Marcus Revaj, Gabriela Surita, Maxim Tabachnyk, Jacob Austin, Nimesh Ghelani, Dan Zheng, Peter Josling, Mariana Stariolo, Chris Gorgolewski, Sascha Varkevisser, Katja Grünwedel, Alberto Elizondo, Tobias Welp, Paige Bailey, Pierre-Antoine Manzagol, Pascal Lamblin, Chenjie Gu, Petros Maniatis, Henryk Michalewski, Sara Wiltberger, Ambar Murillo, Satish Chandra, Madhura Dudhgaonkar, Niranjan Tulpule, Zoubin Ghahramani, Juanjo Carin, Danny Tarlow, Kevin Villela, Stoyan Nikolov, David Tattersall, Boris Bokowski, Kathy Nix, Mehdi Ghissassi, Luis C. Cobo, Yujia Li, David Choi, Kristóf Molnár, Vahid Meimand, Amit Patel, Brett Wiltshire, Laurent Le Brun, Mingpan Guo, Hermann Loose, Jonas Mattes, Savinee Dancs.

Read More