NVIDIA Studio Lineup Adds RTX-Powered Microsoft Surface Laptop Studio 2

NVIDIA Studio Lineup Adds RTX-Powered Microsoft Surface Laptop Studio 2

Editor’s note: This post is part of our weekly In the NVIDIA Studio series, which celebrates featured artists, offers creative tips and tricks and demonstrates how NVIDIA Studio technology improves creative workflows.

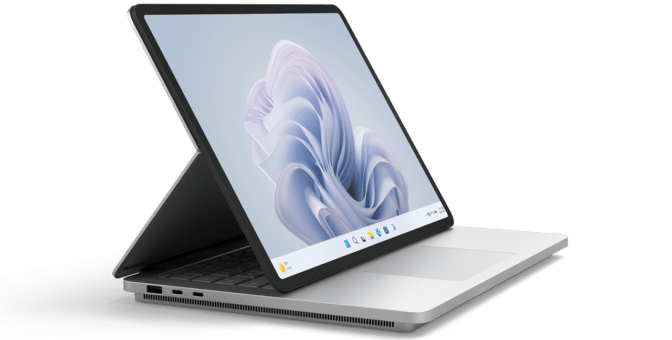
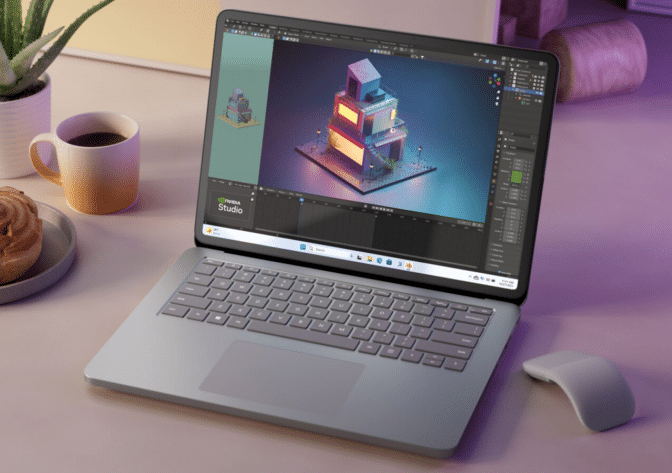
The NVIDIA Studio laptop lineup is expanding with the new Microsoft Surface Laptop Studio 2, powered by GeForce RTX 4060, GeForce RTX 4050 or NVIDIA RTX 2000 Ada Generation Laptop GPUs, providing powerful performance and versatility for creators.

The Microsoft Surface Laptop Studio 2.

Backed by the NVIDIA Studio platform, the Surface Laptop Studio 2, announced today, offers maximum stability with preinstalled Studio Drivers, plus exclusive tools to accelerate professional and creative workflows.

NVIDIA today also launched DLSS 3.5, adding Ray Reconstruction to the suite of AI-powered DLSS technologies. The latest feature puts a powerful new AI neural network at the fingertips of creators on RTX PCs, producing higher-quality, lifelike ray-traced images in real time before generating a full render.

Chaos Vantage is the first creative application to integrate Ray Reconstruction. For gamers, Ray Reconstruction is now available in Cyberpunk 2077 and is slated for the Phantom Liberty expansion on Sept. 26.

Blackmagic Design has adopted NVIDIA TensorRT acceleration in update 18.6 for its popular DaVinci Resolve software for video editing, color correction, visual effects, motion graphics and audio post-production. By integrating TensorRT, the software now runs AI tools like Magic Mask, Speed Warp and Super Scale over 50% faster than before. With this acceleration, AI runs up to 2.3x faster on GeForce RTX and NVIDIA RTX GPUs compared to Macs.

The September Studio Driver is now available for download — providing support for the Surface Laptop Studio 2, new app releases and more.

NVIDIA and GeForce RTX GPUs get NVIDIA Studio Drivers free of charge.

This week’s In the NVIDIA Studio installment features Studio Spotlight artist Gavin O’Donnell, who created a Wild West-inspired piece using a workflow streamlined with AI and RTX acceleration in Blender and Unreal Engine running on a GeForce RTX 3090 GPU.

Create Without Compromise

The Surface Laptop Studio 2, when configured with NVIDIA laptop GPUs, delivers up to 2x the graphics performance compared to the previous generation, and is NVIDIA Studio validated.

The versatile Microsoft Surface Laptop Studio 2.

In addition to NVIDIA graphics, the Surface Laptop Studio 2 comes with 13th Gen Intel Core processors, up to 64GB of RAM and a 2TB SSD. It features a bright, vibrant 14.4-inch PixelSense Flow touchscreen, with true-to-life color and up to 120Hz refresh rate, and now comes with Dolby Vision IQ and HDR to deliver sharper colors.

The system’s unique design adapts to fit any workflow. It instantly transitions from a pro-grade laptop to a perfectly angled display for entertainment to a portable creative canvas for drawing and sketching with the Surface Slim Pen 2.

NVIDIA Studio systems deliver upgraded performance thanks to dedicated ray tracing, AI and video encoding hardware. They also provide AI app acceleration, advanced rendering and Ray Reconstruction with NVIDIA DLSS, plus exclusive software like NVIDIA Omniverse, NVIDIA Broadcast, NVIDIA Canvas and RTX Video Super Resolution — helping creators go from concept to completion faster.

The Surface Laptop Studio 2 will be available beginning October 3.

An AI for RTX

NVIDIA GeForce and RTX GPUs feature powerful local accelerators that are critical for AI performance, supercharging creativity by unlocking AI capabilities on Windows 11 PCs — including the Surface Laptop Studio 2.​

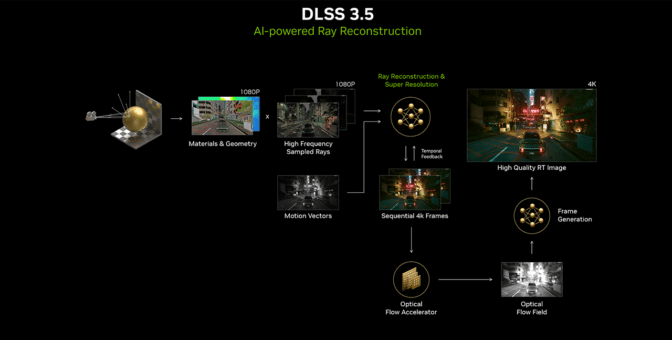
AI-powered Ray Resstruction.

With the launch of DLSS 3.5 with Ray Reconstruction, an NVIDIA supercomputer-trained AI network replaces hand-tuned denoisers to generate higher-quality pixels between sampled rays.

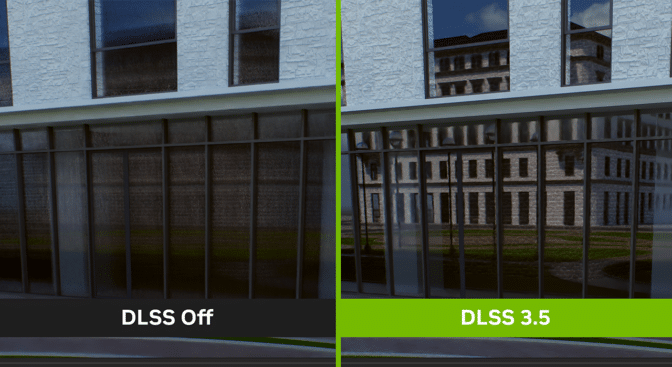
Ray Reconstruction improves the real-time editing experience by sharpening images and reducing noise — even while panning around a scene. The benefits of Ray Reconstruction shine in the viewport, as rendering during camera movement is notoriously difficult.

Chaos Vantage DLSS 3.5 with Ray Reconstruction technology.

By adding DLSS 3.5 support, Chaos Vantage will enable creators to explore large scenes in a fully ray-traced environment at high frame rates with improved image quality. Ray Reconstruction joins other AI-accelerated features in Vantage, including the NVIDIA OptiX denoiser and Super Resolution.

DLSS 3.5 and AI-powered Ray Reconstruction today join performance-multiplying AI Frame Generation in Cyberpunk 2077 with the new 2.0 update. On Sept. 26, Cyberpunk 2077: Phantom Liberty will launch with full ray tracing and DLSS 3.5.

NVIDIA TensorRT — the high-performance inference optimizer that delivers low latency and high throughput for deep learning inference applications and features — has been added to DaVinci Resolve in version 18.6.

Performance testing conducted by NVIDIA in August 2023. NVIDIA Driver 536.75. Windows 11. Measures time to apply various AI effects in DaVinci Resolve 18.6: Magic Mask, Speed Warp, Super Res, Depth Map.

The added acceleration dramatically increases performance. AI effects now run on a GeForce RTX 4090 GPU up to 2.3x faster than on M2 Ultra, and 5.4x faster than on 7900 XTX.

Stay tuned for updates in the weeks ahead for more AI on RTX, including DLSS 3.5 support coming to Omniverse this October.

Welcome to the Wild, Wild West

Gavin O’Donnell — an Ireland-based senior environment concept artist at Disruptive Games — is no stranger to interactive entertainment.

He also does freelance work on the side including promo art, environment design and matte painting for an impressive client list, including Disney, Giant Animation, ImagineFX, Netflix and more.

O’Donnell’s series of Western-themed artwork — the Wild West Project — was directly inspired by the critically acclaimed classic open adventure game Red Dead Redemption 2.

Prospector, lawman or vigilante?

“I really enjoyed how immersive the storyline and the world in general was, so I wanted to create a scene that might exist in that fictional world,” said O’Donnell. Furthermore, it presented him an opportunity to practice new workflows within 3D apps Blender and Unreal Engine.

‘Wild West Project’ brings the American Frontier to life.

Workflows combining NVIDIA technologies including RTX GPU acceleration at the intersection of AI were of especially great interest — accelerated by his GeForce RTX 3090 laptop GPU.

In Blender — O’Donnell sampled AI-powered Blender Cycles RTX-accelerated OptiX ray tracing in the viewport for interactive, photoreal rendering for modeling and animation.

On a beautiful journey.

Meanwhile — in Unreal Engine — O’Donnell sampled NVIDIA DLSS to increase the interactivity of the viewport by using AI to upscale frames rendered at lower resolution while still retaining high-fidelity detail. On top of RTX-accelerated rendering for high-fidelity visualization of 3D designs, virtual production and game development, the artist could simply create better, more detailed artwork, faster and easier.

O’Donnell credits his success to a constant state of creative evaluation — ensuring everything from his content creation techniques, methods of gaining inspiration, and technological knowledge — enabling the highest quality artwork possible — all while maintaining resource and efficiency gains.

As such, O’Donnell recently upgraded to an NVIDIA Studio laptop equipped with a GeForce RTX 4090 GPU with spectacular results. His rendering speeds in Blender, already very fast, sped up 73%, a massive time savings for the artist.

Senior environment concept artist Gavin O’Donnell.

Check out O’Donnell’s portfolio on ArtStation.

And finally, don’t forget to enter the #StartToFinish community challenge! Show us a photo or video of how one of your art projects started — and then one of the final result — using the hashtag #StartToFinish and tagging @NVIDIAStudio for a chance to be featured! Submissions considered through Sept. 30.

Follow NVIDIA Studio on Instagram, Twitter and Facebook. Access tutorials on the Studio YouTube channel and get updates directly in your inbox by subscribing to the Studio newsletter.

Read More

Run AI on Your PC? GeForce Users Are Ahead of the Curve

Run AI on Your PC? GeForce Users Are Ahead of the Curve

Gone are the days when AI was the domain of sprawling data centers or elite researchers.

For GeForce RTX users, AI is now running on your PC. It’s personal, enhancing every keystroke, every frame and every moment.

Gamers are already enjoying the benefits of AI in over 300 RTX games. Meanwhile, content creators have access to over 100 RTX creative and design apps, with AI enhancing everything from video and photo editing to asset generation.

And for GeForce enthusiasts, it’s just the beginning. RTX is the platform for today and the accelerator that will power the AI of tomorrow.

How Did AI and Gaming Converge?

NVIDIA pioneered the integration of AI and gaming with DLSS, a technique that uses AI to generate pixels in video games automatically and which has increased frame rates by up to 4x.

And with the recent introduction of DLSS 3.5, NVIDIA has enhanced the visual quality in some of the world’s top titles, setting a new standard for visually richer and more immersive gameplay.

But NVIDIA’s AI integration doesn’t stop there. Tools like RTX Remix empower game modders to remaster classic content using high-quality textures and materials generated by AI.

With NVIDIA ACE for Games, AI-powered avatars come to life on the PC, marking a new era of immersive gaming.

How Are RTX and AI Powering Creators?

Creators use AI to imagine new concepts, automate tedious tasks and create stunning works of art. They rely on RTX because it accelerates top creator applications, including the world’s most popular photo editing, video editing, broadcast and 3D apps.

With over 100 RTX apps now AI-enabled, creators can get more done and deliver incredible results.

The performance metrics are staggering.

RTX GPUs boost AI image generation speeds in tools like Stable Diffusion by 4.5x compared to competing processors. Meanwhile, in 3D rendering, Blender experiences a speed increase of 5.4x.

Video editing in DaVinci Resolve powered by AI doubles its speed, and Adobe Photoshop’s photo editing tasks become 3x as swift.

NVIDIA RTX AI tech demonstrates a staggering 10x faster speeds in distinct workflows when juxtaposed against its competitors.

NVIDIA provides various AI tools, apps and software development kits designed specifically for creators. This includes exclusive offerings like NVIDIA Omniverse, OptiX Denoiser, NVIDIA Canvas, NVIDIA Broadcast and NVIDIA DLSS.

How Is AI Changing Our Digital Experience Beyond Chatbots?

Beyond gaming and content creation, RTX GPUs bring AI to all types of users.

Add Microsoft to the equation and 100 million RTX-powered Windows 11 PCs and workstations are already AI-ready.

The complementary technologies behind the Windows platform and NVIDIA’s dynamic AI hardware and software stack are the driving forces that power hundreds of Windows apps and games.

  • Gamers: RTX-accelerated AI has been adopted in more than 300 games, increasing frame rates and enhancing visual fidelity.
  • Creators: More than 100 AI-enabled creative applications benefit from RTX acceleration — including the top apps for image generation, video editing, photo editing and 3D. AI helps artists work faster, automate tedious tasks and  expand the boundaries of creative expression.
  • Video Streamers: RTX Video Super Resolution uses AI to increase the resolution and improve the quality of streamed video, elevating the home video experience.
  • Office Workers and Students: Teleconferencing and remote learning get an RTX boost with NVIDIA Broadcast. AI improves video and audio quality and adds unique effects to make virtual interactions smoother and collaboration more efficient.
  • Developers: Thanks to NVIDIA’s world-leading AI development platform and technology developed by Microsoft and NVIDIA called CUDA on Windows Subsystem for Linux, developers can now do early AI development and training from the comfort of Windows, and easily migrate to servers for large training runs.

What Are the Emerging AI Applications for RTX PCs?

Generative AI enables users to quickly generate new content based on a variety of inputs — text, images, sounds, animation, 3D models or other types of data — bringing easy-to-use AI to more PCs.

Large language models (LLMs) are at the heart of many of these use cases.

Perhaps the best known is ChatGPT, a chatbot that runs in the cloud and one of the fastest growing applications in history.

Many of these LLMs now run directly on PC, enabling new end-user applications like automatically drafting documents and emails, summarizing web content, extracting insights from spreadsheet data, planning travel, and powering general-purpose AI assistants.

LLMs are some of the most demanding PC workloads, requiring a powerful AI accelerator — like an RTX GPU.

What Powers the AI Revolution on Our Desktops (and Beyond)?

What’s fueling the PC AI revolution?

Three pillars: lightning-fast graphics processing from GPUs, AI capabilities integral to GeForce and the omnipresent cloud.

Gamers already know all about the parallel processing power of GPUs. But what role did the GPU play in enabling AI in the cloud?

NVIDIA GPUs have transformed cloud services. These advanced systems power everything from voice recognition to autonomous factory operations.

In 2016, NVIDIA hand-delivered to OpenAI the first NVIDIA DGX AI supercomputer — the engine behind the LLM breakthrough powering ChatGPT.

NVIDIA DGX supercomputers, packed with GPUs and used initially as an AI research instrument, are now running 24/7 at businesses worldwide to refine data and process AI. Half of all Fortune 100 companies have installed DGX AI supercomputers.

The cloud, in turn, provides more than just vast quantities of training data for advanced AI models running on these machines.

Why Choose Desktop AI?

But why run AI on your desktop when the cloud seems limitless?

GPU-equipped desktops — where the AI revolution began — are still where the action is.

  • Availability: Whether a gamer or a researcher, everyone needs tools — from games to sophisticated AI models used by wildlife researchers in the field — that can function even when offline.
  • Speed: Some applications need instantaneous results. Cloud latency doesn’t always cut it.
  • Data size: Uploading and downloading large datasets from the cloud can be inefficient and cumbersome.
  • Privacy: Whether you’re a Fortune 500 company or just editing family photos and videos, we all have data we want to keep close to home.

RTX GPUs are based on the same architecture that fuels NVIDIA’s cloud performance. They blend the benefits of running AI locally with access to tools and the performance only NVIDIA can deliver.

NPUs, often called inference accelerators, are now finding their way into modern CPUs, highlighting the growing understanding of AI’s critical role in every application.

While NPUs are designed to offload light AI tasks, NVIDIA’s GPUs stand unparalleled for demanding AI models with raw performance ranging from a 20x-100x increase.

What’s Next for AI in Our Everyday Lives?

AI isn’t just a trend — it will impact many aspects of our daily lives.

AI functionality will expand as research advances and user expectations will evolve. Keeping up will require GPUs — and a rich software stack built on top of them — that are up to the challenge.

NVIDIA is at the forefront of this transformative era, offering end-to-end optimized development solutions.

NVIDIA provides developers with tools to add more AI features to PCs, enhancing value for users, all powered by RTX.

From gaming innovations with RTX Remix to the NVIDIA NeMo LLM language model for assisting coders, the AI landscape on the PC is rich and expanding.

Whether it’s stunning new gaming content, AI avatars, incredible tools for creators or the next generation of digital assistants, the promise of AI-powered experiences will continuously redefine the standard of personal computing.

Learn more about GeForce’s AI capabilities.

Read More

Into the Omniverse: Blender 4.0 Alpha Release Sets Stage for New Era of OpenUSD Artistry

Into the Omniverse: Blender 4.0 Alpha Release Sets Stage for New Era of OpenUSD Artistry

Editor’s note: This post is part of Into the Omniverse, a series focused on how artists, developers and enterprises can transform their workflows using the latest advances in OpenUSD and NVIDIA Omniverse.

For seasoned 3D artists and budding digital creation enthusiasts alike, an alpha version of the popular 3D software Blender is elevating creative journeys.

With the update’s features for intricate shader network creation and enhanced asset-export capabilities, the development community using Blender and the Universal Scene Description framework, aka OpenUSD, is helping to evolve the 3D landscape.

NVIDIA engineers play a key role in enhancing the OpenUSD capabilities of Blender which also brings enhancements for use with NVIDIA Omniverse, a development platform for connecting and building OpenUSD-based tools and applications.

A Universal Upgrade for Blender Workflows

With Blender 4.0 Alpha, 3D creators across industries and enterprises can access optimized OpenUSD workflows for various use cases.

For example, Emily Boehmer, a design intern at BMW Group’s Technology Office in Munich, is using the combined power of Omniverse, Blender and Adobe Substance 3D Painter to create realistic, OpenUSD-based assets to train computer vision AI models.

Boehmer worked with her team to create assets for use with SORDI.ai, an AI dataset published by BMW Group that contains over 800,000 photorealistic images.

A clip of an industrial crate virtually “aging.”

USD helped optimize Boehmer’s workflow. “It’s great to see USD support for both Blender and Substance 3D Painter,” she said. “When I create 3D assets using USD, I can be confident that they’ll look and behave as I expect them to in the scenes that they’ll be placed in because I can add physical properties to them.”

Australian animator Marko Matosevic is also harnessing the combined power of Blender, Omniverse and USD in his 3D workflows.

Matosevic began creating tutorials for his YouTube channel, Markom3D, to help artists of all levels. He now shares his vast 3D knowledge with over 77,000 subscribers.

Most recently, Matosevic created a 3D spaceship in Blender that he later enhanced in Omniverse through virtual reality.

Individual creators aren’t the only ones seeing success with Blender and USD. Multimedia entertainment studio Moment Factory creates OpenUSD-based digital twins to simulate their immersive events — including live performances, multimedia shows and interactive installations — in Omniverse with USD before deploying them in the real world.

Moment Factory’s interactive installation at InfoComm 2023.

Team members can work in the digital twin at the same time, including designers using Blender to create and render eye-catching beauty shots to share their creative vision with customers.

See how Moment Factory uses Omniverse, Blender and USD to bring their immersive events to life in their recent livestream.

These 3D workflow enhancements are available to all. Blender users and USD creators, including Boehmer, showcased their unique 3D pipeline on this recent Omniverse community livestream:

New Features Deliver Elevated 3D Experience

The latest USD improvements in Blender are the result of collaboration among many contributors, including AMD, Apple, Unity and NVIDIA, enabled by the Blender Foundation.

For example, hair object support — which improves USD import and export capabilities for digital hair — was added by a Unity software engineer. And a new Python IO callback system — which lets technical artists use Python to access USD application programming interfaces — was developed by a software engineer at NVIDIA, with support from others at Apple and AMD.

NVIDIA engineers are continuing to work on other USD contributions to include in future Blender updates.

Coming soon, the Blender 4.0 Alpha 201.0 Omniverse Connector will offer new features for USD and Omniverse users, including:

  • Universal Material Mapper 2 add-on: This allows for more complex shader networks, or the blending of multiple textures and materials, to be round-tripped between Omniverse apps and Blender through USD.
  • Improved UsdPreviewSurface support and USDZ import/export capabilities: This enables creators to export 3D assets for viewing in AR and VR applications.
  • Generic attribute support: This allows geometry artists to generate vertex colors — red, green or blue values — or other per-vertex (3D point) values and import/export them between Blender and other 3D applications.

Learn more about the Blender updates by watching this tutorial:

Get Plugged Into the Omniverse 

Learn from industry experts on how OpenUSD is enabling custom 3D pipelines, easing 3D tool development and delivering interoperability between 3D applications in sessions from SIGGRAPH 2023, now available on demand.

Anyone can build their own Omniverse extension or Connector to enhance their 3D workflows and tools. Explore the Omniverse ecosystem’s growing catalog of connections, extensions, foundation applications and third-party tools.

Share your Blender and Omniverse work as part of the latest community challenge, #StartToFinish. Use the hashtag to submit a screenshot of a project featuring both its beginning and ending stages for a chance to be featured on the @NVIDIAStudio and @NVIDIAOmniverse social channels.

To learn more about how OpenUSD can improve 3D workflows, check out a new video series about the framework. For more resources on OpenUSD, explore the Alliance for OpenUSD forum or visit the AOUSD website.

Get started with NVIDIA Omniverse by downloading the standard license for free or learn how Omniverse Enterprise can connect your team

Developers can check out these Omniverse resources to begin building on the platform. 

Stay up to date on the platform by subscribing to the newsletter and following NVIDIA Omniverse on Instagram, LinkedIn, Medium, Threads and Twitter.

For more, check out our forums, Discord server, Twitch and YouTube channels.

Featured image courtesy of Alex Trevino.

Read More

NVIDIA CEO Jensen Huang to Headline AI Summit in Tel Aviv

NVIDIA CEO Jensen Huang to Headline AI Summit in Tel Aviv

NVIDIA founder and CEO Jensen Huang will highlight the newest in generative AI and cloud computing at the NVIDIA AI Summit in Tel Aviv from Oct. 15-16.

The two-day summit is set to attract more than 2,500 developers, researchers and decision-makers from across one of the world’s most vibrant technology hubs.

With over 6,000 startups, Israel consistently ranks among the world’s top countries for VC investments per capita. The 2023 Global Startup Ecosystem report places Tel Aviv among the top 5 cities globally for startups.

The summit features more than 60 live sessions led by experts from NVIDIA and the region’s tech leaders, who will dive deep into topics like accelerated computing, robotics, cybersecurity and climate science.

Attendees will be able to network and gain insights from some of NVIDIA’s foremost experts, including Kimberly Powell, vice president and general manager of healthcare; Deepu Talla, vice president and general manager of embedded and edge computing; Gilad Shainer, senior vice president of networking and HPC; and Gal Chechik, senior director and head of the Israel AI Research Center.

Key events and features of the summit include:

  • Livestream: The keynote by Huang will take place Monday, Oct. 16, at 10 a.m. Israel time (11 p.m. Pacific) and will be available for livestreaming, with on-demand access to follow.
  • Ecosystem exhibition: An exhibition space at the Summit will showcase NVIDIA’s tech demos, paired with contributions from partners and emerging startups from the NVIDIA Inception program.
  • Deep dive into AI: The first day is dedicated to intensive learning sessions hosted by the NVIDIA Deep Learning Institute. Workshops encompass topics like “Fundamentals of Deep Learning” and “Building AI-Based Cybersecurity Pipelines,” among a range of other topics. Edge AI & Robotics Developer Day activities will explore innovations in AI and the NVIDIA Jetson Orin platform.
  • Multitrack sessions: The second day will include multiple tracks, covering areas such as generative AI and LLMs, AI in healthcare, networking and developer tools and NVIDIA Omniverse.

Learn more at https://www.nvidia.com/en-il/ai-summit-israel/.

Featured image credit: Gady Munz via the PikiWiki – Israel free image collection project

Read More

Cash In: ‘PAYDAY 3’ Streams on GeForce NOW

Cash In: ‘PAYDAY 3’ Streams on GeForce NOW

Time to get the gang back together — PAYDAY 3 streams on GeForce NOW this week.

It’s one of 11 titles joining the cloud this week, including Party Animals.

The Perfect Heist

PAYDAY 3 on GeForce NOW
Not pictured: the crew member in a fuzzy bunny mask. He stayed home.

PAYDAY 3 is the highly anticipated sequel to one of the world’s most popular co-op shooters. Step out of retirement and back into the life of crime in the shoes of the Payday Gang — who bring the envy of their peers and the nightmare of law enforcement wherever they go. Set several years after the end of the crew’s reign of terror over Washington, D.C., the game reassembles the group to deal with the threat that’s roused them out of early retirement.

Upgrade to a GeForce NOW Ultimate membership to pull off every heist at the highest quality. Ultimate members can stream on GeForce RTX 4080 rigs with support for up to 4K at 120 frames per second gameplay on PCs and Macs, providing a gaming experience so seamless that it would be a crime to stream on anything less.

Game On

Party Animals on GeForce NOW
Paw it out with friends on nearly any device.

There’s always more action every GFN Thursday. Here’s the full list of this week’s GeForce NOW library additions:

  • HumanitZ (New release on Steam, Sept. 18)
  • Party Animals (New release on Steam, Sept. 20)
  • PAYDAY 3 (New release on Steam, Epic Games Store, Xbox PC Game Pass, Sept. 21)
  • Warhaven (New release on Steam)
  • 911 Operator (Epic Games Store)
  • Ad Infinitum (Steam)
  • Chained Echoes (Xbox, available on PC Game Pass)
  • Deceit 2 (Steam)
  • The Legend of Tianding (Xbox, available on PC Game Pass)
  • Mechwarrior 5: Mercenaries (Xbox, available on PC Game Pass)
  • Sprawl (Steam)

Starting today, the Cyberpunk 2077 2.0 patch will also be supported, adding DLSS 3.5 technology and other new features.

What are you planning to play this weekend? Let us know on Twitter or in the comments below.

Read More

Virtually Incredible: Mercedes-Benz Prepares Its Digital Production System for Next-Gen Platform With NVIDIA Omniverse, MB.OS and Generative AI

Virtually Incredible: Mercedes-Benz Prepares Its Digital Production System for Next-Gen Platform With NVIDIA Omniverse, MB.OS and Generative AI

Mercedes-Benz is using digital twins for production with help from NVIDIA Omniverse, a platform for developing Universal Scene Description (OpenUSD) applications to design, collaborate, plan and operate manufacturing and assembly facilities.

Mercedes-Benz’s new production techniques will bring its next-generation vehicle portfolio into its manufacturing facilities operating in Rastatt, Germany; Kecskemét, Hungary; and Beijing, China — and offer a blueprint for its more than 30 factories worldwide. This “Digital First” approach enhances efficiency, avoids defects and saves time, marking a step-change in the flexibility, resilience and intelligence of the Mercedes-Benz MO360 production system.

The digital twin in production helps ensure Mercedes-Benz assembly lines can be retooled, configured and optimized in physically accurate simulations first. The new assembly lines in the Kecskemét plant will enable production of vehicles based on the newly launched Mercedes Modular Architecture that are developed virtually using digital twins in Omniverse.

By leveraging Omniverse, Mercedes-Benz can interact directly with its suppliers, reducing coordination processes by 50%. Using a digital twin in production doubles the speed for converting or constructing an assembly hall, while improving the quality of the processes, according to the automaker.

“Using NVIDIA Omniverse and AI, Mercedes-Benz is building a connected, digital-first approach to optimize its manufacturing processes, ultimately reducing construction time and production costs,” said Rev Lebaredian, vice president of Omniverse and simulation technology at NVIDIA, during a digital event held earlier today.

In addition, the introduction of AI opens up new areas of energy and cost savings. The Rastatt plant is being used to pioneer digital production in the paint shop. Mercedes-Benz used AI to monitor relevant sub-processes in the pilot testing, which led to energy savings of 20%.

Supporting State-of-the-Art Software Systems

Next-generation Mercedes-Benz vehicles will feature its new operating system “MB.OS,” which will be standard across its entire vehicle portfolio and deliver premium software capabilities and experiences across all vehicle domains.

Mercedes-Benz has partnered with NVIDIA to develop software-defined vehicles. Its fleets will be built on NVIDIA DRIVE Orin and DRIVE software, with intelligent driving capabilities tested and validated in the NVIDIA DRIVE Sim platform, which is also built on Omniverse.

The automaker’s MO360 production system will enable it to produce electric, hybrid and gas models on the same production lines and to scale the manufacturing of electric vehicles. The implementation of MB.OS in production will allow its cars to roll off assembly lines with the latest versions of vehicle software.

“Mercedes-Benz is initiating a new era of automotive manufacturing thanks to the integration of artificial intelligence, MB.OS and the digital twin based on NVIDIA Omniverse into the MO360 ecosystem,” said Jörg Burzer, member of the board of the Mercedes-Benz Group AG, Production, Quality and Supply Chain Management. “With our new ‘Digital First’ approach, we unlock efficiency potential even before the launch of our MMA models in our global production network and can accelerate the ramp-up significantly.”

Flexible Factories of the Future

Avoiding costly manufacturing production shutdowns is critical. Running simulations in NVIDIA Omniverse enables factory planners to optimize factory floor and production line layouts for supply routes, and production lines can be validated without having to disrupt production.

This virtual approach also enables efficient design of new lines and change management for existing lines while reducing downtime and helping improve product quality. For the world’s automakers, much is at stake across the entire software development stack, from chip to cloud.

Omniverse Collaboration for Efficiencies 

The Kecskemét plant is the first with a full digital twin of the entire factory. This virtual area enables development at the heart of assembly, between its tech and trim lines. And plans are for the new Kecskemét factory hall to launch into full production.

Collaboration in Omniverse has enabled plant suppliers and planners to interact with each other interactively in the virtual environment, so that layout options and automation changes can be incorporated and validated in real time. This accelerates how quickly new production lines can reach maximum capacity and reduces the risk of re-work or stoppages.

Virtual collaboration with digital twins can accelerate planning and implementation of projects by weeks, as well as translate to significant cost savings for launching new manufacturing lines.

Learn more about NVIDIA Omniverse and DRIVE Orin.

Read More

Train and deploy ML models in a multicloud environment using Amazon SageMaker

Train and deploy ML models in a multicloud environment using Amazon SageMaker

As customers accelerate their migrations to the cloud and transform their business, some find themselves in situations where they have to manage IT operations in a multicloud environment. For example, you might have acquired a company that was already running on a different cloud provider, or you may have a workload that generates value from unique capabilities provided by AWS. Another example is independent software vendors (ISVs) that make their products and services available in different cloud platforms to benefit their end customers. Or an organization may be operating in a Region where a primary cloud provider is not available, and in order to meet the data sovereignty or data residency requirements, they can use a secondary cloud provider.

In these scenarios, as you start to embrace generative AI, large language models (LLMs) and machine learning (ML) technologies as a core part of your business, you may be looking for options to take advantage of AWS AI and ML capabilities outside of AWS in a multicloud environment. For example, you may want to make use of Amazon SageMaker to build and train ML model, or use Amazon SageMaker Jumpstart to deploy pre-built foundation or third party ML models, which you can deploy at the click of a few buttons. Or you may want to take advantage of Amazon Bedrock to build and scale generative AI applications, or you can leverage AWS’ pre-trained AI services, which don’t require you to learn machine learning skills. AWS provides support for scenarios where organizations want to bring their own model to Amazon SageMaker or into Amazon SageMaker Canvas for predictions.

In this post, we demonstrate one of the many options that you have to take advantage of AWS’s broadest and deepest set of AI/ML capabilities in a multicloud environment. We show how you can build and train an ML model in AWS and deploy the model in another platform. We train the model using Amazon SageMaker, store the model artifacts in Amazon Simple Storage Service (Amazon S3), and deploy and run the model in Azure. This approach is beneficial if you use AWS services for ML for its most comprehensive set of features, yet you need to run your model in another cloud provider in one of the situations we’ve discussed.

Key concepts

Amazon SageMaker Studio is a web-based, integrated development environment (IDE) for machine learning. SageMaker Studio allows data scientists, ML engineers, and data engineers to prepare data, build, train, and deploy ML models on one web interface. With SageMaker Studio, you can access purpose-built tools for every stage of the ML development lifecycle, from data preparation to building, training, and deploying your ML models, improving data science team productivity by up to ten times. SageMaker Studio notebooks are quick start, collaborative notebooks that integrate with purpose-built ML tools in SageMaker and other AWS services.

SageMaker is a comprehensive ML service enabling business analysts, data scientists, and MLOps engineers to build, train, and deploy ML models for any use case, regardless of ML expertise.

AWS provides Deep Learning Containers (DLCs) for popular ML frameworks such as PyTorch, TensorFlow, and Apache MXNet, which you can use with SageMaker for training and inference. DLCs are available as Docker images in Amazon Elastic Container Registry (Amazon ECR). The Docker images are preinstalled and tested with the latest versions of popular deep learning frameworks as well as other dependencies needed for training and inference. For a complete list of the pre-built Docker images managed by SageMaker, see Docker Registry Paths and Example Code. Amazon ECR supports security scanning, and is integrated with Amazon Inspector vulnerability management service to meet your organization’s image compliance security requirements, and to automate vulnerability assessment scanning. Organizations can also use AWS Trainium and AWS Inferentia for better price-performance for running ML training jobs or inference.

Solution overview

In this section, we describe how to build and train a model using SageMaker and deploy the model to Azure Functions. We use a SageMaker Studio notebook to build, train, and deploy the model. We train the model in SageMaker using a pre-built Docker image for PyTorch. Although we’re deploying the trained model to Azure in this case, you could use the same approach to deploy the model on other platforms such as on premises or other cloud platforms.

When we create a training job, SageMaker launches the ML compute instances and uses our training code and the training dataset to train the model. It saves the resulting model artifacts and other output in an S3 bucket that we specify as input to the training job. When model training is complete, we use the Open Neural Network Exchange (ONNX) runtime library to export the PyTorch model as an ONNX model.

Finally, we deploy the ONNX model along with a custom inference code written in Python to Azure Functions using the Azure CLI. ONNX supports most of the commonly used ML frameworks and tools. One thing to note is that converting an ML model to ONNX is useful if you want to want to use a different target deployment framework, such as PyTorch to TensorFlow. If you’re using the same framework on both the source and target, you don’t need to convert the model to ONNX format.

The following diagram illustrates the architecture for this approach.
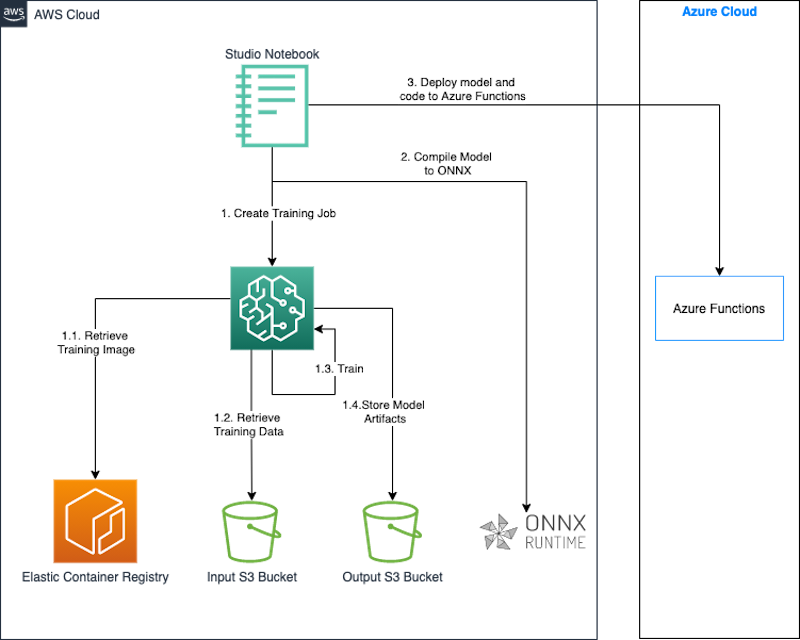
Multicloud train and deploy architecture diagram

We use a SageMaker Studio notebook along with the SageMaker Python SDK to build and train our model. The SageMaker Python SDK is an open-source library for training and deploying ML models on SageMaker. For more details, refer to Create or Open an Amazon SageMaker Studio Notebook.

The code snippets in the following sections have been tested in the SageMaker Studio notebook environment using the Data Science 3.0 image and Python 3.0 kernel.

In this solution, we demonstrate the following steps:

  1. Train a PyTorch model.
  2. Export the PyTorch model as an ONNX model.
  3. Package the model and inference code.
  4. Deploy the model to Azure Functions.

Prerequisites

You should have the following prerequisites:

  • An AWS account.
  • A SageMaker domain and SageMaker Studio user. For instructions to create these, refer to Onboard to Amazon SageMaker Domain Using Quick setup.
  • The Azure CLI.
  • Access to Azure and credentials for a service principal that has permissions to create and manage Azure Functions.

Train a model with PyTorch

In this section, we detail the steps to train a PyTorch model.

Install dependencies

Install the libraries to carry out the steps required for model training and model deployment:

pip install torchvision onnx onnxruntime

Complete initial setup

We begin by importing the AWS SDK for Python (Boto3) and the SageMaker Python SDK. As part of the setup, we define the following:

  • A session object that provides convenience methods within the context of SageMaker and our own account.
  • A SageMaker role ARN used to delegate permissions to the training and hosting service. We need this so that these services can access the S3 buckets where our data and model are stored. For instructions on creating a role that meets your business needs, refer to SageMaker Roles. For this post, we use the same execution role as our Studio notebook instance. We get this role by calling sagemaker.get_execution_role().
  • The default Region where our training job will run.
  • The default bucket and the prefix we use to store the model output.

See the following code:

import sagemaker
import boto3
import os

execution_role = sagemaker.get_execution_role()
region = boto3.Session().region_name
session = sagemaker.Session()
bucket = session.default_bucket()
prefix = "sagemaker/mnist-pytorch"

Create the training dataset

We use the dataset available in the public bucket sagemaker-example-files-prod-{region}. The dataset contains the following files:

  • train-images-idx3-ubyte.gz – Contains training set images
  • train-labels-idx1-ubyte.gz – Contains training set labels
  • t10k-images-idx3-ubyte.gz – Contains test set images
  • t10k-labels-idx1-ubyte.gz – Contains test set labels

We use thetorchvision.datasets module to download the data from the public bucket locally before uploading it to our training data bucket. We pass this bucket location as an input to the SageMaker training job. Our training script uses this location to download and prepare the training data, and then train the model. See the following code:

MNIST.mirrors = [
    f"https://sagemaker-example-files-prod-{region}.s3.amazonaws.com/datasets/image/MNIST/"
]

MNIST(
    "data",
    download=True,
    transform=transforms.Compose(
        [transforms.ToTensor(), transforms.Normalize((0.1307,), (0.3081,))]
    ),
)

Create the training script

With SageMaker, you can bring your own model using script mode. With script mode, you can use the pre-built SageMaker containers and provide your own training script, which has the model definition, along with any custom libraries and dependencies. The SageMaker Python SDK passes our script as an entry_point to the container, which loads and runs the train function from the provided script to train our model.

When the training is complete, SageMaker saves the model output in the S3 bucket that we provided as a parameter to the training job.

Our training code is adapted from the following PyTorch example script. The following excerpt from the code shows the model definition and the train function:

# define network

class Net(nn.Module):
    def __init__(self):
        super(Net, self).__init__()
        self.conv1 = nn.Conv2d(1, 32, 3, 1)
        self.conv2 = nn.Conv2d(32, 64, 3, 1)
        self.dropout1 = nn.Dropout(0.25)
        self.dropout2 = nn.Dropout(0.5)
        self.fc1 = nn.Linear(9216, 128)
        self.fc2 = nn.Linear(128, 10)

    def forward(self, x):
        x = self.conv1(x)
        x = F.relu(x)
        x = self.conv2(x)
        x = F.relu(x)
        x = F.max_pool2d(x, 2)
        x = self.dropout1(x)
        x = torch.flatten(x, 1)
        x = self.fc1(x)
        x = F.relu(x)
        x = self.dropout2(x)
        x = self.fc2(x)
        output = F.log_softmax(x, dim=1)
        return output
# train

def train(args, model, device, train_loader, optimizer, epoch):
    model.train()
    for batch_idx, (data, target) in enumerate(train_loader):
        data, target = data.to(device), target.to(device)
        optimizer.zero_grad()
        output = model(data)
        loss = F.nll_loss(output, target)
        loss.backward()
        optimizer.step()
        if batch_idx % args.log_interval == 0:
            print('Train Epoch: {} [{}/{} ({:.0f}%)]tLoss: {:.6f}'.format(
                epoch, batch_idx * len(data), len(train_loader.dataset),
                100. * batch_idx / len(train_loader), loss.item()))
            if args.dry_run:
                break

Train the model

Now that we have set up our environment and created our input dataset and custom training script, we can start the model training using SageMaker. We use the PyTorch estimator in the SageMaker Python SDK to start a training job on SageMaker. We pass in the required parameters to the estimator and call the fit method. When we call fit on the PyTorch estimator, SageMaker starts a training job using our script as training code:

from sagemaker.pytorch import PyTorch

output_location = f"s3://{bucket}/{prefix}/output"
print(f"training artifacts will be uploaded to: {output_location}")

hyperparameters={
    "batch-size": 100,
    "epochs": 1,
    "lr": 0.1,
    "gamma": 0.9,
    "log-interval": 100
}

instance_type = "ml.c4.xlarge"
estimator = PyTorch(
    entry_point="train.py",
    source_dir="code",  # directory of your training script
    role=execution_role,
    framework_version="1.13",
    py_version="py39",
    instance_type=instance_type,
    instance_count=1,
    volume_size=250,
    output_path=output_location,
    hyperparameters=hyperparameters
)

estimator.fit(inputs = {
    'training': f"{inputs}",
    'testing':  f"{inputs}"
})

Export the trained model as a ONNX model

After the training is complete and our model is saved to the predefined location in Amazon S3, we export the model to an ONNX model using the ONNX runtime.

We include the code to export our model to ONNX in our training script to run after the training is complete.

PyTorch exports the model to ONNX by running the model using our input and recording a trace of operators used to compute the output. We use a random input of the right type with the PyTorch torch.onnx.export function to export the model to ONNX. We also specify the first dimension in our input as dynamic so that our model accepts a variable batch_size of inputs during inference.

def export_to_onnx(model, model_dir, device):
    logger.info("Exporting the model to onnx.")
    dummy_input = torch.randn(1, 1, 28, 28).to(device)
    input_names = [ "input_0" ]
    output_names = [ "output_0" ]
    path = os.path.join(model_dir, 'mnist-pytorch.onnx')
    torch.onnx.export(model, dummy_input, path, verbose=True, input_names=input_names, output_names=output_names,
                     dynamic_axes={'input_0' : {0 : 'batch_size'},    # variable length axes
                                'output_0' : {0 : 'batch_size'}})

ONNX is an open standard format for deep learning models that enables interoperability between deep learning frameworks such as PyTorch, Microsoft Cognitive Toolkit (CNTK), and more. This means you can use any of these frameworks to train the model and subsequently export the pre-trained models in ONNX format. By exporting the model to ONNX, you get the benefit of a broader selection of deployment devices and platforms.

Download and extract the model artifacts

The ONNX model that our training script has saved has been copied by SageMaker to Amazon S3 in the output location that we specified when we started the training job. The model artifacts are stored as a compressed archive file called model.tar.gz. We download this archive file to a local directory in our Studio notebook instance and extract the model artifacts, namely the ONNX model.

import tarfile

local_model_file = 'model.tar.gz'
model_bucket,model_key = estimator.model_data.split('/',2)[-1].split('/',1)
s3 = boto3.client("s3")
s3.download_file(model_bucket,model_key,local_model_file)

model_tar = tarfile.open(local_model_file)
model_file_name = model_tar.next().name
model_tar.extractall('.')
model_tar.close()

Validate the ONNX model

The ONNX model is exported to a file named mnist-pytorch.onnx by our training script. After we have downloaded and extracted this file, we can optionally validate the ONNX model using the onnx.checker module. The check_model function in this module checks the consistency of a model. An exception is raised if the test fails.

import onnx

onnx_model = onnx.load("mnist-pytorch.onnx")
onnx.checker.check_model(onnx_model)

Package the model and inference code

For this post, we use .zip deployment for Azure Functions. In this method, we package our model, accompanying code, and Azure Functions settings in a .zip file and publish it to Azure Functions. The following code shows the directory structure of our deployment package:

mnist-onnx
├── function_app.py
├── model
│ └── mnist-pytorch.onnx
└── requirements.txt

List dependencies

We list the dependencies for our inference code in the requirements.txt file at the root of our package. This file is used to build the Azure Functions environment when we publish the package.

azure-functions
numpy
onnxruntime

Write inference code

We use Python to write the following inference code, using the ONNX Runtime library to load our model and run inference. This instructs the Azure Functions app to make the endpoint available at the /classify relative path.

import logging
import azure.functions as func
import numpy as np
import os
import onnxruntime as ort
import json


app = func.FunctionApp()

def preprocess(input_data_json):
    # convert the JSON data into the tensor input
    return np.array(input_data_json['data']).astype('float32')
    
def run_model(model_path, req_body):
    session = ort.InferenceSession(model_path)
    input_data = preprocess(req_body)
    logging.info(f"Input Data shape is {input_data.shape}.")
    input_name = session.get_inputs()[0].name  # get the id of the first input of the model   
    try:
        result = session.run([], {input_name: input_data})
    except (RuntimeError) as e:
        print("Shape={0} and error={1}".format(input_data.shape, e))
    return result[0] 

def get_model_path():
    d=os.path.dirname(os.path.abspath(__file__))
    return os.path.join(d , './model/mnist-pytorch.onnx')

@app.function_name(name="mnist_classify")
@app.route(route="classify", auth_level=func.AuthLevel.ANONYMOUS)
def main(req: func.HttpRequest) -> func.HttpResponse:
    logging.info('Python HTTP trigger function processed a request.')
    # Get the img value from the post.
    try:
        req_body = req.get_json()
    except ValueError:
        pass

    if req_body:
        # run model
        result = run_model(get_model_path(), req_body)
        # map output to integer and return result string.
        digits = np.argmax(result, axis=1)
        logging.info(type(digits))
        return func.HttpResponse(json.dumps({"digits": np.array(digits).tolist()}))
    else:
        return func.HttpResponse(
             "This HTTP triggered function successfully.",
             status_code=200
        )

Deploy the model to Azure Functions

Now that we have the code packaged into the required .zip format, we’re ready to publish it to Azure Functions. We do that using the Azure CLI, a command line utility to create and manage Azure resources. Install the Azure CLI with the following code:

!pip install -q azure-cli

Then complete the following steps:

  1. Log in to Azure:
    !az login
  2. Set up the resource creation parameters:
    import random
    
    random_suffix = str(random.randint(10000,99999))
    resource_group_name = f"multicloud-{random_suffix}-rg"
    storage_account_name = f"multicloud{random_suffix}"
    location = "ukwest"
    sku_storage = "Standard_LRS"
    functions_version = "4"
    python_version = "3.9"
    function_app = f"multicloud-mnist-{random_suffix}"
    
  3. Use the following commands to create the Azure Functions app along with the prerequisite resources:
    !az group create --name {resource_group_name} --location {location}
    !az storage account create --name {storage_account_name} --resource-group {resource_group_name} --location {location} --sku {sku_storage}
    !az functionapp create --name {function_app} --resource-group {resource_group_name} --storage-account {storage_account_name} --consumption-plan-location "{location}" --os-type Linux --runtime python --runtime-version {python_version} --functions-version {functions_version}
    
  4. Set up the Azure Functions so that when we deploy the Functions package, the requirements.txt file is used to build our application dependencies:
    !az functionapp config appsettings set --name {function_app} --resource-group {resource_group_name} --settings @./functionapp/settings.json
  5. Configure the Functions app to run the Python v2 model and perform a build on the code it receives after .zip deployment:
    {
    	"AzureWebJobsFeatureFlags": "EnableWorkerIndexing",
    	"SCM_DO_BUILD_DURING_DEPLOYMENT": true
    }
    
  6. After we have the resource group, storage container, and Functions app with the right configuration, publish the code to the Functions app:
    !az functionapp deployment source config-zip -g {resource_group_name} -n {function_app} --src {function_archive} --build-remote true
    

Test the model

We have deployed the ML model to Azure Functions as an HTTP trigger, which means we can use the Functions app URL to send an HTTP request to the function to invoke the function and run the model.

To prepare the input, download the test images files from the SageMaker example files bucket and prepare a set of samples to the format required by the model:

from torch.utils.data import DataLoader
from torchvision import datasets, transforms
import matplotlib.pyplot as plt

transform=transforms.Compose(
        [transforms.ToTensor(), transforms.Normalize((0.1307,), (0.3081,))]
)

test_dataset = datasets.MNIST(root='../data',  download=True, train=False, transform=transform)
test_loader = DataLoader(test_dataset, batch_size=16, shuffle=True)

test_features, test_labels = next(iter(test_loader))

Use the requests library to send a post request to the inference endpoint with the sample inputs. The inference endpoint takes the format as shown in the following code:

import requests, json

def to_numpy(tensor):
    return tensor.detach().cpu().numpy() if tensor.requires_grad else tensor.cpu().numpy()

url = f"https://{function_app}.azurewebsites.net/api/classify"
response = requests.post(url, 
                json.dumps({"data":to_numpy(test_features).tolist()})
            )
predictions = json.loads(response.text)['digits']

Clean up

When you’re done testing the model, delete the resource group along with the contained resources, including the storage container and Functions app:

!az group delete --name {resource_group_name} --yes

Additionally, it is recommended to shut down idle resources within SageMaker Studio to reduce costs. For more information, refer to Save costs by automatically shutting down idle resources within Amazon SageMaker Studio.

Conclusion

In this post, we showed how you can build and train an ML model with SageMaker and deploy it to another cloud provider. In the solution, we used a SageMaker Studio notebook, but for production workloads, we recommended using MLOps to create repeatable training workflows to accelerate model development and deployment.

This post didn’t show all the possible ways to deploy and run a model in a multicloud environment. For example, you can also package your model into a container image along with inference code and dependency libraries to run the model as a containerized application in any platform. For more information about this approach, refer to Deploy container applications in a multicloud environment using Amazon CodeCatalyst. The intent of the post is to show how organizations can use AWS AI/ML capabilities in a multicloud environment.


About the authors

Raja Vaidyanathan is a Solutions Architect at AWS supporting global financial services customers. Raja works with customers to architect solutions to complex problems with long-term positive impact on their business. He’s a strong engineering professional skilled in IT strategy, enterprise data management, and application architecture, with particular interests in analytics and machine learning.

Amandeep Bajwa is a Senior Solutions Architect at AWS supporting financial services enterprises. He helps organizations achieve their business outcomes by identifying the appropriate cloud transformation strategy based on industry trends and organizational priorities. Some of the areas Amandeep consults on are cloud migration, cloud strategy (including hybrid and multicloud), digital transformation, data and analytics, and technology in general.

Prema Iyer is Senior Technical Account Manager for AWS Enterprise Support. She works with external customers on a variety of projects, helping them improve the value of their solutions when using AWS.

Read More
Neural Graphical Models

Neural Graphical Models

This research paper was presented at the 17th European Conference on Symbolic and Quantitative Approaches to Reasoning with Uncertainty (opens in new tab), a premier forum for advances in the theory and practice of reasoning under uncertainty.

ECSQARU Blog Hero:
Neural Graphical Models

In the field of reasoning under uncertainty, probabilistic graphical models (PGMs) stand out as a powerful tool for analyzing data. They can represent relationships between features and learn underlying distributions that model functional dependencies between them. Learning, inference, and sampling are operations that make graphical models useful for domain exploration.  

In a broad sense, learning involves fitting the distribution function parameters from data, and inference is the procedure of answering queries in the form of conditional distributions with one or more observed variables. Sampling entails the ability to extract samples from the underlying distribution as defined by the graphical model. A common challenge with graphical model representations lies in the high computational complexity of one or more of these operations.   

Various graphical models impose restrictions on the set of distributions or types of variables in the domain. Some graphical models work with continuous variables only (or categorical variables only) or place restrictions on the graph structure, for example, the constraint that continuous variables cannot be parents of categorical variables in a directed acyclic graph (DAG). Other restrictions affect the set of distributions the models can represent, for example, only multivariate Gaussian distributions.

Microsoft Research Podcast

Collaborators: Gov4git with Petar Maymounkov and Kasia Sitkiewicz

Gov4git is a governance tool for decentralized, open-source cooperation, and is helping to lay the foundation for a future in which everyone can collaborate more efficiently, transparently, and easily and in ways that meet the unique desires and needs of their respective communities.


In our paper, “Neural Graphical Models (opens in new tab),” presented at ECSQARU 2023 (opens in new tab), we propose Neural Graphical Models (NGMs), a new type of PGM that learns to represent the probability function over the domain using a deep neural network. The parameterization of such a network can be learned from data efficiently, with a loss function that jointly optimizes adherence to the dependency structure, given as input in the form of a directed or undirected graph, and fit to the data. Probability functions represented by NGMs are unrestricted by any of the common restrictions inherent in other PGMs. NGMs can handle various input types: categorical, continuous, images and embedding representations. They also support efficient inference and sampling.

Figure 1 - The image on the left shows an undirected network graph with five variables: x1, x2, x3, x4 and x5. The variable x3 is connected to all other variables, and x1 is directly connected to x3 and x4 only. The annotation next to the nodes indicates that the value of each variable is a function of the values of its neighbors. For example, the value of x1 is a function of x3 and x4, the value of x2 is a function of x3, and so on. On the right, we see a table representing the adjacency matrix for the same graph, with both rows and columns labeled with variables names from x1 to x5. The cells show either ones or zeros. The ones indicate a presence of an edge, for example in the cell on the intersection of the row labeled x1 and the column labeled x3.
Figure 1: Graphical view of NGMs: The input graph G (undirected) for given input data X. Each feature ( x_i=f_i(text{Nbrs}(x_i))) is a function of the neighboring features. For a DAG, the functions between features will be defined by the Markov Blanket relationship ( x_i=f_i(text{MB}(x_i))). On the right, the adjacency matrix represents the associated dependency structure S.
Figure 2 - The image shows a neural network. The input layer has five variables: x1, x2, …, x5, and the corresponding output layer has the same five variables. Between the input and output layers there is one hidden layer with six nodes. Some of the units in the input layer are connected to the units in the hidden layer, and some of the units in the hidden layer are connected to the units in the output layer. A careful examination shows that there is a path from a unit xi in the input layer to a unit xj in the output layer whenever there is an edge from the xi node to the xj node in the graph in Figure 1. Note that there are no self-paths, that is, paths from xi in the input layer to xi in the output layer. Some of the remaining neural network connections representing zeroed-out weights are shown in dashed black lines.
Figure 2: Neural view of NGMs: This is a neural network as a multitask learning architecture capturing nonlinear dependencies for the features of the undirected graph in Figure 1. The presence of a path from the input to the output features indicates a dependency between them. The dependency matrix between the input and output of the NN reduces to matrix product operation (S_{nn}=Pi_i|W_i|=|W_1|times|W_2|). Note that not all the zeroed-out weights of the MLP (in black-dashed lines) are shown for the sake of clarity.

Experimental validations for NGMs

In our paper (opens in new tab), we evaluate NGMs’ performance, inference accuracy, sensitivity to the input graph, and ability to recover the input dependency structure when trained on both real and synthetic data: Infant mortality data (opens in new tab) from the Centers for Disease Control and Prevention (CDC), synthetic Gaussian Graphical model data, and lung cancer data from Kaggle. 

The infant mortality dataset (opens in new tab) describes pregnancy and birth variables for all live births in the US and, in instances of infant death before the first birthday, the cause of death. We used the latest available data, which includes information about 3,988,733 live births in the US during 2015. It was particularly challenging to evaluate the inference accuracy of NGMs using this dataset due to the (thankfully) rare occurrence of infant deaths during the first year of life, making queries concerning such low probability events hard to accurately estimate.  

We used the CDC data to evaluate the NGMs’ inference accuracy. We compared their prediction for four variables of various types: gestational age (ordinal, expressed in weeks), birth weight (continuous, specified in grams), survival until the first birthday (binary) and the cause of death. We used the categories of “alive,” the 10 most common causes of death, or “other” for the less common causes. Here, “alive” was indicated for 99.48% of infants. We also compared the performance of logistic regression, Bayesian networks, Explainable Boosting Machines (EBM), and NGMs. In case of NGMs, we trained two models: one using the Bayesian network graph and one using the uGLAD graph.

Our results demonstrate that NGM are significantly more accurate than logistic regression, more accurate than Bayesian networks, and on par with EBM models for categorical and ordinal variables. They particularly shine when predicting very low probability categories for multi-valued variable cause of death, where, in contrast most models (such as both PGMs and classification models) typically struggle. Note that while we need to train a separate LR and EBM model for each outcome variable evaluated, all variables can be predicted within one trained NGM model. Interestingly, the two NGM models show similar accuracy results despite the differences in the two dependency structures used in training. 

We believe that NGMs are an interesting amalgam of the deep learning architectures’ expressivity, and PGMs’ representation capabilities and can be applied in many domains, given that they place no restrictions on input types and distributions. We encourage you to explore NGMs and take advantage of the ability to work with a wider range of distributions and inputs. You can access the code for Neural Graphical Models on GitHub (opens in new tab).

The post Neural Graphical Models appeared first on Microsoft Research.

Read More