NVIDIA Expands Collaboration With Microsoft to Help Developers Build, Deploy AI Applications Faster

NVIDIA Expands Collaboration With Microsoft to Help Developers Build, Deploy AI Applications Faster

If optimized AI workflows are like a perfectly tuned orchestra — where each component, from hardware infrastructure to software libraries, hits exactly the right note — then the long-standing harmony between NVIDIA and Microsoft is music to developers’ ears.

The latest AI models developed by Microsoft, including the Phi-3 family of small language models, are being optimized to run on NVIDIA GPUs and made available as NVIDIA NIM inference microservices. Other microservices developed by NVIDIA, such as the cuOpt route optimization AI, are regularly added to Microsoft Azure Marketplace as part of the NVIDIA AI Enterprise software platform.

In addition to these AI technologies, NVIDIA and Microsoft are delivering a growing set of optimizations and integrations for developers creating high-performance AI apps for PCs powered by NVIDIA GeForce RTX and NVIDIA RTX GPUs.

Building on the progress shared at NVIDIA GTC, the two companies are furthering this ongoing collaboration at Microsoft Build, an annual developer event, taking place this year in Seattle through May 23.

Accelerating Microsoft’s Phi-3 Models 

Microsoft is expanding its family of Phi-3 open small language models, adding small (7-billion-parameter) and medium (14-billion-parameter) models similar to its Phi-3-mini, which has 3.8 billion parameters. It’s also introducing a new 4.2-billion-parameter multimodal model, Phi-3-vision, that supports images and text.

All of these models are GPU-optimized with NVIDIA TensorRT-LLM and available as NVIDIA NIMs, which are accelerated inference microservices with a standard application programming interface (API) that can be deployed anywhere.

APIs for the NIM-powered Phi-3 models are available at ai.nvidia.com and through NVIDIA AI Enterprise on the Azure Marketplace.

NVIDIA cuOpt Now Available on Azure Marketplace

NVIDIA cuOpt, a GPU-accelerated AI microservice for route optimization, is now available in Azure Marketplace via NVIDIA AI Enterprise. cuOpt features massively parallel algorithms that enable real-time logistics management for shipping services, railway systems, warehouses and factories.

The model has set two dozen world records on major routing benchmarks, demonstrating the best accuracy and fastest times. It could save billions of dollars for the logistics and supply chain industries by optimizing vehicle routes, saving travel time and minimizing idle periods.

Through Azure Marketplace, developers can easily integrate the cuOpt microservice with Azure Maps to support teal-time logistics management and other cloud-based workflows, backed by enterprise-grade management tools and security.

Optimizing AI Performance on PCs With NVIDIA RTX

The NVIDIA accelerated computing platform is the backbone of modern AI — helping developers build solutions for over 100 million Windows GeForce RTX-powered PCs and NVIDIA RTX-powered workstations worldwide.

NVIDIA and Microsoft are delivering new optimizations and integrations to Windows developers to accelerate AI in next-generation PC and workstation applications. These include:

  • Faster inference performance for large language models via the NVIDIA DirectX driver, the Generative AI ONNX Runtime extension and DirectML. These optimizations, available now in the GeForce Game Ready, NVIDIA Studio and NVIDIA RTX Enterprise Drivers, deliver up to 3x faster performance on NVIDIA and GeForce RTX GPUs.
  • Optimized performance on RTX GPUs for AI models like Stable Diffusion and Whisper via WebNN, an API that enables developers to accelerate AI models in web applications using on-device hardware.
  • With Windows set to support PyTorch through DirectML, thousands of Hugging Face models will work in Windows natively. NVIDIA and Microsoft are collaborating to scale performance on more than 100 million RTX GPUs.

Join NVIDIA at Microsoft Build 

Conference attendees can visit NVIDIA booth FP28 to meet developer experts and experience live demos of NVIDIA NIM, NVIDIA cuOpt, NVIDIA Omniverse and the NVIDIA RTX AI platform. The booth also highlights the NVIDIA MONAI platform for medical imaging workflows and NVIDIA BioNeMo generative AI platform for drug discovery — both available on Azure as part of NVIDIA AI Enterprise.

Attend sessions with NVIDIA speakers to dive into the capabilities of the NVIDIA RTX AI platform on Windows PCs and discover how to deploy generative AI and digital twin tools on Microsoft Azure.

And sign up for the Developer Showcase, taking place Wednesday, to discover how developers are building innovative generative AI using NVIDIA AI software on Azure.

Read More

New Performance Optimizations Supercharge NVIDIA RTX AI PCs for Gamers, Creators and Developers

New Performance Optimizations Supercharge NVIDIA RTX AI PCs for Gamers, Creators and Developers

NVIDIA today announced at Microsoft Build new AI performance optimizations and integrations for Windows that help deliver maximum performance on NVIDIA GeForce RTX AI PCs and NVIDIA RTX workstations.

Large language models (LLMs) power some of the most exciting new use cases in generative AI and now run up to 3x faster with ONNX Runtime (ORT) and DirectML using the new NVIDIA R555 Game Ready Driver. ORT and DirectML are high-performance tools used to run AI models locally on Windows PCs.

WebNN, an application programming interface for web developers to deploy AI models, is now accelerated with RTX via DirectML, enabling web apps to incorporate fast, AI-powered capabilities. And PyTorch will support DirectML execution backends, enabling Windows developers to train and infer complex AI models on Windows natively. NVIDIA and Microsoft are collaborating to scale performance on RTX GPUs.

These advancements build on NVIDIA’s world-leading AI platform, which accelerates more than 500 applications and games on over 100 million RTX AI PCs and workstations worldwide.

RTX AI PCs — Enhanced AI for Gamers, Creators and Developers

NVIDIA introduced the first PC GPUs with dedicated AI acceleration, the GeForce RTX 20 Series with Tensor Cores, along with the first widely adopted AI model to run on Windows, NVIDIA DLSS, in 2018. Its latest GPUs offer up to 1,300 trillion operations per second of dedicated AI performance.

In the coming months, Copilot+ PCs equipped with new power-efficient systems-on-a-chip and RTX GPUs will be released, giving gamers, creators, enthusiasts and developers increased performance to tackle demanding local AI workloads, along with Microsoft’s new Copilot+ features.

For gamers on RTX AI PCs, NVIDIA DLSS boosts frame rates by up to 4x, while NVIDIA ACE brings game characters to life with AI-driven dialogue, animation and speech.

For content creators, RTX powers AI-assisted production workflows in apps like Adobe Premiere, Blackmagic Design DaVinci Resolve and Blender to automate tedious tasks and streamline workflows. From 3D denoising and accelerated rendering to text-to-image and video generation, these tools empower artists to bring their visions to life.

For game modders, NVIDIA RTX Remix, built on the NVIDIA Omniverse platform, provides AI-accelerated tools to create RTX remasters of classic PC games. It makes it easier than ever to capture game assets, enhance materials with generative AI tools and incorporate full ray tracing.

For livestreamers, the NVIDIA Broadcast application delivers high-quality AI-powered background subtraction and noise removal, while NVIDIA RTX Video provides AI-powered upscaling and auto-high-dynamic range to enhance streamed video quality.

Enhancing productivity, LLMs powered by RTX GPUs execute AI assistants and copilots faster, and can process multiple requests simultaneously.

And RTX AI PCs allow developers to build and fine-tune AI models directly on their devices using NVIDIA’s AI developer tools, which include NVIDIA AI Workbench, NVIDIA cuDNN and CUDA on Windows Subsystem for Linux. Developers also have access to RTX-accelerated AI frameworks and software development kits like NVIDIA TensorRT, NVIDIA Maxine and RTX Video.

The combination of AI capabilities and performance deliver enhanced experiences for gamers, creators and developers.

Faster LLMs and New Capabilities for Web Developers

Microsoft recently released the generative AI extension for ORT, a cross-platform library for AI inference. The extension adds support for optimization techniques like quantization for LLMs like Phi-3, Llama 3, Gemma and Mistral. ORT supports different execution providers for inferencing via various software and hardware stacks, including DirectML.

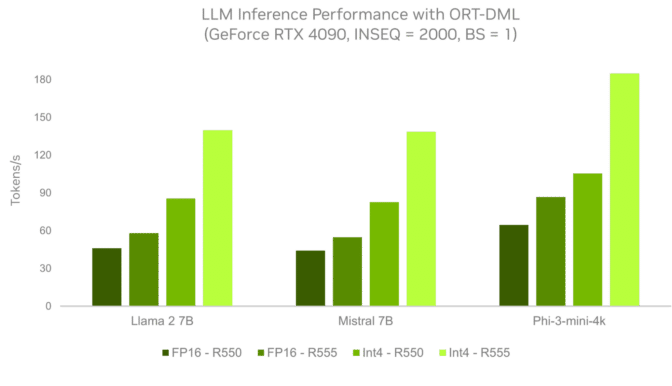
ORT with the DirectML backend offers Windows AI developers a quick path to develop AI capabilities, with stability and production-grade support for the broad Windows PC ecosystem. NVIDIA optimizations for the generative AI extension for ORT, available now in R555 Game Ready, Studio and NVIDIA RTX Enterprise Drivers, help developers get up to 3x faster performance on RTX compared to previous drivers.

Inference performance for three LLMs using ONNX Runtime and the DirectML execution provider with the latest R555 GeForce driver compared to the previous R550 driver. INSEQ=2000 representative of document summarization workloads. All data captured with GeForce RTX 4090 GPU using batch size 1. The generative AI extension support for int4 quantization, plus the NVIDIA optimizations, result in up to 3x faster performance for LLMs.

Developers can unlock the full capabilities of RTX hardware with the new R555 driver, bringing better AI experiences to consumers, faster. It includes:

  • Support for DQ-GEMM metacommand to handle INT4 weight-only quantization for LLMs
  • New RMSNorm normalization methods for Llama 2, Llama 3, Mistral and Phi-3 models
  • Group and multi-query attention mechanisms, and sliding window attention to support Mistral
  • In-place KV updates to improve attention performance
  • Support for GEMM of non-multiple-of-8 tensors to improve context phase performance

Additionally, NVIDIA has optimized AI workflows within WebNN to deliver the powerful performance of RTX GPUs directly within browsers. The WebNN standard helps web app developers accelerate deep learning models with on-device AI accelerators, like Tensor Cores.

Now available in developer preview, WebNN uses DirectML and ORT Web, a Javascript library for in-browser model execution, to make AI applications more accessible across multiple platforms. With this acceleration, popular models like Stable Diffusion, SD Turbo and Whisper run up to 4x faster on WebNN compared to WebGPU and are now available for developers to use. Microsoft Build attendees can learn more about developing on RTX in the Accelerating development on Windows PCs with RTX AI in-person session on Wednesday, May 22, at 11 a.m. PT.

Read More

A Superbloom of Updates in the May Studio Driver Gives Fresh Life to Content Creation

A Superbloom of Updates in the May Studio Driver Gives Fresh Life to Content Creation

Editor’s note: This post is part of our In the NVIDIA Studio series, which celebrates featured artists, offers creative tips and tricks, and demonstrates how NVIDIA Studio technology improves creative workflows. We’re also deep diving on new GeForce RTX GPU features, technologies and resources, and how they dramatically accelerate content creation.

A superbloom of creative app updates, included in the May Studio Driver, is ready for download today.

New GPU-accelerated and AI-powered apps and features are now available, backed by the NVIDIA Studio platform.

And this week’s featured In the NVIDIA Studio artist, Yao Chan, created the whimsical, spring-inspired 3D scene By the Window using her NVIDIA RTX GPU.

May’s Creative App Rundown

RTX Video is a collection of AI enhancements that improves the quality of video played on apps like YouTube, Prime Video and Disney+. RTX Video Super Resolution (VSR) upscales video for cleaner, crisper imagery, while RTX Video HDR transforms standard dynamic range video content to high-dynamic range (HDR10), improving its visibility, details and vibrancy.

Mozilla Firefox, the third most popular PC browser, has added support for RTX VSR and HDR, including AI-enhanced upscaling, de-artifacting and HDR effects for most streamed videos.

NVIDIA RTX Remix allows modders to easily capture game assets, automatically enhance materials with generative AI tools and create stunning RTX remasters with full ray tracing. RTX Remix recently added DLSS 3.5 support featuring Ray Reconstruction, an AI model that creates higher-quality images for intensive ray-traced games and apps, to the modding toolkit.

Game developers interested in creating their own ray-traced mod for a classic game can download the RTX Remix Beta and watch tutorial videos to get a head start.

Maxon’s Cinema 4D modeling software empowers 3D video effects artists and motion designers to create complex scenes with ease. The integration of the software’s Version 2024.4 with C4D’s Unified Simulation systems now enables control of emission fields to modify behaviors more precisely.

This integration unlocks the ability to orchestrate object interactions with different simulation types, including Pyro, Cloth, soft bodies and rigid bodies. These simulations run considerably faster depending on the RTX GPU in use.

The NVIDIA Omniverse Audio2Face app for iClone 8 uses AI to produce expressive facial animations solely from audio input. In addition to generating natural lip-sync animations for multilingual dialogue, the latest standalone release supports multilingual lip-sync and singing animations, as well as full-spectrum editing with slider controls and a keyframe editor.

Along with accurate lip-sync, facial animations are significantly enhanced by nuanced facial expressions. Pairing Audio2Face with the iClone AccuFACE plug-in, powered by NVIDIA Maxine, Reallusion provides a flexible and multifaceted approach to facial animation, laying the groundwork with audio tracks and adding subtle expressions with webcams.

These latest AI-powered tools and creative app power ups are available for NVIDIA and GeForce RTX GPU owners.

All Things Small, Bright and Beautiful

China-based 3D visual effects artist Yao Chan finds inspiration and joy in the small things in life.

“As the weather gradually warms up, everything is rejuvenating and flowers are blooming,” said Chan. “I want to create an illustration that captures the warm and bright atmosphere of spring.”

Her 3D scene By the Window closely resembles a corner of her home filled with various succulent plants, pots and neatly arranged gardening tools.

“I think everyone has a place or moment that warms their heart in one way or another, and that’s an emotion I want to share with my audience,” said the artist.

Chan usually first sketches out her ideas in Adobe Photoshop, but with her real-life reference already set, she dove right into blocking out the scene in Blender.

Since she wanted to use a hand-painted texture style for modeling the vases and pots, Chan added Blender’s displace modifier and used a Voronoi texture to give the shapes a handcrafted effect.

Chan used hair from the particle system and played with roughness, kink and hair shape effects to accurately model fluffy plants like Kochia scoparia and moss.

Blender Cycles’ RTX-accelerated OptiX ray tracing in the viewport, unlocked by Chan’s GeForce RTX GPU, ensured smooth, interactive modeling throughout her creative workflow.

Modeling and mesh work — complete.

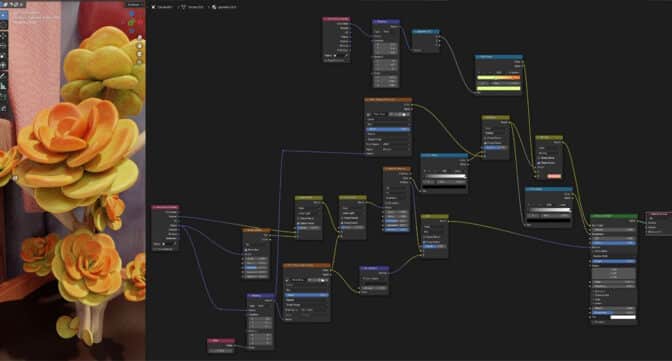
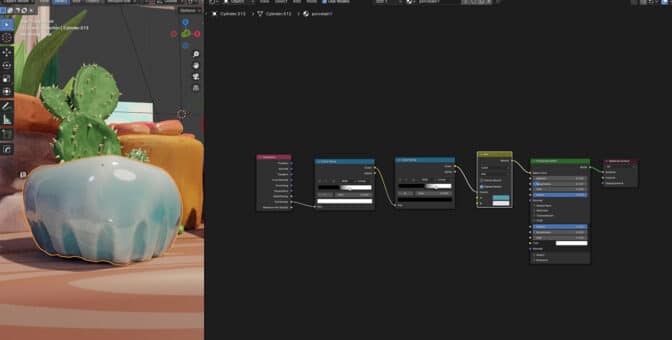
For texturing, Chan referred to former In the NVIDIA Studio featured artist SouthernShotty’s tutorial, using the precision of geometry nodes to highlight the structure of objects and gradient nodes to control the color and transparency of plants.

Chan entered the node zone in Blender.

Chan then used the “pointiness” node to simulate the material of ceramic flower pots.

The “pointiness” node helped simulate materials.

Lighting was fairly straightforward, consisting of sunlight, a warm-toned key light, a cool-toned fill light and a small light source to illuminate the area beneath the table.

Several lights added brightness to the scene.

Chan also added a few volume lights in front of the camera.

Lighting from the side.

Finally, to give the image a more vintage look, Chan added noise to the final rendered image in compositing.

Final compositing work.

Chan’s AI-powered simulations and viewport renderings were powered by her RTX GPU.

“RTX GPUs accelerate workflows and ensure fluent video editing,” she said.

Check out Chan’s latest work on Instagram.

3D artist Yao Chan.

Follow NVIDIA Studio on Instagram, X and Facebook. Access tutorials on the Studio YouTube channel and get updates directly in your inbox by subscribing to the Studio newsletter

Read More

Maximizing Training Throughput Using PyTorch FSDP and Torch.compile

Maximizing Training Throughput Using PyTorch FSDP and Torch.compile

Recently, we demonstrated how FSDP and selective activation checkpointing can be used to achieve 57% MFU (Model Flops Utilization) for training a 7B model on A100 GPUs. We also demonstrated how it can train a high quality model, which we open sourced as Granite 7B base model on Hugging Face Hub under the Apache v2.0 license.

We continued our quest to improve the utilization of GPUs by leveraging torch.compile. Using torch.compile and the selective activation checkpointing from our previous work, we achieve a MFU of 68% for the 7B model on A100 GPUs! torch.compile improves training MFU between 10% and 23% for various model sizes.

This blog is organized into three parts: (1) Challenges addressed in order to train using torch.compile, (2) Numerical parity of compile with no-compile, and (3) MFU report.

We open sourced all the code and updated it in the fms-fsdp repository. We are also working with Team PyTorch at Meta to contribute these to the newly released torch titan repository for pre-training.

Challenges of using torch.compile

torch.compile is a graph compilation technique that improves GPU utilization. For details on how torch compile works, we refer the readers to the recent PyTorch paper and associated tutorials. A key challenge in getting torch.compile to perform well is to minimize (or eliminate) graph breaks. We initially started with the Llama implementation provided by Meta, but compiling it caused too many graph breaks resulting in reduced training throughput.

Several portions of the model architecture had to be fixed, with the most important one being the positional embedding layer (RoPE). The typical RoPE implementation uses complex numbers, which was not supported in torch.compile at the time of testing. We implemented RoPE using einops while maintaining parity with the original model architecture implementation. We had to properly cache the frequencies so that we did not run into graph breaks within the RoPE implementation.

Compiling an FSDP model does result in graph breaks, which the PyTorch team at Meta is working to remove. However, these graph breaks as of PyTorch 2.3 are at FSDP unit boundaries and do not affect throughput significantly.

When using custom kernels, we need to wrap each kernel by exposing its API to torch.compile. This involves indicating what parameters are modified in-place, how they are modified, and what shapes and strides will their return values have based on the inputs. In our case, SDPA Flash attention is already integrated appropriately and we were able to get that kernel to work with torch.compile with no graph breaks.

We also noticed that when increasing the amount of data from 2T to 6T tokens, the data loader became a bottleneck. A key reason for this is the fact that previously, we implemented document shuffling in our dataloader naively, by having each worker maintain a list of shuffled document pointers.

With the larger dataset, these pointer lists were growing to hundreds of thousands of entries per worker. Maintaining pointer lists at this scale became expensive enough that cpu contention throttled our training throughput. We re-implemented document shuffling without any pointer lists using a Linear Congruential Generator. LCG is a pseudorandom number generator algorithm that implements a random walk over a population, providing sampling without replacement.

We leveraged the same idea to produce implicit bijective mappings from ordered to shuffled document indices. This enables us to shrink those annoying lists of hundreds of thousands of pointers down to a single integer state for the LCG. This eliminated 80% of the bottleneck and provided a significant boost to our performance. We will devote a separate blog to go into all the details of our performant pre-training data loader.

Numerical Parity of torch.compile and torch.no-compile

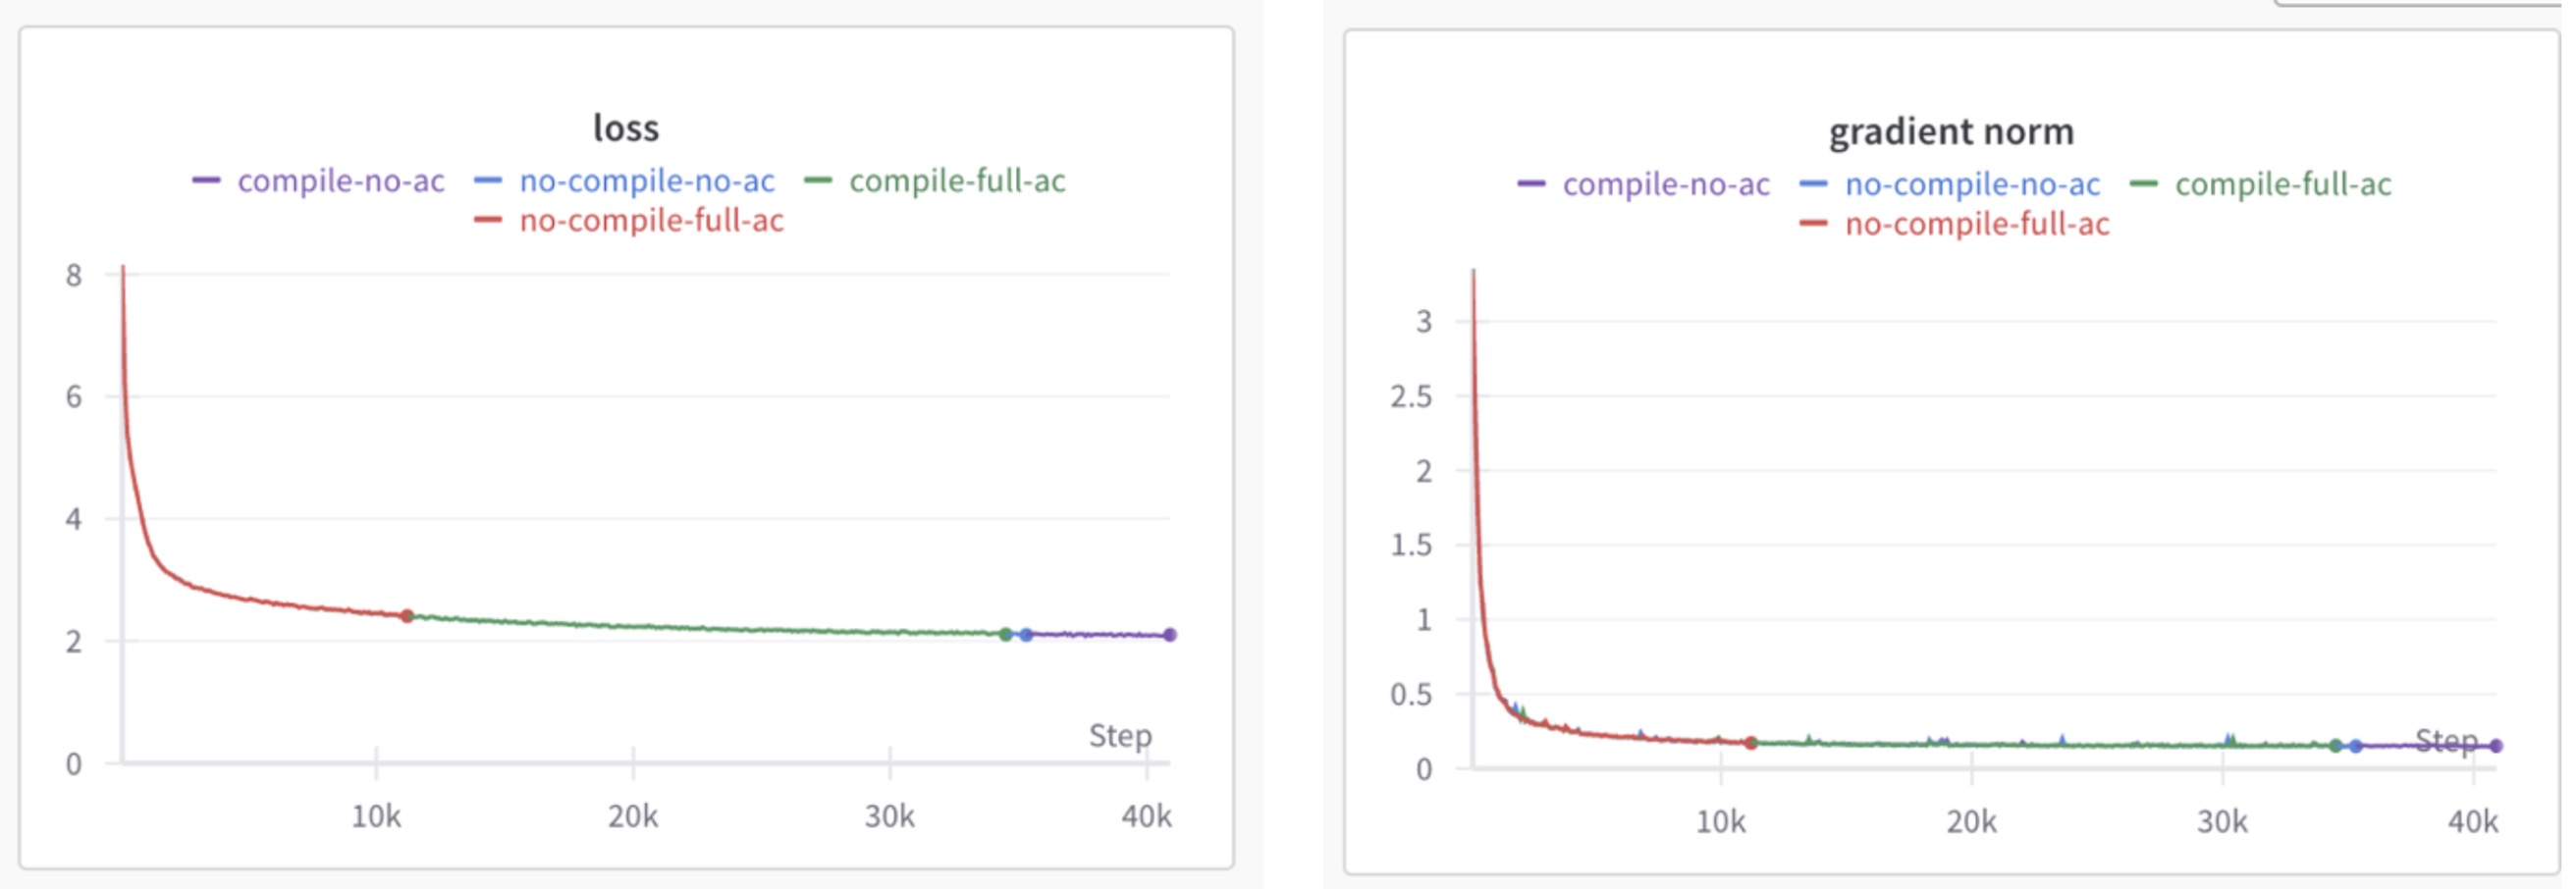
We had previously observed parity issues when training with compile and no-compile options, with one of these being related to the use of SDPA. After a few days of intense debugging sessions between the PyTorch teams at Meta and IBM, we were able to achieve parity between PyTorch compile and no-compile modes. To document and verify this parity, we take a mini-Llama model architecture of 1.4B size and train it to 100B tokens in four variations – no-compile, compile with no activation checkpointing, compile with selective activation checkpointing, and compile with full activation checkpointing.

We plot the loss curves and gradient norm for these options below:

Figure 1: Loss curve and gradient norm for various compile options

Figure 1: Loss curve and gradient norm for various compile options

Further, we run the lm-evaluation-harness and compare the various model scores on different benchmarks and observe no major differences between compile and no-compile, which is shown below.

Figure 2: lm-evaluation-harness comparison of various benchmarks between compile and no-compile

Figure 2: lm-evaluation-harness comparison of various benchmarks between compile and no-compile

We observe from all these results that compile with all its variants is equal to no-compile option, thus demonstrating parity between compile and no-compile.

MFU report

Finally, like our previous blog, we compute the MFU for four different model sizes on two clusters. One cluster is 128 A100 GPUs with 400 Gbps inter-node connectivity, and the other is 464 H100 GPUs with 3.2 Tbps inter-node connectivity. We use the selective activation checkpointing that we covered in the prior blog in addition to compile. We capture the results in the table below.

Model size Batch size MFU no-compile MFU compile Percentage gain (%)
7B 2 0.57 0.68 20
13B 2 0.51 0.60 17
34B 2 0.47 0.54 15
70B 2 0.50 0.55 10

Table 1: MFU results with compile and no compile for Llama2 model architectures on 128 A100 80GB GPUs with 400Gbps internode interconnect

Model size Batch size MFU no-compile MFU compile Percentage gain
7B 2 0.37 0.45 21
13B 2 0.35 0.43 23
34B 2 0.32 0.38 19
70B 2 0.32 0.38 19

Table 2: MFU results with compile and no compile for Llama2 model architectures on 464 H100 80GB GPUs with 3.2Tbps internode interconnect

We also had an internal production run on 448 GPUs using a Llama2 7B architecture. Using compile and selective activation checkpointing, with a global batch size of 3.7M, we trained for 4T tokens in 13 days 10 hours!

During training, the data center cooling had to kick in with extra air conditioning and our training team was alerted to this, since we were using the GPUs quite effectively ☺

One key observation from the tables 1 and 2 is that the MFU numbers do not linearly scale with model size. There are two possible explanations that we are actively investigating, one is the scalability of FSDP as model size increases and when tensor parallel needs to be enabled to more effectively use the GPU and the other is batch size, which can be increased further to get better MFU. We plan to explore FSDP v2 and selective operator checkpointing along with the tensor parallel feature to study the scaling laws of FSDP with model size.

Future Work

We plan to start testing FSDP v2 which will be released as part of PyTorch 2.4. FSDP2 provides per parameter sharding and selective operator checkpointing feature that can potentially provide even better memory-compute tradeoffs.

We have also been engaged with the PyTorch team at Meta to evaluate the new asynchronous checkpointing feature that can further improve the GPU utilization by reducing the time to write checkpoints.

We are exploring extending various Triton kernels currently used in inference to perform backward operations to gain speedups beyond inference only.

Finally, as recent work on use of fp8 is emerging, we plan to explore how we can even further accelerate model training using the new data type that promises a 2x acceleration.

Acknowledgements

There are several teams that have been involved in reaching this proof point and we would like to thank the teams across Meta and IBM. Specifically, we extend our gratitude to the Meta PyTorch distributed and compiler teams and IBM Research.

Multiple people were extensively involved in the effort of achieving torch.compile numerical parity with our models, and we wish to acknowledge the key folks involved in this effort; Animesh Jain and Less Wright at Meta, and Linsong Chu, Davis Wertheimer, Brian Vaughan, Antoni i Viros Martin, Mudhakar Srivatsa, and Raghu Ganti at IBM Research.

Special thanks to Stas Bekman, who provided extensive feedback and helped improve this blog. Their insights have been invaluable in highlighting key aspects of optimizing the training and exploring further enhancements.

Read More

Every Company to Be an ‘Intelligence Manufacturer,’ Declares NVIDIA CEO Jensen Huang at Dell Technologies World

Every Company to Be an ‘Intelligence Manufacturer,’ Declares NVIDIA CEO Jensen Huang at Dell Technologies World

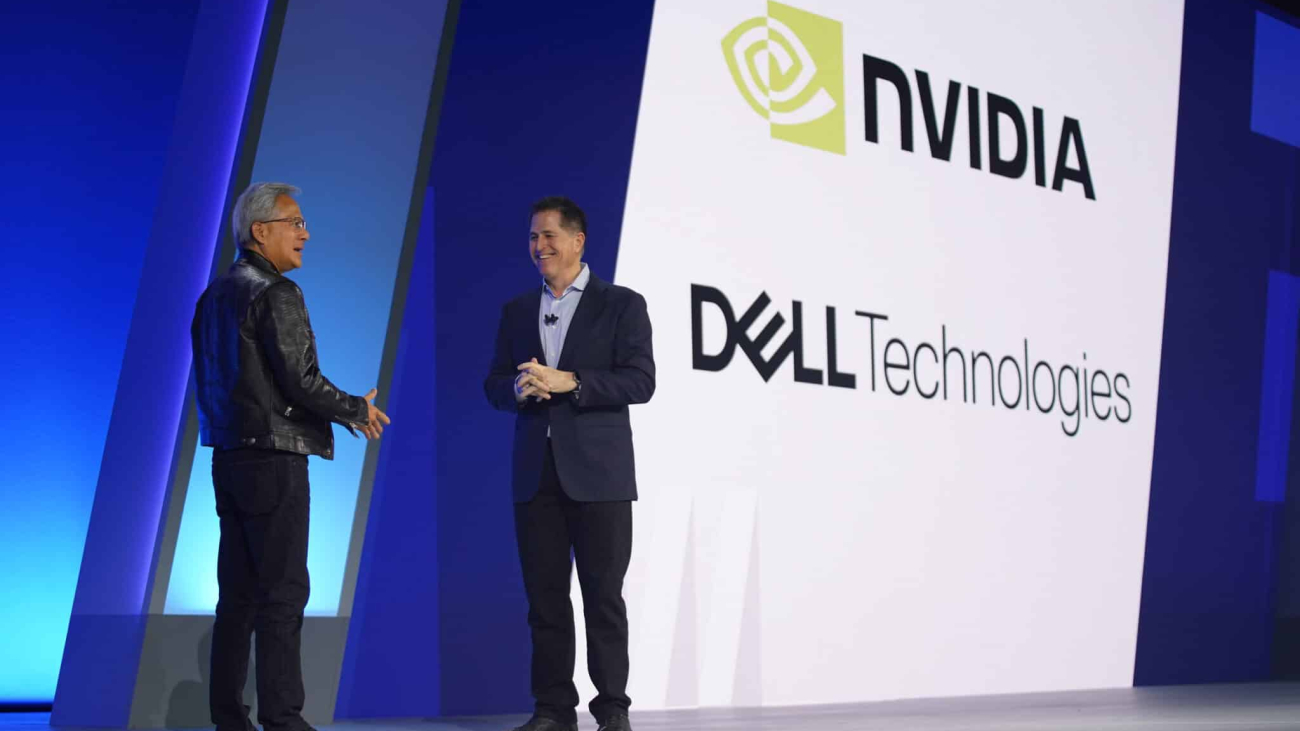
AI heralds a new era of innovation for every business in every industry, NVIDIA founder and CEO Jensen Huang said Monday during an appearance at Dell Technologies World.

“We now have the ability to manufacture intelligence,” Huang said during an on-stage conversation with Dell CEO Michael Dell. “The last Industrial Revolution was the manufacturing of software; previously, it was manufacturing electricity — now we are manufacturing intelligence.”

Together with Michael Dell, ServiceNow CEO Bill McDermott and Samsung SDS President and CEO Hwang Sung-woo, Huang shared his insights on the transformative impact of generative AI on the global economy and various industries.

“Every company at its foundation is intelligence — fundamentally every company is an intelligence manufacturer,” Huang emphasized, underscoring the potential of AI to create digital intelligence.

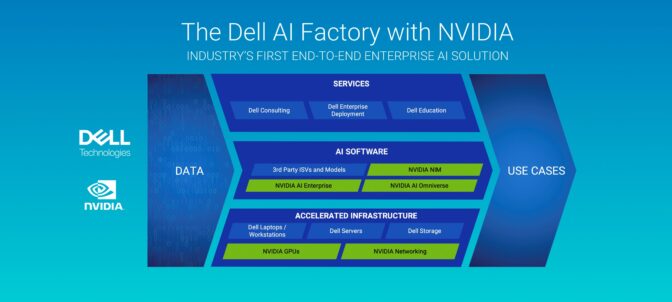
During the keynote, Dell and NVIDIA announced a slew of updates to the Dell AI Factory.

This includes the Dell PowerEdge XE9680L server with liquid cooling and eight NVIDIA Blackwell Tensor Core GPUs, the industry’s densest, energy-efficient rack-scale solutions for large Blackwell GPU deployments.

The Dell NativeEdge platform will automate the delivery of NVIDIA AI Enterprise software, helping developers and IT operators easily deploy AI applications and solutions at the edge. Advancements also include the ability to simplify AI application development for faster time to value with the integration of NVIDIA NIM inference microservices, deployment automation and more.

Huang discussed the concept of an AI factory, likening it to the factories of the last Industrial Revolution that used water to produce electricity. In the current Industrial Revolution, data centers act as AI factories, transforming data and electricity into valuable data tokens distributed globally.

“What has happened is instead of just producing software, we’re now producing intelligence — that intelligence is formulated in the form of tokens that can then be expressed in any information modality that we’d like it to be,” Huang explained.

Huang underscored the importance of full-stack accelerated computing to enable this, noting NVIDIA’s advancements.

Together, NVIDIA and Dell are providing the world’s industries with a full-stack offering — including computing, networking, storage, services and software — that drives copilots, coding assistants, virtual customer service agents and industrial digital twins.

Michael Dell introduced the latest innovations for the Dell AI Factory with NVIDIA, emphasizing their ability to simplify and accelerate customers’ AI journeys.

“We are unleashing this super genius power. Everyone is going to have access to this technology — and it’s gonna get smarter,” Dell said.

The Dell AI Factory with NVIDIA, announced earlier this year, offers a full stack of AI solutions from data center to edge, enabling organizations to quickly adopt and deploy AI at scale.

This platform integrates Dell’s AI capabilities with NVIDIA’s cutting-edge technologies, providing customers with an expansive AI portfolio and an open ecosystem of technology partners.

The Dell AI Factory, based on the NVIDIA partnership, will help establish AI sovereignty for countries by enabling strong data security and customized AI service development.

Together, Dell and NVIDIA will bring these capabilities to companies, help stand it up, and help develop new applications that enterprises can deploy, Huang said.

“Our partnership between us is really about that, literally from the ground up building AI factories and delivering it to the world’s enterprises as a solution,” Huang said.

Read More

ContextQ: Generated Questions to Support Meaningful Parent-Child Dialogue While Co-Reading

Much of early literacy education happens at home with caretakers reading books to young children. Prior research demonstrates how having dialogue with children during co-reading can develop critical reading readiness skills, but most adult readers are unsure if and how to lead effective conversations. We present ContextQ, a tablet-based reading application to unobtrusively present auto-generated dialogic questions to caretakers to support this dialogic reading practice. An ablation study demonstrates how our method of encoding educator expertise into the question generation pipeline can…Apple Machine Learning Research

Automatic Creative Selection with Cross-Modal Matching

Application developers advertise their Apps by creating product pages with App images, and bidding on search terms. It is then crucial for App images to be highly relevant with the search terms. Solutions to this problem require an image-text matching model to predict the quality of the match between the chosen image and the search terms. In this work, we present a novel approach to matching an App image to search terms based on fine-tuning a pre-trained LXMERT model. We show that compared to the CLIP model and a baseline using a Transformer model for search terms, and a ResNet model for…Apple Machine Learning Research

Mixtral 8x22B is now available in Amazon SageMaker JumpStart

Mixtral 8x22B is now available in Amazon SageMaker JumpStart

Today, we are excited to announce the Mixtral-8x22B large language model (LLM), developed by Mistral AI, is available for customers through Amazon SageMaker JumpStart to deploy with one click for running inference. You can try out this model with SageMaker JumpStart, a machine learning (ML) hub that provides access to algorithms and models so you can quickly get started with ML. In this post, we walk through how to discover and deploy the Mixtral-8x22B model.

What is Mixtral 8x22B

Mixtral 8x22B is Mistral AI’s latest open-weights model and sets a new standard for performance and efficiency of available foundation models, as measured by Mistral AI across standard industry benchmarks. It is a sparse Mixture-of-Experts (SMoE) model that uses only 39 billion active parameters out of 141 billion, offering cost-efficiency for its size. Continuing with Mistral AI’s belief in the power of publicly available models and broad distribution to promote innovation and collaboration, Mixtral 8x22B is released under Apache 2.0, making the model available for exploring, testing, and deploying. Mixtral 8x22B is an attractive option for customers selecting between publicly available models and prioritizing quality, and for those wanting a higher quality from mid-sized models, such as Mixtral 8x7B and GPT 3.5 Turbo, while maintaining high throughput.

Mixtral 8x22B provides the following strengths:

  • Multilingual native capabilities in English, French, Italian, German, and Spanish languages
  • Strong mathematics and coding capabilities
  • Capable of function calling that enables application development and tech stack modernization at scale
  • 64,000-token context window that allows precise information recall from large documents

About Mistral AI

Mistral AI is a Paris-based company founded by seasoned researchers from Meta and Google DeepMind. During his time at DeepMind, Arthur Mensch (Mistral CEO) was a lead contributor on key LLM projects such as Flamingo and Chinchilla, while Guillaume Lample (Mistral Chief Scientist) and Timothée Lacroix (Mistral CTO) led the development of LLaMa LLMs during their time at Meta. The trio are part of a new breed of founders who combine deep technical expertise and operating experience working on state-of-the-art ML technology at the largest research labs. Mistral AI has championed small foundational models with superior performance and commitment to model development. They continue to push the frontier of artificial intelligence (AI) and make it accessible to everyone with models that offer unmatched cost-efficiency for their respective sizes, delivering an attractive performance-to-cost ratio. Mixtral 8x22B is a natural continuation of Mistral AI’s family of publicly available models that include Mistral 7B and Mixtral 8x7B, also available on SageMaker JumpStart. More recently, Mistral launched commercial enterprise-grade models, with Mistral Large delivering top-tier performance and outperforming other popular models with native proficiency across multiple languages.

What is SageMaker JumpStart

With SageMaker JumpStart, ML practitioners can choose from a growing list of best-performing foundation models. ML practitioners can deploy foundation models to dedicated Amazon SageMaker instances within a network isolated environment, and customize models using SageMaker for model training and deployment. You can now discover and deploy Mixtral-8x22B with a few clicks in Amazon SageMaker Studio or programmatically through the SageMaker Python SDK, enabling you to derive model performance and MLOps controls with SageMaker features such as Amazon SageMaker Pipelines, Amazon SageMaker Debugger, or container logs. The model is deployed in an AWS secure environment and under your VPC controls, providing data encryption at rest and in-transit.

SageMaker also adheres to standard security frameworks such as ISO27001 and SOC1/2/3 in addition to complying with various regulatory requirements. Compliance frameworks like General Data Protection Regulation (GDPR) and California Consumer Privacy Act (CCPA), Health Insurance Portability and Accountability Act (HIPAA), and Payment Card Industry Data Security Standard (PCI DSS) are supported to make sure data handling, storing, and process meet stringent security standards.

SageMaker JumpStart availability is dependent on the model; Mixtral-8x22B v0.1 is currently supported in the US East (N. Virginia) and US West (Oregon) AWS Regions.

Discover models

You can access Mixtral-8x22B foundation models through SageMaker JumpStart in the SageMaker Studio UI and the SageMaker Python SDK. In this section, we go over how to discover the models in SageMaker Studio.

SageMaker Studio is an integrated development environment (IDE) that provides a single web-based visual interface where you can access purpose-built tools to perform all ML development steps, from preparing data to building, training, and deploying your ML models. For more details on how to get started and set up SageMaker Studio, refer to Amazon SageMaker Studio.

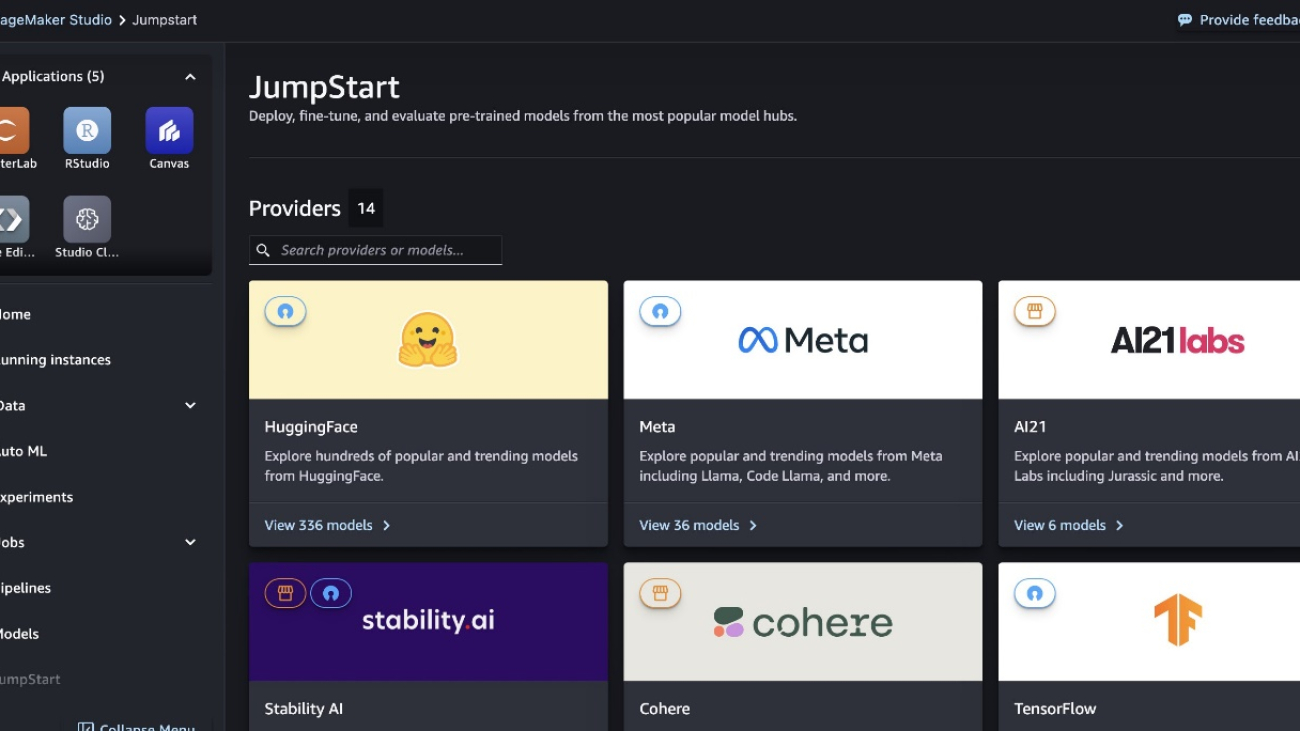
In SageMaker Studio, you can access SageMaker JumpStart by choosing JumpStart in the navigation pane.

From the SageMaker JumpStart landing page, you can search for “Mixtral” in the search box. You will see search results showing Mixtral 8x22B Instruct, various Mixtral 8x7B models, and Dolphin 2.5 and 2.7 models.

You can choose the model card to view details about the model such as license, data used to train, and how to use. You will also find the Deploy button, which you can use to deploy the model and create an endpoint.

SageMaker has seamless logging, monitoring, and auditing enabled for deployed models with native integrations with services like AWS CloudTrail for logging and monitoring to provide insights into API calls and Amazon CloudWatch to collect metrics, logs, and event data to provide information into the model’s resource utilization.

Deploy a model

Deployment starts when you choose Deploy. After deployment finishes, an endpoint has been created. You can test the endpoint by passing a sample inference request payload or selecting your testing option using the SDK. When you select the option to use the SDK, you will see example code that you can use in your preferred notebook editor in SageMaker Studio. This will require an AWS Identity and Access Management (IAM) role and policy attached to it to restrict model access. Additionally, if you choose to deploy the model endpoint within SageMaker Studio, you will be prompted to choose an instance type, initial instance count, and maximum instance count. The ml.p4d.24xlarge and ml.p4de.24xlarge instance types are the only instance types currently supported for Mixtral 8x22B Instruct v0.1.

To deploy using the SDK, we start by selecting the Mixtral-8x22b model, specified by the model_id with value huggingface-llm-mistralai-mixtral-8x22B-instruct-v0-1. You can deploy any of the selected models on SageMaker with the following code. Similarly, you can deploy Mixtral-8x22B instruct using its own model ID.

from sagemaker.jumpstart.model import JumpStartModel model = JumpStartModel(model_id=""huggingface-llm-mistralai-mixtral-8x22B-instruct-v0-1") predictor = model.deploy()

This deploys the model on SageMaker with default configurations, including the default instance type and default VPC configurations. You can change these configurations by specifying non-default values in JumpStartModel.

After it’s deployed, you can run inference against the deployed endpoint through the SageMaker predictor:

payload = {"inputs": "Hello!"} 
predictor.predict(payload)

Example prompts

You can interact with a Mixtral-8x22B model like any standard text generation model, where the model processes an input sequence and outputs predicted next words in the sequence. In this section, we provide example prompts.

Mixtral-8x22b Instruct

The instruction-tuned version of Mixtral-8x22B accepts formatted instructions where conversation roles must start with a user prompt and alternate between user instruction and assistant (model answer). The instruction format must be strictly respected, otherwise the model will generate sub-optimal outputs. The template used to build a prompt for the Instruct model is defined as follows:

<s> [INST] Instruction [/INST] Model answer</s> [INST] Follow-up instruction [/INST]]

<s> and </s> are special tokens for beginning of string (BOS) and end of string (EOS), whereas [INST] and [/INST] are regular strings.

The following code shows how you can format the prompt in instruction format:

from typing import Dict, List

def format_instructions(instructions: List[Dict[str, str]]) -> List[str]:
    """Format instructions where conversation roles must alternate user/assistant/user/assistant/..."""
    prompt: List[str] = []
    for user, answer in zip(instructions[::2], instructions[1::2]):
        prompt.extend(["<s>", "[INST] ", (user["content"]).strip(), " [/INST] ", (answer["content"]).strip(), "</s>"])
    prompt.extend(["<s>", "[INST] ", (instructions[-1]["content"]).strip(), " [/INST] ","</s>"])
    return "".join(prompt)


def print_instructions(prompt: str, response: str) -> None:
    bold, unbold = '33[1m', '33[0m'
    print(f"{bold}> Input{unbold}n{prompt}nn{bold}> Output{unbold}n{response[0]['generated_text']}n")

Summarization prompt

You can use the following code to get a response for a summarization:

instructions = [{"role": "user", "content": """Summarize the following information. Format your response in short paragraph.

Article:

Contextual compression - To address the issue of context overflow discussed earlier, you can use contextual compression to compress and filter the retrieved documents in alignment with the query’s context, so only pertinent information is kept and processed. This is achieved through a combination of a base retriever for initial document fetching and a document compressor for refining these documents by paring down their content or excluding them entirely based on relevance, as illustrated in the following diagram. This streamlined approach, facilitated by the contextual compression retriever, greatly enhances RAG application efficiency by providing a method to extract and utilize only what’s essential from a mass of information. It tackles the issue of information overload and irrelevant data processing head-on, leading to improved response quality, more cost-effective LLM operations, and a smoother overall retrieval process. Essentially, it’s a filter that tailors the information to the query at hand, making it a much-needed tool for developers aiming to optimize their RAG applications for better performance and user satisfaction.
"""}]
prompt = format_instructions(instructions)
payload = {
"inputs": prompt,
"parameters": {"max_new_tokens": 1500}
}
response=predictor.predict(payload)
print_instructions(prompt, response)

The following is an example of the expected output:

> > Input
<s>[INST] Summarize the following information. Format your response in short paragraph.

Article:

Contextual compression - To address the issue of context overflow discussed earlier, you can use contextual compression to compress and filter the retrieved documents in alignment with the query’s context, so only pertinent information is kept and processed. This is achieved through a combination of a base retriever for initial document fetching and a document compressor for refining these documents by paring down their content or excluding them entirely based on relevance, as illustrated in the following diagram. This streamlined approach, facilitated by the contextual compression retriever, greatly enhances RAG application efficiency by providing a method to extract and utilize only what’s essential from a mass of information. It tackles the issue of information overload and irrelevant data processing head-on, leading to improved response quality, more cost-effective LLM operations, and a smoother overall retrieval process. Essentially, it’s a filter that tailors the information to the query at hand, making it a much-needed tool for developers aiming to optimize their RAG applications for better performance and user satisfaction. [/INST] </s>
> Output
<s>[INST] Summarize the following information. Format your response in short paragraph.

Article:

Contextual compression - To address the issue of context overflow discussed earlier, you can use contextual compression to compress and filter the retrieved documents in alignment with the query’s context, so only pertinent information is kept and processed. This is achieved through a combination of a base retriever for initial document fetching and a document compressor for refining these documents by paring down their content or excluding them entirely based on relevance, as illustrated in the following diagram. This streamlined approach, facilitated by the contextual compression retriever, greatly enhances RAG application efficiency by providing a method to extract and utilize only what’s essential from a mass of information. It tackles the issue of information overload and irrelevant data processing head-on, leading to improved response quality, more cost-effective LLM operations, and a smoother overall retrieval process. Essentially, it’s a filter that tailors the information to the query at hand, making it a much-needed tool for developers aiming to optimize their RAG applications for better performance and user satisfaction. [/INST] </s>Contextual compression is a technique used to manage the issue of context overflow in information retrieval. This method involves compressing and filtering the retrieved documents to align with the query's context, ensuring that only relevant information is processed. This is achieved through a two-step process: a base retriever fetches the initial set of documents, and a document compressor refines these documents by either reducing their content or excluding them entirely based on relevance.

The contextual compression retriever significantly improves the efficiency of Retrieval-Augmented Generation (RAG) applications by extracting and utilizing only the essential information from a large pool of data. This approach addresses the problem of information overload and irrelevant data processing, leading to improved response quality, cost-effective operations, and a smoother retrieval process. In essence, contextual compression acts as a filter that tailors the information to the specific query, making it an indispensable tool for developers aiming to optimize their RAG applications for better performance and user satisfaction.

Multilingual translation prompt

You can use the following code to get a response for a multilingual translation:

Prompt

instructions = [{"role": "user", "content": """
<You are a multilingual assistant. Translate the following sentences in the order in which they are presented into French, German, and Spanish. Make sure to label each section as French, German, and Spanish. [/INST]

1.	Customer: "I recently ordered a set of wireless headphones, but I received a different model. What steps should I take to receive the correct product I ordered?"
2.	Customer: "I purchased a customizable laptop last month and opted for specific upgrades. However, the laptop's performance isn't as expected. Can I have a technician look into it, or should I consider returning it?"
3.	Customer: "My order for a designer handbag was supposed to include a matching wallet as part of a promotional deal, but the wallet was not in the package. How can this issue be resolved?"
4.	Customer: "I see that the tracking information for my order of ceramic cookware shows it was delivered, but I haven't received it. Could you assist in determining where my package might be?"
5.	Customer: "I'm trying to buy an antique mirror from your vintage collection, but the website keeps giving me an error when I try to check out. Is there another way to complete my purchase?" 
"""}]
prompt = format_instructions(instructions)
payload = {
"inputs": prompt,
"parameters": {"max_new_tokens": 2000, "do_sample": True}
}
response=predictor.predict(payload)
print_instructions(prompt, response)

The following is an example of the expected output:

> Input
<s>[INST] <You are a multilingual assistant. Translate the following sentences in the order in which they are presented into French, German, and Spanish. Make sure to label each section as French, German, and Spanish. [/INST]


1. Customer: "I recently ordered a set of wireless headphones, but I received a different model. What steps should I take to receive the correct product I ordered?"
2. Customer: "I purchased a customizable laptop last month and opted for specific upgrades. However, the laptop's performance isn't as expected. Can I have a technician look into it, or should I consider returning it?"
3. Customer: "My order for a designer handbag was supposed to include a matching wallet as part of a promotional deal, but the wallet was not in the package. How can this issue be resolved?"
4. Customer: "I see that the tracking information for my order of ceramic cookware shows it was delivered, but I haven't received it. Could you assist in determining where my package might be?"
5. Customer: "I'm trying to buy an antique mirror from your vintage collection, but the website keeps giving me an error when I try to check out. Is there another way to complete my purchase?" [/INST] </s>
> Output
<s>[INST] <You are a multilingual assistant. Translate the following sentences in the order in which they are presented into French, German, and Spanish. Make sure to label each section as French, German, and Spanish. [/INST]


1. Customer: "I recently ordered a set of wireless headphones, but I received a different model. What steps should I take to receive the correct product I ordered?"
2. Customer: "I purchased a customizable laptop last month and opted for specific upgrades. However, the laptop's performance isn't as expected. Can I have a technician look into it, or should I consider returning it?"
3. Customer: "My order for a designer handbag was supposed to include a matching wallet as part of a promotional deal, but the wallet was not in the package. How can this issue be resolved?"
4. Customer: "I see that the tracking information for my order of ceramic cookware shows it was delivered, but I haven't received it. Could you assist in determining where my package might be?"
5. Customer: "I'm trying to buy an antique mirror from your vintage collection, but the website keeps giving me an error when I try to check out. Is there another way to complete my purchase?" [/INST] </s>

French:

1. Client : "J'ai récemment commandé un casque audio sans fil, mais j'ai reçu un modèle différent. Quelles sont les étapes à suivre pour recevoir le produit correct que j'ai commandé ?"
2. Client : "J'ai acheté un ordinateur portable personnalisable le mois dernier et j'ai opté pour des mises à niveau spécifiques. Cependant, les performances de l'ordinateur portable ne sont pas à la hauteur de mes attentes. Puis-je avoir un technicien qui vérifie cela, ou devrais-je envisager de le retourner ?"
3. Client : "Ma commande pour un sac à main de designer devait inclure un portefeuille assorti dans le cadre d'une offre promotionnelle, mais le portefeuille ne se trouvait pas dans le paquet. Comment puis-je résoudre ce problème ?"
4. Client : "Je vois que les informations de suivi de ma commande de batterie de cuisine en céramique indiquent qu'elle a été livrée, mais je ne l'ai pas reçue. Pourriez-vous m'aider à déterminer où se trouve mon colis ?"
5. Client : "J'essaie d'acheter un miroir antique de votre collection vintage, mais le site continue de me donner une erreur lorsque j'essaie de passer à la caisse. Existe-t-il un autre moyen de finaliser mon achat ?"

German:

1. Kunde: "Ich habe kürzlich ein Set kabelloser Kopfhörer bestellt, aber ich habe ein anderes Modell erhalten. Welche Schritte sollte ich unternehmen, um das richtige Produkt zu erhalten, das ich bestellt habe?"
2. Kunde: "Ich habe letzten Monat einen anpassbaren Laptop gekauft und habe mich für spezifische Upgrades entschieden. Allerdings entspricht die Leistung des Laptops nicht meinen Erwartungen. Kann ich einen Techniker hinzuziehen lassen oder sollte ich eine Rückgabe in Erwägung ziehen?"
3. Kunde: "Meine Bestellung für eine Designer-Handtasche sollte inklusive eines passenden Portemonnaies als Teil einer Werbeaktion sein, aber das Portemonnaie war nicht im Paket. Wie kann dieses Problem gelöst werden?"
4. Kunde: "Ich sehe, dass die Sendungsverfolgungsinformationen für meine Bestellung von Keramik-Kochgeschirr anzeigen, dass es geliefert wurde, aber ich habe es nicht erhalten. Könnten Sie mir dabei helfen, festzustellen, wo sich mein Paket befindet?"
5. Kunde: "Ich versuche ein Antikspiegel aus Ihrer Vintage-Kollektion zu kaufen, aber die Website gibt mir jedes Mal einen Fehler, wenn ich versuche, den Bestellvorgang abzuschließen. Gibt es einen anderen Weg, meinen Kauf abzuschließen?"

Spanish:

1. Cliente: "Recientemente ordené un conjunto de audífonos inalámbricos, pero recibí un modelo diferente. ¿Cuáles son los pasos que debo seguir para recibir el producto correcto que ordené?"
2. Cliente: "Compré una computadora personalizable el mes pasado y opté por actualizaciones específicas. Sin embargo, el rendimiento de la computadora no está a la altura de mis expectativas. ¿Puedo tener un técnico que revise esto, o debería considerar devolverla?"
3. Cliente: "Mi pedido de un bolso de diseñador debería haber incluido una billetera a juego como parte de una oferta promocional, pero la billetera no estaba en el paquete. ¿Cómo puedo resolver este problema?"
4. Cliente: "Veo que la información de seguimiento de mi pedido de utensilios de cocina de cerámica indica que ha sido entregado, pero aún no lo he recibido. ¿Podría ayudarme a determinar dónde se encuentra mi paquete?"
5. Cliente: "Estoy tratando de comprar un espejo antiguo de su colección de vintage, pero el sitio sigue dándome un error cada vez que trato de realizar el pago. ¿Hay otra forma de completar mi compra?"

Code generation

You can use the following code to get a response for code generation:

instructions = [{"role": "user", "content": "Write a program on Dijstra's algorithm using a priority queue in python:"}]
prompt = format_instructions(instructions)
payload = {
"inputs": prompt,
"parameters": {"max_new_tokens": 1000}
}
response=predictor.predict(payload)
print_instructions(prompt, response)

You get the following output:

> Input
<s>[INST] Write a program on Dijstra's algorithm using a priority queue in python: [/INST] </s>

> Output
<s>[INST] Write a program on Dijstra's algorithm using a priority queue in python: [/INST] </s>Here is a Python implementation of Dijkstra's algorithm using a priority queue (heapq module):
```python
import heapq

def dijkstra(graph, start):
    # Initialize the priority queue with the starting vertex and its distance (0)
    priority_queue = [(0, start)]
    # Initialize the distances dictionary with infinite distances for all vertices except the starting vertex
    distances = {vertex: float('inf') for vertex in graph}
    distances[start] = 0
    # Initialize the previous dictionary to keep track of the shortest path
    previous = {vertex: None for vertex in graph}

    while priority_queue:
        # Get the vertex with the smallest distance from the priority queue
        current_distance, current_vertex = heapq.heappop(priority_queue)

        # If the current distance is greater than the stored distance, skip this vertex
        if current_distance > distances[current_vertex]:
            continue

        # Update the distances of the adjacent vertices
        for neighbor, weight in graph[current_vertex].items():
            distance = current_distance + weight
            # If the new distance is smaller than the stored distance, update the distance and previous vertex
            if distance < distances[neighbor]:
                distances[neighbor] = distance
                previous[neighbor] = current_vertex
                # Add the neighbor to the priority queue
                heapq.heappush(priority_queue, (distance, neighbor))

    return distances, previous

# Example usage:
graph = {
    'A': {'B': 1, 'C': 4},
    'B': {'A': 1, 'C': 2, 'D': 5},
    'C': {'A': 4, 'B': 2, 'D': 1},
    'D': {'B': 5, 'C': 1}
}

distances, previous = dijkstra(graph, 'A')
print(distances)  # {'A': 0, 'B': 1, 'C': 3, 'D': 4}
```
In this implementation, the `graph` parameter is a dictionary where the keys are the vertices and the values are dictionaries that map adjacent vertices to their weights. The `start` parameter is the starting vertex for the algorithm. The function returns two dictionaries: `distances` and `previous`. The `distances` dictionary maps each vertex to its shortest distance from the starting vertex, and the `previous` dictionary maps each vertex to its previous vertex in the shortest path.

Reasoning and math

You can use the following code to get a response for reasoning and math:


instructions = [{"role": "user", "content": """Sarah went to a car shop to buy a car from Fred for $20,000 in 2024. She plans to sell the car but it depreciates by 2% each year after she has bought it. She went to a dealer in which that dealer told her that the car has only depreciated by 1.4% each year. After 7 years of using the car, Sarah decides to sell it directly to another person.

How much did Sarah sell the car for and what year is it? Explain the steps before answering. It's ok to make some assumptions as you come to your answer.

"""}]
prompt = format_instructions(instructions)
payload = {
"inputs": prompt,
"parameters": {"max_new_tokens": 2000, "do_sample": True}
}
response=predictor.predict(payload)
print_instructions(prompt, response)

You get the following output:

<s>[INST] Sarah went to a car shop to buy a car from Fred for $20,000 in 2024. She plans to sell the car but it depreciates by 2% each year after she has bought it. She went to a dealer in which that dealer told her that the car has only depreciated by 1.4% each year. After 7 years of using the car, Sarah decides to sell it directly to another person. 

How much did Sarah sell the car for and what year is it? Explain the steps before answering. It's ok to make some assumptions as you come to your answer. [/INST] </s>To solve this problem, we need to calculate the value of the car after 7 years, assuming two different annual depreciation rates: 2% and 1.4%.

First, let's calculate the value of the car after 7 years assuming a 2% annual depreciation rate:

Year 1: $20,000 - ($20,000 * 2%) = $19,600
Year 2: $19,600 - ($19,600 * 2%) = $19,208
Year 3: $19,208 - ($19,208 * 2%) = $18,821.60
Year 4: $18,821.60 - ($18,821.60 * 2%) = $18,442.22
Year 5: $18,442.22 - ($18,442.22 * 2%) = $18,071.62
Year 6: $18,071.62 - ($18,071.62 * 2%) = $17,709.76
Year 7: $17,709.76 - ($17,709.76 * 2%) = $17,356.58

So, assuming a 2% annual depreciation rate, the value of the car after 7 years would be approximately $17,356.58.

Next, let's calculate the value of the car after 7 years assuming a 1.4% annual depreciation rate:

Year 1: $20,000 - ($20,000 * 1.4%) = $19,728
Year 2: $19,728 - ($19,728 * 1.4%) = $19,463.23
Year 3: $19,463.23 - ($19,463.23 * 1.4%) = $19,205.80
Year 4: $19,205.80 - ($19,205.80 * 1.4%) = $18,955.66
Year 5: $18,955.66 - ($18,955.66 * 1.4%) = $18,712.73
Year 6: $18,712.73 - ($18,712.73 * 1.4%) = $18,476.95
Year 7: $18,476.95 - ($18,476.95 * 1.4%) = $18,248.33

So, assuming a 1.4% annual depreciation rate, the value of the car after 7 years would be approximately $18,248.33.

Now, since Sarah sells the car directly to another person, we can assume that she sold it for the higher of the two values. Therefore, she sold the car for $18,248.33.

As for the year in which she sold the car, since we know that Sarah purchased the car in 2024 and used it for 7 years, we can calculate the year as follows:

2024 + 7 = 2031

Therefore, Sarah sold the car in the year 2031.

So, Sarah sold the car for $18,248.33 in the year 2031.

Clean up

After you’re done running the notebook, delete all resources that you created in the process so your billing is stopped. Use the following code:

predictor.delete_model()
predictor.delete_endpoint()

Conclusion

In this post, we showed you how to get started with Mixtral-8x22B in SageMaker Studio and deploy the model for inference. Because foundation models are pre-trained, they can help lower training and infrastructure costs and enable customization for your use case. Visit SageMaker JumpStart in SageMaker Studio now to get started.

Now that you are aware of Mistral AI and their Mixtral 8x22B models, we encourage you to deploy an endpoint on SageMaker to perform inference testing and try out responses for yourself. Refer to the following resources for more information:


About the Authors

Marco Punio is a Solutions Architect focused on generative AI strategy, applied AI solutions, and conducting research to help customers hyper-scale on AWS. He is a qualified technologist with a passion for machine learning, artificial intelligence, and mergers and acquisitions. Marco is based in Seattle, WA, and enjoys writing, reading, exercising, and building applications in his free time.

Preston Tuggle is a Sr. Specialist Solutions Architect working on generative AI.

June Won is a product manager with Amazon SageMaker JumpStart. He focuses on making foundation models easily discoverable and usable to help customers build generative AI applications. His experience at Amazon also includes mobile shopping application and last mile delivery.

Dr. Ashish Khetan is a Senior Applied Scientist with Amazon SageMaker built-in algorithms and helps develop machine learning algorithms. He got his PhD from University of Illinois Urbana-Champaign. He is an active researcher in machine learning and statistical inference, and has published many papers in NeurIPS, ICML, ICLR, JMLR, ACL, and EMNLP conferences.

Shane Rai is a Principal GenAI Specialist with the AWS World Wide Specialist Organization (WWSO). He works with customers across industries to solve their most pressing and innovative business needs using AWS’s breadth of cloud-based AI/ML services including model offerings from top tier foundation model providers.

Hemant Singh is an Applied Scientist with experience in Amazon SageMaker JumpStart. He got his master’s from Courant Institute of Mathematical Sciences and B.Tech from IIT Delhi. He has experience in working on a diverse range of machine learning problems within the domain of natural language processing, computer vision, and time series analysis.

Read More

Building Generative AI prompt chaining workflows with human in the loop

Building Generative AI prompt chaining workflows with human in the loop

Generative AI is a type of artificial intelligence (AI) that can be used to create new content, including conversations, stories, images, videos, and music. Like all AI, generative AI works by using machine learning models—very large models that are pretrained on vast amounts of data called foundation models (FMs). FMs are trained on a broad spectrum of generalized and unlabeled data. They’re capable of performing a wide variety of general tasks with a high degree of accuracy based on input prompts. Large language models (LLMs) are one class of FMs. LLMs are specifically focused on language-based tasks such as summarization, text generation, classification, open-ended conversation, and information extraction.

FMs and LLMs, even though they’re pre-trained, can continue to learn from data inputs or prompts during inference. This means that you can develop comprehensive outputs through carefully curated prompts. A prompt is the information you pass into an LLM to elicit a response. This includes task context, data that you pass to the model, conversation and action history, instructions, and even examples. The process of designing and refining prompts to get specific responses from these models is called prompt engineering.

While LLMs are good at following instructions in the prompt, as a task gets complex, they’re known to drop tasks or perform a task not at the desired accuracy. LLMs can handle complex tasks better when you break them down into smaller subtasks. This technique of breaking down a complex task into subtasks is called prompt chaining. With prompt chaining, you construct a set of smaller subtasks as individual prompts. Together, these subtasks make up the overall complex task. To accomplish the overall task, your application feeds each subtask prompt to the LLM in a pre-defined order or according to a set of rules.

While Generative AI can create highly realistic content, including text, images, and videos, it can also generate outputs that appear plausible but are verifiably incorrect. Incorporating human judgment is crucial, especially in complex and high-risk decision-making scenarios. This involves building a human-in-the-loop process where humans play an active role in decision making alongside the AI system.

In this blog post, you will learn about prompt chaining, how to break a complex task into multiple tasks to use prompt chaining with an LLM in a specific order, and how to involve a human to review the response generated by the LLM.

Example overview

To illustrate this example, consider a retail company that allows purchasers to post product reviews on their website. By responding promptly to those reviews, the company demonstrates its commitments to customers and strengthens customer relationships.

Figure 1: Customer review and response

The example application in this post automates the process of responding to customer reviews. For most reviews, the system auto-generates a reply using an LLM. However, if the review or LLM-generated response contains uncertainty around toxicity or tone, the system flags it for a human reviewer. The human reviewer then assesses the flagged content to make the final decision about the toxicity or tone.

The application uses event-driven architecture (EDA), a powerful software design pattern that you can use to build decoupled systems by communicating through events. As soon as the product review is created, the review receiving system uses Amazon EventBridge to send an event that a product review is posted, along with the actual review content. The event starts an AWS Step Functions workflow. The workflow runs through a series of steps including generating content using an LLM and involving human decision making.

Figure 2: Review workflow

The process of generating a review response includes evaluating the toxicity of the review content, identifying sentiment, generating a response, and involving a human approver. This naturally fits into a workflow type of application because it’s a single process containing multiple sequential steps along with the need to manage state between steps. Hence the example uses Step Functions for workflow orchestration. Here are the steps in the review response workflow.

  1. Detect if the review content has any harmful information using the Amazon Comprehend DetectToxicContent API. The API responds with the toxicity score that represents the overall confidence score of detection between 0 and 1 with score closer to 1 indicating high toxicity.
  2. If toxicity of the review is in the range of 0.4 – 0.6, send the review to a human reviewer to make the decision.
  3. If the toxicity of the review is greater than 0.6 or the reviewer finds the review harmful, publish HARMFUL_CONTENT_DETECTED message.
  4. If the toxicity of the review is less than 0.4 or reviewer approves the review, find the sentiment of the review first and then generate the response to the review comment. Both tasks are achieved using a generative AI model.
  5. Repeat the toxicity detection through the Comprehend API for the LLM generated response.
  6. If the toxicity of the LLM generated response is in the range of 0.4 – 0.6, send the LLM generated response to a human reviewer.
  7. If the LLM generated response is found to be non-toxic, publish NEW_REVIEW_RESPONSE_CREATED event.
  8. If the LLM generated response is found to be toxic, publish RESPONSE_GENERATION_FAILED event.

Figure 3: product review evaluation and response workflow

Getting started

Use the instructions in the GitHub repository to deploy and run the application.

Prompt chaining

Prompt chaining simplifies the problem for the LLM by dividing single, detailed, and monolithic tasks into smaller, more manageable tasks. Some, but not all, LLMs are good at following all the instructions in a single prompt. The simplification results in writing focused prompts for the LLM, leading to a more consistent and accurate response. The following is a sample ineffective single prompt.

Read the below customer review, filter for harmful content and provide your thoughts on the overall sentiment in JSON format. Then construct an email response based on the sentiment you determine and enclose the email in JSON format. Based on the sentiment, write a report on how the product can be improved.

To make it more effective, you can split the prompt into multiple subtasks:

  1. Filter for harmful content
  2. Get the sentiment
  3. Generate the email response
  4. Write a report

You can even run some of the tasks in parallel. By breaking down to focused prompts, you achieve the following benefits:

  • You speed up the entire process. You can handle tasks in parallel, use different models for different tasks, and send response back to the user rather than waiting for the model to process a larger prompt for considerably longer time.
  • Better prompts provide better output. With focused prompts, you can engineer the prompts by adding additional relevant context thus improving the overall reliability of the output.
  • You spend less time developing. Prompt engineering is an iterative process. Both debugging LLM calls for detailed prompt and refining the larger prompt for accuracy require significant time and effort. Smaller tasks enable you to experiment and refine through successive iterations.

Step Functions is a natural fit to build prompt chaining because it offers multiple different ways to chain prompts: sequentially, in parallel, and iteratively by passing the state data from one state to another. Consider the situation where you have built the product review response prompt chaining workflow and now want to evaluate the responses from different LLMs to find the best fit using an evaluation test suite. The evaluation test suite consists of hundreds of test product reviews, a reference response to the review, and a set of rules to evaluate the LLM response against the reference response. You can automate the evaluation activity using a Step Functions workflow. The first task in the workflow asks the LLM to generate a review response for the product review. The second task then asks the LLM to compare the generated response to the reference response using the rules and generate an evaluation score. Based on the evaluation score for each review, you can decide if the LLM passes your evaluation criteria or not. You can use the map state in Step Functions to run the evaluations for each review in your evaluation test suite in parallel. See this repository for more prompt chaining examples.

Human in the loop

Involving human decision making in the example allows you to improve the accuracy of the system when the toxicity of the content cannot be determined to be either safe or harmful. You can implement human review within the Step Functions workflow using Wait for a Callback with the Task Token integration. When you use this integration with any supported AWS SDK API, the workflow task generates a unique token and then pauses until the token is returned. You can use this integration to include human decision making, call a legacy on-premises system, wait for completion of long running tasks, and so on.

"Wait for human approval for product review": {
      "Type": "Task",
      "Resource": "arn:aws:states:::lambda:invoke.waitForTaskToken",
      "Parameters": {
        "FunctionName": "arn:aws:lambda:{region}:{account}:function:human-approval-helper-product-review-response-automation-stage",
        "Payload": {
          "review_text.$": "$$.Execution.Input.review_text",
          "token.$": "$$.Task.Token",
          "api_url": "https://{apiID}.execute-api.{region}.amazonaws.com/dev"
}

In the sample application, the send email for approval task includes a wait for the callback token. It invokes an AWS Lambda function with a token and waits for the token. The Lambda function builds an email message along with the link to an Amazon API Gateway URL. Lambda then uses Amazon Simple Notification Service (Amazon SNS) to send an email to a human reviewer. The reviewer reviews the content and either accepts or rejects the message by selecting the appropriate link in the email. This action invokes the Step Functions SendTaskSuccess API. The API sends back the task token and a status message of whether to accept or reject the review. Step Functions receives the token, resumes the send email for approval task and then passes control to the choice state. The choice state decides whether to go through acceptance or rejection of the review based on the status message.

Figure 4: Human-in-the-loop workflow

Event-driven architecture

EDA enables building extensible architectures. You can add consumers at any time by subscribing to the event. For example, consider moderating images and videos attached to a product review in addition to the text content. You also need to write code to delete the images and videos if they are found harmful. You can add a consumer, the image moderation system, to the NEW_REVIEW_POSTED event without making any code changes to the existing event consumers or producers. Development of the image moderation system and the review response system to delete harmful images can proceed in parallel which in turn improves development velocity.

When the image moderation workflow finds toxic content, it publishes a HARMFULL_CONTENT_DETECTED event. The event can be processed by a review response system that decides what to do with the event. By decoupling systems through events, you gain many advantages including improved development velocity, variable scaling, and fault tolerance.

Figure 5: Event-driven workflow

Cleanup

Use the instructions in the GitHub repository to delete the sample application.

Conclusion

In this blog post, you learned how to build a generative AI application with prompt chaining and a human-review process. You learned how both techniques improve the accuracy and safety of a generative AI application. You also learned how event-driven architectures along with workflows can integrate existing applications with generative AI applications.

Visit Serverless Land for more Step Functions workflows.


About the authors

Veda Raman is a Senior Specialist Solutions Architect for Generative AI and machine learning based at AWS. Veda works with customers to help them architect efficient, secure and scalable machine learning applications. Veda specializes in generative AI services like Amazon Bedrock and Amazon Sagemaker.

Uma Ramadoss is a Principal Solutions Architect at Amazon Web Services, focused on the Serverless and Integration Services. She is responsible for helping customers design and operate event-driven cloud-native applications using services like Lambda, API Gateway, EventBridge, Step Functions, and SQS. Uma has a hands on experience leading enterprise-scale serverless delivery projects and possesses strong working knowledge of event-driven, micro service and cloud architecture.

Read More