Recursion CEO Chris Gibson on Accelerating the Biopharmaceutical Industry With AI

Recursion CEO Chris Gibson on Accelerating the Biopharmaceutical Industry With AI

Techbio is a field combining data, technology and biology to enhance scientific processes — and AI has the potential to supercharge the biopharmaceutical industry further.  In this episode of NVIDIA’s AI Podcast, host Noah Kravitz speaks with Chris Gibson, cofounder and CEO of Recursion, about how the company uses AI and machine learning to accelerate drug discovery and development at scale. Tune in to hear Gibson discuss how AI is transforming the biopharmaceutical industry by increasing efficiency and lowering discovery costs.

Time Stamps

0:58: Background on Recursion
6:23: Recursion’s approach to drug discovery
12:06: Empirical data generation and generative AI prediction
17:46: How supercomputing is accelerating drug discovery
22:32: What is techbio?
29:15: The future — using natural language prompts to work with AI systems
31:44: Recursion’s plans for future

You Might Also Like:|

Cardiac Clarity: Dr. Keith Channon Talks Revolutionizing Heart Health With AI – Ep. 212

Caristo Diagnostics has developed an AI-powered solution for detecting coronary inflammation in cardiac CT scans. Dr. Keith Channon, cofounder and chief medical officer of the company, discusses how Caristo uses AI to improve treatment plans and risk predictions by providing patient-specific readouts.

Cofounder of Annalise.ai Aengus Tran on Using AI as a Spell Check for Health Checks – Ep. 207

Clinician-led healthcare AI company Harrison.ai has built annalise.ai. This AI solution serves as a “spell checker” for radiologists — flagging critical findings to improve the speed and accuracy of radiology image analysis, reducing misdiagnoses. Harrison.ai CEO and cofounder Aengus Tran discusses the potential of autonomous AI systems to scale global healthcare capacity.

Matice Founder Jessica Whited on Harnessing Regenerative Species for Medical Breakthroughs – Ep. 198

Matice Biosciences is using AI to study the regeneration of tissues in animal species known as super-regenerators, such as salamanders and planarians. Jessica Whited, a regenerative biologist at Harvard and cofounder of Matice Biosciences, discusses the company’s goal to harness regenerative species and AI to develop new treatments that help humans heal from injuries without scarring.

Bojan Tunguz, Johnny Israeli on How AI and Crowdsourcing Can Advance Vaccine Distribution – Ep. 195

Artificial intelligence is teaming up with crowdsourcing to improve the thermo-stability of mRNA vaccines, making distribution more accessible worldwide. Bojan Tunguz, a physicist and senior system software engineer at NVIDIA, and Johnny Israeli, senior manager of AI and cloud software at NVIDIA, discuss the fusion of AI, crowdsourcing and machine learning and its potential in drug discovery.

Subscribe to the AI Podcast

Get the AI Podcast through iTunes, Google Play, Amazon Music, Castbox, DoggCatcher, Overcast, PlayerFM, Pocket Casts, Podbay, PodBean, PodCruncher, PodKicker, Soundcloud, Spotify, Stitcher and TuneIn.

Make the AI Podcast better: Have a few minutes to spare? Fill out this listener survey.

Read More

Problem Solved: STEM Studies Supercharged With RTX and AI Technologies

Problem Solved: STEM Studies Supercharged With RTX and AI Technologies

Editor’s note: This post is part of the AI Decoded series, which demystifies AI by making the technology more accessible, and showcases new hardware, software, tools and accelerations for RTX PC users.

AI powered by NVIDIA GPUs is accelerating nearly every industry, creating high demand for graduates, especially from STEM fields, who are proficient in using the technology. Millions of students worldwide are participating in university STEM programs to learn skills that will set them up for career success.

To prepare students for the future job market, NVIDIA has worked with top universities to develop a GPU-accelerated AI curriculum that’s now taught in more than 5,000 schools globally. Students can get a jumpstart outside of class with NVIDIA’s AI Learning Essentials, a set of resources that equips individuals with the necessary knowledge, skills and certifications for the rapidly evolving AI workforce.

NVIDIA GPUs — whether running in university data centers, GeForce RTX laptops or NVIDIA RTX workstations — are accelerating studies, helping enhance the learning experience and enabling students to gain hands-on experience with hardware used widely in real-world applications.

Supercharged AI Studies

NVIDIA provides several tools to help students accelerate their studies.

The RTX AI Toolkit is a powerful resource for students looking to develop and customize AI models for projects in computer science, data science, and other STEM fields. It allows students to train and fine-tune the latest generative AI models, including Gemma, Llama 3 and Phi 3, up to 30x faster — enabling them to iterate and innovate more efficiently, advancing their studies and research projects.

Students studying data science and economics can use NVIDIA RAPIDS AI and data science software libraries to run traditional machine learning models up to 25x faster than conventional methods, helping them handle large datasets more efficiently, perform complex analyses in record time and gain deeper insights from data.

AI-deal for Robotics, Architecture and Design

Students studying robotics can tap the NVIDIA Isaac platform for developing, testing and deploying AI-powered robotics applications. Powered by NVIDIA GPUs, the platform consists of NVIDIA-accelerated libraries, applications frameworks and AI models that supercharge the development of AI-powered robots like autonomous mobile robots, arms and manipulators, and humanoids.

While GPUs have long been used for 3D design, modeling and simulation, their role has significantly expanded with the advancement of AI. GPUs are today used to run AI models that dramatically accelerate rendering processes.

Some industry-standard design tools powered by NVIDIA GPUs and AI include:

  • SOLIDWORKS Visualize: This 3D computer-aided design rendering software uses NVIDIA Optix AI-powered denoising to produce high-quality ray-traced visuals, streamlining the design process by providing faster, more accurate visual feedback.
  • Blender: This popular 3D creation suite uses NVIDIA Optix AI-powered denoising to deliver stunning ray-traced visuals, significantly accelerating content creation workflows.
  • D5 Render: Commonly used by architects, interior designers and engineers, D5 Render incorporates NVIDIA DLSS technology for real-time viewport rendering, enabling smoother, more detailed visualizations without sacrificing performance. Powered by fourth-generation Tensor Cores and the NVIDIA Optical Flow Accelerator on GeForce RTX 40 Series GPUs and NVIDIA RTX Ada Generation GPUs, DLSS uses AI to create additional frames and improve image quality.
  • Enscape: Enscape makes it possible to ray trace more geometry at a higher resolution, at exactly the same frame rate. It uses DLSS to enhance real-time rendering capabilities, providing architects and designers with seamless, high-fidelity visual previews of their projects.

Beyond STEM

Students, hobbyists and aspiring artists use the NVIDIA Studio platform to supercharge their creative processes with RTX and AI. RTX GPUs power creative apps such as Adobe Creative Cloud, Autodesk, Unity and more, accelerating a variety of processes such as exporting videos and rendering art.

ChatRTX is a demo app that lets students create a personalized GPT large language model connected to their own content and study materials, including text, images or other data. Powered by advanced AI, ChatRTX functions like a personalized chatbot that can quickly provide students relevant answers to questions based on their connected content. The app runs locally on a Windows RTX PC or workstation, meaning students can get fast, secure results personalized to their needs.

NVIDIA ChatRTX user interface.

Schools are increasingly adopting remote learning as a teaching modality. NVIDIA Broadcast — a free application that delivers professional-level audio and video with AI-powered features on RTX PCs and workstations — integrates seamlessly with remote learning applications including BlueJeans, Discord, Google Meet, Microsoft Teams, Webex and Zoom. It uses AI to enhance remote learning experiences by removing background noise, improving image quality in low-light scenarios, and enabling background blur and background replacement.

NVIDIA Broadcast.

From Data Centers to School Laptops

@dannylum_

The GeForce RTX 40 Series Laptops are perfect for your back to school all-in-one computer! Get one today #STEM #Gaming #engineering #student #BeyondFast #ad @NVIDIA GeForce

♬ original sound – Danny Lum

NVIDIA RTX-powered mobile workstations and GeForce RTX and Studio RTX 40 Series laptops offer supercharged development, learning, gaming and creating experiences with AI-enabled tools and apps. They also include exclusive access to the NVIDIA Studio platform of creative tools and technologies, and Max-Q technologies that optimize battery life and acoustics — giving students an ideal platform for all aspects of campus life.

Say goodbye to late nights in the computer lab — GeForce RTX laptops and NVIDIA RTX workstations share the same architecture as the NVIDIA GPUs powering many university labs and data centers. That means students can study, create and play — all on the same PC.

STEM Application Performance for GeForce RTX 4060 Laptop GPU versus Laptop without GeForce RTX GPU.

Learn more about GeForce RTX laptops and NVIDIA RTX workstations.

Read More

FlexAttention: The Flexibility of PyTorch with the Performance of FlashAttention

FlexAttention: The Flexibility of PyTorch with the Performance of FlashAttention

a cartoon chart flexing his muscles

In theory, Attention is All You Need. In practice, however, we also need optimized attention implementations like FlashAttention.

Although these fused attention implementations have substantially improved performance and enabled long contexts, this efficiency has come with a loss of flexibility. You can no longer try out a new attention variant by writing a few PyTorch operators – you often need to write a new custom kernel! This operates as a sort of “software lottery” for ML researchers – if your attention variant doesn’t fit into one of the existing optimized kernels, you’re doomed to slow runtime and CUDA OOMs.

For some examples of attention variants, we have Causal, Relative Positional Embeddings, Alibi, Sliding Window Attention, PrefixLM, Document Masking/Sample Packing/Jagged Tensors, Tanh Soft-Capping, PagedAttention, etc. Even worse, folks often want combinations of these! Sliding Window Attention + Document Masking + Causal + Context Parallelism? Or what about PagedAttention + Sliding Window + Tanh Soft-Capping?

The left picture below represents the state of the world today – some combinations of masking + biases + setting have existing kernels implemented. But the various options lead to an exponential number of settings, and so overall we end up with fairly spotty support. Even worse, new attention variants researchers come up with will have zero support.

Attention variant support diagram

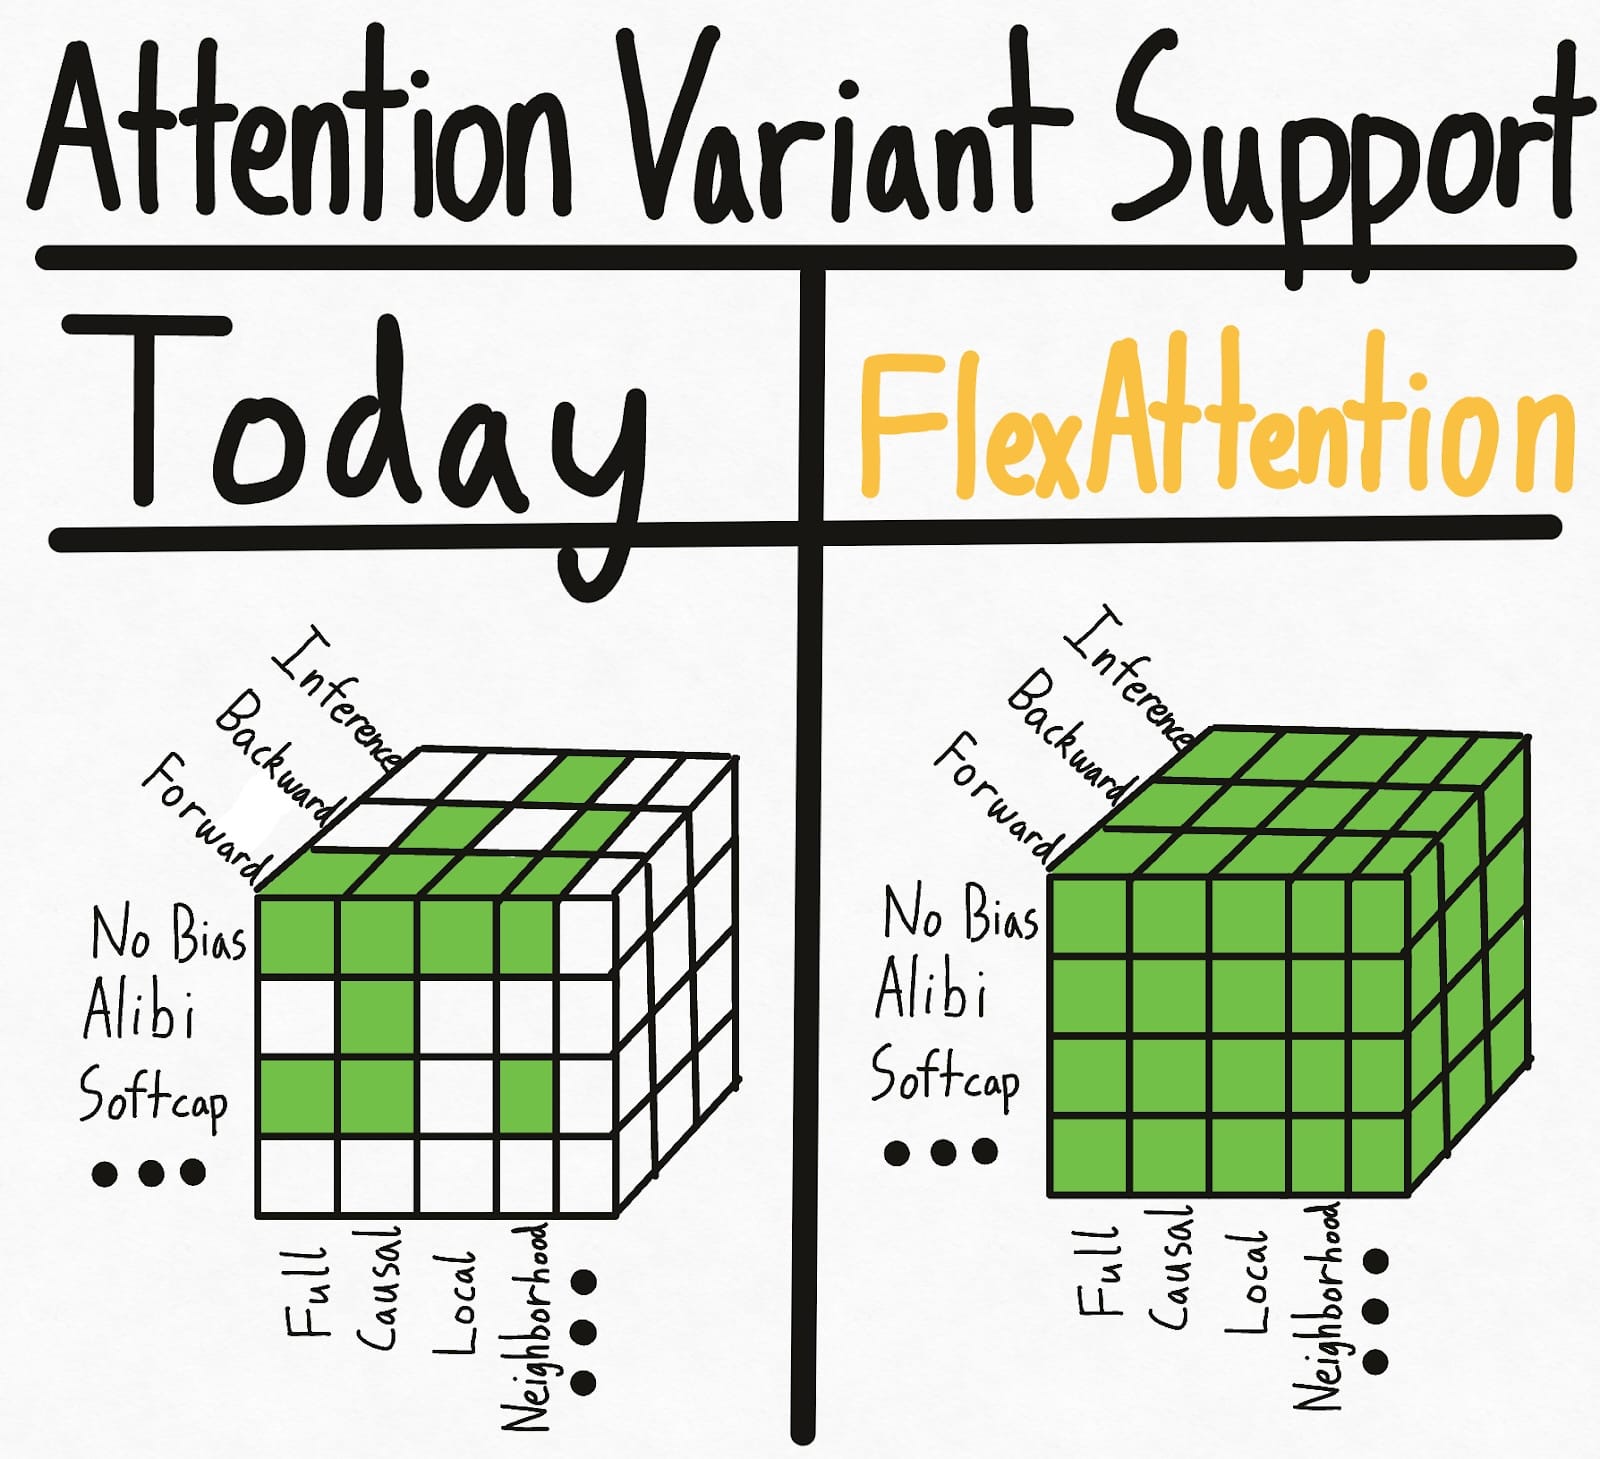
To solve this hypercube problem once and for all, we introduce FlexAttention, a new PyTorch API.

  1. We provide a flexible API that allows implementing many attention variants (including all the ones mentioned in the blog post so far) in a few lines of idiomatic PyTorch code.
  2. We lower this into a fused FlashAttention kernel through torch.compile, generating a FlashAttention kernel that doesn’t materialize any extra memory and has performance competitive with handwritten ones.
  3. We also automatically generate the backwards pass, leveraging PyTorch’s autograd machinery.
  4. Finally, we can also take advantage of sparsity in the attention mask, resulting in significant improvements over standard attention implementations.

With FlexAttention, we hope that trying new attention variants will only be limited by your imagination.

You can find many FlexAttention examples at the Attention Gym: https://github.com/pytorch-labs/attention-gym. If you have any cool applications, feel free to submit an example!

PS: We also find this API very exciting since it leverages a lot of existing PyTorch infra in a fun way – more on that in the end.

FlexAttention

Here is the classic attention equation:

math equation

In code form:

Q, K, V: Tensor[batch_size, num_heads, sequence_length, head_dim]
score: Tensor[batch_size, num_heads, sequence_length, sequence_length] = (Q @ K) / sqrt(head_dim)
probabilities = softmax(score, dim=-1)
output: Tensor[batch_size, num_heads, sequence_length, head_dim] = probabilities @ V

FlexAttention allows for an user-defined function score_mod:

math equation

In code form:

Q, K, V: Tensor[batch_size, num_heads, sequence_length, head_dim]
score: Tensor[batch_size, num_heads, sequence_length, sequence_length] = (Q @ K) / sqrt(head_dim)
modified_scores: Tensor[batch_size, num_heads, sequence_length, sequence_length] = score_mod(score)
probabilities = softmax(modified_scores, dim=-1)
output: Tensor[batch_size, num_heads, sequence_length, head_dim] = probabilities @ V

This function allows you to modify the attention scores prior to softmax. Surprisingly, this ends up being sufficient for the vast majority of attention variants (examples below)!

Concretely, the expected signature for score_mod is somewhat unique.

def score_mod(score: f32[], b: i32[], h: i32[], q_idx: i32[], kv_idx: i32[])
    return score # noop - standard attention

In other words, score is a scalar pytorch tensor that represents the dot product of a query token and a key token. The rest of the arguments tell you which dot product you’re currently computing – b (current element in batch), h (current head), q_idx (position in query), kv_idx (position in key/value tensors).

To apply this function, we could implement it as

for b in range(batch_size):
    for h in range(num_heads):
        for q_idx in range(sequence_length):
            for kv_idx in range(sequence_length):
                modified_scores[b, h, q_idx, kv_idx] = score_mod(scores[b, h, q_idx, kv_idx], b, h, q_idx, kv_idx)

Of course, this is not how FlexAttention is implemented under the hood. Leveraging torch.compile, we automatically lower your function into a single fused FlexAttention kernel – guaranteed or your money back!

This API ends up being surprisingly expressive. Let’s look at some examples.

Score Mod Examples

Full Attention

Let’s first do “full attention”, or standard bidirectional attention. In this case, score_mod is a no-op – it takes as input the scores and then returns them as is..

def noop(score, b, h, q_idx, kv_idx):
    return score

And to use it end to end (including both forwards and backwards):

from torch.nn.attention.flex_attention import flex_attention

flex_attention(query, key, value, score_mod=noop).sum().backward()

Relative Position Encodings

One common attention variant is the “relative position encoding”. Instead of encoding the absolute distance in the queries and keys, relative position encoding adjusts scores based on the “distance” between the queries and keys.

def relative_positional(score, b, h, q_idx, kv_idx):
    return score + (q_idx - kv_idx)

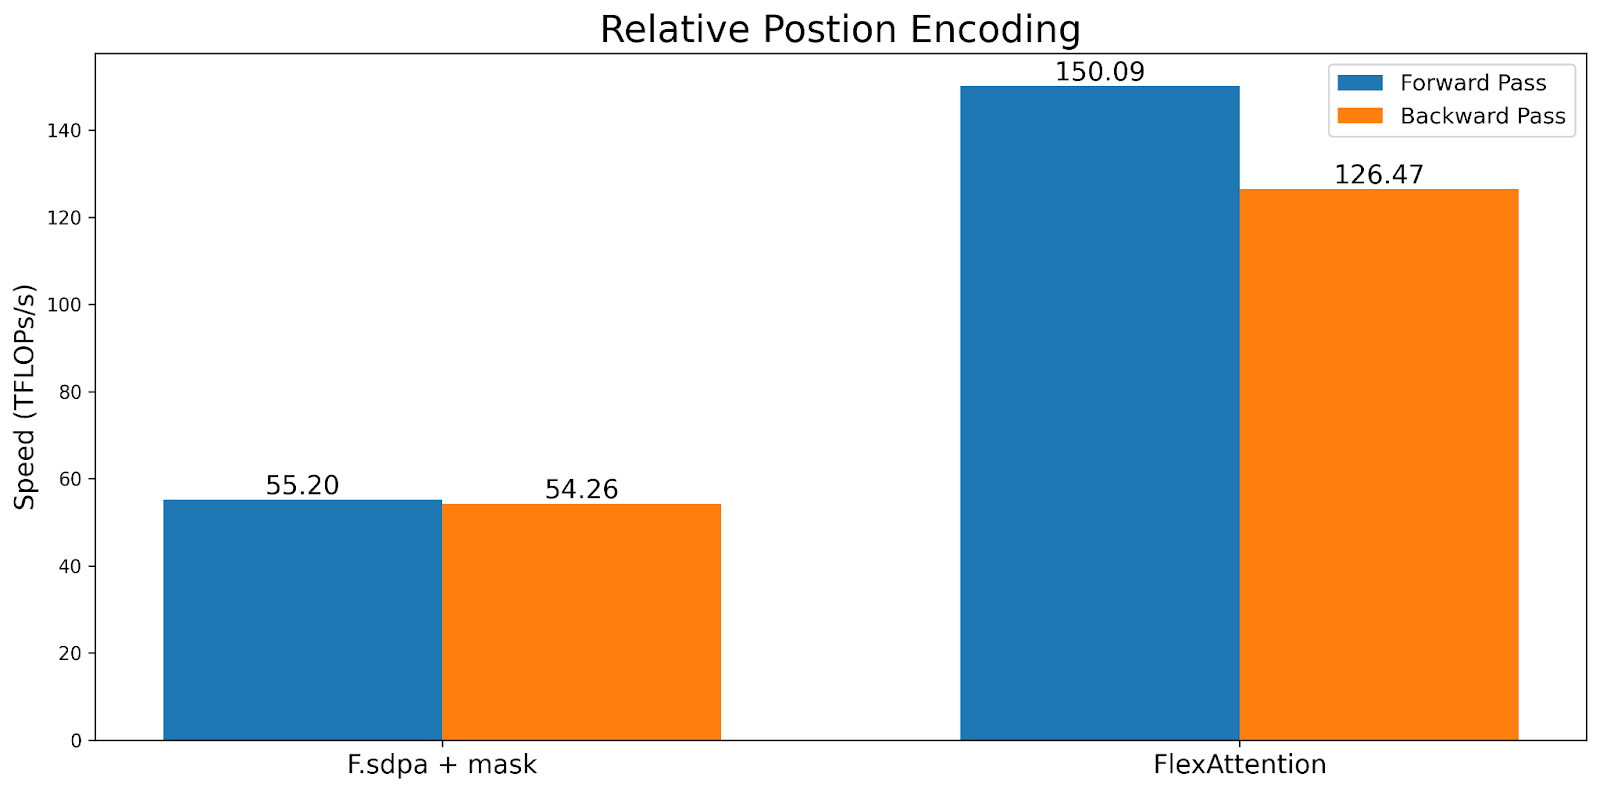
Note that unlike typical implementations, this does not need to materialize a SxS tensor. Instead, FlexAttention computes the bias values “on the fly” within the kernel, leading to significant memory and performance improvements.

relative position encoding

ALiBi Bias

alibi bias

Source: Train Short, Test Long: Attention with Linear Biases Enables Input Length Extrapolation

ALiBi was introduced in Train Short, Test Long: Attention with Linear Biases Enables Input Length Extrapolation, and claims to have beneficial properties for length extrapolation at inference. Notably, MosaicML has pointed to “lack of kernel support” as the main reason why they eventually switched from ALiBi to rotary embeddings.

Alibi is similar to relative positional encodings with one exception – it has a per-head factor that is typically precomputed.

alibi_bias = generate_alibi_bias() # [num_heads]

def alibi(score, b, h, q_idx, kv_idx):
    bias = alibi_bias[h] * (q_idx - kv_idx)
    return score + bias

This demonstrates one interesting piece of flexibility torch.compile provides – we can load from alibi_bias even though it wasn’t explicitly passed in as an input! The generated Triton kernel will calculate the correct loads from the alibi_bias tensor and fuse it. Note that you could regenerate alibi_bias and we still wouldn’t need to recompile.

Soft-capping

Soft-capping is a technique used in Gemma2 and Grok-1 that prevents logits from growing excessively large. In FlexAttention, it looks like:

softcap = 20
def soft_cap(score, b, h, q_idx, kv_idx):
    score = score / softcap
    score = torch.tanh(score)
    score = score * softcap
    return score

Note that we also automatically generate the backwards pass from the forwards pass here. Also, although this implementation is semantically correct, we likely want to use a tanh approximation in this case for performance reasons. See attention-gym for more details.
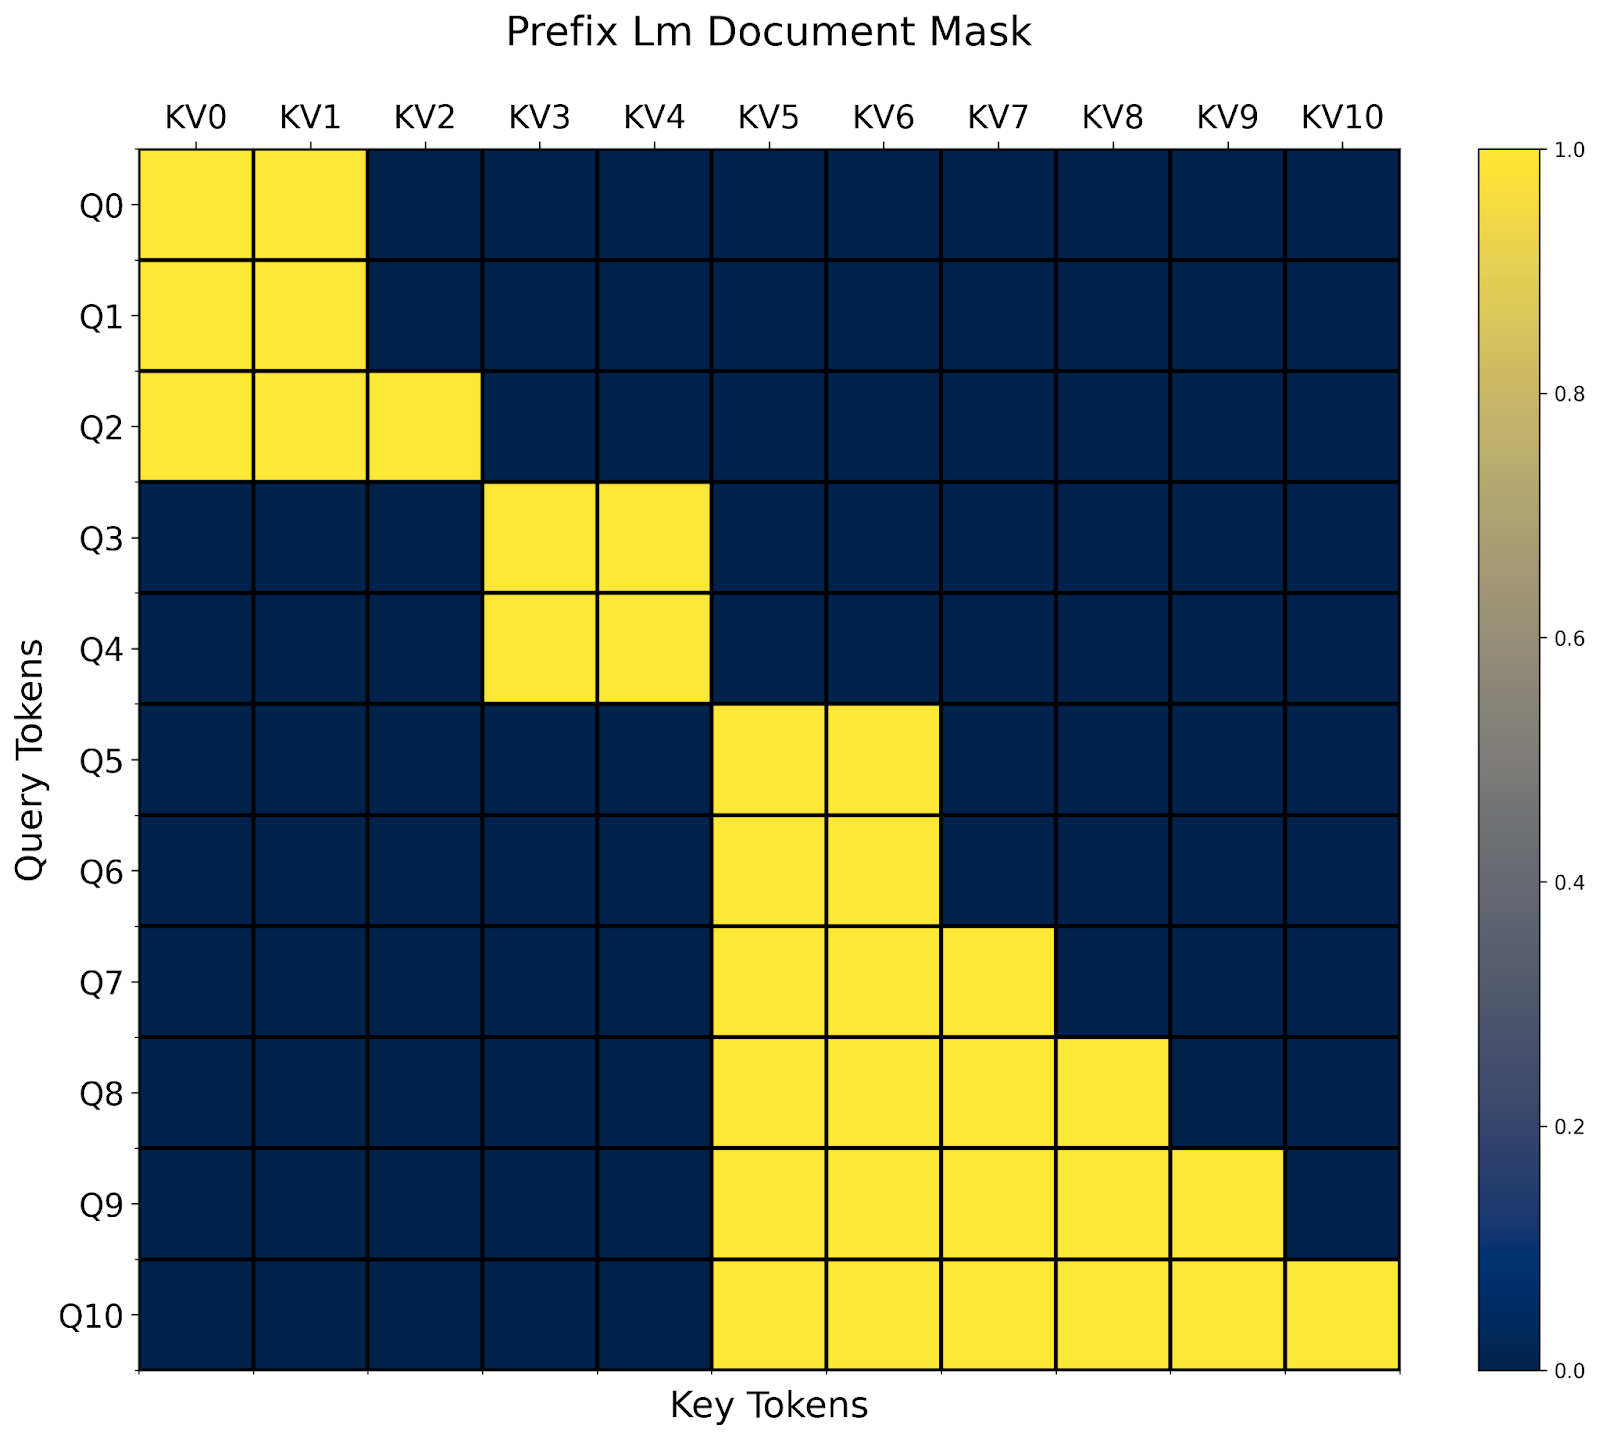
Causal Mask

Although bidirectional attention is the simplest, the original Attention is All You Need paper and the vast majority of LLMs use attention in a decoder-only setting where each token can only attend to the tokens prior to it. Folks often think of this as a lower-triangular mask, but with the score_mod API it can be expressed as:

def causal_mask(score, b, h, q_idx, kv_idx):
    return torch.where(q_idx >= kv_idx, score, -float("inf"))

Basically, if the query token is “after” the key token, we keep the score. Otherwise, we mask it out by setting it to -inf, thus ensuring it won’t participate in the softmax calculation.

However, masking is special compared to other modifications – if something is masked out, we can completely skip its computation! In this case, a causal mask has about 50% sparsity, so not taking advantage of the sparsity would result in a 2x slowdown. Although this score_mod is sufficient to implement causal masking correctly, getting the performance benefits of sparsity requires another concept – mask_mod.

Mask Mods

To take advantage of sparsity from masking, we need to do some more work. Specifically, by passing a mask_mod to create_block_mask, we can create a BlockMask. FlexAttention can then use BlockMask to take advantage of the sparsity!

The signature of mask_mod is very similar to score_mod – just without the score. In particular

# returns True if this position should participate in the computation
mask_mod(b, h, q_idx, kv_idx) => bool

Note that score_mod is strictly more expressive than mask_mod. However, for masking, it’s recommended to use mask_mod and create_block_mask, as it’s more performant. See the FAQ on why score_mod and mask_mod are separate.

Now, let’s take a look at how we might implement causal mask with mask_mod.

Causal Mask

from torch.nn.attention.flex_attention import create_block_mask

def causal(b, h, q_idx, kv_idx):
    return q_idx >= kv_idx

# Because the sparsity pattern is independent of batch and heads, we'll set them to None (which broadcasts them) 
block_mask = create_block_mask(causal, B=None, H=None, Q_LEN=1024, KV_LEN=1024)
# In this case, we don't need a score_mod, so we won't pass any in.
# However, score_mod can still be combined with block_mask if you need the additional flexibility.
flex_attention(query, key, value, block_mask=block_mask)

Note that create_block_mask is a relatively expensive operation! Although FlexAttention will not need to recompile when it changes, if you aren’t careful about caching it, it can lead to significant slowdowns (check out the FAQ for suggestions on best practices).

flexattention performance charts

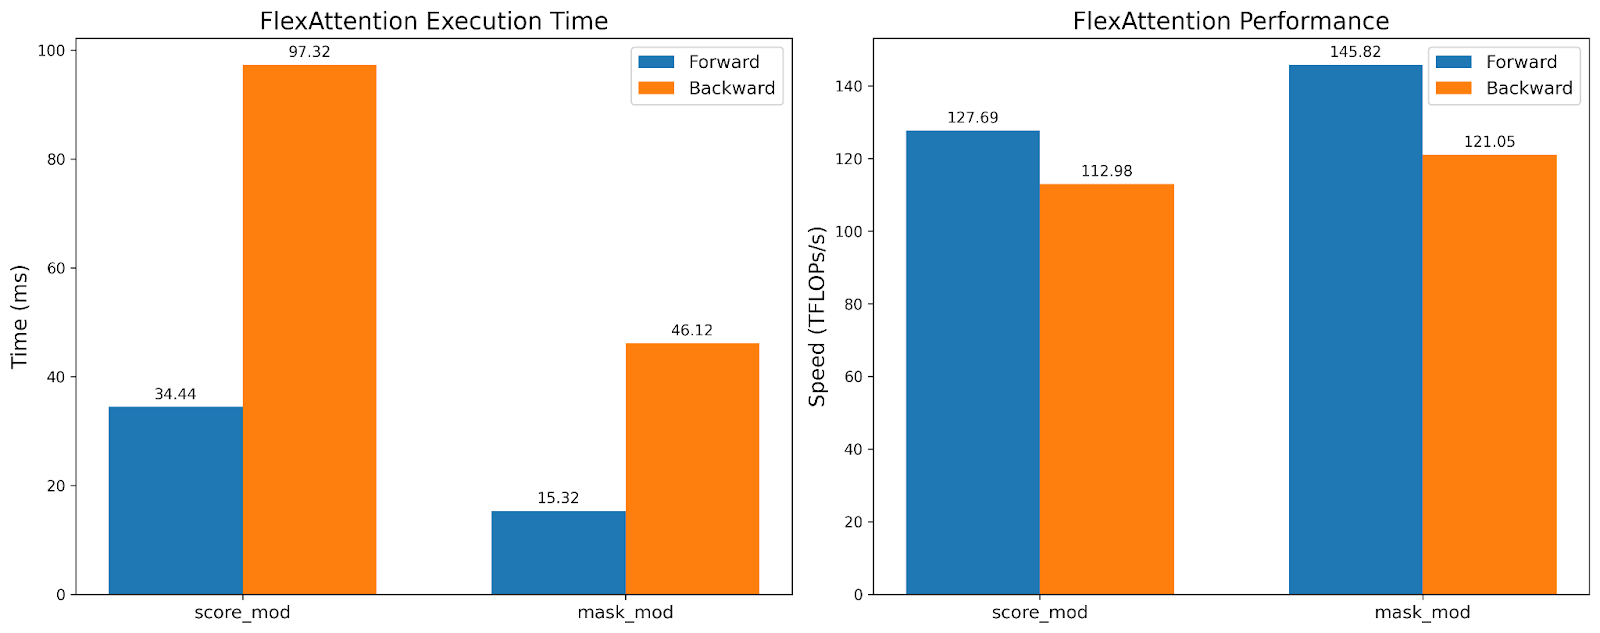
While the TFlops are roughly the same, the execution time is 2x faster for the mask_mod version! This demonstrates that we can leverage the sparsity that BlockMask provides us without losing hardware efficiency.

Sliding Window + Causal

Sliding Window Causal diagrams

Source: Mistral 7B

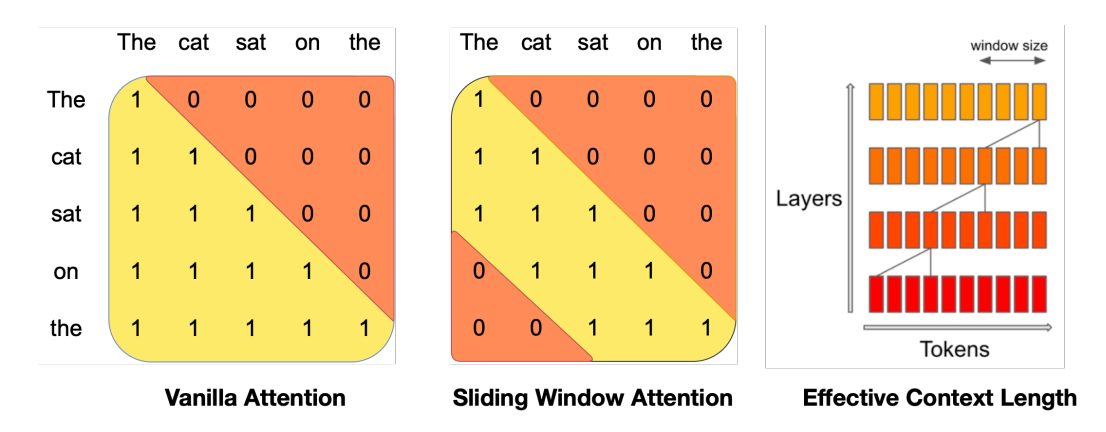
Popularized by Mistral, sliding window attention (also known as local attention) takes advantage of the intuition that the most recent tokens are the most useful. In particular, it allows the query token to only attend to, say, the 1024 most recent tokens. This is often used together with causal attention.

SLIDING_WINDOW = 1024

def sliding_window_causal(b, h, q_idx, kv_idx):
    causal_mask = q_idx >= kv_idx
    window_mask = q_idx - kv_idx <= SLIDING_WINDOW 
    return causal_mask & window_mask

# If you want to be cute...
from torch.nn.attention import or_masks

def sliding_window(b, h, q_idx, kv_idx)
    return q_idx - kv_idx <= SLIDING_WINDOW

sliding_window_causal = or_masks(causal_mask, sliding_window)

We benchmark it against F.scaled_dot_product_attention with a sliding window mask as well as FA2 with a causal mask (as a reference point for performance). Not only are we significantly faster than F.scaled_dot_product_attention, we’re also significantly faster than FA2 with a causal mask as this mask has significantly more sparsity.

execution time charts

PrefixLM

PrefixLM diagram

Source: PaliGemma: A versatile 3B VLM for transfer

The T5 architecture, proposed in Exploring the Limits of Transfer Learning with a Unified Text-to-Text Transformer, describes an attention variant that performs full bidirectional attention on a “prefix”, and causal attention on the rest. We again compose two mask functions to accomplish this, one for causal masking and one that is based off of the prefix length.

prefix_length: [B]
def prefix_mask(b, h, q_idx, kv_idx):
    return kv_idx <= prefix_length[b]

prefix_lm_causal = or_masks(prefix_mask, causal_mask)
# In this case, our mask is different per sequence so we set B equal to our batch size
block_mask = create_block_mask(prefix_lm_causal, B=B, H=None, S, S)

Just like with score_mod, mask_mod allows us to refer to additional tensors that aren’t explicitly an input to the function! However, with prefixLM, the sparsity pattern changes per input. This means that for each new input batch, we’ll need to recompute the BlockMask. One common pattern is to call create_block_mask at the beginning of your model and reuse that block_mask for all attention calls in your model. See Recomputing Block Masks vs. Recompilation.

However, in exchange for that, we’re not only able to have an efficient attention kernel for prefixLM, we’re also able to take advantage of however much sparsity exists in the input! FlexAttention will dynamically adjust its performance based off of the BlockMask data, without needing to recompile the kernel.

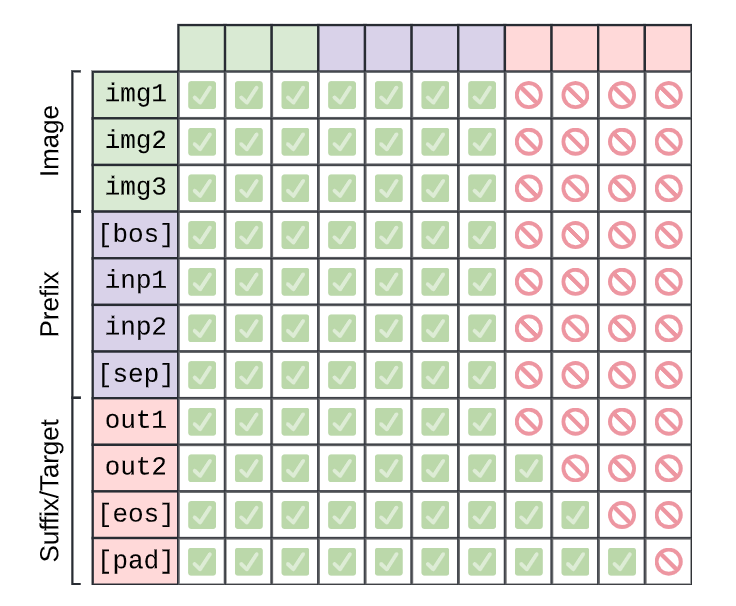
Document Masking/Jagged Sequences

Another common attention variant is document masking/jagged sequences. Imagine that you have a number of sequences of varying length. You want to train on all of them together, but unfortunately, most operators only accept rectangular tensors.

Through BlockMask, we can support this efficiently in FlexAttention as well!

  1. First, we flatten all sequences into a single sequence with sum(sequence lengths) tokens.
  2. Then, we compute the document_id that each token belongs to.
  3. Finally, in our mask_mod, we simply whether the query and kv token belong to the same document!
# The document that each token belongs to.
# e.g. [0, 0, 0, 1, 1, 2, 2, 2, 2, 2, 2] corresponds to sequence lengths 3, 2, and 6.
document_id: [SEQ_LEN]

def document_masking(b, h, q_idx, kv_idx):
    return document_id[q_idx] == document_id[kv_idx]

And that’s it! In this case, we see that we end up with a blockdiagonal mask.

blockdiagonal mask

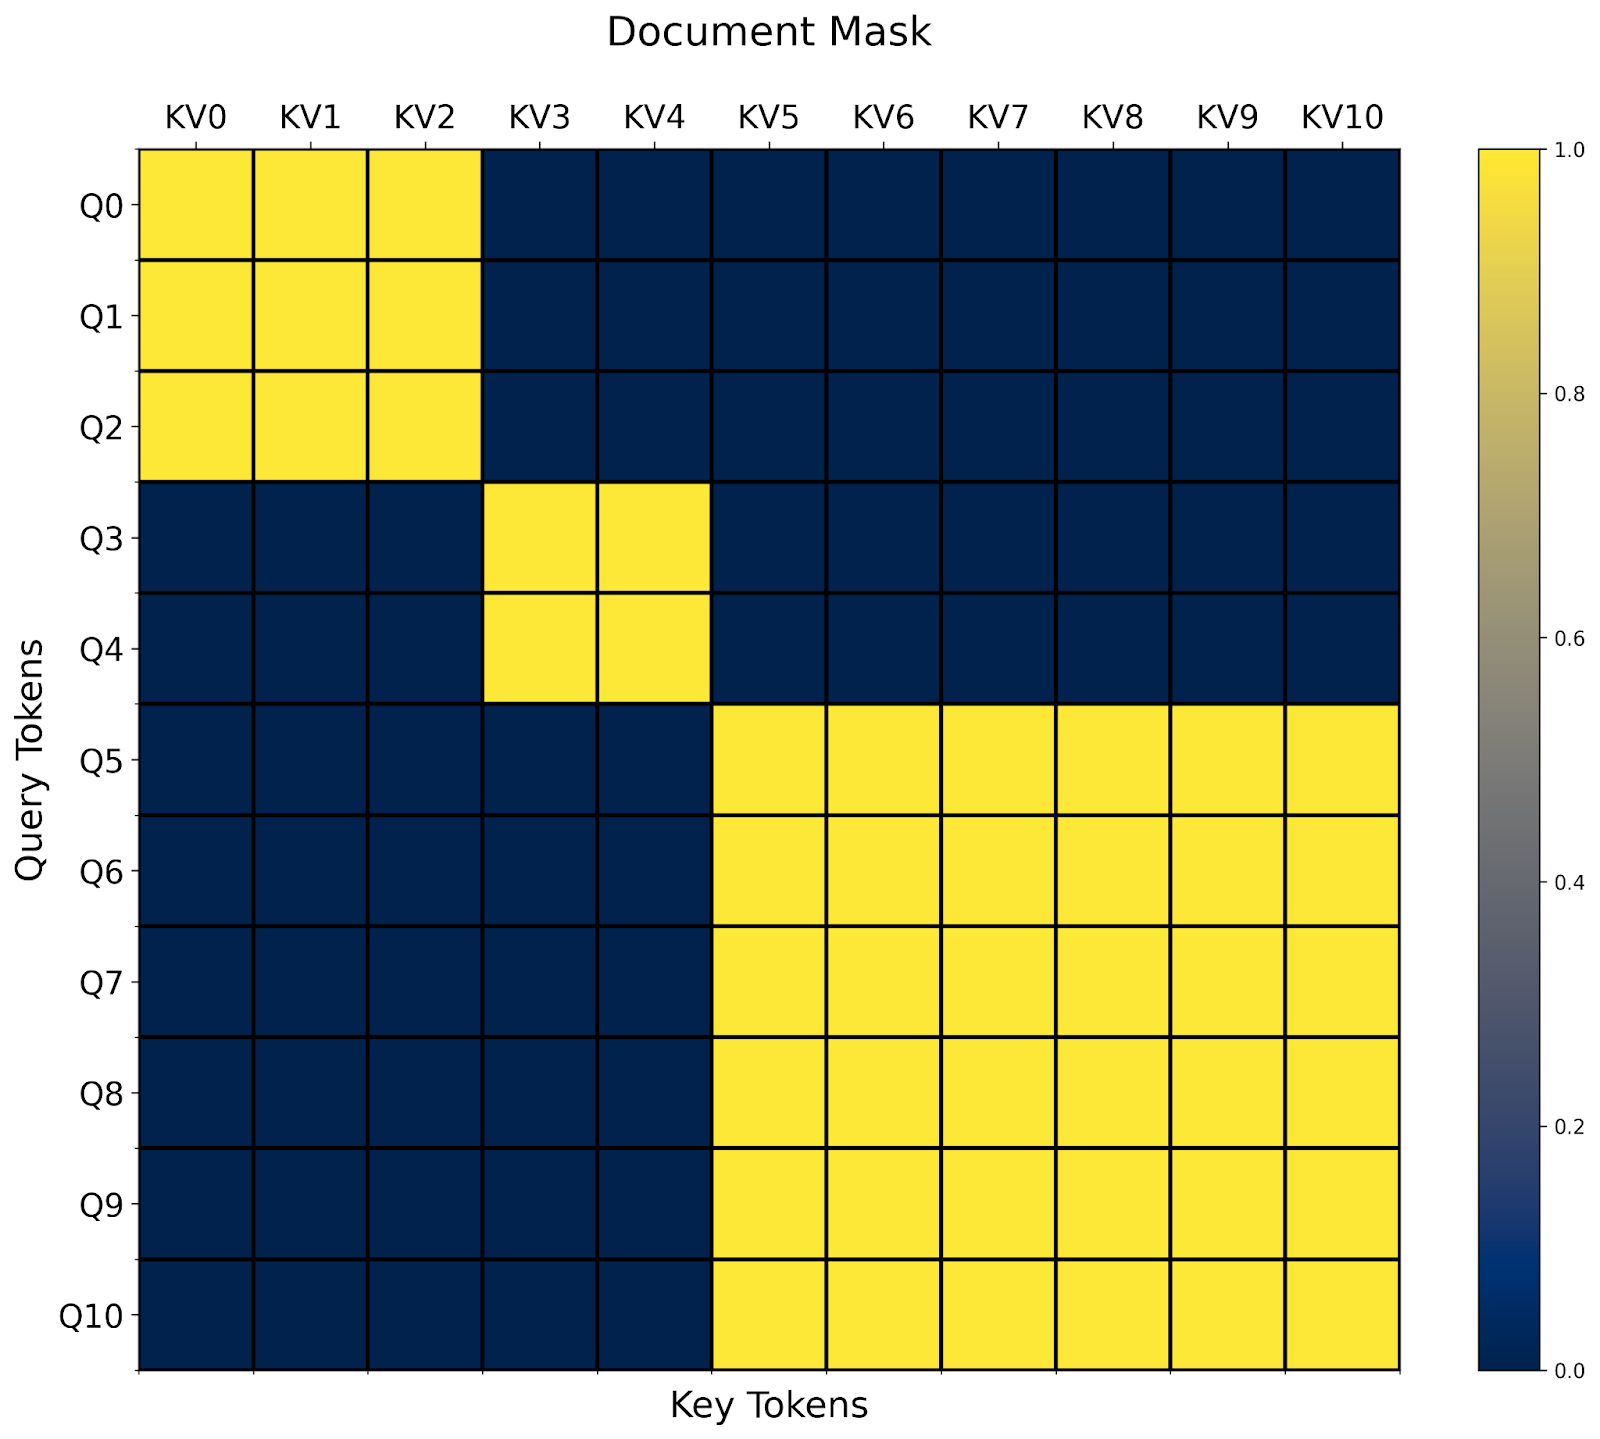
One interesting aspect about document masking is that it’s easy to see how it might combine with an arbitrary combination of other masks . For example, we already defined prefixlm_mask in the previous section. Do we now need to define a prefixlm_document_mask function as well?

In these cases, one pattern we’ve found quite useful is what we call a “higher level modification”. In this case, we can take an existing mask_mod and automatically transform it into one that works with jagged sequences!

def generate_doc_mask_mod(mask_mod, document_id):
    # Get unique document IDs and their counts
    _, counts = torch.unique_consecutive(document_id, return_counts=True)
    # Create cumulative counts (offsets)
    offsets = torch.cat([torch.tensor([0], device=document_id.device), counts.cumsum(0)[:-1]])
    def doc_mask_wrapper(b, h, q_idx, kv_idx):
        same_doc = document_id[q_idx] == document_id[kv_idx]
        q_logical = q_idx - offsets[document_id[q_idx]]
        kv_logical = kv_idx - offsets[document_id[kv_idx]]
        inner_mask = mask_mod(b, h, q_logical, kv_logical)
        return same_doc & inner_mask
    return doc_mask_wrapper

For example, given the prefix_lm_causal mask from above, we can transform it into one that works on on packed documents like so:

prefix_length = torch.tensor(2, dtype=torch.int32, device="cuda")
def prefix_mask(b, h, q_idx, kv_idx):
    return kv_idx < prefix_length
prefix_lm_causal = or_masks(prefix_mask, causal_mask)
doc_prefix_lm_causal_mask = generate_doc_mask_mod(prefix_lm_causal, document_id)

blockdiagonal mask

Now, this mask is “block-prefixLM-diagonal” shaped. 🙂

That’s all of our examples! There are far more attention variants than we have space to list, so check out Attention Gym for more examples. We hope that the community will contribute some of their favorite applications of FlexAttention as well.

FAQ

Q: When does FlexAttention need to recompile?

As FlexAttention leverages torch.compile for graph capture, it can actually avoid recompilation in a broad spectrum of cases. Notably, it does not need to recompile even if captured tensors change values!

flex_attention = torch.compile(flex_attention)
def create_bias_mod(bias)
    def bias_mod(score, b, h, q_idx, kv_idx):
        return score + bias
    return bias_mod
bias_mod1 = create_bias_mod(torch.tensor(0))
flex_attention(..., score_mod=bias_mod1) # Compiles the kernel here 

bias_mod2 = create_bias_mod(torch.tensor(2))
flex_attention(..., score_mod=bias_mod2) # Doesn't need to recompile! 

Even changing the block-sparsity doesn’t require a recompile. However, if the block-sparsity changes, we do need to recompute the BlockMask.

Q: When should we recompute the BlockMask?

We need to recompute the BlockMask whenever the block-sparsity changes. Although computing the BlockMask is much cheaper than recompilation (on the order of hundreds of microseconds as opposed to seconds), you should still take care to not excessively recompute the BlockMask.

Here are some common patterns and some recommendations on how you might approach them.

Mask never changes (e.g. causal mask)
In this case, you can simply precompute the block mask and cache it globally, reusing it for all attention calls.

block_mask = create_block_mask(causal_mask, 1, 1, S,S)
causal_attention = functools.partial(flex_attention, block_mask=block_mask)

Mask changes every batch (e.g. document masking)
In this case, we would suggest computing the BlockMask at the beginning of the model and threading it through the model – reusing the BlockMask for all layers.

def forward(self, x, doc_mask):
    # Compute block mask at beginning of forwards
    block_mask = create_block_mask(doc_mask, None, None, S, S)    
    x = self.layer1(x, block_mask)
    x = self.layer2(x, block_mask)
    ...
    # amortize block mask construction cost across all layers
    x = self.layer3(x, block_mask) 
    return x

Mask changes every layer (e.g. data-dependent sparsity)
This is the hardest setting, since we’re unable to amortize the block mask computation across multiple FlexAttention invocations. Although FlexAttention can certainly still benefit this case, the actual benefits from BlockMask depend on how sparse your attention mask is and how fast we can construct the BlockMask. That leads us to…

Q: How can we compute BlockMask quicker?

create_block_mask is unfortunately fairly expensive, both from a memory and compute perspective, as determining whether a block is completely sparse requires evaluating mask_mod at every single point in the block. There are a couple ways to address this:

  1. If your mask is the same across batch size or heads, make sure that you’re broadcasting over those (i.e. set them to None in create_block_mask).
  2. Compile create_block_mask. Unfortunately, today, torch.compile does not work directly on create_block_mask due to some unfortunate limitations. However, you can set _compile=True, which will significantly reduce the peak memory and runtime (often an order of magnitude in our testing).
  3. Write a custom constructor for BlockMask. The metadata for BlockMask is quite simple (see the documentation). It’s essentially two tensors.
    a. num_blocks: The number of KV blocks computed for each query block.
    b. indices: The positions of the KV blocks computed for each query block.

    For example, here’s a custom BlockMask constructor for causal_mask.

def create_causal_mask(S):
    BLOCK_SIZE = 128
    # The first query block computes one block, the second query block computes 2 blocks, etc.
    num_blocks = torch.arange(S // BLOCK_SIZE, device="cuda") + 1
    # Since we're always computing from the left to the right,
    # we can use the indices [0, 1, 2, ...] for every query block.
    indices = torch.arange(S // BLOCK_SIZE, device="cuda").expand(
        S // BLOCK_SIZE, S // BLOCK_SIZE
    )
    num_blocks = num_blocks[None, None, :]
    indices = indices[None, None, :]
    return BlockMask(num_blocks, indices, BLOCK_SIZE=BLOCK_SIZE, mask_mod=causal_mask)
Q: Why are score_mod and mask_mod different? Isn’t mask_mod just a special case of score_mod?

Very astute question, hypothetical audience member! In fact, any mask_mod can be easily converted to a score_mod (we do not recommend using this function in practice!)

def mask_mod_as_score_mod(b, h, q_idx, kv_idx):
    return torch.where(mask_mod(b, h, q_idx, kv_idx), score, -float("inf"))

So, if score_mod can implement everything mask_mod can, what’s the point of having mask_mod?

One immediate challenge: a score_mod requires the actual score value as an input, but when we’re precomputing the BlockMask, we don’t have the actual score value. We can perhaps fake the values by passing in all zeros, and if the score_mod returns -inf, then we consider it to be masked (in fact, we originally did this!).

However, there are two issues. The first is that this is hacky – what if the user’s score_mod returned -inf when the input is 0? Or what if the user’s score_mod masked out with a large negative value instead of -inf? It seems we’re trying to cram a round peg into a square hole. However, there’s a more important reason to separate out mask_mod from score_mod – it’s fundamentally more efficient!.

As it turns out, applying masking to every single computed element is actually quite expensive – our benchmarks see about a 15-20% degradation in performance! So, although we can get significant speedups by skipping half the computation, we lose a meaningful part of that speedup from needing to mask out every element!

Luckily, if we visualize the causal mask, we notice that the vast majority of blocks do not require a “causal mask” at all – they’re fully computed! It is only the blocks on the diagonal, partially computed and partially masked, that require masking to be applied.

blockdiagonal mask

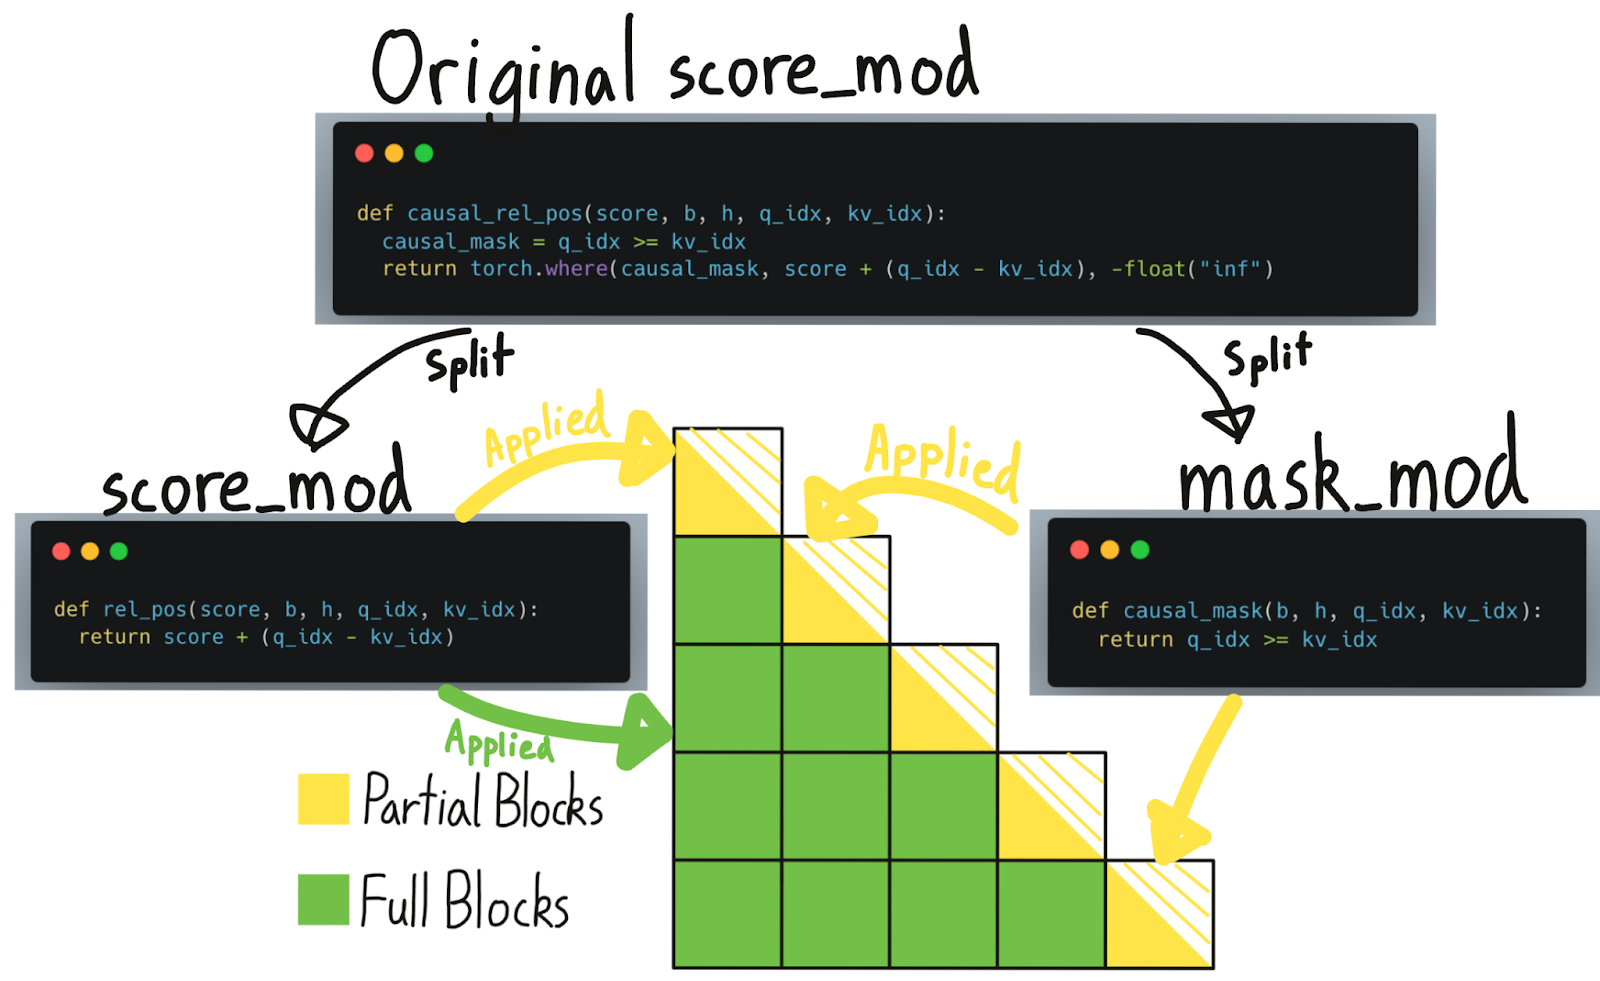
The BlockMask previously told us which blocks we need to compute and which blocks we can skip. Now, we further augment this data structure to also tell us which blocks are “fully computed” (i.e. masking can be skipped) vs. “partially computed” (i.e. a mask needs to be applied). Note, however, that although masks can be skipped on “fully computed” blocks, other score_mods like relative positional embeddings still need to be applied.

Given just a score_mod, there’s no sound way for us to tell which parts of it are “masking”. Hence, the user must separate these out themselves into mask_mod.

Q: How much additional memory does the BlockMask need?

The BlockMask metadata is of size [BATCH_SIZE, NUM_HEADS, QUERY_LEN//BLOCK_SIZE, KV_LEN//BLOCK_SIZE]. If the mask is the same across the batch or heads dimension it can be broadcasted over that dimension to save memory.

At the default BLOCK_SIZE of 128, we expect that the memory usage will be fairly negligible for most use cases. For example, for a sequence length of 1 million, the BlockMask would only use 60MB of additional memory. If this is a problem, you can increase the block size: create_block_mask(..., BLOCK_SIZE=1024). For example, increasing BLOCK_SIZE to 1024 would result in this metadata dropping to under a megabyte.

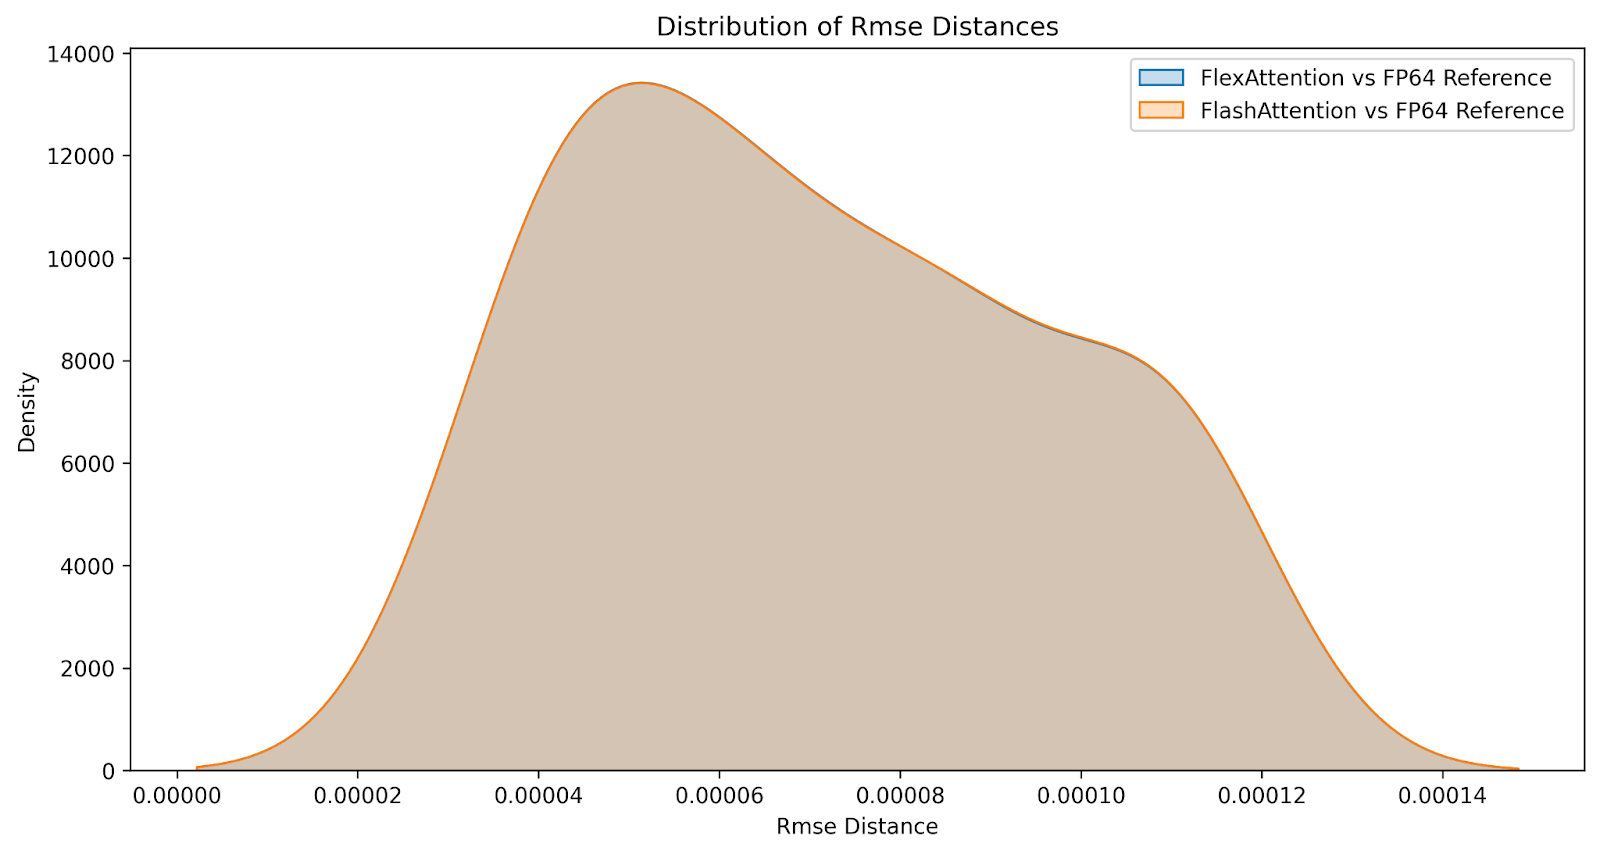
Q: How do the numerics compare?

Although the results are not bitwise identical, we are confident that FlexAttention is as numerically accurate as FlashAttention. We generate the following distribution of differences comparing FlashAttention versus FlexAttention over a large range of inputs on both causal and non causal attention variants. The errors are nearly identical.

distribution chart

Performance

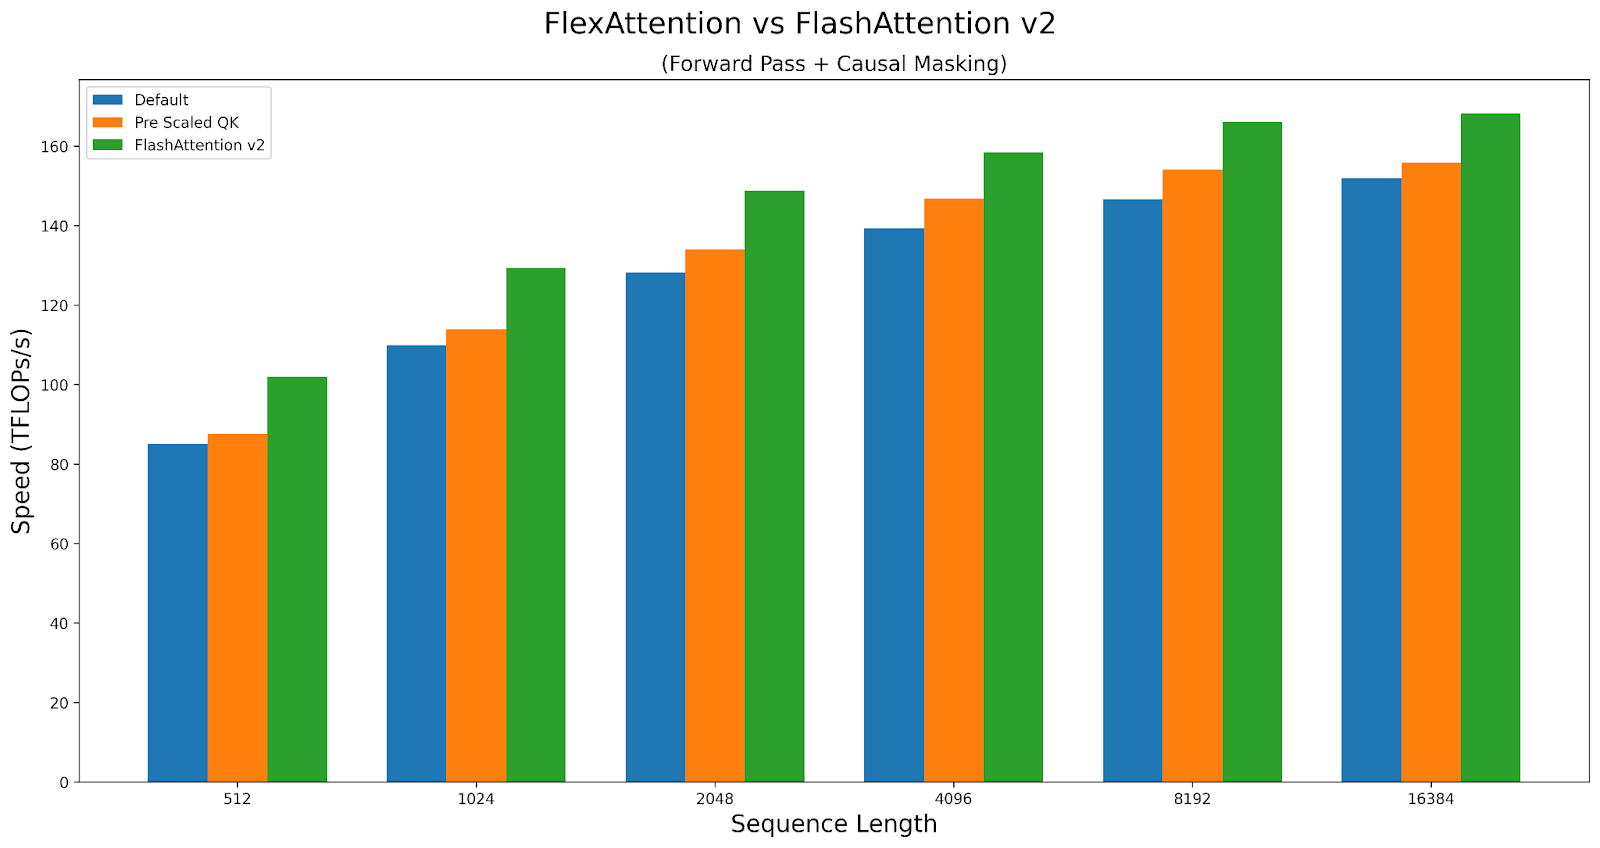
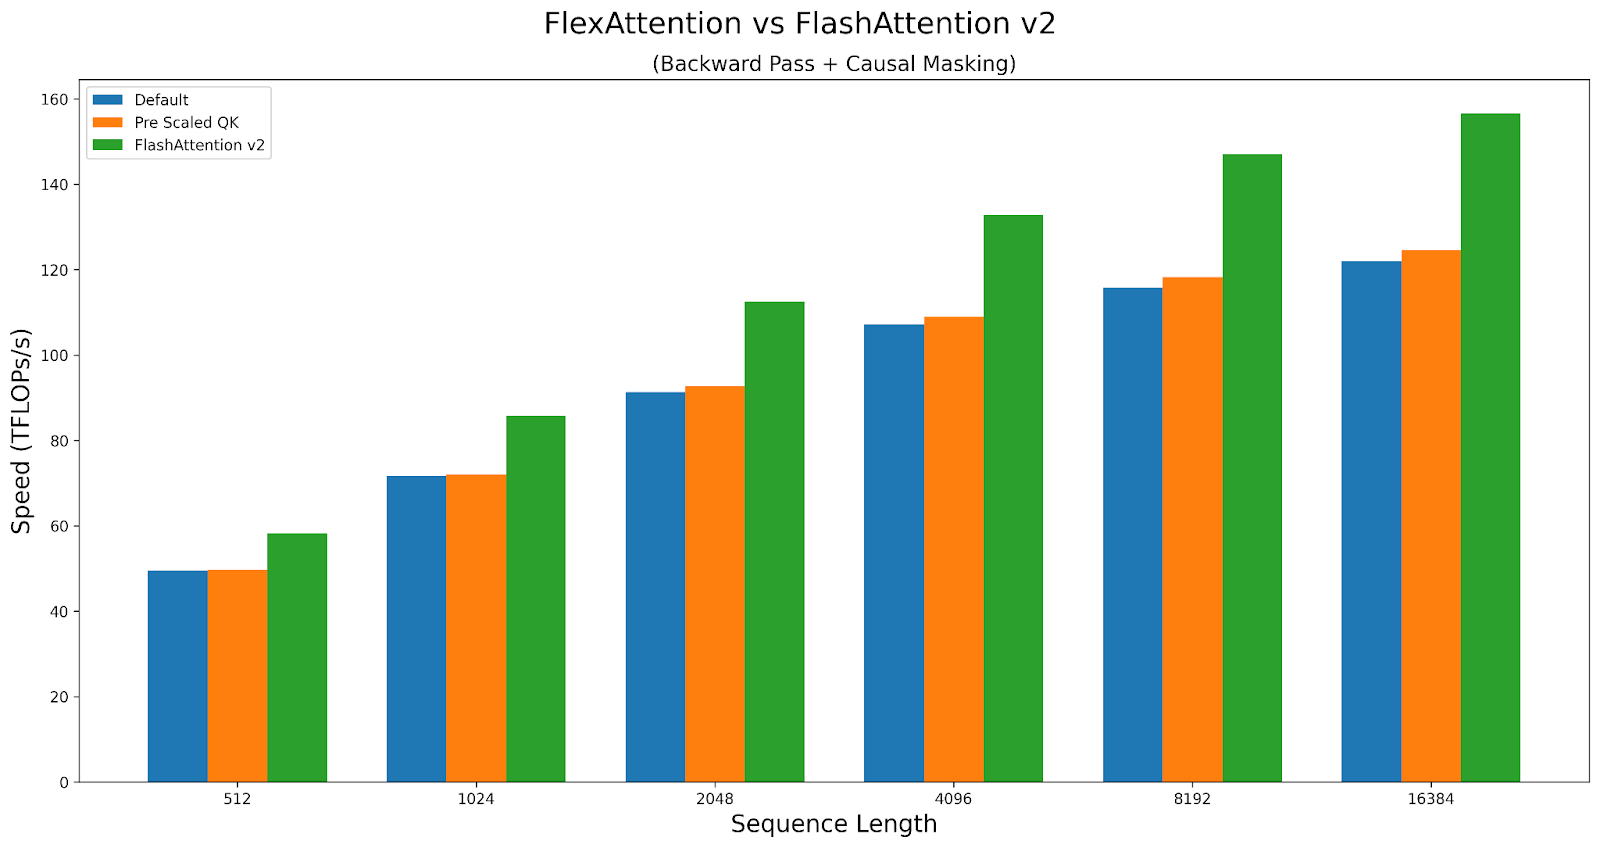
Generally speaking, FlexAttention is nearly as performant as a handwritten Triton kernel, which is unsurprising, as we heavily leverage a handwritten Triton kernel. However, due to its generality, we do incur a small performance penalty. For example, we must incur some additional latency to determine which block to compute next. In some cases, we provide some kernel options that can affect the performance of the kernel while changing its behavior. They can be found here: performance knobs

As a case study, let’s explore how the knobs affect the performance of causal attention. We will compare performance of the triton kernel versus FlashAttentionv2 on A100. The script can be found here.

FlexAttention achieves 90% of FlashAttention2’s performance in the forward pass and 85% in the backward pass. FlexAttention is currently utilizing a deterministic algorithm that recomputes more intermediates than FAv2, but we have plans to improve FlexAttention’s backward algorithm and hope to close this gap!

flexattention speed chart

flexattention speed chart

Conclusion

We hope you have as much fun using FlexAttention as we did developing it! While working on this, we ended up finding way more applications of this API than we could have expected. We’ve already seen it accelerate torchtune’s sample packing throughput by 71%, replace the need for a researcher to spend over a week writing their own custom Triton kernel, and deliver competitive performance with custom handwritten attention variants.

One final thing that made implementing FlexAttention quite fun is that we were able to leverage a lot of existing PyTorch infra in an interesting way. For example, one of the unique aspects about TorchDynamo (torch.compile’s frontend) is that it does not require tensors used in the compiled function to be explicitly passed in as inputs. This allows us to compile mods like document masking, which require accessing global variables where the global variables need to change!

bias = torch.randn(1024, 1024)
def score_mod(score, b, h, q_idx, kv_idx):
    return score + bias[q_idx][kv_idx] # The bias tensor can change!

Furthermore, the fact that torch.compile is a generic graph-capture mechanism also allows it to support more “advanced” transformations, such as the higher order transform that transforms any mask_mod into one that works with jagged tensors.

We also leverage TorchInductor (torch.compile’s backend) infrastructure for Triton templates. Not only did this make it easy to support codegening FlexAttention – it also automatically gave us support for dynamic shapes as well as epilogue fusion (i.e. fusing an operator onto the end of attention)! In the future, we plan on extending this support to allow for quantized versions of attention or things like RadixAttention as well.

In addition, we also leveraged higher order ops, PyTorch’s autograd to automatically generate the backwards pass, as well as vmap to automatically apply score_mod for creating the BlockMask.

And, of course, this project wouldn’t have been possible without Triton and TorchInductor’s ability to generate Triton code.

We look forward to leveraging the approach we used here to more applications in the future!

Limitations and Future Work

  • FlexAttention is currently available in PyTorch nightly releases, we plan to release it as a prototype feature in 2.5.0
  • We did not cover how to use FlexAttention for inference here (or how to implement PagedAttention) – we will cover those in a later post.
  • We are working to improve the performance of FlexAttention to match FlashAttention3 on H100 GPUs.
  • FlexAttention requires that all sequence lengths be a multiple of 128 – this will be addressed soon.
  • We plan on adding GQA support soon – for now, you can just replicate the kv heads.

Acknowledgements

We want to highlight some prior work (and people) that have inspired FlexAttention.

  • Tri Dao’s work on FlashAttention
  • Francisco Massa and the Xformers team for BlockSparseAttention in Triton
  • The Jax team’s work on SplashAttention
  • Philippe Tillet and Keren Zhou for helping us with Triton
  • Ali Hassani for discussions on neighborhood attention
  • Everybody who’s complained about attention kernels not supporting their favorite attention variant 🙂

Read More

Generating Gender Alternatives in Machine Translation

This paper was accepted at the 5th Workshop on Gender Bias in Natural Language Processing 2024.
Machine translation (MT) systems often translate terms with ambiguous gender (e.g., English term “the nurse”) into the gendered form that is most prevalent in the systems’ training data (e.g., “enfermera”, the Spanish term for a female nurse). This often reflects and perpetuates harmful stereotypes present in society. With MT user interfaces in mind that allow for resolving gender ambiguity in a frictionless manner, we study the problem of generating all grammatically correct gendered translation…Apple Machine Learning Research

Build custom generative AI applications powered by Amazon Bedrock

Build custom generative AI applications powered by Amazon Bedrock

With last month’s blog, I started a series of posts that highlight the key factors that are driving customers to choose Amazon Bedrock. I explored how Bedrock enables customers to build a secure, compliant foundation for generative AI applications. Now I’d like to turn to a slightly more technical, but equally important differentiator for Bedrock—the multiple techniques that you can use to customize models and meet your specific business needs.

As we’ve all heard, large language models (LLMs) are transforming the way we leverage artificial intelligence (AI) and enabling businesses to rethink core processes. Trained on massive datasets, these models can rapidly comprehend data and generate relevant responses across diverse domains, from summarizing content to answering questions. The wide applicability of LLMs explains why customers across healthcare, financial services, and media and entertainment are moving quickly to adopt them. However, our customers tell us that while pre-trained LLMs excel at analyzing vast amounts of data, they often lack the specialized knowledge necessary to tackle specific business challenges.

Customization unlocks the transformative potential of large language models. Amazon Bedrock equips you with a powerful and comprehensive toolset to transform your generative AI from a one-size-fits-all solution into one that is finely tailored to your unique needs. Customization includes varied techniques such as Prompt Engineering, Retrieval Augmented Generation (RAG), and fine-tuning and continued pre-training. Prompt Engineering involves carefully crafting prompts to get a desired response from LLMs. RAG combines knowledge retrieved from external sources with language generation to provide more contextual and accurate responses. Model Customization techniques—including fine-tuning and continued pre-training involve further training a pre-trained language model on specific tasks or domains for improved performance. These techniques can be used in combination with each other to train base models in Amazon Bedrock with your data to deliver contextual and accurate outputs. Read the below examples to understand how customers are using customization in Amazon Bedrock to deliver on their use cases.

Thomson Reuters, a global content and technology company, has seen positive results with Claude 3 Haiku, but anticipates even better results with customization. The company—which serves professionals in legal, tax, accounting, compliance, government, and media—expects that it will see even faster and more relevant AI results by fine-tuning Claude with their industry expertise.

“We’re excited to fine-tune Anthropic’s Claude 3 Haiku model in Amazon Bedrock to further enhance our Claude-powered solutions. Thomson Reuters aims to provide accurate, fast, and consistent user experiences. By optimizing Claude around our industry expertise and specific requirements, we anticipate measurable improvements that deliver high-quality results at even faster speeds. We’ve already seen positive results with Claude 3 Haiku, and fine-tuning will enable us to tailor our AI assistance more precisely.”

– Joel Hron, Chief Technology Officer at Thomson Reuters.

At Amazon, we see Buy with Prime using Amazon Bedrock’s cutting-edge RAG-based customization capabilities to drive greater efficiency. Their order on merchants’ sites are covered by Buy with Prime Assist, 24/7 live chat customer service. They recently launched a chatbot solution in beta capable of handling product support queries. The solution is powered by Amazon Bedrock and customized with data to go beyond traditional email-based systems. My colleague Amit Nandy, Product Manager at Buy with Prime, says,

“By indexing merchant websites, including subdomains and PDF manuals, we constructed tailored knowledge bases that provided relevant and comprehensive support for each merchant’s unique offerings. Combined with Claude’s state-of-the-art foundation models and Guardrails for Amazon Bedrock, our chatbot solution delivers a highly capable, secure, and trustworthy customer experience. Shoppers can now receive accurate, timely, and personalized assistance for their queries, fostering increased satisfaction and strengthening the reputation of Buy with Prime and its participating merchants.”

Stories like these are the reason why we continue to double down on our customization capabilities for generative AI applications powered by Amazon Bedrock.

In this blog, we’ll explore the three major techniques for customizing LLMs in Amazon Bedrock. And, we’ll cover related announcements from the recent AWS New York Summit.

Prompt Engineering: Guiding your application toward desired answers

Prompts are the primary inputs that drive LLMs to generate answers. Prompt engineering is the practice of carefully crafting these prompts to guide LLMs effectively. Learn more here. Well-designed prompts can significantly boost a model’s performance by providing clear instructions, context, and examples tailored to the task at hand. Amazon Bedrock supports multiple prompt engineering techniques. For example, few-shot prompting provides examples with desired outputs to help models better understand tasks, such as sentiment analysis samples labeled “positive” or “negative.” Zero-shot prompting provides task descriptions without examples. And chain-of-thought prompting enhances multi-step reasoning by asking models to break down complex problems, which is useful for arithmetic, logic, and deductive tasks.

Our Prompt Engineering Guidelines outline various prompting strategies and best practices for optimizing LLM performance across applications. Leveraging these techniques can help practitioners achieve their desired outcomes more effectively. However, developing optimal prompts that elicit the best responses from foundational models is a challenging and iterative process, often requiring weeks of refinement by developers.

Zero-shot prompting Few-shot prompting
Zero-shot prompting Zero-shot prompting
Chain-of-thought prompting with Prompt Flows Visual Builder
Prompt Flow Visual Builder

Retrieval-Augmented Generation: Augmenting results with retrieved data

LLMs generally lack specialized knowledge, jargon, context, or up-to-date information needed for specific tasks. For instance, legal professionals seeking reliable, current, and accurate information within their domain may find interactions with generalist LLMs inadequate. Retrieval-Augmented Generation (RAG) is the process of allowing a language model to consult an authoritative knowledge base outside of its training data sources—before generating a response.

The RAG process involves three main steps:

  • Retrieval: Given an input prompt, a retrieval system identifies and fetches relevant passages or documents from a knowledge base or corpus.
  • Augmentation: The retrieved information is combined with the original prompt to create an augmented input.
  • Generation: The LLM generates a response based on the augmented input, leveraging the retrieved information to produce more accurate and informed outputs.

Amazon Bedrock’s Knowledge Bases is a fully managed RAG feature that allows you to connect LLMs to internal company data sources—delivering relevant, accurate, and customized responses. To offer greater flexibility and accuracy in building RAG-based applications, we announced multiple new capabilities at the AWS New York Summit. For example, now you can securely access data from new sources like the web (in preview), allowing you to index public web pages, or access enterprise data from Confluence, SharePoint, and Salesforce (all in preview). Advanced chunking options are another exciting new feature, enabling you to create custom chunking algorithms tailored to your specific needs, as well as leverage built-in semantic and hierarchical chunking options. You now have the capability to extract information with precision from complex data formats (e.g., complex tables within PDFs), thanks to advanced parsing techniques. Plus, the query reformulation feature allows you to deconstruct complex queries into simpler sub-queries, enhancing retrieval accuracy. All these new features help you reduce the time and cost associated with data access and construct highly accurate and relevant knowledge resources—all tailored to your specific enterprise use cases.

Model Customization: Enhancing performance for specific tasks or domains

Model customization in Amazon Bedrock is a process to customize pre-trained language models for specific tasks or domains. It involves taking a large, pre-trained model and further training it on a smaller, specialized dataset related to your use case. This approach leverages the knowledge acquired during the initial pre-training phase while adapting the model to your requirements, without losing the original capabilities. The fine-tuning process in Amazon Bedrock is designed to be efficient, scalable, and cost-effective, enabling you to tailor language models to your unique needs, without the need for extensive computational resources or data. In Amazon Bedrock, model fine-tuning can be combined with prompt engineering or the Retrieval-Augmented Generation (RAG) approach to further enhance the performance and capabilities of language models. Model customization can be implemented both for labeled and unlabeled data.

Fine-Tuning with labeled data involves providing labeled training data to improve the model’s performance on specific tasks. The model learns to associate appropriate outputs with certain inputs, adjusting its parameters for better task accuracy. For instance, if you have a dataset of customer reviews labeled as positive or negative, you can fine-tune a pre-trained model within Bedrock on this data to create a sentiment analysis model tailored to your domain. At the AWS New York Summit, we announced Fine-tuning for Anthropic’s Claude 3 Haiku. By providing task-specific training datasets, users can fine-tune and customize Claude 3 Haiku, boosting its accuracy, quality, and consistency for their business applications.

Continued Pre-training with unlabeled data, also known as domain adaptation, allows you to further train the LLMs on your company’s proprietary, unlabeled data. It exposes the model to your domain-specific knowledge and language patterns, enhancing its understanding and performance for specific tasks.

Customization holds the key to unlocking the true power of generative AI

Large language models are revolutionizing AI applications across industries, but tailoring these general models with specialized knowledge is key to unlocking their full business impact. Amazon Bedrock empowers organizations to customize LLMs through Prompt Engineering techniques, such as Prompt Management and Prompt Flows, that help craft effective prompts. Retrieval-Augmented Generation—powered by Amazon Bedrock’s Knowledge Bases—lets you integrate LLMs with proprietary data sources to generate accurate, domain-specific responses. And Model Customization techniques, including fine-tuning with labeled data and continued pre-training with unlabeled data, help optimize LLM behavior for your unique needs. After taking a close look at these three main customization methods, it’s clear that while they may take different approaches, they all share a common goal—to help you address your specific business problems..

Resources       

For more information on customization with Amazon Bedrock, check the below resources:

  1. Learn more about Amazon Bedrock
  2. Learn more about Amazon Bedrock Knowledge Bases
  3. Read announcement blog on additional data connectors in Knowledge Bases for Amazon Bedrock
  4. Read blog on advanced chunking and parsing options in Knowledge Bases for Amazon Bedrock
  5. Learn more about Prompt Engineering
  6. Learn more about Prompt Engineering techniques and best practices
  7. Read announcement blog on Prompt Management and Prompt Flows
  8. Learn more about fine-tuning and continued pre-training
  9. Read the announcement blog on fine-tuning Anthropic’s Claude 3 Haiku

About the author

Vasi Philomin is VP of Generative AI at AWS. He leads generative AI efforts, including Amazon Bedrock and Amazon Titan.

Read More

Meet the Maker: High School Student Develops Robot Guide Dogs With NVIDIA Jetson

Meet the Maker: High School Student Develops Robot Guide Dogs With NVIDIA Jetson

High school student Selin Alara Ornek is looking ahead — using machine learning and the NVIDIA Jetson platform for edge AI and robotics to create robot guide dogs for the visually impaired.

The project, called IC4U, is one of seven robots Ornek has created to date, including a school aid robot, named BB4All, that can help prevent bullying with real-time notification and health-monitoring capabilities.

About the Maker

A high school senior from Istanbul, Turkey, Ornek has always had a passion for the intersection of AI, social good and robotics. She’s a self-taught robotics developer — in building IC4U, she used the Jetson Developer Kit as a sandbox to explore and experiment.

She is a member of AI4ALL, a nonprofit program with the mission to make AI more diverse and inclusive, and the New York Academy of Science. A global presence in the robotics scene, she’s been recognized at the European Youth Awards and Women in Tech Global Awards events. She placed first in the 2021 Istanbul Bosphorus Robot Cup and third at the 2023 OpenCV AI Competition.

Her Inspiration

Ornek’s inspiration for creating IC4U came from a trip to France, where she saw a guide dog assisting its owner. Her late dog, Korsan, was also a key source of inspiration.

“I started to think about if a visually impaired person lost their dog, not only would they lose their best friend, but their eyes,” Ornek said.

The project was built to offer the visually impaired a companion not limited by aging and health.

Her Jetson Project

Ornek initially used ultrasonic sensors located in IC4U’s eyes to detect obstacles. But after attending the 2021 World Summit AI as a panelist, she decided to develop new AI applications for the robot dog that’d enable it to mimic a real one.

The ultrasonic sensors only offered object detection from directly in front of IC4U, and Ornek wanted to expand detection to the robot’s entire surroundings.

The solution was using sound sensors located in the robot’s ears. IC4U can turn toward a sound and process visual information gathered by an integrated ZED 2i Wide-Angle 3D AI camera, which captures a wider range of visual data and helps detect information such as the size and speed of an object.

“To power the ZED 2i camera and for high-quality image processing, I used an NVIDIA Jetson Nano developer kit,” Ornek said. “I was so impressed with the ZED 2i camera’s performance that I didn’t want to limit its use to a simple object-recognition task.”

She began to think of other ways that IC4U could assist a visually impaired person. IC4U’s improved data processing from high-resolution sensors, powered by Jetson, enables it to detect city objects such as stop signs, traffic light colors and the denomination of paper money.

In addition, Ornek used the Jetson Nano to add a shopping feature to IC4U via web scraping from publicly available resources, aiming to one day expand it by partnering with online retail stores.

Back to School

In the long run, Ornek hopes to deploy IC4U for use in smart cities and spaces — continuing her exploration of AI applications with next-generation platforms like Jetson Orin.

This fall, she’ll begin studying computer science at the University of British Columbia on a full scholarship, as a recipient of the Karen McKellin International Leader of Tomorrow Award. She strives to encourage other youth, especially girls, that technology is fun.

Students and educators with a valid accredited university or education-related email address can sign up to purchase the Jetson Orin Nano or Jetson AGX Orin Developer Kit at a discounted rate. U.S.-based students and educators can visit Sparkfun to sign up for their discount — residents of other countries should check their eligibility (login required).

Learn more about the NVIDIA Jetson platform and NVIDIA Deep Learning Institute Jetson AI courses and certifications.

Read More

Use Amazon Bedrock to generate, evaluate, and understand code in your software development pipeline

Use Amazon Bedrock to generate, evaluate, and understand code in your software development pipeline

Generative artificial intelligence (AI) models have opened up new possibilities for automating and enhancing software development workflows. Specifically, the emergent capability for generative models to produce code based on natural language prompts has opened many doors to how developers and DevOps professionals approach their work and improve their efficiency. In this post, we provide an overview of how to take advantage of the advancements of large language models (LLMs) using Amazon Bedrock to assist developers at various stages of the software development lifecycle (SDLC).

Amazon Bedrock is a fully managed service that offers a choice of high-performing foundation models (FMs) from leading AI companies like AI21 Labs, Anthropic, Cohere, Meta, Mistral AI, Stability AI, and Amazon through a single API, along with a broad set of capabilities to build generative AI applications with security, privacy, and responsible AI.

The following process architecture proposes an example SDLC flow that incorporates generative AI in key areas to improve the efficiency and speed of development.

The intent of this post is to focus on how developers can create their own systems to augment, write, and audit code by using models within Amazon Bedrock instead of relying on out-of-the-box coding assistants. We discuss the following topics:

  • A coding assistant use case to help developers write code faster by providing suggestions
  • How to use the code understanding capabilities of LLMs to surface insights and recommendations
  • An automated application generation use case to generate functioning code and automatically deploy changes into a working environment

Considerations

It’s important to consider some technical options when choosing your model and approach to implementing this functionality at each step. One such option is the base model to use for the task. With each model having been trained on a different corpus of data, there will inherently be different task performance per model. Anthropic’s Claude 3 on Amazon Bedrock models write code effectively out of the box in many common coding languages, for example, whereas others may not be able to reach that performance without further customization. Customization, however, is another technical choice to make. For instance, if your use case includes a less common language or framework, customizing the model through fine-tuning or using Retrieval Augmented Generation (RAG) may be necessary to achieve production-quality performance, but involves more complexity and engineering effort to implement effectively.

There is an abundance of literature breaking down these trade-offs; for this post, we are just describing what should be explored in its own right. We are simply laying the context that goes into the builder’s initial steps in implementing their generative AI-powered SDLC journey.

Coding assistant

Coding assistants are a very popular use case, with an abundance of examples from which to choose. AWS offers several services that can be applied to assist developers, either through in-line completion from tools like Amazon CodeWhisperer, or to be interacted with via natural language using Amazon Q. Amazon Q for builders has several implementations of this functionality, such as:

In nearly all the use cases described, there can be an integration with the chat interface and assistants. The use cases here are focused on more direct code generation use cases using natural language prompts. This is not to be confused with in-line generation tools that focus on autocompleting a coding task.

The key benefit of an assistant over in-line generation is that you can start new projects based on simple descriptions. For instance, you can describe that you want a serverless website that will allow users to post in blog fashion, and Amazon Q can start building the project by providing sample code and making recommendations on which frameworks to use to do this. This natural language entry point can give you a template and framework to operate within so you can spend more time on the differentiating logic of your application rather than the setup of repeatable and commoditized components.

Code understanding

It’s common for a company that begins to experiment with generative AI to augment the productivity of their individual developers to then use LLMs to infer meaning and functionality of code to improve the reliability, efficiency, security, and speed of the development process. Code understanding by humans is a central part of the SDLC: creating documentation, performing code reviews, and applying best practices. Onboarding new developers can be a challenge even for mature teams. Instead of a more senior developer taking time to respond to questions, an LLM with awareness of the code base and the team’s coding standards could be used to explain sections of code and design decisions to the new team member. The onboarding developer has everything they need with a rapid response time and the senior developer can focus on building. In addition to user-facing behaviors, this same mechanism can be repurposed to work completely behind the scenes to augment existing continuous integration and continuous delivery (CI/CD) processes as an additional reviewer.

For instance, you can use prompt engineering techniques to guide and automate the application of coding standards, or include the existing code base as referential material to use custom APIs. You can also take proactive measures by prefixing each prompt with a reminder to follow the coding standards and make a call to get them from document storage, passing them to the model as context with the prompt. As a retroactive measure, you can add a step during the review process to check the written code against the standards to enforce adherence, similar to how a team code review would work. For example, let’s say that one of the team’s standards is to reuse components. During the review step, the model can read over a new code submission, note that the component already exists in the code base, and suggest to the reviewer to reuse the existing component instead of recreating it.

The following diagram illustrates this type of workflow.

Application generation

You can extend the concepts from the use cases described in this post to create a full application generation implementation. In the traditional SDLC, a human creates a set of requirements, makes a design for the application, writes some code to implement that design, builds tests, and receives feedback on the system from external sources or people, and then the process repeats. The bottleneck in this cycle typically comes at the implementation and testing phases. An application builder needs to have substantive technical skills to write code effectively, and there are typically numerous iterations required to debug and perfect code—even for the most skilled builders. In addition, a foundational knowledge of a company’s existing code base, APIs, and IP are fundamental to implementing an effective solution, which can take humans a long time to learn. This can slow down the time to innovation for new teammates or teams with technical skills gaps. As mentioned earlier, if models can be used with the capability to both create and interpret code, pipelines can be created that perform the developer iterations of the SDLC by feeding outputs of the model back in as input.

The following diagram illustrates this type of workflow.

For example, you can use natural language to ask a model to write an application that prints all the prime numbers between 1–100. It returns a block of code that can be run with applicable tests defined. If the program doesn’t run or some tests fail, the error and failing code can be fed back into the model, asking it to diagnose the problem and suggest a solution. The next step in the pipeline would be to take the original code, along with the diagnosis and suggested solution, and stitch the code snippets together to form a new program. The SDLC restarts in the testing phase to get new results, and either iterates again or a working application is produced. With this basic framework, an increasing number of components can be added in the same manner as in a traditional human-based workflow. This modular approach can be continuously improved until there is a robust and powerful application generation pipeline that simply takes in a natural language prompt and outputs a functioning application, handling all of the error correction and best practice adherence behind the scenes.

The following diagram illustrates this advanced workflow.

Conclusion

We are at the point in the adoption curve of generative AI that teams are able to get real productivity gains from using the variety of techniques and tools available. In the near future, it will be imperative to take advantage of these productivity gains to stay competitive. One thing we do know is that the landscape will continue to rapidly progress and change, so building a system tolerant of change and flexibility is key. Developing your components in a modular fashion allows for stability in the face of an ever-changing technical landscape while being ready to adopt the latest technology at each step of the way.

For more information about how to get started building with LLMs, see these resources:


About the Authors

Ian Lenora is an experienced software development leader who focuses on building high-quality cloud native software, and exploring the potential of artificial intelligence. He has successfully led teams in delivering complex projects across various industries, optimizing efficiency and scalability. With a strong understanding of the software development lifecycle and a passion for innovation, Ian seeks to leverage AI technologies to solve complex problems and create intelligent, adaptive software solutions that drive business value.

Cody Collins is a New York-based Solutions Architect at Amazon Web Services, where he collaborates with ISV customers to build cutting-edge solutions in the cloud. He has extensive experience in delivering complex projects across diverse industries, optimizing for efficiency and scalability. Cody specializes in AI/ML technologies, enabling customers to develop ML capabilities and integrate AI into their cloud applications.

Samit KumbhaniSamit Kumbhani is an AWS Senior Solutions Architect in the New York City area with over 18 years of experience. He currently collaborates with Independent Software Vendors (ISVs) to build highly scalable, innovative, and secure cloud solutions. Outside of work, Samit enjoys playing cricket, traveling, and biking.

Read More

Editor’s Paradise: NVIDIA RTX-Powered Video Software CyberLink PowerDirector Gains High-Efficiency Video Coding Upgrades

Editor’s Paradise: NVIDIA RTX-Powered Video Software CyberLink PowerDirector Gains High-Efficiency Video Coding Upgrades

Editor’s note: This post is part of our In the NVIDIA Studio series, which celebrates featured artists, offers creative tips and tricks, and demonstrates how NVIDIA Studio technology improves creative workflows. We’re also deep diving on new GeForce RTX GPU features, technologies and resources, and how they dramatically accelerate content creation.

Every month brings new creative app updates and optimizations powered by the NVIDIA Studio platform — supercharging creative processes with NVIDIA RTX and AI.

RTX-powered video editing app CyberLink PowerDirector now has a setting for high-efficiency video encoding (HEVC). 3D artists can access new features and faster workflows in Adobe Substance 3D Modeler and SideFX: Houdini. And content creators using Topaz Video AI Pro can now scale their photo and video touchups faster with NVIDIA TensorRT acceleration.

The August Studio Driver is ready to install via the NVIDIA app beta — the essential companion for creators and gamers — to keep GeForce RTX PCs up to date with the latest NVIDIA drivers and technology.

And this week’s featured In the NVIDIA Studio artist Stavros Liaskos is creating physically accurate 3D digital replicas of Greek Orthodox churches, holy temples, monasteries and other buildings using the NVIDIA Omniverse platform for building and connecting Universal Scene Description (OpenUSD) apps.

Discover the latest breakthroughs in graphics and generative AI by watching the replay of NVIDIA founder and CEO Jensen Huang’s firechat chats with Lauren Goode, senior writer at WIRED, and Meta founder and CEO Mark Zuckerberg at SIGGRAPH. 

There’s a Creative App for That

The NVIDIA NVENC video encoder is built into every RTX graphics card, offloading the compute-intensive task of video encoding from the CPU to a dedicated part of the GPU.

CyberLink PowerDirector, a popular video editing program that recently added support for RTX Video HDR, now has a setting to increase HEVC with NVIDIA NVENC HEVC Ultra-High-Quality mode.

The new functionality reduces bit rates and improves encoding efficiency by 55%, significantly boosting video quality. Using the custom setting, content creators can offer audiences superior viewing experiences.

Encoding efficiency jumps by 55% with just a few clicks.

Alpha exporting allows users to add overlay effects to videos by exporting HEVC video with an alpha channel. This technique can be used to create transparent backgrounds and rapidly process animated overlays, making it ideal for creating social media content.

With an alpha channel, users can export HEVC videos up to 8x faster compared with run-length encoding supported by other processors, and with a 100x reduction in file size.

Adobe Substance 3D Modeler, a multisurface 3D sculpting tool for artists, virtual effects specialists and designers, released Block to Stock, an AI-powered, geometry-based feature for accelerating the prototyping of complex shapes.

It allows rough 3D shapes to be quickly replaced with pre-existing, similarly shaped 3D models that have greater detail. The result is a highly detailed shape crafted in no time.

The recently released version 20.5 of SideFX: Houdini, a 3D procedural software for modeling, animation and lighting, introduced NVIDIA OptiX 8 and NVIDIA’s Shader Execution Reordering feature to its Karma XPU renderer — exclusively on NVIDIA RTX GPUs.

With these additions, computationally intensive tasks can now be executed up to 4x faster on RTX GPUs.

Topaz Video AI Pro, a photo and video enhancement software for noise reduction, sharpening and upscaling, added TensorRT acceleration for multi-GPU configurations, enabling parallelization across multiple GPUs for supercharged rendering speeds — up to 2x faster with two GPUs over a single GPU system, with further acceleration in systems with additional GPUs.

Virtual Cultural Sites to G(r)eek Out About

Anyone can now explore over 30 Greek cultural sites in virtual reality, thanks to the immersive work of Stavros Liaskos, managing director of visual communications company Reyelise.

“Many historical and religious sites are at risk due to environmental conditions, neglect and socio-political issues,” he said. “By creating detailed 3D replicas, we’re helping to ensure their architectural splendor is preserved digitally for future generations.”

Liaskos dedicated the project to his father, who passed away last year.

“He taught me the value of patience and instilled in me the belief that nothing is unattainable,” he said. “His wisdom and guidance continue to inspire me every day.”

Churches are architecturally complex structures. To create physically accurate 3D models of them, Liaskos used the advanced real-time rendering capabilities of Omniverse, connected with a slew of content-creation apps.

The OpenUSD framework enabled a seamless workflow across the various apps Liaskos used. For example, after using Trimble X7 for highly accurate 3D scanning of structures, Liaskos easily moved to Autodesk 3ds Max and Blender for modeling and animation.

Then, with ZBrush, he sculpted intricate architectural details on the models and refined textures with Adobe Photoshop and Substance 3D. It was all brought together in Omniverse for real-time lighting and rendering.

Interior rendering of the Panagia Xrysospiliotissa Church in Nicosia, Cyprus.

For post-production work, like adding visual effects and compiling rendered scenes, Liaskos used OpenUSD to transfer his projects to Adobe After Effects, where he finalized the video output. Nearly every element of his creative workflow was accelerated by his NVIDIA RTX A4500 GPU. 

Interior scene of the Church of Saint Basil on Metsovou Street in Athens.

Liaskos also explored developing extended reality (XR) applications that allow users to navigate his 3D projects in real time in virtual reality (VR).


First, he used laser scanning and photogrammetry to capture the detailed geometries and textures of the churches.


Then, he tapped Autodesk 3ds Max and Maxon ZBrush for retopology, ensuring the models were optimized for real-time rendering without compromising detail.

After importing them into NVIDIA Omniverse with OpenUSD, Liaskos packaged the XR scenes so they could be streamed to VR headsets  using either the NVIDIA Omniverse Create XR spatial computing app or Unity Engine, enabling immersive viewing experiences.

“This approach will even more strikingly showcase the architectural beauty and cultural significance of these sites,” Liaskos said. “The simulation must be as good as possible to recreate the overwhelming, impactful feeling of calm and safety that comes with visiting a deeply spiritual space.”

Creator Stavros Liaskos.

Follow NVIDIA Studio on Instagram, X and Facebook. Access tutorials on the Studio YouTube channel and get updates directly in your inbox by subscribing to the Studio newsletter

Stay up to date on NVIDIA Omniverse with Instagram, Medium and X. For more, join the Omniverse community and check out the Omniverse forums, Discord server, Twitch and YouTube channels. 

Read More

Inference AudioCraft MusicGen models using Amazon SageMaker

Inference AudioCraft MusicGen models using Amazon SageMaker

Music generation models have emerged as powerful tools that transform natural language text into musical compositions. Originating from advancements in artificial intelligence (AI) and deep learning, these models are designed to understand and translate descriptive text into coherent, aesthetically pleasing music. Their ability to democratize music production allows individuals without formal training to create high-quality music by simply describing their desired outcomes.

Generative AI models are revolutionizing music creation and consumption. Companies can take advantage of this technology to develop new products, streamline processes, and explore untapped potential, yielding significant business impact. Such music generation models enable diverse applications, from personalized soundtracks for multimedia and gaming to educational resources for students exploring musical styles and structures. It assists artists and composers by providing new ideas and compositions, fostering creativity and collaboration.

One prominent example of a music generation model is AudioCraft MusicGen by Meta. MusicGen code is released under MIT, model weights are released under CC-BY-NC 4.0. MusicGen can create music based on text or melody inputs, giving you better control over the output. The following diagram shows how MusicGen, a single stage auto-regressive Transformer model, can generate high-quality music based on text descriptions or audio prompts.

Music Generation Models - MusicGen Input Output flow

MusicGen uses cutting-edge AI technology to generate diverse musical styles and genres, catering to various creative needs. Unlike traditional methods that include cascading several models, such as hierarchically or upsampling, MusicGen operates as a single language model, which operates over several streams of compressed discrete music representation (tokens). This streamlined approach empowers users with precise control over generating high-quality mono and stereo samples tailored to their preferences, revolutionizing AI-driven music composition.

MusicGen models can be used across education, content creation, and music composition. They can enable students to experiment with diverse musical styles, generate custom soundtracks for multimedia projects, and create personalized music compositions. Additionally, MusicGen can assist musicians and composers, fostering creativity and innovation.

This post demonstrates how to deploy MusicGen, a music generation model on Amazon SageMaker using asynchronous inference. We specifically focus on text conditioned generation of music samples using MusicGen models.

Solution overview

With the ability to generate audio, music, or video, generative AI models can be computationally intensive and time-consuming. Generative AI models with audio, music, and video output can use asynchronous inference that queues incoming requests and process them asynchronously. Our solution involves deploying the AudioCraft MusicGen model on SageMaker using SageMaker endpoints for asynchronous inference. This entails deploying AudioCraft MusicGen models sourced from the Hugging Face Model Hub onto a SageMaker infrastructure.

The following solution architecture diagram shows how a user can generate music using natural language text as an input prompt by using AudioCraft MusicGen models deployed on SageMaker.

MusicGen on Amazon SageMaker Asynchronous Inference

The following steps detail the sequence happening in the workflow from the moment the user enters the input to the point where music is generated as output:

  1. The user invokes the SageMaker asynchronous endpoint using an Amazon SageMaker Studio notebook.
  2. The input payload is uploaded to an Amazon Simple Storage Service (Amazon S3) bucket for inference. The payload consists of both the prompt and the music generation parameters. The generated music will be downloaded from the S3 bucket.
  3. The facebook/musicgen-large model is deployed to a SageMaker asynchronous endpoint. This endpoint is used to infer for music generation.
  4. The HuggingFace Inference Containers image is used as a base image. We use an image that supports PyTorch 2.1.0 with a Hugging Face Transformers framework.
  5. The SageMaker HuggingFaceModel is deployed to a SageMaker asynchronous endpoint.
  6. The Hugging Face model (facebook/musicgen-large) is uploaded to Amazon S3 during deployment. Also, during inference, the generated outputs are uploaded to Amazon S3.
  7. We use Amazon Simple Notification Service (Amazon SNS) topics to notify the success and failure as defined as a part of SageMaker asynchronous inference configuration.

Prerequisites

Make sure you have the following prerequisites in place :

  1. Confirm you have access to the AWS Management Console to create and manage resources in SageMaker, AWS Identity and Access Management (IAM), and other AWS services.
  2. If you’re using SageMaker Studio for the first time, create a SageMaker domain. Refer to Quick setup to Amazon SageMaker to create a SageMaker domain with default settings.
  3. Obtain the AWS Deep Learning Containers for Large Model Inference from pre-built HuggingFace Inference Containers.

Deploy the solution

To deploy the AudioCraft MusicGen model to a SageMaker asynchronous inference endpoint, complete the following steps:

  1. Create a model serving package for MusicGen.
  2. Create a Hugging Face model.
  3. Define asynchronous inference configuration.
  4. Deploy the model on SageMaker.

We detail each of the steps and show how we can deploy the MusicGen model onto SageMaker. For sake of brevity, only significant code snippets are included. The full source code for deploying the MusicGen model is available in the GitHub repo.

Create a model serving package for MusicGen

To deploy MusicGen, we first create a model serving package. The model package contains a requirements.txt file that lists the necessary Python packages to be installed to serve the MusicGen model. The model package also contains an inference.py script that holds the logic for serving the MusicGen model.

Let’s look at the key functions used in serving the MusicGen model for inference on SageMaker:

def model_fn(model_dir):
    '''loads model'''
    model = MusicgenForConditionalGeneration.from_pretrained("facebook/musicgen-large")
    return model

The model_fn function loads the MusicGen model facebook/musicgen-large from the Hugging Face Model Hub. We rely on the MusicgenForConditionalGeneration Transformers module to load the pre-trained MusicGen model.

You can also refer to musicgen-large-load-from-s3/deploy-musicgen-large-from-s3.ipynb, which demonstrates the best practice of downloading the model from the Hugging Face Hub to Amazon S3 and reusing the model artifacts for future deployments. Instead of downloading the model every time from Hugging Face when we deploy or when scaling happens, we download the model to Amazon S3 and reuse it for deployment and during scaling activities. Doing so can improve the download speed, especially for large models, thereby helping prevent the download from happening over the internet from a website outside of AWS. This best practice also maintains consistency, which means the same model from Amazon S3 can be deployed across various staging and production environments.

The predict_fn function uses the data provided during the inference request and the model loaded through model_fn:

texts, generation_params = _process_input(data)
processor = AutoProcessor.from_pretrained("facebook/musicgen-large")
inputs = processor (
    text = texts,
    padding=True,
    return_tensors="pt",
)

Using the information available in the data dictionary, we process the input data to obtain the prompt and generation parameters used to generate the music. We discuss the generation parameters in more detail later in this post.

device = torch.device('cuda' if torch.cuda.is_available() else 'cpu')
model.to(device)
audio_values = model.generate(**inputs.to(device),
                                **generation_params)

We load the model to the device and then send the inputs and generation parameters as inputs to the model. This process generates the music in the form of a three-dimensional Torch tensor of shape (batch_size, num_channels, sequence_length).

sampling_rate = model.config.audio_encoder.sampling_rate
disk_wav_locations = _write_wavs_to_disk(sampling_rate, audio_values)
# Upload wavs to S3
result_dict["generated_outputs_s3"] = _upload_wav_files(disk_wav_locations, bucket_name)
# Clean up disk
for wav_on_disk in disk_wav_locations:
    _delete_file_on_disk(wav_on_disk)

We then use the tensor to generate .wav music and upload these files to Amazon S3 and clean up the .wav files saved on disk. We then obtain the S3 URI of the .wav files and send them locations in the response.

We now create the archive of the inference scripts and upload those to the S3 bucket:

musicgen_prefix = 'musicgen_large'
s3_model_key = f'{musicgen_prefix}/model/model.tar.gz'
s3_model_location = f"s3://{sagemaker_session_bucket}/{s3_model_key}"
s3 = boto3.resource("s3")
s3.Bucket(sagemaker_session_bucket).upload_file("model.tar.gz", s3_model_key)

The uploaded URI of this object on Amazon S3 will later be used to create the Hugging Face model.

Create the Hugging Face model

Now we initialize HuggingFaceModel with the necessary arguments. During deployment, the model serving artifacts, stored in s3_model_location, will be deployed. Before the model serving, the MusicGen model will be downloaded from Hugging Face as per the logic in model_fn.

huggingface_model = HuggingFaceModel(
    name=async_endpoint_name,
    model_data=s3_model_location,  # path to your model artifacts 
    role=role,
    env= {
           'TS_MAX_REQUEST_SIZE': '100000000',
           'TS_MAX_RESPONSE_SIZE': '100000000',
           'TS_DEFAULT_RESPONSE_TIMEOUT': '3600'
       },# iam role with permissions to create an Endpoint
    transformers_version="4.37",  # transformers version used
    pytorch_version="2.1",  # pytorch version used
    py_version="py310",  # python version used
)

The env argument accepts a dictionary of parameters such as TS_MAX_REQUEST_SIZE and TS_MAX_RESPONSE_SIZE, which define the byte size values for request and response payloads to the asynchronous inference endpoint. The TS_DEFAULT_RESPONSE_TIMEOUT key in the env dictionary represents the timeout in seconds after which the asynchronous inference endpoint stops responding.

You can run MusicGen with the Hugging Face Transformers library from version 4.31.0 onwards. Here we set transformers_version to 4.37. MusicGen requires at least PyTorch version 2.1 or latest, and we have set pytorch_version to 2.1.

Define asynchronous inference configuration

Music generation using a text prompt as input can be both computationally intensive and time-consuming. Asynchronous inference in SageMaker is designed to address these demands. When working with music generation models, it’s important to note that the process can often take more than 60 seconds to complete.

SageMaker asynchronous inference queues incoming requests and processes them asynchronously, making it ideal for requests with large payload sizes (up to 1 GB), long processing times (up to 1 hour), and near real-time latency requirements. By queuing incoming requests and processing them asynchronously, this capability efficiently handles the extended processing times inherent in music generation tasks. Moreover, asynchronous inference enables seamless auto scaling, making sure that resources are allocated only when needed, leading to cost savings.

Before we proceed with asynchronous inference configuration , we create SNS topics for success and failure that can be used to perform downstream tasks:

from utils.sns_client import SnsClient
import time
sns_client = SnsClient(boto3.client("sns"))
timestamp = time.time_ns()
topic_names = [f"musicgen-large-topic-SuccessTopic-{timestamp}", f"musicgen-large-topic-ErrorTopic-{timestamp}"]

topic_arns = []
for topic_name in topic_names:
    print(f"Creating topic {topic_name}.")
    response = sns_client.create_topic(topic_name)
    topic_arns.append(response.get('TopicArn'))

We now create an asynchronous inference endpoint configuration by specifying the AsyncInferenceConfig object:

# create async endpoint configuration
async_config = AsyncInferenceConfig(
    output_path=s3_path_join(
        "s3://", sagemaker_session_bucket, "musicgen_large/async_inference/output"
    ),  # Where our results will be stored
    # Add nofitication SNS if needed
    notification_config={
        "SuccessTopic": topic_arns[0],
        "ErrorTopic": topic_arns[1],
    },  #  Notification configuration
)

The arguments to the AsyncInferenceConfig are detailed as follows:

  • output_path – The location where the output of the asynchronous inference endpoint will be stored. The files in this location will have an .out extension and will contain the details of the asynchronous inference performed by the MusicGen model.
  • notification_config – Optionally, you can associate success and error SNS topics. Dependent workflows can poll these topics to make informed decisions based on the inference outcomes.

Deploy the model on SageMaker

With the asynchronous inference configuration defined, we can deploy the Hugging Face model, setting initial_instance_count to 1:

# deploy the endpoint
async_predictor = huggingface_model.deploy(
    initial_instance_count=1,
    instance_type=instance_type,
    async_inference_config=async_config,
    endpoint_name=async_endpoint_name,
)

After successfully deploying, you can optionally configure automatic scaling to the asynchronous endpoint. With asynchronous inference, you can also scale down your asynchronous endpoint’s instances to zero.

We now dive into inferencing the asynchronous endpoint for music generation.

Inference

In this section, we show how to perform inference using an asynchronous inference endpoint with the MusicGen model. For the sake of brevity, only significant code snippets are included. The full source code for inferencing the MusicGen model is available in the GitHub repo. The following diagram explains the sequence of steps to invoke the asynchronous inference endpoint.

MusicGen - Amazon SageMaker Async Inference Sequence Diagram

We detail the steps to invoke the SageMaker asynchronous inference endpoint for MusicGen by prompting a desired mood in natural language using English. We then demonstrate how to download and play the .wav files generated from the user prompt. Finally, we cover the process of cleaning up the resources created as part of this deployment.

Prepare prompt and instructions

For controlled music generation using MusicGen models, it’s important to understand various generation parameters:

generation_params = { 
    'guidance_scale': 3,
    'max_new_tokens': 1200, 
    'do_sample': True, 
    'temperature': 1 
}

From the preceding code, let’s understand the generation parameters:

  • guidance_scale – The guidance_scale is used in classifier-free guidance (CFG), setting the weighting between the conditional logits (predicted from the text prompts) and the unconditional logits (predicted from an unconditional or ‘null’ prompt). A higher guidance scale encourages the model to generate samples that are more closely linked to the input prompt, usually at the expense of poorer audio quality. CFG is enabled by setting guidance_scale > 1. For best results, use guidance_scale = 3. Our deployment defaults to 3.
  • max_new_tokens – The max_new_tokens parameter specifies the number of new tokens to generate. Generation is limited by the sinusoidal positional embeddings to 30-second inputs, meaning MusicGen can’t generate more than 30 seconds of audio (1,503 tokens). Our deployment defaults to 256.
  • do_sample – The model can generate an audio sample conditioned on a text prompt through use of the MusicgenProcessor to preprocess the inputs. The preprocessed inputs can then be passed to the .generate method to generate text-conditional audio samples. Our deployment defaults to True.
  • temperature – This is the softmax temperature parameter. A higher temperature increases the randomness of the output, making it more diverse. Our deployment defaults to 1.

Let’s look at how to build a prompt to infer the MusicGen model:

data = {
    "texts": [
        "Warm and vibrant weather on a sunny day, feeling the vibes of hip hop and synth",
    ],
    "bucket_name": sagemaker_session_bucket,
    "generation_params": generation_params
}

The preceding code is the payload, which will be saved as a JSON file and uploaded to an S3 bucket. We then provide the URI of the input payload during the asynchronous inference endpoint invocation along with other arguments as follows.

The texts key accepts an array of texts, which may contain the mood you want to reflect in your generated music. You can include musical instruments in the text prompt to the MusicGen model to generate music featuring those instruments.

The response from the invoke_endpoint_async is a dictionary of various parameters:

response = sagemaker_runtime.invoke_endpoint_async(
    EndpointName=endpoint_name,
    InputLocation=input_s3_location,
    ContentType="application/json",
    InvocationTimeoutSeconds=3600
)

OutputLocation in the response metadata represents Amazon S3 URI where the inference response payload is stored.

Asynchronous music generation

As soon as the response metadata is sent to the client, the asynchronous inference begins the music generation. The music generation happens on the instance chosen during the deployment of the MusicGen model on the SageMaker asynchronous Inference endpoint , as detailed in the deployment section.

Continuous polling and obtaining music files

While the music generation is in progress, we continuously poll for the response metadata parameter OutputLocation:

from utils.inference_utils import get_output
output = get_output(sm_session, response.get('OutputLocation'))

The get_output function keeps polling for the presence of OutputLocation and returns the S3 URI of the .wav music file.

Audio output

Lastly, we download the files from Amazon S3 and play the output using the following logic:

from utils.inference_utils import play_output_audios
music_files = []
for s3_url in output.get('generated_outputs_s3'):
    if s3_url is not None:
        music_files.append(download_from_s3(s3_url))
play_output_audios(music_files, data.get('texts'))

You now have access to the .wav files and can try changing the generation parameters to experiment with various text prompts.

The following is another music sample based on the following generation parameters:

generation_params = { 'guidance_scale': 5, 'max_new_tokens': 1503, 'do_sample': True, 'temperature': 0.9 }
data = {
    "texts": [
        "Catchy funky beats with drums and bass, synthesized pop for an upbeat pop game",
    ],
    "bucket_name": sagemaker_session_bucket,
    "generation_params": generation_params
}

Clean up

To avoid incurring unnecessary charges, you can clean up using the following code:

import boto3
sagemaker_runtime = boto3.client('sagemaker-runtime')

cleanup = False # < - Set this to True to clean up resources.
endpoint_name = <Endpoint_Name>

sm_client = boto3.client('sagemaker')
endpoint = sm_client.describe_endpoint(EndpointName=endpoint_name)
endpoint_config_name = endpoint['EndpointConfigName']
endpoint_config = sm_client.describe_endpoint_config(EndpointConfigName=endpoint_config_name)
model_name = endpoint_config['ProductionVariants'][0]['ModelName']
notification_config = endpoint_config['AsyncInferenceConfig']['OutputConfig'].get('NotificationConfig', None)
print(f"""
About to delete the following sagemaker resources:
Endpoint: {endpoint_name}
Endpoint Config: {endpoint_config_name}
Model: {model_name}
""")
for k,v in notification_config.items():
    print(f'About to delete SNS topics for {k} with ARN: {v}')

if cleanup:
    # delete endpoint
    sm_client.delete_endpoint(EndpointName=endpoint_name)
    # delete endpoint config
    sm_client.delete_endpoint_config(EndpointConfigName=endpoint_config_name)
    # delete model
    sm_client.delete_model(ModelName=model_name)
    print('deleted model, config and endpoint')

The aforementioned cleanup routine will delete the SageMaker endpoint, endpoint configurations, and models associated with MusicGen model, so that you avoid incurring unnecessary charges. Make sure to set cleanup variable to True, and replace <Endpoint_Name> with the actual endpoint name of the MusicGen model deployed on SageMaker. Alternatively, you can use the console to delete the endpoints and its associated resources that were created while running the code mentioned in the post.

Conclusion

In this post, we learned how to use SageMaker asynchronous inference to deploy the AudioCraft MusicGen model. We started by exploring how the MusicGen models work and covered various use cases for deploying MusicGen models. We also explored how you can benefit from capabilities such as auto scaling and the integration of asynchronous endpoints with Amazon SNS to power downstream tasks. We then took a deep dive into the deployment and inference workflow of MusicGen models on SageMaker, using the AWS Deep Learning Containers for HuggingFace inference and the MusicGen model sourced from the Hugging Face Hub.

Get started with generating music using your creative prompts by signing up for AWS. The full source code is available on the official GitHub repository.

References


About the Authors

Pavan Kumar Rao NavulePavan Kumar Rao Navule is a Solutions Architect at Amazon Web Services, where he works with ISVs in India to help them innovate on the AWS platform. He is specialized in architecting AI/ML and generative AI services at AWS. Pavan is a published author for the book “Getting Started with V Programming.” In his free time, Pavan enjoys listening to the great magical voices of Sia and Rihanna.

David John ChakramDavid John Chakram is a Principal Solutions Architect at AWS. He specializes in building data platforms and architecting seamless data ecosystems. With a profound passion for databases, data analytics, and machine learning, he excels at transforming complex data challenges into innovative solutions and driving businesses forward with data-driven insights.

Sudhanshu HateSudhanshu Hate is a principal AI/ML specialist with AWS and works with clients to advise them on their MLOps and generative AI journey. In his previous role before Amazon, he conceptualized, created, and led teams to build ground-up open source-based AI and gamification platforms, and successfully commercialized it with over 100 clients. Sudhanshu has to his credit a couple of patents, has written two books and several papers and blogs, and has presented his points of view in various technical forums. He has been a thought leader and speaker, and has been in the industry for nearly 25 years. He has worked with Fortune 1000 clients across the globe and most recently with digital native clients in India.

Rupesh BajajRupesh Bajaj is a Solutions Architect at Amazon Web Services, where he collaborates with ISVs in India to help them leverage AWS for innovation. He specializes in providing guidance on cloud adoption through well-architected solutions and holds seven AWS certifications. With 5 years of AWS experience, Rupesh is also a Gen AI Ambassador. In his free time, he enjoys playing chess.

Read More