NVIDIA to Present Innovations at Hot Chips That Boost Data Center Performance and Energy Efficiency

NVIDIA to Present Innovations at Hot Chips That Boost Data Center Performance and Energy Efficiency

A deep technology conference for processor and system architects from industry and academia has become a key forum for the trillion-dollar data center computing market.

At Hot Chips 2024 next week, senior NVIDIA engineers will present the latest advancements powering the NVIDIA Blackwell platform, plus research on liquid cooling for data centers and AI agents for chip design.

They’ll share how:

  • NVIDIA Blackwell brings together multiple chips, systems and NVIDIA CUDA software to power the next generation of AI across use cases, industries and countries.
  • NVIDIA GB200 NVL72 — a multi-node, liquid-cooled, rack-scale solution that connects 72 Blackwell GPUs and 36 Grace CPUs — raises the bar for AI system design.
  • NVLink interconnect technology provides all-to-all GPU communication, enabling record high throughput and low-latency inference for generative AI.
  • The NVIDIA Quasar Quantization System pushes the limits of physics to accelerate AI computing.
  • NVIDIA researchers are building AI models that help build processors for AI.

An NVIDIA Blackwell talk, taking place Monday, Aug. 26, will also spotlight new architectural details and examples of generative AI models running on Blackwell silicon.

It’s preceded by three tutorials on Sunday, Aug. 25, that will cover how hybrid liquid-cooling solutions can help data centers transition to more energy-efficient infrastructure and how AI models, including large language model (LLM)-powered agents, can help engineers design the next generation of processors.

Together, these presentations showcase the ways NVIDIA engineers are innovating across every area of data center computing and design to deliver unprecedented performance, efficiency and optimization.

Be Ready for Blackwell

NVIDIA Blackwell is the ultimate full-stack computing challenge. It comprises multiple NVIDIA chips, including the Blackwell GPU, Grace CPU, BlueField data processing unit, ConnectX network interface card, NVLink Switch, Spectrum Ethernet switch and Quantum InfiniBand switch.

Ajay Tirumala and Raymond Wong, directors of architecture at NVIDIA, will provide a first look at the platform and explain how these technologies work together to deliver a new standard for AI and accelerated computing performance while advancing energy efficiency.

The multi-node NVIDIA GB200 NVL72 solution is a perfect example. LLM inference requires low-latency, high-throughput token generation. GB200 NVL72 acts as a unified system to deliver up to 30x faster inference for LLM workloads, unlocking the ability to run trillion-parameter models in real time.

Tirumala and Wong will also discuss how the NVIDIA Quasar Quantization System — which brings together algorithmic innovations, NVIDIA software libraries and tools, and Blackwell’s second-generation Transformer Engine — supports high accuracy on low-precision models, highlighting examples using LLMs and visual generative AI.

Keeping Data Centers Cool

The traditional hum of air-cooled data centers may become a relic of the past as researchers develop more efficient and sustainable solutions that use hybrid cooling, a combination of air and liquid cooling.

Liquid-cooling techniques move heat away from systems more efficiently than air, making it easier for computing systems to stay cool even while processing large workloads. The equipment for liquid cooling also takes up less space and consumes less power than air-cooling systems, allowing data centers to add more server racks — and therefore more compute power — in their facilities.

Ali Heydari, director of data center cooling and infrastructure at NVIDIA, will present several designs for hybrid-cooled data centers.

Some designs retrofit existing air-cooled data centers with liquid-cooling units, offering a quick and easy solution to add liquid-cooling capabilities to existing racks. Other designs require the installation of piping for direct-to-chip liquid cooling using cooling distribution units or by entirely submerging servers in immersion cooling tanks. Although these options demand a larger upfront investment, they lead to substantial savings in both energy consumption and operational costs.

Heydari will also share his team’s work as part of COOLERCHIPS, a U.S. Department of Energy program to develop advanced data center cooling technologies. As part of the project, the team is using the NVIDIA Omniverse platform to create physics-informed digital twins that will help them model energy consumption and cooling efficiency to optimize their data center designs.

AI Agents Chip In for Processor Design

Semiconductor design is a mammoth challenge at microscopic scale. Engineers developing cutting-edge processors work to fit as much computing power as they can onto a piece of silicon a few inches across, testing the limits of what’s physically possible.

AI models are supporting their work by improving design quality and productivity, boosting the efficiency of manual processes and automating some time-consuming tasks. The models include prediction and optimization tools to help engineers rapidly analyze and improve designs, as well as LLMs that can assist engineers with answering questions, generating code, debugging design problems and more.

Mark Ren, director of design automation research at NVIDIA, will provide an overview of these models and their uses in a tutorial. In a second session, he’ll focus on agent-based AI systems for chip design.

AI agents powered by LLMs can be directed to complete tasks autonomously, unlocking broad applications across industries. In microprocessor design, NVIDIA researchers are developing agent-based systems that can reason and take action using customized circuit design tools, interact with experienced designers, and learn from a database of human and agent experiences.

NVIDIA experts aren’t just building this technology — they’re using it. Ren will share examples of how engineers can use AI agents for timing report analysis, cell cluster optimization processes and code generation. The cell cluster optimization work recently won best paper at the first IEEE International Workshop on LLM-Aided Design.

Register for Hot Chips, taking place Aug. 25-27, at Stanford University and online.

Read More

Build private and secure enterprise generative AI applications with Amazon Q Business using IAM Federation

Build private and secure enterprise generative AI applications with Amazon Q Business using IAM Federation

Amazon Q Business is a conversational assistant powered by generative artificial intelligence (AI) that enhances workforce productivity by answering questions and completing tasks based on information in your enterprise systems, which each user is authorized to access. In an earlier post, we discussed how you can build private and secure enterprise generative AI applications with Amazon Q Business and AWS IAM Identity Center. If you want to use Amazon Q Business to build enterprise generative AI applications, and have yet to adopt organization-wide use of AWS IAM Identity Center, you can use Amazon Q Business IAM Federation to directly manage user access to Amazon Q Business applications from your enterprise identity provider (IdP), such as Okta or Ping Identity. Amazon Q Business IAM Federation uses Federation with IAM and doesn’t require the use of IAM Identity Center.

AWS recommends using AWS Identity Center if you have a large number of users in order to achieve a seamless user access management experience for multiple Amazon Q Business applications across many AWS accounts in AWS Organizations. You can use federated groups to define access control, and a user is charged only one time for their highest tier of Amazon Q Business subscription. Although Amazon Q Business IAM Federation enables you to build private and secure generative AI applications, without requiring the use of IAM Identity Center, it is relatively constrained with no support for federated groups, and limits the ability to charge a user only one time for their highest tier of Amazon Q Business subscription to Amazon Q Business applications sharing SAML identity provider or OIDC identity provider in a single AWS accouGnt.

This post shows how you can use Amazon Q Business IAM Federation for user access management of your Amazon Q Business applications.

Solution overview

To implement this solution, you create an IAM identity provider for SAML or IAM identity provider for OIDC based on your IdP application integration. When creating an Amazon Q Business application, you choose and configure the corresponding IAM identity provider.

When responding to requests by an authenticated user, the Amazon Q Business application uses the IAM identity provider configuration to validate the user identity. The application can respond securely and confidentially by enforcing access control lists (ACLs) to generate responses from only the enterprise content the user is authorized to access.

We use the same example from Build private and secure enterprise generative AI apps with Amazon Q Business and AWS IAM Identity Center—a generative AI employee assistant built with Amazon Q Business—to demonstrate how to set it up using IAM Federation to only respond using enterprise content that each employee has permissions to access. Thus, the employees are able to converse securely and privately with this assistant.

Architecture

Amazon Q Business IAM Federation requires federating the user identities provisioned in your enterprise IdP such as Okta or Ping Identity account using Federation with IAM. This involves a onetime setup of creating a SAML or OIDC application integration in your IdP account, and then creating a corresponding SAML identity provider or an OIDC identity provider in AWS IAM. This SAML or OIDC IAM identity provider is required for you to create an Amazon Q Business application. The IAM identity provider is used by the Amazon Q Business application to validate and trust federated identities of users authenticated by the enterprise IdP, and associate a unique identity with each user. Thus, a user is uniquely identified across all Amazon Q Business applications sharing the same SAML IAM identity provider or OIDC IAM identity provider.

The following diagram shows a high-level architecture and authentication workflow. The enterprise IdP, such as Okta or Ping Identity, is used as the access manager for an authenticated user to interact with an Amazon Q Business application using an Amazon Q web experience or a custom application using an API.

The user authentication workflow consists of the following steps:

  1. The client application makes an authentication request to the IdP on behalf of the user.
  2. The IdP responds with identity or access tokens in OIDC mode, or a SAML assertion in SAML 2.0 mode. Amazon Q Business IAM Federation requires the enterprise IdP application integration to provide a special principal tag email attribute with its value set to the email address of the authenticated user. If user attributes such as role or location (city, state, country) are present in the SAML or OIDC assertions, Amazon Q Business will extract these attributes for personalization. These attributes are included in the identity token claims in OIDC mode, and SAML assertions in the SAML 2.0 mode.
  3. The client application makes an AssumeRoleWithWebIdentity (OIDC mode) or AssumeRoleWithSAML (SAML mode) API call to AWS Security Token Service (AWS STS) to acquire AWS Sig V4 credentials. Email and other attributes are extracted and enforced by the Amazon Q Business application using session tags in AWS STS. The AWS Sig V4 credentials include information about the federated user.
  4. The client application uses the credentials obtained in the previous step to make Amazon Q Business API calls on behalf of the authenticated user. The Amazon Q Business application knows the user identity based on the credential used to make the API calls, shows only the specific user’s conversation history, and enforces document ACLs. The application retrieves only those documents from the index that the user is authorized to access and are relevant to the user’s query, to be included as context when the query is sent to the underlying large language model (LLM). The application generates a response based only on enterprise content that the user is authorized to access.

How subscriptions work with Amazon Q Business IAM Federation

The way user subscriptions are handled when you use IAM Identity Center vs. IAM Federation is different.

For applications that use IAM Identity Center, AWS will de-duplicate subscriptions across all Amazon Q Business applications accounts, and charge each user only one time for their highest subscription level. De-duplication will apply only if the Amazon Q Business applications share the same organization instance of IAM Identity Center. Users subscribed to Amazon Q Business applications using IAM federation will be charged one time when they share the same SAML IAM identity provider or OIDC IAM identity provider. Amazon Q Business applications can share the same SAML IAM identity provider or OIDC IAM identity provider only if they are in the same AWS account. For example, if you use Amazon Q Business IAM Federation, and need to use Amazon Q Business applications across 3 separate AWS accounts, each AWS account will require its own SAML identity provider or OIDC identity provider to be created and used in the corresponding Amazon Q Business applications, and a user subscribed to these three Amazon Q Business applications will be charged three times. In another example, if a user is subscribed to some Amazon Q Business applications that use IAM Identity Center and others that use IAM Federation, they will be charged one time across all IAM Identity Center applications and one time per SAML IAM identity provider or OIDC IAM identity provider used by the Amazon Q Business applications using IAM Federation.

For Amazon Q Business applications using IAM Identity Center, the Amazon Q Business administrator directly assigns subscriptions for groups and users on the Amazon Q Business management console. For an Amazon Q Business application using IAM federation, the administrator chooses the default subscription tier during application creation. When an authenticated user logs in using either the Amazon Q Business application web experience or a custom application using the Amazon Q Business API, that user is automatically subscribed to the default tier.

Limitations

At the time of writing, Amazon Q Business IAM Federation has the following limitations:

  1. Amazon Q Business doesn’t support OIDC for Google and Microsoft Entra ID.
  2. There is no built-in mechanism to validate a user’s membership to federated groups defined in the enterprise IdP. If you’re using ACLs in your data sources with groups federated from the enterprise IdP, you can use the PutGroup API to define the federated groups in the Amazon Q Business user store. This way, the Amazon Q Business application can validate a user’s membership to the federated group and enforce the ACLs accordingly. This limitation does not apply to configurations where groups used in ACLs are defined locally within the data sources. For more information, refer to Group mapping.

Guidelines to choosing a user access mechanism

The following table summarizes the guidelines to consider when choosing a user access mechanism.

Federation Type AWS Account Type Amazon Q Business Subscription Billing Scope Supported Identity Source Other Considerations
Federated with IAM Identity Center Multiple accounts managed by AWS Organizations AWS organization, support for federated group-level subscriptions to Amazon Q Business applications All identity sources supported by IAM Identity Center: IAM Identity Center directory, Active Directory, and IdP AWS recommends this option if you have a large number of users and multiple applications, with many federated groups used to define access control and permissions.
Federated with IAM using OIDC IAM identity provider Single, standalone account All Amazon Q Business applications within a single standalone AWS account sharing the same OIDC IAM identity provider IdP with OIDC application integration This method is more straightforward to configure compared to a SAML 2.0 provider. It’s also less complex to share IdP application integrations across Amazon Q Business web experiences and custom applications using Amazon Q Business APIs.
Federated with IAM using SAML IAM identity provider Single, standalone account All Amazon Q Business applications within a single standalone AWS account sharing the same SAML IAM identity provider IdP with SAML 2.0 application integration This method is more complex to configure compared to OIDC, and requires a separate IdP application integration for each Amazon Q Business web experience. Some sharing is possible for custom applications using Amazon Q Business APIs.

Prerequisites

To implement the sample use case described in this post, you need an Okta account. This post covers workflows for both OIDC and SAML 2.0, so you can follow either one or both workflows based on your interest. You need to create application integrations for OIDC or SAML mode, and then configure the respective IAM identity providers in your AWS account, which will be required to create and configure your Amazon Q Business applications. Though you use the same Okta account and the same AWS account to create two Amazon Q Business applications one using an OIDC IAM identity provider, and the other using SAML IAM identity provider, the same user subscribed to both these Amazon Q Business applications will be charged twice, since they don’t share the underlying SAML or OIDC IAM identity providers.

Create an Amazon Q Business application with an OIDC IAM identity provider

To set up an Amazon Q Business application with an OIDC IAM identity identifier, you first configure the Okta application integration using OIDC. Then you create an IAM identity provider for that OIDC app integration, and create an Amazon Q Business application using that OIDC IAM identity provider. Lastly, you update the Okta application integration with the web experience URIs of the newly created Amazon Q Business application.

Create an Okta application integration with OIDC

Complete the following steps to create your Okta application integration with OIDC:

  1. On the administration console of your Okta account, choose Applications, then Applications in the navigation pane.
  2. Choose Create App Integration.
  3. For Sign-in method, select OIDC.
  4. For Application type, select Web Application.
  5. Choose Next.
  1. Give your app integration a name.
  2. Select Authorization Code and Refresh Token for Grant Type.
  3. Confirm that Refresh token behavior is set to Use persistent token.
  4. For Sign-in redirect URIs, provide a placeholder value such as https://example.com/authorization-code/callback.

You update this later with the web experience URI of the Amazon Q Business application you create.

  1. On the Assignments tab, assign access to appropriate users within your organization to your Amazon Q Business application.

In this step, you can select all users in your Okta organization, or choose select groups, such as Finance-Group if it’s defined, or select individual users.

  1. Choose Save to save the app integration.

Your app integration will look similar to the following screenshots.

  1. Note the values for Client ID and Client secret to use in subsequent steps.

  1. On the Sign on tab, choose Edit next to OpenID Connect ID Token.
  2. For Issuer, note the Okta URL.
  3. Choose Cancel.
  1. In the navigation pane, choose Security and then API.
  2. Under API, Authorization Servers, choose default.
  3. On the Claims tab, choose Add Claim.
  4. For Name, enter https://aws.amazon.com/tags.
  5. For Include in token type, select ID Token.
  6. For Value, enter {"principal_tags": {"Email": {user.email}}}.
  7. Choose Create.

The claim will look similar to the following screenshot. It is a best practice to use a custom authorization server. However, because this is an illustration, we use the default authorization server.

Set up an IAM identity provider for OIDC

To set up an IAM identity provider for OIDC, complete the following steps:

  1. On the IAM console, choose Identity providers in the navigation pane.
  2. Choose Add provider.
  3. For Provider type, select OpenID Connect.
  4. For Provider URL, enter the Okta URL you copied earlier, followed by /oauth2/default.
  5. For Audience, enter the client ID you copied earlier.
  6. Choose Add provider.

Create an Amazon Q Business application with the OIDC IAM identity provider

Complete the following steps to create an Amazon Q Business application with the OIDC IdP:

  1. On the Amazon Q Business console, choose Create application.
  2. Give the application a name.
  3. For Access management method, select AWS IAM Identity provider.
  4. For Choose an Identity provider type, select OpenID Connect (OIDC).
  5. For Select Identity Provider, choose the IdP you created.
  6. For Client ID, enter the client ID of the Okta application integration you copied earlier.
  7. Leave the remaining settings as default and choose Create.
  1. In the Select retriever step, unless you want to change the retriever type or the index type, choose Next.
  2. For now, select Next on the Connect data sources We configure the data source later.

On the Manage access page, in Default subscription settings, Subscription Tier of Q Business Pro is selected by default. This means that when an authenticated user starts using the Amazon Q Business application, they will automatically get subscribed as Amazon Q Business Pro. The Amazon Q Business administrator can change the subscription tier for a user at any time.

  1. In Web experience settings uncheck Create web experience. Choose Done.
  2. On the Amazon Q Business Applications page, choose the application you just created to view the details.
  3. In the Application Details page, note the Application ID.
  4. In a new tab of your web browser open the management console for AWS Secrets Manager. Choose Store a new secret.
  5. For Choose secret type choose Other type of secret. For Key/value pairs, enter client_secret as key and enter the client secret you copied from the Okta application integration as value. Choose Next.
  6. For Configure secret give a Secret name.
  7. For Configure rotation, unless you want to make any changes, accept the defaults, and choose Next.
  8. For Review, review the secret you just stored, and choose Store.
  9. On AWS Secrets Manager, Secrets page choose the secret you just created. Note the Secret name and Secret ARN.
  10. Follow the instructions on IAM role for an Amazon Q web experience using IAM Federation to create Web experience IAM role, and Secret Manager Role. You will require the Amazon Q Business Application ID, Secret name and Secret ARN you copied earlier.
  11. Open the Application Details for your Amazon Q Business application. Choose Edit.
  12. For Update application, there is no need to make changes. Choose Update.
  13. For Update retriever, there is no need to make changes. Choose Next.
  14. For Connect data sources, there is no need to make changes. Choose Next.
  15. For Update access, select Create web experience.
  16. For Service role name select the web experience IAM role you created earlier.
  17. For AWS Secrets Manager secret, select the secret you stored earlier.
  18. For Web Experience to use Secrets: Service role name, select the Secret Manager Role you created earlier.
  19. Choose Update.
  20. On the Amazon Q Business Applications page, choose the application you just updated to view the details.
  21. Note the value for Deployed URL.

Before you can use the web experience to interact with the Amazon Q Business application you just created, you need to update the Okta application integration with the redirect URL of the web experience.

  1. Open the Okta administration console, then open the Okta application integration you created earlier.
  2. On the General tab, choose Edit next to General Settings.
  3. For Sign-in redirect URIs, replace the placeholder https://example.com/ with the value for Deployed URL of your web experience. Make sure the authorization-code/callback suffix is not deleted. The full URL should look like https://your_deployed_url/authorization-code/callback.
  4. Choose Save.

Create an Amazon Q Business application with a SAML 2.0 IAM identity provider

The process to set up an Amazon Q Business application with a SAML 2.0 IAM identity provider is similar to creating an application using OIDC. You first configure an Okta application integration using SAML 2.0. Then you create an IAM identity provider for that SAML 2.0 app integration, and create an Amazon Q Business application using the SAML 2.0 IAM identity provider. Lastly, you update the Okta application integration with the web experience URIs of the newly created Amazon Q Business application.

Create an Okta application integration with SAML 2.0

Complete the following steps to create your Okta application integration with SAML 2.0:

  1. On the administration console of your Okta account, choose Applications, then Applications in the navigation pane.
  2. Choose Create App Integration.
  3. For Sign-in method, select SAML 2.0.
  4. Choose Next.
  1. On the General Settings page, enter an app name and choose Next.

This will open the Create SAML Integration page.

  1. For Single sign-on URL, enter a placeholder URL such as https://example.com/saml and deselect Use this for Recipient URL and Destination URL.
  2. For Recipient URL, enter https://signin.aws.amazon.com/saml.
  3. For Destination URL, enter the placeholder https://example.com/saml.
  4. For Audience URL (SP Entity ID), enter https://signin.aws.amazon.com/saml.
  5. For Name ID format, choose Persistent.
  6. Choose Next and then Finish.

The placeholder values of https://example.com will need to be updated with the deployment URL of the Amazon Q Business web experience, which you create in subsequent steps.

  1. On the Sign On tab of the app integration you just created, note the value for Metadata URL.
  1. Open the URL in your web browser, and save it on your local computer.

The metadata will be required in subsequent steps.

Set up an IAM identity provider for SAML 2.0

To set up an IAM IdP for SAML 2.0, complete the following steps:

  1. On the IAM console, choose Identity providers in the navigation pane.
  2. Choose Add provider.
  3. For Provider type, select SAML.
  4. Enter a provider name.
  5. For Metadata document, choose Choose file and upload the metadata document you saved earlier.
  6. Choose Add provider.
  1. From the list of identity providers, choose the identity provider you just created.
  2. Note the values for ARN, Issuer URL, and SSO service location to use in subsequent steps.

Create an Amazon Q Business application with the SAML 2.0 IAM identity provider

Complete the following steps to create an Amazon Q Business application with the SAML 2.0 IAM identity provider:

  1. On the Amazon Q Business console, choose Create application.
  2. Give the application a name.
  3. For Access management method, select AWS IAM Identity provider.
  4. For Choose an Identity provider type, select SAML.
  5. For Select Identity Provider, choose the IdP you created.
  6. Leave the remaining settings as default and choose Create.
  1. In the Select retriever step, unless you want to change the retriever type or the index type, choose Next.
  2. For now, choose Next on the Connect data sources We will configure the data source later.

On the Manage access page, in Default subscription settings, Subscription Tier of Q Business Pro is selected by default. This means that when an authenticated user starts using the Amazon Q Business application, they will automatically get subscribed as Amazon Q Business Pro. The Amazon Q Business administrator can change the subscription tier for a user at any time.

  1. For Web experience settings, uncheck Create web experience. Choose Done.
  2. On the Amazon Q Business Applications page, choose the application you just created.
  3. In the Application Details page, note the Application ID.
  4. Follow the instructions on IAM role for an Amazon Q web experience using IAM Federation to create Web experience IAM role. You will require the Amazon Q Business Application ID you copied earlier.
  5. Open the Application Details for your Amazon Q Business application. Choose Edit.
  6. For Update application, there is no need to make changes. Choose Update.
  7. For Update retriever, there is no need to make changes. Choose Next.
  8. For Connect data sources, there is no need to make changes. Choose Next.
  9. For Update access, select Create web experience.
  10. For this post, we continue with the default setting.
  11. For Authentication URL, enter the value for SSO service location that you copied earlier.
  12. Choose Update.
  13. On the Amazon Q Business Applications page, choose the application you just updated to view the details.
  14. Note the values for Deployed URL and Web experience IAM role ARN to use in subsequent steps.

 Before you can use the web experience to interact with the Amazon Q Business application you just created, you need to update the Okta application integration with the redirect URL of the web experience.

  1. Open the Okta administration console, then open the Okta application integration you created earlier.
  2. On the General tab, choose Edit next to SAML Settings.
  3. For Single sign-on URL and Destination URL, replace the placeholder https://example.com/ with the value for Deployed URL of your web experience. Make sure the /saml suffix isn’t deleted.
  4. Choose Save.
  1. On the Edit SAML Integration page, in the Attribute Statements (optional) section, add attribute statements as listed in the following table.

This step is not optional and these attributes are used by the Amazon Q Business application to determine the identity of the user, so be sure to confirm their correctness.

Name Name format Value
https://aws.amazon.com/SAML/Attributes/PrincipalTag:Email Unspecified user.email
https://aws.amazon.com/SAML/Attributes/Role Unspecified <Web experience IAM role ARN>,<identity-provider-arn>
https://aws.amazon.com/SAML/Attributes/RoleSessionName Unspecified user.email

For the value of the https://aws.amazon.com/SAML/Attributes/Role attribute, you need to concatenate the web experience IAM role ARN and IdP ARN you copied earlier with a comma between them, without spaces or any other characters.

  1. Choose Next and Finish.
  2. On the Assignments tab, assign users who can access the app integration you just created.

This step controls access to appropriate users within your organization to your Amazon Q Business application. In this step, you can enable self-service so that all users in your Okta organization, or choose select groups, such as Finance-Group if it’s defined, or select individual users.

Set up the data source

Whether you created the Amazon Q Business application using an OIDC IAM identity provider or SAML 2.0 IAM identity provider, the procedure to create a data source remains the same. For this post, we set up a data source for Atlassian Confluence. The following steps show how to configure the data source for the Confluence environment. For more details on how to set up a Confluence data source, refer to Connecting Confluence (Cloud) to Amazon Q Business.

  1. On the Amazon Q Business Application details page, choose Add data source.
  1. On the Add data source page, choose Confluence.
  1. For Data source name, enter a name.
  2. For Source, select Confluence Cloud and enter the Confluence URL.
  1. For Authentication, select Basic authentication and enter the Secrets Manager secret.
  2. For IAM role, select Create a new service role.
  3. Leave the remaining settings as default.
  1. For Sync scope, select the appropriate content to sync.
  2. Under Space and regex patterns, provide the Confluence spaces to be included.
  3. For Sync mode, select Full sync.
  4. For Sync run schedule, choose Run on demand.
  5. Choose Add data source.
  1. After the data source creation is complete, choose Sync now to start the data source sync.

Wait until the sync is complete before logging in to the web experience to start querying.

Employee AI assistant use case

To illustrate how you can build a secure and private generative AI assistant for your employees using Amazon Q Business applications, let’s take a sample use case of an employee AI assistant in an enterprise corporation. Two new employees, Mateo Jackson and Mary Major, have joined the company on two different projects, and have finished their employee orientation. They have been given corporate laptops, and their accounts are provisioned in the corporate IdP. They have been told to get help from the employee AI assistant for any questions related to their new team member activities and their benefits.

The company uses Confluence to manage their enterprise content. The sample Amazon Q application used to run the scenarios for this post is configured with a data source using the built-in connector for Confluence to index the enterprise Confluence spaces used by employees. The example uses three Confluence spaces with the following permissions:

  • HR Space – All employees, including Mateo and Mary
  • AnyOrgApp Project Space – Employees assigned to the project, including Mateo
  • ACME Project Space – Employees assigned to the project, including Mary

Let’s look at how Mateo and Mary experience their employee AI assistant.

Both are provided with the URL of the employee AI assistant web experience. They use the URL and sign in to the IdP from the browsers of their laptops. Mateo and Mary both want to know about their new team member activities and their fellow team members. They ask the same questions to the employee AI assistant but get different responses, because each has access to separate projects. In the following screenshots, the browser window on the left is for Mateo Jackson and the one on the right is for Mary Major. Mateo gets information about the AnyOrgApp project and Mary gets information about the ACME project.

Mateo chooses Sources under the question about team members to take a closer look at the team member information, and Mary chooses Sources under the question for the new team member checklist. The following screenshots show their updated views.

Mateo and Mary want to find out more about the benefits their new job offers and how the benefits are applicable to their personal and family situations.

The following screenshot shows that Mary asks the employee AI assistant questions about her benefits and eligibility.

Mary can also refer to the source documents.

The following screenshot shows that Mateo asks the employee AI assistant different questions about his eligibility.

Mateo looks at the following source documents.

Both Mary and Mateo first want to know their eligibility for benefits. But after that, they have different questions to ask. Even though the benefits-related documents are accessible by both Mary and Mateo, their conversations with the employee AI assistant are private and personal. The assurance that their conversation history is private and can’t be seen by any other user is critical for the success of a generative AI employee productivity assistant.

Clean up

If you created a new Amazon Q Business application to try out the integration with IAM federation, and don’t plan to use it further, you can unsubscribe, remove automatically subscribed users from the application, and delete it so that your AWS account doesn’t accumulate costs.

  1. To unsubscribe and remove users, go to the application details page and choose Manage subscriptions.
  1. Select all the users, choose Remove to remove subscriptions, and choose Done.
  1. To delete the application after removing the users, return to the application details page and choose Delete.

Conclusion

For enterprise generative AI assistants such as the one shown in this post to be successful, they must respect access control as well as assure the privacy and confidentiality of every employee. Amazon Q Business achieves this by integrating with IAM Identity Center or with IAM Federation to provide a solution that authenticates each user and validates the user identity at each step to enforce access control along with privacy and confidentiality.

In this post, we showed how Amazon Q Business IAM Federation uses SAML 2.0 and OIDC IAM identity providers to uniquely identify a user authenticated by the enterprise IdP, and then that user identity is used to match up document ACLs set up in the data source. At query time, Amazon Q Business responds to a user query utilizing only those documents that the user is authorized to access. This functionality is similar to that achieved by the integration of Amazon Q Business with IAM Identity Center we saw in an earlier post. Additionally, we also provided the guidelines to consider when choosing a user access mechanism.

To learn more, refer to Amazon Q Business, now generally available, helps boost workforce productivity with generative AI and the Amazon Q Business User Guide.


About the authors

Abhinav JawadekarAbhinav Jawadekar is a Principal Solutions Architect in the Amazon Q Business service team at AWS. Abhinav works with AWS customers and partners to help them build generative AI solutions on AWS.

Venky Nagapudi is a Senior Manager of Product Management for Q Business, Amazon Comprehend and Amazon Translate. His focus areas on Q Business include user identity management, and using offline intelligence from documents to improve Q Business accuracy and helpfulness.

Read More

Causal Inference under Incentives: An Annotated Reading List

Causal Inference under Incentives: An Annotated Reading List

Causal inference is the process of determining whether and how a cause leads to an effect, typically using statistical methods to distinguish correlation from causation. Learning causal relationships from data is an important task across a wide variety of domains ranging from healthcare and drug development, to online advertising and e-commerce. As a result, there has been much work in the literature on economics, statistics, computer science, and public policy on designing algorithms and methodologies for causal inference.

While most of the focus has been on questions which are statistical in nature, one must also take game-theoretic incentives into consideration when doing causal inference about strategic individuals who have a preference over the treatment they receive. For example, it may be hard to infer causal relationships in randomized control trials when there is non-compliance by participants in the study (i.e. when participants do not adhere to the treatment they are assigned). More generally, causal learning may be difficult whenever individuals are free to self-select their own treatments and there is sufficient heterogeneity between individuals with different preferences. Even when compliance can be enforced, individuals may strategize by modifying the attributes they present to the causal inference process in order to be assigned a more desirable treatment.

This annotated reading list is intended to serve as a brief summary of work on causal inference in the presence of strategic agents. While this list is not comprehensive, we hope that it will be a useful starting point for members of the machine learning community to learn more about this exciting research area at the intersection of causal inference and game theory.

The reading list is organized as follows: (1, 3) study non-compliance in randomized trials, (2-4) focus on instrumental variable methods, (4-6) consider incentive misalignment between the individual running the causal inference procedure and the subjects of the procedure, (7,8) study cross-unit interference, and (9,10) are about synthetic control methods.

  1. [Robins 1998]: This paper provides an overview of methods to correct for non-compliance in randomized trials (i.e., non-adherence by trial participants to the treatment assignment protocol).
  2. [Angrist et al. 1996]: This seminal paper outlines the concept of instrumental variables (IVs) and describes how they can be used to estimate causal effects. An IV is a variable that affects the treatment variable but is unrelated to the outcome variable except through its effect on the treatment. IV methods leverage the fact that variation in IVs is independent of any confounding in order to estimate the causal effect of the treatment.
  3. [Ngo et al. 2021]: Unlike prior work on non-compliance in clinical trials, this work leverages tools from information design to reveal information about the effectiveness of the treatments in such a way that participants become incentivized to comply with the treatment recommendations over time.
  4. [Harris et al. 2022]: This paper studies the problem of making decisions about a population of strategic agents. The authors make the novel observation that the assessment rule deployed by the principal is a valid instrument, which allows them to apply standard methods for instrumental variable regression to learn causal relationships in the presence of strategic behavior.
  5. [Miller et al. 2020]: This paper considers the problem of strategic classification, where a principal (i.e. decision maker) makes decisions about a population of strategic agents. Given knowledge of the principal’s deployed assessment rule, the agents may strategically modify their observable features in order to receive a more desirable assessment (e.g., a better interest rate on a loan). The authors are the first to show that designing good incentives for agent improvement (i.e. encouraging strategizing in a way which actually benefits the agent) is at least as hard as orienting edges in the corresponding causal graph.
  6. [Wang et al. 2023]: Incentive misalignment between patients and providers may occur when average treated outcomes are used as quality metrics. Such misalignment is generally undesirable in healthcare domains, as it may lead to decreased patient welfare. To mitigate this issue, this work proposes an alternative quality metric, the total treatment effect, which accounts for counterfactual untreated outcomes. The authors show that rewarding the total treatment effect maximizes total patient welfare.
  7. [Wager and Xu 2021]: Motivated by applications such as ride-sharing and tuition subsidies, this work studies settings in which interventions on one unit (e.g. a person or product) may have effects on others (i.e., cross-unit interference). The authors focus on the problem of setting supply-side payments in a centralized marketplace. They use a mean-field modeling-based approach to model the cross-unit interference, and design a class of experimentation schemes which allow them to optimize payments without disturbing the market equilibrium.
  8. [Li et al. 2023]: Like [Wager and Xu 2021], this paper studies the effects of cross-unit interference, although the interference considered here comes from congestion in a service system. As a result, the interference considered here is dynamic, in contrast to the static interference considered in the previous entry.
  9. [Abadie and Gardeazabal 2003]: This is the first paper on synthetic control methods (SCMs), a popular technique for estimating counterfactuals from longitudinal data. In the SCM setup, there is a pre-intervention time period during which all units are under control, followed by a post-intervention time period when all units undergo exactly one intervention (either the treatment or control). Given a test unit (who was given the treatment) and a set of donor units (who remained under control), SCMs use the pre-treatment data to learn a relationship (usually linear or convex) between the test and donor units. This relationship is then extrapolated to the post-intervention time period in order to estimate the counterfactual trajectory for the test unit under control.
  10. [Ngo et al. 2023]: A common assumption in the literature on SCMs is that of “overlap”: the outcomes for the test unit can be written as a combination (e.g., linear or convex) of the donor units. This work sheds light on this often overlooked assumption and shows that (i) when units select their own treatments and (ii) there is sufficient heterogeneity between units who prefer different treatments, then overlap does not hold. Like [Ngo et al. 2021], the authors use tools from information design and multi-armed bandits to incentivize units to explore different treatments in a way which ensures that the overlap condition will gradually become satisfied over time.

[Editor’s note: this article is cross-posted in SIGecom Exchanges 22.1.]

References:

  1. Abadie, A. and Gardeazabal, J. 2003. The economic costs of conflict: A case study of the basque country. American economic review 93, 1, 113–132.
  2. Angrist, J. D., Imbens, G. W., and Rubin, D. B. 1996. Identification of causal effects using instrumental variables. Journal of the American statistical Association 91, 434, 444–455.
  3. Harris, K., Ngo, D. D. T., Stapleton, L., Heidari, H., and Wu, S. 2022. Strategic instrumental variable regression: Recovering causal relationships from strategic responses. In International Conference on Machine Learning. PMLR, 8502–8522.
  4. Li, S., Johari, R., Kuang, X., and Wager, S. 2023. Experimenting under stochastic congestion. arXiv preprint arXiv:2302.12093.
  5. Miller, J., Milli, S., and Hardt, M. 2020. Strategic classification is causal modeling in disguise. In International Conference on Machine Learning. PMLR, 6917–6926.
  6. Ngo, D., Harris, K., Agarwal, A., Syrgkanis, V., and Wu, Z. S. 2023. Incentive-aware synthetic control: Accurate counterfactual estimation via incentivized exploration. arXiv preprint arXiv:2312.16307.
  7. Ngo, D. D. T., Stapleton, L., Syrgkanis, V., and Wu, S. 2021. Incentivizing compliance with algorithmic instruments. In International Conference on Machine Learning. PMLR, 8045–8055.
  8. Robins, J. M. 1998. Correction for non-compliance in equivalence trials. Statistics in medicine 17, 3, 269–302.
  9. Wager, S. and Xu, K. 2021. Experimenting in equilibrium. Management Science 67, 11, 6694–6715.
  10. Wang, S., Bates, S., Aronow, P., and Jordan, M. I. 2023. Operationalizing counterfactual metrics: Incentives, ranking, and information asymmetry. arXiv preprint arXiv:2305.14595.

Read More

Positional Description for Numerical Normalization

We present a Positional Description Scheme (PDS) tailored for digit sequences, integrating placeholder value information for each digit. Given the structural limitations of subword tokenization algorithms, language models encounter critical Text Normalization (TN) challenges when handling numerical tasks. Our schema addresses this challenge through straightforward pre-processing, preserving the model architecture while significantly simplifying number normalization, rendering the problem tractable. This simplifies the task and facilitates more compact production-ready models capable of…Apple Machine Learning Research

Unleashing the power of generative AI: Verisk’s Discovery Navigator revolutionizes medical record review

Unleashing the power of generative AI: Verisk’s Discovery Navigator revolutionizes medical record review

This post is co-written with Sneha Godbole and Kate Riordan from Verisk.

Verisk (Nasdaq: VRSK) is a leading strategic data analytics and technology partner to the global insurance industry. It empowers its customers to strengthen operating efficiency, improve underwriting and claims outcomes, combat fraud, and make informed decisions about global risks, including climate change, extreme events, sustainability, and political issues. At the forefront of harnessing cutting-edge technologies in the insurance sector such as generative artificial intelligence (AI), Verisk is committed to enhancing its clients’ operational efficiencies, productivity, and profitability. Verisk’s generative AI-powered solutions and applications are developed with a steadfast commitment to ethical and responsible use of AI, incorporating privacy and security controls, human oversight, and transparent practices consistent with its ethical AI principles and governance practices.

Verisk’s Discovery Navigator product is a leading medical record review platform designed for property and casualty claims professionals, with applications to any industry that manages large volumes of medical records. It streamlines document review for anyone needing to identify medical information within records, including bodily injury claims adjusters and managers, nurse reviewers and physicians, administrative staff, and legal professionals. By replacing hours of manual review for a single claim, insurers can modernize the reviewer’s workflow, saving time and empowering better, faster decision-making, which is critical to improving outcomes.

With AI-powered analysis, the process of reviewing an average file of a few hundred pages is reduced to minutes with Discovery Navigator. By responsibly building proprietary AI models created with Verisk’s extensive clinical, claims, and data science expertise, complex and unstructured documents are automatically organized, reviewed, and summarized. It employs sophisticated AI to extract medical information from records, providing users with structured information that can be easily reviewed and uploaded into their claims management system. This allows reviewers to access necessary information in minutes, compared to the hours spent doing this manually.

Discovery Navigator recently released automated generative AI record summarization capabilities. It was built using Amazon Bedrock, a fully managed service from AWS that provides access to foundation models (FMs) from leading AI companies through an API to build and scale generative AI applications. This new functionality offers an immediate overview of the initial injury and current medical status, empowering record reviewers of all skill levels to quickly assess injury severity with the click of a button. By automating the extraction and organization of key treatment data and medical information into a concise summary, claims handlers can now identify important bodily injury claims data faster than before.

In this post, we describe the development of the automated summary feature in Discovery Navigator incorporating generative AI, the data, the architecture, and the evaluation of the pipeline.

Solution overview

Discovery Navigator is designed to retrieve medical information and generate summaries from medical records. These medical records are mostly unstructured documents, often containing multiple dates of service. Examples of the myriad of documents include provider notes, tables in different formats, body figures to describe the injury, medical charts, health forms, and handwritten notes. The medical record documents are scanned and typically available as a single file.

Following a virus scan, the most immediate step in Discovery Navigator’s AI pipeline is to convert the scanned image pages of medical records into searchable documents. For this optical character recognition (OCR) conversion process, Discovery Navigator uses Amazon Textract.

The following figure illustrates the architecture of the Discovery Navigator AI pipeline.

Discovery Navigator AI Pipeline

Discovery Navigator AI Pipeline

The OCR converted medical records are passed through various AI models that extract key medical data. The AI extracted medical information is used to add highlighting in the original medical record document and to generate an indexed report. The highlighted medical record document allows the user to focus on the provided results and target their review towards the pages with highlights, thereby saving time. The report gives a quick summary of the extracted medical information with page links to navigate through the document for review.

The following figure shows the Discovery Navigator generative AI auto-summary pipeline. The OCR converted medical record pages are processed through Verisk’s AI models and select pages are sent to Amazon Bedrock using AWS PrivateLink, for generating visit summaries. The user is given a summary report consisting of AI extracted medical information and generative AI summaries.

Discovery Navigator Inference Pipeline

Discovery Navigator Inference Pipeline

Discovery Navigator results

Discovery Navigator produces results in two different ways: first, it provides an initial document containing an indexed report of identified medical data points and includes a highlighting feature within the original document to emphasize the results. Additionally, an optional automated high-level summary created through generative AI capabilities is provided.

Discovery Navigator offers multiple different medical models, for example, diagnosis codes. These codes are identified and highlighted in the document. In the sample in the following figure, additional intelligence is provided utilizing a note feature to equip the user with the clinical description directly on the page, avoiding time spent locating this information elsewhere. The Executive Summary report displays an overview of all the medical terms extracted from the medical record, and the Index Report provides page links for quick review.

Indexed reports of extracted medical information

Indexed reports of extracted medical information

Discovery Navigator’s new generative AI summary feature creates an in-depth summarization report, as shown in the following figure. This report includes a summary of the initial injury following the date of loss, a list of certain medical information extracted from the medical record, and a summary of the future treatment plan based on the most recent visit in the medical record.

DNAV Screen Shot

Discovery Navigator Executive Summary

Performance

To assess the generative AI summary quality, Verisk designed human evaluation metrics with the help of in-house clinical expertise. Verisk conducted multiple rounds of human evaluation of the generated summaries with respect to the medical records. Feedback from each round of tests was incorporated in the following test.

Verisk’s evaluation involved three major parts:

  • Prompt engineeringPrompt engineering is the process where you guide generative AI solutions to generate desired output. Verisk framed prompts using their in-house clinical experts’ knowledge on medical claims. With each round of testing, Verisk added instructions to the prompts to capture the pertinent medical information and to reduce possible hallucinations. The generative AI large language model (LLM) can be prompted with questions or asked to summarize a given text. Verisk decided to test three approaches: a question answer prompt, summarize prompt, and question answer prompt followed by summarize prompt.
  • Splitting of document pages – The medical record generative AI summaries are created for each date of visit in the medical record. Verisk tested two strategies of splitting the pages by visit: split visit pages individually and send them to a text splitter to generate text chunks for generative AI summarization, or concatenate all visit pages and send them to a text splitter to generate text for generative AI summarization. Summaries generated from each strategy were used during evaluation of the generative AI summary.
  • Quality of summary – For the generative AI summary, Verisk wanted to capture information regarding the reason for visit, assessment, and future treatment plan. For evaluation of summary quality, Verisk created a template of questions for the clinical expert, which allowed them to assess the best performing prompt in terms of inclusion of required medical information and the best document splitting strategy. The evaluation questions also collected feedback on the number of hallucinations and inaccurate or not helpful information. For each summary presented to the clinical expert, they were asked to categorize it as either good, acceptable, or bad.

Based on Verisk’s evaluation template questions and rounds of testing, they concluded that the question answer prompt with concatenated pages generated over 90% good or acceptable summaries with low hallucinations and inaccurate or unnecessary information.

Business impact

By quickly and accurately summarizing key medical data from bodily injury claims, Verisk’s Discovery Navigator, with its new generative AI auto-summary feature powered by Amazon Bedrock, has immense potential to drive operational efficiencies and boost profitability for insurers. The automated extraction and summarization of critical treatment information allows claims handlers to expedite the review process, thereby reducing settlement times. This accelerated claim resolution can help minimize claims leakage and optimize resource allocation, enabling insurers to focus efforts on more complex cases. The Discovery Navigator platform has a proven to be up to 90% faster than manual record review, allowing claims handlers to compile record summaries in a fraction of the time.

Conclusion

The incorporation of generative AI into Discovery Navigator underscores Verisk’s commitment to using cutting-edge technologies to drive operational efficiencies and enhance outcomes for its clients in the insurance industry. By automating the extraction and summarization of key medical data, Discovery Navigator empowers claims professionals to expedite the review process, facilitate quicker settlements, and ultimately provide a superior experience for customers. The collaboration with AWS and the successful integration of FMs from Amazon Bedrock have been pivotal in delivering this functionality. The rigorous evaluation process, guided by Verisk’s clinical expertise, makes sure that the generated summaries meet the highest standards of accuracy, relevance, and reliability.

As Verisk continues to explore the vast potential of generative AI, the Discovery Navigator auto-summary feature serves as a testament to the company’s dedication to responsible and ethical AI adoption. By prioritizing transparency, security, and human oversight, Verisk aims to build trust and drive innovation while upholding its core values. Looking ahead, Verisk remains steadfast in its pursuit of harnessing advanced technologies to unlock new levels of efficiency, insight, and value for its global customer base. With a focus on continuous improvement and a deep understanding of industry needs, Verisk is poised to shape the future of insurance analytics and drive resilience across communities and businesses worldwide.

Resources


About the Authors

Sneha Godbole is a AVP of Analytics at Verisk. She has partnered with Verisk leaders on creating Discovery Navigator, an AI powered tool that automatically enables identification and retrieval of key data points within large unstructured documents. Sneha holds two Master of Science degrees (from University of Utah and SUNY Buffalo) and a Data Science Specialization certificate from Johns Hopkins University. Prior to joining Verisk, Sneha has worked as a software developer in France to build android solutions and collaborated on a paper publication with Brigham Young University, Utah.

Kate Riordan is the Director of Automation Initiatives at Verisk. She currently is the product owner for Discovery Navigator, an AI powered tool that automatically enables identification and retrieval of key data points within large unstructured documents and oversees automation and efficiency projects. Kate began her career at Verisk as a Medicare Set Aside compliance attorney. In that role, she completed and obtained CMS approval of hundreds of Medicare Set Asides. She is fluent in Section 111 reporting requirements, the conditional payment recovery process, Medicare Advantage, Part D and Medicaid recovery. Kate is a member of the Massachusetts bar.

Ryan Doty is a Sr. Solutions Architect at AWS, based out of New York. He helps enterprise customers in the Northeast U.S. accelerate their adoption of the AWS Cloud by providing architectural guidelines to design innovative and scalable solutions. Coming from a software development and sales engineering background, the possibilities that the cloud can bring to the world excite him.

Tarik Makota is a Principal Solutions Architect with Amazon Web Services. He provides technical guidance, design advice, and thought leadership to AWS’ customers across the US Northeast. He holds an M.S. in Software Development and Management from Rochester Institute of Technology.

Dom Bavaro is a Senior Solutions Architect for Financial Services. While providing technical guidance to customers across many use cases, He is focused on helping customer build and productionize Generative AI solutions and workflows.

Read More

Index your Atlassian Confluence Cloud contents using the Amazon Q Confluence Cloud connector for Amazon Q Business

Index your Atlassian Confluence Cloud contents using the Amazon Q Confluence Cloud connector for Amazon Q Business

Amazon Q Business is a generative artificial intelligence (AI)-powered assistant designed to enhance enterprise operations. It’s a fully managed service that helps provide accurate answers to users’ questions while honoring the security and access restrictions of the content. It can be tailored to your specific business needs by connecting to your company’s information and enterprise systems using built-in connectors to a variety of enterprise data sources. Amazon Q Business enables users in various roles, such as marketing managers, project managers, and sales representatives, to have tailored conversations, solve business problems, generate content, take action, and more, through a web interface. This service aims to help make employees work smarter, move faster, and drive significant impact by providing immediate and relevant information to help them with their tasks.

One such enterprise data repository you can use to store content is Atlassian Confluence. Confluence is a team workspace that provides a place to create, and collaborate on various projects, products, or ideas. Team spaces help your teams structure, organize, and share work, so each user has visibility into the institutional knowledge of the enterprise and access to the information they need or answers to the questions they have.

There are two Confluence offerings:

  • Cloud – This is offered as a software as a service (SaaS) product. It’s always on and continuously updated.
  • Data Center (self-managed) – Here, you host Confluence on your infrastructure, which may be on premises or the cloud, allowing you to keep data within your chosen environment and manage it yourself.

Your users may need to get answers in Amazon Q Business from the content in Atlassian’s Confluence Cloud instance as a part of their work. For this you will need to configure an Amazon Q Confluence Cloud connector. As a part of this configuration, one of the steps is to configure the authentication of the connector so that it can authenticate with Confluence (Cloud) and then index the relevant content.

This post covers the steps to configure the Confluence Cloud connector for Amazon Q Business.

Types of documents

When you connect Amazon Q to a data source, what Amazon Q considers—and crawls—as a document varies by connector. The Confluence Cloud connector crawls the following as documents:

  • Spaces – Each space is considered a single document.
  • Pages – Each page is considered a single document.
  • Blogs – Each blog is considered a single document.
  • Comments – Each comment is considered a single document.
  • Attachments – Each attachment is considered a single document.

Metadata

Every document has structural attributes—or metadata—attached to it. Document attributes can include information such as document title, document author, time created, time updated, and document type.

When you connect Amazon Q Business to a data source, it automatically maps specific data source document attributes to fields within an Amazon Q Business index. If a document attribute in your data source doesn’t have an attribute mapping already available, or if you want to map additional document attributes to index fields, use the custom field mappings to specify how a data source attribute maps to an Amazon Q Business index field. You create field mappings by editing your data source after your application and retriever are created.

To learn more about the supported entities and the associated reserved and custom attributes for the Amazon Q Confluence connector, refer to Amazon Q Business Confluence (Cloud) data source connector field mappings.

Authentication types

An Amazon Q Business application requires you to use AWS IAM Identity Center to manage user access. Although it’s recommended to have an IAM Identity Center instance configured (with users federated and groups added) before you start, you can also choose to create and configure an IAM Identity Center instance for your Amazon Q Business application using the Amazon Q console.

You can also add users to your IAM Identity Center instance from the Amazon Q Business console, if you aren’t federating identity. When you add a new user, make sure that the user is enabled in your IAM Identity Center instance and they have verified their email ID. They need to complete these steps before they can log in to your Amazon Q Business web experience.

Your identity source in IAM Identity Center defines where your users and groups are managed. After you configure your identity source, you can look up users or groups to grant them single sign-on access to AWS accounts, applications, or both.

You can have only one identity source per organization in AWS Organizations. You can choose one of the following as your identity source:

  • IAM Identity Center directory – When you enable IAM Identity Center for the first time, it’s automatically configured with an IAM Identity Center directory as your default identity source. This is where you create your users and groups, and assign their level of access to your AWS accounts and applications.
  • Active Directory – Choose this option if you want to continue managing users in either your AWS Managed Microsoft AD directory using AWS Directory Service or your self-managed directory in Active Directory (AD).
  • External Identity Provider – Choose this option if you want to manage users in other external identity providers (IdPs) through the Security Assertion Markup Language (SAML) 2.0 standard, such as Okta.

Access control lists

Amazon Q Business connectors index access control list (ACL) information that’s attached to a Confluence document along with the document itself. For document ACLs, Amazon Q Business indexes the following:

  • User email address
  • Group name for the local group
  • Group name for the federated group

When you connect a Confluence (Cloud) data source to Amazon Q Business, the connector crawls ACL (user and group) information attached to a document from your Confluence (Cloud) instance. The information is used to determine which content can be used to construct chat responses for a given user, according the end-user’s document access permissions.

You configure user and group access to Confluence spaces using the space permissions page, in Confluence. Similarly for pages and blogs, you use the restrictions page. For more information about space permissions, see Space Permissions Overview on the Confluence Support website. For more information about page and blog restrictions, see Page Restrictions on the Confluence Support website.

An Amazon Q Business connector updates any changes in ACLs each time that your data source content is crawled. To capture ACL changes to make sure that the right end-users have access to the right content, re-sync your data source regularly.

Identity crawling for Amazon Q Business User Store

As stated earlier, Amazon Q Business crawls ACL information at the document level from supported data sources. In addition, Amazon Q Business crawls and stores principal information within each data source (local user alias, local group, and federated group identity configurations) into the Amazon Q Business User Store. This is useful when your application is connected to multiple data sources with different authorization and authentication systems, but you want to create a unified, access-controlled chat experience for your end-users.

Amazon Q Business internally maps the local user and group IDs attached to the document, to the federated identities of users and groups. Mapping identities streamlines user management and speeds up chat responses by reducing ACL information retrieval time during chat requests. Identity crawling, along with the authorization feature, helps filter and generate web experience content restricted by end-user context. For more information about this process, see Understanding Amazon Q Business User Store.

The group and user IDs are mapped as follows:

  • _group_ids – Group names are present on spaces, pages, and blogs where there are restrictions. They’re mapped from the name of the group in Confluence. Group names are always lowercase.
  • _user_id – Usernames are present on the space, page, or blog where there are restrictions. They’re mapped depending on the type of Confluence instance that you’re using. For Confluence Cloud, the _user_id is the account ID of the user.

Overview of solution

With Amazon Q Business, you can configure multiple data sources to provide a central place to search across your document repository. For our solution, we demonstrate how to index a Confluence repository using the Amazon Q Business connector for Confluence. In this blog we will:

  1. Configure an Amazon Q Business Application.
  2. Connect Confluence (Cloud) to Amazon Q Business.
  3. Index the data in the Confluence repository.
  4. Run a sample query to test the solution.

Prerequisites

Before you begin using Amazon Q Business for the first time, complete the following tasks:

  1. Set up your AWS account.
  2. Optionally, install the AWS Command Line Interface (AWS CLI).
  3. Optionally, set up the AWS SDKs.
  4. Consider AWS Regions and endpoints.
  5. Set up required permissions.
  6. Enable and configure an IAM Identity Center instance.

For more information, see Setting up for Amazon Q Business.

To set up the Amazon Q Business connector for Confluence, you need to complete additional prerequisites. For more information, see Prerequisites for connecting Amazon Q Business to Confluence (Cloud).

Create an Amazon Q Business application with the Confluence Cloud connector

As the first step towards creating a generative AI assistant, you configure an application. Then you select and create a retriever, and also connect any data sources. After this, you grant end-user access to users to interact with an application using the preferred identity provider, IAM Identity Center. Complete the following steps:

  1. On the Amazon Q Business console, choose Get started.
Figure 1: Initial Amazon Q for Business home page

Figure 1: Initial Amazon Q for Business home page

  1. On the Applications page, choose Create application.

Figure 2: Amazon Q for Business application creation page

  1. Enter a name for your application, select the level of service access, and connect to IAM Identity Center. (Note: The IAM Identity Center instance does not have to be in the same Region as Amazon Q Business.)
  2. Choose Create.

Figure 3: Amazon Q for Business application configuration page

For additional details on configuring the Amazon Q application and connecting to IAM Identity Center, refer to Creating an Amazon Q Business application environment.

  1. Select your retriever and index provisioning options.
  2. Choose Next.

Figure 4: Amazon Q for Business retriever selection page

For additional details on creating and selecting a retriever, refer to Creating and selecting a retriever for an Amazon Q Business application.

  1. Connect to Confluence as your data source.
  2. Enter a name and description.
  3. Select Confluence Cloud as the source and enter your Confluence URL.

Figure 5: Confluence connector page

  1. There are two options for Authentication: Basic authentication and OAuth 2.0 authentication. Select the best option depending on your use case.

Figure 6: Confluence connector authentication options

Before you connect Confluence (Cloud) to Amazon Q Business, you need to create and retrieve the Confluence (Cloud) credentials you will use to connect Confluence (Cloud) to Amazon Q Business. You also need to add any permissions needed by Confluence (Cloud) to connect to Amazon Q Business.

The following procedures give you an overview of how to configure Confluence (Cloud) to connect to Amazon Q Business using either basic authentication or OAuth 2.0 authentication.

Configure Confluence (Cloud) basic authentication for Amazon Q Business

Complete the following steps to configure basic authentication:

  1. Log in to your account from Confluence (Cloud). Note the username you logged in with. You will need this later to connect to Amazon Q Business.
  2. From your Confluence (Cloud) home page, note your Confluence (Cloud) URL from your Confluence browser URL. For example, https://example.atlassian.net. You will need this later to connect to Amazon Q Business.
  3. Navigate to the Security page in Confluence (Cloud).
  4. On the API tokens page, choose Create API token.

Figure 7: Confluence API token creation

  1. In the Create an API token dialog box, for Label, add a name for your API token.
  2. Choose Create.

Figure 8: Confluence API token labelling

  1. From the Your new API token dialog box, copy the API token and save it in your preferred text editor. You can’t retrieve the API token after you close the dialog box.

Figure 9: Copying your Confluence API token

  1. Choose Close.

You now have the username, Confluence (Cloud) URL, and Confluence (Cloud) API token you need to connect to Amazon Q Business with basic authentication.

For more information, see Manage API tokens for your Atlassian account in Atlassian Support.

Configure Confluence (Cloud) OAuth 2.0 authentication for Amazon Q Business

Complete the following steps to configure Confluence (Cloud) OAuth 2.0 authentication:

  1. Retrieve the username and Confluence (Cloud) URL.
  2. Configure an OAuth 2.0 app integration.
  3. Retrieve the Confluence (Cloud) client ID and client secret.
  4. Generate a Confluence (Cloud) access token.
  5. Generate a Confluence (Cloud) refresh token.
  6. Generate a new Confluence (Cloud) access token using a refresh token.

Retrieve the username and Confluence (Cloud) URL

Complete the following steps:

  1. Log in to your account from Confluence (Cloud). Note the username you logged in with. You will need this later to connect to Amazon Q Business.
  2. From your Confluence (Cloud) home page, note your Confluence (Cloud) URL from your Confluence browser URL. For example, https://example.atlassian.net. You will need this later to both configure your OAuth 2.0 token and connect to Amazon Q Business.

Configuring an OAuth 2.0 app integration

Complete the following steps:

  1. Log in to your account from the Atlassian Developer page.
  2. Choose the profile icon in the top-right corner and on the dropdown menu, choose Developer console.

    Figure 10: Logging into the Confluence Developer Console

  3. On the welcome page, choose Create and choose OAuth 2.0 integration.

    Figure 11: Creating your Confluence OAuth 2.0 token

  4. Under Create a new OAuth 2.0 (3LO) integration, for Name, enter a name for the OAuth 2.0 application you’re creating. Then, read the Developer Terms, and select I agree to be bound by Atlassian’s developer terms checkbox, if you do.
  5. Select Create.

    Figure 12: Creating your Confluence OAuth 2.0 integration

    The console will display a summary page outlining the details of the OAuth 2.0 app you created.

    Figure 13: Your Confluence application

  6. Still in the Confluence console, in the navigation pane, choose Authorization.
  7. Choose Add to add OAuth 2.0 (3LO) to your app.

    Figure 14: Adding OAuth 2.0 to your Confluence app

  8. Under OAuth 2.0 authorization code grants (3LO) for apps, for Callback URL, enter the Confluence (Cloud) URL you copied, then choose Save changes.

    Figure 15: Adding OAuth 2.0 to your Confluence app (part 2)

  9. Under Authorization URL generator, choose Add APIs to add APIs to your app. This will redirect you to the Permissions page.
  10. On the Permissions page, for Scopes, navigate to User Identity API. Select Add, then select Configure.

    Figure 16: Configuring Permissions for your Confluence app

  11. Under User Identity API, choose Edit Scopes, then add the following read scopes:
    1. read:me – View active user profile.
    2. read:account – View user profiles.

      Figure 17: Configuring Scopes for your Confluence app

  12. Choose Save and return to the Permissions page.
  13. On the Permissions page, for Scopes, navigate to Confluence API. Select Add, and then select Configure.

    Figure 18: Configuring Permissions for your Confluence app (part 2)

  14. Under Confluence API, make sure you’re on the Classic scopes tab.

    Figure 19: Configuring Permissions for your Confluence app (part 3)

  15. Choose Edit Scopes and add the following read scopes:
    1. read:confluence-space.summary – Read Confluence space summary.
    2. read:confluence-props – Read Confluence content properties.
    3. read:confluence-content.all – Read Confluence detailed content.
    4. read:confluence-content.summary – Read Confluence content summary.
    5. read:confluence-content.permission – Read content permission in Confluence.
    6. read:confluence-user – Read user.
    7. read:confluence-groups – Read user groups.
  16. Choose Save.
  17. Navigate to the Granular scopes

    Figure 20: Configuring Permissions for your Confluence app (part 4)

  18. Choose Edit Scopes and add the following read scopes:
    1. read:content:confluence – View detailed contents.
    2. read:content-details:confluence – View content details.
    3. read:space-details:confluence – View space details.
    4. read:audit-log:confluence – View audit records.
    5. read:page:confluence – View pages.
    6. read:attachment:confluence – View and download content attachments.
    7. read:blogpost:confluence – View blog posts.
    8. read:custom-content:confluence – View custom content.
    9. read:comment:confluence – View comments.
    10. read:template:confluence – View content templates.
    11. read:label:confluence – View labels.
    12. read:watcher:confluence – View content watchers.
    13. read:group:confluence – View groups.
    14. read:relation:confluence – View entity relationships.
    15. read:user:confluence – View user details.
    16. read:configuration:confluence – View Confluence settings.
    17. read:space:confluence – View space details.
    18. read:space.permission:confluence – View space permissions.
    19. read:space.property:confluence – View space properties.
    20. read:user.property:confluence – View user properties.
    21. read:space.setting:confluence – View space settings.
    22. read:analytics.content:confluence – View analytics for content.
    23. read:content.permission:confluence – Check content permissions.
    24. read:content.property:confluence – View content properties.
    25. read:content.restriction:confluence – View content restrictions.
    26. read:content.metadata:confluence – View content summaries.
    27. read:inlinetask:confluence – View tasks.
    28. read:task:confluence – View tasks.
    29. read:permission:confluence – View content restrictions and space permissions.
    30. read:whiteboard:confluence – View whiteboards.
    31. read:app-data:confluence – Read app data.

For more information, see Implementing OAuth 2.0 (3LO) and Determining the scopes required for an operation in Atlassian Developer.

Retrieve the Confluence (Cloud) client ID and client secret

Complete the following steps:

  1. In the navigation pane, choose Settings.
  2. In the Authentication details section, copy and save the following in your preferred text editor:
    1. Client ID – You enter this as the app key on the Amazon Q Business console.
    2. Secret – You enter this as the app secret on the Amazon Q Business console.

Figure 21: Retrieving Confluence app authentication details

You need these to generate your Confluence (Cloud) OAuth 2.0 token and also to connect Amazon Q Business to Confluence (Cloud).

For more information, see Implementing OAuth 2.0 (3LO) and Determining the scopes required for an operation in the Atlassian Developer documentation.

Generate a Confluence (Cloud) access token

Complete the following steps:

  1. Log in to your Confluence account from the Atlassian Developer page.
  2. Open the OAuth 2.0 app you want to generate a refresh token for.
  3. In the navigation pane, choose Authorization.
  4. For OAuth 2.0 (3LO), choose Configure.
  5. On the Authorization page, under Authorization URL generator, copy the URL for Granular Confluence API authorization URL and save it in your preferred text editor.

Figure 22: Retrieving Confluence API URL details

The URL is in the following format:

https://auth.atlassian.com/authorize?

audience=api.atlassian.com

&client_id=YOUR_CLIENT_ID

&scope=REQUESTED_SCOPE%20REQUESTED_SCOPE_TWO

&redirect_uri=https://YOUR_APP_CALLBACK_URL

&state=YOUR_USER_BOUND_VALUE

&response_type=code

&prompt=consent
  1. In the saved authorization URL, update the state=${YOUR_USER_BOUND_VALUE} parameter value to any text of your choice. For example, state=sample_text.

For more information, see What is the state parameter used for? in the Atlassian Support documentation.

  1. Open your preferred web browser and enter the authorization URL you copied into the browser URL.
  2. On the page that opens, make sure everything is correct and choose Accept.

Figure 23: Testing a Confluence API URL

You will be returned to your Confluence (Cloud) home page.

  1. Copy the URL of the Confluence (Cloud) home page and save it in your preferred text editor.

The URL contains the authorization code for your application. You will need this code to generate your Confluence (Cloud) access token. The whole section after code= is the authorization code.

  1. Navigate to Postman.

If you don’t have Postman installed on your local system, you can also choose to use cURL to generate a Confluence (Cloud) access token. Use the following cURL command to do so:

curl --location 'https://auth.atlassian.com/oauth/token' 
--header 'Content-Type: application/json' 
--data '{"grant_type": "authorization_code",
"client_id": "YOUR_CLIENT_ID",
"client_secret": "YOUR_CLIENT_SECRET",
"code": "AUTHORIZATION_CODE",
"redirect_uri": "YOUR_CALLBACK_URL"}'
  1. If, however, you have Postman installed, on the main Postman window, choose POST as the method, then enter the following URL: https://auth.atlassian.com/oauth/token.
  2. Choose Body, then choose raw and JSON.

Figure 24: Testing a Confluence access token in Postman

  1. In the text box, enter the following code extract, replacing the fields with your credential values:
{"grant_type": "authorization_code",
"client_id": "YOUR_CLIENT_ID",
"client_secret": "YOUR_CLIENT_SECRET",
"code": "YOUR_AUTHORIZATION_CODE",
"redirect_uri": "https://YOUR_APP_CALLBACK_URL"}
  1. Choose Send.

If everything is configured correctly, Postman will return an access token.

  1. Copy the access token and save it in your preferred text editor. You will need it to connect Confluence (Cloud) to Amazon Q Business.

For more information, see Implementing OAuth 2.0 (3LO) in the Atlassian Developer documentation.

Generate a Confluence (Cloud) refresh token

The access token you use to connect Confluence (Cloud) to Amazon Q Business using OAuth 2.0 authentication expires after 1 hour. When it expires, you can either repeat the whole authorization process and generate a new access token, or generate a refresh token.

Refresh tokens are implemented using a rotating refresh token mechanism. Each time they’re used, rotating refresh tokens issues a new limited-life refresh token that is valid for 90 days. Each new rotating refresh token resets the inactivity expiry time and allocates another 90 days. This mechanism improves on single persistent refresh tokens by reducing the period in which a refresh token can be compromised and used to obtain a valid access token. For additional details, see OAuth 2.0 (3LO) apps in the Atlassian Developer documentation.

To generate a refresh token, you add a %20offline_access parameter to the end of the scope value in the authorization URL you used to generate your access token. Complete the following steps to generate a refresh token:

  1. Log in to your account from the Atlassian Developer page.
  2. Open the OAuth 2.0 app you want to generate a refresh token for.
  3. In the navigation pane, choose Authorization.
  4. For OAuth 2.0 (3LO), choose Configure.
  5. On the Authorization page, under Authorization URL generator, copy the URL for Granular Confluence API authorization URL and save it in your preferred text editor.

Figure 25: Retrieving Confluence API URL details

  1. In the saved authorization URL, update the state=${YOUR_USER_BOUND_VALUE} parameter value to any text of your choice. For example, state=sample_text.

For more information, see What is the state parameter used for? in the Atlassian Support documentation.

  1. Add the following text at the end of the scope value in your authorization URL: %20offline_access and copy it. For example:
https://auth.atlassian.com/authorize?

audience=api.atlassian.com

&client_id=YOUR_CLIENT_ID

&scope=REQUESTED_SCOPE%20REQUESTED_SCOPE_TWO%20offline_access

&redirect_uri=https://YOUR_APP_CALLBACK_URL

&state=YOUR_USER_BOUND_VALUE

&response_type=code

&prompt=consent
  1. Open your preferred web browser and enter the modified authorization URL you copied into the browser URL.
  2. On the page that opens, make sure everything is correct and then choose Accept.

Figure 26: Testing a Confluence API URL

You will be returned to the Confluence (Cloud) console.

  1. Copy the URL of the Confluence (Cloud) home page and save it in a text editor of your choice.

The URL contains the authorization code for your application. You will need this code to generate your Confluence (Cloud) refresh token. The whole section after code= is the authorization code.

  1. Navigate to Postman.

If you don’t have Postman installed on your local system, you can also choose to use cURL to generate a Confluence (Cloud) access token. Use the following cURL command to do so:

curl --location 'https://auth.atlassian.com/oauth/token' 
--header 'Content-Type: application/json' 
--data '{"grant_type": "authorization_code",
"client_id": "YOUR CLIENT ID",
"client_secret": "YOUR CLIENT SECRET",
"code": "AUTHORIZATION CODE",
"redirect_uri": "YOUR CALLBACK URL"}'

  1. If, however, you have Postman installed, on the main Postman window, choose POST as the method, then enter the following URL: https://auth.atlassian.com/oauth/token.
  2. Choose Body on the menu, then choose raw and JSON.

Figure 27: Retrieving a Confluence refresh token in Postman

  1. In the text box, enter the following code extract, replacing the fields with your credential values:
{"grant_type": "authorization_code",
"client_id": "YOUR_CLIENT_ID",
"client_secret": "YOUR_CLIENT_SECRET",
"code": "YOUR_AUTHORIZATION_CODE",
"redirect_uri": "https://YOUR_APP_CALLBACK_URL"}

  1. Choose Send.

If everything is configured correctly, Postman will return a refresh token.

  1. Copy the refresh token and save it using your preferred text editor. You will need it to connect Confluence (Cloud) to Amazon Q Business.

For more information, see Implementing a Refresh Token Flow in the Atlassian Developer documentation.

Generate a new Confluence (Cloud) access token using a refresh token

You can use the refresh token you generated to create a new access token and refresh token pair when an existing access token expires. Complete the following steps to generate a refresh token:

  1. Copy the refresh token you generated following the steps in the previous section.
  2. Navigate to Postman.

If you don’t have Postman installed on your local system, you can also choose to use cURL to generate a Confluence (Cloud) access token. Use the following cURL command to do so:

curl --location 'https://auth.atlassian.com/oauth/token' 
--header 'Content-Type: application/json' 
--data '{"grant_type": "refresh_token",
"client_id": "YOUR_CLIENT_ID",
"client_secret": "YOUR_CLIENT_SECRET",
"refresh_token": "YOUR_REFRESH_TOKEN"}'

  1. In the Postman main window, choose POST as the method, then enter the following URL: https://auth.atlassian.com/oauth/token.
  2. Choose Body from the menu and choose raw and JSON.

Figure 28: Using a Confluence refresh token in Postman

  1. In the text box, enter the following code extract, replacing the fields with your credential values:
{"grant_type": "refresh_token",
"client_id": "YOUR_CLIENT_ID",
"client_secret": "YOUR_CLIENT_SECRET",
"refresh_token": "YOUR REFRESH TOKEN"}

  1. Choose Send.

If everything is configured correctly, Postman will return a new access token and refresh token pair in the following format:

{"access_token": "string,
"expires_in": "expiry time of access_token in seconds",
"scope": "string",
"refresh_token": "string"}

For more information, see Implementing a Refresh Token Flow and How do I get a new access token, if my access token expires or is revoked? in the Atlassian Developer documentation.

Continue creating your application

Complete the following steps to continue creating your application:

  1. For AWS Secrets Manager secret, choose an existing secret or create an AWS Secrets Manager secret to store your Confluence authentication credentials. If you choose to create a secret, an AWS Secrets Manager window opens. Enter the following information in the window:
    1. For Secret name, enter a name for your secret.
    2. Enter the information you generated earlier:
      1. If using Basic Authentication, enter your Secret name, User name, and Password (Confluence API Token) that you generated and downloaded from your Confluence account.
      2. If using OAuth2.0 Authentication, enter the Secret name, App key, App secret, Access token, and Refresh token that you created in your Confluence account.
    3. Choose Save and add secret.For additional details on creating a Secrets Manager secret, refer to Create an AWS Secrets Manager secret.
  2. Choose the secret you created to use for your Confluence connector.

    Figure 29: Selecting a secret in Secrets Manager

  3. Under Configure VPC and security group, you can choose whether you want to use a VPC (Optional). If you do (which we recommend), enter the following information:
    1. For Subnets, enter up to 6 repository subnets that define the subnets and IP ranges the repository instance uses in the selected VPC.
    2. For VPC security groups, Choose up to 10 security groups that allow access to your data source.For more information, see Virtual private cloud.

      Figure 30: Configuring VPC and Security Group in Amazon Q Business

  4. Under Identity crawler, confirm that crawling is enabled.Amazon Q Business crawls identity information from your data source by default to make sure the responses from your connected data sources are generated only from documents end-users have access to. For more information, see Identity crawler.By default, an Amazon Q Business application is configured to respond to end user chat queries using only enterprise data. If you would like Amazon Q Business to use the underlying LLM knowledge to generate responses when it can’t find the information from your connected data sources, you can enable this in the Response settings under your application guardrails.
  5. Under IAM role, choose an existing AWS Identity and Access Management (IAM) role or create an IAM role to access your repository credentials and index content.Creating a new service role is recommended. For more information, see IAM role for Amazon Q Confluence (Cloud) connector.

    Figure 31: Configuring IAM role in Amazon Q Business

  6. Under Sync scope, choose from the following options:
    1. For Sync contents, you can choose to sync from the following entity types: pages, page comments, page attachments, blogs, blog comments, blog attachments, personal spaces, archived spaces, and archived pages.
    2. For Maximum single file size, specify the file size limit in megabytes that Amazon Q Business will crawl. Amazon Q Business will crawl only the files within the size limit you define. The file size should be greater than 0 MB and less than or equal to 50 MB.
  7. Under Additional configuration, for Space and regex patterns, specify whether to include or exclude specific spaces in your index with the following settings:
    1. Space key – For example, my-space-123.
    2. URL – For example, .*/MySite/MyDocuments/.
    3. File type – For example, .*.pdf, .*.txt.
    4. For Entity title regex patterns, specify regular expression patterns to include or exclude certain blogs, pages, comments, and attachments by titles.

      Figure 32: Configuring scopes and regexes in Amazon Q Business

  8. Under Sync mode, choose how you want to update your index when your data source content changes. When you sync your data source with Amazon Q Business for the first time, all content is synced by default. You have the following options:
    1. Full sync – Sync all content regardless of the previous sync status.
    2. New, modified, or deleted content sync – Sync only new, modified, and deleted documents.
  9. Under Sync run schedule, for Frequency, choose how often Amazon Q Business will sync with your data source. For more details, see Sync run schedule.
  10. Under Tags, you can optionally add tags to search and filter your resources or track your AWS costs. See Tagging resources for more details.

    Figure 33: Configuring sync mode, sync frequency, and tagging

  11. Under Field mappings, select the data source document attributes to map to your index fields. Add the fields from the Data source details page after you finish adding your data source. You can choose from two types of fields:
    1. Default – Automatically created by Amazon Q Business on your behalf based on common fields in your data source. You can’t edit these.
    2. Custom – Automatically created by Amazon Q Business on your behalf based on common fields in your data source. You can edit these. You can also create and add new custom fields.For more information, see Field mappings.
  12. To finish connecting your data source to Amazon Q, choose Add data source.

    Figure 34: Mapping Confluence fields in Amazon Q Business

  13. After the Confluence connector is created, you’re redirected to the Connect data sources page, where you can add additional data sources if needed.
  14. Choose Next to continue.
  15. Under Add or assign users and groups, you can to assign users or groups from IAM Identity Center. If you have the appropriate permissions, you have the ability to add new users. Select the appropriate option for you.
  16. Choose Next.

    Figure 35: Assigning users/ groups and Web experience service access in Amazon Q Business

  17. Under Assign users and groups, you can choose the users or groups you want to add to your Amazon Q Business application. (In order for a user to get an answer from Amazon Q Business, the user IDs added in IAM Identity Center need to match the user IDs in Confluence.)
  18. In Web experience service access, enter the following information:
    1. For Choose a method to authorize Amazon Q Business – A service access role assumed by end users when they sign in to your web experience that grants them permission to start and manage conversations in Amazon Q Business. You can choose to use an existing role or create a new role.
    2. Service role name – A name for the service role you created for easy identification on the console.
  19. Select Create application.
  20. Once the application is created, navigate to the Data source details section, choose Sync now to allow Amazon Q Business to begin syncing (crawling and ingesting) data from your data source.

When the sync job is complete, your data source is ready to use.

The time the sync will take depends on the size of your Confluence environment. Check back periodically to see if the sync has finished.

Run a sample query to test the solution

When the sync on your data source is complete, you can deploy the web experience to test the solution. For additional details for setting up the Amazon Q Business web experience, see Customizing an Amazon Q Business web experience.

Figure 37: Amazon Q Business web experience URLs

After you’re signed in to the web experience, try out a question based on information in your Confluence Cloud. The following screenshots show some examples.

Figure 38: Sample Amazon Q Business web experience prompt and completion

Figure 39: Sample Amazon Q Business web experience prompt and completion (part 2)

Figure 40: Sample Amazon Q Business web experience prompt and completion (part 3)

Amazon Q Business generates a response, as well as the citations to where the information came from. You can click the links in the citation to go directly to the source page.

Troubleshooting and FAQs

For information on troubleshooting your connector, see Troubleshooting your Amazon Q Business Confluence (Cloud) connector.

Refer to Amazon Q Business FAQs for frequently asked questions.

Clean up

If you no longer need your Amazon Q Business application, make sure to delete it to avoid unwanted costs. When you delete your application, it will remove the associated index and data connectors.

Figure 41: Deleting Amazon Q Business confluence connector

Conclusion

In this post, we provided an overview of Amazon Q Business Confluence Cloud connector and how you can use it for seamless integration of generative AI assistance to your Confluence Cloud. By using a single interface for the variety of data sources in the organization, you can enable employees to be more data-driven, efficient, prepared, and productive.

To learn more about Amazon Q Business connector for Confluence Cloud, refer to Connecting Confluence (Cloud) to Amazon Q Business.


About the Authors

Tyler Geary is a Solutions Architect at Amazon Web Services (AWS), where he is a member of the Enterprise Financial Services team, focusing on Insurance customers. He helps his customers identify business challenges and opportunities, tying them back to innovative solutions powered by AWS, with a particular focus on Generative AI. In his free time, Tyler enjoys hiking, camping, and spending time in the great outdoors.

Sumeet Tripathi is an Enterprise Support Lead (TAM) at AWS in North Carolina. He has over 17 years of experience in technology across various roles. He is passionate about helping customers to reduce operational challenges and friction. His focus area is AI/ML and Energy & Utilities Segment. Outside work, He enjoys traveling with family, watching cricket and movies.

Vishal Naik is a Sr. Solutions Architect at Amazon Web Services (AWS). He is a builder who enjoys helping customers accomplish their business needs and solve complex challenges with AWS solutions and best practices. His core area of focus includes Generative AI and Machine Learning. In his spare time, Vishal loves making short films on time travel and alternate universe themes.

Read More

Snowflake Arctic models are now available in Amazon SageMaker JumpStart

Snowflake Arctic models are now available in Amazon SageMaker JumpStart

This post is co-written with Matt Marzillo from Snowflake.

Today, we are excited to announce that the Snowflake Arctic Instruct model is available through Amazon SageMaker JumpStart to deploy and run inference. Snowflake Arctic is a family of enterprise-grade large language models (LLMs) built by Snowflake to cater to the needs of enterprise users, exhibiting exceptional capabilities (as shown in the following benchmarks) in SQL querying, coding, and accurately following instructions. SageMaker JumpStart is a machine learning (ML) hub that provides access to algorithms, models, and ML solutions so you can quickly get started with ML.

In this post, we walk through how to discover and deploy the Snowflake Arctic Instruct model using SageMaker JumpStart, and provide example use cases with specific prompts.

What is Snowflake Arctic

Snowflake Arctic is an enterprise-focused LLM that delivers top-tier enterprise intelligence among open LLMs with highly competitive cost-efficiency. Snowflake is able to achieve high enterprise intelligence through a Dense Mixture of Experts (MoE) hybrid transformer architecture and efficient training techniques. With the hybrid transformer architecture, Artic is designed with a 10-billion dense transformer model combined with a residual 128×3.66B MoE MLP resulting in a total of 480 billion parameters spread across 128 fine-grained experts and uses top-2 gating to choose 17 billion active parameters. This enables Snowflake Arctic to have enlarged capacity for enterprise intelligence due to the large number of total parameters and simultaneously be more resource-efficient for training and inference by engaging the moderate number of active parameters.

Snowflake Arctic is trained with a three-stage data curriculum with different data composition focusing on generic skills in the first phase (1 trillion tokens, the majority from web data), and enterprise-focused skills in the next two phases (1.5 trillion and 1 trillion tokens, respectively, with more code, SQL, and STEM data). This helps the Snowflake Arctic model set a new baseline of enterprise intelligence while being cost-effective.

In addition to the cost-effective training, Snowflake Arctic also comes with a number of innovations and optimizations to run inference efficiently. At small batch sizes, inference is memory bandwidth bound, and Snowflake Arctic can have up to four times fewer memory reads compared to other openly available models, leading to faster inference performance. At very large batch sizes, inference switches to being compute bound and Snowflake Arctic incurs up to four times fewer compute compared to other openly available models. Snowflake Arctic models are available under an Apache 2.0 license, which provides ungated access to weights and code. All the data recipes and research insights will also be made available for customers.

What is SageMaker JumpStart

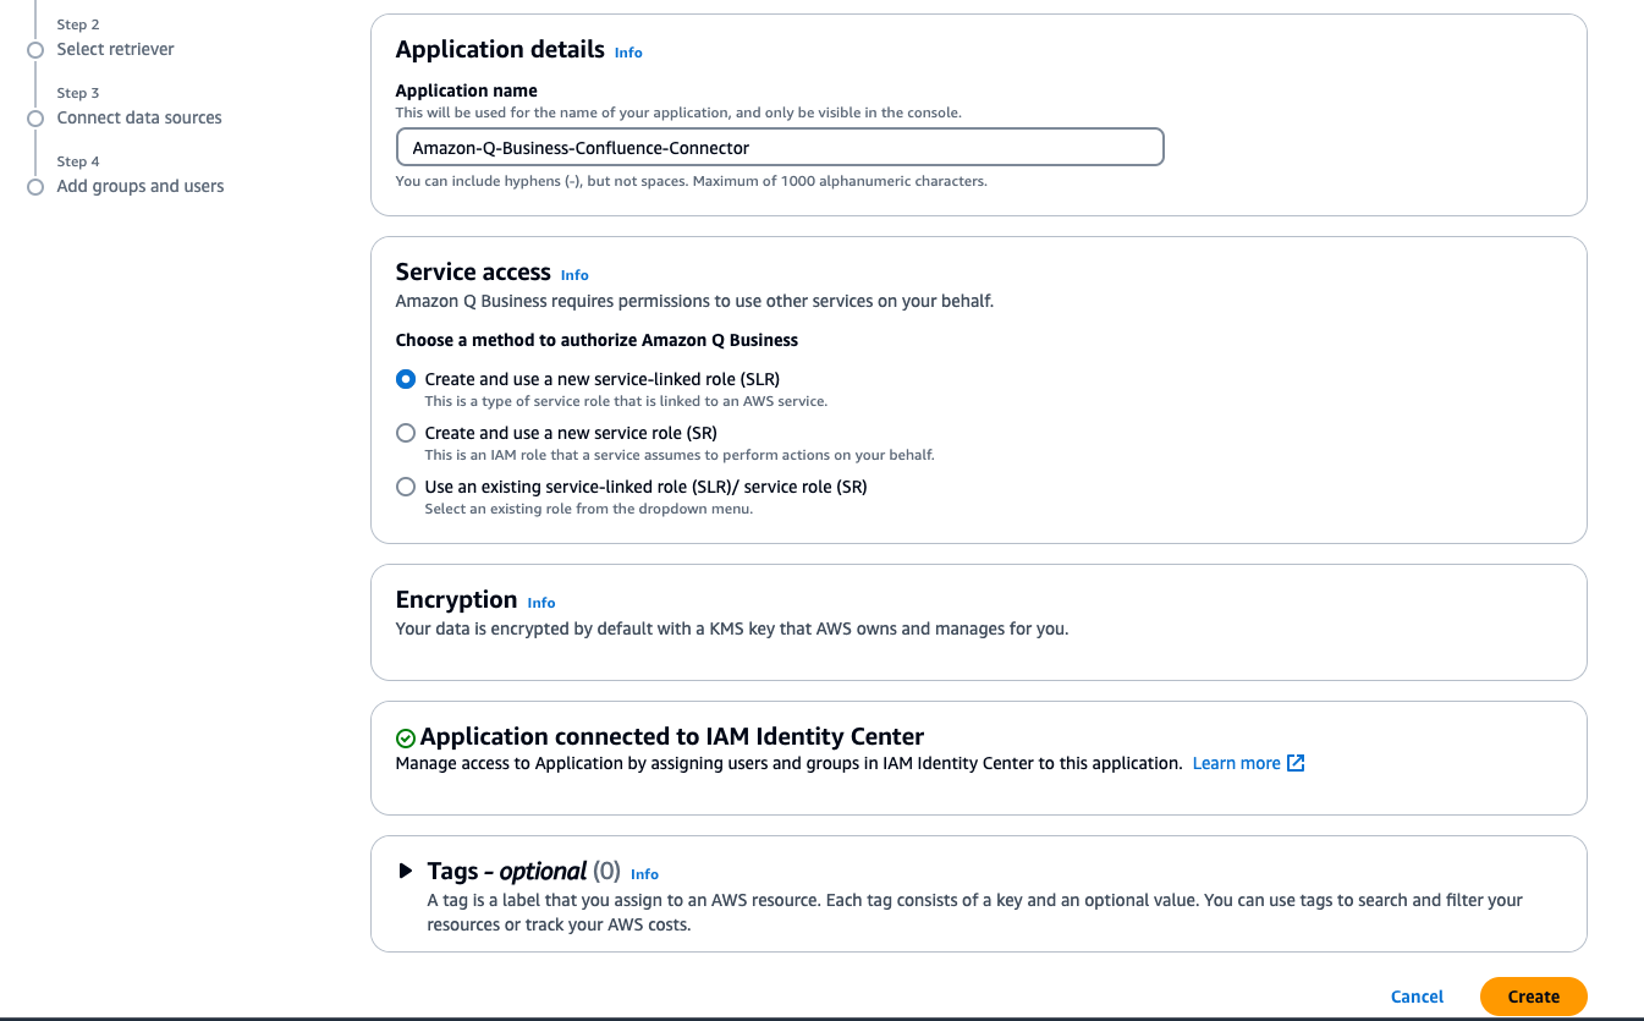
With SageMaker JumpStart, you can choose from a broad selection of publicly available foundation models (FM). ML practitioners can deploy FMs to dedicated Amazon SageMaker instances from a network isolated environment and customize models using SageMaker for model training and deployment. You can now discover and deploy Arctic Instruct model with a few clicks in Amazon SageMaker Studio or programmatically through the SageMaker Python SDK, enabling you to derive model performance and machine learning operations (MLOps) controls with SageMaker features such as Amazon SageMaker Pipelines, Amazon SageMaker Debugger, or container logs. The model is deployed in an AWS secure environment and under your virtual private cloud (VPC) controls, helping provide data security. Snowflake Arctic Instruct model is available today for deployment and inference in SageMaker Studio in the us-east-2 AWS Region, with planned future availability in additional Regions.
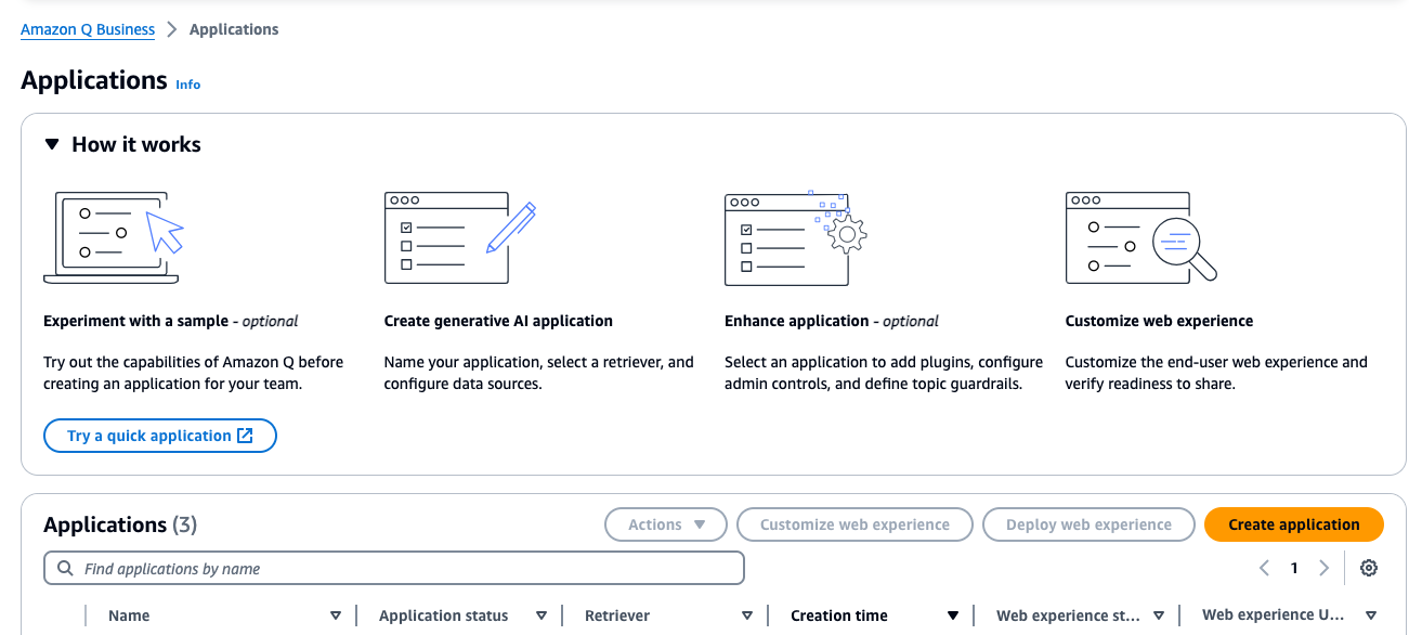
Discover models

You can access the FMs through SageMaker JumpStart in the SageMaker Studio UI and the SageMaker Python SDK. In this section, we go over how to discover the models in SageMaker Studio.

SageMaker Studio is an integrated development environment (IDE) that provides a single web-based visual interface where you can access purpose-built tools to perform all ML development steps, from preparing data to building, training, and deploying your ML models. For more details on how to get started and set up SageMaker Studio, refer to Amazon SageMaker Studio.

In SageMaker Studio, you can access SageMaker JumpStart, which contains pre-trained models, notebooks, and prebuilt solutions, under Prebuilt and automated solutions.

SageMaker Studio Landing page

From the SageMaker JumpStart landing page, you can discover various models by browsing through different hubs, which are named after model providers. You can find Snowflake Arctic Instruct model in the Hugging Face hub. If you don’t see the Arctic Instruct model, update your SageMaker Studio version by shutting down and restarting. For more information, refer to Shut down and Update Studio Classic Apps.

SageMaker Jumpstart Model hub Landing page

You can also find Snowflake Arctic Instruct model by searching for “Snowflake” in the search field.

Snowflake search results

You can choose the model card to view details about the model such as license, data used to train, and how to use the model. You will also find two options to deploy the model, Deploy and Preview notebooks, which will deploy the model and create an endpoint.

Snowflake Arctic Model Card SageMaker JumpStart

Deploy the model in SageMaker Studio

When you choose Deploy in SageMaker Studio, deployment will start.

Model Endpoint Deployment

You can monitor the progress of the deployment on the endpoint details page that you’re redirected to.

Deployed Endpoint

Deploy the model through a notebook

Alternatively, you can choose Open notebook to deploy the model through the example notebook. The example notebook provides end-to-end guidance on how to deploy the model for inference and clean up resources.

To deploy using the notebook, you start by selecting an appropriate model, specified by the model_id. You can deploy any of the selected models on SageMaker with the following code:

from sagemaker.jumpstart.model import JumpStartModel
model = JumpStartModel(model_id = "huggingface-llm-snowflake-arctic-instruct-vllm")

predictor = model.deploy()

This deploys the model on SageMaker with default configurations, including the default instance type and default VPC configurations. You can change these configurations by specifying non-default values in JumpStartModel. To learn more, refer to API documentation.

Run inference

After you deploy the model, you can run inference against the deployed endpoint through the SageMaker predictor API. Snowflake Arctic Instruct accepts history of chats between user and assistant and generates subsequent chats.

predictor.predict(payload)

Inference parameters control the text generation process at the endpoint. The max new tokens parameter controls the size of the output generated by the model. This may not be the same as the number of words because the vocabulary of the model is not the same as the English language vocabulary. The temperature parameter controls the randomness in the output. Higher temperature results in more creative and hallucinated outputs. All the inference parameters are optional.

The model accepts formatted instructions where conversation roles must start with a prompt from the user and alternate between user instructions and the assistant. The instruction format must be strictly respected, otherwise the model will generate suboptimal outputs. The template to build a prompt for the model is defined as follows:

<|im_start|>system
{system_message} <|im_end|>
<|im_start|>user
{human_message} <|im_end|>
<|im_start|>assistantn

<|im_start|> and <|im_end|> are special tokens for beginning of string (BOS) and end of string (EOS). The model can contain multiple conversation turns between system, user, and assistant, allowing for the incorporation of few-shot examples to enhance the model’s responses.

The following code shows how you can format the prompt in instruction format:

<|im_start|>usern5x + 35 = 7x -60 + 10. Solve for x<|im_end|>n<|im_start|>assistantn

from typing import Dict, List

def format_instructions(instructions: List[Dict[str, str]]) -> List[str]:
    """Format instructions where conversation roles must alternate system/user/assistant/user/assistant/..."""
    prompt: List[str] = []
    for instruction in instructions:
        if instruction["role"] == "system":
            prompt.extend(["<|im_start|>systemn", (instruction["content"]).strip(), "<|im_end|>n"])
        elif instruction["role"] == "user":
            prompt.extend(["<|im_start|>usern", (instruction["content"]).strip(), "<|im_end|>n"])
        else:
            raise ValueError(f"Invalid role: {instruction['role']}. Role must be either 'user' or 'system'.")
    prompt.extend(["<|im_start|>assistantn"])
    return "".join(prompt)

def print_instructions(prompt: str, response: str) -> None:
    bold, unbold = '33[1m', '33[0m'
    print(f"{bold}> Input{unbold}n{prompt}nn{bold}> Output{unbold}n{response[0]['generated_text'].strip()}n")

In the following sections, we provide example prompts for different enterprise-focused use cases.

Long text summarization

You can use Snowflake Arctic Instruct for custom tasks like summarizing long-form text into JSON-formatted output. Through text generation, you can perform a variety of tasks, such as text summarization, language translation, code generation, sentiment analysis, and more. The input payload to the endpoint looks like the following code:

payload = {
“inputs”: str,
(optional)"parameters":{"max_new_tokens":int, "top_p":float, "temperature":float}
}

The following is an example of a prompt and the text generated by the model. All outputs are generated with inference parameters {"max_new_tokens":512, "top_p":0.95, "temperature":0.7, "top_k":50}.

The input is as follows:

instructions = [
{
"role": "user",
"content": """Summarize this transcript in less than 200 words.
Put the product name, defect and summary in JSON format.

Transcript:

Customer: Hello

Agent: Hi there, I hope you're having a great day! To better assist you, could you please provide your first and last name and the company you are calling from?

Customer: Sure, my name is Jessica Turner and I'm calling from Mountain Ski Adventures.

Agent: Thanks, Jessica. What can I help you with today?

Customer: Well, we recently ordered a batch of XtremeX helmets, and upon inspection, we noticed that the buckles on several helmets are broken and won't secure the helmet properly.

Agent: I apologize for the inconvenience this has caused you. To confirm, is your order number 68910?

Customer: Yes, that's correct.

Agent: Thank you for confirming. I'm going to look into this issue and see what we can do to correct it. Would you prefer a refund or a replacement for the damaged helmets?

Customer: A replacement would be ideal, as we still need the helmets for our customers.

Agent: I understand. I will start the process to send out replacements for the damaged helmets as soon as possible. Can you please specify the quantity of helmets with broken buckles?

Customer: There are ten helmets with broken buckles in total.

Agent: Thank you for providing me with the quantity. We will expedite a new shipment of ten XtremeX helmets with functioning buckles to your location. You should expect them to arrive within 3-5 business days.

Customer: Thank you for your assistance, I appreciate it.

Agent: You're welcome, Jessica! If you have any other questions or concerns, please don't hesitate to contact us. Have a great day!
"""
}
]

prompt = format_instructions(instructions)
inputs = {
"inputs": prompt,
"parameters": {
"temperature": 0.1,
"top_p": 0.95,
"max_new_tokens": 512,
"do_sample": False
}
}
response = predictor.predict(inputs)
print_instructions(prompt, response)

We get the following output:

> Output
{
"product_name": "XtremeX helmets",
"defect": "broken buckles",
"summary": "Customer reports that several XtremeX helmets have broken buckles that won't secure the helmet properly. They prefer a replacement as they still need the helmets for their customers. Agent confirms the order number and will send out replacements for the damaged helmets within 3-5 business days."
}

Code generation

Using the preceding example, we can use code generation prompts as follows:

instructions = [
{
"role": "user",
"content": "Write a function in Python to write a json file:"
}
]
prompt = format_instructions(instructions)
inputs = {
"inputs": prompt,
"parameters": {
"temperature": 0.1,
"top_p": 0.95,
"max_new_tokens": 400,
"do_sample": False
}
}
response = predictor.predict(inputs)
print_instructions(prompt, response)

The preceding code uses Snowflake Arctic Instruct to generate a Python function that writes a JSON file. It defines a payload dictionary with the input prompt “Write a function in Python to write a json file:” and some parameters to control the generation process, like the maximum number of tokens to generate and whether to enable sampling. It sends this payload to a predictor (likely an API), receives the generated text response, and prints it to the console. The printed output should be the Python function for writing a JSON file, as requested in the prompt.

The following is the output:

> Input
<|im_start|>user
Write a function in Python to write a json file:<|im_end|>
<|im_start|>assistant

> Output
Here is a simple function in Python that writes a Python dictionary to a JSON file:

```python
import json

def write_json(data, filename):
with open(filename, 'w') as f:
json.dump(data, f)
```

You can use this function to write a Python dictionary to a file like this:

```python
data = {
"name": "John",
"age": 30,
"city": "New York"
}

write_json(data, 'output.json')
```

This will create a file named `output.json` in the same directory as your Python script, and write the `data` dictionary to that file in JSON format.

The output from the code generation defines the write_json that takes the file name and a Python object and writes the object as JSON data. The output shows the expected JSON file content, illustrating the model’s natural language processing and code generation capabilities.

Mathematics and reasoning

Snowflake Arctic Instruct also report strength in mathematical reasoning. Let’s use the following prompt to test it:

instructions = [
{
"role": "user",
"content": "I bought an ice cream for 6 kids. Each cone was $1.25 and I paid with a $10 bill. How many dollars did I get back? Explain first before answering."
}
]
prompt = format_instructions(instructions)
inputs = {
"inputs": prompt,
"parameters": {
"temperature": 0.6,
"top_p": 0.9,
"max_new_tokens": 200,
"do_sample": False
}
}
response = predictor.predict(inputs)
print_instructions(prompt, response)

The following is the output:

> Input
<|im_start|>user
I bought an ice cream for 6 kids. Each cone was $1.25 and I paid with a $10 bill. How many dollars did I get back? Explain first before answering.<|im_end|>
<|im_start|>assistant

> Output
To solve this problem, we first need to calculate the total cost of the ice cream cones and then subtract that amount from the $10 bill to find out how much change was received.

Step 1: Calculate the total cost of the ice cream cones
There are 6 kids, and each cone costs $1.25. So, the total cost is:
6 kids * $1.25/cone = $7.50

Step 2: Calculate the change received
You paid with a $10 bill, so to find out how much change you got back, subtract the total cost from the $10 bill:
$10 - $7.50 = $2.50

So, you received $2.50 in change.

The preceding code shows Snowflake Arctic’s capability to comprehend natural language prompts involving mathematical reasoning, break them down into logical steps, and generate human-like explanations and solutions.

SQL generation

Snowflake Arctic Instruct model is also adept in generating SQL queries based on natural language prompting and their enterprise intelligent training. We test that capability with the following prompt:

question = "Show the average price by cut and sort the results by average price in descending order"
context = """
Here is the table name <tableName> ML_HOL_DB.ML_HOL_SCHEMA.DIAMONDS </tableName>

<tableDescription> This table has data on diamond sales from our favorite diamond dealer. </tableDescription>

Here are the columns of the ML_HOL_DB.ML_HOL_SCHEMA.DIAMONDS

<columns>nn CARAT, CUT, COLOR, CLARITY, DEPTH, TABLE_PCT, PRICE, X, Y, Z nn</columns>
"""
instructions = [
{
"role": "user",
"content": """You will be acting as an AI Snowflake SQL Expert named Snowflake Cortex Assistant.
Your goal is to give correct, executable sql query to users.
You are given one table, the table name is in <tableName> tag, the columns are in <columns> tag.
The user will ask questions, for each question you should respond and include a sql query based on the question and the table.

{context}

Here are 7 critical rules for the interaction you must abide:
<rules>
1. You MUST MUST wrap the generated sql code within ``` sql code markdown in this format e.g
```sql
(select 1) union (select 2)
```
2. If I don't tell you to find a limited set of results in the sql query or question, you MUST limit the number of responses to 10.
3. Text / string where clauses must be fuzzy match e.g ilike %keyword%
4. Make sure to generate a single snowflake sql code, not multiple.
5. YOU SHOULD USE ONLY THE COLUMN NAMES IN <COLUMNS>, AND THE TABLE GIVEN IN <TABLENAME>.
6. DO NOT put numerical at the very front of sql variable.
7. BE CONCISE. DO NOT SHOW ANY TEXT AFTER THE SQL QUERY! ONLY SHOW THE SQL QUERY AND NOTHING ELSE!
</rules>

Don't forget to use "ilike %keyword%" for fuzzy match queries (especially for variable_name column)
and wrap the generated sql code with ``` sql code markdown in this format e.g:
```sql
(select 1) union (select 2)
```

For each question from the user, make sure to include a SQL QUERY in your response.

Question: {question}

Answer: the most important piece of information is the SQL QUERY. BE CONCISE AND JUST SHOW THE SQL QUERY. DO NOT SHOW ANY TEXT AFTER THE SQL QUERY!')) as response
""".format(context=context, question=question)
}
]

prompt = format_instructions(instructions)
inputs = {
"inputs": prompt,
"parameters": {
"temperature": 0.1,
"top_p": 0.95,
"max_new_tokens": 512,
"do_sample": False
}
}
response = predictor.predict(inputs)
print_instructions(prompt, response)

The following is the output:

> Output
SELECT CUT, AVG(PRICE) as AVG_PRICE FROM ML_HOL_DB.ML_HOL_SCHEMA.DIAMONDS 
GROUP BY CUT ORDER BY AVG_PRICE DESC LIMIT 10;

The output shows that Snowflake Arctic Instruct inferred the specific fields of interest in the tables and provided a slightly more complex query that involves joining two tables to get the desired result.

Clean up

After you’re done running the notebook, delete all resources that you created in the process so your billing is stopped. Use the following code:

predictor.delete_model()
predictor.delete_endpoint()

When deploying the endpoint from the SageMaker Studio console, you can delete it by choosing Delete on the endpoint details page.

Delete Endpoint

Conclusion

In this post, we showed you how to get started with Snowflake Arctic Instruct model in SageMaker Studio, and provided example prompts for multiple enterprise use cases. Because FMs are pre-trained, they can also help lower training and infrastructure costs and enable customization for your use case. Check out SageMaker JumpStart in SageMaker Studio now to get started. To learn more, refer to the following resources:


About the Authors

Natarajan Chennimalai Kumar – Principal Solutions Architect, 3P Model Providers, AWS
Pavan Kumar Rao Navule – Solutions Architect, AWS
Nidhi Gupta – Sr Partner Solutions Architect, AWS
Bosco Albuquerque – Sr Partner Solutions Architect, AWS
Matt Marzillo – Sr Partner Engineer, Snowflake
Nithin Vijeaswaran – Solutions Architect, AWS
Armando Diaz – Solutions Architect, AWS
Supriya Puragundla – Sr Solutions Architect, AWS
Jin Tan Ruan – Prototyping Developer, AWS

Read More

Fine tune a generative AI application for Amazon Bedrock using Amazon SageMaker Pipeline decorators

Fine tune a generative AI application for Amazon Bedrock using Amazon SageMaker Pipeline decorators

Building a deployment pipeline for generative artificial intelligence (AI) applications at scale is a formidable challenge because of the complexities and unique requirements of these systems. Generative AI models are constantly evolving, with new versions and updates released frequently. This makes managing and deploying these updates across a large-scale deployment pipeline while providing consistency and minimizing downtime a significant undertaking. Generative AI applications require continuous ingestion, preprocessing, and formatting of vast amounts of data from various sources. Constructing robust data pipelines that can handle this workload reliably and efficiently at scale is a considerable challenge. Monitoring the performance, bias, and ethical implications of generative AI models in production environments is a crucial task.

Achieving this at scale necessitates significant investments in resources, expertise, and cross-functional collaboration between multiple personas such as data scientists or machine learning (ML) developers who focus on developing ML models and machine learning operations (MLOps) engineers who focus on the unique aspects of AI/ML projects and help improve delivery time, reduce defects, and make data science more productive. In this post, we show you how to convert Python code that fine-tunes a generative AI model in Amazon Bedrock from local files to a reusable workflow using Amazon SageMaker Pipelines decorators. You can use Amazon SageMaker Model Building Pipelines to collaborate between multiple AI/ML teams.

SageMaker Pipelines

You can use SageMaker Pipelines to define and orchestrate the various steps involved in the ML lifecycle, such as data preprocessing, model training, evaluation, and deployment. This streamlines the process and provides consistency across different stages of the pipeline. SageMaker Pipelines can handle model versioning and lineage tracking. It automatically keeps track of model artifacts, hyperparameters, and metadata, helping you to reproduce and audit model versions.

The SageMaker Pipelines decorator feature helps convert local ML code written as a Python program into one or more pipeline steps. Because Amazon Bedrock can be accessed as an API, developers who don’t know Amazon SageMaker can implement an Amazon Bedrock application or fine-tune Amazon Bedrock by writing a regular Python program.

You can write your ML function as you would for any ML project. After being tested locally or as a training job, a data scientist or practitioner who is an expert on SageMaker can convert the function to a SageMaker pipeline step by adding a @step decorator.

Solution overview

SageMaker Model Building Pipelines is a tool for building ML pipelines that takes advantage of direct SageMaker integration. Because of this integration, you can create a pipeline for orchestration using a tool that handles much of the step creation and management for you.

As you move from pilot and test phases to deploying generative AI models at scale, you will need to apply DevOps practices to ML workloads. SageMaker Pipelines is integrated with SageMaker, so you don’t need to interact with any other AWS services. You also don’t need to manage any resources because SageMaker Pipelines is a fully managed service, which means that it creates and manages resources for you. Amazon SageMaker Studio offers an environment to manage the end-to-end SageMaker Pipelines experience. The solution in this post shows how you can take Python code that was written to preprocess, fine-tune, and test a large language model (LLM) using Amazon Bedrock APIs and convert it into a SageMaker pipeline to improve ML operational efficiency.

The solution has three main steps:

  1. Write Python code to preprocess, train, and test an LLM in Amazon Bedrock.
  2. Add @step decorated functions to convert the Python code to a SageMaker pipeline.
  3. Create and run the SageMaker pipeline.

The following diagram illustrates the solution workflow.

Prerequisites

If you just want to view the notebook code, you can view the notebook on GitHub.

If you’re new to AWS, you first need to create and set up an AWS account. Then you will set up SageMaker Studio in your AWS account. Create a JupyterLab space within SageMaker Studio to run the JupyterLab application.

When you’re in the SageMaker Studio JupyterLab space, complete the following steps:

  1. On the File menu, choose New and Terminal to open a new terminal.
  2. In the terminal, enter the following code:
    git clone https://github.com/aws/amazon-sagemaker-examples.git

  3. You will see the folder caller amazon-sagemaker-examples in the SageMaker Studio File Explorer pane.
  4. Open the folder amazon-sagemaker-examples/sagemaker-pipelines/step-decorator/bedrock-examples.
  5. Open the notebook fine_tune_bedrock_step_decorator.ipynb.

This notebook contains all the code for this post, and you can run it from beginning to end.

Explanation of the notebook code

The notebook uses the default Amazon Simple Storage Service (Amazon S3) bucket for the user. The default S3 bucket follows the naming pattern s3://sagemaker-{Region}-{your-account-id}. If it doesn’t already exist, it will be automatically created.

It uses the SageMaker Studio default AWS Identity and Access Management (IAM) role for the user. If your SageMaker Studio user role doesn’t have administrator access, you need to add the necessary permissions to the role.

For more information, refer to the following:

It creates a SageMaker session and gets the default S3 bucket and IAM role:

sagemaker_session = sagemaker.session.Session()
region = sagemaker_session.boto_region_name

bucket_name = sagemaker_session.default_bucket()
role_arn = sagemaker.get_execution_role() 
...

Use Python to preprocess, train, and test an LLM in Amazon Bedrock

To begin, we need to download data and prepare an LLM in Amazon Bedrock. We use Python to do this.

Load data

We use the CNN/DailyMail dataset from Hugging Face to fine-tune the model. The CNN/DailyMail dataset is an English-language dataset containing over 300,000 unique news articles as written by journalists at CNN and the Daily Mail. The raw dataset includes the articles and their summaries for training, validation, and test. Before we can use the dataset, it must be formatted to include the prompt. See the following code:

def add_prompt_to_data(dataset):

    datapoints = []
    
    for datapoint in dataset:
        # Add insruction prompt to each CNN article
        # and add prefix 'response:' to the article summary.
        temp_dict = {}
        temp_dict['prompt'] = instruction + datapoint['article']
        temp_dict['completion'] = 'response:nn' + datapoint['highlights']
        datapoints.append(temp_dict)
    return datapoints

def data_load(ds_name: str, ds_version: str) -> tuple:

    dataset = load_dataset(ds_name, ds_version)
    datapoints_train = add_prompt_to_data(dataset['train'])
    datapoints_valid = add_prompt_to_data(dataset['validation'])
    datapoints_test = add_prompt_to_data(dataset['test'])
    ...

Split data

Split the dataset into training, validation, and testing. For this post, we restrict the size of each row to 3,000 words and select 100 rows for training, 10 for validation, and 5 for testing. You can follow the notebook in GitHub for more details.

def data_split(step_load_result: tuple)  -> tuple:

    train_lines = reduce_dataset_size(step_load_result[0], 3000, 100)
    validation_lines = reduce_dataset_size(step_load_result[1], 3000, 10)
    test_lines = reduce_dataset_size(step_load_result[2], 3000, 5)
    
    ...

    return train_lines, validation_lines, test_lines

Upload data to Amazon S3

Next, we convert the data to JSONL format and upload the training, validation, and test files to Amazon S3:

def upload_file_to_s3(bucket_name: str, file_names: tuple,
                        s3_key_names: tuple):
    import boto3
    s3_client = boto3.client('s3')
    for i in range(len(file_names)):
        s3_client.upload_file(file_names[i], bucket_name, s3_key_names[i])
    ...
    
def data_upload_to_s3(data_split_response: tuple, bucket_name: str) -> tuple:

    dataset_folder = "fine-tuning-datasets"

    if not os.path.exists(dataset_folder):
        os.makedirs(dataset_folder)

    abs_path = os.path.abspath(dataset_folder)
    train_file = write_jsonl_file(abs_path, 'train-cnn.jsonl', data_split_response[0])
    val_file = write_jsonl_file(abs_path, 'validation-cnn.jsonl', data_split_response[1])
    test_file = write_jsonl_file(abs_path, 'test-cnn.jsonl', data_split_response[2])

    file_names = train_file, val_file, test_file

    s3_keys = f'{dataset_folder}/train/train-cnn.jsonl', f'{dataset_folder}/validation/validation-cnn.jsonl', f'{dataset_folder}/test/test-cnn.jsonl'

    upload_file_to_s3(bucket_name, file_names, s3_keys)
    
    ...

Train the model

Now that the training data is uploaded in Amazon S3, it’s time to fine-tune an Amazon Bedrock model using the CNN/DailyMail dataset. We fine-tune the Amazon Titan Text Lite model provided by Amazon Bedrock for a summarization use case. We define the hyperparameters for fine-tuning and launch the training job:

    hyper_parameters = {
        "epochCount": "2",
        "batchSize": "1",
        "learningRate": "0.00003",
    }
...

    training_job_response = bedrock.create_model_customization_job(
        customizationType = "FINE_TUNING",
        jobName = training_job_name,
        customModelName = custom_model_name,
        roleArn = role_arn,
        baseModelIdentifier = "amazon.titan-text-lite-v1:0:4k",
        hyperParameters = hyper_parameters,
        trainingDataConfig = training_data_config,
        validationDataConfig = validation_data_config,
        outputDataConfig = output_data_config
    )
...
    model_id = bedrock.get_custom_model(modelIdentifier=custom_model_name)['modelArn']

    print(f'Model id: {model_id}')
    return model_id

Create Provisioned Throughput

Throughput refers to the number and rate of inputs and outputs that a model processes and returns. You can purchase Provisioned Throughput to provision dedicated resources instead of on-demand throughput, which could have performance fluctuations. For customized models, you must purchase Provisioned Throughput to be able to use it. See Provisioned Throughput for Amazon Bedrock for more information.

def create_prov_thruput(model_id: str, provisioned_model_name: str) -> str:

    bedrock = boto3.client(service_name="bedrock")

    provisioned_model_id = bedrock.create_provisioned_model_throughput(
                modelUnits=1,
                provisionedModelName=provisioned_model_name,
                modelId=model_id
                )['provisionedModelArn']
    ...

    return provisioned_model_id

Test the model

Now it’s time to invoke and test the model. We use the Amazon Bedrock runtime prompt from the test dataset along with the ID of the Provisioned Throughput that was set up in the previous step and inference parameters such as maxTokenCount, stopSequence, temperature, and top:

...
def test_model (provisioned_model_id: str) -> tuple:

    s3.download_file(s3_bucket, s3_key, 'test-cnn.jsonl')

...
    body = json.dumps(
        {
            "inputText": prompt,
            "textGenerationConfig": {
                "maxTokenCount": 2048,
                "stopSequences": ['User:'],
                "temperature": 0,
                "topP": 0.9
            }
        }
    )

    accept = 'application/json'
    contentType = 'application/json'

    bedrock_runtime = boto3.client(service_name="bedrock-runtime")

    fine_tuned_response = bedrock_runtime.invoke_model(body=body,
                                        modelId=provisioned_model_id,
                                        accept=accept,
                                        contentType=contentType)

    fine_tuned_response_body = json.loads(fine_tuned_response.get('body').read())
    summary = fine_tuned_response_body["results"][0]["outputText"]

    return prompt, summary

Decorate functions with @step that converts Python functions into a SageMaker pipeline steps

The @step decorator is a feature that converts your local ML code into one or more pipeline steps. You can write your ML function as you would for any ML project and then create a pipeline by converting Python functions into pipeline steps using the @step decorator, creating dependencies between those functions to create a pipeline graph or directed acyclic graph (DAG), and passing the leaf nodes of that graph as a list of steps to the pipeline. To create a step using the @step decorator, annotate the function with @step. When this function is invoked, it receives the DelayedReturn output of the previous pipeline step as input. An instance holds the information about all the previous steps defined in the function that form the SageMaker pipeline DAG.

In the notebook, we already added the @step decorator at the beginning of each function definition in the cell where the function was defined, as shown in the following code. The function’s code will come from the fine-tuning Python program that we’re trying to convert here into a SageMaker pipeline.

@step(
name="data-load-step",
keep_alive_period_in_seconds = 300,
)
def data_load(ds_name: str, ds_version: str) -> tuple:
...
return datapoints_train, datapoints_valid, datapoints_test

@step(
name = "data-split-step",
keep_alive_period_in_seconds = 300,
)
def data_split(step_load_result: tuple)  -> tuple:
...
return train_lines, validation_lines, test_lines

@step(
name = "data-upload-to-s3-step",
keep_alive_period_in_seconds=300,
)
def data_upload_to_s3(data_split_response: tuple, bucket_name: str) -> tuple:
...
return f's3://{bucket_name}/{s3_keys[0]}', f's3://{bucket_name}/{s3_keys[1]}', f's3://{bucket_name}/{s3_keys[2]}'

@step(
name = "model-training-step",
keep_alive_period_in_seconds=300,
)
def train(custom_model_name: str,
training_job_name: str,
step_data_upload_to_s3_result: tuple) -> str:
...
return model_id

@step(
name = "create-provisioned-throughput-step",
keep_alive_period_in_seconds=300,
)
def create_prov_thruput(model_id: str, provisioned_model_name: str) -> str:
...
return provisioned_model_id

@step(
name = "model-testing-step",
keep_alive_period_in_seconds=300,
)
def test_model (provisioned_model_id: str) -> tuple:
...
return prompt, summary

Create and run the SageMaker pipeline

To bring it all together, we connect the defined pipeline @step functions into a multi-step pipeline. Then we submit and run the pipeline:

pipeline_name = "bedrock-fine-tune-pipeline"
...
data_load_response = data_load(param1, param2)

data_split_response = data_split(data_load_response)

data_upload_to_s3_response = data_upload_to_s3(data_split_response, bucket_name)

train_response = train(custom_model_name, training_job_name, data_upload_to_s3_response)

create_prov_thruput_response = create_prov_thruput(train_response, provisioned_model_name)

test_model_response = test_model(create_prov_thruput_response)

pipeline = Pipeline(
    name=pipeline_name,
    steps=[test_model_response],
    parameters=[param1, param2]
    )
...
execution = pipeline.start()

After the pipeline has run, you can list the steps of the pipeline to retrieve the entire dataset of results:

execution.list_steps()

[{'StepName': 'model-testing-step',
  ...
  'StepStatus': 'Succeeded',
  'Metadata': {'TrainingJob': {'Arn': 'arn:aws:sagemaker:us-east-1:xxxxxxxx:training-job/pipelines-a6lnarybitw1-model-testing-step-rnUvvmGxgn'}},
  ... 
 {'StepName': 'create-provisioned-throughput-step',
  ...  
  'StepStatus': 'Succeeded',
  'Metadata': {'TrainingJob': {'Arn': 'arn:aws:sagemaker:us-east-1:xxxxxxxx:training-job/pipelines-a6lnarybitw1-create-provisioned-t-vmNdXHTaH3'}},
  ...  
 {'StepName': 'model-training-step',
  ...
  'StepStatus': 'Succeeded',
  'Metadata': {'TrainingJob': {'Arn': 'arn:aws:sagemaker:us-east-1:xxxxxxxx:training-job/pipelines-a6lnarybitw1-model-training-step-t3vmuAmWf6'}},
  ... 
 {'StepName': 'data-upload-to-s3-step',
  ... 
  'StepStatus': 'Succeeded',
  'Metadata': {'TrainingJob': {'Arn': 'arn:aws:sagemaker:us-east-1:xxxxxxxx:training-job/pipelines-a6lnarybitw1-data-upload-to-s3-st-cDKe6fJYtf'}},
  ...  
 {'StepName': 'data-split-step',
  ...
  'StepStatus': 'Succeeded',
  'Metadata': {'TrainingJob': {'Arn': 'arn:aws:sagemaker:us-east-1:xxxxxxxx:training-job/pipelines-a6lnarybitw1-data-split-step-ciIP7t0tTq'}},
  ...
 {'StepName': 'data-load-step',
  ... 
  'StepStatus': 'Succeeded',
  'Metadata': {'TrainingJob': {'Arn': 'arn:aws:sagemaker:us-east-1:xxxxxxxx:training-job/pipelines-a6lnarybitw1-data-load-step-swEWNYi5mK'}},

You can track the lineage of a SageMaker ML pipeline in SageMaker Studio. Lineage tracking in SageMaker Studio is centered around a DAG. The DAG represents the steps in a pipeline. From the DAG, you can track the lineage from any step to any other step. The following diagram displays the steps of the Amazon Bedrock fine-tuning pipeline. For more information, refer to View a Pipeline Execution.

By choosing a step on the Select step dropdown menu, you can focus on a specific part of the graph. You can view detailed logs of each step of the pipeline in Amazon CloudWatch Logs.

Clean up

To clean up and avoid incurring charges, follow the detailed cleanup instructions in the GitHub repo to delete the following:

  • The Amazon Bedrock Provisioned Throughput
  • The customer model
  • The Sagemaker pipeline
  • The Amazon S3 object storing the fine-tuned dataset

Conclusion

MLOps focuses on streamlining, automating, and monitoring ML models throughout their lifecycle. Building a robust MLOps pipeline demands cross-functional collaboration. Data scientists, ML engineers, IT staff, and DevOps teams must work together to operationalize models from research to deployment and maintenance. SageMaker Pipelines allows you to create and manage ML workflows while offering storage and reuse capabilities for workflow steps.

In this post, we walked you through an example that uses SageMaker step decorators to convert a Python program for creating a custom Amazon Bedrock model into a SageMaker pipeline. With SageMaker Pipelines, you get the benefits of an automated workflow that can be configured to run on a schedule based on the requirements for retraining the model. You can also use SageMaker Pipelines to add useful features such as lineage tracking and the ability to manage and visualize your entire workflow from within the SageMaker Studio environment.

AWS provides managed ML solutions such as Amazon Bedrock and SageMaker to help you deploy and serve existing off-the-shelf foundation models or create and run your own custom models.

See the following resources for more information about the topics discussed in this post:


About the Authors

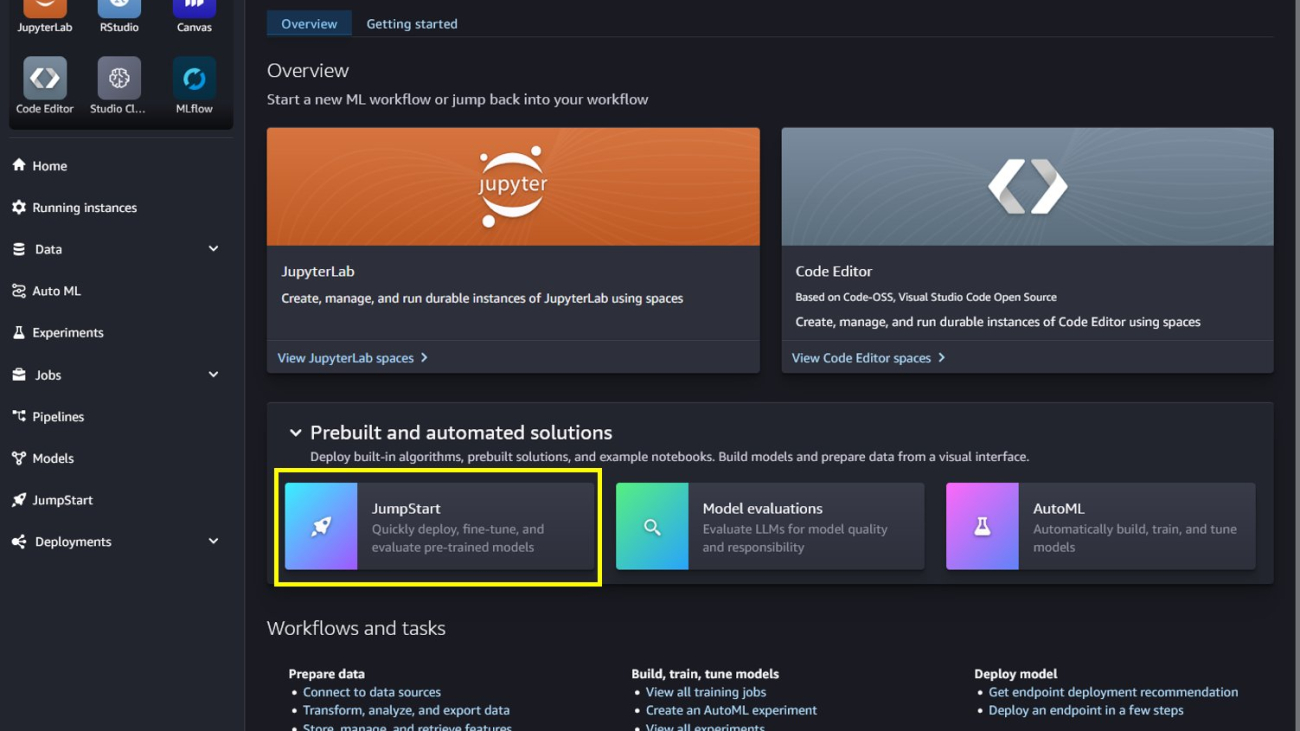
Neel Sendas is a Principal Technical Account Manager at Amazon Web Services. Neel works with enterprise customers to design, deploy, and scale cloud applications to achieve their business goals. He has worked on various ML use cases, ranging from anomaly detection to predictive product quality for manufacturing and logistics optimization. When he isn’t helping customers, he dabbles in golf and salsa dancing.

Ashish Rawat is a Senior AI/ML Specialist Solutions Architect at Amazon Web Services, based in Atlanta, Georgia. Ashish has extensive experience in Enterprise IT architecture and software development including AI/ML and generative AI. He is instrumental in guiding customers to solve complex business challenges and create competitive advantage using AWS AI/ML services.

Read More

Straight Out of Gamescom and Into Xbox PC Games, GeForce NOW Newly Supports Automatic Xbox Sign-In

Straight Out of Gamescom and Into Xbox PC Games, GeForce NOW Newly Supports Automatic Xbox Sign-In

Straight out of Gamescom, NVIDIA introduced GeForce NOW support for Xbox automatic sign-in, as well as Black Myth: Wukong from Game Science and a demo for the PC launch of FINAL FANTASY XVI from Square Enix — all available in the cloud today.

There are more triple-A games coming to the cloud this GFN Thursday: Civilization VI, Civilization V and Civilization: Beyond Earth — some of the first games from publisher 2K — are available today for members to stream with GeForce quality.

And members can look forward to playing the highly anticipated Indiana Jones and the Great Circle from Bethesda when it joins the cloud later this year.

Plus, GeForce NOW has added a data center in Warsaw, Poland, expanding low-latency, high-performance cloud gaming to members in the region.

It’s an action-packed GFN Thursday, with 25 new titles joining the cloud this week.

Instant Play, Every Day

XBOX SSO on GeForce NOW
Auto sign-in, auto win.

GeForce NOW is streamlining gaming convenience with Xbox account integration. Starting today, members can link their Xbox profile directly to the cloud service. After initial setup, members will be logged in automatically across all devices for future cloud gaming sessions, enabling them to dive straight into their favorite PC games.

The new feature builds on existing support for Epic Games and Ubisoft automatic sign-in — and complements Xbox game sync, which adds supported PC Game Pass and Microsoft Store titles to members’ cloud libraries. Gamers can enjoy a cohesive experience accessing over 140 PC Game Pass titles across devices without the need for repeated logins.

Go Bananas

Black Myth Wukong on GeForce NOW
No monkey business in the cloud — just high-performance gameplay.

Black Myth: Wukong, the highly anticipated action role-playing game (RPG) based on Chinese mythology, is now available to stream from the cloud.

Embark on the Monkey King’s epic journey in the action RPG inspired by Chinese mythology, wielding magical abilities and battling fierce monsters and gods across the breathtaking landscapes of ancient China.

GeForce NOW Ultimate members can experience the game’s stunning visuals and fluid combat — enhanced by NVIDIA RTX technologies such as full ray tracing and DLSS 3 — at up to 4K resolution and 120 frames per second, bringing the mystical world of Black Myth: Wukong to life.

Fantasy Becomes Reality

FINAL FANTASY XVI Demo on GeForce NOW
Eikon-ic battles, epic tales.

The latest mainline numbered entry in Square Enix’s renowned RPG series, FINAL FANTASY XVI will join the cloud when it launches on PC later this month. Members can try a demo of the highly anticipated game today.

Take a journey through the epic, dark-fantasy world of Valisthea, a land dominated by colossal Mothercrystals and divided among six powerful nations teetering on the brink of conflict. Follow the story of Clive Rosfield, a young knight on a quest for vengeance after a tragic betrayal. Dive into the high-octane action with real-time combat for fast-paced, dynamic battles that emphasize strategy and skill.

The demo offers a taste of the game’s stunning visuals, intricate storyline and innovative combat options. With GeForce NOW, gamers can experience the breathtaking world of Valisthea and stream it at up to 4K and 120 frames per second with an Ultimate membership.

Everybody Wants to Rule the World

Civ games on GeForce NOW
Guide a rising nation to glory, and expand through diplomacy and other tactics in “Sid Meier’s Civilization VI.”

Becoming history’s greatest leader has never been easier — the Sid Meier’s Civilization franchise from 2K is now available on GeForce NOW.

Since 1991, the award-winning Civilization series of turn-based strategy games has challenged players to build an empire to stand the test of time. Players assume the role of a famous historical leader, making crucial economic, political and military decisions to pursue prosperity and secure a path to victory.

Members can lead, expand and conquer from the cloud in the latest entries from the franchise, including Sid Meier’s Civilization VI, Civilization V, Civilization IV and Civilization: Beyond Earth. Manage a budding nation with support for ultrawide resolutions, and build empires on the go using low-powered devices like Chromebooks, Macs and more.

Adventure Calls, Dr. Jones

Indiana Jones and the Great Circle coming soon to GeForce NOW
Gameplay so good, it belongs in a museum.

Uncover one of history’s greatest mysteries in Indiana Jones and the Great Circle. Members can stream the cinematic action-adventure game from the award-winning producers Bethesda Softworks, Lucasfilm and MachineGames at GeForce NOW Ultimate quality from the cloud when the title launches later this year.

In 1937, sinister forces are scouring the globe for the secret to an ancient power connected to the Great Circle, and only Indiana Jones can stop them. Become the legendary archaeologist and venture from the hallowed halls of the Vatican and the sunken temples of Sukhothai to the pyramids of Egypt and snowy Himalayan peaks.

Ultimate members can stream the game at up to 4K resolution and 120 fps, even on low-powered devices — as well as experience the adventure with support for full ray tracing, accelerated and enhanced by NVIDIA DLSS 3.5 with Ray Reconstruction.

Let’s Play Today

Skull & Bones S3
The latest ‘Skull and Bones’ is available to play from the cloud without waiting for updates.

In the newest season of Skull and Bones, gear up to face imminent dangers on scorched seas — from the formidable Li Tian Ning and Commander Zhang, to a ferocious dragon that descends from the heavens. Join the battle in season 3 to earn exclusive new rewards through time-limited events such as Mooncake Regatta and Requiem of the Lost. Discover new quality-of-life improvements including a new third-person camera while at sea, new endgame features and an expanded Black Market.

Members can look for the following games available to stream in the cloud this week:

  • Black Myth: Wukong (New release on Steam and Epic Games Store, Aug. 19)
  • Final Fantasy XVI Demo (New release on Steam, Aug. 19)
  • GIGANTIC: RAMPAGE EDITION (Available on Epic Games Store, free Aug. 22)
  • Skull & Bones (New release on Steam, Aug. 22)
  • Alan Wake’s American Nightmare (Xbox, available on Microsoft Store)
  • Commandos 3 – HD Remaster (Xbox, available on Microsoft Store)
  • Desperados III (Xbox, available on Microsoft Store)
  • The Dungeon Of Naheulbeuk: The Amulet Of Chaos (Xbox, available on Microsoft Store)
  • The Flame in the Flood (Xbox, available on Microsoft Store)
  • FTL: Faster Than Light (Xbox, available on Microsoft Store)
  • Genesis Noir (Xbox, available on PC Game Pass)
  • House Flipper (Xbox, available on PC Game Pass)
  • Medieval Dynasty (Xbox, available on PC Game Pass)
  • My Time At Portia (Xbox, available on PC Game Pass)
  • Night in the Wood (Xbox, available on Microsoft Store )
  • Offworld Trading Company (Xbox, available on PC Game Pass)
  • Orwell: Keeping an Eye On You (Xbox, available on Microsoft Store)
  • Project Winter (Xbox, available on Microsoft Store)
  • Shadow Tactics: Blades of the Shogun (Xbox, available on Microsoft Store)
  • Sid Meier’s Civilization VI (Steam, Epic Games Store and Xbox, available on the Microsoft store)
  • Sid Meier’s Civilization V (Steam)
  • Sid Meier’s Civilization IV (Steam)
  • Sid Meier’s Civilization: Beyond Earth (Steam)
  • Spirit of the North (Xbox, available on PC Game Pass)
  • Wreckfest (Xbox, available on PC Game Pass)

What are you planning to play this weekend? Let us know on X or in the comments below.

Read More