What’s the ROI? Getting the Most Out of LLM Inference

What’s the ROI? Getting the Most Out of LLM Inference

Large language models and the applications they power enable unprecedented opportunities for organizations to get deeper insights from their data reservoirs and to build entirely new classes of applications.

But with opportunities often come challenges.

Both on premises and in the cloud, applications that are expected to run in real time place significant demands on data center infrastructure to simultaneously deliver high throughput and low latency with one platform investment.

To drive continuous performance improvements and improve the return on infrastructure investments, NVIDIA regularly optimizes the state-of-the-art community models, including Meta’s Llama, Google’s Gemma, Microsoft’s Phi and our own NVLM-D-72B, released just a few weeks ago.

Relentless Improvements

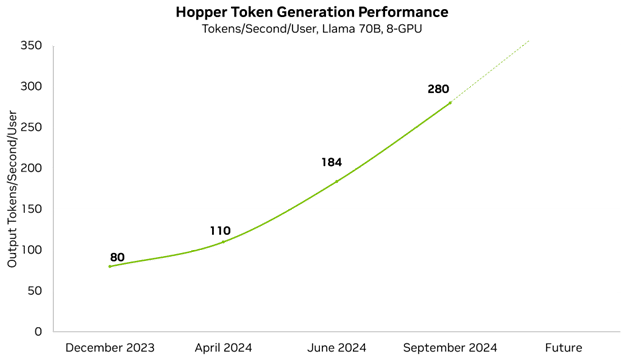
Performance improvements let our customers and partners serve more complex models and reduce the needed infrastructure to host them. NVIDIA optimizes performance at every layer of the technology stack, including TensorRT-LLM, a purpose-built library to deliver state-of-the-art performance on the latest LLMs. With improvements to the open-source Llama 70B model, which delivers very high accuracy, we’ve already improved minimum latency performance by 3.5x in less than a year.

We’re constantly improving our platform performance and regularly publish performance updates. Each week, improvements to NVIDIA software libraries are published, allowing customers to get more from the very same GPUs. For example, in just a few months’ time, we’ve improved our low-latency Llama 70B performance by 3.5x.

Over the past 10 months, NVIDIA has increased performance on the Llama 70B model by 3.5x through a combination of optimized kernels, multi-head attention techniques and a variety of parallelization techniques.
NVIDIA has increased performance on the Llama 70B model by 3.5x.

In the most recent round of MLPerf Inference 4.1, we made our first-ever submission with the Blackwell platform. It delivered 4x more performance than the previous generation.

This submission was also the first-ever MLPerf submission to use FP4 precision. Narrower precision formats, like FP4, reduces memory footprint and memory traffic, and also boost computational throughput. The process takes advantage of Blackwell’s second-generation Transformer Engine, and with advanced quantization techniques that are part of TensorRT Model Optimizer, the Blackwell submission met the strict accuracy targets of the MLPerf benchmark.

MLPerf Inference v4.1 Closed, Data Center. Results retrieved from www.mlperf.org on August 28, 2024. Blackwell results measured on single GPU and retrieved from entry 4.1-0074 in the Closed, Preview category. H100 results from entry 4.1-0043 in the Closed, Available category on 8x H100 system and divided by GPU count for per GPU comparison. Per-GPU throughput is not a primary metric of MLPerf Inference. The MLPerf name and logo are registered and unregistered trademarks of MLCommons Association in the United States and other countries. All rights reserved. Unauthorized use strictly prohibited. See www.mlcommons.org for more information.
Blackwell B200 delivers up to 4x more performance versus previous generation on MLPerf Inference v4.1’s Llama 2 70B workload.

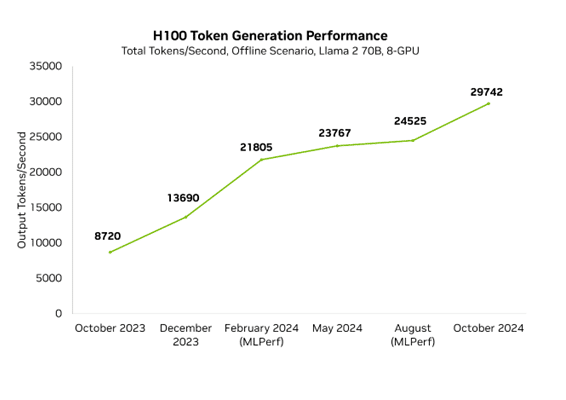
Improvements in Blackwell haven’t stopped the continued acceleration of Hopper. In the last year, Hopper performance has increased 3.4x in MLPerf on H100 thanks to regular software advancements. This means that NVIDIA’s peak performance today, on Blackwell, is 10x faster than it was just one year ago on Hopper.

MLPerf Inference v4.1 Closed, Data Center. Results retrieved from www.mlperf.org from multiple dates and entries. The October 2023, December 2023, May 2024 and October 24 data points are from internal measurements. The remaining data points are from official submissions. All results using eight accelerators. The MLPerf name and logo are registered and unregistered trademarks of MLCommons Association in the United States and other countries. All rights reserved. Unauthorized use strictly prohibited. See www.mlcommons.org for more information.
These results track progress on the MLPerf Inference Llama 2 70B Offline scenario over the past year.

Our ongoing work is incorporated into TensorRT-LLM, a purpose-built library to accelerate LLMs that contain state-of-the-art optimizations to perform inference efficiently on NVIDIA GPUs. TensorRT-LLM is built on top of the TensorRT Deep Learning Inference library and leverages much of TensorRT’s deep learning optimizations with additional LLM-specific improvements.

Improving Llama in Leaps and Bounds

More recently, we’ve continued optimizing variants of Meta’s Llama models, including versions 3.1 and 3.2 as well as model sizes 70B and the biggest model, 405B. These optimizations include custom quantization recipes, as well as efficient use of parallelization techniques to more efficiently split the model across multiple GPUs, leveraging NVIDIA NVLink and NVSwitch interconnect technologies. Cutting-edge LLMs like Llama 3.1 405B are very demanding and require the combined performance of multiple state-of-the-art GPUs for fast responses.

Parallelism techniques require a hardware platform with a robust GPU-to-GPU interconnect fabric to get maximum performance and avoid communication bottlenecks. Each NVIDIA H200 Tensor Core GPU features fourth-generation NVLink, which provides a whopping 900GB/s of GPU-to-GPU bandwidth. Every eight-GPU HGX H200 platform also ships with four NVLink Switches, enabling every H200 GPU to communicate with any other H200 GPU at 900GB/s, simultaneously.

Many LLM deployments use parallelism over choosing to keep the workload on a single GPU, which can have compute bottlenecks. LLMs seek to balance low latency and high throughput, with the optimal parallelization technique depending on application requirements.

For instance, if lowest latency is the priority, tensor parallelism is critical, as the combined compute performance of multiple GPUs can be used to serve tokens to users more quickly. However, for use cases where peak throughput across all users is prioritized, pipeline parallelism can efficiently boost overall server throughput.

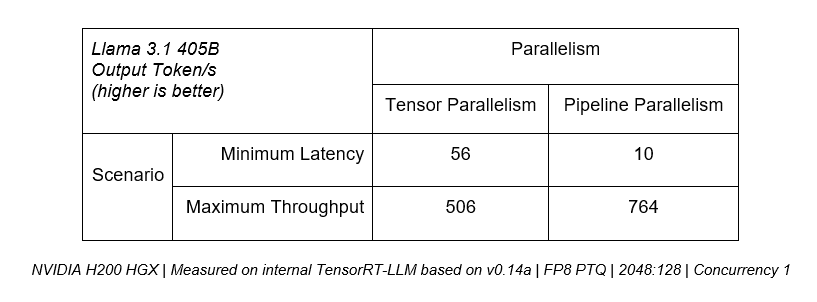
The table below shows that tensor parallelism can deliver over 5x more throughput in minimum latency scenarios, whereas pipeline parallelism brings 50% more performance for maximum throughput use cases.

For production deployments that seek to maximize throughput within a given latency budget, a platform needs to provide the ability to effectively combine both techniques like in TensorRT-LLM.

Read the technical blog on boosting Llama 3.1 405B throughput to learn more about these techniques.

This table shows that tensor parallelism can deliver over 5x more throughput in minimum latency scenarios, whereas pipeline parallelism brings 50% more performance for maximum throughput use cases.
Different scenarios have different requirements, and parallelism techniques bring optimal performance for each of these scenarios.

The Virtuous Cycle

Over the lifecycle of our architectures, we deliver significant performance gains from ongoing software tuning and optimization. These improvements translate into additional value for customers who train and deploy on our platforms. They’re able to create more capable models and applications and deploy their existing models using less infrastructure, enhancing their ROI.

As new LLMs and other generative AI models continue to come to market, NVIDIA will continue to run them optimally on its platforms and make them easier to deploy with technologies like NIM microservices and NIM Agent Blueprints.

Learn more with these resources:

Read More

Flux and Furious: New Image Generation Model Runs Fastest on RTX AI PCs and Workstations

Flux and Furious: New Image Generation Model Runs Fastest on RTX AI PCs and Workstations

Editor’s note: This post is part of the AI Decoded series, which demystifies AI by making the technology more accessible, and showcases new hardware, software, tools and accelerations for GeForce RTX PC and NVIDIA RTX workstation users.

Image generation models — a popular subset of generative AI — can parse and understand written language, then translate words into images in almost any style.

Representing the cutting edge of what’s possible in image generation, a new series of models from Black Forest Labs — now available to try on PC and workstations — run fastest on GeForce RTX and NVIDIA RTX GPUs.

Fluxible Capabilities

FLUX.1 AI is a text-to-image generation model suite developed by Black Forest Labs. The models are built on the diffusion transformer (DiT) architecture, which allows models with a high number of parameters to maintain efficiency. The Flux models are trained on 12 billion parameters for high-quality image generation.

DiT models are efficient and computationally intensive — and NVIDIA RTX GPUs are essential for handling these new models, the largest of which can’t run on non-RTX GPUs without significant tweaking. Flux models now support the NVIDIA TensorRT software development kit, which improves their performance up to 20%. Users can try Flux and other models with TensorRT in ComfyUI.

Prompt: “A magazine photo of a monkey bathing in a hot spring in a snowstorm with steam coming off the water.” Source: NVIDIA

Flux Appeal

FLUX.1 excels in generating high-quality, diverse images with exceptional prompt adherence, which refers to how accurately the AI interprets and executes instructions. High prompt adherence means the generated image closely matches the text prompt’s described elements, style and mood. Low prompt adherence results in images that may partially or completely deviate from given instructions.

FLUX.1 is noted for its ability to render the human anatomy accurately, including for challenging, intricate features like hands and faces. FLUX.1 also significantly improves the generation of legible text within images, addressing another common challenge in text-to-image models. This makes FLUX.1 models suitable for applications that require precise text representation, such as promotional materials and book covers.

FLUX.AI is available in three variants, offering users choices to best fit their workflows without sacrificing quality:

  • FLUX.1 pro: State-of-the-art quality for enterprise users; accessible through an application programming interface.
  • FLUX.1 dev: A distilled, free version of FLUX.1 pro that still provides high quality.
  • FLUX.1 schnell: The fastest model, ideal for local development and personal use; has a permissive Apache 2.0 license.

The dev and schnell models are open source, and Black Forest Labs provides access to its weights on the popular platform Hugging Face. This encourages innovation and collaboration within the image generation community by allowing researchers and developers to build upon and enhance the models.

Embraced by the Community

The Flux models’ dev and schnell variants were downloaded more than 2 million times on HuggingFace in less than three weeks since their launch.

Users have praised FLUX.1 for its abilities to produce visually stunning images with exceptional detail and realism, as well as to process complex prompts without requiring extensive parameter adjustments.

Prompt: “A highly detailed professional close-up photo of an animorphic Bengal tiger wearing a white, ribbed tank top, sunglasses and headphones around his neck as a DJ with its paws on the turntable on stage at an outdoor electronic dance music concert in Ibiza at night; party atmosphere, wispy smoke with caustic lighting.” Source: NVIDIA


Prompt: “A photographic-quality image of a bustling city street during a rainy evening with a yellow taxi cab parked at the curb with its headlights on, reflecting off the wet pavement. A woman in a red coat is standing under a bright green umbrella, looking at her smartphone. On the left, there is a coffee shop with a neon sign that reads ‘Café Mocha’ in blue letters. The shop has large windows, through which people can be seen enjoying their drinks. Streetlights illuminate the area, casting a warm glow over the scene, while raindrops create a misty effect in the air. In the background, a tall building with a large digital clock displays the time as 8:45 p.m.” Source: NVIDIA

In addition, FLUX.1’s versatility in handling various artistic styles and efficiency in quickly generating images makes it a valuable tool for both personal and professional projects.

Get Started

Users can access FLUX.1 using popular community webpages like ComfyUI. The community-run ComfyUI Wiki includes step-by-step instructions for getting started.

Many YouTube creators also offer video tutorials on Flux models, like this one from MDMZ:

Share your generated images on social media using the hashtag #fluxRTX for a chance to be featured on NVIDIA AI’s channels.

Generative AI is transforming gaming, videoconferencing and interactive experiences of all kinds. Make sense of what’s new and what’s next by subscribing to the AI Decoded newsletter.

Read More

Contrastive Localized Language-Image Pre-Training

Contrastive Language-Image Pre-training (CLIP) has been a celebrated method for training vision encoders to generate image/text representations facilitating various applications. Recently, CLIP has been widely adopted as the vision backbone of multimodal large language models (MLLMs) to connect image inputs for language interactions. The success of CLIP as a vision-language foundation model relies on aligning web-crawled noisy text annotations at image levels. Nevertheless, such criteria may become insufficient for downstream tasks in need of fine-grained vision representations, especially…Apple Machine Learning Research

When is Multicalibration Post-Processing Necessary?

Calibration is a well-studied property of predictors which guarantees meaningful uncertainty estimates. Multicalibration is a related notion — originating in algorithmic fairness — which requires predictors to be simultaneously calibrated over a potentially complex and overlapping collection of protected subpopulations (such as groups defined by ethnicity, race, or income). We conduct the first comprehensive study evaluating the usefulness of multicalibration post-processing across a broad set of tabular, image, and language datasets for models spanning from simple decision trees to 90…Apple Machine Learning Research

On the Limited Generalization Capability of the Implicit Reward Model Induced by Direct Preference Optimization

Reinforcement Learning from Human Feedback (RLHF) is an effective approach for aligning language models to human preferences. Central to RLHF is learning a reward function for scoring human preferences. Two main approaches for learning a reward model are 1) training an explicit reward model as in RLHF, and 2) using an implicit reward learned from preference data through methods such as Direct Preference Optimization (DPO). Prior work has shown that the implicit reward model of DPO can approximate a trained reward model, but it is unclear to what extent DPO can generalize to distribution…Apple Machine Learning Research

Efficient Pre-training of Llama 3-like model architectures using torchtitan on Amazon SageMaker

Efficient Pre-training of Llama 3-like model architectures using torchtitan on Amazon SageMaker

This post is co-written with Less Wright and Wei Feng from Meta

Pre-training large language models (LLMs) is the first step in developing powerful AI systems that can understand and generate human-like text. By exposing models to vast amounts of diverse data, pre-training lays the groundwork for LLMs to learn general language patterns, world knowledge, and reasoning capabilities. This foundational process enables LLMs to perform a wide range of tasks without task-specific training, making them highly versatile and adaptable. Pre-training is essential for building a strong base of knowledge, which can then be refined and specialized through fine-tuning, transfer learning, or few-shot learning approaches.

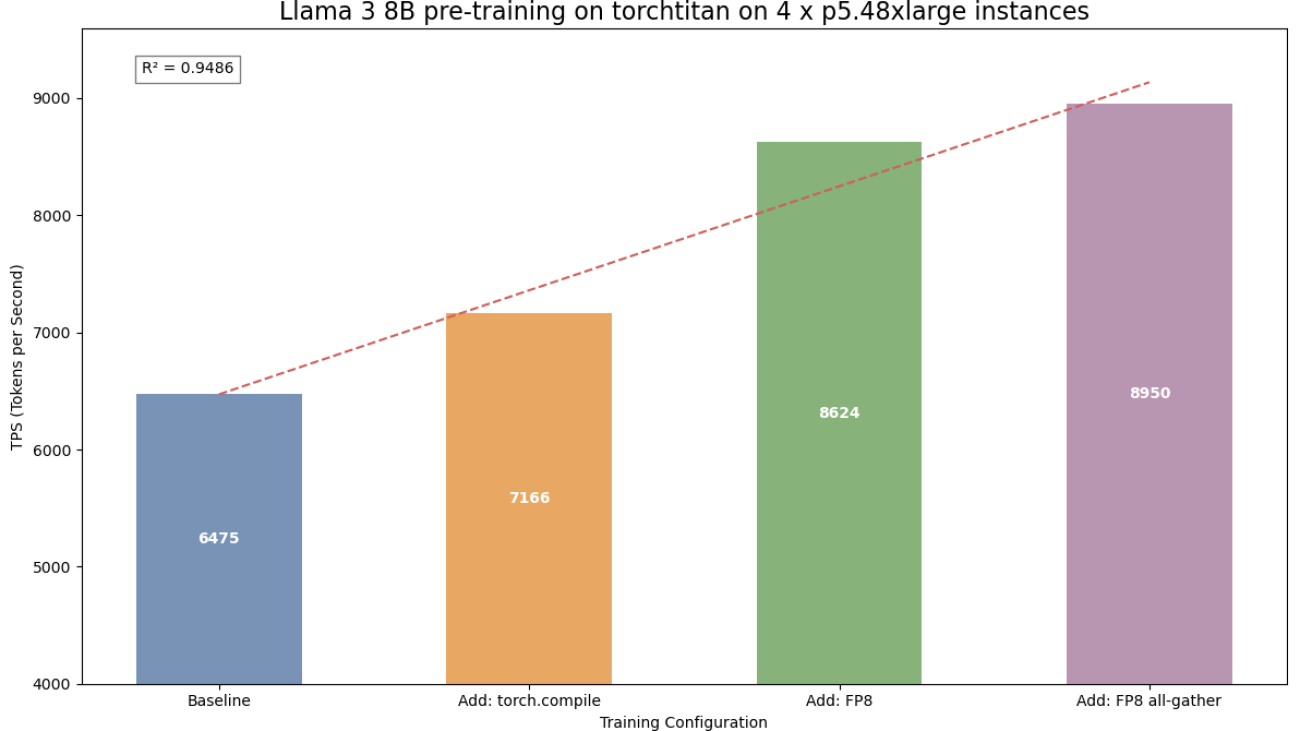
In this post, we collaborate with the team working on PyTorch at Meta to showcase how the torchtitan library accelerates and simplifies the pre-training of Meta Llama 3-like model architectures. We showcase the key features and capabilities of torchtitan such as FSDP2, torch.compile integration, and FP8 support that optimize the training efficiency. We pre-train a Meta Llama 3 8B model architecture using torchtitan on Amazon SageMaker on p5.48xlarge instances, each equipped with 8 Nvidia H100 GPUs. We demonstrate a 38.23% performance speedup in the training throughput compared to the baseline without applying the optimizations (as shown in the following figure). Amazon SageMaker Model Training reduces the time and cost to train and tune machine learning (ML) models at scale without the need to manage infrastructure. You can take advantage of the highest-performing ML compute infrastructure currently available, and SageMaker can automatically scale infrastructure up or down, from one to thousands of GPUs.

To learn more, you can find our complete code sample on GitHub.

Introduction to torchtitan

torchtitan is a reference architecture for large-scale LLM training using native PyTorch. It aims to showcase PyTorch’s latest distributed training features in a clean, minimal code base. The library is designed to be simple to understand, use, and extend for different training purposes, with minimal changes required to the model code when applying various parallel processing techniques.

torchtitan offers several key features, including FSDP2 with per-parameter sharding, tensor parallel processing, selective layer and operator activation checkpointing, and distributed checkpointing. It supports pre-training of Meta Llama 3-like and Llama 2-like model architectures of various sizes and includes configurations for multiple datasets. The library provides straightforward configuration through TOML files and offers performance monitoring through TensorBoard. In the following sections, we highlight some of the key features of torchtitan.

Transitioning from FSDP1 to FSDP2

FSDP1 and FSDP2 are two approaches to fully sharded data parallel training. FSDP1 uses flat-parameter sharding, which flattens all parameters to 1D, concatenates them into a single tensor, pads it, and then chunks it across workers. This method offers bounded padding and efficient unsharded storage, but might not always allow optimal sharding for individual parameters. FSDP2, on the other hand, represents sharded parameters as DTensors sharded on dim-0, handling each parameter individually. This approach enables easier manipulation of parameters, for example per-weight learning rate, communication-free sharded state dicts, and simpler meta-device initialization. The transition from FSDP1 to FSDP2 reflects a shift towards more flexible and efficient parameter handling in distributed training, addressing limitations of the flat-parameter approach while potentially introducing new optimization opportunities.

torchtitan support for torch.compile

torch.compile is a key feature in PyTorch that significantly boosts model performance with minimal code changes. Through its just-in-time (JIT) compilation, it analyzes and transforms PyTorch code into more efficient kernels. torchtitan supports torch.compile, which delivers substantial speedups, especially for large models and complex architectures, by using techniques like operator fusion, memory planning, and automatic kernel selection. This is enabled by setting compile = true in the model’s TOML configuration file.

torchtitan support for FP8 linear operations

torchtitan provides support for FP8 (8-bit floating point) computation that significantly reduces memory footprint and enhances performance in LLM training. FP8 has two formats, E4M3 and E5M2, each optimized for different aspects of training. E4M3 offers higher precision, making it ideal for forward propagation, whereas E5M2, with its larger dynamic range, is better suited for backpropagation. When operating at a lower precision, FP8 has no impact on model accuracy, which we demonstrate by convergence comparisons of the Meta Llama 3 8B pre-training at 2,000 steps. FP8 support on torchtitan is through the torchao library, and we enable FP8 by setting enable_float8_linear = true in the model’s TOML configuration file.

torchtitan support for FP8 all-gather

This feature enables efficient communication of FP8 tensors across multiple GPUs, significantly reducing network bandwidth compared to bfloat16 all-gather operations. FP8 all-gather performs float8 casting before the all-gather operation, reducing the message size. Key to its efficiency is the combined absolute maximum (AMAX) AllReduce, which calculates AMAX for all float8 parameters in a single operation after the optimizer step, avoiding multiple small all-reduces. Similar to FP8 support, this also has no impact on model accuracy, which we demonstrate by convergence comparisons of the Meta Llama 3 8B pre-training.

Pre-training Meta Llama 3 8B with torchtitan on Amazon SageMaker

SageMaker training jobs offer several key advantages that enhance the pre-training process of Meta Llama 3-like model architectures with torchtitan. It provides a fully managed environment that simplifies large-scale distributed training across multiple instances, which is crucial for efficiently pre-training LLMs. SageMaker supports custom containers, which allows seamless integration of the torchtitan library and its dependencies, so all necessary components are readily available.

The built-in distributed training capabilities of SageMaker streamline the setup of multi-GPU and multi-node jobs, reducing the complexity typically associated with such configurations. Additionally, SageMaker integrates with TensorBoard, enabling real-time monitoring and visualization of training metrics and providing valuable insights into the pre-training process. With these features, researchers and practitioners can focus more on model development and optimization rather than infrastructure management, ultimately accelerating the iterative process of creating and refining custom LLMs.

Solution overview

In the following sections, we walk you through how to prepare a custom image with the torchtitan library, then configure a training job estimator function to launch a Meta Llama 3 8B model pre-training with the c4 dataset (Colossal Clean Crawled Corpus) on SageMaker. The c4 dataset is a large-scale web text corpus that has been cleaned and filtered to remove low-quality content. It is frequently used for pre-training language models.

Prerequisites

Before you begin, make sure you have the following requirements in place:

Build the torchtitan custom image

SageMaker BYOC (Bring Your Own Container) allows you to use custom Docker containers to train and deploy ML models. Typically, SageMaker provides built-in algorithms and preconfigured environments for popular ML frameworks. However, there may be cases where you have unique or proprietary algorithms, dependencies, or specific requirements that aren’t available in the built-in options, necessitating custom containers. In this case, we need to use the nightly versions of torch, torchdata, and the torchao package to train with FP8 precision.

We use the Amazon SageMaker Studio Image Build convenience package, which offers a command line interface (CLI) to simplify the process of building custom container images directly from SageMaker Studio notebooks. This tool eliminates the need for manual setup of Docker build environments, streamlining the workflow for data scientists and developers. The CLI automatically manages the underlying AWS services required for image building, such as Amazon Simple Storage Service (Amazon S3), AWS CodeBuild, and Amazon Elastic Container Registry (Amazon ECR), allowing you to focus on your ML tasks rather than infrastructure setup. It offers a simple command interface, handles packaging of Dockerfiles and container code, and provides the resulting image URI for use in SageMaker training and hosting.

Before getting started, make sure your AWS Identity and Access Management (IAM) execution role has the required IAM permissions and policies to use the Image Build CLI. For more information, see Using the Amazon SageMaker Studio Image Build CLI to build container images from your Studio notebooks. We have provided the Jupyter notebook to build the custom container in the GitHub repo.

Complete the following steps to build the custom image:

  1. Install the Image Build package with the following command:
! pip install sagemaker-studio-image-build
  1. To extend the pre-built image, you can use the included deep learning libraries and settings without having to create an image from scratch:
FROM 763104351884.dkr.ecr.${REGION}.amazonaws.com/pytorch-training:2.3.0-gpu-py311-cu121-ubuntu20.04-sagemaker
  1. Next, specify the libraries to install. You need the nightly versions of torch, torchdata, and the torchao libraries:
RUN pip install --pre torch --force-reinstall --index-url https://download.pytorch.org/whl/nightly/cu121

RUN pip install --pre torchdata --index-url https://download.pytorch.org/whl/nightly

#install torchtitan dependencies
RUN pip install --no-cache-dir 
datasets>=2.19.0 
tomli>=1.1.0 
tensorboard 
sentencepiece 
tiktoken 
blobfile 
tabulate

#install torchao package for FP8 support
RUN pip install --pre torchao --index-url https://download.pytorch.org/whl/nightly/cu121
#Display installed packages for reference
RUN pip freeze
  1. Use the Image Build CLI to build and push the image to Amazon ECR:

!sm-docker build --repository torchtitan:latest . You’re now ready to use this image for pre-training models with torchtitan in SageMaker.

Prepare your dataset (optional)

By default, the torchtitan library uses the allenai/c4 “en” dataset in its training configuration. This is streamed directly during training using the HuggingFaceDataset class. However, you may want to pre-train the Meta Llama 3 models on your own dataset residing in Amazon S3. For this purpose, we have prepared a sample Jupyter notebook to download the allenai/c4 “en” dataset from the Hugging Face dataset hub to an S3 bucket. We use the SageMaker InputDataConfiguration to load the dataset to our training instances in the later section. You can download the dataset with a SageMaker processing job available in the sample Jupyter notebook.

Launch your training with torchtitan

Complete the following steps to launch your training:

  1. Import the necessary SageMaker modules and retrieve your work environment details, such as AWS account ID and AWS Region. Make sure to upgrade the SageMaker SDK to the latest version. This might require a SageMaker Studio kernel restart.
%pip install --upgrade "sagemaker>=2.224"
%pip install sagemaker-experiments

import os
import boto3
import sagemaker
from sagemaker import get_execution_role
from sagemaker.pytorch import PyTorch

role = get_execution_role()
print(f"SageMaker Execution Role: {role}")

client = boto3.client("sts")
account = client.get_caller_identity()["Account"]
print(f"AWS account: {account}")

session = boto3.session.Session()
region = session.region_name
print(f"AWS region: {region}")

sm_boto_client = boto3.client("sagemaker")
sagemaker_session = sagemaker.session.Session(boto_session=session)

default_bucket = sagemaker_session.default_bucket()
print("Default bucket for this session: ", default_bucket)
  1. Clone the torchtitan repository and prepare the training environment. Create a source directory and move the necessary dependencies from the torchtitan directory. This step makes sure you have all the required files for your training process.
git clone https://github.com/pytorch/torchtitan.git
mkdir torchtitan/src
!mv  torchtitan/torchtitan/ torchtitan/train_configs/ torchtitan/train.py  torchtitan/src/
  1. Use the following command to download the Meta Llama 3 tokenizer, which is essential for preprocessing your dataset. Provide your Hugging Face token.
    python torchtitan/src/torchtitan/datasets/download_tokenizer.py --repo_id meta-llama/Meta-Llama-3-8B --tokenizer_path "original" --hf_token="YOUR_HF_TOKEN"

One of the key advantages of torchtitan is its straightforward configuration through TOML files. We modify the Meta Llama-3-8b TOML configuration file to enable monitoring and optimization features.

  1. Enable TensorBoard profiling for better insights into the training process:
[metrics]
log_freq = 10
enable_tensorboard = true
save_tb_folder = "/opt/ml/output/tensorboard"
  1. Enable torch.compile for improved performance:
compile = true
  1. Enable FP8 for more efficient computations:
float8]
enable_float8_linear = true
  1. Activate FP8 all-gather for optimized distributed training:
enable_fsdp_float8_all_gather= true
precompute_float8_dynamic_scale_for_fsdp = true
  1. To monitor the training progress, set up TensorBoard output. This allows you to visualize the training metrics in real time, providing valuable insights into how the model is learning.
from sagemaker.debugger import TensorBoardOutputConfig

LOG_DIR="/opt/ml/output/tensorboard"
tensorboard_output_config = TensorBoardOutputConfig(
s3_output_path=f"s3://sagemaker-{region}-{account}/tensorboard/",
container_local_output_path=LOG_DIR
)
  1. Set up the data channels for SageMaker training. Create TrainingInput objects that point to the preprocessed dataset in Amazon S3, so your model has access to the training data it needs.
#update the path below the s3 dataset path from running the previous Jupyter Notebook from Step 2
training_dataset_location = "<PATH-TO-DATASET>" 

s3_train_bucket = training_dataset_location

if s3_train_bucket != None:
   train = sagemaker.inputs.TrainingInput(s3_train_bucket, distribution="FullyReplicated", s3_data_type="S3Prefix")
   data_channels = {"train": train}

  1. With all the pieces in place, you’re ready to create the SageMaker PyTorch estimator. This estimator encapsulates all the configurations, including the custom container, hyperparameters, and resource allocations.

import os

from time import gmtime, strftime

hyperparameters = {
   "config_file": "train_configs/llama3_8b.toml"
}
timestamp = strftime("%Y-%m-%d-%H-%M", gmtime())


estimator = PyTorch(
   base_job_name=f'llama3-8b-{timestamp}',
   entry_point="train.py",
   image_uri="<PATH-TO-IMAGE-URI>",
   source_dir=os.path.join(os.getcwd(), "src"),
   role=role,
   instance_type="ml.p5.48xlarge",
   volume_size=800,
   instance_count=4,
   hyperparameters=hyperparameters,
   use_spot_instances = False,
   sagemaker_session=sagemaker_session,
   tensorboard_output_config=tensorboard_output_config,
   distribution={
   'torch_distributed': {'enabled': True},
   },
  
)
  1. Initiate the model training on SageMaker:

estimator.fit(inputs=data_channels)

Performance numbers

The following table summarizes the performance numbers for the various training runs with different optimizations.

Setup Configuration TOML Configuration

Throughput

(Tokens per Second)

Speedup Over

Baseline

LLama3 – 8B pre-training on 4 x p5.48xlarge instances

(32 NVIDIA H100 GPUs)

Baseline Default Configuration 6475
torch.compile compile = true 7166 10.67%
FP8 linear

compile = true

enable_float8_linear = true

8624 33.19%
FP8 all-gather

compile = true

enable_float8_linear = true

enable_fsdp_float8_all_gather= true

precompute_float8_dynamic_scale_for_fsdp = true

8950 38.23%

The performance results show clear optimization progress in Meta Llama 3 8B pre-training. torch.compile() delivered an 10.67% speedup, and FP8 linear operations tripled this to 33%. Adding FP8 all-gather further increased the speedup to 38.23% over the baseline. This progression demonstrates how combining optimization strategies significantly enhances training efficiency.

The following figure illustrates the stepwise performance gains for Meta Llama 3 8B pre-training on torchtitan with the optimizations.

These optimizations didn’t affect the model’s training quality. The loss curves for all optimization levels, including the baseline, torch.compile(), FP8 linear, and FP8 all-gather configurations, remained consistent throughout the training process, as shown in the following figure.

Loss curves with different configurations

The following table showcases the consistent loss value with the different configurations.

Configuration Loss After 2,000 Steps
Baseline 3.602
Plus torch.compile 3.601
Plus FP8 3.612
Plus FP8 all-gather 3.607

Clean up

After you complete your training experiments, clean up your resources to avoid unnecessary charges. You can start by deleting any unused SageMaker Studio resources. Next, remove the custom container image from Amazon ECR by deleting the repository you created. If you ran the optional step to use your own dataset, delete the S3 bucket where this data was stored.

Conclusion

In this post, we demonstrated how to efficiently pre-train Meta Llama 3 models using the torchtitan library on SageMaker. With torchtitan’s advanced optimizations, including torch.compile, FP8 linear operations, and FP8 all-gather, we achieved a 38.23% acceleration in Meta Llama 3 8B pre-training without compromising the model’s accuracy.

SageMaker simplified the large-scale training by offering seamless integration with custom containers, effortless scaling across multiple instances, built-in support for distributed training, and integration with TensorBoard for real-time monitoring.

Pre-training is a crucial step in developing powerful and adaptable LLMs that can effectively tackle a wide range of tasks and applications. By combining the latest PyTorch distributed training features in torchtitan with the scalability and flexibility of SageMaker, organizations can use their proprietary data and domain expertise to create robust and high-performance AI models. Get started by visiting the GitHub repository for the complete code example and optimize your LLM pre-training workflow.

Special thanks

Special thanks to Gokul Nadathur (Engineering Manager at Meta), Gal Oshri (Principal Product Manager Technical at AWS) and Janosch Woschitz (Sr. ML Solution Architect at AWS) for their support to the launch of this post.


About the Authors

Roy Allela is a Senior AI/ML Specialist Solutions Architect at AWS.He helps AWS customers—from small startups to large enterprises—train and deploy foundation models efficiently on AWS. He is passionate about computational optimization problems and improving the performance of AI workloads.

Kanwaljit Khurmi is a Principal Solutions Architect at Amazon Web Services. He works with AWS customers to provide guidance and technical assistance, helping them improve the value of their solutions when using AWS. Kanwaljit specializes in helping customers with containerized and machine learning applications.

Trevor Harvey is a Principal Specialist in Generative AI at Amazon Web Services (AWS) and an AWS Certified Solutions Architect – Professional. He serves as a voting member of the PyTorch Foundation Governing Board, where he contributes to the strategic advancement of open-source deep learning frameworks. At AWS, Trevor works with customers to design and implement machine learning solutions and leads go-to-market strategies for generative AI services.

Less Wright is an AI/Partner Engineer in PyTorch. He works on Triton/CUDA kernels (Accelerating Dequant with SplitK work decomposition); paged, streaming, and quantized optimizers; and PyTorch Distributed (PyTorch FSDP).

Wei Feng is a Software Engineer on the PyTorch distributed team. He has worked on float8 all-gather for FSDP2, TP (Tensor Parallel) in TorchTitan, and 4-bit quantization for distributed QLoRA in TorchTune. He is also a core maintainer of FSDP2.

Read More

NVIDIA AI Summit Highlights Game-Changing Energy Efficiency and AI-Driven Innovation

NVIDIA AI Summit Highlights Game-Changing Energy Efficiency and AI-Driven Innovation

Accelerated computing is sustainable computing, Bob Pette, NVIDIA’s vice president and general manager of enterprise platforms, explained in a keynote at the NVIDIA AI Summit on Tuesday in Washington, D.C.

NVIDIA’s accelerated computing isn’t just efficient. It’s critical to the next wave of industrial, scientific and healthcare transformations.

“We are in the dawn of a new industrial revolution,” Pette told an audience of policymakers, press, developers and entrepreneurs gathered for the event​. “I’m just here to tell you that we’re designing our systems with not just performance in mind, but with energy efficiency in mind.”

NVIDIA’s Blackwell platform has achieved groundbreaking energy efficiency in AI computing, reducing energy consumption by up to 2,000x over the past decade for training models like GPT-4.

NVIDIA accelerated computing is cutting energy use for token generation — the output from AI models — by 100,000x, underscoring the value of accelerated computing for sustainability amid the rapid adoption of AI worldwide.

“These AI factories produce product.  Those products are tokens, tokens are intelligence, and Intelligence is money,” Pette said. That’s what “will revolutionize every industry on this planet.”

NVIDIA’s CUDA libraries, which have been fundamental in enabling breakthroughs across industries, now power over 4,000 accelerated applications, Pette explained.

“CUDA enables acceleration…. It also turns out to be one of the most impressive ways to reduce energy consumption,” Pette said.

These libraries are central to the company’s energy-efficient AI innovations driving significant performance gains while minimizing power consumption.

Pette also detailed how NVIDIA’s AI software helps organizations deploy AI solutions quickly and efficiently, enabling businesses to innovate faster and solve complex problems across sectors.

Pette discussed the concept of agentic AI, which goes beyond traditional AI by enabling intelligent agents to perceive, reason and act autonomously.

Agentic AI is capable of ”reasoning, of learning, and taking action,” Pette said. It’s transforming industries like manufacturing, customer service, and healthcare,” Pette said.

These AI agents are transforming industries by automating complex tasks and accelerating innovation in sectors like manufacturing, customer service and healthcare, he explained.

He also described how AI agents empower businesses to drive innovation in healthcare, manufacturing, scientific research and climate modeling.

With agentic AI, “you can do in minutes what used to take days,” Pette said.

NVIDIA, in collaboration with its partners, is tackling some of the world’s greatest challenges, including improving diagnostics and healthcare delivery, advancing climate modeling efforts and even helping find signs of life beyond our planet.

NVIDIA is collaborating with SETI to conduct real-time AI searches for fast radio bursts from distant galaxies, helping continue the exploration of space, Pette said.

Pette emphasized that NVIDIA is unlocking a $10 trillion opportunity in healthcare.

Through AI, NVIDIA is accelerating innovations in diagnostics, drug discovery and medical imaging, helping transform patient care worldwide.

Solutions like the NVIDIA Clara medical imaging platform are revolutionizing diagnostics, Parabricks is enabling breakthroughs in genomics research and the MONAI AI framework is advancing medical imaging capabilities.

Pette highlighted partnerships with leading institutions, including Carnegie Mellon University and the University of Pittsburgh, fostering AI innovation and development.

Pette also described how NVIDIA’s collaboration with federal agencies illustrates the importance of public-private partnerships in advancing AI-driven solutions in healthcare, climate modeling and national security.

Pette also announced that a new NVIDIA NIM Agent Blueprint supports cybersecurity advancements, enabling industries to safeguard critical infrastructure with AI-driven solutions.

In cybersecurity, Pette highlighted the NVIDIA NIM Agent Blueprint, a powerful tool enabling organizations to safeguard critical infrastructure through real-time threat detection and analysis.

This blueprint reduces threat response times from days to seconds, representing a significant leap forward in protecting industries.

“Agentic systems can access tools and reason through full lines of thought to provide instant one-click assessments,” Pette said. “This boosts productivity by allowing security analysts to focus on the most critical tasks while AI handles the heavy lifting of analysis, delivering fast and actionable insights.

NVIDIA’s accelerated computing solutions are advancing climate research by enabling more accurate and faster climate modeling. This technology is helping scientists tackle some of the most urgent environmental challenges, from monitoring global temperatures to predicting natural disasters.

Pette described how the NVIDIA Earth 2 platform enables climate experts to import data from multiple sources, fusing them together for analysis using Nvidia Omniverse. “NVIDIA Earth 2 brings together the power of simulation AI and visualization to empower the climate, tech ecosystem,” Pette said.

NVIDIA’s Greg Estes on Building the AI Workforce of the Future

Following Pette’s keynote, Greg Estes, NVIDIA’s vice president of corporate marketing and developer programs, underscored the company’s dedication to workforce training through initiatives like the NVIDIA AI Tech Community.

And through its Deep Learning Institute, NVIDIA has already trained more than 600,000 people worldwide, equipping the next generation with the critical skills to navigate and lead in the AI-driven future.

SUBHEAD: Exploring AI’s Role in Cybersecurity and Sustainability

Throughout the week, industry leaders are exploring AI’s role in solving critical issues in fields like cybersecurity and sustainability.

Upcoming sessions will feature U.S. Secretary of Energy Jennifer Granholm, who will discuss how AI is advancing energy innovation and scientific discovery.

Other speakers will address AI’s role in climate monitoring and environmental management, further showcasing the technology’s ability to address global sustainability challenges.

Learn more about how this week’s AI Summit highlights how AI is shaping the future across industries and how NVIDIA’s solutions are laying the groundwork for continued innovation. 

Read More

Time series forecasting with Amazon SageMaker AutoML

Time series forecasting with Amazon SageMaker AutoML

Time series forecasting is a critical component in various industries for making informed decisions by predicting future values of time-dependent data. A time series is a sequence of data points recorded at regular time intervals, such as daily sales revenue, hourly temperature readings, or weekly stock market prices. These forecasts are pivotal for anticipating trends and future demands in areas such as product demand, financial markets, energy consumption, and many more.

However, creating accurate and reliable forecasts poses significant challenges because of factors such as seasonality, underlying trends, and external influences that can dramatically impact the data. Additionally, traditional forecasting models often require extensive domain knowledge and manual tuning, which can be time-consuming and complex.

In this blog post, we explore a comprehensive approach to time series forecasting using the Amazon SageMaker AutoMLV2 Software Development Kit (SDK). SageMaker AutoMLV2 is part of the SageMaker Autopilot suite, which automates the end-to-end machine learning workflow from data preparation to model deployment. Throughout this blog post, we will be talking about AutoML to indicate SageMaker Autopilot APIs, as well as Amazon SageMaker Canvas AutoML capabilities. We’ll walk through the data preparation process, explain the configuration of the time series forecasting model, detail the inference process, and highlight key aspects of the project. This methodology offers insights into effective strategies for forecasting future data points in a time series, using the power of machine learning without requiring deep expertise in model development. The code for this post can be found in the GitHub repo.

The following diagram depicts the basic AutoMLV2 APIs, all of which are relevant to this post. The diagram shows the workflow for building and deploying models using the AutoMLV2 API. In the training phase, CSV data is uploaded to Amazon S3, followed by the creation of an AutoML job, model creation, and checking for job completion. The deployment phase allows you to choose between real-time inference via an endpoint or batch inference using a scheduled transform job that stores results in S3.
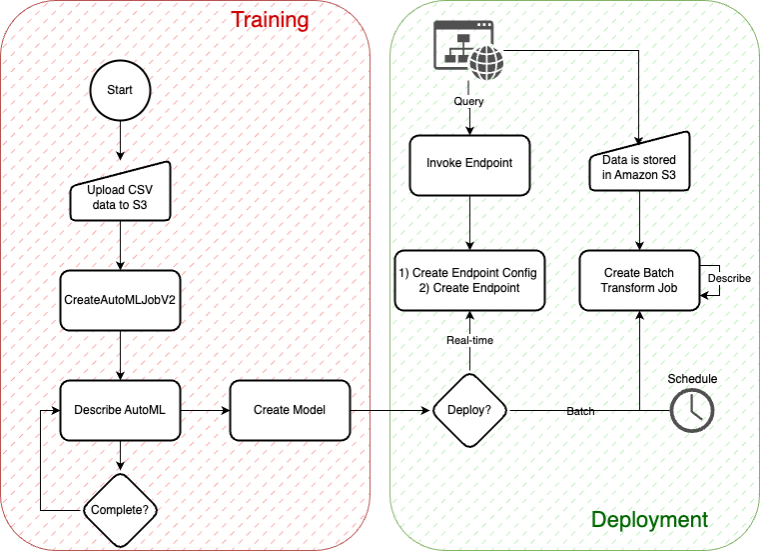
Basic AutoMLV2 API's

1. Data preparation

The foundation of any machine learning project is data preparation. For this project, we used a synthetic dataset containing time series data of product sales across various locations, focusing on attributes such as product code, location code, timestamp, unit sales, and promotional information. The dataset can be found in an Amazon-owned, public Amazon Simple Storage Service (Amazon S3) dataset.

When preparing your CSV file for input into a SageMaker AutoML time series forecasting model, you must ensure that it includes at least three essential columns (as described in the SageMaker AutoML V2 documentation):

  1. Item identifier attribute name: This column contains unique identifiers for each item or entity for which predictions are desired. Each identifier distinguishes the individual data series within the dataset. For example, if you’re forecasting sales for multiple products, each product would have a unique identifier.
  2. Target attribute name: This column represents the numerical values that you want to forecast. These could be sales figures, stock prices, energy usage amounts, and so on. It’s crucial that the data in this column is numeric because the forecasting models predict quantitative outcomes.
  3. Timestamp attribute name: This column indicates the specific times when the observations were recorded. The timestamp is essential for analyzing the data in a chronological context, which is fundamental to time series forecasting. The timestamps should be in a consistent and appropriate format that reflects the regularity of your data (for example, daily or hourly).

All other columns in the dataset are optional and can be used to include additional time-series related information or metadata about each item. Therefore, your CSV file should have columns named according to the preceding attributes (item identifier, target, and timestamp) as well as any other columns needed to support your use case For instance, if your dataset is about forecasting product demand, your CSV might look something like this:

  • Product_ID (item identifier): Unique product identifiers.
  • Sales (target): Historical sales data to be forecasted.
  • Date (timestamp): The dates on which sales data was recorded.

The process of splitting the training and test data in this project uses a methodical and time-aware approach to ensure that the integrity of the time series data is maintained. Here’s a detailed overview of the process:

Ensuring timestamp integrity

The first step involves converting the timestamp column of the input dataset to a datetime format using pd.to_datetime. This conversion is crucial for sorting the data chronologically in subsequent steps and for ensuring that operations on the timestamp column are consistent and accurate.

Sorting the data

The sorted dataset is critical for time series forecasting, because it ensures that data is processed in the correct temporal order. The input_data DataFrame is sorted based on three columns: product_code, location_code, and timestamp. This multi-level sort guarantees that the data is organized first by product and location, and then chronologically within each product-location grouping. This organization is essential for the logical partitioning of data into training and test sets based on time.

Splitting into training and test sets

The splitting mechanism is designed to handle each combination of product_code and location_code separately, respecting the unique temporal patterns of each product-location pair. For each group:

  • The initial test set is determined by selecting the last eight timestamps (yellow + green below). This subset represents the most recent data points that are candidates for testing the model’s forecasting ability.
  • The final test set is refined by removing the last four timestamps from the initial test set, resulting in a test dataset that includes the four timestamps immediately preceding the latest data (green below). This strategy ensures the test set is representative of the near-future periods the model is expected to predict, while also leaving out the most recent data to simulate a realistic forecasting scenario.
  • The training set comprises the remaining data points, excluding the last eight timestamps (blue below). This ensures the model is trained on historical data that precedes the test period, avoiding any data leakage and ensuring that the model learns from genuinely past observations.

This process is visualized in the following figure with an arbitrary value on the Y axis and the days of February on the X axis.
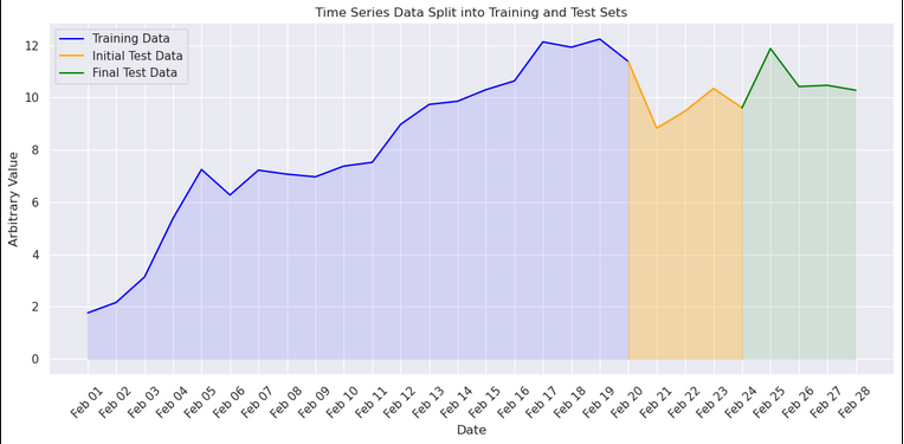
Time series data split

The test dataset is used to evaluate the performance of the trained model and compute various loss metrics, such as mean absolute error (MAE) and root-mean-squared error (RMSE). These metrics quantify the model’s accuracy in forecasting the actual values in the test set, providing a clear indication of the model’s quality and its ability to make accurate predictions. The evaluation process is detailed in the “Inference: Batch, real-time, and asynchronous” section, where we discuss the comprehensive approach to model evaluation and conditional model registration based on the computed metrics.

Creating and saving the datasets

After the data for each product-location group is categorized into training and test sets, the subsets are aggregated into comprehensive training and test DataFrames using pd.concat. This aggregation step combines the individual DataFrames stored in train_dfs and test_dfs lists into two unified DataFrames:

  • train_df for training data
  • test_df for testing data

Finally, the DataFrames are saved to CSV files (train.csv for training data and test.csv for test data), making them accessible for model training and evaluation processes. This saving step not only facilitates a clear separation of data for modelling purposes but also enables reproducibility and sharing of the prepared datasets.

Summary

This data preparation strategy meticulously respects the chronological nature of time series data and ensures that the training and test sets are appropriately aligned with real-world forecasting scenarios. By splitting the data based on the last known timestamps and carefully excluding the most recent periods from the training set, the approach mimics the challenge of predicting future values based on past observations, thereby setting the stage for a robust evaluation of the forecasting model’s performance.

2. Training a model with AutoMLV2

SageMaker AutoMLV2 reduces the resources needed to train, tune, and deploy machine learning models by automating the heavy lifting involved in model development. It provides a straightforward way to create high-quality models tailored to your specific problem type, be it classification, regression, or forecasting, among others. In this section, we delve into the steps to train a time series forecasting model with AutoMLV2.

Step 1: Define the tine series forecasting configuration

The first step involves defining the problem configuration. This configuration guides AutoMLV2 in understanding the nature of your problem and the type of solution it should seek, whether it involves classification, regression, time-series classification, computer vision, natural language processing, or fine-tuning of large language models. This versatility is crucial because it allows AutoMLV2 to adapt its approach based on the specific requirements and complexities of the task at hand. For time series forecasting, the configuration includes details such as the frequency of forecasts, the horizon over which predictions are needed, and any specific quantiles or probabilistic forecasts. Configuring the AutoMLV2 job for time series forecasting involves specifying parameters that would best use the historical sales data to predict future sales.

The AutoMLTimeSeriesForecastingConfig is a configuration object in the SageMaker AutoMLV2 SDK designed specifically for setting up time series forecasting tasks. Each argument provided to this configuration object tailors the AutoML job to the specifics of your time series data and the forecasting objectives.

time_series_config = AutoMLTimeSeriesForecastingConfig(
    forecast_frequency='W',
    forecast_horizon=4,
    item_identifier_attribute_name='product_code',
    target_attribute_name='unit_sales',
    timestamp_attribute_name='timestamp',
    ...
)

The following is a detailed explanation of each configuration argument used in your time series configuration:

  • forecast_frequency
    • Description: Specifies how often predictions should be made.
    • Value ‘W’: Indicates that forecasts are expected on a weekly basis. The model will be trained to understand and predict data as a sequence of weekly observations. Valid intervals are an integer followed by Y (year), M (month), W (week), D (day), H (hour), and min (minute). For example, 1D indicates every day and 15min indicates every 15 minutes. The value of a frequency must not overlap with the next larger frequency. For example, you must use a frequency of 1H instead of 60min.
  • forecast_horizon
    • Description: Defines the number of future time-steps the model should predict.
    • Value 4: The model will forecast four time-steps into the future. Given the weekly frequency, this means the model will predict the next four weeks of data from the last known data point.
  • forecast_quantiles
    • Description: Specifies the quantiles at which to generate probabilistic forecasts.
    • Values [p50,p60,p70,p80,p90]: These quantiles represent the 50th, 60th, 70th, 80th, and 90th percentiles of the forecast distribution, providing a range of possible outcomes and capturing forecast uncertainty. For instance, the p50 quantile (median) might be used as a central forecast, while the p90 quantile provides a higher-end forecast, where 90% of the actual data is expected to fall below the forecast, accounting for potential variability.
  • filling
    • Description: Defines how missing data should be handled before training; specifying filling strategies for different scenarios and columns.
    • Value filling_config: This should be a dictionary detailing how to fill missing values in your dataset, such as filling missing promotional data with zeros or specific columns with predefined values. This ensures the model has a complete dataset to learn from, improving its ability to make accurate forecasts.
  • item_identifier_attribute_name
    • Description: Specifies the column that uniquely identifies each time series in the dataset.
    • Value ’product_code’: This setting indicates that each unique product code represents a distinct time series. The model will treat data for each product code as a separate forecasting problem.
  • target_attribute_name
    • Description: The name of the column in your dataset that contains the values you want to predict.
    • Value unit_sales: Designates the unit_sales column as the target variable for forecasts, meaning the model will be trained to predict future sales figures.
  • timestamp_attribute_name
    • Description: The name of the column indicating the time point for each observation.
    • Value ‘timestamp’: Specifies that the timestamp column contains the temporal information necessary for modeling the time series.
  • grouping_attribute_names
    • Description: A list of column names that, in combination with the item identifier, can be used to create composite keys for forecasting.
    • Value [‘location_code’]: This setting means that forecasts will be generated for each combination of product_code and location_code. It allows the model to account for location-specific trends and patterns in sales data.

The configuration provided instructs the SageMaker AutoML to train a model capable of weekly sales forecasts for each product and location, accounting for uncertainty with quantile forecasts, handling missing data, and recognizing each product-location pair as a unique series. This detailed setup aims to optimize the forecasting model’s relevance and accuracy for your specific business context and data characteristics.

Step 2: Initialize the AutoMLV2 job

Next, initialize the AutoMLV2 job by specifying the problem configuration, the AWS role with permissions, the SageMaker session, a base job name for identification, and the output path where the model artifacts will be stored.

automl_sm_job = AutoMLV2(
    problem_config=time_series_config,
    role=role,
    sagemaker_session=sagemaker_session,
    base_job_name='time-series-forecasting-job',
    output_path=f's3://{bucket}/{prefix}/output'
)

Step 3: Fit the model

To start the training process, call the fit method on your AutoMLV2 job object. This method requires specifying the input data’s location in Amazon S3 and whether SageMaker should wait for the job to complete before proceeding further. During this step, AutoMLV2 will automatically pre-process your data, select algorithms, train multiple models, and tune them to find the best solution.

automl_sm_job.fit(
    inputs=[AutoMLDataChannel(s3_data_type='S3Prefix', s3_uri=train_uri, channel_type='training')],
    wait=True,
    logs=True
)

Please note that model fitting may take several hours, depending on the size of your dataset and compute budget. A larger compute budget allows for more powerful instance types, which can accelerate the training process. In this situation, provided you’re not running this code as part of the provided SageMaker notebook (which handles the order of code cell processing correctly), you will need to implement some custom code that monitors the training status before retrieving and deploying the best model.

3. Deploying a model with AutoMLV2

Deploying a machine learning model into production is a critical step in your machine learning workflow, enabling your applications to make predictions from new data. SageMaker AutoMLV2 not only helps build and tune your models but also provides a seamless deployment experience. In this section, we’ll guide you through deploying your best model from an AutoMLV2 job as a fully managed endpoint in SageMaker.

Step 1: Identify the best model and extract name

After your AutoMLV2 job completes, the first step in the deployment process is to identify the best performing model, also known as the best candidate. This can be achieved by using the best_candidate method of your AutoML job object. You can either use this method immediately after fitting the AutoML job or specify the job name explicitly if you’re operating on a previously completed AutoML job.

# Option 1: Directly after fitting the AutoML job
best_candidate = automl_sm_job.best_candidate()

# Option 2: Specifying the job name directly
best_candidate = automl_sm_job.best_candidate(job_name='your-auto-ml-job-name')

best_candidate_name = best_candidate['CandidateName']

Step 2: Create a SageMaker model

Before deploying, create a SageMaker model from the best candidate. This model acts as a container for the artifacts and metadata necessary to serve predictions. Use the create_model method of the AutoML job object to complete this step.

endpoint_name = f"ep-{best_candidate_name}-automl-ts"

# Create a SageMaker model from the best candidate
automl_sm_model = automl_sm_job.create_model(name=best_candidate_name, candidate=best_candidate)

4. Inference: Batch, real-time, and asynchronous

For deploying the trained model, we explore batch, real-time, and asynchronous inference methods to cater to different use cases.

The following figure is a decision tree to help you decide what type of endpoint to use. The diagram outlines a decision-making process for selecting between batch, asynchronous, or real-time inference endpoints. Starting with the need for immediate responses, it guides you through considerations like the size of the payload and the computational complexity of the model. Depending on these factors, you can choose a faster option with lower computational requirements or a slower batch process for larger datasets.
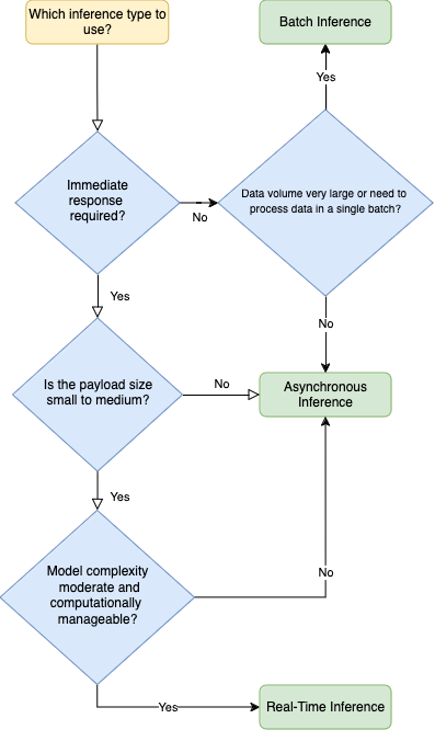
Decisioin tree for selecting between batch, asynchronous, or real-time inference endpoints

Batch inference using SageMaker pipelines

  • Usage: Ideal for generating forecasts in bulk, such as monthly sales predictions across all products and locations.
  • Process: We used SageMaker’s batch transform feature to process a large dataset of historical sales data, outputting forecasts for the specified horizon.

The inference pipeline used for batch inference demonstrates a comprehensive approach to deploying, evaluating, and conditionally registering a machine learning model for time series forecasting using SageMaker. This pipeline is structured to ensure a seamless flow from data preprocessing, through model inference, to post-inference evaluation and conditional model registration. Here’s a detailed breakdown of its construction:

  • Batch tranform step
    • Transformer Initialization: A Transformer object is created, specifying the model to use for batch inference, the compute resources to allocate, and the output path for the results.
    • Transform step creation: This step invokes the transformer to perform batch inference on the specified input data. The step is configured to handle data in CSV format, a common choice for structured time series data.
  • Evaluation step
    • Processor setup: Initializes an SKLearn processor with the specified role, framework version, instance count, and type. This processor is used for the evaluation of the model’s performance.
    • Evaluation processing: Configures the processing step to use the SKLearn processor, taking the batch transform output and test data as inputs. The processing script (evaluation.py) is specified here, which will compute evaluation metrics based on the model’s predictions and the true labels.
    • Evaluation strategy: We adopted a comprehensive evaluation approach, using metrics like mean absolute error (MAE) and root-means squared error (RMSE) to quantify the model’s accuracy and adjusting the forecasting configuration based on these insights.
    • Outputs and property files: The evaluation step produces an output file (evaluation_metrics.json) that contains the computed metrics. This file is stored in Amazon S3 and registered as a property file for later access in the pipeline.
  • Conditional model registration
    • Model metrics setup: Defines the model metrics to be associated with the model package, including statistics and explainability reports sourced from specified Amazon S3 URIs.
    • Model registration: Prepares for model registration by specifying content types, inference and transform instance types, model package group name, approval status, and model metrics.
    • Conditional registration step: Implements a condition based on the evaluation metrics (for example, MAE). If the condition (for example, MAE is greater than or equal to threshold) is met, the model is registered; otherwise, the pipeline concludes without model registration.
  • Pipeline creation and runtime
    • Pipeline definition: Assembles the pipeline by naming it and specifying the sequence of steps to run: batch transform, evaluation, and conditional registration.
    • Pipeline upserting and runtime: The pipeline.upsert method is called to create or update the pipeline based on the provided definition, and pipeline.start() runs the pipeline.

The following figure is an example of the SageMaker Pipeline directed acyclic graph (DAG).
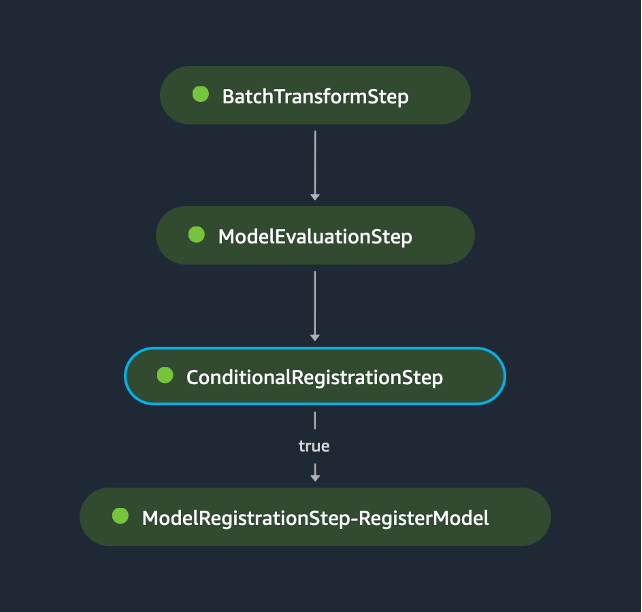
SageMaker Pipeline directed acyclic graph (DAG) for this problem.

This pipeline effectively integrates several stages of the machine learning lifecycle into a cohesive workflow, showcasing how Amazon SageMaker can be used to automate the process of model deployment, evaluation, and conditional registration based on performance metrics. By encapsulating these steps within a single pipeline, the approach enhances efficiency, ensures consistency in model evaluation, and streamlines the model registration process—all while maintaining the flexibility to adapt to different models and evaluation criteria.

Inferencing with Amazon SageMaker Endpoint in (near) real-time

But what if you want to run inference in real-time or asynchronously? SageMaker real-time endpoint inference offers the capability to deliver immediate predictions from deployed machine learning models, crucial for scenarios demanding quick decision making. When an application sends a request to a SageMaker real-time endpoint, it processes the data in real time and returns the prediction almost immediately. This setup is optimal for use cases that require near-instant responses, such as personalized content delivery, immediate fraud detection, and live anomaly detection.

  • Usage: Suited for on-demand forecasts, such as predicting next week’s sales for a specific product at a particular location.
  • Process: We deployed the model as a SageMaker endpoint, allowing us to make real-time predictions by sending requests with the required input data.

Deployment involves specifying the number of instances and the instance type to serve predictions. This step creates an HTTPS endpoint that your applications can invoke to perform real-time predictions.

# Deploy the model to a SageMaker endpoint
predictor = automl_sm_model.deploy(initial_instance_count=1, endpoint_name=endpoint_name, instance_type='ml.m5.xlarge')

The deployment process is asynchronous, and SageMaker takes care of provisioning the necessary infrastructure, deploying your model, and ensuring the endpoint’s availability and scalability. After the model is deployed, your applications can start sending prediction requests to the endpoint URL provided by SageMaker.

While real-time inference is suitable for many use cases, there are scenarios where a slightly relaxed latency requirement can be beneficial. SageMaker Asynchronous Inference provides a queue-based system that efficiently handles inference requests, scaling resources as needed to maintain performance. This approach is particularly useful for applications that require processing of larger datasets or complex models, where the immediate response is not as critical.

  • Usage: Examples include generating detailed reports from large datasets, performing complex calculations that require significant computational time, or processing high-resolution images or lengthy audio files. This flexibility makes it a complementary option to real-time inference, especially for businesses that face fluctuating demand and seek to maintain a balance between performance and cost.
  • Process: The process of using asynchronous inference is straightforward yet powerful. Users submit their inference requests to a queue, from which SageMaker processes them sequentially. This queue-based system allows SageMaker to efficiently manage and scale resources according to the current workload, ensuring that each inference request is handled as promptly as possible.

Clean up

To avoid incurring unnecessary charges and to tidy up resources after completing the experiments or running the demos described in this post, follow these steps to delete all deployed resources:

  1. Delete the SageMaker endpoints: To delete any deployed real-time or asynchronous endpoints, use the SageMaker console or the AWS SDK. This step is crucial as endpoints can accrue significant charges if left running.
  2. Delete the SageMaker Pipeline: If you have set up a SageMaker Pipeline, delete it to ensure that there are no residual executions that might incur costs.
  3. Delete S3 artifacts: Remove all artifacts stored in your S3 buckets that were used for training, storing model artifacts, or logging. Ensure you delete only the resources related to this project to avoid data loss.
  4. Clean up any additional resources: Depending on your specific implementation and additional setup modifications, there may be other resources to consider, such as roles or logs. Check your AWS Management Console for any resources that were created and delete them if they are no longer needed.

Conclusion

This post illustrates the effectiveness of Amazon SageMaker AutoMLV2 for time series forecasting. By carefully preparing the data, thoughtfully configuring the model, and using both batch and real-time inference, we demonstrated a robust methodology for predicting future sales. This approach not only saves time and resources but also empowers businesses to make data-driven decisions with confidence.

If you’re inspired by the possibilities of time series forecasting and want to experiment further, consider exploring the SageMaker Canvas UI. SageMaker Canvas provides a user-friendly interface that simplifies the process of building and deploying machine learning models, even if you don’t have extensive coding experience.

Visit the SageMaker Canvas page to learn more about its capabilities and how it can help you streamline your forecasting projects. Begin your journey towards more intuitive and accessible machine learning solutions today!


About the Authors

Nick McCarthy is a Senior Machine Learning Engineer at AWS, based in London. He has worked with AWS clients across various industries including healthcare, finance, sports, telecoms and energy to accelerate their business outcomes through the use of AI/ML. Outside of work he loves to spend time travelling, trying new cuisines and reading about science and technology. Nick has a Bachelors degree in Astrophysics and a Masters degree in Machine Learning.

Davide Gallitelli is a Senior Specialist Solutions Architect for AI/ML in the EMEA region. He is based in Brussels and works closely with customers throughout Benelux. He has been a developer since he was very young, starting to code at the age of 7. He started learning AI/ML at university, and has fallen in love with it since then.

Read More