Simplify automotive damage processing with Amazon Bedrock and vector databases

Simplify automotive damage processing with Amazon Bedrock and vector databases

In the automotive industry, the ability to efficiently assess and address vehicle damage is crucial for efficient operations, customer satisfaction, and cost management. However, manual inspection and damage detection can be a time-consuming and error-prone process, especially when dealing with large volumes of vehicle data, the complexity of assessing vehicle damage, and the potential for human error in the assessment.

This post explores a solution that uses the power of AWS generative AI capabilities like Amazon Bedrock and OpenSearch vector search to perform damage appraisals for insurers, repair shops, and fleet managers.

Amazon Bedrock is a fully managed service that offers a choice of high-performing foundation models (FMs) from leading AI companies like AI21 Labs, Anthropic, Cohere, Meta, Mistral, Stability AI, and Amazon through a single API, along with a broad set of capabilities to build generative AI applications with security, privacy, and responsible AI. Amazon OpenSearch Service is a powerful, highly flexible search engine that allows you to retrieve data based on a variety of lexical and semantic retrieval approaches.

By combining these powerful tools, we have developed a comprehensive solution that streamlines the process of identifying and categorizing automotive damage. This approach not only enhances efficiency, but also provides valuable insights that can help automotive businesses make more informed decisions.

The traditional way to solve these problems is to use computer vision machine learning (ML) models to classify the damage and its severity and complement with regression models that predict numerical outcomes based on input features like the make and model of the car, damage severity, damaged part, and more.

This approach creates challenges to maintain multiple models for classifying damage severity and creating estimates. Although these models can provide precise estimates based on historical data, they can’t be generalized to provide a quick range of estimates and any changes to the damage dataset (which includes updated makes and models) or varying repair estimates based on parts, labor, and facility. Any generalization to provide such estimates using traditional models will lead to feature engineering complexity.

This is where large language models (LLMs) come into play to look at the features both visually and based on text descriptions and find the closest match semantically.

Solution overview

Automotive companies have large datasets that include damages that have happened to their vehicle assets, which include images of the vehicles, the damage, and detailed information about that damage. This metadata includes details such as make, model, year, area of the damage, severity of the damage, parts replacement cost, and labor required to repair.

The information contained in these datasets—the images and the corresponding metadata—is converted to numerical vectors using a process called multimodal embedding. These embedding vectors contain the necessary information of the image and the text metadata encoded in numerical representation. We query against these embedding vectors to find the closest match to the incoming damaged vehicle image. This technique is called semantic search. In this solution, we use OpenSearch Service, a powerful, highly flexible search engine that allows you to retrieve data based on a variety of lexical and semantic retrieval approaches, including vector search. We generate the embeddings using the Amazon Titan Multimodal Embeddings model, available on Amazon Bedrock.

This solution is available in our GitHub repo, including detailed instructions about its deployment and testing.

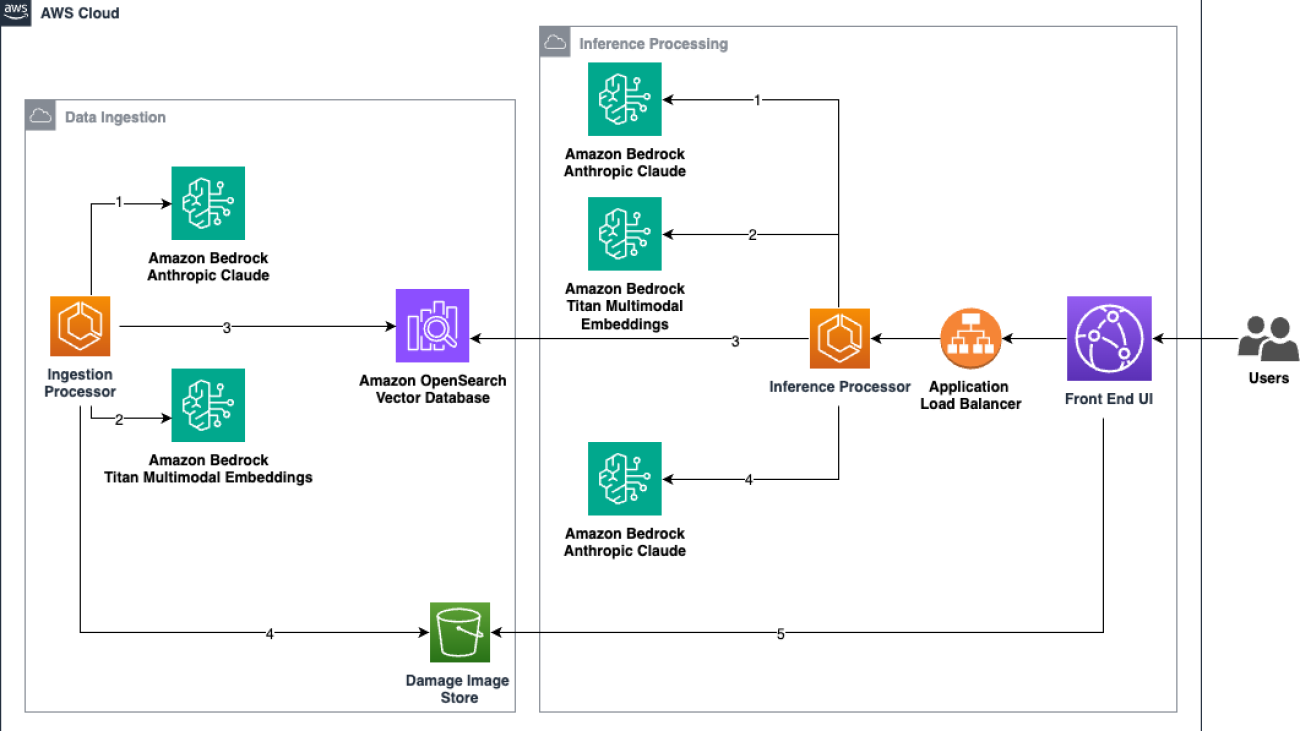
The following architecture diagram illustrates the proposed solution. It contains two flows:

  • Data ingestion – The data ingestion flow converts the damage datasets (images and metadata) into vector embeddings and stores them in the OpenSearch vector store. We need to initially invoke this flow to load all the historic data into OpenSearch. We can also schedule it to load the updated dataset on a regular basis, or invoke it in near real time whenever new data flows in.
  • Damage assessment inference – The inference processing flow runs every time there is a new damage image to find the closest match from the current dataset stored in OpenSearch.

The data ingestion flow consists of the following steps:

  1. The ingestion process starts with the ingestion processor taking each damaged image from the existing damage repair cost dataset and passing it to Anthropic’s Claude 3 on Amazon Bedrock. The invoice details of the repair costs could be in various formats, like PDF, images, tables, and so on. These images are passed to Anthropic’s Claude 3 Haiku to be analyzed and output into a standardized JSON format. The step of creating the metadata during the ingestion process is optional if the repair invoices are already present in a standardized format.

In this solution, Anthropic’s Claude 3 creates the JSON metadata for each image. The dataset provided in this example only contains images. In a production scenario, the metadata would ideally contain relevant data from existing invoices, where Amazon Bedrock could be used to extract the relevant information and create the standardized metadata, if it doesn’t exist yet.

The following is an example image.

The following code shows an example of the ingested metadata:

{
  "make": "Make_1",
  "model": "Model_1",
  "year": 2015,
  "state": "FL",
  "damage": "Right Front",
  "repair_cost": 750,
  "damage_severity": "moderate",
  "damage_description": "Dent and scratches on the right fender",
  "parts_for_repair": [
    "Right fender",
    "Paint"
  ],
  "labor_hours": 4,
  "parts_cost": 400,
  "labor_cost": 350,
  "s3_location": "repair-data/203.jpeg"
}
  1. The JSON output from the previous step along with the actual damage image are sent to the Amazon Titan Multimodal Embeddings model to generate embedding vectors. Each vector is of 1,024 dimensions, and it encodes both the image and the repair cost JSON data.
  2. The outputs generated in the previous steps (the text representation and vector embeddings of the damage data) are stored in an Amazon OpenSearch Serverless vector search collection. By storing both the text representation and vector embeddings, you can use the power of hybrid search (text search and semantic search) to optimize the search results.
  3. Finally, the ingestion processor stores the raw images in Amazon Simple Storage Service (Amazon S3), which we use later in the inference flow to show the closest matches to the user.

The user performing the damage assessment interacts with the UI by providing the image of the damaged vehicle and some basic information needed for the assessment. The inference processing flow includes the following steps:

Inference Flow Steps:

  1. The inference processor takes each damaged image provided by the user and passes it to Anthropic’s Claude 3 to be analyzed and output into a standardized JSON format.
  2. The JSON output from the previous step along with the damage image are sent to the Amazon Titan Multimodal Embeddings model to generate embedding vectors.
  3. The embeddings are queried against all the embeddings of the existing damage data inside the OpenSearch Serverless collection to find the closest matches. For the top k (k=3 in our sample application) closest matches, it returns the JSON data that contains the repair costs and other damage expenses. With that information, several stats like median expenses and repair costs upper and lower bounds are calculated.
  4. In our scenario, the solution takes the metadata from each of the matches and sends that metadata to Anthropic’s Claude 3 Haiku hosted on Amazon Bedrock. The prompt is engineered to get the LLM to consider the total repair cost of each match and calculate an average. Production implementations of this solution could have variations of how this final step is done. Calculation of the repair costs could be done on different ways, in this case using generative AI, or by retrieving further information from other datasets, such as current parts and labor costs, to calculate a new repair cost average.
  5. The UI displays the repair expenses estimates along with the accuracy. The front end also pulls the images from Amazon S3 that are closest in match to the queried image.

Prompts and datasets

Our solution consists of automotive damage images, which are provided as part of our repository, and the code provided handles the ingestion of images and the UI that users can interact with. Our sample dataset contains images from different vehicles (for this post, we use three fictitious car brands and models). We use the following prompt to create the JSON metadata that is ingested with the image:

'Instruction: You are a damage repair cost estimator and based on the image you need 
to create a json output as close as possible to the <model>, 
you need to estimate the repair cost to populate within the output and you need to 
provide the damage severity according to the <criteria>, 
you also need to provide a damage description which is short and less than 10 words. 
Just provide the json output in the response, do not explain the reasoning. 
For testing purposes assume the image is from a fictitious car brand "Make_1" and a 
fictitious model "Model_1" in the state of Florida.‘

This prompt instructs the model to create the metadata as JSON output, and an example of that JSON metadata is provided within the <model> tag. The prompt also adds instructions for the model to assess the damage and estimate the cost following the <criteria> tag. The model and criteria are parameters that are created within the code and passed to the model. They are defined in the code from lines 85–106.

For each fictitious vehicle make and model, we have a dataset with 200 images. These images are stored within the /containers/ingestion/data_set path of the repository.

During the inference flow, the first steps that are run by the UI are capturing the image from the user and creating new metadata based on this new image and some basic information that the user provides. The following prompt is part of the inference code, which is used to create the initial metadata:

Instruction: You are a car damage assessor that needs to create a short description 
for the damage in the image. Analyze the image and populate the json output adding an 
extra field called damage description, this description has to be short and less than 
10 words, provide ONLY the json as a response and no other data, the xml tags also 
must not be in the response.

These prompts are examples provided with the solution to create basic metadata, which is then used to increase the accuracy of the vector search. There might be different use cases where more detailed prompts are required, and for that, this solution can serve as a base.

Prerequisites

To deploy the proposed sample solution, some prerequisites are needed:

Deploy the solution

Complete the following steps to deploy this solution:

  1. Run the provided CloudFormation template.
  2. Download the dataset from the public dataset repository. Specific instructions can be found on the AWS Samples repository.
  3. Upload the dataset to the S3 source bucket. Specific instructions can be found on the AWS Samples repository.
  4. Run the ECS task, which runs the image ingestion process following the steps mentioned on the GitHub repo.
  5. To access the inference code, open the AWS CloudFormation console, navigate to the stack’s Outputs tab, and choose the CloudFront distribution link for the InferenceUIURL key to go to the inference UI.

  1. Test the solution by following the testing procedures in our GitHub repo.

Clean up

To clean up the resources you created, complete the following steps:

  1. On the AWS CloudFormation console, navigate to the Outputs tab of the stack you deployed.
  2. Note the name of your ECR repository and S3 bucket.
  3. On the Amazon S3 console, delete the contents of the bucket.
  4. On the Amazon ECR console, delete the images in the repository.
  5. On the AWS CloudFormation console, delete the stack.

Deleting the stack removes all other related resources from your AWS account. The bucket and repository must be empty in order to delete them.

Conclusion

The integration of Amazon Bedrock and vector databases like OpenSearch presents a powerful solution for simplifying automotive damage processing. This innovative approach offers several key benefits:

  • Efficiency – By using generative AI and semantic search capabilities, the system can quickly process and analyze damage reports, significantly reducing the time required for assessments
  • Accuracy – The use of multimodal embeddings and vector search makes sure damage assessments are based on comprehensive data, including both visual and textual information, leading to more accurate results
  • Scalability – As the dataset grows, the system’s performance improves, allowing it to handle increasing volumes of data without compromising speed or accuracy
  • Adaptability – The system can be updated with new data, so it remains current with the latest repair costs and damage types without the need to fully train using a traditional ML model

As the automotive industry continues to evolve, solutions like this will play a crucial role in streamlining operations, improving customer satisfaction, and optimizing resource allocation. By embracing AI-driven technologies, automotive businesses can stay ahead of the curve and deliver more efficient, accurate, and cost-effective damage assessment services. The combination of powerful AI models available in Amazon Bedrock and vector search capabilities of OpenSearch Service demonstrates the potential for transformative solutions in the automotive industry. As these technologies continue to advance, we can expect even more innovative applications that will reshape how we approach vehicle damage assessment and repair.

For detailed instructions and deployment steps, refer to our GitHub repo. Let us know in the comments section your thoughts about this solution and potential improvements we can add.


About the Authors

Vinicius Pedroni is a Senior Solutions Architect at AWS for the Travel and Hospitality Industry, with focus on Edge Services and Generative AI. Vinicius is also passionate about assisting customers on their Cloud Journey, allowing them to adopt the right strategies at the right moment.

Manikanth Pasumarti is a Solutions Architect based out of New York City. He works with enterprise customers to architect and design solutions for their business needs. He is passionate about math and loves to teach kids in his free time.

Read More

Abstracts: November 14, 2024

Abstracts: November 14, 2024

Outlined illustrations of Tong Wang and Bonnie Kruft for the Microsoft Research Podcast, Abstracts series.

Members of the research community at Microsoft work continuously to advance their respective fields. Abstracts brings its audience to the cutting edge with them through short, compelling conversations about new and noteworthy achievements.

In this episode, Microsoft Senior Researcher Tong Wang joins guest host Bonnie Kruft, partner and deputy director of Microsoft Research AI for Science, to discuss “Ab initio characterization of protein molecular dynamics with AI2BMD.” In the paper, which was published by the scientific journal Nature, Wang and his coauthors detail a system that leverages AI to advance the state of the art in simulating the behavior of large biomolecules. AI2BMD, which is generalizable across a wide range of proteins, has the potential to advance solutions to scientific problems and enhance biomedical research in drug discovery, protein design, and enzyme engineering.

Transcript

[MUSIC]

BONNIE KRUFT: Welcome to Abstracts, a Microsoft Research Podcast that puts the spotlight on world-class research in brief. In this series, members of the research community at Microsoft give us a quick snapshot—or a podcast abstract—of their new and noteworthy papers.

[MUSIC FADES] 

I’m Bonnie Kruft, partner and deputy director of Microsoft Research AI for Science and your host for today. Joining me is Tong Wang, a senior researcher at Microsoft. Tong is the lead author of a paper called “Ab initio characterization of protein molecular dynamics with AI2BMD,” which has just been published by the top scientific journal Nature. Tong, thanks so much for joining us today on Abstracts!


TONG WANG: Thank you, Bonnie.

KRUFT: Microsoft Research is one of the earliest institutions to apply AI in biomolecular simulation research. Why did the AI for Science team choose this direction, and—with this work specifically, AI2BMD—what problem are you and your coauthors addressing, and why should people know about it?

WANG: So as Richard Feynman famously said, “Everything that living things do can be understood in terms of the jigglings and the wigglings of atoms.” To study the mechanisms behind the biological processes and to develop biomaterials and drugs requires a computational approach that can accurately characterize the dynamic motions of biomolecules. When we review the computational research for biomolecular structure, we can get two key messages. First, in recent years, predicting the crystal, or static, protein structures with methods powered by AI has achieved great success and just won the Nobel Prize in Chemistry in the last month. However, characterizing the dynamic structures of proteins is more meaningful for biology, drug, and medicine fields but is much more challenging. Second, molecular dynamics simulation, or MD, is one of the most widely used approaches to study protein dynamics, which can be roughly divided into classical molecular dynamics simulation and quantum molecular dynamics simulation. Both approaches have been developed for more than a half century and won Nobel Prize. Classical MD is fast but less accurate, while quantum MD is very accurate but computationally prohibitive for the protein study. However, we need both the accuracy and the efficiency to detect the biomechanisms. Thus, applying AI in biomolecular simulation can become the third way to achieve both ab initio—or first principles—accuracy and high efficiency. In the winter of 2020, we have foreseen the trend that AI can make a difference in biomolecular simulations. Thus, we chose this direction.

KRUFT: It took four years from the idea to the launch of AI2BMD, and there were many important milestones along the way. First, talk about how your work builds on and/or differs from what’s been done previously in this field, and then give our audience a sense of the key moments and challenges along the AI2BMD research journey.

WANG: First, I’d like to say applying AI in biomolecular simulation is a novel research field. For AI-powered MD simulation for large biomolecules, there is no existing dataset, no well-designed machine learning model for the interactions between the atoms and the molecules, no clear technical roadmap, no mature AI-based simulation system. So we face various new challenges every day. Second, there are some other works exploring this area at the same time. I think a significant difference between AI2BMD and other works is that other works require to generate new data and train the deep learning models for any new proteins. So it takes a protein-specific solution. As a contrast, AI2BMD proposes a generalizable solution for a wide range of proteins. To achieve it, as you mentioned, there are some key milestones during the four-year journey. The first one is we proposed the generalizable protein fragmentation approach that divides proteins into the commonly used 20 kinds of dipeptides. Thus, we don’t need to generate data for various proteins. Instead, we only need to sample the conformational space of such dipeptides. So we built the protein unit dataset that contains about 20 million samples with ab initio accuracy. Then we proposed ViSNet, the graph neural network for molecular geometry modeling as the machine learning potential for AI2BMD. Furthermore, we designed AI2BMD simulation system by efficiently leveraging CPUs and GPUs at the same time, achieving hundreds of times simulation speed acceleration than one year before and accelerating the AI-driven simulation with only ten to a hundred millisecond per simulation step. Finally, we examined AI2BMD on energy, force, free energy, J coupling, and many kinds of property calculations for tens of proteins and also applied AI2BMD in the drug development competition. All things are done by the great team with science and engineering expertise and the great leadership and support from AI for Science lab.

KRUFT: Tell us about how you conducted this research. What was your methodology?

WANG: As exploring an interdisciplinary research topic, our team consists of experts and students with biology, chemistry, physics, math, computer science, and engineering backgrounds. The teamwork with different expertise is key to AI2BMD research. Furthermore, we collaborated and consulted with many senior experts in the molecular dynamics simulation field, and they provided very insightful and constructive suggestions to our research. Another aspect of the methodology I’d like to emphasize is learning from negative results. Negative results happened most of the time during the study. What we do is to constantly analyze the negative results and adjust our algorithm and model accordingly. There’s no perfect solution for a research topic, and we are always on the way.

KRUFT: AI2BMD got some upgrades this year, and as we mentioned at the top of the episode, the work around the latest system was published in the scientific journal Nature. So tell us, Tong—what is new about the latest AI2BMD system? 

WANG: Good question. We posted a preliminary version of AI2BMD manuscript on bioRxiv last summer. I’d like to share three important upgrades through the past one and a half year. The first is hundreds of times of simulation speed acceleration for AI2BMD, which becomes one of the fastest AI-driven MD simulation system and leads to perform much longer simulations than before. The second aspect is AI2BMD was applied for many protein property calculations, such as enthalpy, heat capacity, folding free energy, pKa, and so on. Furthermore, we have been closely collaborating with the Global Health Drug Discovery Institute, GHDDI, a nonprofit research institute founded and supported by the Gates Foundation, to leverage AI2BMD and other AI capabilities to accelerate the drug discovery processes.

KRUFT: What significance does AI2BMD hold for research in both biology and AI? And also, what impact does it have outside of the lab, in terms of societal and individual benefits?

WANG: Good question. For biology, AI2BMD provides a much more accurate approach than those used in the past several decades to simulate the protein dynamic motions and study the bioactivity. For AI, AI2BMD proves AI can make a big difference to the dynamic protein structure study beyond AI for the protein static structure prediction. Raised by AI2BMD and other works, I can foresee there is a coming age of AI-driven biomolecular simulation, providing binding free-energy calculation with quantum simulation accuracy for the complex of drug and the target protein for drug discovery, detecting more flexible biomolecular conformational changes that molecular mechanics cannot do, and opening more opportunities for enzyme engineering and vaccine and antibody design.

KRUFT: AI is having a profound influence on the speed and breadth of scientific discovery, and we’re excited to see more and more talented people joining us in this space. What do you want our audience to take away from this work, particularly those already working in the AI for Science space or looking to enter it?

WANG: Good question. I’d like to share three points from my research experience. First is aim high. Exploring a disruptive research topic is better than doing 10 incremental works. In the years of research, our organization always encourages us to do the big things. Second is persistence. I remembered a computer scientist previously said about 90% of the time during research is failure and frustration. The rate is even higher when exploring a new research direction. In AI2BMD study, when we suffered from research bottlenecks that cannot be tackled for several months, when we received critical comments from reviewers, when some team members wanted to give up and leave, I always encourage everyone to persist, and we will make it. More importantly, the foundation of persistence is to ensure your research direction is meaningful and constantly adjust your methodology from failures and critical feedback. The third one is real-world applications. Our aim is to leverage AI for advancing science. Proposing scientific problems is a first step, then developing AI tools and evaluating on benchmarks and, more importantly, examining its usefulness in the real-world applications and further developing your AI algorithms. In this way, you can close the loop of AI for Science research.

KRUFT: And, finally, Tong, what unanswered questions or unsolved problems remain in this area, and what’s next on the agenda for the AI2BMD team?

WANG: Well, I think AI2BMD is a starting point for the coming age of AI-driven MD for biomolecules. There are lots of new scientific questions and challenges coming out in this new field. For example, how to expand the simulated molecules from proteins to other kinds of biomolecules; how to describe the biochemical reactions during the simulations; how to further improve the simulation efficiency and robustness; and how to apply it for more real-world scenarios. We warmly welcome any people from both academic and industrial fields to work together with us to make the joint efforts to push the frontier of this new field moving forward.

[MUSIC]

KRUFT: Well, Tong, thank you for joining us today, and to our listeners, thanks for tuning in. If you want to read the full paper on AI2BMD, you can find a link at aka.ms/abstracts, or you can read it on the Nature website. See you next time on Abstracts!

[MUSIC FADES]

The post Abstracts: November 14, 2024 appeared first on Microsoft Research.

Read More

Understanding prompt engineering: Unlock the creative potential of Stability AI models on AWS

Understanding prompt engineering: Unlock the creative potential of Stability AI models on AWS

In the rapidly evolving world of generative AI image modeling, prompt engineering has become a crucial skill for developers, designers, and content creators. By crafting effective prompts, you can harness the full potential of advanced diffusion transformer text-to-image models, enabling you to produce high-quality images that align closely with your creative vision. Amazon Bedrock offers access to powerful models such as Stable Image Ultra and Stable Diffusion 3 Large, which are designed to transform text descriptions into stunning visual outputs. Stability AI’s newest launch of Stable Diffusion 3.5 Large (SD3.5L) on Amazon SageMaker JumpStart enhances image generation, human anatomy rendering, and typography by producing more diverse outputs and adhering closely to user prompts, making it a significant upgrade over its predecessor.

In this post, we explore advanced prompt engineering techniques that can enhance the performance of these models and facilitate the creation of compelling imagery through text-to-image transformations.

Understanding the Prompt Structure

Prompt engineering is a valuable technique for effectively using generative AI image models. The structure of a prompt directly affects the generated images’ quality, creativity, and accuracy. Stability AI’s latest models enhance productivity by helping users achieve quality results. This guide offers practical prompting tips for the Stable Diffusion 3 family of models, allowing you to refine image concepts quickly and precisely. A well-structured Stable Diffusion prompt typically consists of the following key components:

  1. Subject – This is the main focus of your image. You can provide extensive details, such as the gender of a character, their clothing, and the setting. For example, “A corgi dog sitting on the front porch.”
Generated by SD3 Large Generated by SD Ultra Generated by SD3.5 Large
  1. Medium – This refers to the material or technique used in creating the artwork. Examples include “oil paint,” “digital art,” “voxel art,” or “watercolor.” A complete prompt might read: “3D Voxel Art; wide angle shot of a bright and colorful world.”
Generated by SD3 Large Generated by SD Ultra Generated by SD3.5 Large
  1. Style – You can specify an art style (such as impressionism, realism, or surrealism). A more detailed prompt could be: “Impressionist painting of a lady in a sun hat in a blooming garden.”
Generated by SD3 Large Generated by SD Ultra Generated by SD3.5 Large
  1. Composition and framing – You can describe the desired composition and framing of the image. This could include specifying close-up shots, wide-angle views, or particular compositional techniques. Consider the images generated by the following prompt: “Wide-shot of two friends lying on a hilltop, stargazing against an open sky filled with stars.”
Generated by SD3 Large Generated by SD Ultra Generated by SD3.5 Large
  1. Lighting and color:You can describe the lighting or shadows in the scene. Terms like “backlight,” “hard rim light,” and “dynamic shadows” can enhance the feel of the image. Consider the following prompt and images generated with it: “A yellow umbrella left open on a rainy street, surrounded by neon reflections, with hard rim light outlining its shape against the wet pavement, adding a moody glow.”
Generated by SD3 Large Generated by SD Ultra Generated by SD3.5 Large
  1. Resolution – Specifying resolution helps control image sharpness. For example: “A winding river through a snowy forest in 4K, illuminated by soft winter sunlight, with tree shadows across the snow and icy reflections.”
Generated by SD3 Large Generated by SD Ultra Generated by SD3.5 Large

Treat the SD3 generation of models as a creative partner. By expressing your ideas clearly in natural language, you give the model the best opportunity to generate an image that aligns with your vision.

Prompting techniques

The following are key prompting techniques to employ:

  • Descriptive language – Unlike previous models that required concise prompts, SD3.5 allows for detailed descriptions. For instance, instead of simply stating “a man and woman,” you can specify intricate details such as clothing styles and background settings. This clarity helps in achieving better adherence to the desired output.
  • Negative prompts – Negative prompting offers enhanced control over colors and content by removing unwanted elements, textures, or hues from the image. Whereas the main prompt establishes the image’s broad composition, negative prompts allow for honing in on specific elements, yielding a cleaner, more polished result. This added refinement helps keep distractions to a minimum, aligning the final output closely with your intended vision.
  • Using multiple text encoders –The SD3 generation of models features three text encoders that can accept varied prompts. This allows you to experiment with assigning general themes or styles to one encoder while detailing specific subjects in another.
  • Tokenization – Perfecting the art of prompt engineering for the Stable Diffusion 3 model family requires a deep understanding of several key concepts and techniques. At the core of effective prompting lies the process of tokenization and token analysis. It’s crucial to comprehend how the SD3 family breaks down your prompt text into individual tokens, because this directly impacts the model’s interpretation and subsequent image generation. By analyzing these tokens, you can identify potential issues such as out-of-vocabulary words that might split into sub-word tokens, multi-word phrases that don’t tokenize together as expected, or ambiguous tokens like “3D” that could be interpreted in multiple ways. For instance, in the prompt “A realistic 3D render of a red apple,” the clarity of tokenization can significantly affect the quality of the output image.
Generated by SD3 Large Generated by SD Ultra Generated by SD3.5 Large
  • Prompt weighting – Prompt weighting and emphasis techniques allow you to fine-tune the importance of specific elements within your prompt. By using syntax like “A photo of a (red:1.2) apple,” you can increase the significance of the color “red” in the generated image. Similarly, emphasizing multiple aspects, as in “A (photorealistic:1.4) (3D render:1.2) of a red apple,” can help achieve a more nuanced result that balances photorealism with 3D rendering qualities. “(photorealistic 1.4)” indicates that the image should be photorealistic, with a weight of 1.4. The higher weight (>1.0) emphasizes that the photorealistic quality is more important than usual. Although you can technically set weights higher than 5.0, it’s advisable to stay within the range of 1.5–2.0 for effective results. This level of control enables you to guide the model’s focus more precisely, resulting in outputs that more closely align with your creative vision.
A photo of a (red:1.2) apple A (photorealistic:1.4) (3D render:1.2) of a red apple

Practical settings for optimal results

To optimize the performance for these models, several key settings should be adjusted based on user preferences and hardware capabilities. Start with 28 denoising steps to balance image quality and generation time. For the Guidance Scale (CFG), set it between 3.5–4.5 to maintain fidelity to the prompt without creating overly contrasted images. ComfyUI is an open source, node-based application that empowers users to generate images, videos, and audio using advanced AI models, offering a highly customizable workflow for creative projects. In ComfyUI, using the dpmpp_2m sampler along with the sgm_uniform scheduler yields effective results. Additionally, aim for a resolution of approximately 1 megapixel (for example, 1024×1024 for square images) while making sure that dimensions are divisible by 64 for optimal output quality. These settings provide a solid foundation for generating high-quality images while efficiently utilizing your hardware resources, allowing for further adjustments based on specific requirements.

Prompt programming

Treating prompts as a form of programming language can also yield powerful results. By structuring your prompts with components like subjects, styles, and scenes, you create a modular system that’s simple to adjust and extend. For example, using syntax like “A red apple [SUBJ], photorealistic [STYLE], on a wooden table [SCENE]” allows for systematic modifications and experimentation with different elements of the prompt.

Prompt augmentation and tuning

Lastly, prompt augmentation and tuning can significantly enhance the effectiveness of your prompts. This might involve incorporating additional data such as reference images or rough sketches as conditioning inputs alongside your text prompts. Furthermore, fine-tuning models on carefully curated datasets of prompt-image pairs can improve the associations between textual descriptions and visual outputs, leading to more accurate and refined results. With these advanced techniques, you can push the boundaries of what’s possible with SD3.5, creating increasingly sophisticated and tailored images that truly bring your ideas to life.

Responsible and ethical AI with Amazon Bedrock

When working with Stable Diffusion models through Amazon Bedrock, Amazon Bedrock Guardrails can intercept and evaluate user prompts before they reach the image generation pipeline. This allows for filtering and moderation of input text to prevent the creation of harmful, offensive, or inappropriate images. The system offers configurable content filters that can be adjusted to different strength levels, giving fine-tuned control over what types of image content are permitted to be generated. Organizations can define denied topics specific to image generation, such as blocking requests for violent imagery or explicit content. Word filters can be set up to detect and block specific phrases or terms that may lead to undesirable image outputs. Additionally, sensitive information filters can be applied to protect personally identifiable information (PII) from being incorporated into generated images. This multi-layered approach helps prevent misuse of Stable Diffusion models, maintain compliance with regulations around AI-generated imagery, and provide a consistently safe user experience when using these powerful image generation capabilities. By implementing Amazon Bedrock Guardrails, organizations can confidently deploy Stable Diffusion models while mitigating risks and adhering to ethical AI principles.

Conclusion

In the dynamic realm of generative AI image modeling, understanding prompt engineering is essential for developers, designers, and content creators looking to unlock the full potential of models like Stable Diffusion 3.5 Large. This advanced model, available on Amazon Bedrock, enhances image generation by producing diverse outputs that closely align with user prompts. Effective prompting involves understanding the structure of prompts, which typically includes key components such as the subject, medium, style, and resolution. By clearly defining these elements and employing techniques like prompt weighting and chaining, you can refine your creative vision and achieve high-quality results.

Additionally, the process of tokenization plays a crucial role in how prompts are interpreted by the model. Analyzing tokens can help identify potential issues that may affect output quality. You can also enhance your prompts through modular programming approaches and by incorporating additional data like reference images. By fine-tuning models on datasets of prompt-image pairs, creators can improve the associations between text and visuals, leading to more accurate results.

This post provided practical tips and techniques to optimize performance and elevate the creative possibilities within Stable Diffusion 3.5 Large, empowering you to produce compelling imagery that resonates with their artistic intent. To get started, see Stability AI in Amazon Bedrock. To explore what’s available on SageMaker JumpStart, see Stability AI builds foundation models on Amazon SageMaker.


About the Authors

Isha Dua is a Senior Solutions Architect based in the San Francisco Bay Area working with GENAI Model providers and helping customer optimize their GENAI workloads on AWS. She helps enterprise customers grow by understanding their goals and challenges, and guides them on how they can architect their applications in a cloud-native manner while ensuring resilience and scalability. She’s passionate about machine learning technologies and environmental sustainability.

Sanwal Yousaf is a Solutions Engineer at Stability AI. His work at Stability AI focuses on working with enterprises to architect solutions using Stability AI’s Generative models to solve pressing business problems. He is passionate about creating accessible resources for people to learn and develop proficiency with AI.
Read More

Introducing Stable Diffusion 3.5 Large in Amazon SageMaker JumpStart

Introducing Stable Diffusion 3.5 Large in Amazon SageMaker JumpStart

We are excited to announce the availability of Stability AI’s latest and most advanced text-to-image model, Stable Diffusion 3.5 Large, in Amazon SageMaker JumpStart. This new cutting-edge image generation model, which was trained on Amazon SageMaker HyperPod, empowers AWS customers to generate high-quality images from text descriptions with unprecedented ease, flexibility, and creative potential. By adding Stable Diffusion 3.5 Large to SageMaker JumpStart, we’re taking another significant step towards democratizing access to advanced AI technologies and enabling businesses of all sizes to harness the power of generative AI.

In this post, we provide an implementation guide for subscribing to Stable Diffusion 3.5 Large in SageMaker JumpStart, deploying the model in Amazon SageMaker Studio, and generating images using text-to-image prompts.

Stable Diffusion 3.5 Large capabilities and use cases

At 8.1 billion parameters, with superior quality and prompt adherence, Stable Diffusion 3.5 Large is the most powerful model in the Stable Diffusion family. The model excels at creating diverse, high-quality images across a wide range of styles, making it an excellent tool for media, gaming, advertising, ecommerce, corporate training, retail, and education. For ideation, Stable Diffusion 3.5 Large can accelerate storyboarding, concept art creation, and rapid prototyping of visual effects. For production, you can quickly generate high-quality 1-megapixel images for campaigns, social media posts, and advertisements, saving time and resources while maintaining creative control.

Stable Diffusion 3.5 Large offers users nearly endless creative possibilities, including:

  • Enhanced creativity and photorealism – You can generate exceptional visuals with highly detailed 3D imagery that include fine details like lighting and textures.
  • Exceptional multi-subject proficiency – It offers unrivaled capabilities in generating images with multiple subjects, which is ideal for creating complex scenes.
  • Increased efficiency – Fast, accurate, and quality content production streamlines operations, saving time and money. Despite its power and complexity, Stable Diffusion 3.5 Large is optimized for efficiency, providing accessibility and ease of use across a broad audience.

Solution overview

With SageMaker JumpStart, you can choose from a broad selection of publicly available foundation models (FMs). ML practitioners can deploy FMs to dedicated SageMaker instances from a network isolated environment and customize models using Amazon SageMaker for model training and deployment. You can now discover and deploy the Stable Diffusion 3.5 large model with a few clicks in SageMaker Studio or programmatically through the SageMaker Python SDK, enabling you to derive model performance and MLOps controls with SageMaker features such as Amazon SageMaker Pipelines, Amazon SageMaker Debugger, or container logs. The model is deployed in an AWS secure environment and under your virtual private cloud (VPC) controls, helping provide data security.

The Stable Diffusion 3.5 Large model is available today in the following AWS Regions: US East (N. Virginia, Ohio), US West (Oregon), Asia Pacific (Osaka, Hong Kong), China (Beijing), Middle East (Bahrain), Africa (Cape Town), and Europe (Milan, Stockholm).

SageMaker Studio is an integrated development environment (IDE) that provides a single web-based visual interface where you can access purpose-built tools to perform all machine learning (ML) development steps, from preparing data to building, training, and deploying your ML models. For more details on how to get started and set up SageMaker Studio, refer to Amazon SageMaker Studio.

Prerequisites

Make sure that your AWS Identity and Access Management (IAM) role has AmazonSageMakerFullAccess. To successfully deploy the model, confirm that your IAM role has the following three permissions and you have authority to make AWS Marketplace subscriptions in the AWS account used:

  • aws-marketplace:ViewSubscriptions
  • aws-marketplace:Unsubscribe
  • aws-marketplace:Subscribe

Subscribe to the Stable Diffusion 3.5 Large model package

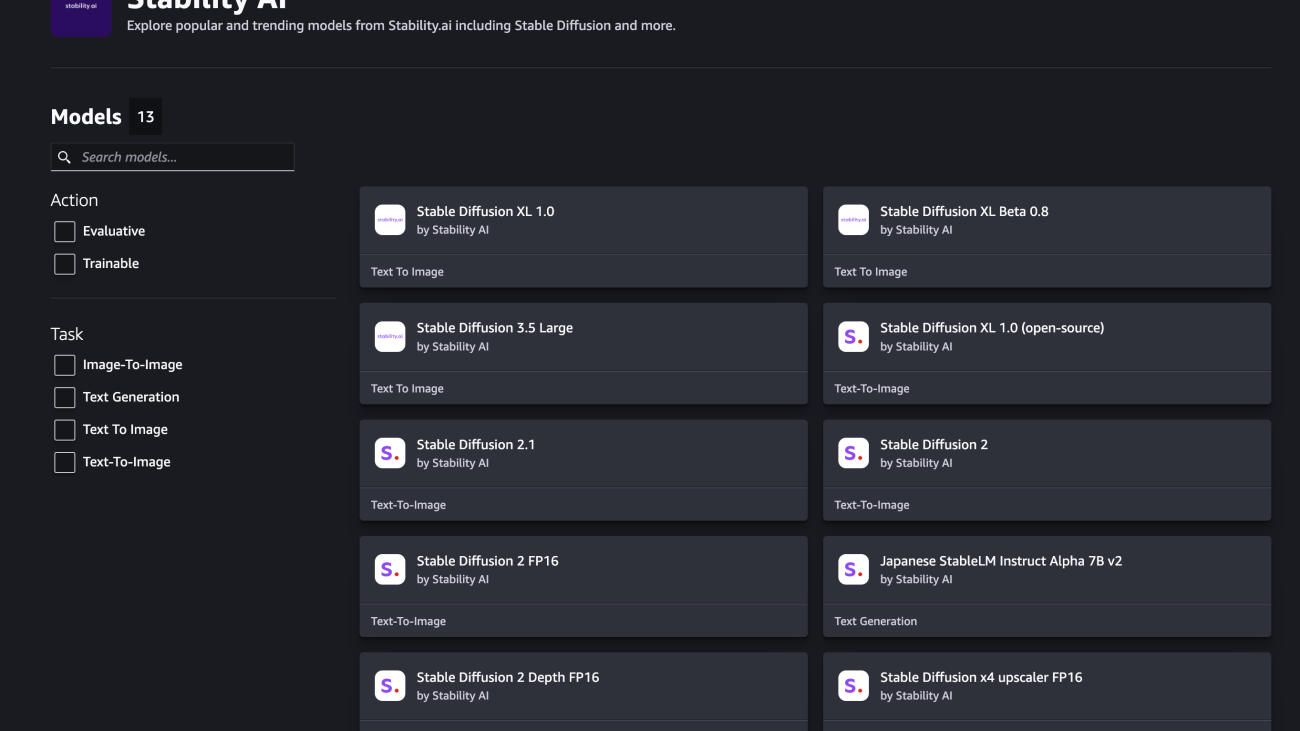
You can access SageMaker JumpStart through the SageMaker Studio Home page by selecting JumpStart in the Prebuilt and automated solutions section. The JumpStart landing page allows you to explore various resources including solutions, models, and notebooks. You can search for a particular provider. In this following screenshot, we are looking at all the models by Stability AI on SageMaker JumpStart.

Each model is presented with a model card containing key information such as the model name, fine-tuning capability, provider, and a brief description. To find the Stable Diffusion 3.5L model, you can either browse the Foundation Model: Image Generation carousel or use the search function. Select Stable Diffusion 3.5 Large.

Next, we will subscribe to Stable Diffusion 3.5 Large, follow these steps:

  1. Open the model listing page in AWS Marketplace using the link available from the example notebook in SageMaker JumpStart.
  2. On the listing, choose Continue to subscribe.
  3. On the Subscribe to this software page, review and choose Accept Offer if you and your organization accept the EULA, pricing, and support terms.
  4. Choose Continue to configuration to start configuring your model.
  5. Choose a supported Region, and you will see the model package Amazon Resource Name (ARN) that you need to specify when creating an endpoint.

Note: If you don’t have the necessary permissions to view or subscribe to the model, reach out to your AWS administrator or procurement point of contact. Many enterprises may limit AWS Marketplace permissions to control the actions that someone can take in the AWS Marketplace Management Portal.

Deploy the model in SageMaker Studio

Now you’re prepared to follow the notebook example from Stability AI’s GitHub repository to create an endpoint (with the model package ARN from AWS Marketplace) and create a deployable ModelPackage.

For Stable Diffusion 3.5 Large, you’ll need to deploy on an Amazon Elastic Compute Cloud (Amazon EC2) ml.p5.48xlarge instance.

Generate images with a text prompt

Refer to the Stable Diffusion 3.5 Large documentation for more details. From the example notebook, the code to generate an image is as follows:

sm_runtime = boto3.client("sagemaker-runtime")

params = {
    "prompt": " Photography, pink rose flowers in the twilight, glowing, tile houses in the background.",
    "seed": 101,
    "aspect_ratio": "21:9",
    "output_format": "jpeg",
}

payload = json.dumps(params).encode("utf-8")

response = sm_runtime.invoke_endpoint(
    EndpointName=endpoint_name,
    ContentType="application/json",
    Accept="application/json",
    Body=payload,
)

out = json.loads(response["Body"].read().decode("utf-8"))
try:
    base64_string = out["body"]["images"][0]
    image_data = base64.b64decode(base64_string)
    image = Image.open(io.BytesIO(image_data))
    display(image)

except:
    print(out)

The following are examples of images generated from different prompts.

Prompt:

Photography, pink rose flowers in the twilight, glowing, tile houses in the background.

Prompt:

The word “AWS x Stability” in a thick, blocky script surrounded by roots and vines against a solid white background. The scene is lit by flat light, creating a reflective scene with a minimal color palette. Quilling style.

Prompt:

Expressionist painting, side profile of a silhouette of a student seated at a desk, absorbed in reading a book. Her thoughts artistically connect to the stars and the vast universe, symbolizing the expansion of knowledge and a boundless mind.

Prompt:

High-energy street scene in a neon-lit Tokyo alley at night, where steam rises from food carts, and colorful neon signs illuminate the rain-slicked pavement.

Prompt:

3D animation scene of an adventurer traveling the world with his pet dog.

Clean up

When you’ve finished working, you can delete the endpoint to release the EC2 instances associated with it and stop billing.

Get your list of SageMaker endpoints using the AWS Command Line Interface (AWS CLI) as follows:

!aws sagemaker list-endpoints

Then delete the endpoints:

deployed_model.sagemaker_session.delete_endpoint(endpoint_name)

Conclusion

In this post, we walked through subscribing to Stable Diffusion 3.5 Large in SageMaker JumpStart, deploying the model in SageMaker Studio, and generating of a variety of images with Stability AI’s latest text-to-image model.

Start creating amazing images today with Stable Diffusion 3.5 Large on SageMaker JumpStart. To learn more about SageMaker JumpStart, see SageMaker JumpStart pretrained models, Amazon SageMaker JumpStart Foundation Models, and Getting started with Amazon SageMaker JumpStart.

If you’d like to explore advanced prompt engineering techniques that can enhance the performance of text-to-image models from Stability AI and facilitate the creation of compelling imagery, see Understanding prompt engineering: Unlock the creative potential of Stability AI models on AWS.


About the Authors

Tom Yemington is a Senior GenAI Models Specialist focused on helping model providers and customers scale generative AI solutions in AWS. Tom is a Certified Information Systems Security Professional (CISSP). Outside of work, you can find Tom racing vintage cars or teaching people how to race as an instructor at track-day events.

Isha Dua is a Senior Solutions Architect based in the San Francisco Bay Area working with GENAI Model providers and helping customer optimize their GENAI workloads on AWS. She helps enterprise customers grow by understanding their goals and challenges, and guides them on how they can architect their applications in a cloud-native manner while ensuring resilience and scalability. She’s passionate about machine learning technologies and environmental sustainability.

Boshi Huang is a Senior Applied Scientist in Generative AI at Amazon Web Services, where he collaborates with customers to develop and implement generative AI solutions. Boshi’s research focuses on advancing the field of generative AI through automatic prompt engineering, adversarial attack and defense mechanisms, inference acceleration, and developing methods for responsible and reliable visual content generation.

Read More

From Seed to Stream: ‘Farming Simulator 25’ Sprouts on GeForce NOW

From Seed to Stream: ‘Farming Simulator 25’ Sprouts on GeForce NOW

Grab a pitchfork and fire up the tractor — the fields of GeForce NOW are about to get a whole lot greener with Farming Simulator 25.

Whether looking for a time-traveling adventure, cozy games or epic action, GeForce NOW has something for everyone with over 2,000 games in its cloud library. Nine titles arrive this week, including the new 4X historical grand strategy game Ara: History Untold from Oxide Games and Xbox Game Studios.

And in this season of giving, GeForce NOW will offer members new rewards and more this month. This week, GeForce NOW is spreading cheer with a new reward for members that’s sure to delight Throne and Liberty fans. Get ready to add a dash of mischief and a sprinkle of wealth to the epic adventures in the sprawling world of this massively multiplayer online role-playing game.

Plus, the NVIDIA app is officially released for download this week. GeForce users can use it to access GeForce NOW to play their games with RTX performance when they’re away from their gaming rigs or don’t want to wait around for their games to update and patch.

A Cloud Gaming Bounty

Get ready to plow the fields and tend to crops anywhere with GeForce NOW.

Farming Simulator 25 on GeForce NOW

Farming Simulator 25 from Giants Software launched in the cloud for members to stream, bringing a host of new features and improvements — including the introduction of rice as a crop type, complete with specialized machinery and techniques for planting, flooding fields and harvesting.

This expansion into rice farming is accompanied by a new Asian-themed map that offers players a lush landscape filled with picturesque rice paddies to cultivate. The game will also include two other diverse environments: a spacious North American setting and a scenic Central European location, allowing farmers to build their agricultural empires in varied terrains. Don’t forget about the addition of water buffaloes and goats, as well as the introduction of animal offspring for a new layer of depth to farm management.

Be the cream of the crop streaming with a Performance or Ultimate membership. Performance members get up to 1440p 60 frames per second and Ultimate streams at up to 4K and 120 fps for the most incredible levels of realism and variety. Whether tackling agriculture, forestry and animal husbandry single-handedly or together with friends in cooperative multiplayer mode, experience farming life like never before with GeForce NOW.

Mischief Managed

Whether new to the game or a seasoned adventurer, GeForce NOW members can claim a special PC-exclusive reward to use in Amazon Games’ hit title Throne and Liberty. The reward includes 200 Ornate Coins and a PC-exclusive mischievous youngster named Gneiss Amitoi that will enhance the Throne and Liberty journey as members forge alliances, wage epic battles and uncover hidden treasures.

Throne and Liberty on GeForce NOW

Ornate Coins allow players to acquire morphs for animal shapeshifting, autonomous pets named Amitois, exclusive cosmetic items, experience boosters and inventory expansions. Gneiss Youngster Amitoi is a toddler-aged prankster that randomly targets players and non-playable characters with its tricks. While some of its mischief can be mean-spirited, it just wants attention, and will pout and roll back to its adventurer’s side if ignored, adding an entertaining dynamic to the journey through the world of Throne and Liberty.

Members who’ve opted in to GeForce NOW’s Rewards program can check their email for instructions on how to redeem the reward. Ultimate and Performance members can start redeeming the reward today, while free members will be able to claim it starting tomorrow, Nov. 15. It’s available through Tuesday, Dec. 10, first come, first served.

Rewriting History

Ara History Untold on GeForce NOW

Explore, build, lead and conquer a nation in Ara: History Untold, where every choice will shape the world and define a player’s legacy. It’s now available for GeForce NOW members to stream.

Ara: History Untold offers a fresh take on 4X historical grand strategy games. Players will prove their worth by guiding their citizens through history to the pinnacles of human achievement. Explore new lands, develop arts and culture, and engage in diplomacy — or combat — with other nations, before ultimately claiming the mantle of the greatest nation of all time.

Members can craft their own unique story of triumph and achievement by streaming the game across devices from the cloud. GeForce NOW Performance and Ultimate members can enjoy longer gaming sessions and faster access to servers than free users, perfect for crafting sprawling empires and engaging in complex diplomacy without worrying about local hardware limitations.

New Games Are Knocking

GeForce NOW brings the new Wuthering Waves update “When the Night Knocks” for members this week. Version 1.4 brings a wealth of new content, including two new Resonators, Camellya and Lumi, along with powerful new weapons, including the five-star Red Spring and the four-star event weapon Somnoire Anchor. Dive into the Somnoire Adventure Event, Somnium Labyrinth, and enjoy a variety of log-in rewards, combat challenges and exploration activities. The update also includes Camellya’s companion story, a new Phantom Echo and introduces the exciting Weapon Projection feature.

Members can look for the following games available to stream in the cloud this week:

  • Farming Simulator 25 (New release on Steam, Nov. 12)
  • Sea Power: Naval Combat in the Missile Age (New release on Steam, Nov. 12)
  • Industry Giant 4.0 (New release Steam, Nov. 15)
  • Ara: History Untold (Steam and Xbox, available on PC Game Pass)
  • Call of Duty: Black Ops Cold War (Steam and Battle.net)
  • Call of Duty: Vanguard (Steam and Battle.net)
  • Magicraft (Steam)
  • Crash Bandicoot N. Sane Trilogy (Steam and Xbox, available on PC Game Pass)
  • Spyro Reignited Trilogy (Steam and Xbox, available on PC Game Pass)

What are you planning to play this weekend? Let us know on X or in the comments below.

Read More

Keeping an AI on Diabetes Risk: Gen AI Model Predicts Blood Sugar Levels Four Years Out

Keeping an AI on Diabetes Risk: Gen AI Model Predicts Blood Sugar Levels Four Years Out

Diabetics — or others monitoring their sugar intake — may look at a cookie and wonder, “How will eating this affect my glucose levels?” A generative AI model can now predict the answer.

Researchers from the Weizmann Institute of Science, Tel Aviv-based startup Pheno.AI and NVIDIA led the development of GluFormer, an AI model that can predict an individual’s future glucose levels and other health metrics based on past glucose monitoring data.

Data from continuous glucose monitoring could help more quickly diagnose patients with prediabetes or diabetes, according to Harvard Health Publishing and NYU Langone Health. GluFormer’s AI capabilities can further enhance the value of this data, helping clinicians and patients spot anomalies, predict clinical trial outcomes and forecast health outcomes up to four years in advance.

The researchers showed that, after adding dietary intake data into the model, GluFormer can also predict how a person’s glucose levels will respond to specific foods and dietary changes, enabling precision nutrition.

Accurate predictions of glucose levels for those at high risk of developing diabetes could enable doctors and patients to adopt preventative care strategies sooner, improving patient outcomes and reducing the economic impact of diabetes, which could reach $2.5 trillion globally by 2030.

AI tools like GluFormer have the potential to help the hundreds of millions of adults with diabetes. The condition currently affects around 10% of the world’s adults — a figure that could potentially double by 2050 to impact over 1.3 billion people. It’s one of the 10 leading causes of death globally, with side effects including kidney damage, vision loss and heart problems.

GluFormer is a transformer model, a kind of neural network architecture that tracks relationships in sequential data. It’s the same architecture as OpenAI’s GPT models — in this case generating glucose levels instead of text.

“Medical data, and continuous glucose monitoring in particular, can be viewed as sequences of diagnostic tests that trace biological processes throughout life,” said Gal Chechik, senior director of AI research at NVIDIA. “We found that the transformer architecture, developed for long text sequences, can take a sequence of medical tests and predict the results of the next test. In doing so, it learns something about how the diagnostic measurements develop over time.”

The model was trained on 14 days of glucose monitoring data from over 10,000 non-diabetic study participants, with data collected every 15 minutes through a wearable monitoring device. The data was collected as part of the Human Phenotype Project, an initiative by Pheno.AI, a startup that aims to improve human health through data collection and analysis.

“Two important factors converged at the same time to enable this research: the maturing of generative AI technology powered by NVIDIA and the collection of large-scale health data by the Weizmann Institute,” said the paper’s lead author, Guy Lutsker, an NVIDIA researcher and Ph.D. student at the Weizmann Institute of Science. “It put us in the unique position to extract interesting medical insights from the data.”

The research team validated GluFormer across 15 other datasets and found it generalizes well to predict health outcomes for other groups, including those with prediabetes, type 1 and type 2 diabetes, gestational diabetes and obesity.

They used a cluster of NVIDIA Tensor Core GPUs to accelerate model training and inference.

Beyond glucose levels, GluFormer can predict medical values including visceral adipose tissue, a measure of the amount of body fat around organs like the liver and pancreas; systolic blood pressure, which is associated with diabetes risk; and apnea-hypopnea index, a measurement for sleep apnea, which is linked to type 2 diabetes.

Read the GluFormer research paper on Arxiv.

Read More

NVIDIA Ranks No. 1 as Forbes Debuts List of America’s Best Companies 2025

NVIDIA Ranks No. 1 as Forbes Debuts List of America’s Best Companies 2025

NVIDIA ranked No. 1 on Forbes magazine’s new list — America’s Best Companies — based on more than 60 measures in nearly a dozen categories that cover financial performance, customer and employee satisfaction, sustainability, remote work policies and more.

Forbes stated that the company thrived in numerous areas, “particularly employee satisfaction, earning high ratings in career opportunities, company benefits and culture,” as well as financial strength.

About 2,000 of the largest public companies in the U.S. were eligible, with 300 making the list.

Beau Davidson, vice president of employee experience at NVIDIA, told Forbes that the company has created systemic opportunities to listen to its staff (such as quarterly surveys, CEO Q&As and a virtual suggestion box) and then takes action on concerns ranging from benefits to cafe snacks.

NVIDIA has also championed Free Days — two days each quarter where the entire company closes. “It allows us to take a break as a company,” Davidson told Forbes. NVIDIA provides counselors onsite and a careers week that provides programs and training for workers to pursue internal job opportunities.

NVIDIA enjoys a low rate of employee turnover — widely viewed as a sign of employee happiness, according to People Data Labs, Forbes’ data provider on workforce stability.

For a full list of rankings, view Forbes’ America’s Best Companies 2025 list.

Check out the NVIDIA Careers page and learn more about NVIDIA Life

Read More

Indonesia Tech Leaders Team With NVIDIA and Partners to Launch Nation’s AI

Indonesia Tech Leaders Team With NVIDIA and Partners to Launch Nation’s AI

Working with NVIDIA and its partners, Indonesia’s technology leaders have launched an initiative to bring sovereign AI to the nation’s more than 277 million Indonesian speakers.

The collaboration is grounded in a broad public-private partnership that reflects the nation’s concept of “gotong royong,” a term describing a spirit of mutual assistance and community collaboration.

NVIDIA founder and CEO Jensen Huang joined Indonesia Minster for State-Owned Enterprises Erick Thohir, Indosat Ooredoo Hutchison (IOH) President Director and CEO Vikram Sinha, GoTo CEO Patrick Walujo and other leaders in Jakarta to celebrate the launch of Sahabat-AI.

Sahabat-AI is a collection of open-source Indonesian large language models (LLMs) that local industries, government agencies, universities and research centers can use to create generative AI applications. Built with NVIDIA NeMo and NVIDIA NIM microservices, the models were launched today at Indonesia AI Day, a conference focused on enabling AI sovereignty and driving AI-driven digital independence in the country.

Built by Indonesians, for Indonesians, Sahabat-AI models understand local contexts and enable people to build generative AI services and applications in Bahasa Indonesian and various local languages. The models form the foundation of a collaborative effort to empower Indonesia through a locally developed, open-source LLM ecosystem.

“Artificial intelligence will democratize technology. It is the great equalizer,” said Huang. “The technology is complicated but the benefit is not.”

“Sahabat-AI is not just a technological achievement, it embodies Indonesia’s vision for a future where digital sovereignty and inclusivity go hand in hand,” Sinha said. “By creating an AI model that speaks our language and reflects our culture, we’re empowering every Indonesian to harness advanced technology’s potential. This initiative is a crucial step toward democratizing AI as a tool for growth, innovation and empowerment across our diverse society.”

To accelerate this initiative, IOH — one of Indonesia’s largest telecom and internet companies — earlier this year launched “GPU Merdeka by Lintasarta,” an NVIDIA-accelerated sovereign AI cloud. The GPU Merdeka cloud service operates at a BDx Indonesia AI data center powered by renewable energy.

Bolstered by the NVIDIA Cloud Partner program, IOH subsidiary Lintasarta built the high-performance AI cloud in less than three months, a feat that would’ve taken much longer without NVIDIA’s technology infrastructure. The AI cloud is now driving transformation across energy, financial services, healthcare and other industries.

The NVIDIA Cloud Partner (NCP) program provides Lintasarta with access to NVIDIA reference architectures — blueprints for building high-performance, scalable and secure data centers.

The program also offers technological and go-to-market support, access to the latest NVIDIA AI software and accelerated computing platforms, and opportunities to collaborate with NVIDIA’s extensive ecosystem of industry partners. These partners include global systems integrators like Accenture and Tech Mahindra and software companies like GoTo and Hippocratic AI, each of which is working alongside IOH to boost the telco’s sovereign AI initiatives.

Developing Industry-Specific Applications With Accenture

Partnering with leading professional services company Accenture, IOH is developing applications for industry-specific use cases based on its new AI cloud, Sahabat-AI and the NVIDIA AI Enterprise software platform.

NVIDIA CEO Huang joined Accenture CEO Julie Sweet in a fireside chat during Indonesia AI Day to discuss how the companies are supporting enterprise and industrial AI in Indonesia.

The collaboration taps into the Accenture AI Refinery platform to help Indonesian enterprises build AI solutions tailored for financial services, energy and other industries, while delivering sovereign data governance.

Initially focused on financial services, IOH’s work with Accenture and NVIDIA technologies is delivering pre-built enterprise solutions that can help Indonesian banks more quickly harness AI.

With a modular architecture, these solutions can meet clients’ needs wherever they are in their AI journeys, helping increase profitability, operational efficiency and sustainable growth.

Building the Bahasa LLM and Chatbot Services With Tech Mahindra

Built with India-based global systems integrator Tech Mahindra, the Sahabat-AI LLMs power various AI services in Indonesia.

For example, Sahabat-AI enables IOH’s AI chatbot to answer queries in the Indonesian language for various citizen and resident services. A person could ask about processes for updating their national identification card, as well as about tax rates, payment procedures, deductions and more.

The chatbot integrates with a broader citizen services platform Tech Mahindra and IOH are developing as part of the Indonesian government’s sovereign AI initiative.

Indosat developed Sahabat-AI using the NVIDIA NeMo platform for developing customized LLMs. The team fine-tuned a version of the Llama 3 8B model, customizing it for the Bahasa language using a diverse dataset tailored for effective communication with users.

To further optimize performance, Sahabat-AI uses NVIDIA NIM microservices, which have demonstrated up to 2.5x greater throughput compared with standard implementations. This improvement in processing efficiency allows for faster responses and more satisfying user experiences.

In addition, NVIDIA NeMo Guardrails open-source software orchestrates dialog management and helps ensure accuracy, appropriateness and security of the LLM-based chatbot.

Many other service capabilities tapping Sahabat-AI are also planned for development, including AI-powered healthcare services and other local applications.

Improving Indonesian Healthcare With Hippocratic AI

Among the first to tap into Sahabat-AI is healthcare AI company Hippocratic AI, which is using the models, the NVIDIA AI platform and IOH’s sovereign AI cloud to develop digital agents that can have humanlike conversations, exhibit empathic qualities, and build rapport and trust with patients across Indonesia.

Hippocratic AI empowers a novel trillion-parameter constellation architecture that brings together specialized healthcare LLM agents to deliver safe, accurate digital agent implementation.

Digital AI agents can significantly increase staff productivity by offloading time-consuming tasks, allowing human nurses and medical professionals to focus on critical duties to increase healthcare accessibility and quality of service.

IOH’s sovereign AI cloud lets Hippocratic AI keep patient data local and secure, and enables extremely low-latency AI inference for its LLMs.

Enhancing Simplicity, Accessibility for On-Demand and Financial Services With GoTo

GoTo offers technology infrastructure and solutions that help users thrive in the digital economy, including through applications spanning on-demand services for transport, food, grocery and logistics delivery, financial services and e-commerce.

The company — which operates one of Indonesia’s leading on-demand transport services, as well as a leading payment application in the country — is adopting and enhancing the new Sahabat-AI models to integrate with its AI voice assistant, called Dira.

Dira is a speech and generative AI-powered digital assistant that helps customers book rides, order food deliveries, transfer money, pay bills and more.

Tapping into Sahabat-AI, Dira is poised to deliver more localized and culturally relevant interactions with application users.

Advancing Sustainability Within Lintasarta as IOH’s AI Factory

Fundamentally, Lintasarta’s AI cloud is an AI factory — a next-generation data center that hosts advanced, full-stack accelerated computing platforms for the most computationally intensive tasks. It’ll enable regional governments, businesses and startups to build, customize and deploy generative AI applications aligned with local language and customs.

Looking forward, Lintasarta plans to expand its AI factory with the most advanced NVIDIA technologies. The infrastructure already boasts a “green” design, powered by renewable energy and sustainable technologies. Lintasarta is committed to adding value to Indonesia’s digital ecosystem with integrated, secure and sustainable technology, in line with the Golden Indonesia 2045 vision.

Beyond Indonesia, NVIDIA NIM microservices are bolstering sovereign AI models that support local languages in India, Japan, Taiwan and many other countries and regions.

NVIDIA NIM microservices, NeMo and NeMo Guardrails are available as part of the NVIDIA AI Enterprise software platform.

Learn more about NVIDIA-powered sovereign AI factories for telecommunications.

See notice regarding software product information.

Read More

Improve governance of models with Amazon SageMaker unified Model Cards and Model Registry

Improve governance of models with Amazon SageMaker unified Model Cards and Model Registry

You can now register machine learning (ML) models in Amazon SageMaker Model Registry with Amazon SageMaker Model Cards, making it straightforward to manage governance information for specific model versions directly in SageMaker Model Registry in just a few clicks.

Model cards are an essential component for registered ML models, providing a standardized way to document and communicate key model metadata, including intended use, performance, risks, and business information. This transparency is particularly important for registered models, which are often deployed in high-stakes or regulated industries, such as financial services and healthcare. By including detailed model cards, organizations can establish the responsible development of their ML systems, enabling better-informed decisions by the governance team.

When solving a business problem with an ML model, customers want to refine their approach and register multiple versions of the model in SageMaker Model Registry to find the best candidate model. To effectively operationalize and govern these various model versions, customers want the ability to clearly associate model cards with a particular model version. This lack of a unified user experience posed challenges for customers, who needed a more streamlined way to register and govern their models.

Because SageMaker Model Cards and SageMaker Model Registry were built on separate APIs, it was challenging to associate the model information and gain a comprehensive view of the model development lifecycle. Integrating model information and then sharing it across different stages became increasingly difficult. This required custom integration efforts, along with complex AWS Identity and Access Management (IAM) policy management, further complicating the model governance process.

With the unification of SageMaker Model Cards and SageMaker Model Registry, architects, data scientists, ML engineers, or platform engineers (depending on the organization’s hierarchy) can now seamlessly register ML model versions early in the development lifecycle, including essential business details and technical metadata. This unification allows you to review and govern models across your lifecycle from a single place in SageMaker Model Registry. By consolidating model governance workflows in SageMaker Model Registry, you can improve transparency and streamline the deployment of models to production environments upon governance officers’ approval.

In this post, we discuss a new feature that supports the integration of model cards with the model registry. We discuss the solution architecture and best practices for managing model cards with a registered model version, and walk through how to set up, operationalize, and govern your models using the integration in the model registry.

Solution overview

In this section, we discuss the solution to address the aforementioned challenges with model governance. First, we introduce the unified model governance solution architecture for addressing the model governance challenges for an end-to-end ML lifecycle in a scalable, well-architected environment. Then we dive deep into the details of the unified model registry and discuss how it helps with governance and deployment workflows.

Unified model governance architecture

ML governance enforces the ethical, legal, and efficient use of ML systems by addressing concerns like bias, transparency, explainability, and accountability. It helps organizations comply with regulations, manage risks, and maintain operational efficiency through robust model lifecycles and data quality management. Ultimately, ML governance builds stakeholder trust and aligns ML initiatives with strategic business goals, maximizing their value and impact. ML governance starts when you want to solve a business use case or problem with ML and is part of every step of your ML lifecycle, from use case inception, model building, training, evaluation, deployment, and monitoring of your production ML system.

Let’s delve into the architecture details of how you can use a unified model registry along with other AWS services to govern your ML use case and models throughout the entire ML lifecycle.

SageMaker Model Registry catalogs your models along with their versions and associated metadata and metrics for training and evaluation. It also maintains audit and inference metadata to help drive governance and deployment workflows.

The following are key concepts used in the model registry:

  • Model package group – A model package group or model group solves a business problem with an ML model (for this example, we use the model CustomerChurn). This model group contains all the model versions associated with that ML model.
  • Model package version – A model package version or model version is a registered model version that includes the model artifacts and inference code for the model.
  • Registered model – This is the model group that is registered in SageMaker Model Registry.
  • Deployable model – This is the model version that is deployable to an inference endpoint.

Additionally, this solution uses Amazon DataZone. With the integration of SageMaker and Amazon DataZone, it enables collaboration between ML builders and data engineers for building ML use cases. ML builders can request access to data published by data engineers. Upon receiving approval, ML builders can then consume the accessed data to engineer features, create models, and publish features and models to the Amazon DataZone catalog for sharing across the enterprise. As part of the SageMaker Model Cards and SageMaker Model Registry unification, ML builders can now share technical and business information about their models, including training and evaluation details, as well as business metadata such as model risk, for ML use cases.

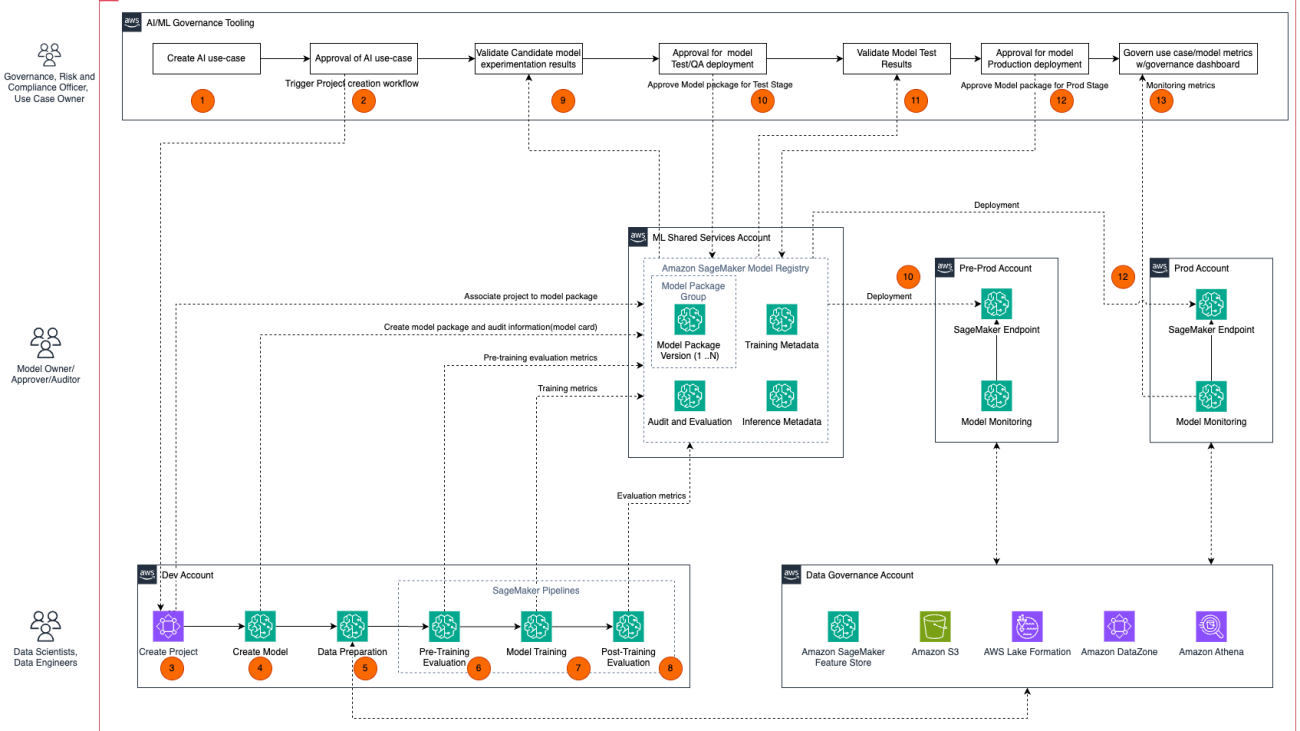
The following diagram depicts the architecture for unified governance across your ML lifecycle.

There are several for implementing secure and scalable end-to-end governance for your ML lifecycle:

  1. Define your ML use case metadata (name, description, risk, and so on) for the business problem you’re trying to solve (for example, automate a loan application process).
  2. Set up and invoke your use case approval workflow for building the ML model (for example, fraud detection) for the use case.
  3. Create an ML project to create a model for the ML use case.
  4. Create a SageMaker model package group to start building the model. Associate the model to the ML project and record qualitative information about the model, such as purpose, assumptions, and owner.
  5. Prepare the data to build your model training pipeline.
  6. Evaluate your training data for data quality, including feature importance and bias, and update the model package version with relevant evaluation metrics.
  7. Train your ML model with the prepared data and register the candidate model package version with training metrics.
  8. Evaluate your trained model for model bias and model drift, and update the model package version with relevant evaluation metrics.
  9. Validate that the candidate model experimentation results meet your model governance criteria based on your use case risk profile and compliance requirements.
  10. After you receive the governance team’s approval on the candidate model, record the approval on the model package version and invoke an automated test deployment pipeline to deploy the model to a test environment.
  11. Run model validation tests in a test environment and make sure the model integrates and works with upstream and downstream dependencies similar to a production environment.
  12. After you validate the model in the test environment and make sure the model complies with use case requirements, approve the model for production deployment.
  13. After you deploy the model to the production environment, continuously monitor model performance metrics (such as quality and bias) to make sure the model stays in compliance and meets your business use case key performance indicators (KPIs).

Architecture tools, components, and environments

You need to set up several components and environments for orchestrating the solution workflow:

  • AI governance tooling – This tooling should be hosted in an isolated environment (a separate AWS account) where your key AI/ML governance stakeholders can set up and operate approval workflows for governing AI/ML use cases across your organization, lines of business, and teams.
  • Data governance – This tooling should be hosted in an isolated environment to centralize data governance functions such as setting up data access policies and governing data access for AI/ML use cases across your organization, lines of business, and teams.
  • ML shared services – ML shared services components should be hosted in an isolated environment to centralize model governance functions such as accountability through workflows and approvals, transparency through centralized model metadata, and reproducibility through centralized model lineage for AI/ML use cases across your organization, lines of business, and teams.
  • ML development – This phase of the ML lifecycle should be hosted in an isolated environment for model experimentation and building the candidate model. Several activities are performed in this phase, such as creating the model, data preparation, model training, evaluation, and model registration.
  • ML pre-production – This phase of ML lifecycle should be hosted in an isolated environment for integrating the testing the candidate model with the ML system and validating that the results comply with the model and use case requirements. The candidate model that was built in the ML development phase is deployed to an endpoint for integration testing and validation.
  • ML production – This phase of the ML lifecycle should be hosted in an isolated environment for deploying the model to a production endpoint for shadow testing and A/B testing, and for gradually rolling out the model for operations in a production environment.

Integrate a model version in the model registry with model cards

In this section, we provide API implementation details for testing this in your own environment. We walk through an example notebook to demonstrate how you can use this unification during the model development data science lifecycle.

We have two example notebooks in GitHub repository: AbaloneExample and DirectMarketing.

Complete the following steps in the above Abalone example notebook:

  1. Install or update the necessary packages and library.
  2. Import the necessary library and instantiate the necessary variables like SageMaker client and Amazon Simple Storage Service (Amazon S3) buckets.
  3. Create an Amazon DataZone domain and a project within the domain.

You can use an existing project if you already have one. This is an optional step and we will be referencing the Amazon DataZone project ID while creating the SageMaker model package. For overall governance between your data and the model lifecycle, this can help create the correlation between business unit/domain, data and corresponding model.

The following screenshot shows the Amazon DataZone welcome page for a test domain.

In Amazon DataZone, projects enable a group of users to collaborate on various business use cases that involve creating assets in project inventories and thereby making them discoverable by all project members, and then publishing, discovering, subscribing to, and consuming assets in the Amazon DataZone catalog. Project members consume assets from the Amazon DataZone catalog and produce new assets using one or more analytical workflows. Project members can be owners or contributors.

You can gather the project ID on the project details page, as shown in the following screenshot.

In the notebook, we refer to the project ID as follows:

project_id = "5rn1teh0tv85rb"
  1. Prepare a SageMaker model package group.

A model group contains a group of versioned models. We refer to the Amazon DataZone project ID when we create the model package group, as shown in the following screenshot. It’s mapped to the custom_details field.

  1. Update the details for the model card, including the intended use and owner:
model_overview = ModelOverview(
    #model_description="This is an example model used for a Python SDK demo of unified Amazon SageMaker Model Registry and Model Cards.",
    #problem_type="Binary Classification",
    #algorithm_type="Logistic Regression",
    model_creator="DEMO-Model-Registry-ModelCard-Unification",
    #model_owner="datascienceteam",
)
intended_uses = IntendedUses(
    purpose_of_model="Test model card.",
    intended_uses="Not used except this test.",
    factors_affecting_model_efficiency="No.",
    risk_rating=RiskRatingEnum.LOW,
    explanations_for_risk_rating="Just an example.",
)
business_details = BusinessDetails(
    business_problem="The business problem that your model is used to solve.",
    business_stakeholders="The stakeholders who have the interest in the business that your model is used for.",
    line_of_business="Services that the business is offering.",
)
additional_information = AdditionalInformation(
    ethical_considerations="Your model ethical consideration.",
    caveats_and_recommendations="Your model's caveats and recommendations.",
    custom_details={"custom details1": "details value"},
)
my_card = ModelCard(
    name="mr-mc-unification",
    status=ModelCardStatusEnum.DRAFT,
    model_overview=model_overview,
    intended_uses=intended_uses,
    business_details=business_details,
    additional_information=additional_information,
    sagemaker_session=sagemaker_session,
)

This data is used to update the created model package. The SageMaker model package helps create a deployable model that you can use to get real-time inferences by creating a hosted endpoint or to run batch transform jobs.

The model card information shown as model_card=my_card in the following code snippet can be passed to the pipeline during the model register step:

register_args = model.register(
    content_types=["text/csv"],
    response_types=["text/csv"],
    inference_instances=["ml.t2.medium", "ml.m5.large"],
    transform_instances=["ml.m5.large"],
    model_package_group_name=model_package_group_name,
    approval_status=model_approval_status,
    model_metrics=model_metrics,
    drift_check_baselines=drift_check_baselines,
    model_card=my_card
)

step_register = ModelStep(name="RegisterAbaloneModel", step_args=register_args)

Alternatively, you can pass it as follows:

step_register = RegisterModel(
    name="MarketingRegisterModel",
    estimator=xgb_train,
    model_data=step_train.properties.ModelArtifacts.S3ModelArtifacts,
    content_types=["text/csv"],
    response_types=["text/csv"],
    inference_instances=["ml.t2.medium", "ml.m5.xlarge"],
    transform_instances=["ml.m5.xlarge"],
    model_package_group_name=model_package_group_name,
    approval_status=model_approval_status,
    model_metrics=model_metrics,
    model_card=my_card
)

The notebook will invoke a run of the SageMaker pipeline (which can also be invoked from an event or from the pipelines UI), which includes preprocessing, training, and evaluation.

After the pipeline is complete, you can navigate to Amazon SageMaker Studio, where you can see a model package on the Models page.

You can view the details like business details, intended use, and more on the Overview tab under Audit, as shown in the following screenshots.

The Amazon DataZone project ID is captured in the Documentation section.

You can view performance metrics under Train as well.

Evaluation details like model quality, bias pre-training, bias post-training, and explainability can be reviewed on the Evaluate tab.

Optionally, you can view the model card details from the model package itself.

Additionally, you can update the audit details of the model by choosing Edit in the top right corner. Once you are done with your changes, choose Save to keep the changes in the model card.

Also, you can update the model’s deploy status.

You can track the different statuses and activity as well.

Lineage

ML lineage is crucial for tracking the origin, evolution, and dependencies of data, models, and code used in ML workflows, providing transparency and traceability. It helps with reproducibility and debugging, making it straightforward to understand and address issues.

Model lineage tracking captures and retains information about the stages of an ML workflow, from data preparation and training to model registration and deployment. You can view the lineage details of a registered model version in SageMaker Model Registry using SageMaker ML lineage tracking, as shown in the following screenshot. ML model lineage tracks the metadata associated with your model training and deployment workflows, including training jobs, datasets used, pipelines, endpoints, and the actual models. You can also use the graph node to view more details, such as dataset and images used in that step.

Clean up

If you created resources while using the notebook in this post, follow the instructions in the notebook to clean up those resources.

Conclusion

In this post, we discussed a solution to use a unified model registry with other AWS services to govern your ML use case and models throughout the entire ML lifecycle in your organization. We walked through an end-to-end architecture for developing an AI use case embedding governance controls, from use case inception to model building, model validation, and model deployment in production. We demonstrated through code how to register a model and update it with governance, technical, and business metadata in SageMaker Model Registry.

We encourage you to try out this solution and share your feedback in the comments section.


About the authors

Ram Vittal is a Principal ML Solutions Architect at AWS. He has over 3 decades of experience architecting and building distributed, hybrid, and cloud applications. He is passionate about building secure and scalable AI/ML and big data solutions to help enterprise customers with their cloud adoption and optimization journey to improve their business outcomes. In his spare time, he rides his motorcycle and walks with his 3-year-old Sheepadoodle.

Neelam Koshiya is principal solutions architect (GenAI specialist) at AWS. With a background in software engineering, she moved organically into an architecture role. Her current focus is to help enterprise customers with their ML/ GenAI journeys for strategic business outcomes. Her area of depth is machine learning. In her spare time, she enjoys reading and being outdoors.

Siamak Nariman is a Senior Product Manager at AWS. He is focused on AI/ML technology, ML model management, and ML governance to improve overall organizational efficiency and productivity. He has extensive experience automating processes and deploying various technologies.

Saumitra Vikaram is a Senior Software Engineer at AWS. He is focused on AI/ML technology, ML model management, ML governance, and MLOps to improve overall organizational efficiency and productivity.
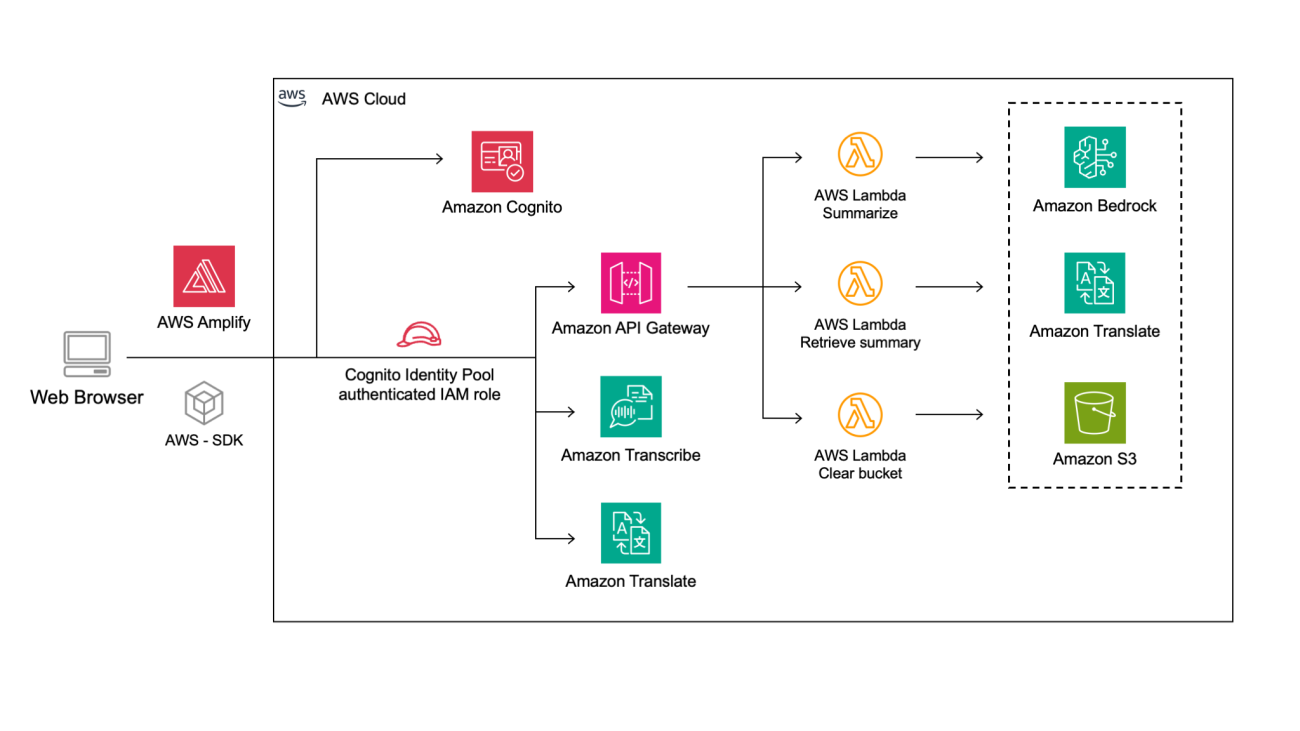
Read More

Transcribe, translate, and summarize live streams in your browser with AWS AI and generative AI services

Transcribe, translate, and summarize live streams in your browser with AWS AI and generative AI services

Live streaming has been gaining immense popularity in recent years, attracting an ever-growing number of viewers and content creators across various platforms. From gaming and entertainment to education and corporate events, live streams have become a powerful medium for real-time engagement and content consumption. However, as the reach of live streams expands globally, language barriers and accessibility challenges have emerged, limiting the ability of viewers to fully comprehend and participate in these immersive experiences.

Recognizing this need, we have developed a Chrome extension that harnesses the power of AWS AI and generative AI services, including Amazon Bedrock, an AWS managed service to build and scale generative AI applications with foundation models (FMs). This extension aims to revolutionize the live streaming experience by providing real-time transcription, translation, and summarization capabilities directly within your browser.

With this extension, viewers can seamlessly transcribe live streams into text, enabling them to follow along with the content even in noisy environments or when listening to audio is not feasible. Moreover, the extension’s translation capabilities open up live streams to a global audience, breaking down language barriers and fostering more inclusive participation. By offering real-time translations into multiple languages, viewers from around the world can engage with live content as if it were delivered in their first language.

In addition, the extension’s capabilities extend beyond mere transcription and translation. Using the advanced natural language processing and summarization capabilities of FMs available through Amazon Bedrock, the extension can generate concise summaries of the content being transcribed in real time. This innovative feature empowers viewers to catch up with what is being presented, making it simpler to grasp key points and highlights, even if they have missed portions of the live stream or find it challenging to follow complex discussions.

In this post, we explore the approach behind building this powerful extension and provide step-by-step instructions to deploy and use it in your browser.

Solution overview

The solution is powered by two AWS AI services, Amazon Transcribe and Amazon Translate, along with Amazon Bedrock, a fully managed service that allows you to build generative AI applications. The solution also uses Amazon Cognito user pools and identity pools for managing authentication and authorization of users, Amazon API Gateway REST APIs, AWS Lambda functions, and an Amazon Simple Storage Service (Amazon S3) bucket.

After deploying the solution, you can access the following features:

  • Live transcription and translation – The Chrome extension transcribes and translates audio streams for you in real time using Amazon Transcribe, an automatic speech recognition service. This feature also integrates with Amazon Transcribe automatic language identification for streaming transcriptions—with a minimum of 3 seconds of audio, the service can automatically detect the dominant language and generate a transcript without you having to specify the spoken language.
  • Summarization – The Chrome extension uses FMs such as Anthropic’s Claude 3 models on Amazon Bedrock to summarize content being transcribed, so you can grasp key ideas of your live stream by reading the summary.

Live transcription is currently available in the over 50 languages currently supported by Amazon Transcribe streaming (Chinese, English, French, German, Hindi, Italian, Japanese, Korean, Brazilian Portuguese, Spanish, and Thai), while translation is available in the over 75 languages currently supported by Amazon Translate.

The following diagram illustrates the architecture of the application.

Architecture diagram showing services' interactions

The solution workflow includes the following steps:

  1. A Chrome browser is used to access the desired live streamed content, and the extension is activated and displayed as a side panel. The extension delivers a web application implemented using the AWS SDK for JavaScript and the AWS Amplify JavaScript library.
  2. The user signs in by entering a user name and a password. Authentication is performed against the Amazon Cognito user pool. After a successful login, the Amazon Cognito identity pool is used to provide the user with the temporary AWS credentials required to access application features. For more details about the authentication and authorization flows, refer to Accessing AWS services using an identity pool after sign-in.
  3. The extension interacts with Amazon Transcribe (StartStreamTranscription operation), Amazon Translate (TranslateText operation), and Amazon Bedrock (InvokeModel operation). Interactions with Amazon Bedrock are handled by a Lambda function, which implements the application logic underlying an API made available using API Gateway.
  4. The user is provided with the transcription, translation, and summary of the content playing inside the browser tab. The summary is stored inside an S3 bucket, which can be emptied using the extension’s Clean Up feature.

In the following sections, we walk through how to deploy the Chrome extension and the underlying backend resources and set up the extension, then we demonstrate using the extension in a sample use case.

Prerequisites

For this walkthrough, you should have the following prerequisites:

Deploy the backend

The first step consists of deploying an AWS Cloud Development Kit (AWS CDK) application that automatically provisions and configures the required AWS resources, including:

  • An Amazon Cognito user pool and identity pool that allow user authentication
  • An S3 bucket, where transcription summaries are stored
  • Lambda functions that interact with Amazon Bedrock to perform content summarization
  • IAM roles that are associated with the identity pool and have permissions required to access AWS services

Complete the following steps to deploy the AWS CDK application:

  1. Using a command line interface (Linux shell, macOS Terminal, Windows command prompt or PowerShell), clone the GitHub repository to a local directory, then open the directory:
git clone https://github.com/aws-samples/aws-transcribe-translate-summarize-live-streams-in-browser.git
cd aws-transcribe-translate-summarize-live-streams-in-browser

  1. Open the cdk/bin/config.json file and populate the following configuration variables:
{
    "prefix": "aaa123",
    "aws_region": "us-west-2",
    "bedrock_region": "us-west-2",
    "bucket_name": "summarization-test",
    "bedrock_model_id": "anthropic.claude-3-sonnet-20240229-v1:0"
}

The template launches in the us-east-2 AWS Region by default. To launch the solution in a different Region, change the aws_region parameter accordingly. Make sure to select a Region in which all the AWS services in scope (Amazon Transcribe, Amazon Translate, Amazon Bedrock, Amazon Cognito, API Gateway, Lambda, Amazon S3) are available.

The Region used for bedrock_region can be different from aws_region because you might have access to Amazon Bedrock models in a Region different from the Region where you want to deploy the project.

By default, the project uses Anthropic’s Claude 3 Sonnet as a summarization model; however, you can use a different model by changing the bedrock_model_id in the configuration file. For the complete list of model IDs, see Amazon Bedrock model IDs. When selecting a model for your deployment, don’t forget to check that the desired model is available in your preferred Region; for more details about model availability, see Model support by AWS Region.

  1. If you have never used the AWS CDK on this account and Region combination, you will need to run the following command to bootstrap the AWS CDK on the target account and Region (otherwise, you can skip this step):
npx cdk bootstrap aws://{targetAccountId}/{targetRegion}
  1. Navigate to the cdk sub-directory, install dependencies, and deploy the stack by running the following commands:
cd cdk
npm i
npx cdk deploy
  1. Confirm the deployment of the listed resources by entering y.

Wait for AWS CloudFormation to finish the stack creation.

You need to use the CloudFormation stack outputs to connect the frontend to the backend. After the deployment is complete, you have two options.

The preferred option is to use the provided postdeploy.sh script to automatically copy the cdk configuration parameters to a configuration file by running the following command, still in the /cdk folder:

./scripts/postdeploy.sh

Alternatively, you can copy the configuration manually:

  1. Open the AWS CloudFormation console in the same Region where you deployed the resources.
  2. Find the stack named AwsStreamAnalysisStack.
  3. On the Outputs tab, note of the output values to complete the next steps.

Set up the extension

Complete the following steps to get the extension ready for transcribing, translating, and summarizing live streams:

  1. Open the src/config.js Based on how you chose to collect the CloudFormation stack outputs, follow the appropriate step:
    1. If you used the provided automation, check whether the values inside the src/config.js file have been automatically updated with the corresponding values.
    2. If you copied the configuration manually, populate the src/config.js file with the values you noted. Use the following format:
const config = {
    "aws_project_region": "{aws_region}", // The same you have used as aws_region in cdk/bin/config.json
    "aws_cognito_identity_pool_id": "{CognitoIdentityPoolId}", // From CloudFormation outputs
    "aws_user_pools_id": "{CognitoUserPoolId}", // From CloudFormation outputs
    "aws_user_pools_web_client_id": "{CognitoUserPoolClientId}", // From CloudFormation outputs
    "bucket_s3": "{BucketS3Name}", // From CloudFormation outputs
    "bedrock_region": "{bedrock_region}", // The same you have used as bedrock_region in cdk/bin/config.json
    "api_gateway_id": "{APIGatewayId}" // From CloudFormation outputs
};

Take note of the CognitoUserPoolId, which will be needed in a later step to create a new user.

  1. In the command line interface, move back to the aws-transcribe-translate-summarize-live-streams-in-browser directory with a command similar to following:
cd ~/aws-transcribe-translate-summarize-live-streams-in-browser
  1. Install dependencies and build the package by running the following commands:
npm i
npm run build
  1. Open your Chrome browser and navigate to chrome://extensions/.

Make sure that developer mode is enabled by toggling the icon on the top right corner of the page.

  1. Choose Load unpacked and upload the build directory, which can be found inside the local project folder aws-transcribe-translate-summarize-live-streams-in-browser.
  2. Grant permissions to your browser to record your screen and audio:
    1. Identify the newly added Transcribe, translate and summarize live streams (powered by AWS)
    2. Choose Details and then Site Settings.
    3. In the Microphone section, choose Allow.
  3. Create a new Amazon Cognito user:
    1. On the Amazon Cognito console, choose User pools in the navigation pane.
    2. Choose the user pool with the CognitoUserPoolId value noted from the CloudFormation stack outputs.
    3. On the Users tab, choose Create user and configure this user’s verification and sign-in options.

See a walkthrough of Steps 4-6 in the animated image below. For additional details, refer to Creating a new user in the AWS Management Console.

Gif showcasing steps previously desccribed to setup the extension

Use the extension

Now that the extension in set up, you can interact with it by completing these steps:

  1. On the browser tab, choose the Extensions.
  2. Choose (right-click) on the Transcribe, translate and summarize live streams (powered by AWS) extension and choose Open side panel.
  3. Log in using the credentials created in the Amazon Cognito user pool from the previous step.
  4. Close the side panel.

You’re now ready to experiment with the extension.

  1. Open a new tab in the browser, navigate to a website featuring an audio/video stream, and open the extension (choose the Extensions icon, then choose the option menu (three dots) next to AWS transcribe, translate, and summarize, and choose Open side panel).
  2. Use the Settings pane to update the settings of the application:
    • Mic in use – The Mic not in use setting is used to record only the audio of the browser tab for a live video streaming. Mic in use is used for a real-time meeting where your microphone is recorded as well.
    • Transcription language – This is the language of the live stream to be recorded (set to auto to allow automatic identification of the language).
    • Translation language – This is the language in which the live stream will be translated and the summary will be printed. After you choose the translation language and start the recording, you can’t change your choice for the ongoing live stream. To change the translation language for the transcript and summary, you will have to record it from scratch.
  3. Choose Start recording to start recording, and start exploring the Transcription and Translation

Content on the Translation tab will appear with a few seconds of delay compared to what you see on the Transcription tab. When transcribing speech in real time, Amazon Transcribe incrementally returns a stream of partial results until it generates the final transcription for a speech segment. This Chrome extension has been implemented to translate text only after a final transcription result is returned.

  1. Expand the Summary section and choose Get summary to generate a summary. The operation will take a few seconds.
  2. Choose Stop recording to stop recording.
  3. Choose Clear all conversations in the Clean Up section to delete the summary of the live stream from the S3 bucket.

See the extension in action in the video below.

Troubleshooting

If you receive the error “Extension has not been invoked for the current page (see activeTab permission). Chrome pages cannot be captured.”, check the following:

  • Make sure you’re using the extension on the tab where you first opened the side pane. If you want to use it on a different tab, stop the extension, close the side pane, and choose the extension icon again to run it
  • Make sure you have given permissions for audio recording in the web browser.

If you can’t get the summary of the live stream, make sure you have stopped the recording and then request the summary. You can’t change the language of the transcript and summary after the recording has started, so remember to choose it appropriately before you start the recording.

Clean up

When you’re done with your tests, to avoid incurring future charges, delete the resources created during this walkthrough by deleting the CloudFormation stack:

  1. On the AWS CloudFormation console, choose Stacks in the navigation pane.
  2. Choose the stack AwsStreamAnalysisStack.
  3. Take note of the CognitoUserPoolId and CognitoIdentityPoolId values among the CloudFormation stack outputs, which will be needed in the following step.
  4. Choose Delete stack and confirm deletion when prompted.

Because the Amazon Cognito resources won’t be automatically deleted, delete them manually:

  1. On the Amazon Cognito console, locate the CognitoUserPoolId and CognitoIdentityPoolId values previously retrieved in the CloudFormation stack outputs.
  2. Select both resources and choose Delete.

Conclusion

In this post, we showed you how to deploy a code sample that uses AWS AI and generative AI services to access features such as live transcription, translation and summarization. You can follow the steps we provided to start experimenting with the browser extension.

To learn more about how to build and scale generative AI applications, refer to Transform your business with generative AI.


About the Authors

Luca Guida is a Senior Solutions Architect at AWS; he is based in Milan and he supports independent software vendors in their cloud journey. With an academic background in computer science and engineering, he started developing his AI/ML passion at university; as a member of the natural language processing and generative AI community within AWS, Luca helps customers be successful while adopting AI/ML services.

Chiara Relandini is an Associate Solutions Architect at AWS. She collaborates with customers from diverse sectors, including digital native businesses and independent software vendors. After focusing on ML during her studies, Chiara supports customers in using generative AI and ML technologies effectively, helping them extract maximum value from these powerful tools.

Arian Rezai Tabrizi is an Associate Solutions Architect based in Milan. She supports enterprises across various industries, including retail, fashion, and manufacturing, on their cloud journey. Drawing from her background in data science, Arian assists customers in effectively using generative AI and other AI technologies.

Read More