Image and video prompt engineering for Amazon Nova Canvas and Amazon Nova Reel

Image and video prompt engineering for Amazon Nova Canvas and Amazon Nova Reel

Amazon has introduced two new creative content generation models on Amazon Bedrock: Amazon Nova Canvas for image generation and Amazon Nova Reel for video creation. These models transform text and image inputs into custom visuals, opening up creative opportunities for both professional and personal projects. Nova Canvas, a state-of-the-art image generation model, creates professional-grade images from text and image inputs, ideal for applications in advertising, marketing, and entertainment. Similarly, Nova Reel, a cutting-edge video generation model, supports the creation of short videos from text and image inputs, complete with camera motion controls using natural language. Although these models are powerful tools for creative expression, their effectiveness relies heavily on how well users can communicate their vision through prompts.

This post dives deep into prompt engineering for both Nova Canvas and Nova Reel. We share proven techniques for describing subjects, environments, lighting, and artistic style in ways the models can understand. For Nova Reel, we explore how to effectively convey camera movements and transitions through natural language. Whether you’re creating marketing content, prototyping designs, or exploring creative ideas, these prompting strategies can help you unlock the full potential of the visual generation capabilities of Amazon Nova.

Solution overview

To get started with Nova Canvas and Nova Reel, you can either use the Image/Video Playground on the Amazon Bedrock console or access the models through APIs. For detailed setup instructions, including account requirements, model access, and necessary permissions, refer to Creative content generation with Amazon Nova.

Generate images with Nova Canvas

Prompting for image generation models like Amazon Nova Canvas is both an art and a science. Unlike large language models (LLMs), Nova Canvas doesn’t reason or interpret command-based instructions explicitly. Instead, it transforms prompts into images based on how well the prompt captures the essence of the desired image. Writing effective prompts is key to unlocking the full potential of the model for various use cases. In this post, we explore how to craft effective prompts, examine essential elements of good prompts, and dive into typical use cases, each with compelling example prompts.

Essential elements of good prompts

A good prompt serves as a descriptive image caption rather than command-based instructions. It should provide enough detail to clearly describe the desired outcome while maintaining brevity (limited to 1,024 characters). Instead of giving command-based instructions like “Make a beautiful sunset,” you can achieve better results by describing the scene as if you’re looking at it: “A vibrant sunset over mountains, with golden rays streaming through pink clouds, captured from a low angle.” Think of it as painting a vivid picture with words to guide the model effectively.

Effective prompts start by clearly defining the main subject and action:

  • Subject – Clearly define the main subject of the image. Example: “A blue sports car parked in front of a grand villa.”
  • Action or pose – Specify what the subject is doing or how it is positioned. Example: “The car is angled slightly towards the camera, its doors open, showcasing its sleek interior.”

Add further context:

  • Environment – Describe the setting or background. Example: “A grand villa overlooking Lake Como, surrounded by manicured gardens and sparkling lake waters.”

After you define the main focus of the image, you can refine the prompt further by specifying additional attributes such as visual style, framing, lighting, and technical parameters. For instance:

  • Lighting – Include lighting details to set the mood. Example: “Soft, diffused lighting from a cloudy sky highlights the car’s glossy surface and the villa’s stone facade.”
  • Camera position and framing – Provide information about perspective and composition. Example: “A wide-angle shot capturing the car in the foreground and the villa’s grandeur in the background, with Lake Como visible beyond.”
  • Style – Mention the visual style or medium. Example: “Rendered in a cinematic style with vivid, high-contrast details.”

Finally, you can use a negative prompt to exclude specific elements or artifacts from your composition, aligning it more closely to your vision:

  • Negative prompt – Use the negativeText parameter to exclude unwanted elements in your main prompt. For instance, to remove any birds or people from the image, rather than adding “no birds or people” to the prompt, add “birds, people” to the negative prompt instead. Avoid using negation words like “no,” “not,” or “without” in both the prompt and negative prompt because they might lead to unintended consequences.

Let’s bring all these elements together with an example prompt with a basic and enhanced version that shows these techniques in action.

Basic: A car in front of a house Enhanced: A blue luxury sports car parked in front of a grand villa overlooking Lake Como. The setting features meticulously manicured gardens, with the lake’s sparkling waters and distant mountains in the background. The car’s sleek, polished surface reflects the surrounding elegance, enhanced by soft, diffused lighting from a cloudy sky. A wide-angle shot capturing the car, villa, and lake in harmony, rendered in a cinematic style with vivid, high-contrast details.

Example image generation prompts

By mastering these techniques, you can create stunning visuals for a wide range of applications using Amazon Nova Canvas. The following images have been generated using Nova Canvas at a 1280×720 pixel resolution with a CFG scale of 6.5 and seed of 0 for reproducibility (see Request and response structure for image generation for detailed explanations of these parameters). This resolution also matches the image dimensions expected by Nova Reel, allowing seamless integration for video experimentation. Let’s examine some example prompts and their resulting images to see these techniques in action.

Aerial view of sparse arctic tundra landscape, expansive white terrain with meandering frozen rivers and scattered rock formations. High-contrast black and white composition showcasing intricate patterns of ice and snow, emphasizing texture and geological diversity. Bird’s-eye perspective capturing the abstract beauty of the arctic wilderness. An overhead shot of premium over-ear headphones resting on a reflective surface, showcasing the symmetry of the design. Dramatic side lighting accentuates the curves and edges, casting subtle shadows that highlight the product’s premium build quality
An angled view of a premium matte metal water bottle with bamboo accents, showcasing its sleek profile. The background features a soft blur of a serene mountain lake. Golden hour sunlight casts a warm glow on the bottle’s surface, highlighting its texture. Captured with a shallow depth of field for product emphasis. Watercolor scene of a cute baby dragon with pearlescent mint-green scales crouched at the edge of a garden puddle, tiny wings raised. Soft pastel flowers and foliage frame the composition. Loose, wet-on-wet technique for a dreamy atmosphere, with sunlight glinting off ripples in the puddle.
Abstract figures emerging from digital screens, glitch art aesthetic with RGB color shifts, fragmented pixel clusters, high contrast scanlines, deep shadows cast by volumetric lighting An intimate portrait of a seasoned fisherman, his face filling the frame. His thick gray beard is flecked with sea spray, and his knit cap is pulled low over his brow. The warm glow of sunset bathes his weathered features in golden light, softening the lines of his face while still preserving the character earned through years at sea. His eyes reflect the calm waters of the harbor behind him.

Generate video with Nova Reel

Video generation models work best with descriptive prompts rather than command-based instructions. When crafting prompts, focus on what you want to see rather than telling the model what to do. Think of writing a detailed caption or scene description like you’re explaining a video that already exists. For example, describing elements like the main subjects, what they’re doing, the setting around them, how the scene is lit, the overall artistic style, and any camera movements can help create more accurate results. The key is to paint a complete picture through description rather than giving step-by-step directions. This means instead of saying “create a dramatic scene,” you could describe “a stormy beach at sunset with crashing waves and dark clouds, filmed with a slow aerial shot moving over the coastline.” The more specific and descriptive you can be about the visual elements you want, the better the output will be. You might want to include details about the subject, action, environment, lighting, style, and camera motion.

When writing a video generation prompt for Nova Reel, be mindful of the following requirements and best practices:

  • Prompts must be no longer than 512 characters.
  • For best results, place camera movement descriptions at the start or end of your prompt.
  • Specify what you want to include rather than what to exclude. For example, instead of “fruit basket with no bananas,” say “fruit basket with apples, oranges, and pears.”

When describing camera movements in your video prompts, be specific about the type of motion you want—whether it’s a smooth dolly shot (moving forward/backward), a pan (sweeping left/right), or a tilt (moving up/down). For more dynamic effects, you can request aerial shots, orbit movements, or specialized techniques like dolly zooms. You can also specify the speed of the movement; refer to camera controls for more ideas.

Example video generation prompts

Let’s look at some of the outputs from Amazon Nova Reel.

Track right shot of single red balloon floating through empty subway tunnel. Balloon glows from within, casting soft red light on concrete walls. Cinematic 4k, moody lighting Dolly in shot of peaceful deer drinking from forest stream. Sunlight filtering through and bokeh of other deer and forest plants. 4k cinematic.
Pedestal down in a pan in modern kitchen penne pasta with heavy cream white sauce on top, mushrooms and garlic, steam coming out. Orbit shot of crystal light bulb centered on polished marble surface, gentle floating gears spinning inside with golden glow. Premium lighting. 4k cinematic.

Generate image-based video using Nova Reel

In addition to the fundamental text-to-video, Amazon Nova Reel also supports an image-to-video feature that allows you to use an input reference image to guide video generation. Using image-based prompts for video generation offers significant advantages: it speeds up your creative iteration process and provides precise control over the final output. Instead of relying solely on text descriptions, you can visually define exactly how you want your video to start. These images can come from Nova Canvas or from other sources where you have appropriate rights to use them. This approach has two main strategies:

  • Simple camera motion – Start with your reference image to establish the visual elements and style, then add minimal prompts focused purely on camera movement, such as “dolly forward.” This approach keeps the scene largely static while creating dynamic motion through camera direction.
  • Dynamic transformation – This strategy involves describing specific actions and temporal changes in your scene. Detail how elements should evolve over time, framing your descriptions as summaries of the desired transformation rather than step-by-step commands. This allows for more complex scene evolution while maintaining the visual foundation established by your reference image.

This method streamlines your creative workflow by using your image as the visual foundation. Rather than spending time refining text prompts to achieve the right look, you can quickly create an image in Nova Canvas (or source it elsewhere) and use it as your starting point in Nova Reel. This approach leads to faster iterations and more predictable results compared to pure text-to-video generation.

Let’s take some images we created earlier with Amazon Nova Canvas and use them as reference frames to generate videos with Amazon Nova Reel.

Slow dolly forward A 3d animated film: A mint-green baby dragon is talking dramatically. Emotive, high quality animation.
Track right of a premium matte metal water bottle with bamboo accents with background serene mountain lake ripples moving Orbit shot of premium over-ear headphones on a reflective surface. Dramatic side lighting accentuates the curves and edges, casting subtle shadows that highlight the product’s premium build quality.

Tying it all together

You can transform your storytelling by combining multiple generated video clips into a captivating narrative. Although Nova Reel handles the video generation, you can further enhance the content using preferred video editing software to add thoughtful transitions, background music, and narration. This combination creates an immersive journey that transports viewers into compelling storytelling. The following example showcases Nova Reel’s capabilities in creating engaging visual narratives. Each clip is crafted with professional lighting and cinematic quality.

Best practices

Consider the following best practices:

  • Refine iteratively – Start simple and refine your prompt based on the output.
  • Be specific – Provide detailed descriptions for better results.
  • Diversify adjectives – Avoid overusing generic descriptors like “beautiful” or “amazing;” opt for specific terms like “serene” or “ornate.”
  • Refine prompts with AI – Use multimodal understanding models like Amazon Nova (Pro, Lite, or Micro) to help you convert your high-level idea into a refined prompt based on best practices. Generative AI can also help you quickly generate different variations of your prompt to help you experiment with different combinations of style, framing, and more, as well as other creative explorations. Experiment with community-built tools like the Amazon Nova Canvas Prompt Refiner in PartyRock, the Amazon Nova Canvas Prompting Assistant, and the Nova Reel Prompt Optimizer.
  • Maintain a templatized prompt library – Keep a catalog of effective prompts and their results to refine and adapt over time. Create reusable templates for common scenarios to save time and maintain consistency.
  • Learn from others – Explore community resources and tools to see effective prompts and adapt them.
  • Follow trends – Monitor updates or new model features, because prompt behavior might change with new capabilities.

Fundamentals of prompt engineering for Amazon Nova

Effective prompt engineering for Amazon Nova Canvas and Nova Reel follows an iterative process, designed to refine your input and achieve the desired output. This process can be visualized as a logical flow chart, as illustrated in the following diagram.

The process consists of the following steps:

  1. Begin by crafting your initial prompt, focusing on descriptive elements such as subject, action, environment, lighting, style, and camera position or motion.
  2. After generating the first output, assess whether it aligns with your vision. If the result is close to what you want, proceed to the next step. If not, return to Step 1 and refine your prompt.
  3. When you’ve found a promising direction, maintain the same seed value. This maintains consistency in subsequent generations while you make minor adjustments.
  4. Make small, targeted changes to your prompt. These could involve adjusting descriptors, adding or removing elements, and more.
  5. Generate a new output with your refined prompt, keeping the seed value constant.
  6. Evaluate the new output. If it’s satisfactory, move to the next step. If not, return to Step 4 and continue refining.
  7. When you’ve achieved a satisfactory result, experiment with different seed values to create variations of your successful prompt. This allows you to explore subtle differences while maintaining the core elements of your desired output.
  8. Select the best variations from your generated options as your final output.

This iterative approach allows for systematic improvement of your prompts, leading to more accurate and visually appealing results from Nova Canvas and Nova Reel models. Remember, the key to success lies in making incremental changes, maintaining consistency where needed, and being open to exploring variations after you’ve found a winning formula.

Conclusion

Understanding effective prompt engineering for Nova Canvas and Nova Reel unlocks exciting possibilities for creating stunning images and compelling videos. By following the best practices outlined in this guide—from crafting descriptive prompts to iterative refinement—you can transform your ideas into production-ready visual assets.

Ready to start creating? Visit the Amazon Bedrock console today to experiment with Nova Canvas and Nova Reel in the Amazon Bedrock Playground or using the APIs. For detailed specifications, supported features, and additional examples, refer to the following resources:


About the authors

Yanyan Zhang is a Senior Generative AI Data Scientist at Amazon Web Services, where she has been working on cutting-edge AI/ML technologies as a Generative AI Specialist, helping customers use generative AI to achieve their desired outcomes. Yanyan graduated from Texas A&M University with a PhD in Electrical Engineering. Outside of work, she loves traveling, working out, and exploring new things.

Kris Schultz has spent over 25 years bringing engaging user experiences to life by combining emerging technologies with world class design. In his role as Senior Product Manager, Kris helps design and build AWS services to power Media & Entertainment, Gaming, and Spatial Computing.

Sanju Sunny is a Digital Innovation Specialist with Amazon ProServe. He engages with customers in a variety of industries around Amazon’s distinctive customer-obsessed innovation mechanisms in order to rapidly conceive, validate and prototype new products, services and experiences.

Nitin Eusebius is a Sr. Enterprise Solutions Architect at AWS, experienced in Software Engineering, Enterprise Architecture, and AI/ML. He is deeply passionate about exploring the possibilities of generative AI. He collaborates with customers to help them build well-architected applications on the AWS platform, and is dedicated to solving technology challenges and assisting with their cloud journey.

Read More

Amphitrite Rides AI Wave to Boost Maritime Shipping, Ocean Cleanup With Real-Time Weather Prediction and Simulation

Amphitrite Rides AI Wave to Boost Maritime Shipping, Ocean Cleanup With Real-Time Weather Prediction and Simulation

Named after Greek mythology’s goddess of the sea, France-based startup Amphitrite is fusing satellite data and AI to simulate and predict oceanic currents and weather.

It’s work that’s making waves in maritime-shipping and oceanic litter-collection operations.

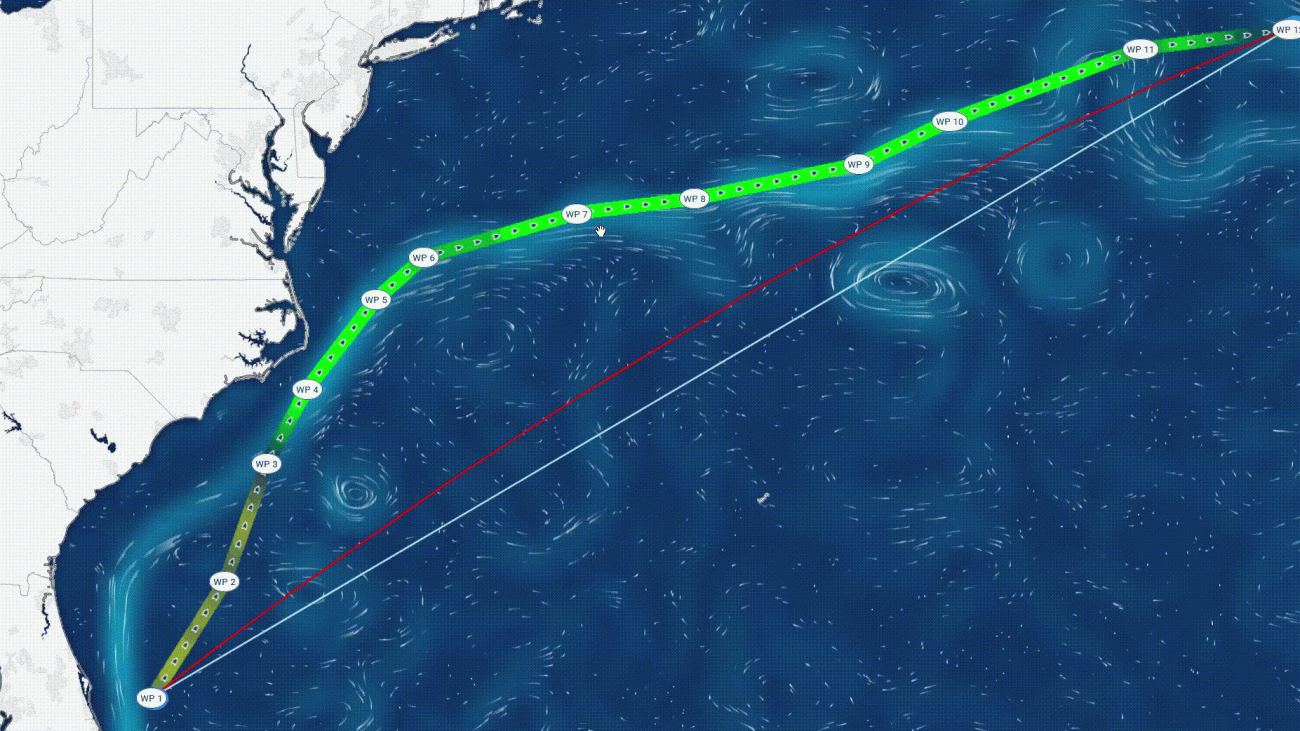
Amphitrite’s AI models — powered by the NVIDIA AI and Earth-2 platforms — provide insights on positioning vessels to best harness the power of ocean currents, helping ships know when best to travel, as well as the optimal course. This helps users reduce travel times, fuel consumption and, ultimately, carbon emissions.

“We’re at a turning point on the modernization of oceanic atmospheric forecasting,” said Alexandre Stegner, cofounder and CEO of Amphitrite. “There’s a wide portfolio of applications that can use these domain-specific oceanographic AI models — first and foremost, we’re using them to help foster the energy transition and alleviate environmental issues.”

Optimizing Routes Based on Currents and Weather

Founded by expert oceanographers, Amphitrite — a member of the NVIDIA Inception program for cutting-edge startups — distinguishes itself from other weather modeling companies with its domain-specific expertise.

Amphitrite’s fine-tuned, three-kilometer-scale AI models focus on analyzing one parameter at a time, making them more accurate than global numerical modeling methods for the variable of interest. Read more in this paper showcasing the AI method, dubbed ORCAst, trained on NVIDIA GPUs.

Depending on the user’s needs, such variables include the current of the ocean within the first 10 meters of the surface — critical in helping ships optimize their travel and minimize fuel consumption — as well as the impacts of extreme waves and wind.

“It’s only with NVIDIA accelerated computing that we can achieve optimal performance and parallelization when analyzing data on the whole ocean,” said Evangelos Moschos, cofounder and chief technology officer of Amphitrite.

Using the latest NVIDIA AI technologies to predict ocean currents and weather in detail, ships can ride or avoid waves, optimize routes and enhance safety while saving energy and fuel.

“The amount of public satellite data that’s available is still much larger than the number of ways people are using this information,” Moschos said. “Fusing AI and satellite imagery, Amphitrite can improve the accuracy of global ocean current analyses by up to 2x compared with traditional methods.”

Fine-Tuned to Handle Oceans of Data

The startup’s AI models, tuned to handle seas of data on the ocean, are based on public data from NASA and the European Space Agency — including its Sentinel-3 satellite.

Plus, Amphitrite offers the world’s first forecast model incorporating data from the Surface Water and Ocean Topography (SWOT) mission — a satellite jointly developed and operated by NASA and French space agency CNES, in collaboration with the Canadian Space Agency and UK Space Agency.

“SWOT provides an unprecedented resolution of the ocean surface,” Moschos said.

While weather forecasting technologies have traditionally relied on numerical modeling and computational fluid dynamics, these approaches are harder to apply to the ocean, Moschos explained. This is because oceanic currents often deal with nonlinear physics. There’s also simply less observational data available on the ocean than on atmospheric weather.

Computer vision and AI, working with real-time satellite data, offer higher reliability for oceanic current and weather modeling than traditional methods.

Amphitrite trains and runs its AI models using NVIDIA H100 GPUs on premises and in the cloud — and is building on the FourCastNet model, part of Earth-2, to develop its computer vision models for wave prediction.

According to a case study along the Mediterranean Sea, the NVIDIA-powered Amphitrite fine-scale routing solution helped reduce one shipping line’s carbon emissions by 10%.

Through NVIDIA Inception, Amphitrite gained technical support when building its on-premises infrastructure, free cloud credits for NVIDIA GPU instances on Amazon Web Services, as well as opportunities to collaborate with NVIDIA experts on using the latest simulation technologies, like Earth-2 and FourCastNet.

Customers Set Sail With Amphitrite’s Models

Enterprises and organizations across the globe are using Amphitrite’s AI models to optimize their operations and make them more sustainable.

CMA-CGM, Genavir, Louis Dreyfus Armateurs and Orange Marine are among the shipping and oceanographic companies analyzing currents using the startup’s solutions.

In addition, Amphitrite is working with a nongovernmental organization to help track and remove pollution in the Pacific Ocean. The initiative uses Amphitrite’s models to analyze currents and follow plastics that drift from a garbage patch off the coast of California.

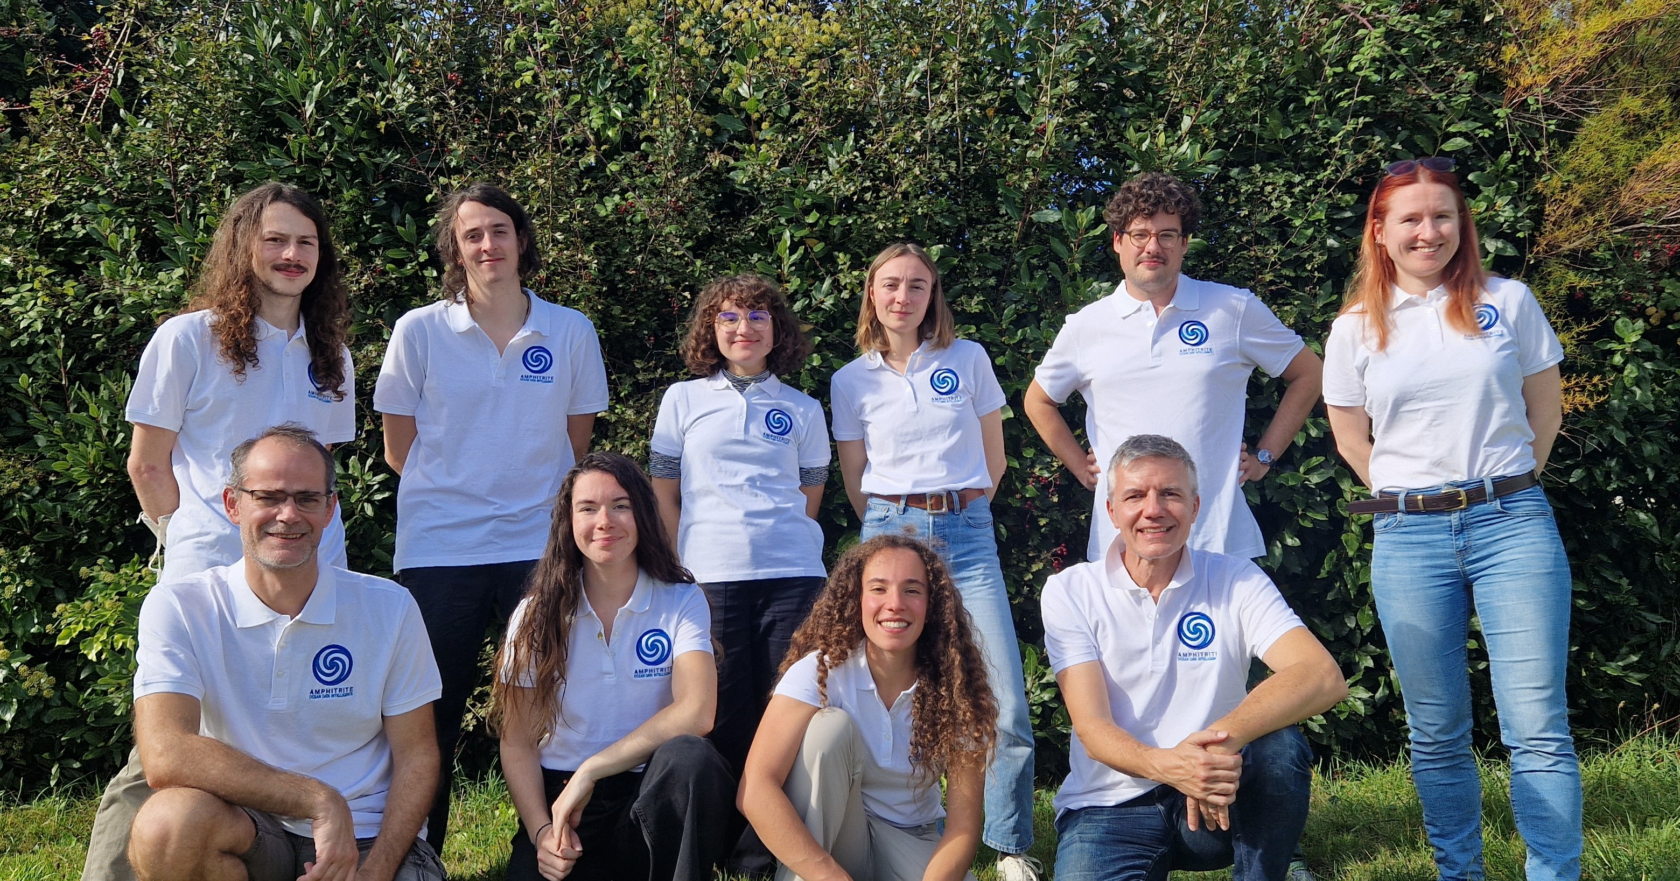
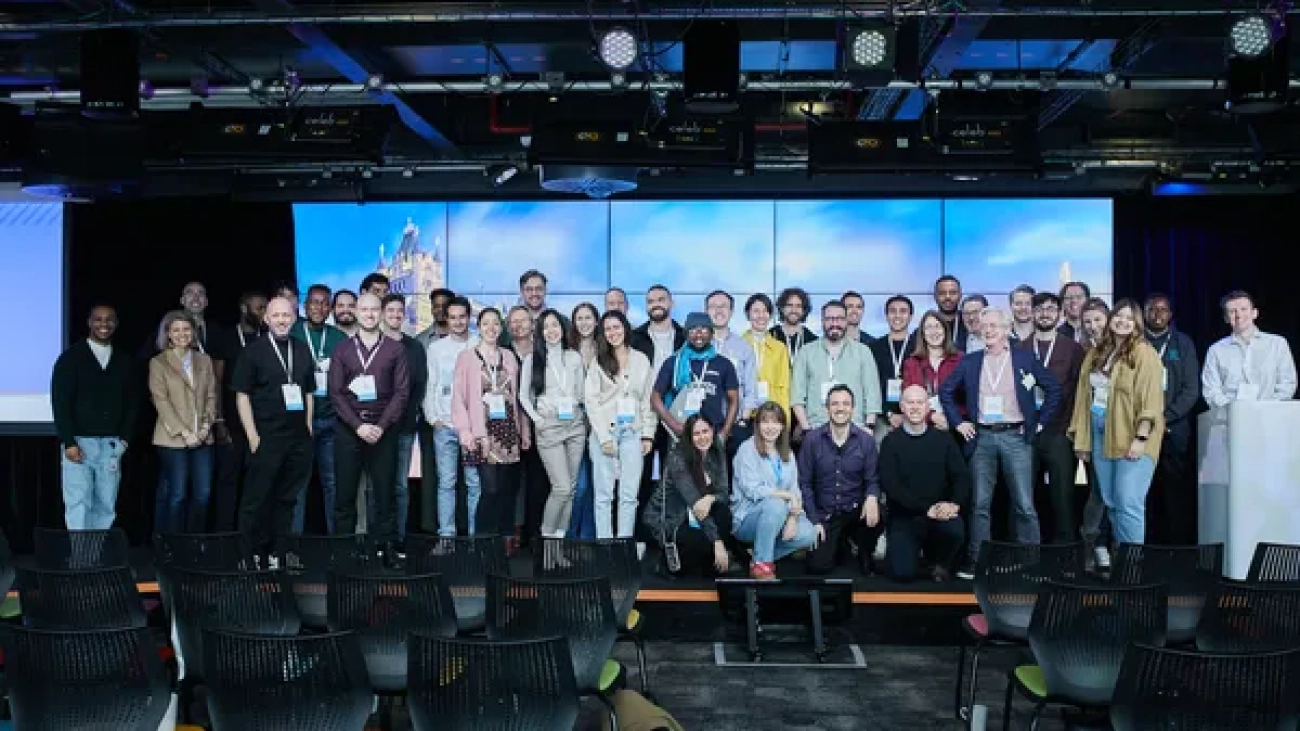
Moschos noted that another way the startup sets itself apart is by having an AI team — led by computer vision scientist Hannah Bull — that comprises majority women, some of whom are featured in the image above.

“This is still rare in the industry, but it’s something we’re really proud of on the technical front, especially since we founded the company in honor of Amphitrite, a powerful but often overlooked female figure in history,” Moschos said.

Learn more about NVIDIA Earth-2.

Read More

Security best practices to consider while fine-tuning models in Amazon Bedrock

Security best practices to consider while fine-tuning models in Amazon Bedrock

Amazon Bedrock has emerged as the preferred choice for tens of thousands of customers seeking to build their generative AI strategy. It offers a straightforward, fast, and secure way to develop advanced generative AI applications and experiences to drive innovation.

With the comprehensive capabilities of Amazon Bedrock, you have access to a diverse range of high-performing foundation models (FMs), empowering you to select the most suitable option for your specific needs, customize the model privately with your own data using techniques such as fine-tuning and Retrieval Augmented Generation (RAG), and create managed agents that run complex business tasks.

Fine-tuning pre-trained language models allows organizations to customize and optimize the models for their specific use cases, providing better performance and more accurate outputs tailored to their unique data and requirements. By using fine-tuning capabilities, businesses can unlock the full potential of generative AI while maintaining control over the model’s behavior and aligning it with their goals and values.

In this post, we delve into the essential security best practices that organizations should consider when fine-tuning generative AI models.

Security in Amazon Bedrock

Cloud security at AWS is the highest priority. Amazon Bedrock prioritizes security through a comprehensive approach to protect customer data and AI workloads.

Amazon Bedrock is built with security at its core, offering several features to protect your data and models. The main aspects of its security framework include:

  • Access control – This includes features such as:
  • Data encryption – Amazon Bedrock offers the following encryption:
  • Network security – Amazon Bedrock offers several security options, including:
    • Support for AWS PrivateLink to establish private connectivity between your virtual private cloud (VPC) and Amazon Bedrock
    • VPC endpoints for secure communication within your AWS environment
  • Compliance – Amazon Bedrock is in alignment with various industry standards and regulations, including HIPAA, SOC, and PCI DSS

Solution overview

Model customization is the process of providing training data to a model to improve its performance for specific use cases. Amazon Bedrock currently offers the following customization methods:

  • Continued pre-training – Enables tailoring an FM’s capabilities to specific domains by fine-tuning its parameters with unlabeled, proprietary data, allowing continuous improvement as more relevant data becomes available.
  • Fine-tuning – Involves providing labeled data to train a model on specific tasks, enabling it to learn the appropriate outputs for given inputs. This process adjusts the model’s parameters, enhancing its performance on the tasks represented by the labeled training dataset.
  • Distillation – Process of transferring knowledge from a larger more intelligent model (known as teacher) to a smaller, faster, cost-efficient model (known as student).

Model customization in Amazon Bedrock involves the following actions:

  1. Create training and validation datasets.
  2. Set up IAM permissions for data access.
  3. Configure a KMS key and VPC.
  4. Create a fine-tuning or pre-training job with hyperparameter tuning.
  5. Analyze results through metrics and evaluation.
  6. Purchase provisioned throughput for the custom model.
  7. Use the custom model for tasks like inference.

In this post, we explain these steps in relation to fine-tuning. However, you can apply the same concepts for continued pre-training as well.

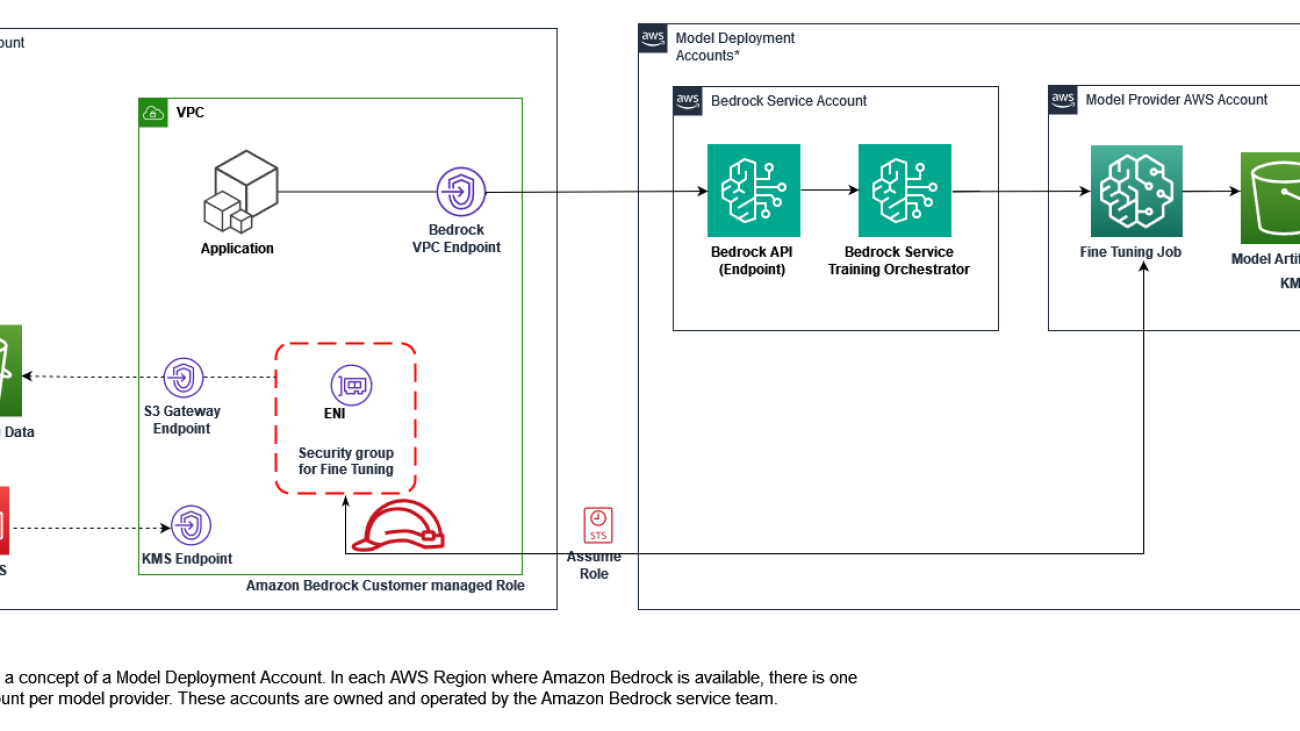
The following architecture diagram explains the workflow of Amazon Bedrock model fine-tuning.

The workflow steps are as follows:

  1. The user submits an Amazon Bedrock fine-tuning job within their AWS account, using IAM for resource access.
  2. The fine-tuning job initiates a training job in the model deployment accounts.
  3. To access training data in your Amazon Simple Storage Service (Amazon S3) bucket, the job employs Amazon Security Token Service (AWS STS) to assume role permissions for authentication and authorization.
  4. Network access to S3 data is facilitated through a VPC network interface, using the VPC and subnet details provided during job submission.
  5. The VPC is equipped with private endpoints for Amazon S3 and AWS KMS access, enhancing overall security.
  6. The fine-tuning process generates model artifacts, which are stored in the model provider AWS account and encrypted using the customer-provided KMS key.

This workflow provides secure data handling across multiple AWS accounts while maintaining customer control over sensitive information using customer managed encryption keys.

The customer is in control of the data; model providers don’t have access to the data, and they don’t have access to a customer’s inference data or their customization training datasets. Therefore, data will not be available to model providers for them to improve their base models. Your data is also unavailable to the Amazon Bedrock service team.

In the following sections, we go through the steps of fine-tuning and deploying the Meta Llama 3.1 8B Instruct model in Amazon Bedrock using the Amazon Bedrock console.

Prerequisites

Before you get started, make sure you have the following prerequisites:

  • An AWS account
  • An IAM federation role with access to do the following:
    • Create, edit, view, and delete VPC network and security resources
    • Create, edit, view, and delete KMS keys
    • Create, edit, view, and delete IAM roles and policies for model customization
    • Create, upload, view, and delete S3 buckets to access training and validation data and permission to write output data to Amazon S3
    • List FMs on the base model that will be used for fine-tuning
    • Create a custom training job for the Amazon Bedrock FM
    • Provisioned model throughputs
    • List custom models and invoke model permissions on the fine-tuned model
  • Model access, which you can request through the Amazon Bedrock console

For this post, we use the us-west-2 AWS Region. For instructions on assigning permissions to the IAM role, refer to Identity-based policy examples for Amazon Bedrock and How Amazon Bedrock works with IAM.

Prepare your data

To fine-tune a text-to-text model like Meta Llama 3.1 8B Instruct, prepare a training and optional validation dataset by creating a JSONL file with multiple JSON lines.

Each JSON line is a sample containing a prompt and completion field. The format is as follows:

{"prompt": "<prompt1>", "completion": "<expected generated text>"}
{"prompt": "<prompt2>", "completion": "<expected generated text>"}

The following is an example from a sample dataset used as one-line input for fine-tuning Meta Llama 3.1 8B Instruct in Amazon Bedrock. In JSONL format, each record is one text line.

{"prompt": "consumer complaints and resolutions for financial products", "completion": "{'Date received': '01/01/24', 'Product': 'Credit card', 'Sub-product': 'Store credit card', 'Issue': 'Other features, terms, or problems', 'Sub-issue': 'Other problem', 'Consumer complaint narrative': None, 'Company public response': None, 'Company': 'Bread Financial Holdings, Inc.', 'State': 'MD', 'ZIP code': '21060', 'Tags': 'Servicemember', 'Consumer consent provided?': 'Consent not provided', 'Submitted via': 'Web', 'Date sent to company': '01/01/24', 'Company response to consumer': 'Closed with non-monetary relief', 'Timely response?': 'Yes', 'Consumer disputed?': None, 'Complaint ID': 8087806}"}

Create a KMS symmetric key

When uploading your training data to Amazon S3, you can use server-side encryption with AWS KMS. You can create KMS keys on the AWS Management Console, the AWS Command Line Interface (AWS CLI) and SDKs, or an AWS CloudFormation template. Complete the following steps to create a KMS key in the console:

  1. On the AWS KMS console, choose Customer managed keys in the navigation pane.
  2. Choose Create key.
  3. Create a symmetric key. For instructions, see Create a KMS key.

Create an S3 bucket and configure encryption

Complete the following steps to create an S3 bucket and configure encryption:

  1. On the Amazon S3 console, choose Buckets in the navigation pane.
  2. Choose Create bucket.
  3. For Bucket name, enter a unique name for your bucket.

  1. For Encryption type¸ select Server-side encryption with AWS Key Management Service keys.
  2. For AWS KMS key, select Choose from your AWS KMS keys and choose the key you created.

  1. Complete the bucket creation with default settings or customize as needed.

Upload the training data

Complete the following steps to upload the training data:

  1. On the Amazon S3 console, navigate to your bucket.
  2. Create the folders fine-tuning-datasets and outputs and keep the bucket encryption settings as server-side encryption.
  3. Choose Upload and upload your training data file.

Create a VPC

To create a VPC using Amazon Virtual Private Cloud (Amazon VPC), complete the following steps:

  1. On the Amazon VPC console, choose Create VPC.
  2. Create a VPC with private subnets in all Availability Zones.

Create an Amazon S3 VPC gateway endpoint

You can further secure your VPC by setting up an Amazon S3 VPC endpoint and using resource-based IAM policies to restrict access to the S3 bucket containing the model customization data.

Let’s create an Amazon S3 gateway endpoint and attach it to VPC with custom IAM resource-based policies to more tightly control access to your Amazon S3 files.

The following code is a sample resource policy. Use the name of the bucket you created earlier.

{
	"Version": "2012-10-17",
	"Statement": [
		{
			"Sid": "RestrictAccessToTrainingBucket",
			"Effect": "Allow",
			"Principal": "*",
			"Action": [
				"s3:GetObject",
				"s3:PutObject",
				"s3:ListBucket"
			],
			"Resource": [
				"arn:aws:s3:::$your-bucket",
				"arn:aws:s3:::$your-bucket/*"
			]
		}
	]
}

Create a security group for the AWS KMS VPC interface endpoint

A security group acts as a virtual firewall for your instance to control inbound and outbound traffic. This VPC endpoint security group only allows traffic originating from the security group attached to your VPC private subnets, adding a layer of protection. Complete the following steps to create the security group:

  1. On the Amazon VPC console, choose Security groups in the navigation pane.
  2. Choose Create security group.
  3. For Security group name, enter a name (for example, bedrock-kms-interface-sg).
  4. For Description, enter a description.
  5. For VPC, choose your VPC.

  1. Add an inbound rule to HTTPS traffic from the VPC CIDR block.

Create a security group for the Amazon Bedrock custom fine-tuning job

Now you can create a security group to establish rules for controlling Amazon Bedrock custom fine-tuning job access to the VPC resources. You use this security group later during model customization job creation. Complete the following steps:

  1. On the Amazon VPC console, choose Security groups in the navigation pane.
  2. Choose Create security group.
  3. For Security group name, enter a name (for example, bedrock-fine-tuning-custom-job-sg).
  4. For Description, enter a description.
  5. For VPC, choose your VPC.

  1. Add an inbound rule to allow traffic from the security group.

Create an AWS KMS VPC interface endpoint

Now you can create an interface VPC endpoint (PrivateLink) to establish a private connection between the VPC and AWS KMS.

For the security group, use the one you created in the previous step.

Attach a VPC endpoint policy that controls the access to resources through the VPC endpoint. The following code is a sample resource policy. Use the Amazon Resource Name (ARN) of the KMS key you created earlier.

{
	"Statement": [
		{
			"Sid": "AllowDecryptAndView",
			"Principal": {
				"AWS": "*"
			},
			"Effect": "Allow",
			"Action": [
				"kms:Decrypt",
				"kms:DescribeKey",
				"kms:ListAliases",
				"kms:ListKeys"
			],
			"Resource": "$Your-KMS-KEY-ARN"
		}
	]
}

Now you have successfully created the endpoints needed for private communication.

Create a service role for model customization

Let’s create a service role for model customization with the following permissions:

  • A trust relationship for Amazon Bedrock to assume and carry out the model customization job
  • Permissions to access your training and validation data in Amazon S3 and to write your output data to Amazon S3
  • If you encrypt any of the following resources with a KMS key, permissions to decrypt the key (see Encryption of model customization jobs and artifacts)
  • A model customization job or the resulting custom model
  • The training, validation, or output data for the model customization job
  • Permission to access the VPC

Let’s first create the required IAM policies:

  1. On the IAM console, choose Policies in the navigation pane.
  2. Choose Create policy.
  3. Under Specify permissions¸ use the following JSON to provide access on S3 buckets, VPC, and KMS keys. Provide your account, bucket name, and VPC settings.

You can use the following IAM permissions policy as a template for VPC permissions:

{
    "Version": "2012-10-17",
    "Statement": [
        {
            "Effect": "Allow",
            "Action": [
                "ec2:DescribeNetworkInterfaces",
                "ec2:DescribeVpcs",
                "ec2:DescribeDhcpOptions",
                "ec2:DescribeSubnets",
                "ec2:DescribeSecurityGroups"
            ],
            "Resource": "*"
        }, 
        {
            "Effect": "Allow",
            "Action": [
                "ec2:CreateNetworkInterface",
            ],
            "Resource":[
               "arn:aws:ec2:${{region}}:${{account-id}}:network-interface/*"
            ],
            "Condition": {
               "StringEquals": { 
                   "aws:RequestTag/BedrockManaged": ["true"]
                },
                "ArnEquals": {
                   "aws:RequestTag/BedrockModelCustomizationJobArn": ["arn:aws:bedrock:${{region}}:${{account-id}}:model-customization-job/*"]
               }
            }
        }, 
        {
            "Effect": "Allow",
            "Action": [
                "ec2:CreateNetworkInterface",
            ],
            "Resource":[
               "arn:aws:ec2:${{region}}:${{account-id}}:subnet/${{subnet-id}}",
               "arn:aws:ec2:${{region}}:${{account-id}}:subnet/${{subnet-id2}}",
               "arn:aws:ec2:${{region}}:${{account-id}}:security-group/security-group-id"
            ]
        }, 
        {
            "Effect": "Allow",
            "Action": [
                "ec2:CreateNetworkInterfacePermission",
                "ec2:DeleteNetworkInterface",
                "ec2:DeleteNetworkInterfacePermission",
            ],
            "Resource": "*",
            "Condition": {
               "ArnEquals": {
                   "ec2:Subnet": [
                       "arn:aws:ec2:${{region}}:${{account-id}}:subnet/${{subnet-id}}",
                       "arn:aws:ec2:${{region}}:${{account-id}}:subnet/${{subnet-id2}}"
                   ],
                   "ec2:ResourceTag/BedrockModelCustomizationJobArn": ["arn:aws:bedrock:${{region}}:${{account-id}}:model-customization-job/*"]
               },
               "StringEquals": { 
                   "ec2:ResourceTag/BedrockManaged": "true"
               }
            }
        }, 
        {
            "Effect": "Allow",
            "Action": [
                "ec2:CreateTags"
            ],
            "Resource": "arn:aws:ec2:${{region}}:${{account-id}}:network-interface/*",
            "Condition": {
                "StringEquals": {
                    "ec2:CreateAction": [
                        "CreateNetworkInterface"
                    ]    
                },
                "ForAllValues:StringEquals": {
                    "aws:TagKeys": [
                        "BedrockManaged",
                        "BedrockModelCustomizationJobArn"
                    ]
                }
            }
        }
    ]
}

You can use the following IAM permissions policy as a template for Amazon S3 permissions:

{
    "Version": "2012-10-17",
    "Statement": [
        {
            "Effect": "Allow",
            "Action": [
                "s3:GetObject",
                "s3:ListBucket"
            ],
            "Resource": [
                "arn:aws:s3:::training-bucket",
                "arn:aws:s3:::training-bucket/*",
                "arn:aws:s3:::validation-bucket",
                "arn:aws:s3:::validation-bucket/*"
            ]
        },
        {
            "Effect": "Allow",
            "Action": [
                "s3:GetObject",
                "s3:PutObject",
                "s3:ListBucket"
            ],
            "Resource": [
                "arn:aws:s3:::output-bucket",
                "arn:aws:s3:::output-bucket/*"
            ]
        }
    ]
}

Now let’s create the IAM role.

  1. On the IAM console, choose Roles in the navigation pane.
  2. Choose Create roles.
  3. Create a role with the following trust policy (provide your AWS account ID):
{
    "Version": "2012-10-17",
    "Statement": [
        {
            "Effect": "Allow",
            "Principal": {
                "Service": "bedrock.amazonaws.com"
            },
            "Action": "sts:AssumeRole",
            "Condition": {
                "StringEquals": {
                    "aws:SourceAccount": "account-id"
                },
                "ArnEquals": {
                    "aws:SourceArn": "arn:aws:bedrock:us-west-2:account-id:model-customization-job/*"
                }
            }
        }
    ] 
}
  1. Assign your custom VPC and S3 bucket access policies.

  1. Give a name to your role and choose Create role.

Update the KMS key policy with the IAM role

In the KMS key you created in the previous steps, you need to update the key policy to include the ARN of the IAM role. The following code is a sample key policy:

{
    "Version": "2012-10-17",
    "Id": "key-consolepolicy-3",
    "Statement": [
        {
            "Sid": "BedrockFineTuneJobPermissions",
            "Effect": "Allow",
            "Principal": {
                "AWS": "$IAM Role ARN"
            },
            "Action": [
                "kms:Decrypt",
                "kms:GenerateDataKey",
                "kms:Encrypt",
                "kms:DescribeKey",
                "kms:CreateGrant",
                "kms:RevokeGrant"
            ],
            "Resource": "$ARN of the KMS key"
        }
     ]
}

For more details, refer to Encryption of model customization jobs and artifacts.

Initiate the fine-tuning job

Complete the following steps to set up your fine-tuning job:

  1. On the Amazon Bedrock console, choose Custom models in the navigation pane.
  2. In the Models section, choose Customize model and Create fine-tuning job.

  1. Under Model details, choose Select model.
  2. Choose Llama 3.1 8B Instruct as the base model and choose Apply.

  1. For Fine-tuned model name, enter a name for your custom model.
  2. Select Model encryption to add a KMS key and choose the KMS key you created earlier.
  3. For Job name, enter a name for the training job.
  4. Optionally, expand the Tags section to add tags for tracking.

  1. Under VPC Settings, choose the VPC, subnets, and security group you created as part of previous steps.

When you specify the VPC subnets and security groups for a job, Amazon Bedrock creates elastic network interfaces (ENIs) that are associated with your security groups in one of the subnets. ENIs allow the Amazon Bedrock job to connect to resources in your VPC.

We recommend that you provide at least one subnet in each Availability Zone.

  1. Under Input data, specify the S3 locations for your training and validation datasets.

  1. Under Hyperparameters, set the values for Epochs, Batch size, Learning rate, and Learning rate warm up steps for your fine-tuning job.

Refer to Custom model hyperparameters for additional details.

  1. Under Output data, for S3 location, enter the S3 path for the bucket storing fine-tuning metrics.
  2. Under Service access, select a method to authorize Amazon Bedrock. You can select Use an existing service role and use the role you created earlier.
  3. Choose Create Fine-tuning job.

Monitor the job

On the Amazon Bedrock console, choose Custom models in the navigation pane and locate your job.

You can monitor the job on the job details page.

Purchase provisioned throughput

After fine-tuning is complete (as shown in the following screenshot), you can use the custom model for inference. However, before you can use a customized model, you need to purchase provisioned throughput for it.

Complete the following steps:

  1. On the Amazon Bedrock console, under Foundation models in the navigation pane, choose Custom models.
  2. On the Models tab, select your model and choose Purchase provisioned throughput.

  1. For Provisioned throughput name, enter a name.
  2. Under Select model, make sure the model is the same as the custom model you selected earlier.
  3. Under Commitment term & model units, configure your commitment term and model units. Refer to Increase model invocation capacity with Provisioned Throughput in Amazon Bedrock for additional insights. For this post, we choose No commitment and use 1 model unit.

  1. Under Estimated purchase summary, review the estimated cost and choose Purchase provisioned throughput.

After the provisioned throughput is in service, you can use the model for inference.

Use the model

Now you’re ready to use your model for inference.

  1. On the Amazon Bedrock console, under Playgrounds in the navigation pane, choose Chat/text.
  2. Choose Select model.
  3. For Category, choose Custom models under Custom & self-hosted models.
  4. For Model, choose the model you just trained.
  5. For Throughput, choose the provisioned throughput you just purchased.
  6. Choose Apply.

Now you can ask sample questions, as shown in the following screenshot.

Implementing these procedures allows you to follow security best practices when you deploy and use your fine-tuned model within Amazon Bedrock for inference tasks.

When developing a generative AI application that requires access to this fine-tuned model, you have the option to configure it within a VPC. By employing a VPC interface endpoint, you can make sure communication between your VPC and the Amazon Bedrock API endpoint occurs through a PrivateLink connection, rather than through the public internet.

This approach further enhances security and privacy. For more information on this setup, refer to Use interface VPC endpoints (AWS PrivateLink) to create a private connection between your VPC and Amazon Bedrock.

Clean up

Delete the following AWS resources created for this demonstration to avoid incurring future charges:

  • Amazon Bedrock model provisioned throughput
  • VPC endpoints
  • VPC and associated security groups
  • KMS key
  • IAM roles and policies
  • S3 bucket and objects

Conclusion

In this post, we implemented secure fine-tuning jobs in Amazon Bedrock, which is crucial for protecting sensitive data and maintaining the integrity of your AI models.

By following the best practices outlined in this post, including proper IAM role configuration, encryption at rest and in transit, and network isolation, you can significantly enhance the security posture of your fine-tuning processes.

By prioritizing security in your Amazon Bedrock workflows, you not only safeguard your data and models, but also build trust with your stakeholders and end-users, enabling responsible and secure AI development.

As a next step, try the solution out in your account and share your feedback.


About the Authors

Vishal Naik is a Sr. Solutions Architect at Amazon Web Services (AWS). He is a builder who enjoys helping customers accomplish their business needs and solve complex challenges with AWS solutions and best practices. His core area of focus includes Generative AI and Machine Learning. In his spare time, Vishal loves making short films on time travel and alternate universe themes.

Sumeet Tripathi is an Enterprise Support Lead (TAM) at AWS in North Carolina. He has over 17 years of experience in technology across various roles. He is passionate about helping customers to reduce operational challenges and friction. His focus area is AI/ML and Energy & Utilities Segment. Outside work, He enjoys traveling with family, watching cricket and movies.
Read More

Secure a generative AI assistant with OWASP Top 10 mitigation

Secure a generative AI assistant with OWASP Top 10 mitigation

A common use case with generative AI that we usually see customers evaluate for a production use case is a generative AI-powered assistant. However, before it can be deployed, there is the typical production readiness assessment that includes concerns such as understanding the security posture, monitoring and logging, cost tracking, resilience, and more. The highest priority of these production readiness assessments is usually security. If there are security risks that can’t be clearly identified, then they can’t be addressed, and that can halt the production deployment of the generative AI application.

In this post, we show you an example of a generative AI assistant application and demonstrate how to assess its security posture using the OWASP Top 10 for Large Language Model Applications, as well as how to apply mitigations for common threats.

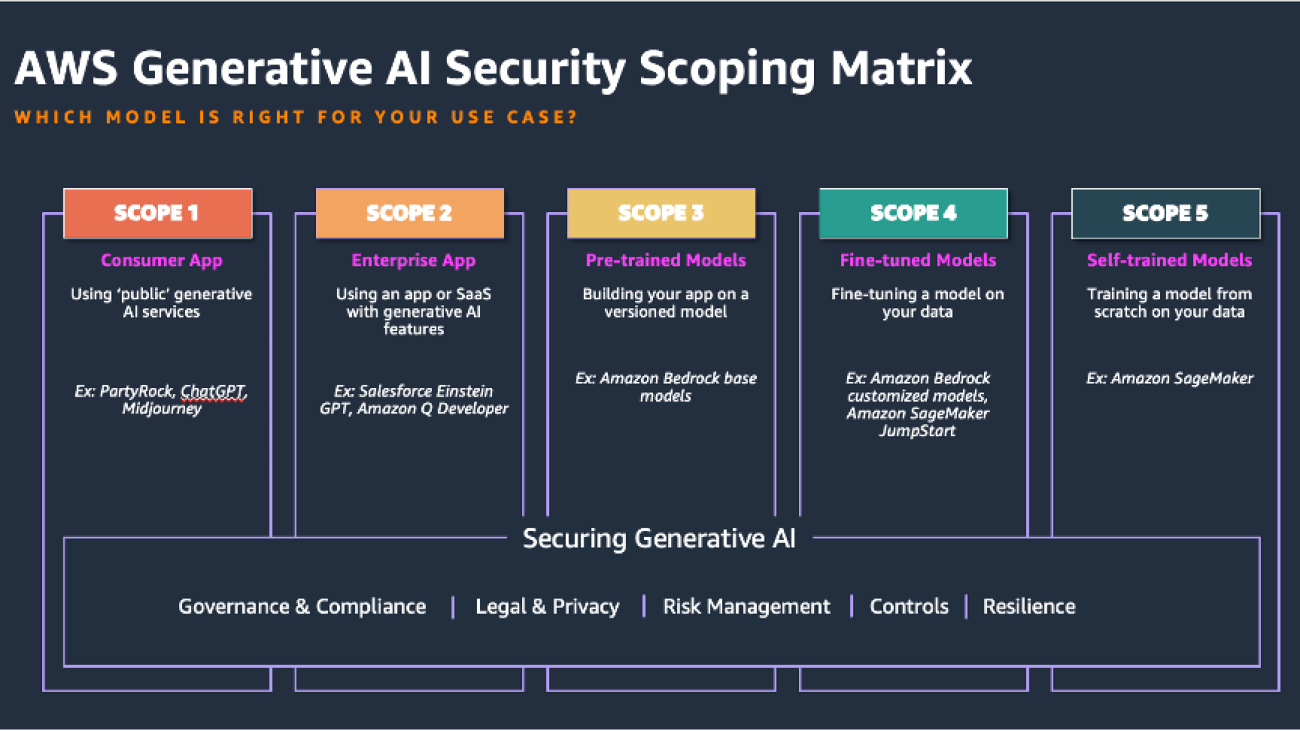
Generative AI scoping framework

Start by understanding where your generative AI application fits within the spectrum of managed vs. custom. Use the AWS generative AI scoping framework to understand the specific mix of the shared responsibility for the security controls applicable to your application. For example, Scope 1 “Consumer Apps” like PartyRock or ChatGPT are usually publicly facing applications, where most of the application internal security is owned and controlled by the provider, and your responsibility for security is on the consumption side. Contrast that with Scope 4/5 applications, where not only do you build and secure the generative AI application yourself, but you are also responsible for fine-tuning and training the underlying large language model (LLM). The security controls in scope for Scope 4/5 applications will range more broadly from the frontend to LLM model security. This post will focus on the Scope 3 generative AI assistant application, which is one of the more frequent use cases seen in the field.

The following figure of the AWS Generative AI Security Scoping Matrix summarizes the types of models for each scope.

AWS GenAI scoping matrix

OWASP Top 10 for LLMs

Using the OWASP Top 10 for understanding threats and mitigations to an application is one of the most common ways application security is assessed. The OWASP Top 10 for LLMs takes a tried and tested framework and applies it to generative AI applications to help us discover, understand, and mitigate the novel threats for generative AI.

OWASP Top 10 for GenAI apps

Solution overview

Let’s start with a logical architecture of a typical generative AI assistant application overlying the OWASP Top 10 for LLM threats, as illustrated in the following diagram.

Logical solution diagram

In this architecture, the end-user request usually goes through the following components:

  • Authentication layer – This layer validates that the user connecting to the application is who they say they are. This is typically done through some sort of an identity provider (IdP) capability like Okta, AWS IAM Identity Center, or Amazon Cognito.
  • Application controller – This layer contains most of the application business logic and determines how to process the incoming user request by generating the LLM prompts and processing LLM responses before they are sent back to the user.
  • LLM and LLM agent – The LLM provides the core generative AI capability to the assistant. The LLM agent is an orchestrator of a set of steps that might be necessary to complete the desired request. These steps might involve both the use of an LLM and external data sources and APIs.
  • Agent plugin controller – This component is responsible for the API integration to external data sources and APIs. This component also holds the mapping between the logical name of an external component, which the LLM agent might refer to, and the physical name.
  • RAG data store – The Retrieval Augmented Generation (RAG) data store delivers up-to-date, precise, and access-controlled knowledge from various data sources such as data warehouses, databases, and other software as a service (SaaS) applications through data connectors.

The OWASP Top 10 for LLM risks map to various layers of the application stack, highlighting vulnerabilities from UIs to backend systems. In the following sections, we discuss risks at each layer and provide an application design pattern for a generative AI assistant application in AWS that mitigates these risks.

The following diagram illustrates the assistant architecture on AWS.

Authentication layer (Amazon Cognito)

Common security threats such as brute force attacks, session hijacking, and denial of service (DoS) attacks can occur. To mitigate these risks, implement best practices like multi-factor authentication (MFA), rate limiting, secure session management, automatic session timeouts, and regular token rotation. Additionally, deploying edge security measures such as AWS WAF and distributed denial of service (DDoS) mitigation helps block common web exploits and maintain service availability during attacks.

In the preceding architecture diagram, AWS WAF is integrated with Amazon API Gateway to filter incoming traffic, blocking unintended requests and protecting applications from threats like SQL injection, cross-site scripting (XSS), and DoS attacks. AWS WAF Bot Control further enhances security by providing visibility and control over bot traffic, allowing administrators to block or rate-limit unwanted bots. This feature can be centrally managed across multiple accounts using AWS Firewall Manager, providing a consistent and robust approach to application protection.

Amazon Cognito complements these defenses by enabling user authentication and data synchronization. It supports both user pools and identity pools, enabling seamless management of user identities across devices and integration with third-party identity providers. Amazon Cognito offers security features, including MFA, OAuth 2.0, OpenID Connect, secure session management, and risk-based adaptive authentication, to help protect against unauthorized access by evaluating sign-in requests for suspicious activity and responding with additional security measures like MFA or blocking sign-ins. Amazon Cognito also enforces password reuse prevention, further protecting against compromised credentials.

AWS Shield Advanced adds an extra layer of defense by providing enhanced protection against sophisticated DDoS attacks. Integrated with AWS WAF, Shield Advanced delivers comprehensive perimeter protection, using tailored detection and health-based assessments to enhance response to attacks. It also offers round-the-clock support from the AWS Shield Response Team and includes DDoS cost protection, making applications remain secure and cost-effective. Together, Shield Advanced and AWS WAF create a security framework that protects applications against a wide range of threats while maintaining availability.

This comprehensive security setup addresses LLM10:2025 Unbound Consumption and LLM02:2025 Sensitive Information Disclosure, making sure that applications remain both resilient and secure.

Application controller layer (LLM orchestrator Lambda function)

The application controller layer is usually vulnerable to risks such as LLM01:2025 Prompt Injection, LLM05:2025 Improper Output Handling, and LLM 02:2025 Sensitive Information Disclosure. Outside parties might frequently attempt to exploit this layer by crafting unintended inputs to manipulate the LLM, potentially causing it to reveal sensitive information or compromise downstream systems.

In the physical architecture diagram, the application controller is the LLM orchestrator AWS Lambda function. It performs strict input validation by extracting the event payload from API Gateway and conducting both syntactic and semantic validation. By sanitizing inputs, applying allowlisting and deny listing of keywords, and validating inputs against predefined formats or patterns, the Lambda function helps prevent LLM01:2025 Prompt Injection attacks. Additionally, by passing the user_id downstream, it enables the downstream application components to mitigate the risk of sensitive information disclosure, addressing concerns related to LLM02:2025 Sensitive Information Disclosure.

Amazon Bedrock Guardrails provides an additional layer of protection by filtering and blocking sensitive content, such as personally identifiable information (PII) and other custom sensitive data defined by regex patterns. Guardrails can also be configured to detect and block offensive language, competitor names, or other undesirable terms, making sure that both inputs and outputs are safe. You can also use guardrails to prevent LLM01:2025 Prompt Injection attacks by detecting and filtering out harmful or manipulative prompts before they reach the LLM, thereby maintaining the integrity of the prompt.

Another critical aspect of security is managing LLM outputs. Because the LLM might generate content that includes executable code, such as JavaScript or Markdown, there is a risk of XSS attacks if this content is not properly handled. To mitigate this risk, apply output encoding techniques, such as HTML entity encoding or JavaScript escaping, to neutralize any potentially harmful content before it is presented to users. This approach addresses the risk of LLM05:2025 Improper Output Handling.

Implementing Amazon Bedrock prompt management and versioning allows for continuous improvement of the user experience while maintaining the overall security of the application. By carefully managing changes to prompts and their handling, you can enhance functionality without introducing new vulnerabilities and mitigating LLM01:2025 Prompt Injection attacks.

Treating the LLM as an untrusted user and applying human-in-the-loop processes over certain actions are strategies to lower the likelihood of unauthorized or unintended operations.

LLM and LLM agent layer (Amazon Bedrock LLMs)

The LLM and LLM agent layer frequently handles interactions with the LLM and faces risks such as LLM10: Unbounded Consumption, LLM05:2025 Improper Output Handling, and LLM02:2025 Sensitive Information Disclosure.

DoS attacks can overwhelm the LLM with multiple resource-intensive requests, degrading overall service quality while increasing costs. When interacting with Amazon Bedrock hosted LLMs, setting request parameters such as the maximum length of the input request will minimize the risk of LLM resource exhaustion. Additionally, there is a hard limit on the maximum number of queued actions and total actions an Amazon Bedrock agent can take to fulfill a customer’s intent, which limits the number of actions in a system reacting to LLM responses, avoiding unnecessary loops or intensive tasks that could exhaust the LLM’s resources.

Improper output handling leads to vulnerabilities such as remote code execution, cross-site scripting, server-side request forgery (SSRF), and privilege escalation. The inadequate validation and management of the LLM-generated outputs before they are sent downstream can grant indirect access to additional functionality, effectively enabling these vulnerabilities. To mitigate this risk, treat the model as any other user and apply validation of the LLM-generated responses. The process is facilitated with Amazon Bedrock Guardrails using filters such as content filters with configurable thresholds to filter harmful content and safeguard against prompt attacks before they are processed further downstream by other backend systems. Guardrails automatically evaluate both user input and model responses to detect and help prevent content that falls into restricted categories.

Amazon Bedrock Agents execute multi-step tasks and securely integrate with AWS native and third-party services to reduce the risk of insecure output handling, excessive agency, and sensitive information disclosure. In the architecture diagram, the action group Lambda function under the agents is used to encode all the output text, making it automatically non-executable by JavaScript or Markdown. Additionally, the action group Lambda function parses each output from the LLM at every step executed by the agents and controls the processing of the outputs accordingly, making sure they are safe before further processing.

Sensitive information disclosure is a risk with LLMs because malicious prompt engineering can cause LLMs to accidentally reveal unintended details in their responses. This can lead to privacy and confidentiality violations. To mitigate the issue, implement data sanitization practices through content filters in Amazon Bedrock Guardrails.

Additionally, implement custom data filtering policies based on user_id and strict user access policies. Amazon Bedrock Guardrails helps filter content deemed sensitive, and Amazon Bedrock Agents further reduces the risk of sensitive information disclosure by allowing you to implement custom logic in the preprocessing and postprocessing templates to strip any unexpected information. If you have enabled model invocation logging for the LLM or implemented custom logging logic in your application to record the input and output of the LLM in Amazon CloudWatch, measures such as CloudWatch Log data protection are important in masking sensitive information identified in the CloudWatch logs, further mitigating the risk of sensitive information disclosure.

Agent plugin controller layer (action group Lambda function)

The agent plugin controller frequently integrates with internal and external services and applies custom authorization to internal and external data sources and third-party APIs. At this layer, the risk of LLM08:2025 Vector & Embedding Weaknesses and LLM06:2025 Excessive Agency are in effect. Untrusted or unverified third-party plugins could introduce backdoors or vulnerabilities in the form of unexpected code.

Apply least privilege access to the AWS Identity and Access Management (IAM) roles of the action group Lambda function, which interacts with plugin integrations to external systems to help mitigate the risk of LLM06:2025 Excessive Agency and LLM08:2025 Vector & Embedding Weaknesses. This is demonstrated in the physical architecture diagram; the agent plugin layer Lambda function is associated with a least privilege IAM role for secure access and interface with other internal AWS services.

Additionally, after the user identity is determined, restrict the data plane by applying user-level access control by passing the user_id to downstream layers like the agent plugin layer. Although this user_id parameter can be used in the agent plugin controller Lambda function for custom authorization logic, its primary purpose is to enable fine-grained access control for third-party plugins. The responsibility lies with the application owner to implement custom authorization logic within the action group Lambda function, where the user_id parameter can be used in combination with predefined rules to apply the appropriate level of access to third-party APIs and plugins. This approach wraps deterministic access controls around a non-deterministic LLM and enables granular access control over which users can access and execute specific third-party plugins.

Combining user_id-based authorization on data and IAM roles with least privilege on the action group Lambda function will generally minimize the risk of LLM08:2025 Vector & Embedding Weaknesses and LLM06:2025 Excessive Agency.

RAG data store layer

The RAG data store is responsible for securely retrieving up-to-date, precise, and user access-controlled knowledge from various first-party and third-party data sources. By default, Amazon Bedrock encrypts all knowledge base-related data using an AWS managed key. Alternatively, you can choose to use a customer managed key. When setting up a data ingestion job for your knowledge base, you can also encrypt the job using a custom AWS Key Management Service (AWS KMS) key.

If you decide to use the vector store in Amazon OpenSearch Service for your knowledge base, Amazon Bedrock can pass a KMS key of your choice to it for encryption. Additionally, you can encrypt the sessions in which you generate responses from querying a knowledge base with a KMS key. To facilitate secure communication, Amazon Bedrock Knowledge Bases uses TLS encryption when interacting with third-party vector stores, provided that the service supports and permits TLS encryption in transit.

Regarding user access control, Amazon Bedrock Knowledge Bases uses filters to manage permissions. You can build a segmented access solution on top of a knowledge base using metadata and filtering feature. During runtime, your application must authenticate and authorize the user, and include this user information in the query to maintain accurate access controls. To keep the access controls updated, you should periodically resync the data to reflect any changes in permissions. Additionally, groups can be stored as a filterable attribute, further refining access control.

This approach helps mitigate the risk of LLM02:2025 Sensitive Information Disclosure and LLM08:2025 Vector & Embedding Weaknesses, to assist in that only authorized users can access the relevant data.

Summary

In this post, we discussed how to classify your generative AI application from a security shared responsibility perspective using the AWS Generative AI Security Scoping Matrix. We reviewed a common generative AI assistant application architecture and assessed its security posture using the OWASP Top 10 for LLMs framework, and showed how to apply the OWASP Top 10 for LLMs threat mitigations using AWS service controls and services to strengthen the architecture of your generative AI assistant application. Learn more about building generative AI applications with AWS Workshops for Bedrock.


About the Authors

Syed JaffrySyed Jaffry is a Principal Solutions Architect with AWS. He advises software companies on AI and helps them build modern, robust and secure application architectures on AWS.

Amit KumarAmit Kumar Agrawal is a Senior Solutions Architect at AWS where he has spent over 5 years working with large ISV customers. He helps organizations build and operate cost-efficient and scalable solutions in the cloud, driving their business and technical outcomes.

Amit KumarTej Nagabhatla is a Senior Solutions Architect at AWS, where he works with a diverse portfolio of clients ranging from ISVs to large enterprises. He specializes in providing architectural guidance across a wide range of topics around AI/ML, security, storage, containers, and serverless technologies. He helps organizations build and operate cost-efficient, scalable cloud applications. In his free time, Tej enjoys music, playing basketball, and traveling.

Read More

AI Maps Titan’s Methane Clouds in Record Time

AI Maps Titan’s Methane Clouds in Record Time

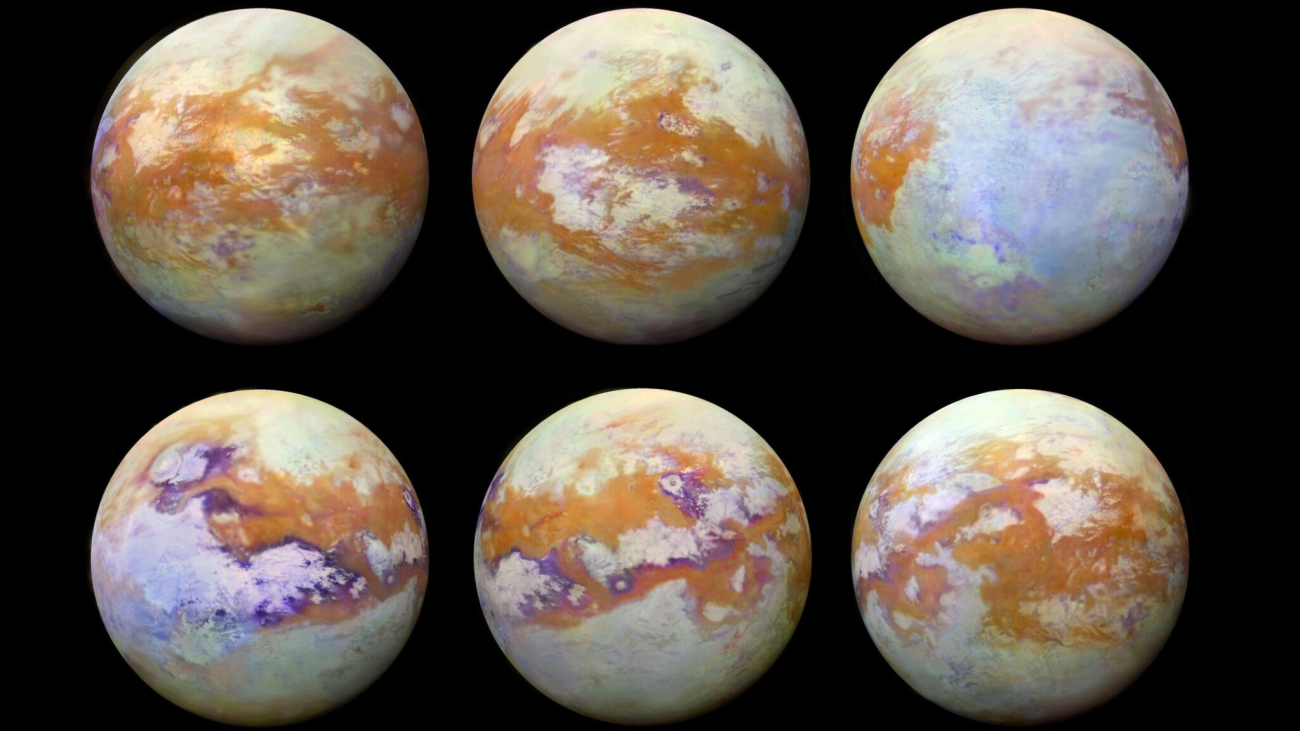
Methane clouds on Titan, Saturn’s largest moon, are more than just a celestial oddity — they’re a window into one of the solar system’s most complex climates.

Until now, mapping them has been slow and grueling work. Enter AI: a team from NASA, UC Berkeley and France’s Observatoire des Sciences de l’Univers just changed the game.

Using NVIDIA GPUs, the researchers trained a deep learning model to analyze years of Cassini data in seconds. Their approach could reshape planetary science, turning what took days into moments.

“We were able to use AI to greatly speed up the work of scientists, increasing productivity and enabling questions to be answered that would otherwise be impractical,” said Zach Yahn, Georgia Tech PhD student and lead author of the study.

Read the full paper, “Rapid Automated Mapping of Clouds on Titan With Instance Segmentation.”

How It Works

At the project’s core is Mask R-CNN — a deep learning model that doesn’t just detect objects. It outlines them pixel by pixel. Trained on hand-labeled images of Titan, it mapped the moon’s elusive clouds: patchy, streaky and barely visible through a smoggy atmosphere.

The team used transfer learning, starting with a model trained on COCO (a dataset of everyday images), and fine-tuned it for Titan’s unique challenges. This saved time and demonstrated how “planetary scientists, who may not always have access to the vast computing resources necessary to train large models from scratch, can still use technologies like transfer learning to apply AI to their data and projects,” Yahn explained.

The model’s potential goes far beyond Titan. “Many other Solar System worlds have cloud formations of interest to planetary science researchers, including Mars and Venus. Similar technology might also be applied to volcanic flows on Io, plumes on Enceladus, linea on Europa and craters on solid planets and moons,” he added.

Fast Science, Powered by NVIDIA

NVIDIA GPUs made this speed possible, processing high-resolution images and generating cloud masks with minimal latency — work that traditional hardware would struggle to handle.

NVIDIA GPUs have become a mainstay for space scientists. They’ve helped analyze Webb Telescope data, model Mars landings and scan for extraterrestrial signals. Now, they’re helping researchers decode Titan.

What’s Next

This AI leap is just the start. Missions like NASA’s Europa Clipper and Dragonfly will flood researchers with data. AI can help handle it, processing it onboard, mid-mission, and even prioritizing findings in real time. Challenges remain, like creating hardware fit for space’s harsh conditions, but the potential is undeniable.

Methane clouds on Titan hold mysteries. Researchers are now unraveling them faster than ever with help from new AI tools accelerated by NVIDIA GPUs.

Read the full paper, “Rapid Automated Mapping of Clouds on Titan With Instance Segmentation.”

Image Credit: NASA Jet Propulsion Laboratory

Read More

How Intel Uses PyTorch to Empower Generative AI through Intel Arc GPUs

How Intel Uses PyTorch to Empower Generative AI through Intel Arc GPUs

Intel has long been at the forefront of technological innovation, and its recent venture into Generative AI (GenAI) solutions is no exception. With the rise of AI-powered gaming experiences, Intel sought to deliver an accessible and intuitive GenAI inferencing solution tailored for AI PCs powered by Intel’s latest GPUs. By leveraging PyTorch as the backbone for development efforts, Intel successfully launched AI Playground, an open source application that showcases advanced GenAI workloads.

The Business Challenge

Our goal was to deliver an accessible and intuitive GenAI inferencing solution tailored for AI PCs powered by Intel. We recognized the need to showcase the capabilities of the latest GenAI workloads on our newest line of client GPUs. To address this, we developed a starter application, AI Playground, which is open source and includes a comprehensive developer reference sample available on GitHub using PyTorch. This application seamlessly integrates image generation, image enhancement, and chatbot functionalities, using retrieval-augmented generation (RAG) features, all within a single, user-friendly installation package. This initiative not only demonstrates the functionality of these AI workloads but also serves as an educational resource for the ecosystem, guiding developers on effectively leveraging the Intel® Arc™ GPU product line for advanced AI applications. This solution leverages Intel® Arc™ Xe Cores and Xe Matrix Extensions (XMX) for accelerating inferencing.

AI Playground

How Intel Used PyTorch

PyTorch is the core AI framework for AI Playground. We extensively leverage PyTorch’s eager mode, which aligns perfectly with the dynamic and iterative nature of our generative models. This approach not only enhances our development workflow but also enables us to rapidly prototype and iterate on advanced AI features. By harnessing PyTorch’s powerful capabilities, we have created a robust reference sample that showcases the potential of GenAI on Intel GPUs in one cohesive application.

Solving AI Challenges with PyTorch

PyTorch has been instrumental in addressing our AI challenges by providing a robust training and inference framework optimized for discrete and integrated Intel Arc GPU product lines. Choosing PyTorch over alternative frameworks or APIs was crucial. Other options would have necessitated additional custom development or one-off solutions, which could have significantly slowed our time to market and limited our feature set. With PyTorch, we leveraged its flexibility and ease of use, allowing our team to focus on innovation through experimentation, rather than infrastructure. The integration of Intel® Extension for PyTorch further enhanced performance by optimizing computational efficiency and enabling seamless scaling on Intel hardware, ensuring that our application ran faster and more efficiently.

A Word from Intel

With PyTorch as the backbone of our AI Playground project, we achieved rapid development cycles that significantly accelerated our time to market. This flexibility enabled us to iteratively enhance features and effectively align with the commitments of our hardware launches in 2024.

-Bob Duffy, AI Playground Product Manager

PyTorch Case Stidu

The Benefits of Using PyTorch

The biggest benefit of using PyTorch for us is the large PyTorch ecosystem, which connects us with an active and cooperative community of developers. This collaboration has facilitated the seamless deployment of key features from existing open source projects, allowing us to integrate the latest GenAI capabilities into AI Playground. Remarkably, we accomplished this with minimal re-coding, ensuring that these advanced features are readily accessible on Intel Arc GPUs.

Learn More

For more information about Intel’s AI Playground and collaboration with PyTorch, visit the following links:

Read More

EMOTION: Expressive Motion Sequence Generation for Humanoid Robots with In-Context Learning

This paper introduces a framework, called EMOTION, for generating expressive motion sequences in humanoid robots, enhancing their ability to engage in human-like non-verbal communication. Non-verbal cues such as facial expressions, gestures, and body movements play a crucial role in effective interpersonal interactions. Despite the advancements in robotic behaviors, existing methods often fall short in mimicking the diversity and subtlety of human non-verbal communication. To address this gap, our approach leverages the in-context learning capability of large language models (LLMs) to…Apple Machine Learning Research

ELEGNT: Expressive and Functional Movement Design for Non-Anthropomorphic Robot

Nonverbal behaviors such as posture, gestures, and gaze are essential for conveying internal states, both consciously and unconsciously, in human interaction. For robots to interact more naturally with humans, robot movement design should likewise integrate expressive qualities—such as intention, attention, and emotions—alongside traditional functional considerations like task fulfillment, spatial constraints, and time efficiency. In this paper, we present the design and prototyping of a lamp-like robot that explores the interplay between functional and expressive objectives in movement…Apple Machine Learning Research

Streamline custom environment provisioning for Amazon SageMaker Studio: An automated CI/CD pipeline approach

Streamline custom environment provisioning for Amazon SageMaker Studio: An automated CI/CD pipeline approach

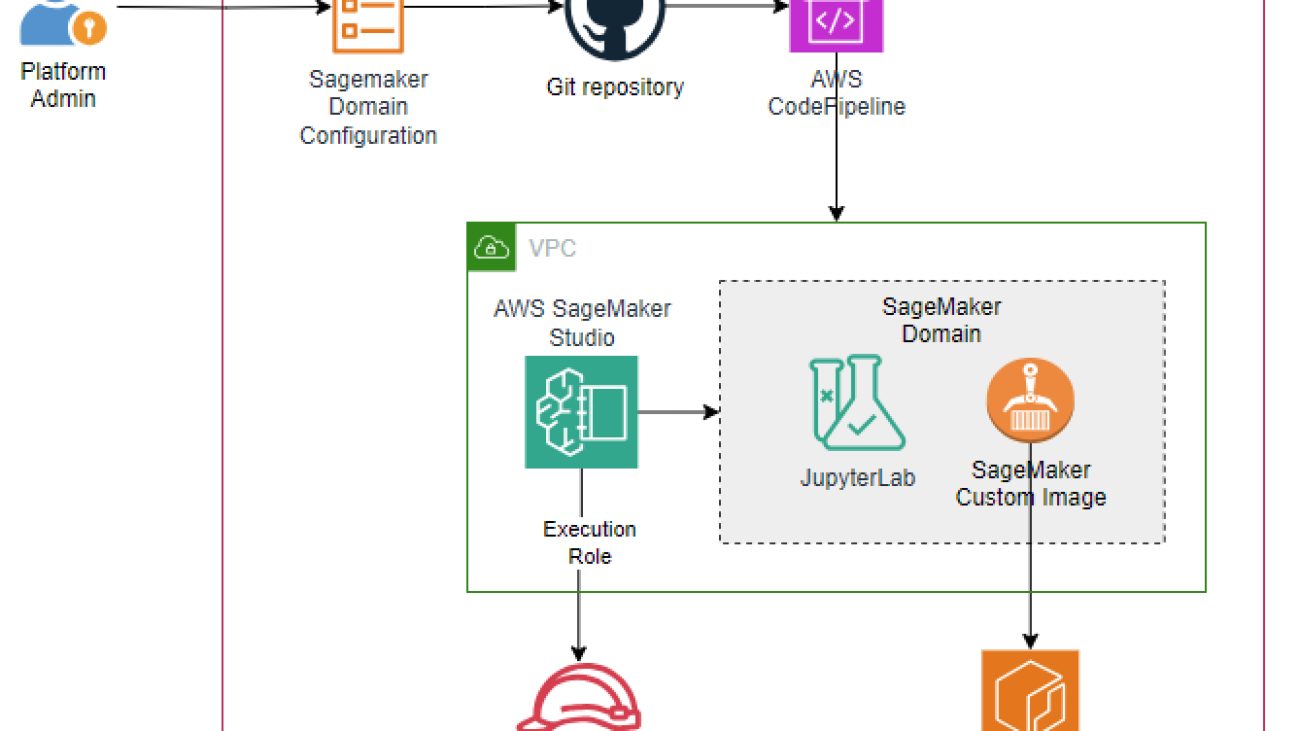
Attaching a custom Docker image to an Amazon SageMaker Studio domain involves several steps. First, you need to build and push the image to Amazon Elastic Container Registry (Amazon ECR). You also need to make sure that the Amazon SageMaker domain execution role has the necessary permissions to pull the image from Amazon ECR. After the image is pushed to Amazon ECR, you create a SageMaker custom image on the AWS Management Console. Lastly, you update the SageMaker domain configuration to specify the custom image Amazon Resource Name (ARN). This multi-step process needs to be followed manually every time end-users create new custom Docker images to make them available in SageMaker Studio.

In this post, we explain how to automate this process. This approach allows you to update the SageMaker configuration without writing additional infrastructure code, provision custom images, and attach them to SageMaker domains. By adopting this automation, you can deploy consistent and standardized analytics environments across your organization, leading to increased team productivity and mitigating security risks associated with using one-time images.

The solution described in this post is geared towards machine learning (ML) engineers and platform teams who are often responsible for managing and standardizing custom environments at scale across an organization. For individual data scientists seeking a self-service experience, we recommend that you use the native Docker support in SageMaker Studio, as described in Accelerate ML workflows with Amazon SageMaker Studio Local Mode and Docker support. This feature allows data scientists to build, test, and deploy custom Docker containers directly within the SageMaker Studio integrated development environment (IDE), enabling you to iteratively experiment with your analytics environments seamlessly within the familiar SageMaker Studio interface.

Solution overview

The following diagram illustrates the solution architecture.

Solution Architecture

We deploy a pipeline using AWS CodePipeline, which automates a custom Docker image creation and attachment of the image to a SageMaker domain. The pipeline first checks out the code base from the GitHub repo and creates custom Docker images based on the configuration declared in the config files. After successfully creating and pushing Docker images to Amazon ECR, the pipeline validates the image by scanning and checking for security vulnerabilities in the image. If no critical or high-security vulnerabilities are found, the pipeline continues to the manual approval stage before deployment. After manual approval is complete, the pipeline deploys the SageMaker domain and attaches custom images to the domain automatically.

Prerequisites

The prerequisites for implementing the solution described in this post include:

Deploy the solution

Complete the following steps to implement the solution:

  1. Log in to your AWS account using the AWS CLI in a shell terminal (for more details, see Authenticating with short-term credentials for the AWS CLI).
  2. Run the following command to make sure you have successfully logged in to your AWS account:
aws sts get-caller-identity
  1. Fork the the GitHub repo to your GitHub account .
  2. Clone the forked repo to your local workstation using the following command:
git clone <clone_url_of_forked_repo>
  1. Log in to the console and create an AWS CodeStar connection to the GitHub repo in the previous step. For instructions, see Create a connection to GitHub (console).
  2. Copy the ARN for the connection you created.
  3. Go to the terminal and run the following command to cd into the repository directory:
cd streamline-sagemaker-custom-images-cicd
  1. Run the following command to install all libraries from npm:
npm install
  1. Run the following commands to run a shell script in the terminal. This script will take your AWS account number and AWS Region as input parameters and deploy an AWS CDK stack, which deploys components such as CodePipeline, AWS CodeBuild, the ECR repository, and so on. Use an existing VPC to setup VPC_ID export variable below. If you don’t have a VPC, create one with at least two subnets and use it.
export AWS_ACCOUNT=$(aws sts get-caller-identity --query Account --output text)
export AWS_REGION=<YOUR_AWS_REGION>
export VPC_ID=<VPC_ID_TO_DEPLOY>
export CODESTAR_CONNECTION_ARN=<CODE_STAR_CONNECTION_ARN_CREATED_IN_ABOVE_STEP>
export REPOSITORY_OWNER=<YOUR_GITHUB_LOGIN_ID>
  1. Run the following command to deploy the AWS infrastructure using the AWS CDK V2 and make sure to wait for the template to succeed:
cdk deploy PipelineStack --require-approval never
  1. On the CodePipeline console, choose Pipelines in the navigation pane.
  2. Choose the link for the pipeline named sagemaker-custom-image-pipeline.

Sagemaker custom image pipeline

  1. You can follow the progress of the pipeline on the console and provide approval in the manual approval stage to deploy the SageMaker infrastructure. Pipeline takes approximately 5-8 min to build image and move to manual approval stage
  2. Wait for the pipeline to complete the deployment stage.

The pipeline creates infrastructure resources in your AWS account with a SageMaker domain and a SageMaker custom image. It also attaches the custom image to the SageMaker domain.

  1. On the SageMaker console, choose Domains under Admin configurations in the navigation pane.

  1. Open the domain named team-ds, and navigate to the Environment

You should be able to see one custom image that is attached.

How custom images are deployed and attached

CodePipeline has a stage called BuildCustomImages that contains the automated steps to create a SageMaker custom image using the SageMaker Custom Image CLI and push it to the ECR repository created in the AWS account. The AWS CDK stack at the deployment stage has the required steps to create a SageMaker domain and attach a custom image to the domain. The parameters to create the SageMaker domain, custom image, and so on are configured in JSON format and used in the SageMaker stack under the lib directory. Refer to the sagemakerConfig section in environments/config.json for declarative parameters.

Add more custom images

Now you can add your own custom Docker image to attach to the SageMaker domain created by the pipeline. For the custom images being created, refer to Dockerfile specifications for the Docker image specifications.

  1. cd into the images directory in the repository in the terminal:
cd images
  1. Create a new directory (for example, custom) under the images directory:
mkdir custom
  1. Add your own Dockerfile to this directory. For testing, you can use the following Dockerfile config:
FROM public.ecr.aws/amazonlinux/amazonlinux:2
ARG NB_USER="sagemaker-user"
ARG NB_UID="1000"
ARG NB_GID="100"
RUN yum update -y && 
    yum install python3 python3-pip shadow-utils -y && 
    yum clean all
RUN yum install --assumeyes python3 shadow-utils && 
    useradd --create-home --shell /bin/bash --gid "${NB_GID}" --uid ${NB_UID} ${NB_USER} && 
    yum clean all && 
    python3 -m pip install jupyterlab
RUN python3 -m pip install --upgrade pip
RUN python3 -m pip install --upgrade urllib3==1.26.6
USER ${NB_UID}
CMD jupyter lab --ip 0.0.0.0 --port 8888 
--ServerApp.base_url="/jupyterlab/default" 
--ServerApp.token='' 
--ServerApp.allow_origin='*'
  1. Update the images section in the json file under the environments directory to add the new image directory name you have created:
"images": [
      "repositoryName": "research-platform-ecr",
       "tags":[
         "jlab",
         "custom" << Add here
       ]
      }
    ]
  1. Update the same image name in customImages under the created SageMaker domain configuration:
"customImages":[
          "jlab",
          "custom" << Add here
 ],
  1. Commit and push changes to the GitHub repository.
  2. You should see CodePipeline is triggered upon push. Follow the progress of the pipeline and provide manual approval for deployment.

After deployment is completed successfully, you should be able to see that the custom image you have added is attached to the domain configuration (as shown in the following screenshot).

Custom Image 2

Clean up

To clean up your resources, open the AWS CloudFormation console and delete the stacks SagemakerImageStack and PipelineStack in that order. If you encounter errors such as “S3 Bucket is not empty” or “ECR Repository has images,” you can manually delete the S3 bucket and ECR repository that was created. Then you can retry deleting the CloudFormation stacks.

Conclusion

In this post, we showed how to create an automated continuous integration and delivery (CI/CD) pipeline solution to build, scan, and deploy custom Docker images to SageMaker Studio domains. You can use this solution to promote consistency of the analytical environments for data science teams across your enterprise. This approach helps you achieve machine learning (ML) governance, scalability, and standardization.


About the Authors

Muni Annachi, a Senior DevOps Consultant at AWS, boasts over a decade of expertise in architecting and implementing software systems and cloud platforms. He specializes in guiding non-profit organizations to adopt DevOps CI/CD architectures, adhering to AWS best practices and the AWS Well-Architected Framework. Beyond his professional endeavors, Muni is an avid sports enthusiast and tries his luck in the kitchen.

Ajay Raghunathan is a Machine Learning Engineer at AWS. His current work focuses on architecting and implementing ML solutions at scale. He is a technology enthusiast and a builder with a core area of interest in AI/ML, data analytics, serverless, and DevOps. Outside of work, he enjoys spending time with family, traveling, and playing football.

Arun Dyasani is a Senior Cloud Application Architect at AWS. His current work focuses on designing and implementing innovative software solutions. His role centers on crafting robust architectures for complex applications, leveraging his deep knowledge and experience in developing large-scale systems.

Shweta Singh is a Senior Product Manager in the Amazon SageMaker Machine Learning platform team at AWS, leading the SageMaker Python SDK. She has worked in several product roles in Amazon for over 5 years. She has a Bachelor of Science degree in Computer Engineering and a Masters of Science in Financial Engineering, both from New York University.

Jenna Eun is a Principal Practice Manager for the Health and Advanced Compute team at AWS Professional Services. Her team focuses on designing and delivering data, ML, and advanced computing solutions for the public sector, including federal, state and local governments, academic medical centers, nonprofit healthcare organizations, and research institutions.

Meenakshi Ponn Shankaran is a Principal Domain Architect at AWS in the Data & ML Professional Services Org. He has extensive expertise in designing and building large-scale data lakes, handling petabytes of data. Currently, he focuses on delivering technical leadership to AWS US Public Sector clients, guiding them in using innovative AWS services to meet their strategic objectives and unlock the full potential of their data.

Read More