Not yet. We present SPACE, a benchmark that systematically evaluates spatial cognition in frontier models. Our benchmark builds on decades of research in cognitive science. It evaluates large-scale mapping abilities that are brought to bear when an organism traverses physical environments, smaller-scale reasoning about object shapes and layouts, and cognitive infrastructure such as spatial attention and memory. For many tasks, we instantiate parallel presentations via text and images, allowing us to benchmark both large language models and large multimodal models. Results suggest that…Apple Machine Learning Research
SELMA: A Speech-Enabled Language Model for Virtual Assistant Interactions
In this work, we present and evaluate SELMA, a Speech-Enabled Language Model for virtual Assistant interactions that integrates audio and text as inputs to a Large Language Model (LLM). SELMA is designed to handle three primary and two auxiliary tasks related to interactions with virtual assistants simultaneously within a single end-to-end model. We employ low-rank adaptation modules for parameter-efficient training of both the audio encoder and the LLM. Additionally, we implement a feature pooling strategy enabling the system to recognize global patterns and improve accuracy on tasks less…Apple Machine Learning Research

Advancing healthcare and scientific discovery with AI
![]() Google Research AI is making accurate health information more accessible and personalized while also improving health outcomes globally.Read More
Google Research AI is making accurate health information more accessible and personalized while also improving health outcomes globally.Read More
4 creative ways I’m using Pixel Studio
![]() Learn more about Pixel Studio, including the just-launched human image generation feature.Read More
Learn more about Pixel Studio, including the just-launched human image generation feature.Read More
Accelerate AWS Well-Architected reviews with Generative AI
Building cloud infrastructure based on proven best practices promotes security, reliability and cost efficiency. To achieve these goals, the AWS Well-Architected Framework provides comprehensive guidance for building and improving cloud architectures. As systems scale, conducting thorough AWS Well-Architected Framework Reviews (WAFRs) becomes even more crucial, offering deeper insights and strategic value to help organizations optimize their growing cloud environments.
In this post, we explore a generative AI solution leveraging Amazon Bedrock to streamline the WAFR process. We demonstrate how to harness the power of LLMs to build an intelligent, scalable system that analyzes architecture documents and generates insightful recommendations based on AWS Well-Architected best practices. This solution automates portions of the WAFR report creation, helping solutions architects improve the efficiency and thoroughness of architectural assessments while supporting their decision-making process.
Scaling Well-Architected reviews using a generative AI-powered solution
As organizations expand their cloud footprint, they face several challenges in adhering to the Well-Architected Framework:
- Time-consuming and resource-intensive manual reviews
- Inconsistent application of Well-Architected principles across different teams
- Difficulty in keeping pace with the latest best practices
- Challenges in scaling reviews for large or numerous architectures
To address these challenges, we have built a WAFR Accelerator solution that uses generative AI to help streamline and expedite the WAFR process. By automating the initial assessment and documentation process, this solution significantly reduces time spent on evaluations while providing consistent architecture assessments against AWS Well-Architected principles. This allows teams to focus more on implementing improvements and optimizing AWS infrastructure. The solution incorporates the following key features:
- Using a Retrieval Augmented Generation (RAG) architecture, the system generates a context-aware detailed assessment. The assessment includes a solution summary, an evaluation against Well-Architected pillars, an analysis of adherence to best practices, actionable improvement recommendations, and a risk assessment.
- An interactive chat interface allows deeper exploration of both the original document and generated content.
- Integration with the AWS Well-Architected Tool pre-populates workload information and initial assessment responses.
This solution offers the following key benefits:
- Rapid analysis and resource optimization – What previously took days of manual review can now be accomplished in minutes, allowing for faster iteration and improvement of architectures. This time efficiency translates to significant cost savings and optimized resource allocation in the review process.
- Consistency and enhanced accuracy – The approach provides a consistent application of AWS Well-Architected principles across reviews, reducing human bias and oversight. This systematic approach leads to more reliable and standardized evaluations.
- Depth of insight – Advanced analysis can identify subtle patterns and potential issues that might be missed in manual reviews, providing deeper insights into architectural strengths and weaknesses.
- Scalability – The solution can handle multiple reviews simultaneously, making it suitable for organizations of all sizes, from startups to enterprises. This scalability allows for more frequent and comprehensive reviews.
- Interactive exploration -The generative AI-driven chat interface allows users to dive deeper into the assessment, asking follow-up questions and gaining a better understanding of the recommendations. This interactivity enhances engagement and promotes more thorough comprehension of the results.
Solution overview
The WAFR Accelerator is designed to streamline and enhance the architecture review process by using the capabilities of generative AI through Amazon Bedrock and other AWS services. This solution automates the analysis of complex architecture documents, evaluating them against the AWS Well-Architected Framework’s pillars and providing detailed assessments and recommendations.
The solution consists of the following capabilties:
- Generative AI-powered analysis – Uses Amazon Bedrock to rapidly analyze architecture documents against AWS Well-Architected best practices, generating detailed assessments and recommendations.
- Knowledge base integration – Incorporates up-to-date WAFR documentation and cloud best practices using Amazon Bedrock Knowledge Bases, providing accurate and context-aware evaluations.
- Customizable – Uses prompt engineering, which enables customization and iterative refinement of the prompts used to drive the large language model (LLM), allowing for refining and continuous enhancement of the assessment process.
- Integration with the AWS Well-Architected Tool – Creates a Well-Architected workload milestone for the assessment and prepopulates answers for WAFR questions based on generative AI-based assessment.
- Generative AI-assisted chat – Offers an AI-driven chat interface for in-depth exploration of assessment results, supporting multi-turn conversations with context management.
- Scalable architecture – Uses AWS services like AWS Lambda and Amazon Simple Queue Service (Amazon SQS) for efficient processing of multiple reviews.
- Data privacy and network security – With Amazon Bedrock, you are in control of your data, and all your inputs and customizations remain private to your AWS account. Your data, such as prompts, completions, custom models, and data used for fine-tuning or continued pre-training, is not used for service improvement and is never shared with third-party model providers. Your data remains in the AWS Region where the API call is processed. All data is encrypted in transit and at rest. You can use AWS PrivateLink to create a private connection between your VPC and Amazon Bedrock.
A human-in-the-loop review is still crucial to validate the generative AI findings, checking for accuracy and alignment with organizational requirements.
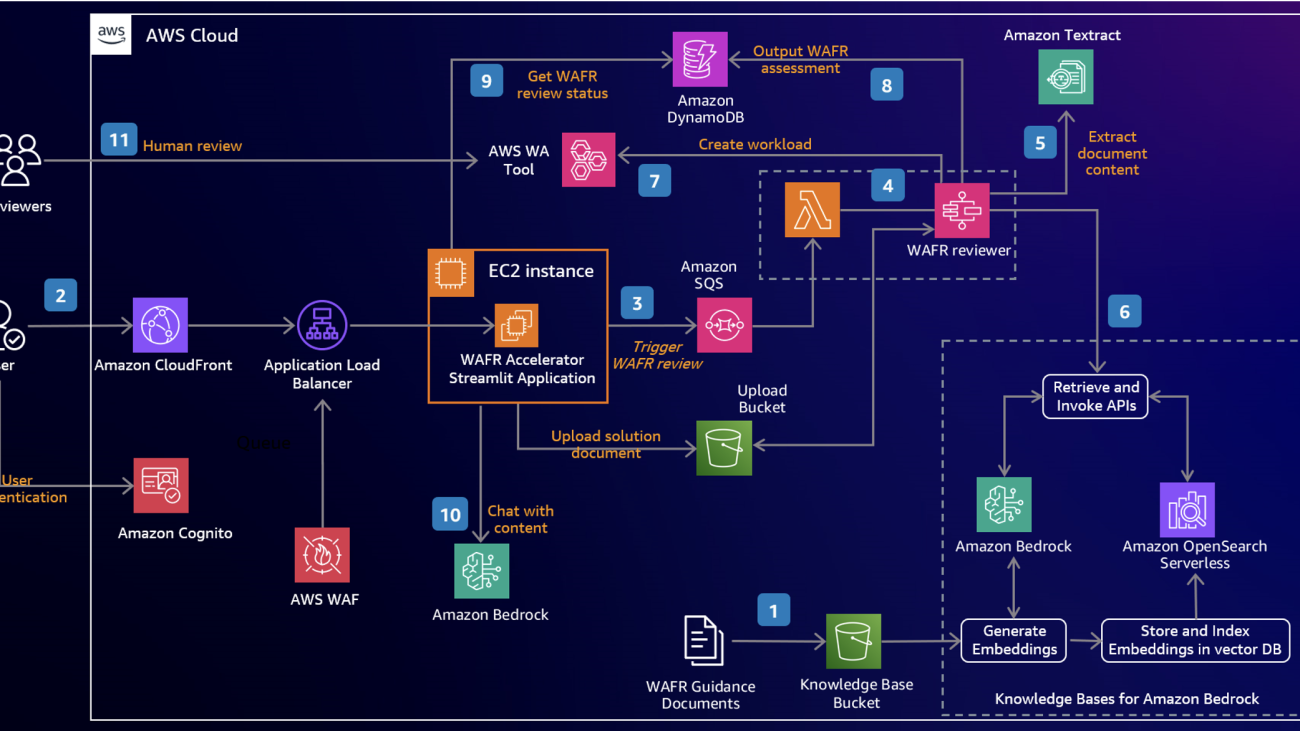
The following diagram illustrates the solution’s technical architecture.

The workflow consists of the following steps:
- WAFR guidance documents are uploaded to a bucket in Amazon Simple Storage Service (Amazon S3). These documents form the foundation of the RAG architecture. Using Amazon Bedrock Knowledge Base, the sample solution ingests these documents and generates embeddings, which are then stored and indexed in Amazon OpenSearch Serverless. This creates a vector database that enables retrieval of relevant WAFR guidance during the review process
- Users access the WAFR Accelerator Streamlit application through Amazon CloudFront, which provides secure and scalable content delivery. User authentication is handled by Amazon Cognito, making sure only authenticated user have access.
- Users upload their solution architecture document in PDF format using the Streamlit application running on an Amazon Elastic Compute Cloud (Amazon EC2) instance that stores it in an S3 bucket. On submission, the WAFR review process is invoked by Amazon SQS, which queues the review request.
- The WAFR reviewer, based on Lambda and AWS Step Functions, is activated by Amazon SQS. It orchestrates the review process, including document content extraction, prompt generation, solution summary, knowledge embedding retrieval, and generation.
- Amazon Textract extracts the content from the uploaded documents, making it machine-readable for further processing.
- The WAFR reviewer uses Amazon Bedrock Knowledge Bases’ fully managed RAG workflow to query the vector database in OpenSearch Serverless, retrieving relevant WAFR guidance based on the selected WAFR pillar and questions. Metadata filtering is used to improve retrieval accuracy.
- Using the extracted document content and retrieved embeddings, the WAFR reviewer generates an assessment using Amazon Bedrock. A workload is created in the AWS Well-Architected Tool with answers populated with the assessment results. This allows users to download initial version of the AWS Well-Architected report from the AWS Well-Architected Tool console on completion of the assessment.
- The assessment is also stored in an Amazon DynamoDB table for quick retrieval and future reference.
- The WAFR Accelerator application retrieves the review status from the DynamoDB table to keep the user informed.
- Users can chat with the content using Amazon Bedrock, allowing for deeper exploration of the document, assessment, and recommendations.
- Once the assessment is complete, human reviewers can review it in the AWS Well-Architected Tool.
Deploy the solution
To implement the solution in your own environment, we’ve provided resources in the following GitHub repo to guide you through the process. The setup is streamlined using the AWS Cloud Development Kit (AWS CDK), which allows for infrastructure as code (IaC) deployment. For step-by-step instructions, we’ve prepared a detailed README file that walks you through the entire setup process.
To get started, complete the following steps:
- Clone the provided repository containing the AWS CDK code and README file.
- Review the README file for prerequisites and environment setup instructions.
- Follow the AWS CDK deployment steps outlined in the documentation.
- Configure necessary environment-specific parameters as described.
Deploying and running this solution in your AWS environment will incur costs for the AWS services used, including but not limited to Amazon Bedrock, Amazon EC2, Amazon S3, and DynamoDB. It is highly recommended that you use a separate AWS account and setup AWS Budget to monitor the costs.
| DISCLAIMER: This is sample code for non-production usage. You should work with your security and legal teams to adhere to your organizational security, regulatory, and compliance requirements before deployment. |
Test the solution
The following diagram illustrates the workflow for using the application.

To demonstrate how generative AI can accelerate AWS Well-Architected reviews, we have developed a Streamlit-based demo web application that serves as the front-end interface for initiating and managing the WAFR review process.
Complete the following steps to test the demo application:
- Open a new browser window and enter the CloudFront URL provided during the setup.
- Add a new user to the Amazon Cognito user pool deployed by the AWS CDK during the setup. Log in to the application using this user’s credentials.

- Choose New WAFR Review in the navigation pane.

- For Analysis type, choose the analysis type:
- Quick – You can generate a quick analysis without creating a workload in the AWS Well-Architected Tool. This option is faster because it groups the questions for an individual pillar into a single prompt. It’s suitable for an initial assessment.
- Deep with Well-Architected Tool – You can generate a comprehensive and detailed analysis that automatically creates a workload in the AWS Well-Architected tool. This thorough review process requires more time to complete as it evaluates each question individually rather than grouping them together. The deep review typically takes approximately 20 minutes, though the actual duration may vary depending on the document size and the number of Well- Architected pillars selected for evaluation.
- Enter the analysis name and description.

- Choose the AWS Well-Architected lens and desired pillars.
- Upload your solution architecture or technical design document
- Choose Create WAFR Analysis.

- Choose Existing WAFR Reviews in the navigation pane.
- Choose your newly submitted analysis.
After the status changes to Completed, you can view the WAFR analysis at the bottom of the page. For multiple reviews, choose the relevant analysis on the dropdown menu.

You can chat with the uploaded document as well as the other generated content by using the WAFR Chat section on the Existing WAFR Reviews page.

Improving assessment quality
The solution uses prompt engineering to optimize textual input to the foundation model (FM) to obtain desired assessment responses. The quality of prompt (the system prompt, in this case) has significant impact on the model output. The solution provides a sample system prompt that is used to drive the assessment. You could enhance this prompt further to align with specific organizational needs. This becomes more crucial when defining and ingesting your own custom lenses.
Another important factor is the quality of the document that is uploaded for assessment. Detailed and architecture-rich documents can result in better inferences and therefore finer assessments. Prompts are defined in such a way that if there is inadequate information for assessment, then it’s highlighted in the output. This minimizes hallucination by the FM and provides a potential opportunity to enrich your design templates in alignment with AWS Well-Architected content.
You could further enhance this solution by using Amazon Bedrock Guardrails to further reduce hallucinations and ground responses in your own source information.
At the time of writing of this blog, only the AWS Well-Architected Framework, Financial Services Industry, and Analytics lenses have been provisioned. However, other lenses, including custom lenses, could be added with a few refinements to the UI application and underlying data store.
Clean up
After you’ve finished exploring or using the solution and no longer require these resources, be sure to clean them up to avoid ongoing charges. Follow these steps to remove all associated resources:
- Navigate to the directory containing your AWS CDK code.
- Run the following command:
cdk destroy. - Confirm the deletion when prompted.
- Manually check for and delete any resources that might not have been automatically removed, such as S3 buckets with content or custom IAM roles.
- Verify that all related resources have been successfully deleted.
Conclusion
In this post, we showed how generative AI and Amazon Bedrock can play a crucial role in expediting and scaling the AWS Well-Architected Framework reviews within an organization. By automating document analysis and using a WAFR-aware knowledge base, the solution offers rapid and in-depth assessments, helping organizations build secure, high-performing, resilient, and efficient infrastructure for a variety of applications and workloads.
To learn more, refer to the following:
- Amazon Bedrock Documentation
- AWS Well-Architected
- Amazon Bedrock Knowledge Bases now supports metadata filtering to improve retrieval accuracy
About the Authors
 Shoeb Bustani is a Senior Enterprise Solutions Architect at AWS, based in the United Kingdom. As a senior enterprise architect, innovator, and public speaker, he provides strategic architectural partnership and guidance to help customers achieve their business outcome leveraging AWS services and best practices.
 Brijesh Pati is an Enterprise Solutions Architect at AWS, helping enterprise customers adopt cloud technologies. With a background in application development and enterprise architecture, he has worked with customers across sports, finance, energy, and professional services sectors. Brijesh specializes in AI/ML solutions and has experience with serverless architectures.
 Rohan Ghosh is as an Enterprise Solutions Architect at Amazon Web Services (AWS), specializing in the Advertising and Marketing sector. With extensive experience in Cloud Solutions Engineering, Application Development, and Enterprise Support, he helps organizations architect and implement cutting-edge cloud solutions. His current focus areas include Data Analytics and Generative AI, where he guides customers in leveraging AWS technologies to drive innovation and business transformation.
Dynamic metadata filtering for Amazon Bedrock Knowledge Bases with LangChain
Amazon Bedrock Knowledge Bases offers a fully managed Retrieval Augmented Generation (RAG) feature that connects large language models (LLMs) to internal data sources. It’s a cost-effective approach to improving LLM output so it remains relevant, accurate, and useful in various contexts. It also provides developers with greater control over the LLM’s outputs, including the ability to include citations and manage sensitive information.
Amazon Bedrock Knowledge Bases has a metadata filtering capability that allows you to refine search results based on specific attributes of the documents, improving retrieval accuracy and the relevance of responses. These metadata filters can be used in combination with the typical semantic (or hybrid) similarity search. Improving document retrieval results helps personalize the responses generated for each user. Dynamic metadata filters allow you to instantly create custom queries based on the varying user profiles or user-inputted responses so the documents retrieved only contain information relevant to the your needs.
In this post, we discuss using metadata filters with Amazon Bedrock Knowledge Bases.
Solution overview
The following code is an example metadata filter for Amazon Bedrock Knowledge Bases. Logical operators (such as AND or OR) can be nested to combine other logical operators and filter conditions. For more information, refer to the Retrieve API.
For our use case, we use an example of a travel website where the user answers a few questions about their travel preferences (including desired destination, preferred activities, and traveling companions) and then the system retrieves relevant documents.
We exclusively focus on the retrieval portion of RAG in this post. We provide the upstream components, including document ingestion and query formatting, as static data instead of code. The downstream generation component is out of scope for this post.
Prerequisites
To follow along with this post, you should understand basic retrieval techniques such as similarity search.
Additionally, you need an Amazon Bedrock knowledge base populated with documents and metadata. For instructions, see Create an Amazon Bedrock knowledge base. We have provided example documents and metadata in the accompanying GitHub repo for you to upload.
The associated notebook contains the required library imports and environment variables. Make sure you run the notebook using an AWS Identity and Access Management (IAM) role with the correct permissions for Amazon Simple Storage Service (Amazon S3) and Amazon Bedrock (AmazonS3FullAccess and AmazonBedrockFullAccess, respectively). We recommend running the notebook locally or in Amazon SageMaker. Then you can run the following code to test your AWS and knowledge base connection:
Create a dynamic filter
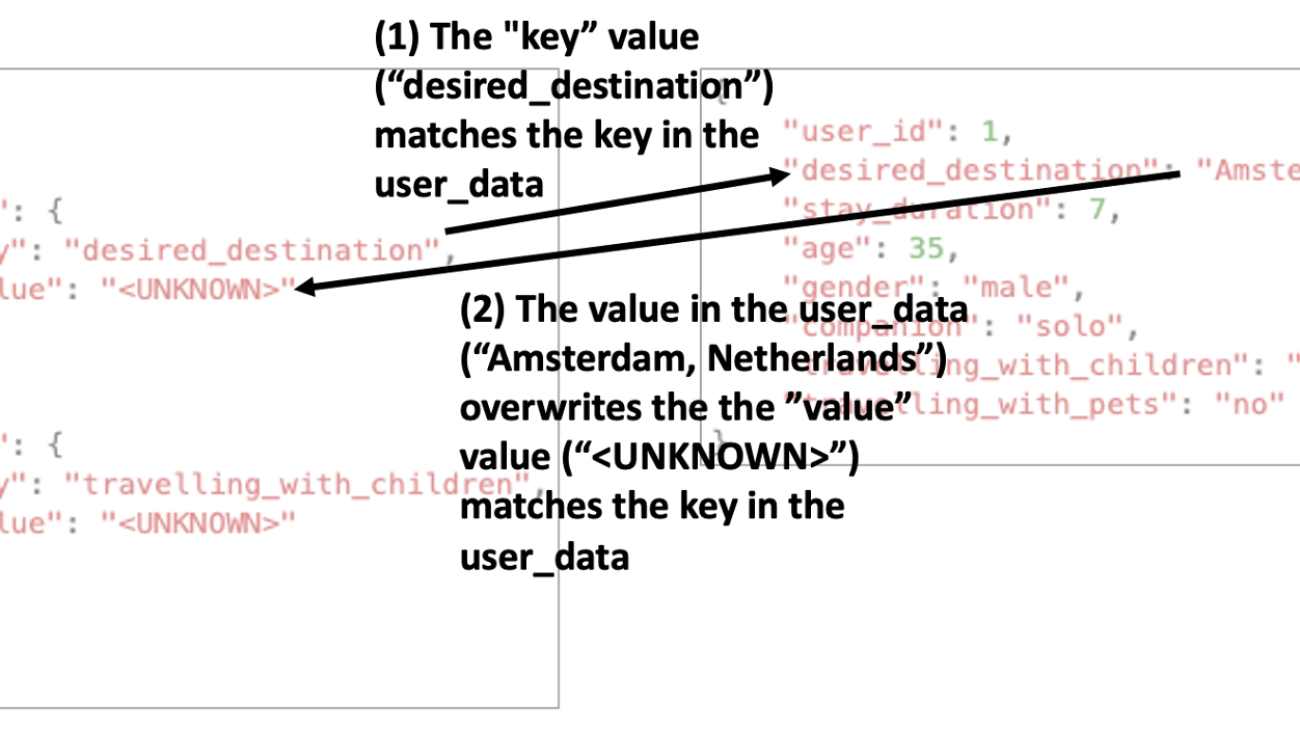
The "value" field within the filter needs to be updated at request time. This means overwriting the retrieval_config object, as shown in the following figure. The placeholder values in the filter get overwritten with the user data at runtime.

Because the retrieval_config object is a nested hierarchy of logical conditions (a tree), you can implement a breadth first search to identify and replace all the "value" field values (where "value" is the key and "<UNKNOWN>" is the placeholder value) with the corresponding value from the user data. See the following code:
Option 1: Create a retriever each time
To define the retrieval_config parameter dynamically, you can instantiate AmazonKnowledgeBasesRetriever each time. This integrates into a larger LangChain centric code base. See the following code:
Option 2: Access the underlying Boto3 API
The Boto3 API is able to directly retrieve with a dynamic retrieval_config. You can take advantage of this by accessing the object that AmazonKnowledgeBasesRetriever wraps. This is slightly faster but is less pythonic because it relies on LangChain implementation details, which may change without notice. This requires additional code to adapt the output to the proper format for a LangChain retriever. See the following code:
Results
Begin by reading in the user data. This example data contains user answers to an online questionnaire about travel preferences. The user_data fields must match the metadata fields.
Here is a preview of the user_data.json file from which certain fields will be extracted as values for filters.
Test the code with filters turned on and off. Only use a few filtering criteria because restrictive filters might return zero documents.
Finally, run both retrieval chains through both sets of filters for each user:
When analyzing the results, you can see that the first half of the documents are identical to the second half. In addition, when metadata filters aren’t used, the documents retrieved are occasionally for the wrong location. For example, trip ID 2 is to Paris, but the retriever pulls documents about London.
Excerpt of output table for reference:
| Retrieval Approach | Filter | Trip ID | Destination | Page Content | Metadata |
| Option_0 | TRUE | 2 | Paris, France | As a 70-year-old retiree, I recently had the pleasure of visiting Paris for the first time. It was a trip I had been looking forward to for years, and I was not disappointed. Here are some of my favorite attractions and activities that I would recommend to other seniors visiting the city. First on my list is the Eiffel Tower… | {‘location’: {‘s3Location’: {‘uri’: ‘s3://{YOUR_S3_BUCKET}/travel_reviews_titan/Paris_6.txt‘}, ‘type’: ‘S3’}, ‘score’: 0.48863396, ‘source_metadata’: {‘x-amz-bedrock-kb-source-uri’: ‘s3://{YOUR_S3_BUCKET}/travel_reviews_titan/Paris_6.txt‘, ‘travelling_with_children’: ‘no’, ‘activities_interest’: [‘museums’, ‘palaces’, ‘strolling’, ‘boat tours’, ‘neighborhood tours’], ‘companion’: ‘unknown’, ‘x-amz-bedrock-kb-data-source-id’: {YOUR_KNOWLEDGE_BASE_ID}, ‘stay_duration’: ‘unknown’, ‘preferred_month’: [‘unknown’], ‘travelling_with_pets’: ‘unknown’, ‘age’: [’71’, ’80’], ‘x-amz-bedrock-kb-chunk-id’: ‘1%3A0%3AiNKlapMBdxcT3sYpRK-d’, ‘desired_destination’: ‘Paris, France’}} |
| Option_0 | TRUE | 2 | Paris, France | As a 35-year-old traveling with my two dogs, I found Paris to be a pet-friendly city with plenty of attractions and activities for pet owners. Here are some of my top recommendations for traveling with pets in Paris: The Jardin des Tuileries is a beautiful park located between the Louvre Museum and the Place de la Concorde… | {‘location’: {‘s3Location’: {‘uri’: ‘s3://{YOUR_S3_BUCKET}/travel_reviews_titan/Paris_9.txt‘}, ‘type’: ‘S3’}, ‘score’: 0.474106, ‘source_metadata’: {‘x-amz-bedrock-kb-source-uri’: ‘s3://{YOUR_S3_BUCKET}/travel_reviews_titan/Paris_9.txt‘, ‘travelling_with_children’: ‘no’, ‘activities_interest’: [‘parks’, ‘museums’, ‘river cruises’, ‘neighborhood exploration’], ‘companion’: ‘pets’, ‘x-amz-bedrock-kb-data-source-id’: {YOUR_KNOWLEDGE_BASE_ID}, ‘stay_duration’: ‘unknown’, ‘preferred_month’: [‘unknown’], ‘travelling_with_pets’: ‘yes’, ‘age’: [’30’, ’31’, ’32’, ’33’, ’34’, ’35’, ’36’, ’37’, ’38’, ’39’, ’40’], ‘x-amz-bedrock-kb-chunk-id’: ‘1%3A0%3Aj52lapMBuHB13c7-hl-4’, ‘desired_destination’: ‘Paris, France’}} |
| Option_0 | TRUE | 2 | Paris, France | If you are looking for something a little more active, I would suggest visiting the Bois de Boulogne. This large park is located on the western edge of Paris and is a great place to go for a walk or a bike ride with your pet. The park has several lakes and ponds, as well as several gardens and playgrounds… | {‘location’: {‘s3Location’: {‘uri’: ‘s3://{YOUR_S3_BUCKET}/travel_reviews_titan/Paris_5.txt‘}, ‘type’: ‘S3’}, ‘score’: 0.45283788, ‘source_metadata’: {‘x-amz-bedrock-kb-source-uri’: ‘s3://{YOUR_S3_BUCKET}/travel_reviews_titan/Paris_5.txt‘, ‘travelling_with_children’: ‘no’, ‘activities_interest’: [‘strolling’, ‘picnic’, ‘walk or bike ride’, ‘cafes and restaurants’, ‘art galleries and shops’], ‘companion’: ‘pet’, ‘x-amz-bedrock-kb-data-source-id’: ‘{YOUR_KNOWLEDGE_BASE_ID}, ‘stay_duration’: ‘unknown’, ‘preferred_month’: [‘unknown’], ‘travelling_with_pets’: ‘yes’, ‘age’: [’40’, ’41’, ’42’, ’43’, ’44’, ’45’, ’46’, ’47’, ’48’, ’49’, ’50’], ‘x-amz-bedrock-kb-chunk-id’: ‘1%3A0%3AmtKlapMBdxcT3sYpSK_N’, ‘desired_destination’: ‘Paris, France’}} |
| Option_0 | FALSE | 2 | Paris, France | { “metadataAttributes”: { “age”: [ “30” ], “desired_destination”: “London, United Kingdom”, “stay_duration”: “unknown”, “preferred_month”: [ “unknown” ], “activities_interest”: [ “strolling”, “sightseeing”, “boating”, “eating out” ], “companion”: “pets”, “travelling_with_children”: “no”, “travelling_with_pets”: “yes” } } | {‘location’: {‘s3Location’: {‘uri’: ‘s3://{YOUR_S3_BUCKET}/travel_reviews_titan/London_2.txt.metadata (1).json’}, ‘type’: ‘S3’}, ‘score’: 0.49567315, ‘source_metadata’: {‘x-amz-bedrock-kb-source-uri’: ‘s3://{YOUR_S3_BUCKET}/travel_reviews_titan/London_2.txt.metadata (1).json’, ‘x-amz-bedrock-kb-chunk-id’: ‘1%3A0%3A5tKlapMBdxcT3sYpYq_r’, ‘x-amz-bedrock-kb-data-source-id’: {YOUR_KNOWLEDGE_BASE_ID}}} |
| Option_0 | FALSE | 2 | Paris, France | As a 35-year-old traveling with my two dogs, I found Paris to be a pet-friendly city with plenty of attractions and activities for pet owners. Here are some of my top recommendations for traveling with pets in Paris: The Jardin des Tuileries is a beautiful park located between the Louvre Museum and the Place de la Concorde… | {‘location’: {‘s3Location’: {‘uri’: ‘s3://{YOUR_S3_BUCKET}/travel_reviews_titan/Paris_9.txt‘}, ‘type’: ‘S3’}, ‘score’: 0.4741059, ‘source_metadata’: {‘x-amz-bedrock-kb-source-uri’: ‘s3://{YOUR_S3_BUCKET}/travel_reviews_titan/Paris_9.txt‘, ‘travelling_with_children’: ‘no’, ‘activities_interest’: [‘parks’, ‘museums’, ‘river cruises’, ‘neighborhood exploration’], ‘companion’: ‘pets’, ‘x-amz-bedrock-kb-data-source-id’: {YOUR_KNOWLEDGE_BASE_ID}, ‘stay_duration’: ‘unknown’, ‘preferred_month’: [‘unknown’], ‘travelling_with_pets’: ‘yes’, ‘age’: [’30’, ’31’, ’32’, ’33’, ’34’, ’35’, ’36’, ’37’, ’38’, ’39’, ’40’], ‘x-amz-bedrock-kb-chunk-id’: ‘1%3A0%3Aj52lapMBuHB13c7-hl-4’, ‘desired_destination’: ‘Paris, France’}} |
| Option_0 | FALSE | 2 | Paris, France | If you are looking for something a little more active, I would suggest visiting the Bois de Boulogne. This large park is located on the western edge of Paris and is a great place to go for a walk or a bike ride with your pet. The park has several lakes and ponds, as well as several gardens and playgrounds… | {‘location’: {‘s3Location’: {‘uri’: ‘s3://{YOUR_S3_BUCKET}/travel_reviews_titan/Paris_5.txt‘}, ‘type’: ‘S3’}, ‘score’: 0.45283788, ‘source_metadata’: {‘x-amz-bedrock-kb-source-uri’: ‘s3://{YOUR_S3_BUCKET}/travel_reviews_titan/Paris_5.txt‘, ‘travelling_with_children’: ‘no’, ‘activities_interest’: [‘strolling’, ‘picnic’, ‘walk or bike ride’, ‘cafes and restaurants’, ‘art galleries and shops’], ‘companion’: ‘pet’, ‘x-amz-bedrock-kb-data-source-id’: {YOUR_KNOWLEDGE_BASE_ID}, ‘stay_duration’: ‘unknown’, ‘preferred_month’: [‘unknown’], ‘travelling_with_pets’: ‘yes’, ‘age’: [’40’, ’41’, ’42’, ’43’, ’44’, ’45’, ’46’, ’47’, ’48’, ’49’, ’50’], ‘x-amz-bedrock-kb-chunk-id’: ‘1%3A0%3AmtKlapMBdxcT3sYpSK_N’, ‘desired_destination’: ‘Paris, France’}} |
Clean up
To avoid incurring additional charges, be sure to delete your knowledge base, OSS/vector store and the underlying S3 bucket.
Conclusion
Enabling dynamic filtering through Knowledge Base’s metadata filtering enhances document retrieval in RAG systems by tailoring outputs to user-specific needs, significantly improving the relevance and accuracy of LLM-generated responses. In the travel website example, filters make sure that retrieved documents closely matched user preferences.
This approach can be applied to other use cases, such as customer support, personalized recommendations, and content curation, where context-sensitive information retrieval is essential. Properly configured filters are crucial for maintaining accuracy across different applications, making this feature a powerful tool for refining LLM outputs in diverse scenarios.
Be sure to take advantage of this powerful and flexible solution in your application. For more information on metadata in Amazon Bedrock Knowledge Bases, see Amazon Bedrock Knowledge Bases now supports metadata filtering to improve retrieval accuracy. Also, Amazon Bedrock Knowledge Bases now provides autogenerated query filters.
Security Best Practices
For AWS IAM Policies:
- Apply least-privilege permissions by being explicit with IAM actions and listing only required permissions rather than using wildcards
- Use temporary credentials with IAM roles for workloads
- Avoid using wildcards (*) in the Action element as this grants access to all actions for specific AWS services
- Remove wildcards from the Resource element and explicitly list the specific resources that IAM entities should access
- Review AWS managed policies carefully before using them and consider using customer managed policies if AWS managed policies grant more permissions than needed
For more detailed security best practices for AWS IAM, see Security best practices in IAM.
For Amazon S3:
- Block Public Access unless explicitly required, make sure S3 buckets are not publicly accessible by using the S3 Block Public Access feature and implementing appropriate bucket policies
- Enable encryption for data at rest (all S3 buckets have default encryption) and enforce encryption for data in transit using HTTPS/TLS
- Grant only the minimum permissions required using IAM policies, bucket policies, and disable ACLs (Access Control Lists) which are no longer recommended for most modern use cases
- Enable server access logging, AWS CloudTrail, and use AWS security services like GuardDuty, Macie, and IAM Access Analyzer to monitor and detect potential security issues
For more detailed security best practices for Amazon S3, see Security best practices for Amazon S3.
For Amazon Bedrock:
- Use IAM roles and policies to control access to Bedrock resources and APIs.
- Implement VPC endpoints to access Bedrock securely from within your VPC.
- Encrypt data at rest and in transit when working with Bedrock to protect sensitive information.
- Monitor Bedrock usage and access patterns using AWS CloudTrail for auditing purposes.
For more information on security in Amazon Bedrock, see Security in Amazon Bedrock.
For Amazon SageMaker:
- Use IAM roles to control access to SageMaker resources and limit permissions based on job functions.
- Encrypt SageMaker notebooks, training jobs, and endpoints using AWS KMS keys for data protection.
- Implement VPC configurations for SageMaker resources to restrict network access and enhance security.
- Use SageMaker private endpoints to access APIs without traversing the public internet.
About the Authors
 Haley Tien is a Deep Learning Architect at AWS Generative AI Innovation Center. She has a Master’s degree in Data Science and assists customers in building generative AI solutions on AWS to optimize their workloads and achieve desired outcomes.
 Adam Weinberger is a Applied Scientist II at AWS Generative AI Innovation Center. He has 10 years of experience in data science and machine learning. He holds a Master’s of Information and Data Science from the University of California, Berkeley.
 Dan Ford is a Applied Scientist II at AWS Generative AI Innovation Center, where he helps public sector customers build state-of-the-art GenAI solutions.

📣 Submit to Speak at PyTorch Conference + Save on Registration
Step into the Future of AI at PyTorch Conference 2025.
The Call for Proposals for PyTorch Conference 2025 is officially open!
Join us in San Francisco from October 22–23, 2025, to showcase your expertise and innovations with PyTorch—the industry-leading, open-source machine learning framework powering innovations from bare-metal infrastructure to sophisticated application and agent layers. This is your opportunity to share insights, breakthroughs, and case studies with a global audience of AI and Generative AI practitioners, researchers, and developers.

Submit your proposals and prepare to engage, learn, and network alongside some of the brightest minds in the AI/ML community. We’re seeking sessions, Birds of a Feather discussions, lightning talks, and poster sessions on the following topics:
- Core PyTorch Framework
- PyTorch on Accelerator Hardware
- PyTorch Ecosystem and Tools
- AI Applications and Use Cases
- AI in Research and Academia
- AI in Industry and Enterprise Applications
- AI Infrastructure and Scalability
- Ethical AI, Governance, and Regulation
- Training, Fine-Tuning, and Alignment
- Inference, Deployment, and Serving
- Performance Measurement and Benchmarking
- Data Engineering and Management for AI
- Generative AI and Large Language Models (LLMs)
- Model Optimization and Efficiency
- Open Source Collaboration, Education and Community Building
- Edge AI and On-Device
- DL Compilers and Kernel Authoring
Learn more and submit your talk by Sunday, June 1, at 11:59 PDT!

Save up to USD$500 with Super Early Bird Pricing!
- Reserve your pass by 11:59 PM PDT on March 21 and score Super Early Bird pricing for just USD$499. That’s a savings of up to USD$500!
- Student or faculty? Learn more about our discounted academic rate.
- Need help covering travel costs? We offer discretionary travel funding for those community members who would otherwise not be able to attend. Learn more.
Become a Sponsor at PyTorch Conference 2025!
Seize your opportunity to influence the future of Generative AI and Machine Learning by sponsoring PyTorch Conference 2025. PyTorch is at the forefront of innovation—empowering rapid experimentation, flexible model development, and efficient deployment into production environments with its powerful, versatile ecosystem of tools and thriving community of dedicated users.
As a sponsor, you’ll gain more than visibility; you’ll strategically position your organization at the heart of a vibrant, global AI/ML ecosystem. Connect directly with 3,000+ expert attendees, researchers, engineers, and decision-makers, and actively shape the conversations driving the next generation of AI advancements.
For more details on CFP submissions, registration, and sponsorship, visit the PyTorch Conference Website.
Customize DeepSeek-R1 distilled models using Amazon SageMaker HyperPod recipes – Part 1
Increasingly, organizations across industries are turning to generative AI foundation models (FMs) to enhance their applications. To achieve optimal performance for specific use cases, customers are adopting and adapting these FMs to their unique domain requirements. This need for customization has become even more pronounced with the emergence of new models, such as those released by DeepSeek.
However, customizing DeepSeek models effectively while managing computational resources remains a significant challenge. Tuning model architecture requires technical expertise, training and fine-tuning parameters, and managing distributed training infrastructure, among others. This often forces companies to choose between model performance and practical implementation constraints, creating a critical need for more accessible and streamlined model customization solutions.
In this two-part series, we discuss how you can reduce the DeepSeek model customization complexity by using the pre-built fine-tuning workflows (also called “recipes”) for both DeepSeek-R1 model and its distilled variations, released as part of Amazon SageMaker HyperPod recipes.
In this first post, we will build a solution architecture for fine-tuning DeepSeek-R1 distilled models and demonstrate the approach by providing a step-by-step example on customizing the DeepSeek-R1 Distill Qwen 7b model using recipes, achieving an average of 25% on all the Rouge scores, with a maximum of 49% on Rouge 2 score with both SageMaker HyperPod and SageMaker training jobs. The second part of the series will focus on fine-tuning the DeepSeek-R1 671b model itself.
At the time of this writing, the DeepSeek-R1 model and its distilled variations for Llama and Qwen were the latest released recipe. Check out sagemaker-hyperpod-recipes on GitHub for the latest released recipes, including support for fine-tuning the DeepSeek-R1 671b parameter model.
Amazon SageMaker HyperPod recipes
At re:Invent 2024, we announced the general availability of Amazon SageMaker HyperPod recipes. SageMaker HyperPod recipes help data scientists and developers of all skill sets to get started training and fine-tuning popular publicly available generative AI models in minutes with state-of-the-art training performance. These recipes include a training stack validated by Amazon Web Services (AWS), which removes the tedious work of experimenting with different model configurations, minimizing the time it takes for iterative evaluation and testing. They automate several critical steps, such as loading training datasets, applying distributed training techniques, automating checkpoints for faster recovery from faults, and managing the end-to-end training loop.
Recipes, paired with the resilient infrastructure of AWS, (Amazon SageMaker HyperPod and Amazon SageMaker Model Training) provide a resilient training environment for fine-tuning FMs such as DeepSeek-R1 with out-of-the-box customization.
To help customers quickly use DeepSeek’s powerful and cost-efficient models to accelerate generative AI innovation, we released new recipes to fine-tune six DeepSeek models, including DeepSeek-R1 distilled Llama and Qwen models using supervised fine-tuning (SFT), Quantized Low-Rank Adaptation (QLoRA), Low-Rank Adaptation (LoRA) techniques. In this post, we introduce these new recipes and walk you through a solution to fine-tune a DeepSeek Qwen 7b model for an advanced medical reasoning use case.
Solution overview
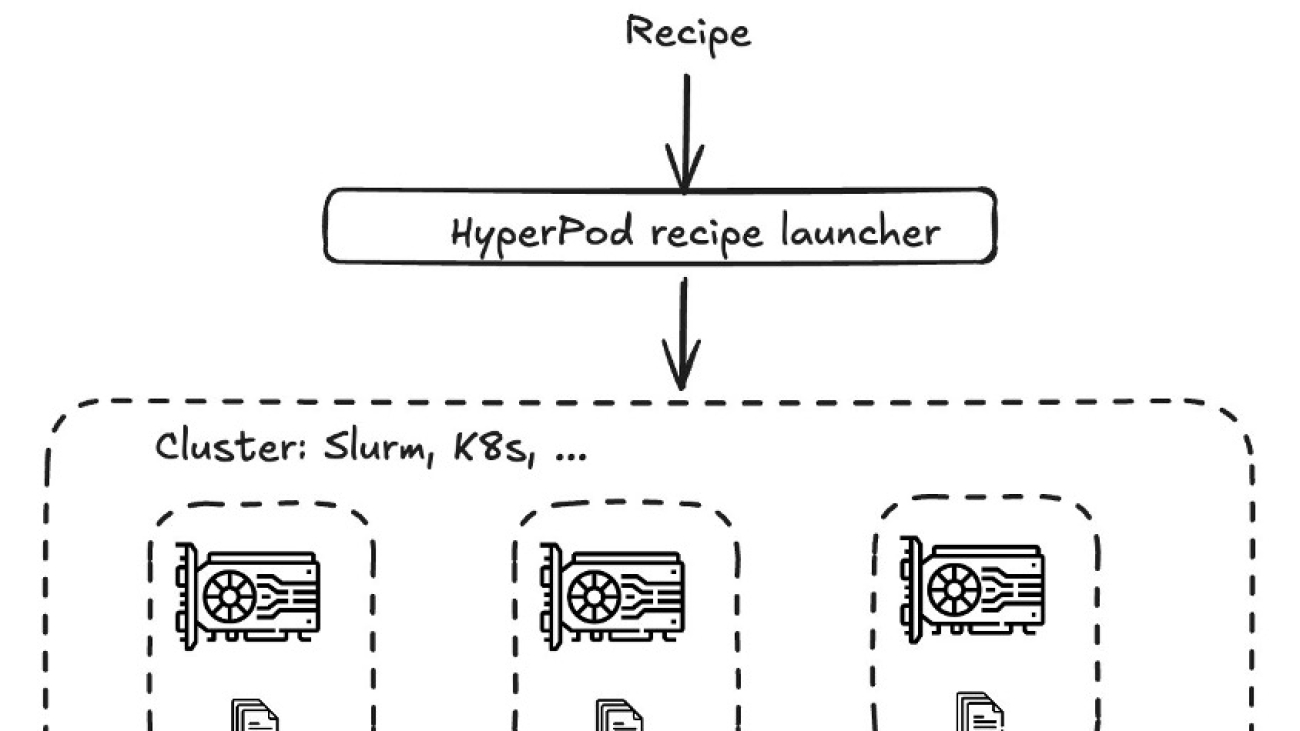
At its core, as depicted in the following diagram, the recipe architecture implements a hierarchical workflow that begins with a recipe specification that covers a comprehensive configuration defining the training parameters, model architecture, and distributed training strategies. These recipes are processed through the HyperPod recipe launcher, which serves as the orchestration layer responsible for launching a job on the corresponding architecture. The launcher interfaces with underlying cluster management systems such as SageMaker HyperPod (Slurm or Kubernetes) or training jobs, which handle resource allocation and scheduling. It’s a familiar NeMo-style launcher with which you can choose a recipe and run it on your infrastructure of choice (SageMaker HyperPod or training).
For example, after choosing your recipe, you can pre-train or fine-tune a model by running python3 main.py recipes=recipe-name. Alternatively, you can use a launcher script, which is a bash script that is preconfigured to run the chosen training or fine-tuning job on your cluster. You can check out main.py (NeMo style launcher) and launcher scripts for DeepSeek on the GitHub repository hosting SageMaker HyperPod recipes.
A key component of this architecture is the HyperPod training adapter for NeMo, which is built on the NVIDIA NeMo framework and Neuronx Distributed training package, which loads data, creates models, and facilitates efficient data parallelism, model parallelism, and hybrid parallelism strategies, which enables optimal utilization of computational resources across the distributed infrastructure. The architecture’s modular design allows for scalability and flexibility, making it particularly effective for training LLMs that require distributed computing capabilities.

You can run these recipes using SageMaker HyperPod or as SageMaker training jobs. For organizations that require granular control over training infrastructure and extensive customization options, SageMaker HyperPod is the ideal choice. SageMaker training jobs, on the other hand, is tailored for organizations that want a fully managed experience for their training workflows. To learn more details about these service features, refer to Generative AI foundation model training on Amazon SageMaker.
In the next sections, we go over the solution architecture for these services before presenting a step-by-step implementation example for each.
SageMaker HyperPod
To submit jobs using SageMaker HyperPod, you can use the HyperPod recipes launcher, which provides an straightforward mechanism to run recipes on both Slurm and Kubernetes. After you choose your orchestrator, you can choose your recipe’s launcher and have it run on your HyperPod cluster. The launcher will interface with your cluster with Slurm or Kubernetes native constructs. For this post, we use the HyperPod recipes launcher mechanism to run the training on a Slurm cluster. The following image shows the solution architecture for SageMaker HyperPod.

SageMaker training jobs
The workflow for SageMaker training jobs begins with an API request that interfaces with the SageMaker control plane, which manages the orchestration of training resources. The system uses the training jobs launcher to efficiently run workloads on a managed cluster.
The architecture uses Amazon Elastic Container Registry (Amazon ECR) for container image management. Training jobs are executed across a distributed cluster, with seamless integration to multiple storage solutions, including Amazon Simple Storage Service (Amazon S3), Amazon Elastic File Storage (Amazon EFS), and Amazon FSx for Lustre. All of this runs under the SageMaker managed environment, providing optimal resource utilization and security.
This design simplifies the complexity of distributed training while maintaining the flexibility needed for diverse machine learning (ML) workloads, making it an ideal solution for enterprise AI development. The following image shows the solution architecture for SageMaker training jobs.

Solution walkthrough
For this solution, consider a use case for a healthcare industry startup that aims to create an accurate, medically verified chat assistant application that bridges complex medical information with patient-friendly explanations. By fine-tuning DeepSeek-R1 Distill Qwen 7b using the FreedomIntelligence/medical-o1-reasoning-SFT dataset, you can use its medical reasoning capabilities to produce content that maintains clinical accuracy.
Prerequisites
You need to complete the following prerequisites before you can run the DeepSeek-R1 Distill Qwen 7B model fine-tuning notebook.
- Make the following quota increase requests for SageMaker. You need to request a minimum of one
p4d.24xlargeinstance (with 8 x NVIDIA A100 GPUs) ranging to a maximum of twop4d.24xlargeinstances (depending on time-to-train and cost-to-train trade-offs for your use case).
On the Service Quotas console, request the following SageMaker quotas:
-
- P4 instances (
p4d.24xlarge) for training job usage: 1–2 - P4 instances (
p4d.24xlarge) for HyperPod clusters (“ml.p4d.24xlargefor cluster usage“): 1-2
- P4 instances (
- If you choose to use HyperPod clusters to run your training, set up a HyperPod Slurm cluster following the documentation at Tutuorial for getting started with SageMaker HyperPod. Alternatively, you can use the AWS CloudFormation template provided in the AWS Workshop Studio at Amazon SageMaker HyperPod Own Account and follow the instructions to set up a cluster and a development environment to access and submit jobs to the cluster.
- (Optional) If you choose to use SageMaker training jobs, you can create an Amazon SageMaker Studio domain (refer to Use quick setup for Amazon SageMaker AI) to access Jupyter notebooks with the preceding role. (You can use JupyterLab in your local setup, too.)
-
- Create an AWS Identity and Access Management (IAM) role with managed policies
AmazonSageMakerFullAccessandAmazonS3FullAccessto give required access to SageMaker to run the examples.
- Create an AWS Identity and Access Management (IAM) role with managed policies
- Clone the GitHub repository with the assets for this deployment. This repository consists of a notebook that references training assets:
Next, we run the model_trainer_deepseek_r1_recipe_lora.ipynb notebook to fine-tune the DeepSeek-R1 model using QLoRA on SageMaker.
Prepare the dataset
To prepare the dataset, you need to load the FreedomIntelligence/medical-o1-reasoning-SFT dataset, tokenize and chunk the dataset, and configure the data channels for SageMaker training on Amazon S3. Complete the following steps:
- Format the dataset by applying the prompt format for DeepSeek-R1 Distill Qwen 7B:
def generate_prompt(data_point):
    full_prompt = f"""
    Below is an instruction that describes a task, paired with an input that provides further context.
    Write a response that appropriately completes the request.
    Before answering, think carefully about the question and create a step-by-step chain of thoughts to ensure a logical and accurate response.

    ### Instruction:
    You are a medical expert with advanced knowledge in clinical reasoning, diagnostics, and treatment planning.
    Please answer the following medical question.

    ### Question:
    {data_point["Question"]}

    ### Response:
    {data_point["Complex_CoT"]}

    """
return {"prompt": full_prompt.strip()}- Load the FreedomIntelligence/medical-o1-reasoning-SFT dataset and split it into training and validation datasets:
# Load dataset from the hub
train_set = load_dataset(dataset_name, 'en', split="train[5%:]")
test_set = load_dataset(dataset_name, 'en', split="train[:5%]")

...

train_dataset = train_set.map(
    generate_and_tokenize_prompt,
    remove_columns=columns_to_remove,
    batched=False
)

test_dataset = test_set.map(
    generate_and_tokenize_prompt,
    remove_columns=columns_to_remove,
    batched=False
)- Load the DeepSeek-R1 Distill Qwen 7B tokenizer from the Hugging Face Transformers library and generate tokens for the train and validation datasets:
model_id = "deepseek-ai/DeepSeek-R1-Distill-Qwen-7B"
max_seq_length=1024

# Initialize a tokenizer by loading a pre-trained tokenizer configuration, using the fast tokenizer implementation if available.
tokenizer = AutoTokenizer.from_pretrained(model_id, use_fast=True)

...

train_dataset = train_dataset.map(tokenize, remove_columns=["prompt"])
test_dataset = test_dataset.map(tokenize, remove_columns=["prompt"])- Prepare the training and validation datasets for SageMaker training by saving them as
arrowfiles, which is required by SageMaker HyperPod recipes, and constructing the S3 paths where these files will be uploaded:
train_dataset_s3_path = f"s3://{bucket_name}/{input_path}/train"
val_dataset_s3_path = f"s3://{bucket_name}/{input_path}/test"

train_dataset.save_to_disk(train_dataset_s3_path)
val_dataset.save_to_disk(val_dataset_s3_path)
The dataset above will be used in the examples for both SageMaker training jobs and SageMaker HyerPod.
Option A: Fine-tune using SageMaker training jobs
To fine-tune the model using SageMaker training jobs with recipes, this example uses the ModelTrainer class.
The ModelTrainer class is a newer and more intuitive approach to model training that significantly enhances user experience and supports distributed training, Build Your Own Container (BYOC), and recipes. For additional information about ModelTrainer, you can refer to Accelerate your ML lifecycle using the new and improved Amazon SageMaker Python SDK – Part 1: ModelTrainer
To set up the fine-tuning workload, complete the following steps:
- Select the instance type, the container image for the training job, and define the checkpoint path where the model will be stored:
instance_type = "ml.p4d.24xlarge"

image_uri = (
    f"658645717510.dkr.ecr.{sagemaker_session.boto_session.region_name}.amazonaws.com/smdistributed-modelparallel:2.4.1-gpu-py311-cu121"
)

checkpoint_s3_path = f"s3://{bucket_name}/deepseek-r1-distilled-qwen-7b-recipe-lora/checkpoints"- Create the ModelTrainer function to encapsulate the training setup from a selected recipe:
from sagemaker.modules.configs import CheckpointConfig, Compute, InputData, SourceCode, StoppingCondition
from sagemaker.modules.distributed import Torchrun
from sagemaker.modules.train import ModelTrainer

instance_count = 1

# Working override for custom dataset
recipe_overrides = {
    ...
    "trainer": {
        "num_nodes": instance_count,
        ...
    },
    ...
    "use_smp_model": False, # Required for PEFT
    "model": {
        "hf_model_name_or_path": model_id,
        "data": {
            "train_dir": "/opt/ml/input/data/train",
            "val_dir": "/opt/ml/input/data/test",
        },
    },
}

# Define the compute
compute_configs = Compute(
    instance_type=instance_type,
    instance_count=instance_count,
    keep_alive_period_in_seconds=0
)

model_trainer = ModelTrainer.from_recipe(
    training_image=image_uri,
    training_recipe="fine-tuning/deepseek/hf_deepseek_r1_distilled_qwen_7b_seq8k_gpu_lora",
    recipe_overrides=recipe_overrides,
    requirements="./requirements.txt",
    compute=compute_configs,
    ...
    checkpoint_config=CheckpointConfig(
        s3_uri=f"{checkpoint_s3_path}/{job_prefix}"
    ),
)
You can point to the specific recipe with the training_recipe argument and override the recipe arguments by providing a dictionary as argument of recipe_overrides. In the previous example:
num_nodes: Indicates the number of instances that will be used for the fine-tuning executioncheckpoint_dir: Location in the container where the job will save model checkpoints
The ModelTrainer class simplifies the experience by encapsulating code and training setup directly from the selected recipe. In this example:
training_recipe:hf_deepseek_r1_distilled_qwen_7b_seq8k_gpu_lorais defining fine-tuning setup for the LoRA technique
- Set up the input channels for ModelTrainer by creating an InputData objects from the provided S3 bucket paths for the training and test and validation datasets
- Submit the training job:
# starting the train job with our uploaded datasets as input
model_trainer.train(input_data_config=data, wait=True)
Option B: Fine-tune using SageMaker HyperPod with Slurm
To fine-tune the model using HyperPod, make sure your cluster is up and ready by following the prerequisites. To access the login or head node of the HyperPod Slurm cluster from your development environment, follow the login instructions at Log in to your cluster in the Amazon SageMaker HyperPod workshop.
Alternatively, you can also use AWS Systems Manager and run a command like the following to start the session. You can find the cluster ID, instance group name, and instance ID on the Amazon SageMaker console.
aws ssm start-session --target sagemaker-cluster:[cluster-id]_[instance-group-name]-[instance-id] --region region_name- In the cluster’s login or head node, run the following commands to set up the environment. Run
sudo su - ubuntuto run the remaining commands as the root user unless you have a specific user ID to access the cluster and your POSIX user is created through a lifecycle script on the cluster. Refer to the multi-user setup for more details.
# create a virtual environment
python3 -m venv ${PWD}/venv
source venv/bin/activate

# clone the recipes repository and set up the environment
git clone --recursive https://github.com/aws/sagemaker-hyperpod-recipes.git
cd sagemaker-hyperpod-recipes
pip3 install -r requirements.txt- Create a squash file using Enroot to run the job on the cluster. Enroot runtime offers GPU acceleration, rootless container support, and seamless integration with high performance computing (HPC) environments, making it ideal for running our workflows securely.
# create a squash file using Enroot
REGION=<region>
IMAGE="658645717510.dkr.ecr.${REGION}.amazonaws.com/smdistributed-modelparallel:2.4.1-gpu-py311-cu121"
aws ecr get-login-password --region "${REGION}" | docker login --username AWS --password-stdin 658645717510.dkr.ecr.${REGION}.amazonaws.com
enroot import -o $PWD/smdistributed-modelparallel.sqsh dockerd://${IMAGE}- After you’ve created the squash file, update the
recipes_collection/config.yamlfile with the absolute path to the squash file (created in the preceding step), and update theinstance_typeif needed. The final config file should have the following parameters:
...

cluster_type: slurm
...

instance_type: p4d.24xlarge
...

container: /fsx/<path-to-smdistributed-modelparallel>.sqsh
...- Download the prepared dataset that you uploaded to S3 into the FSx for Lustre volume attached to the cluster. Run the following commands to download the files from Amazon S3:
aws s3 cp s3://{bucket_name}/{input_path}/train /fsx/ubuntu/deepseek/data/train --recursive
aws s3 cp s3://{bucket_name}/{input_path}/test /fsx/ubuntu/deepseek/data/test --recursive- Update the launcher script for fine-tuning the DeepSeek-R1 Distill Qwen 7B model. The launcher scripts serve as convenient wrappers for executing the training script
main.pyfile), which streamlines the process of fine-tuning and parameter adjustment. For fine-tuning the DeepSeek-R1 Qwen 7B model, you can find the specific script at:
launcher_scripts/deepseek/run_hf_deepseek_r1_qwen_7b_seq16k_gpu_fine_tuning.sh- Before running the script, you need to modify the location of the training and validation files and update the HuggingFace model ID and optionally the access token for private models and datasets. The script should look like the following (update
recipes.trainer.num_nodesif you’re using a multi-node cluster):
SAGEMAKER_TRAINING_LAUNCHER_DIR=${SAGEMAKER_TRAINING_LAUNCHER_DIR:-"$(pwd)"}

HF_MODEL_NAME_OR_PATH="deepseek-ai/DeepSeek-R1-Distill-Qwen-7B" # HuggingFace pretrained model name or path
HF_ACCESS_TOKEN="hf_xxxx" # Optional HuggingFace access token

TRAIN_DIR="/fsx/ubuntu/deepseek/data/train" # Location of training dataset
VAL_DIR="/fsx/ubuntu/deepseek/data/test" # Location of validation dataset

EXP_DIR="/fsx/ubuntu/deepseek/results" # Location to save experiment info including logging, checkpoints, etc

HYDRA_FULL_ERROR=1 python3 "${SAGEMAKER_TRAINING_LAUNCHER_DIR}/main.py"
    recipes=fine-tuning/deepseek/hf_deepseek_r1_distilled_qwen_7b_seq16k_gpu_fine_tuning
    base_results_dir="${SAGEMAKER_TRAINING_LAUNCHER_DIR}/results"
    recipes.run.name="hf-deepseek-r1-distilled-qwen-7b-fine-tuning"
    recipes.exp_manager.exp_dir="$EXP_DIR"
    recipes.trainer.num_nodes=1
    recipes.model.data.train_dir="$TRAIN_DIR"
    recipes.model.data.val_dir="$VAL_DIR"
    recipes.model.hf_model_name_or_path="$HF_MODEL_NAME_OR_PATH"
    recipes.model.hf_access_token="$HF_ACCESS_TOKEN"
You can view the recipe for this fine-tuning task under, overriding any additional parameters as needed:
recipes_collection/recipes/fine-tuning/deepseek/hf_deepseek_r1_distilled_qwen_7b_seq16k_gpu_fine_tuning.yaml- Submit the job by running the launcher script:
bash launcher_scripts/deepseek/run_hf_deepseek_r1_qwen_7b_seq16k_gpu_fine_tuning.shYou can monitor the job using Slurm commands such as squeue and scontrol show to view the status of the job and the corresponding logs. After the job is complete, the trained model will also be available in the results folder, as shown in the following code:
cd results
 ls -R
.:
checkpoints  experiment

./checkpoints:
full

./checkpoints/full:
steps_50

./checkpoints/full/steps_50:
config.json  pytorch_model.bin

./experiment:
...- Upload the fine-tuned model checkpoint to Amazon S3 for evaluating the model using the validation data:
aws s3 cp /fsx/<path_to_checkpoint> s3://{bucket_name}/{model_prefix}/qwen7b --recursiveEvaluate the fine-tuned model
To objectively evaluate your fine-tuned model, you can run an evaluation job on the validation portion of the dataset.
You can run a SageMaker training job and use ROUGE metrics (ROUGE-1, ROUGE-2, ROUGE-L, and ROUGE-L-Sum), which measure the similarity between machine-generated text and human-written reference text. The SageMaker training job will compute ROUGE metrics for both the base DeepSeek-R1 Distill Qwen 7B model and the fine-tuned one. You can access the code sample for ROUGE evaluation in the sagemaker-distributed-training-workshop on GitHub. Please refer this notebook for details.
Complete the following steps:
- Define the S3 path where the fine-tuned checkpoints are stored, the instance_type, and the image uri to use in the training job:
trained_model = <S3_PATH>
instance_type = "ml.p4d.24xlarge"

image_uri = sagemaker.image_uris.retrieve(
    framework="pytorch",
    region=sagemaker_session.boto_session.region_name,
    version="2.4",
    instance_type=instance_type,
    image_scope="training"
)
#763104351884.dkr.ecr.us-east-1.amazonaws.com/pytorch-training:2.4-gpu-py311- Create the ModelTrainer function to encapsulate the evaluation script and define the input data:
from sagemaker.modules.configs import Compute, InputData, OutputDataConfig, SourceCode, StoppingCondition
from sagemaker.modules.distributed import Torchrun
from sagemaker.modules.train import ModelTrainer

# Define the script to be run
source_code = SourceCode(
    source_dir="./scripts",
    requirements="requirements.txt",
    entry_script="evaluate_recipe.py",
)

# Define the compute
...

# Define the ModelTrainer
model_trainer = ModelTrainer(
    training_image=image_uri,
    source_code=source_code,
    compute=compute_configs,
    ...
    hyperparameters={
        "model_id": model_id,  # Hugging Face model id
        "dataset_name": dataset_name
    }
)

# Pass the input data
train_input = InputData(
   channel_name="adapterdir",
   data_source=trained_model,
)

test_input = InputData(
   channel_name="testdata",
   data_source=test_dataset_s3_path, # S3 path where training data is stored
)

# Check input channels configured
data = [train_input, test_input]- Submit the training job:
# starting the train job with our uploaded datasets as input
model_trainer.train(input_data_config=data, wait=True)
The following table shows the task output for the fine-tuned model and the base model.
| Model | Rouge 1 | Rouge 2 | Rouge L | Rouge L Sum |
| Base | 0.36362 | 0.08739 | 0.16345 | 0.3204 |
| Fine-tuned | 0.44232 | 0.13022 | 0.17769 | 0.38989 |
| % Difference | 21.64207 | 49.01703 | 8.7121 | 21.68871 |
Our fine-tuned model demonstrates remarkable efficiency, achieving about 22% overall improvement on the reasoning task after only one training epoch. The most significant gain appears in Rouge 2 scores—which measure bigram overlap—with about 49% increase, indicating better alignment between generated and reference summaries.
Notably, preliminary experiments suggest these results could be further enhanced by extending the training duration. Increasing the number of epochs shows promising potential for additional performance gains while maintaining computational efficiency.
Clean up
To clean up your resources to avoid incurring any more charges, follow these steps:
- Delete any unused SageMaker Studio resources
- (Optional) Delete the SageMaker Studio domain
- Verify that your training job isn’t running anymore. To do so, on your SageMaker console, choose Training and check Training jobs.
- If you created a HyperPod cluster, delete the cluster to stop incurring costs. If you created the networking stack from the HyperPod workshop, delete the stack as well to clean up the virtual private cloud (VPC) resources and the FSx for Lustre volume.
Conclusion
In the first post of this two-part DeepSeek-R1 series, we discussed how SageMaker HyperPod recipes provide a powerful yet accessible solution for organizations to scale their AI model training capabilities with large language models (LLMs) including DeepSeek. The architecture streamlines complex distributed training workflows through its intuitive recipe-based approach, reducing setup time from weeks to minutes.
We recommend starting your LLM customization journey by exploring our sample recipes in the Amazon SageMaker HyperPod documentation. The AWS AI/ML community offers extensive resources, including workshops and technical guidance, to support your implementation journey.
To begin using the SageMaker HyperPod recipes, visit the sagemaker-hyperpod-recipes repo on GitHub for comprehensive documentation and example implementations. Our team continues to expand the recipe ecosystem based on customer feedback and emerging ML trends, making sure that you have the tools needed for successful AI model training.
In our second post, we discuss how these recipes could further be used to fine-tune DeepSeek-R1 671b model. Stay tuned!
About the Authors
 Kanwaljit Khurmi is a Principal Worldwide Generative AI Solutions Architect at AWS. He collaborates with AWS product teams, engineering departments, and customers to provide guidance and technical assistance, helping them enhance the value of their hybrid machine learning solutions on AWS. Kanwaljit specializes in assisting customers with containerized applications and high-performance computing solutions.
 Bruno Pistone is a Senior World Wide Generative AI/ML Specialist Solutions Architect at AWS based in Milan, Italy. He works with AWS product teams and large customers to help them fully understand their technical needs and design AI and Machine Learning solutions that take full advantage of the AWS cloud and Amazon Machine Learning stack. His expertise includes: End-to-end Machine Learning, model customization, and generative AI. He enjoys spending time with friends, exploring new places, and traveling to new destinations.
 Arun Kumar Lokanatha is a Senior ML Solutions Architect with the Amazon SageMaker team. He specializes in large language model training workloads, helping customers build LLM workloads using SageMaker HyperPod, SageMaker training jobs, and SageMaker distributed training. Outside of work, he enjoys running, hiking, and cooking.
 Durga Sury is a Senior Solutions Architect on the Amazon SageMaker team. Over the past 5 years, she has worked with multiple enterprise customers to set up a secure, scalable AI/ML platform built on SageMaker.
 Aman Shanbhag is an Associate Specialist Solutions Architect on the ML Frameworks team at Amazon Web Services, where he helps customers and partners with deploying ML training and inference solutions at scale. Before joining AWS, Aman graduated from Rice University with degrees in computer science, mathematics, and entrepreneurship.
 Anirudh Viswanathan is a Sr Product Manager, Technical – External Services with the SageMaker AI Training team. He holds a Masters in Robotics from Carnegie Mellon University, an MBA from the Wharton School of Business, and is named inventor on over 40 patents. He enjoys long-distance running, visiting art galleries, and Broadway shows.

The latest AI news we announced in February
 Here are Google’s latest AI updates from February 2025Read More

Survey Shows How AI Is Reshaping Healthcare and Life Sciences, From Lab to Bedside
From research and discovery to patient care and administrative tasks, AI is showing transformative potential across nearly every part of healthcare and life sciences.
For example, generative AI can be used to help automate repetitive, time-consuming tasks such as summarizing and creating documents and extracting and analyzing data from reports. It can also aid in drug discovery by finding new protein structures and offer assistance to patients through chatbots and AI assistants, easing the burden on clinical and administrative staff.
This wide range of applications was among key insights of NVIDIA’s inaugural “State of AI in Healthcare and Life Sciences” survey.
The survey — which polled more than 600 professionals across the globe from fields spanning digital healthcare, medical tools and technologies, pharmaceutical and biotech, and payers and practitioners — revealed robust AI adoption in the industry, with about two-thirds of respondents saying their companies are actively using the technology.
AI is also having a tangible impact on the industry’s bottom line, with 81% of respondents saying AI has helped increase revenue, and 45% percent realizing these benefits in less than a year after implementation.
Here are some of the key insights and use cases from the survey:
- 83% of overall respondents agreed with the statement that “AI will revolutionize healthcare and life sciences in the next three to five years”
- 73% said AI is helping to reduce operational costs
- 58% cited data analytics as the top AI workload, with generative AI second at 54%, and large language models third at 53%
- 59% of respondents from pharmaceutical and biotech companies cited drug discovery and development among their top AI use cases
Business Impact of AI in Healthcare and Life Sciences
The healthcare and life sciences industry is seeing how AI can help increase annual revenue and reduce operational costs. Forty-one percent of respondents indicated that the acceleration of research and development has had a positive impact. Thirty-six percent of respondents said AI has helped create a competitive advantage. And 35% have said it’s helped reduce project cycles, deliver better clinical or research insights, and enhance precision and accuracy, respectively.
Given the positive results across a broad range of AI use cases, it comes as no surprise that 78% of respondents said they intend to increase their budget for AI infrastructure this year. In addition, more than a third of respondents noted their investments in AI will increase by more than 10%.
The survey also revealed the top three spending priorities: identifying additional AI use cases (47%), optimizing workflow and production cycles (34%) and hiring more AI experts (26%).
AI Applied Across Healthcare
Each industry segment in the survey had differing priorities in AI implementation. For instance, in the payers and providers industry segment, which includes health insurance companies, hospitals, clinical services and home healthcare, 48% of respondents said their top AI use case was administrative tasks and workflow optimization.
For the medical tools and technologies field, 71% of respondents said their top AI use case was medical imaging and diagnostics, such as using AI to analyze MRI or CAT scans. And for digital healthcare, 54% of respondents said their top use case was clinical decision support, while 54% from the pharmaceutical and biotech fields prioritized drug discovery and development.
AI use cases expected to have the most significant impact in healthcare and life sciences in the next five years include advanced medical imaging and diagnostics (51%), virtual healthcare assistants (34%) and precision medicine — treatment tailored to individual patient characteristics — (29%).
A Growing Dose of Generative AI
Overall, 54% of survey respondents said they’re using generative AI. Of these users, 63% said they’re actively using it, with another 36% assessing the technology through pilots or trials.
Digital healthcare was the leader in generative AI use, according to 71% of respondents from the field. Second was pharmaceutical and biotech at 69%, then medical technologies at 60%, and payers and providers at 44%.
Among all generative AI use cases, coding and document summarization — specific to clinical notes — was the top use case, at 55%. Medical chatbots and AI agents were second, at 53%, and literature analysis was third, at 45%. One notable exception was within the pharmaceutical biotech industry segment, in which respondents stated that drug discovery was the top generative AI use case, at 62%.
Download the “State of AI in Healthcare and Life Sciences: 2025 Trends” report for in-depth results and insights.
Explore NVIDIA’s AI technologies and platforms for healthcare, and sign up for NVIDIA’s healthcare newsletter to stay up to date.