Thousands of NVIDIA Grace Blackwell GPUs Now Live at CoreWeave, Propelling Development for AI Pioneers

Thousands of NVIDIA Grace Blackwell GPUs Now Live at CoreWeave, Propelling Development for AI Pioneers

CoreWeave today became one of the first cloud providers to bring NVIDIA GB200 NVL72 systems online for customers at scale, and AI frontier companies Cohere, IBM and Mistral AI are already using them to train and deploy next-generation AI models and applications.

CoreWeave, the first cloud provider to make NVIDIA Grace Blackwell generally available, has already shown incredible results in MLPerf benchmarks with NVIDIA GB200 NVL72 — a powerful rack-scale accelerated computing platform designed for reasoning and AI agents. Now, CoreWeave customers are gaining access to thousands of NVIDIA Blackwell GPUs.

“We work closely with NVIDIA to quickly deliver to customers the latest and most powerful solutions for training AI models and serving inference,” said Mike Intrator, CEO of CoreWeave. “With new Grace Blackwell rack-scale systems in hand, many of our customers will be the first to see the benefits and performance of AI innovators operating at scale.”

Thousands of NVIDIA Blackwell GPUs are now turning raw data into intelligence at unprecedented speed, with many more coming online soon.

The ramp-up for customers of cloud providers like CoreWeave is underway. Systems built on NVIDIA Grace Blackwell are in full production, transforming cloud data centers into AI factories that manufacture intelligence at scale and convert raw data into real-time insights with speed, accuracy and efficiency.

Leading AI companies around the world are now putting GB200 NVL72’s capabilities to work for AI applications, agentic AI and cutting-edge model development.

Personalized AI Agents

Cohere is using its Grace Blackwell Superchips to help develop secure enterprise AI applications powered by leading-edge research and model development techniques. Its enterprise AI platform, North, enables teams to build personalized AI agents to securely automate enterprise workflows, surface real-time insights and more.

With NVIDIA GB200 NVL72 on CoreWeave, Cohere is already experiencing up to 3x more performance in training for 100 billion-parameter models compared with previous-generation NVIDIA Hopper GPUs — even without Blackwell-specific optimizations.

With further optimizations taking advantage of GB200 NVL72’s large unified memory, FP4 precision and a 72-GPU NVIDIA NVLink domain — where every GPU is connected to operate in concert — Cohere is getting dramatically higher throughput with shorter time to first and subsequent tokens for more performant, cost-effective inference.

“With access to some of the first NVIDIA GB200 NVL72 systems in the cloud, we are pleased with how easily our workloads port to the NVIDIA Grace Blackwell architecture,” said Autumn Moulder, vice president of engineering at Cohere. “This unlocks incredible performance efficiency across our stack — from our vertically integrated North application running on a single Blackwell GPU to scaling training jobs across thousands of them. We’re looking forward to achieving even greater performance with additional optimizations soon.”

AI Models for Enterprise 

IBM is using one of the first deployments of NVIDIA GB200 NVL72 systems, scaling to thousands of Blackwell GPUs on CoreWeave, to train its next-generation Granite models, a series of open-source, enterprise-ready AI models. Granite models deliver state-of-the-art performance while maximizing safety, speed and cost efficiency. The Granite model family is supported by a robust partner ecosystem that includes leading software companies embedding large language models into their technologies.

Granite models provide the foundation for solutions like IBM watsonx Orchestrate, which enables enterprises to build and deploy powerful AI agents that automate and accelerate workflows across the enterprise.

CoreWeave’s NVIDIA GB200 NVL72 deployment for IBM also harnesses the IBM Storage Scale System, which delivers exceptional high-performance storage for AI. CoreWeave customers can access the IBM Storage platform within CoreWeave’s dedicated environments and AI cloud platform.

“We are excited to see the acceleration that NVIDIA GB200 NVL72 can bring to training our Granite family of models,” said Sriram Raghavan, vice president of AI at IBM Research. “This collaboration with CoreWeave will augment IBM’s capabilities to help build advanced, high-performance and cost-efficient models for powering enterprise and agentic AI applications with IBM watsonx.”

Compute Resources at Scale

Mistral AI is now getting its first thousand Blackwell GPUs to build the next generation of open-source AI models.

Mistral AI, a Paris-based leader in open-source AI, is using CoreWeave’s infrastructure, now equipped with GB200 NVL72, to speed up the development of its language models. With models like Mistral Large delivering strong reasoning capabilities, Mistral needs fast computing resources at scale.

To train and deploy these models effectively, Mistral AI requires a cloud provider that offers large, high-performance GPU clusters with NVIDIA Quantum InfiniBand networking and reliable infrastructure management. CoreWeave’s experience standing up NVIDIA GPUs at scale with industry-leading reliability and resiliency through tools such as CoreWeave Mission Control met these requirements.

“Right out of the box and without any further optimizations, we saw a 2x improvement in performance for dense model training,” said Thimothee Lacroix, cofounder and chief technology officer at Mistral AI. “What’s exciting about NVIDIA GB200 NVL72 is the new possibilities it opens up for model development and inference.”

A Growing Number of Blackwell Instances

In addition to long-term customer solutions, CoreWeave offers instances with rack-scale NVIDIA NVLink across 72 NVIDIA Blackwell GPUs and 36 NVIDIA Grace CPUs, scaling to up to 110,000 GPUs with NVIDIA Quantum-2 InfiniBand networking.

These instances, accelerated by the NVIDIA GB200 NVL72 rack-scale accelerated computing platform, provide the scale and performance needed to build and deploy the next generation of AI reasoning models and agents.

Read More

Everywhere, All at Once: NVIDIA Drives the Next Phase of AI Growth

Everywhere, All at Once: NVIDIA Drives the Next Phase of AI Growth

Every company and country wants to grow and create economic opportunity — but they need virtually limitless intelligence to do so. Working with its ecosystem partners, NVIDIA this week is underscoring its work advancing reasoning, AI models and compute infrastructure to manufacture intelligence in AI factories — driving the next phase of growth in the U.S. and around the world.

Yesterday, NVIDIA announced it will manufacture AI supercomputers in the U.S. for the first time. Within the next four years, the company plans with its partners to produce up to half a trillion dollars of AI infrastructure in the U.S.

Building NVIDIA AI supercomputers in the U.S. for American AI factories is expected to create opportunities for hundreds of thousands of people and drive trillions of dollars in growth over the coming decades. Some of the NVIDIA Blackwell compute engines at the heart of those AI supercomputers are already being produced at TSMC fabs in Arizona.

NVIDIA announced today that NVIDIA Blackwell GB200 NVL72 rack-scale systems are now available from CoreWeave for customers to train next-generation AI models and run applications at scale. CoreWeave has thousands of NVIDIA Grace Blackwell processors available now to train and deploy the next wave of AI.

Beyond hardware innovation, NVIDIA also pioneers AI software to create more efficient and intelligent models.

Marking the latest in those advances, the NVIDIA Llama Nemotron Ultra model was recognized today by Artificial Analysis as the world’s most accurate open-source reasoning model for scientific and complex coding tasks. It’s also now ranked among the top reasoning models in the world.

NVIDIA’s engineering feats serve as the foundation of it all. A team of NVIDIA engineers won first place in the AI Mathematical Olympiad, competing against 2,200 teams to solve complex mathematical reasoning problems, which are key to advancing scientific discovery, disciplines and domains. The same post-training techniques and open datasets from NVIDIA’s winning effort in the math reasoning competition were applied in training the Llama Nemotron Ultra model.

The world’s need for intelligence is virtually limitless, and NVIDIA’s AI platform is helping meet that need — everywhere, all at once.

Read More

Math Test? No Problems: NVIDIA Team Scores Kaggle Win With Reasoning Model

Math Test? No Problems: NVIDIA Team Scores Kaggle Win With Reasoning Model

The final days of the AI Mathematical Olympiad’s latest competition were a transcontinental relay for team NVIDIA.

Every evening, two team members on opposite ends of the U.S. would submit an AI reasoning model to Kaggle — the online Olympics of data science and machine learning. They’d wait a tense five hours before learning how well the model tackled a sample set of 50 complex math problems.

After seeing the results, the U.S. team would pass the baton to teammates waking up in Armenia, Finland, Germany and Northern Ireland, who would spend their day testing, modifying and optimizing different model versions.

“Every night I’d be so disappointed in our score, but then I’d wake up and see the messages that came in overnight from teammates in Europe,” said Igor Gitman, senior applied scientist. “My hopes would go up and we’d try again.”

While the team was disheartened by their lack of improvement on the public dataset during the competition’s final days, the real test of an AI model is how well it can generalize to unseen data. That’s where their reasoning model leapt to the top of the leaderboard — correctly answering 34 out of 50 Olympiad questions within a five-hour time limit using a cluster of four NVIDIA L4 GPUs.

“We got the magic in the end,” said Northern Ireland-based team member Darragh Hanley, a Kaggle grandmaster and senior large language model (LLM) technologist.

Building a Winning Equation

The NVIDIA team competed under the name NemoSkills — a nod to their use of the NeMo-Skills collection of pipelines for accelerated LLM training, evaluation and inference. The seven members each contributed different areas of expertise, spanning LLM training, model distillation and inference optimization.

For the Kaggle challenge, over 2,200 participating teams submitted AI models tasked with solving 50 math questions — complex problems at the National Olympiad level, spanning algebra, geometry, combinatorics and number theory — within five hours.

The team’s winning model uses a combination of natural language reasoning and Python code execution.

To complete this inference challenge on the small cluster of NVIDIA L4 GPUs available via Kaggle, the NemoSkills team had to get creative.

Their winning model used Qwen2.5-14B-Base, a foundation model with chain-of-thought reasoning capabilities which the team fine-tuned on millions of synthetically generated solutions to math problems.

These synthetic solutions were primarily generated by two larger reasoning models — DeepSeek-R1 and QwQ-32B — and used to teach the team’s foundation model via a form of knowledge distillation. The end result was a smaller, faster, long-thinking model capable of tackling complex problems using a combination of natural language reasoning and Python code execution.

To further boost performance, the team’s solution reasons through multiple long-thinking responses in parallel before determining a final answer. To optimize this process and meet the competition’s time limit, the team also used an innovative early-stopping technique.

A reasoning model might, for example, be set to answer a math problem 12 different times before picking the most common response. Using the asynchronous processing capabilities of NeMo-Skills and NVIDIA TensorRT-LLM, the team was able to monitor and exit inference early if the model had already converged at the correct answer four or more times.

TensorRT-LLM also enabled the team to harness FP8 quantization, a compression method that resulted in a 1.5x speedup over using the more commonly used FP16 format. ReDrafter, a speculative decoding technique developed by Apple, was used for a further 1.8x speedup.

The final model performed even better on the competition’s unseen final dataset than it did on the public dataset — a sign that the team successfully built a generalizable model and avoided overfitting their LLM to the sample data.

“Even without the Kaggle competition, we’d still be working to improve AI reasoning models for math,” said Gitman. “But Kaggle gives us the opportunity to benchmark and discover how well our models generalize to a third-party dataset.”

Sharing the Wealth 

The team will soon release a technical report detailing the techniques used in their winning solution — and plans to share their dataset and a series of models on Hugging Face. The advancements and optimizations they made over the course of the competition have been integrated into NeMo-Skills pipelines available on GitHub.

Key data, technology, and insights from this pipeline were also used to train the just-released NVIDIA Llama Nemotron Ultra model.

“Throughout this collaboration, we used tools across the NVIDIA software stack,” said Christof Henkel, a member of the Kaggle Grandmasters of NVIDIA, known as KGMON. “By working closely with our LLM research and development teams, we’re able to take what we learn from the competition on a day-to-day basis and push those optimizations into NVIDIA’s open-source libraries.”

After the competition win, Henkel regained the title of Kaggle World Champion — ranking No. 1 among the platform’s over 23 million users. Another teammate, Finland-based Ivan Sorokin, earned the Kaggle Grandmaster title, held by just over 350 people around the world.

For their first-place win, the group also won a $262,144 prize that they’re directing to the NVIDIA Foundation to support charitable organizations.

Meet the full team — Igor Gitman, Darragh Hanley, Christof Henkel, Ivan Moshkov, Benedikt Schifferer, Ivan Sorokin and Shubham Toshniwal — in the video below:

Sample math questions in the featured visual above are from the 2025 American Invitational Mathematics Examination. Find the full set of questions and solutions on the Art of Problem Solving wiki

Read More

Clario enhances the quality of the clinical trial documentation process with Amazon Bedrock

Clario enhances the quality of the clinical trial documentation process with Amazon Bedrock

This post is co-written with Kim Nguyen and Shyam Banuprakash from Clario.

Clario is a leading provider of endpoint data solutions to the clinical trials industry, generating high-quality clinical evidence for life sciences companies seeking to bring new therapies to patients. Since Clario’s founding more than 50 years ago, the company’s endpoint data solutions have supported clinical trials more than 26,000 times with over 700 regulatory approvals across more than 100 countries. One of the critical challenges Clario faces when supporting its clients is the time-consuming process of generating documentation for clinical trials, which can take weeks.

The business challenge

When medical imaging analysis is part of a clinical trial it is supporting, Clario prepares a medical imaging charter process document that outlines the format and requirements of the central review of clinical trial images (the Charter). Based on the Charter, Clario’s imaging team creates several subsequent documents (as shown in the following figure), including the business requirement specification (BRS), training slides, and ancillary documents. The content of these documents is largely derived from the Charter, with significant reformatting and rephrasing required. This process is time-consuming, can be subject to inadvertent manual error, and carries the risk of inconsistent or redundant information, which can delay or otherwise negatively impact the clinical trial.

Document Flow

Clario’s imaging team recognized the need to modernize the document generation process and streamline the processes used to create end-to-end document workflows. Clario engaged with their AWS account team and AWS Generative AI Innovation Center to explore how generative AI could help streamline the process.

The solution

The AWS team worked closely with Clario to develop a prototype solution that uses AWS AI services to automate the BRS generation process. The solution involves the following key services:

  • Amazon Simple Storage Service (Amazon S3): A scalable object storage service used to store the charter-derived and generated BRS documents.
  • Amazon OpenSearch Serverless: An on-demand serverless configuration for Amazon OpenSearch Service used as a vector store.
  • Amazon Bedrock: Amazon Bedrock is a fully managed service that offers a choice of high-performing foundation models (FMs) from leading AI companies through a single API, along with a broad set of capabilities you need to build generative AI applications with security, privacy, and responsible AI. Using Amazon Bedrock, you can experiment with and evaluate top FMs for your use case, privately customize them with your data using techniques such as fine-tuning and Retrieval Augmented Generation (RAG) and build agents that execute tasks using your enterprise systems and data sources.

The solution is shown in the following figure:

Solution Overview

Architecture walkthrough

  1. Charter-derived documents are processed in an on-premises script in preparation for uploading.
  2. Files are sent to AWS using AWS Direct Connect.
  3. The script chunks the documents and calls an embedding model to produce the document embeddings. It then stores the embeddings in an OpenSearch vector database for retrieval by our application. Clario uses an Amazon Titan Text Embeddings model offered by Amazon Bedrock. Each chunk is called to produce an embedding.
  4. Amazon OpenSearch Serverlessis used as the durable vector store. Document chunk embeddings are stored in an OpenSearch vector index, which enables the application to search for the most semantically relevant documents. Clario also stores attributes for the source document and associated trial to allow for a richer search experience.
  5. A custom build user interface is the primary access point for users to access the system, initiate generation jobs, and interact with a chat UI. The UI is integrated with the workflow engine that manages the orchestration process.
  6. The workflow engine calls the Amazon Bedrock API and orchestrates the business requirement specification document generation process. The engine:
    • Uses a global specification that stores the prompts to be used as input when calling the large language model.
    • Queries OpenSearch for the relevant Imaging charter.
    • Loops through every business requirement.
    • Calls the Claude 3.7 Sonnet large language model from Amazon Bedrock to generate responses.
  7. Outputs the business requirement specification document to the user interface, where a business requirement writer can review the answers to produce a final document. Clario uses Claude 3.7 Sonnet from Amazon Bedrock for the question-answering and the conversational AI application.
  8. The final documents are written to Amazon S3 to be consumed and published by additional document workflows that will be built in the future.
  9. An as-needed AI chat agent to allow document-based discovery and enable users to converse with one or more documents.

Benefits and results

By using AWS AI services, Clario has streamlined the complicated BRS generation process significantly. The prototype solution demonstrated the following benefits:

  • Improved accuracy: The use of generative AI models minimized the risk of translation errors and inconsistencies, reducing the need for rework and study delays.
  • Scalability and flexibility: The serverless architecture provided by AWS services allows the solution to scale seamlessly as demand increases, while the modular design enables straightforward integration with other Clario systems.
  • Security: Clario’s data security strategy revolves around confining all its information within the secure AWS ecosystem using the security features of Amazon Bedrock. By keeping data isolated within the AWS infrastructure, Clario helps ensure protection against external threats and unauthorized access. This approach enables Clario to meet compliance requirements and provide clients with confidence in the confidentiality and integrity of their sensitive data.

Lessons learned

The successful implementation of this prototype solution reinforced the value of using generative AI models for domain-specific applications like those prevalent in the life sciences industry. It also highlighted the importance of involving business stakeholders early in the process and having a clear understanding of the business value to be realized. Following the success of this project, Clario is working to productionize the solution in their Medical Imaging business during 2025 to continue offering state-of-the-art services to its customers for best quality data and successful clinical trials.

Conclusion

The collaboration between Clario and AWS demonstrated the potential of AWS AI and machine learning (AI/ML) services and generative AI models, such as Anthropic’s Claude, to streamline document generation processes in the life sciences industry and, specifically, for complicated clinical trial processes. By using these technologies, Clario was able to enhance and streamline the BRS generation process significantly, improving accuracy and scalability. As Clario continues to adopt AI/ML across its operations, the company is well-positioned to drive innovation and deliver better outcomes for its partners and patients.


About the Authors

Kim Nguyen serves as the Sr Director of Data Science at Clario, where he leads a team of data scientists in developing innovative AI/ML solutions for the healthcare and clinical trials industry. With over a decade of experience in clinical data management and analytics, Kim has established himself as an expert in transforming complex life sciences data into actionable insights that drive business outcomes. His career journey includes leadership roles at Clario and Gilead Sciences, where he consistently pioneered data automation and standardization initiatives across multiple functional teams. Kim holds a Master’s degree in Data Science and Engineering from UC San Diego and a Bachelor’s degree from the University of California, Berkeley, providing him with the technical foundation to excel in developing predictive models and data-driven strategies. Based in San Diego, California, he leverages his expertise to drive forward-thinking approaches to data science in the clinical research space.

Shyam Banuprakash serves as the Senior Vice President of Data Science and Delivery at Clario, where he leads complex analytics programs and develops innovative data solutions for the medical imaging sector. With nearly 12 years of progressive experience at Clario, he has demonstrated exceptional leadership in data-driven decision making and business process improvement. His expertise extends beyond his primary role, as he contributes his knowledge as an Advisory Board Member for both Modal and UC Irvine’s Customer Experience Program. Shyam holds a Master of Advanced Study in Data Science and Engineering from UC San Diego, complemented by specialized training from MIT in data science and big data analytics. His career exemplifies the powerful intersection of healthcare, technology, and data science, positioning him as a thought leader in leveraging analytics to transform clinical research and medical imaging.

John O’Donnell is a Principal Solutions Architect at Amazon Web Services (AWS) where he provides CIO-level engagement and design for complex cloud-based solutions in the healthcare and life sciences (HCLS) industry. With over 20 years of hands-on experience, he has a proven track record of delivering value and innovation to HCLS customers across the globe. As a trusted technical leader, he has partnered with AWS teams to dive deep into customer challenges, propose outcomes, and ensure high-value, predictable, and successful cloud transformations. John is passionate about helping HCLS customers achieve their goals and accelerate their cloud native modernization efforts.

Praveen Haranahalli is a Senior Solutions Architect at Amazon Web Services (AWS) where he provides expert guidance and architects secure, scalable cloud solutions for diverse enterprise customers. With nearly two decades of IT experience, including over ten years specializing in Cloud Computing, he has a proven track record of delivering transformative cloud implementations across multiple industries. As a trusted technical advisor, Praveen has successfully partnered with customers to implement robust DevSecOps pipelines, establish comprehensive security guardrails, and develop innovative AI/ML solutions. Praveen is passionate about solving complex business challenges through cutting-edge cloud architectures and helping organizations achieve successful digital transformations powered by artificial intelligence and machine learning technologies.

Read More

Optimizing Mixtral 8x7B on Amazon SageMaker with AWS Inferentia2

Optimizing Mixtral 8x7B on Amazon SageMaker with AWS Inferentia2

Organizations are constantly seeking ways to harness the power of advanced large language models (LLMs) to enable a wide range of applications such as text generation, summarizationquestion answering, and many others. As these models grow more powerful and capable, deploying them in production environments while optimizing performance and cost-efficiency becomes more challenging.

Amazon Web Services (AWS) provides highly optimized and cost-effective solutions for deploying AI models, like the Mixtral 8x7B language model, for inference at scale. The AWS Inferentia and AWS Trainium are AWS AI chips, purpose-built to deliver high throughput and low latency inference and training performance for even the largest deep learning models. The Mixtral 8x7B model adopts the Mixture-of-Experts (MoE) architecture with eight experts. AWS Neuron—the SDK used to run deep learning workloads on AWS Inferentia and AWS Trainium based instances—employs expert parallelism for MoE architecture, sharding the eight experts across multiple NeuronCores.

This post demonstrates how to deploy and serve the Mixtral 8x7B language model on AWS Inferentia2 instances for cost-effective, high-performance inference. We’ll walk through model compilation using Hugging Face Optimum Neuron, which provides a set of tools enabling straightforward model loading, training, and inference, and the Text Generation Inference (TGI) Container, which has the toolkit for deploying and serving LLMs with Hugging Face. This will be followed by deployment to an Amazon SageMaker real-time inference endpoint, which automatically provisions and manages the Inferentia2 instances behind the scenes and provides a containerized environment to run the model securely and at scale.

While pre-compiled model versions exist, we’ll cover the compilation process to illustrate important configuration options and instance sizing considerations. This end-to-end guide combines Amazon Elastic Compute Cloud (Amazon EC2)-based compilation with SageMaker deployment to help you use Mixtral 8x7B’s capabilities with optimal performance and cost efficiency.

Step 1: Set up Hugging Face access

Before you can deploy the Mixtral 8x7B model, there some prerequisites that you need to have in place.

  • The model is hosted on Hugging Face and uses their transformers library. To download and use the model, you need to authenticate with Hugging Face using a user access token. These tokens allow secure access for applications and notebooks to Hugging Face’s services. You first need to create a Hugging Face account if you don’t already have one, which you can then use to generate and manage your access tokens through the user settings.
  • The mistralai/Mixtral-8x7B-Instruct-v0.1 model that you will be working with in this post is a gated model. This means that you need to specifically request access from Hugging Face before you can download and work with the model.

Step 2: Launch an Inferentia2-powered EC2 Inf2 instance

To get started with an Amazon EC2 Inf2 instance for deploying the Mixtral 8x7B, either deploy the AWS CloudFormation template or use the AWS Management Console.

To launch an Inferentia2 instance using the console:

  1. Navigate to the Amazon EC2 console and choose Launch Instance.
  2. Enter a descriptive name for your instance.
  3. Under the Application and OS Images search for and select the Hugging Face Neuron Deep Learning AMI, which comes pre-configured with the Neuron software stack for AWS Inferentia.
  4. For Instance type, select 24xlarge, which contains six Inferentia chips (12 NeuronCores).
  5. Create or select an existing key pair to enable SSH access.
  6. Create or select a security group that allows inbound SSH connections from the internet.
  7. Under Configure Storage, set the root EBS volume to 512 GiB to accommodate the large model size.
  8. After the settings are reviewed, choose Launch Instance.

With your Inf2 instance launched, connect to it over SSH by first locating the public IP or DNS name in the Amazon EC2 console. Later in this post, you will connect to a Jupyter notebook using a browser on port 8888. To do that, SSH tunnel to the instance using the key pair you configured during instance creation.

ssh -i "<pem file>" ubuntu@<instance DNS name> -L 8888:127.0.0.1:8888

After signing in, list the NeuronCores attached to the instance and their associated topology:

neuron-ls

For inf2.24xlarge, you should see the following output listing six Neuron devices:

instance-type: inf2.24xlarge
instance-id: i-...
+--------+--------+--------+-----------+---------+
| NEURON | NEURON | NEURON | CONNECTED |   PCI   |
| DEVICE | CORES  | MEMORY |  DEVICES  |   BDF   |
+--------+--------+--------+-----------+---------+
| 0      | 2      | 32 GB  | 1         | 10:1e.0 |
| 1      | 2      | 32 GB  | 0, 2      | 20:1e.0 |
| 2      | 2      | 32 GB  | 1, 3      | 10:1d.0 |
| 3      | 2      | 32 GB  | 2, 4      | 20:1f.0 |
| 4      | 2      | 32 GB  | 3, 5      | 10:1f.0 |
| 5      | 2      | 32 GB  | 4         | 20:1d.0 |
+--------+--------+--------+-----------+---------+

For more information on the neuron-ls command, see the Neuron LS User Guide.

Make sure the Inf2 instance is sized correctly to host the model. Each Inferentia NeuronCore processor contains 16 GB of high-bandwidth memory (HBM). To accommodate an LLM like the Mixtral 8x7B on AWS Inferentia2 (inf2) instances, a technique called tensor parallelism is used. This allows the model’s weights, activations, and computations to be split and distributed across multiple NeuronCores in parallel. To determine the degree of tensor parallelism required, you need to calculate the total memory footprint of the model. This can be computed as:

total memory = bytes per parameter * number of parameters

The Mixtral-8x7B model consists of 46.7 billion parameters. With float16 casted weights, you need 93.4 GB to store the model weights. The total space required is often greater than just the model parameters because of caching attention layer projections (KV caching). This caching mechanism grows memory allocations linearly with sequence length and batch size. With a batch size of 1 and a sequence length of 1024 tokens, the total memory footprint for the caching is 0.5 GB. The exact formula can be found in the AWS Neuron documentation and the hyper-parameter configuration required for these calculations is stored in the model config.json file.

Given that each NeuronCore has 16 GB of HBM, and the model requires approximately 94 GB of memory, a minimum tensor parallelism degree of 6 would theoretically suffice. However, with 32 attention heads, the tensor parallelism degree must be a divisor of this number.

Furthermore, considering the model’s size and the MoE implementation in transformers-neuronx, the supported tensor parallelism degrees are limited to 8, 16, and 32. For the example in this post, you will distribute the model across eight NeuronCores.

Compile Mixtral-8x7B model to AWS Inferentia2

The Neuron SDK includes a specialized compiler that automatically optimizes the model format for efficient execution on AWS Inferentia2.

  1. To start this process, launch the container and pass the Inferentia devices to the container. For more information about launching the neuronx-tgi container see Deploy the Text Generation Inference (TGI) Container on a dedicated host.
docker run -it --entrypoint /bin/bash 
  --net=host -v $(pwd):$(pwd) -w $(pwd) 
  --device=/dev/neuron0 
  --device=/dev/neuron1 
  --device=/dev/neuron2 
  --device=/dev/neuron3 
  --device=/dev/neuron4 
  --device=/dev/neuron5 
  ghcr.io/huggingface/neuronx-tgi:0.0.25
  1. Inside the container, sign in to the Hugging Face Hub to access gated models, such as the Mixtral-8x7B-Instruct-v0.1. See the previous section for Setup Hugging Face Access. Make sure to use a token with read and write permissions so you can later save the compiled model to the Hugging Face Hub.
huggingface-cli login --token hf_...
  1. After signing in, compile the model with optimum-cli. This process will download the model artifacts, compile the model, and save the results in the specified directory.
  2. The Neuron chips are designed to execute models with fixed input shapes for optimal performance. This requires that the compiled artifact shapes must be known at compilation time. In the following command, you will set the batch size, input/output sequence length, data type, and tensor-parallelism degree (number of neuron cores). For more information about these parameters, see Export a model to Inferentia.

Let’s discuss these parameters in more detail:

  • The parameter batch_size is the number of input sequences that the model will accept.
  • sequence_length specifies the maximum number of tokens in an input sequence. This affects memory usage and model performance during inference or training on Neuron hardware. A larger number will increase the model’s memory requirements because the attention mechanism needs to operate over the entire sequence, which leads to more computations and memory usage; while a smaller number will do the opposite. The value 1024 will be adequate for this example.
  • auto_cast_type parameter controls quantization. It allows type casting for model weights and computations during inference. The options are: bf16, fp16, or tf32. For more information about defining which lower-precision data type the compiler should use see Mixed Precision and Performance-accuracy Tuning. For models trained in float32, the 16-bit mixed precision options (bf16, f16) generally provide sufficient accuracy while significantly improving performance. We use data type float16 with the argument auto_cast_type fp16.
  • The num_cores parameter controls the number of cores on which the model should be deployed. This will dictate the number of parallel shards or partitions the model is split into. Each shard is then executed on a separate NeuronCore, taking advantage of the 16 GB high-bandwidth memory available per core. As discussed in the previous section, given the Mixtral-8x7B model’s requirements, Neuron supports 8, 16, or 32 tensor parallelism The inf2.24xlarge instance contains 12 Inferentia NeuronCores. Therefore, to optimally distribute the model, we set num_cores to 8.
optimum-cli export neuron 
  --model mistralai/Mixtral-8x7B-Instruct-v0.1 
  --batch_size 1 
  --sequence_length 1024 
  --auto_cast_type fp16 
  --num_cores 8 
  ./neuron_model_path
  1. Download and compilation should take 10–20 minutes. After the compilation completes successfully, you can check the artifacts created in the output directory:
neuron_model_path
├── compiled
│ ├── 2ea52780bf51a876a581.neff
│ ├── 3fe4f2529b098b312b3d.neff
│ ├── ...
│ ├── ...
│ ├── cfda3dc8284fff50864d.neff
│ └── d6c11b23d8989af31d83.neff
├── config.json
├── generation_config.json
├── special_tokens_map.json
├── tokenizer.json
├── tokenizer.model
└── tokenizer_config.json
  1. Push the compiled model to the Hugging Face Hub with the following command. Make sure to change <user_id> to your Hugging Face username. If the model repository doesn’t exist, it will be created automatically. Alternatively, store the model on Amazon Simple Storage Service (Amazon S3).

huggingface-cli upload <user_id>/Mixtral-8x7B-Instruct-v0.1 ./neuron_model_path ./

Deploy Mixtral-8x7B SageMaker real-time inference endpoint

Now that the model has been compiled and stored, you can deploy it for inference using SageMaker. To orchestrate the deployment, you will run Python code from a notebook hosted on an EC2 instance. You can use the instance created in the first section or create a new instance. Note that this EC2 instance can be of any type (for example t2.micro with an Amazon Linux 2023 image). Alternatively, you can use a notebook hosted in Amazon SageMaker Studio.

Set up AWS authorization for SageMaker deployment

You need AWS Identity and Access Management (IAM) permissions to manage SageMaker resources. If you created the instance with the provided CloudFormation template, these permissions are already created for you. If not, the following section takes you through the process of setting up the permissions for an EC2 instance to run a notebook that deploys a real-time SageMaker inference endpoint.

Create an AWS IAM role and attach SageMaker permission policy

  1. Go to the IAM console.
  2. Choose the Roles tab in the navigation pane.
  3. Choose Create role.
  4. Under Select trusted entity, select AWS service.
  5. Choose Use case and select EC2.
  6. Select EC2 (Allows EC2 instances to call AWS services on your behalf.)
  7. Choose Next: Permissions.
  8. In the Add permissions policies screen, select AmazonSageMakerFullAccess and IAMReadOnlyAccess. Note that the AmazonSageMakerFullAccess permission is overly permissive. We use it in this example to simplify the process but recommend applying the principle of least privilege when setting up IAM permissions.
  9. Choose Next: Review.
  10. In the Role name field, enter a role name.
  11. Choose Create role to complete the creation.
  12. With the role created, choose the Roles tab in the navigation pane and select the role you just created.
  13. Choose the Trust relationships tab and then choose Edit trust policy.
  14. Choose Add next to Add a principal.
  15. For Principal type, select AWS services.
  16. Enter sagemaker.amazonaws.com and choose Add a principal.
  17. Choose Update policy. Your trust relationship should look like the following:
{
    "Version": "2012-10-17",
    "Statement": [
    {
        "Effect": "Allow",
        "Principal": {
            "Service": [
                "ec2.amazonaws.com",
                "sagemaker.amazonaws.com"
            ]
        },
        "Action": "sts:AssumeRole"
        }
    ]
}

Attach the IAM role to your EC2 instance

  1. Go to the Amazon EC2 console.
  2. Choose Instances in the navigation pane.
  3. Select your EC2 instance.
  4. Choose Actions, Security, and then Modify IAM role.
  5. Select the role you created in the previous step.
  6. Choose Update IAM role.

Launch a Jupyter notebook

Your next goal is to run a Jupyter notebook hosted in a container running on the EC2 instance. The notebook will be run using a browser on port 8888 by default. For this example, you will use SSH port forwarding from your local machine to the instance to access the notebook.

  1. Continuing from the previous section, you are still within the container. The following steps install Jupyter Notebook:
pip install ipykernel
python3 -m ipykernel install --user --name aws_neuron_venv_pytorch --display-name "Python Neuronx"
pip install jupyter notebook
pip install environment_kernels
  1. Launch the notebook server using:
jupyter notebook
  1. Then connect to the notebook using your browser over SSH tunneling

http://localhost:8888/tree?token=…

If you get a blank screen, try opening this address using your browser’s incognito mode.

Deploy the model for inference with SageMaker

After connecting to Jupyter Notebook, follow this notebook. Alternatively, choose File, NewNotebook, and then select Python 3 as the kernel. Use the following instructions and run the notebook cells.

  1. In the notebook, install the sagemaker and huggingface_hub libraries.
!pip install sagemaker
  1. Next, get a SageMaker session and execution role that will allow you to create and manage SageMaker resources. You’ll use a Deep Learning Container.
import os
import sagemaker
from sagemaker.huggingface import get_huggingface_llm_image_uri

os.environ['AWS_DEFAULT_REGION'] = 'us-east-1'

sess = sagemaker.Session()
role = sagemaker.get_execution_role()
print(f"sagemaker role arn: {role}")

# retrieve the llm image uri
llm_image = get_huggingface_llm_image_uri(
	"huggingface-neuronx",
	version="0.0.25"
)

# print ecr image uri
print(f"llm image uri: {llm_image}")
  1. Deploy the compiled model to a SageMaker real-time endpoint on AWS Inferentia2.

Change user_id in the following code to your Hugging Face username. Make sure to update HF_MODEL_ID and HUGGING_FACE_HUB_TOKEN with your Hugging Face username and your access token.

from sagemaker.huggingface import HuggingFaceModel

# sagemaker config
instance_type = "ml.inf2.24xlarge"
health_check_timeout=2400 # additional time to load the model
volume_size=512 # size in GB of the EBS volume

# Define Model and Endpoint configuration parameter
config = {
	"HF_MODEL_ID": "user_id/Mixtral-8x7B-Instruct-v0.1", # replace with your model id if you are using your own model
	"HF_NUM_CORES": "4", # number of neuron cores
	"HF_AUTO_CAST_TYPE": "fp16",  # dtype of the model
	"MAX_BATCH_SIZE": "1", # max batch size for the model
	"MAX_INPUT_LENGTH": "1000", # max length of input text
	"MAX_TOTAL_TOKENS": "1024", # max length of generated text
	"MESSAGES_API_ENABLED": "true", # Enable the messages API
	"HUGGING_FACE_HUB_TOKEN": "hf_..." # Add your Hugging Face token here
}

# create HuggingFaceModel with the image uri
llm_model = HuggingFaceModel(
	role=role,
	image_uri=llm_image,
	env=config
)
  1. You’re now ready to deploy the model to a SageMaker real-time inference endpoint. SageMaker will provision the necessary compute resources instance and retrieve and launch the inference container. This will download the model artifacts from your Hugging Face repository, load the model to the Inferentia devices and start inference serving. This process can take several minutes.
# Deploy model to an endpoint
# https://sagemaker.readthedocs.io/en/stable/api/inference/model.html#sagemaker.model.Model.deploy

llm_model._is_compiled_model = True # We precompiled the model

llm = llm_model.deploy(
	initial_instance_count=1,
	instance_type=instance_type,
	container_startup_health_check_timeout=health_check_timeout,
	volume_size=volume_size
)
  1. Next, run a test to check the endpoint. Update user_id to match your Hugging Face username, then create the prompt and parameters.
# Prompt to generate
messages=[
	{ "role": "system", "content": "You are a helpful assistant." },
	{ "role": "user", "content": "What is deep learning?" }
]

# Generation arguments
parameters = {
	"model": "user_id/Mixtral-8x7B-Instruct-v0.1", # replace user_id
	"top_p": 0.6,
	"temperature": 0.9,
	"max_tokens": 1000,
}
  1. Send the prompt to the SageMaker real-time endpoint for inference
chat = llm.predict({"messages" :messages, **parameters})

print(chat["choices"][0]["message"]["content"].strip())
  1. In the future, if you want to connect to this inference endpoint from other applications, first find the name of the inference endpoint. Alternatively, you can use the SageMaker console and choose Inference, and then Endpoints to see a list of the SageMaker endpoints deployed in your account.
endpoints = sess.sagemaker_client.list_endpoints()

for endpoint in endpoints['Endpoints']:
	print(endpoint['EndpointName'])
  1. Use the endpoint name to update the following code, which can also be run in other locations.
from sagemaker.huggingface import HuggingFacePredictor

endpoint_name="endpoint_name..."

llm = HuggingFacePredictor(
	endpoint_name=endpoint_name,
	sagemaker_session=sess
)

Cleanup

Delete the endpoint to prevent future charges for the provisioned resources.

llm.delete_model()
llm.delete_endpoint()

Conclusion

In this post, we covered how to compile and deploy the Mixtral 8x7B language model on AWS Inferentia2 using the Hugging Face Optimum Neuron container and Amazon SageMaker. AWS Inferentia2 offers a cost-effective solution for hosting models like Mixtral, providing high-performance inference at a lower cost.

For more information, see Deploy Mixtral 8x7B on AWS Inferentia2 with Hugging Face Optimum.

For other methods to compile and run Mixtral inference on Inferentia2 and Trainium see the Run Hugging Face mistralai/Mixtral-8x7B-v0.1 autoregressive sampling on Inf2 & Trn1 tutorial located in the AWS Neuron Documentation and Notebook.


About the authors

Headshot of Lior Sadan (author)Lior Sadan is a Senior Solutions Architect at AWS, with an affinity for storage solutions and AI/ML implementations. He helps customers architect scalable cloud systems and optimize their infrastructure. Outside of work, Lior enjoys hands-on home renovation and construction projects.

Headshot of Stenio de Lima Ferreira (author)Stenio de Lima Ferreira is a Senior Solutions Architect passionate about AI and automation. With over 15 years of work experience in the field, he has a background in cloud infrastructure, devops and data science. He specializes in codifying complex requirements into reusable patterns and breaking down difficult topics into accessible content.

Read More

Elevate business productivity with Amazon Q and Amazon Connect

Elevate business productivity with Amazon Q and Amazon Connect

Modern banking faces dual challenges: delivering rapid loan processing while maintaining robust security against sophisticated fraud. Amazon Q Business provides AI-driven analysis of regulatory requirements and lending patterns. Additionally, you can now report fraud from the same interface with a custom plugin capability that can integrate with Amazon Connect. This fusion of technology transforms traditional lending by enabling faster processing times, faster fraud prevention, and a seamless user experience.

Amazon Q Business is a generative AI-powered assistant that can answer questions, provide summaries, generate content, and securely complete tasks based on data and information in your enterprise systems. Amazon Q Business provides plugins to interact with popular third-party applications, such as Jira, ServiceNow, Salesforce, PagerDuty, and more. Administrators can enable these plugins with a ready-to-use library of over 50 actions to their Amazon Q Business application. Where pre-built plugins are not available, Amazon Q Business provides capabilities to build custom plugins to integrate with your application. Plugins help streamline tasks and boost productivity by integrating external services into the Amazon Q Business chat interface.

Amazon Connect is an AI-powered application that provides one seamless experience for your contact center customers and users. It’s comprised of a full suite of features across communication channels. Amazon Connect Cases, a feature of Amazon Connect, allows your agents to track and manage customer issues that require multiple interactions, follow-up tasks, and teams in your contact center. Agents can document customer issues with the relevant case details, such as date/time opened, issue summary, customer information, and status, in a single unified view.

The solution integrates with Okta Identity Management Platform to provide robust authentication, authorization, and single sign-on (SSO) capabilities across applications. Okta can support enterprise federation clients like Active Directory, LDAP, or Ping.

For loan approval officers reviewing mortgage applications, the seamless integration of Amazon Q Business directly into their primary workflow transforms the user experience. Rather than context-switching between applications, officers can harness the capabilities of Amazon Q to conduct research, analyze data, and report potential fraud cases within their mortgage approval interface.

In this post, we demonstrate how to elevate business productivity by leveraging Amazon Q to provide insights that enable research, data analysis, and report potential fraud cases within Amazon Connect.

Solution overview

The following diagram illustrates the solution architecture.

Architecture

The solution includes the following steps:

  1. Users in Okta are configured to be federated to AWS IAM Identity Center, and a unique ID (audience) is configured for an Amazon API Gateway
  2. When the user chooses to chat in the web application, the following flow is initiated:
    1. The Amazon Q Business application uses the client ID and client secret key to exchange the Okta-generated JSON Web Token (JWT) with IAM Identity Center. The token includes the AWS Security Token Service (AWS STS) context identity.
    2. A temporary token is issued to the application server to assume the role and access the Amazon Q Business API.
  3. The Amazon Q Business application fetches information from the Amazon Simple Storage Service (Amazon S3) data source to answer questions or generate summaries.
  4. The Amazon Q custom plugin uses an Open API schema to discover and understand the capabilities of the API Gateway API.
  5. A client secret is stored in AWS Secrets Manager and the information is provided to the plugin.
  6. The plugin assumes the AWS Identity and Access Management (IAM) role with the kms:decrypt action to access the secrets in Secret Manager.
  7. When a user wants to send a case, the custom plugin invokes the API hosted on API Gateway.
  8. API Gateway uses the same Okta user’s session and authorizes the access.
  9. API Gateway invokes AWS Lambda to create a case in Amazon Connect.
  10. Lambda hosted in Amazon Virtual Private Cloud (Amazon VPC) internally calls the Amazon Connect API using an Amazon Connect VPC interface endpoint powered by AWS PrivateLink.
  11. The contact center agents can also use Amazon Q in Connect to further assist the user.

Prerequisites

The following prerequisites need to be met before you can build the solution:

  • Have a valid AWS account.
  • Have an Amazon Q Business Pro subscription to create Amazon Q applications.
  • Have the service-linked IAM role AWSServiceRoleForQBusiness. If you don’t have one, create it with the amazonaws.com service name.
  • Have an IAM role in the account that will allow the AWS CloudFormation template to create new roles and add policies. If you have administrator access to the account, no action is required.
  • Enable logging in AWS CloudTrail for operational and risk auditing.

Okta prerequisites:

  1. Have an Okta developer account and setup an application and API. If you do not have an Okta, please see the following instructions.

Set up an application and API in Okta

Complete the following steps to set up an application and API in Okta:

  1. Log in to the Okta console.
  2. Provide credentials and choose Login.
  3. Choose Continue with Google.
  4. You might need to set up multi-factor authentication following the instructions on the page.
  5. Log in using the authentication code.
  6. In the navigation pane, choose Applications and choose Create App Integration.

Okta Developer edition

  1. Select OIDC – OpenID for Sign-in method and Web Application for Application type, then choose Next.

Create new app integration

  1. For App integration name, enter a name (for example, myConnectApp).
  2. Select Authorization Code and Refresh Token for Grant type.
  3. Select Skip group assignment for now for Control Access.
  4. Choose Save to create an application.
  5. Take note of the client ID and secret.

Add Authentication server and metadata

  1. In the navigation pane, choose Security, then choose API.
  2. Choose Add Authorization Server, provide the necessary details, and choose Save.

Add authorization server

  1. Take note of the Audience value and choose Metadata URI.

Audience is provided as an input to the CloudFormation template later in the section.

add audience and metadata url

The response will provide the metadata.

  1. From the response, take note of the following:
    • issuer
    • authorization_endpoint
    • token_endpoint
  2. Under Scopes, choose Add Scope, provide the name write/tasks, and choose Create.

Add scope

  1. On the Access Policies tab, choose Add Policy.
  2. Provide a name and description.
  3. Select The following clients and choose the application by entering my in the text box and choosing the application created earlier.
  4. Choose Create Policy to add a policy.

add policy

  1. Choose Add Rule to add a rule and select only Authorization Code for Grant type is.
  2. For Scopes requested, select The following scopes, then enter write in the text box and select the write/tasks
  3. Adjust Access token lifetime is and Refresh token lifetime is to minutes.
  4. Add but will expire if not used every as 5 minutes.
  5. Choose Create rule to create the rule.

Add rule

Add users

  1. In the navigation pane, choose Directory and choose People.
  2. Choose Add person.

add person

  1. Complete the fields:
    1. First name
    2. Last name
    3. Username (use the same as the primary email)
    4. Primary email
  2. Select Send user activation email now.
  3. Choose Save to save the user.

add and save person

  1. You will receive an email. Choose the link in the email to activate the user.
  2. Choose Groups, then choose Add group to add the group.
  3. Provide a name and optional description.
  4. Refresh the page and choose the newly created group.
  5. Choose Assign people to assign users.
  6. Add the newly created user by choosing the plus sign next to the user.

assign person

  1. Under Applications, select the application name created earlier.
  2. On the Assignments tab, choose Assign to People.

assign app to people

  1. Select the user and choose Assign.
  2. Choose Done to complete the assignment.

assign user

Set up Okta as an identity source in IAM Identity Center

Complete the following steps to set up Okta as an identity source:

  1. Enable an IAM Identity Center instance.
  2. Configure SAML and SCIM with Okta and IAM Identity Center.
  3. On the IAM Identity Center console, navigate to the instance.
  4. Under Settings, copy the value Instance ARN. You will need it when you run the CloudFormation template.

Deploy resources using AWS CloudFormation

In this step, we use a CloudFormation template to deploy a Lambda function, configure the REST API, and create identities. Complete the following steps:

  1. Open the AWS CloudFormation console in the us-east-1 AWS Region.
  2. Choose Create stack.
  3. Download the CloudFormation template and upload it in the Specify template
  4. Choose Next.
  5. For Stack name, enter a name (for example, QIntegrationWithConnect).
  6. In the Parameters section, provide values for the following:
    1. Audience
    2. AuthorizationUrl
    3. ClientId
    4. ClientSecret
    5. IdcInstanceArn
    6. Issuer
    7. TokenUrl

Add parameters to CloudFormation

  1. Choose Next.
  2. Keep the other values as default and select I acknowledge that AWS CloudFormation might create IAM resources in the Capabilities.
  3. Select I acknowledge that AWS CloudFormation might require the following capability: CAPABILITY_AUTO_EXPAND in the Capabilities.
  4. Choose Submit to create the CloudFormation stack.
  5. After the successful deployment of the stack, on the Outputs tab, note the value for ALBDNSName.

The CloudFormation template does not deploy certificates for Application Load Balancer. We strongly recommend creating a secure listener for the Application Load Balancer and deploying at least one certificate.

Assign user to Amazon Q Application

  1. On the Amazon Q Business console, navigate to the application named qbusiness-connect-case.
  2. Under User Access, choose Manage user access.
  3. On the user tab, choose Add groups and users and search for the user you created in Okta and propagated in IAM Identity Center.
  4. Choose Assign and Done.

Add Q users

  1. Choose Confirm to confirm the subscription.
  2. Copy the link for Deployed URL.

Q URL

  1. Create a callback URL: <Deployed URL>/oauth/callback.

We recommend that you enable a budget policy notification to prevent unwanted billing.

Configure login credentials for the web application

Complete the following steps to configure login credentials for the web application:

  1. Navigate to the Okta developer login.
  2. Under Applications, choose the web application myConnectApp created earlier.
  3. Choose Edit in the General Settings
  4. Enter the callback URL for Sign-in redirect URIs.
  5. Choose Save.

Q Redirect URL

Sync the knowledge base

Complete the following steps to sync your knowledge base:

  1. On the Amazon S3 console, choose Buckets in the navigation pane.
  2. Search for AmazonQDataSourceBucket and choose the bucket.
  3. Download the sample AnyBank regulations document.
  4. Upload the PDF file to the S3 bucket.
  5. On the Amazon Q Business console, navigate to the Amazon Q Business application.
  6. In the Data sources section, select the data source.
  7. Choose Sync now to sync the data source.

Q data source

Embed the web application

Complete the following steps to embed the web application:

  1. On the Amazon Q Business console, under Enhancements, choose Amazon Q embedded.
  2. Choose Add allowed website.
  3. For Enter website URL, enter http://<ALBDNSName>.

Test the solution

Complete the following steps to test the solution:

  1. Copy the ALBDNSName value from the outputs section of the CloudFormation stack and open it in a browser.

You will see an AnyBank website.

anybank portal page

  1. Choose Chat with us and the Okta sign-in page will pop up.
  2. Provide the sign-in details.

Okta single singon

  1. Upon verification, close the browser tab.
  2. Navigate to the Amazon Q Business application in the chat window.
  3. In the chat window, enter “What are the Fraud Detection and Prevention Measures?”

Amazon Q Business will provide the answers from the knowledge base.

Next, let’s assume that you detected a fraud and want to create a case.

  1. Choose the plugin CreateCase and ask the question, “Can you create a case reporting fraud?”

create case

Amazon Q Business generates the title of the case based on the question.

Create case custom plugin submission page

  1. Choose Submit.
  2. If Amazon Q Business asks you to authorize your access, choose Authorize.

The CreateCase plugin will create a case in Amazon Connect

  1. Navigate to Amazon Connect and open the access URL in a browser.
  2. Provide the user name admin and get the password from visiting the parameter store in AWS Systems Manager.

Connect login page

  1. Choose Agent Workspace.

Agent workspace in Amazon Connect

You can see the case that was created by Amazon Q Business using the custom plugin.

Case in Amazon Connect

Clean up

To avoid incurring future charges, delete the resources that you created and clean up your account:

  1. Empty the contents of the S3 buckets you created as part of the CloudFormation stack.
  2. Delete the CloudFormation stack you created as part of this post.
  3. Disable the application from IAM Identity Center.

Conclusion

As businesses navigate the ever-changing corporate environment, the combination of Amazon Q Business and Amazon Connect emerges as a transformative approach to optimizing employee assistance and operational effectiveness. Harnessing the capabilities of AI-powered assistants and advanced contact center tools, organizations can empower their teams to access data, initiate support requests, and collaborate cohesively through a unified solution. This post showcased a banking portal, but this can be used for other industrial sectors or organizational verticals.

Stay up to date with the latest advancements in generative AI and start building on AWS. If you’re seeking assistance on how to begin, check out the Generative AI Innovation Center.


About the Authors

Sujatha Dantuluri is a seasoned Senior Solutions Architect in the US federal civilian team at AWS, with over two decades of experience supporting commercial and federal government clients. Her expertise lies in architecting mission-critical solutions and working closely with customers to ensure their success. Sujatha is an accomplished public speaker, frequently sharing her insights and knowledge at industry events and conferences. She has contributed to IEEE standards and is passionate about empowering others through her engaging presentations and thought-provoking ideas.

Dr Anil Giri is a Solutions Architect at Amazon Web Services. He works with enterprise software and SaaS customers to help them build generative AI applications and implement serverless architectures on AWS. His focus is on guiding clients to create innovative, scalable solutions using cutting-edge cloud technologies.

Read More

Engagement, user expertise, and satisfaction: Key insights from the Semantic Telemetry Project

Engagement, user expertise, and satisfaction: Key insights from the Semantic Telemetry Project

The image features four white icons on a gradient background that transitions from blue on the left to green on the right. The first icon is a network or molecule structure with interconnected nodes. The second icon is a light bulb, symbolizing an idea or innovation. The third icon is a checklist with three items and checkmarks next to each item. The fourth icon consists of two overlapping speech bubbles, representing communication or conversation.

The Semantic Telemetry Project aims to better understand complex, turn-based human-AI interactions in Microsoft Copilot using a new data science approach. 

This understanding is crucial for recognizing how individuals utilize AI systems to address real-world tasks. It provides actionable insights, enhances key use cases , and identifies opportunities for system improvement.

In a recent blog post, we shared our approach for classifying chat log data using large language models (LLMs), which allows us to analyze these interactions at scale and in near real time. We also introduced two of our LLM-generated classifiers: Topics and Task Complexity. 

This blog post will examine how our suite of LLM-generated classifiers can serve as early indicators for user engagement and highlight how usage and satisfaction varies based on AI and user expertise.

The key findings from our research are: 

  • When users engage in more professional, technical, and complex tasks, they are more likely to continue utilizing the tool and increase their level of interaction with it. 
  • Novice users currently engage in simpler tasks, but their work is gradually becoming more complex over time. 
  • More expert users are satisfied with AI responses only where AI expertise is on par with their own expertise on the topic, while novice users had low satisfaction rates regardless of AI expertise. 

Read on for more information on these findings. Note that all analyses were conducted on anonymous Copilot in Bing interactions containing no personal information. 


Classifiers mentioned in article: 

Knowledge work classifier: Tasks that involve creating artifacts related to information work typically requiring creative and analytical thinking. Examples include strategic business planning, software design, and scientific research. 

Task complexity classifier: Assesses the cognitive complexity of a task if a user performs it without the use of AI. We group into two categories: low complexity and high complexity

Topics classifier: A single label for the primary topic of the conversation.

User expertise: Labels the user’s expertise on the primary topic within the conversation as one of the following categories: Novice (no familiarity with the topic), Beginner (little prior knowledge or experience), Intermediate (some basic knowledge or familiarity with the topic), Proficient (can apply relevant concepts from conversation), and Expert (deep and comprehensive understanding of the topic). 

AI expertise: Labels the AI agent expertise based on the same criteria as user expertise above. 

User satisfaction: A 20-question satisfaction/dissatisfaction rubric that the LLM evaluates to create an aggregate score for overall user satisfaction. 


What keeps Bing Chat users engaged? 

We conducted a study of a random sample of 45,000 anonymous Bing Chat users during May 2024. The data was grouped into three cohorts based on user activity over the course of the month: 

  • Light (1 active chat session per week) 
  • Medium (2-3 active chat sessions per week) 
  • Heavy (4+ active chat sessions per week) 

The key finding is that heavy users are doing more professional, complex work. 

We utilized our knowledge work classifier to label the chat log data as relating to knowledge work tasks. What we found is knowledge work tasks were higher in all cohorts, with the highest percentage in heavy users

Bar chart illustrating knowledge work distribution across three engagement cohorts: light, medium, and heavy. The chart shows that all three cohorts engage in more knowledge work compared to the 'Not knowledge work' and 'Both' categories, with heavy users performing the most knowledge work.
Figure 1: Knowledge work based on engagement cohort

Analyzing task complexity, we observed that users with higher engagement frequently perform the highest number of tasks with high complexity, while users with lower engagement performed more tasks with low complexity. 

Bar chart illustrating task complexity distribution across three engagement cohorts: light, medium, and heavy. The chart shows all three cohorts perform more high complexity tasks than low complexity tasks, with heavy users performing the greatest number of high complexity tasks.
Figure 2: High complexity and low complexity tasks by engagement cohort+ 

Looking at the overall data, we can filter on heavy users and see higher numbers of chats where the user was performing knowledge work tasks. Based on task complexity, we see that most knowledge work tasks seek to apply a solution to an existing problem, primarily within programming and scripting. This is in line with our top overall topic, technology, which we discussed in the previous post. 

Tree diagram illustrating how heavy users are engaging with Bing Chat. The visual selects the most common use case for heavy users: knowledge work, “apply” complexity and related topics.
Figure 3: Heavy users tree diagram 

In contrast, light users tended to do more low complexity tasks (“Remember”), using Bing Chat like a traditional search engine and engaging more in topics like business and finance and computers and electronics.

Tree diagram illustrating how light users are engaging with Bing Chat. The visual selects the most common use case for light users: knowledge work, “remember” complexity and related topics.
Figure 4: Light users tree diagram 

Novice queries are becoming more complex 

We looked at Bing Chat data from January through August 2024 and we classified chats using our User Expertise classifier. When we looked at how the different user expertise groups were using the tool for professional tasks, we discovered that proficient and expert users tend to do more professional tasks with high complexity in topics like programming and scripting, professional writing and editing, and physics and chemistry

Bar chart illustrating top topics for proficient and expert users with programming and scripting (18.3%), professional writing and editing (10.4%), and physics and chemistry (9.8%) as top three topics.
Figure 5: Top topics for proficient/expert users 
Bar chart showing task complexity for proficient and expert users. The chart shows a greater number of high complexity chats than low complexity chats, with the highest percentage in categories “Understand” (30.8%) and “Apply” (29.3%).
Figure 6: Task complexity for proficient/expert 
Bar chart illustrating top topics for novice users with business and finance (12.5%), education and learning (10.0%), and computers and electronics (9.8%) as top three topics.
Figure 7: Top topics for novices 

In contrast, novice users engaged more in professional tasks relating to business and finance and education and learning, mainly using the tool to recall information.

Bar chart showing task complexity for novice users. The chart shows a greater number of low complexity chats than high complexity chats, with the highest percentage in categories “Remember” (48.6%).
Figure 8: Task complexity for novices 

However, novices are targeting increasingly more complex tasks over time. Over the eight-month period, we see the percentage of high complexity tasks rise from about 36% to 67%, revealing that novices are learning and adapting quickly (see Figure 9). 

Line chart showing weekly percentage of high complexity chats for novice users from January-August 2024. The line chart starts at 35.9% in January and ends at 67.2% in August.
Figure 9: High complexity for novices Jan-Aug 2024 

How does user satisfaction vary according to expertise? 

We classified both the user expertise and AI agent expertise for anonymous interactions in Copilot in Bing. We compared the level of user and AI agent expertise with our user satisfaction classifier

The key takeaways are: 

  • Experts and proficient users are only satisfied with AI agents with similar expertise (expert/proficient). 
  • Novices are least satisfied, regardless of the expertise of the AI agent. 
Table illustrating user satisfaction based on expertise level of user and agent. Each row if the table is the user expertise group (novice, beginner, intermediate, proficient, expert) and on the columns is AI expertise group (novice, beginner, intermediate, proficient, expert). The table illustrates that novice users are least satisfied overall and expert/proficient users are satisfied with AI expertise of proficient/expert.
Figure 10: Copilot in Bing satisfaction intersection of AI expertise and User expertise (August-September 2024) 

Conclusion

Understanding these metrics is vital for grasping user behavior over time and relating it to real-world business indicators. Users are finding value from complex professional knowledge work tasks, and novices are quickly adapting to the tool and finding these high value use-cases. By analyzing user satisfaction in conjunction with expertise levels, we can tailor our tools to better meet the needs of different user groups. Ultimately, these insights can help improve user understanding across a variety of tasks.  

In our next post, we will examine the engineering processes involved in LLM-generated classification.

The post Engagement, user expertise, and satisfaction: Key insights from the Semantic Telemetry Project appeared first on Microsoft Research.

Read More

Build multi-agent systems with LangGraph and Amazon Bedrock

Build multi-agent systems with LangGraph and Amazon Bedrock

Large language models (LLMs) have raised the bar for human-computer interaction where the expectation from users is that they can communicate with their applications through natural language. Beyond simple language understanding, real-world applications require managing complex workflows, connecting to external data, and coordinating multiple AI capabilities. Imagine scheduling a doctor’s appointment where an AI agent checks your calendar, accesses your provider’s system, verifies insurance, and confirms everything in one go—no more app-switching or hold times. In these real-world scenarios, agents can be a game changer, delivering more customized generative AI applications.

LLM agents serve as decision-making systems for application control flow. However, these systems face several operational challenges during scaling and development. The primary issues include tool selection inefficiency, where agents with access to numerous tools struggle with optimal tool selection and sequencing, context management limitations that prevent single agents from effectively managing increasingly complex contextual information, and specialization requirements as complex applications demand diverse expertise areas such as planning, research, and analysis. The solution lies in implementing a multi-agent architecture, which involves decomposing the main system into smaller, specialized agents that operate independently. Implementation options range from basic prompt-LLM combinations to sophisticated ReAct (Reasoning and Acting) agents, allowing for more efficient task distribution and specialized handling of different application components. This modular approach enhances system manageability and allows for better scaling of LLM-based applications while maintaining functional efficiency through specialized components.

This post demonstrates how to integrate open-source multi-agent framework, LangGraph, with Amazon Bedrock. It explains how to use LangGraph and Amazon Bedrock to build powerful, interactive multi-agent applications that use graph-based orchestration.

AWS has introduced a multi-agent collaboration capability for Amazon Bedrock Agents, enabling developers to build, deploy, and manage multiple AI agents working together on complex tasks. This feature allows for the creation of specialized agents that handle different aspects of a process, coordinated by a supervisor agent that breaks down requests, delegates tasks, and consolidates outputs. This approach improves task success rates, accuracy, and productivity, especially for complex, multi-step tasks.

Challenges with multi-agent systems

In a single-agent system, planning involves the LLM agent breaking down tasks into a sequence of small tasks, whereas a multi-agent system must have workflow management involving task distribution across multiple agents. Unlike single-agent environments, multi-agent systems require a coordination mechanism where each agent must maintain alignment with others while contributing to the overall objective. This introduces unique challenges in managing inter-agent dependencies, resource allocation, and synchronization, necessitating robust frameworks that maintain system-wide consistency while optimizing performance.

Memory management in AI systems differs between single-agent and multi-agent architectures. Single-agent systems use a three-tier structure: short-term conversational memory, long-term historical storage, and external data sources like Retrieval Augmented Generation (RAG). Multi-agent systems require more advanced frameworks to manage contextual data, track interactions, and synchronize historical records across agents. These systems must handle real-time interactions, context synchronization, and efficient data retrieval, necessitating careful design of memory hierarchies, access patterns, and inter-agent sharing.

Agent frameworks are essential for multi-agent systems because they provide the infrastructure for coordinating autonomous agents, managing communication and resources, and orchestrating workflows. Agent frameworks alleviate the need to build these complex components from scratch.

LangGraph, part of LangChain, orchestrates agentic workflows through a graph-based architecture that handles complex processes and maintains context across agent interactions. It uses supervisory control patterns and memory systems for coordination.

LangGraph Studio enhances development with graph visualization, execution monitoring, and runtime debugging capabilities. The integration of LangGraph with Amazon Bedrock empowers you to take advantage of the strengths of multiple agents seamlessly, fostering a collaborative environment that enhances the efficiency and effectiveness of LLM-based systems.

Understanding LangGraph and LangGraph Studio

LangGraph implements state machines and directed graphs for multi-agent orchestration. The framework provides fine-grained control over both the flow and state of your agent applications. LangGraph models agent workflows as graphs. You define the behavior of your agents using three key components:

  • State – A shared data structure that represents the current snapshot of your application.
  • Nodes – Python functions that encode the logic of your agents.
  • Edges – Python functions that determine which Node to execute next based on the current state. They can be conditional branches or fixed transitions.

LangGraph implements a central persistence layer, enabling features that are common to most agent architectures, including:

  • Memory – LangGraph persists arbitrary aspects of your application’s state, supporting memory of conversations and other updates within and across user interactions.
  • Human-in-the-loop – Because state is checkpointed, execution can be interrupted and resumed, allowing for decisions, validation, and corrections at key stages through human input.

LangGraph Studio is an integrated development environment (IDE) specifically designed for AI agent development. It provides developers with powerful tools for visualization, real-time interaction, and debugging capabilities. The key features of LangGraph Studio are:

  • Visual agent graphs – The IDE’s visualization tools allow developers to represent agent flows as intuitive graphic wheels, making it straightforward to understand and modify complex system architectures.
  • Real-time debugging – The ability to interact with agents in real time and modify responses mid-execution creates a more dynamic development experience.
  • Stateful architecture – Support for stateful and adaptive agents within a graph-based architecture enables more sophisticated behaviors and interactions.

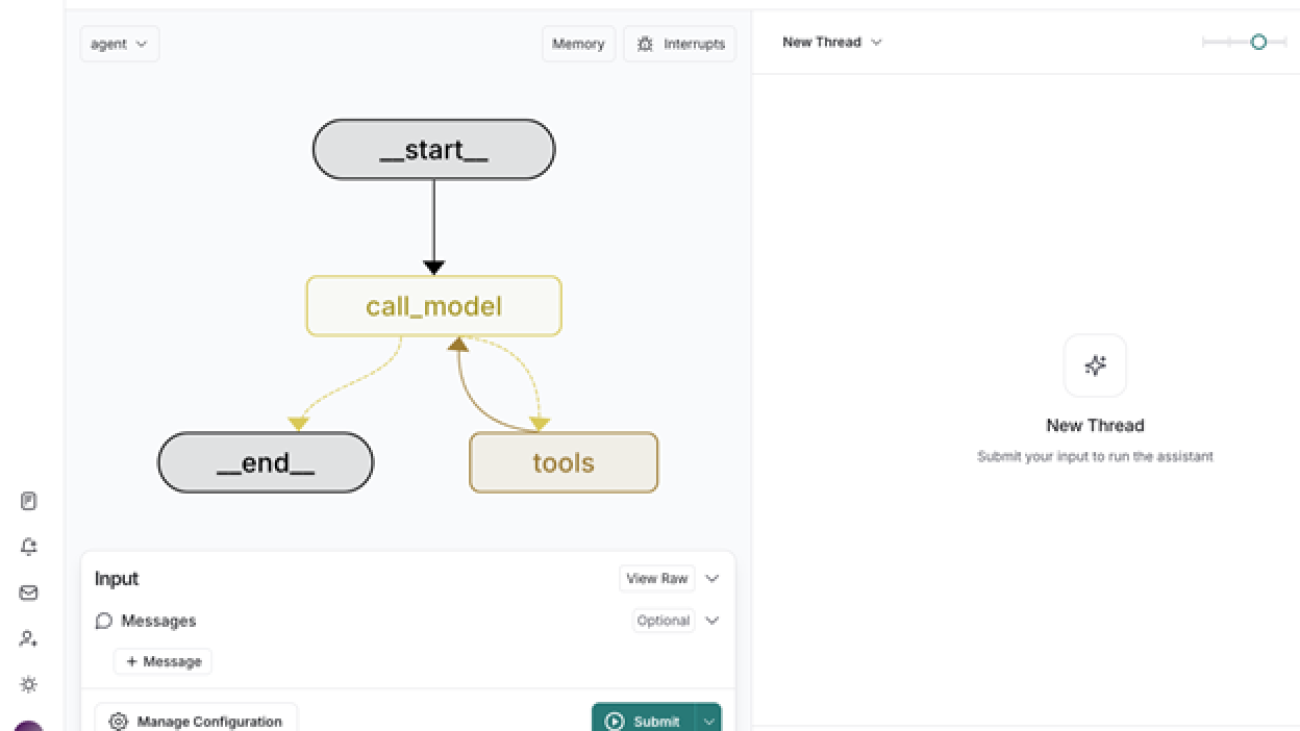
The following screenshot shows the nodes, edges, and state of a typical LangGraph agent workflow as viewed in LangGraph Studio.

LangGraph agent workflow as viewed in LangGraph Studio

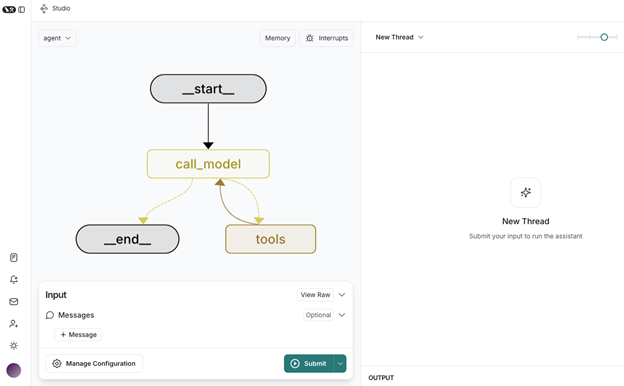
Figure 1: LangGraph Studio UI

In the preceding example, the state begins with __start__ and ends with __end__. The nodes for invoking the model and tools are defined by you and the edges tell you which paths can be followed by the workflow.

LangGraph Studio is available as a desktop application for MacOS users. Alternatively, you can run a local in-memory development server that can be used to connect a local LangGraph application with a web version of the studio.

Solution overview

This example demonstrates the supervisor agentic pattern, where a supervisor agent coordinates multiple specialized agents. Each agent maintains its own scratchpad while the supervisor orchestrates communication and delegates tasks based on agent capabilities. This distributed approach improves efficiency by allowing agents to focus on specific tasks while enabling parallel processing and system scalability.

Let’s walk through an example with the following user query: “Suggest a travel destination and search flight and hotel for me. I want to travel on 15-March-2025 for 5 days.” The workflow consists of the following steps:

  1. The Supervisor Agent receives the initial query and breaks it down into sequential tasks:
    1. Destination recommendation required.
    2. Flight search needed for March 15, 2025.
    3. Hotel booking required for 5 days.
  2. The Destination Agent begins its work by accessing the user’s stored profile. It searches its historical database, analyzing patterns from similar user profiles to recommend the destination. Then it passes the destination back to the Supervisor Agent.
  3. The Supervisor Agent forwards the chosen destination to the Flight Agent, which searches available flights for the given date.
  4. The Supervisor Agent activates the Hotel Agent, which searches for hotels in the destination city.
  5. The Supervisor Agent compiles the recommendations into a comprehensive travel plan, presenting the user with a complete itinerary including destination rationale, flight options, and hotel suggestions.

The following figure shows a multi-agent workflow of how these agents connect to each other and which tools are involved with each agent.

multi-agent workflow Figure 2: Multi-agent workflow

Prerequisites

You will need the following prerequisites before you can proceed with this solution. For this post, we use the us-west-2 AWS Region. For details on available Regions, see Amazon Bedrock endpoints and quotas.

Core components

Each agent is structured with two primary components:

  • graph.py – This script defines the agent’s workflow and decision-making logic. It implements the LangGraph state machine for managing agent behavior and configures the communication flow between different components. For example:
    • The Flight Agent’s graph manages the flow between chat and tool operations.
    • The Hotel Agent’s graph handles conditional routing between search, booking, and modification operations.
    • The Supervisor Agent’s graph orchestrates the overall multi-agent workflow.
  • tools.py – This script contains the concrete implementations of agent capabilities. It implements the business logic for each operation and handles data access and manipulation. It provides specific functionalities like:
    • Flight tools: search_flights, book_flights, change_flight_booking, cancel_flight_booking.
    • Hotel tools: suggest_hotels, book_hotels, change_hotel_booking, cancel_hotel_booking.

This separation between graph (workflow) and tools (implementation) allows for a clean architecture where the decision-making process is separate from the actual execution of tasks. The agents communicate through a state-based graph system implemented using LangGraph, where the Supervisor Agent directs the flow of information and tasks between the specialized agents.

To set up Amazon Bedrock with LangGraph, refer to the following GitHub repo. The high-level steps are as follows:

  1. Install the required packages:
pip install boto3 langchain-aws

These packages are essential for AWS Bedrock integration:

  • boto: AWS SDK for Python, handles AWS service communication
  • langchain-aws: Provides LangChain integrations for AWS services
  1. Import the modules:
from langchain_aws import ChatBedrockConverse 
from langchain_aws import ChatBedrock

  1. Create an LLM object:
bedrock_client = boto3.client("bedrock-runtime", region_name="<region_name>")
llm = ChatBedrockConverse(
        model="anthropic.claude-3-haiku-20240307-v1:0",
        temperature=0,
        max_tokens=None,
        client=bedrock_client,
        # other params...
    )

LangGraph Studio configuration

This project uses a langgraph.json configuration file to define the application structure and dependencies. This file is essential for LangGraph Studio to understand how to run and visualize your agent graphs.

{
"dependencies": [
"boto3>=1.35.87",
"langchain-aws>=0.2.10",
"."
],
"graphs": {
"supervisor": "./src/supervisor_agent/graph.py:graph",
"flight": "./src/flight_agent/graph.py:graph",
"hotel": "./src/hotel_agent/graph.py:graph"
},
"env": "./.env"
}

LangGraph Studio uses this file to build and visualize the agent workflows, allowing you to monitor and debug the multi-agent interactions in real time.

Testing and debugging

You’re now ready to test the multi-agent travel assistant. You can start the graph using the langgraph dev command. It will start the LangGraph API server in development mode with hot reloading and debugging capabilities. As shown in the following screenshot, the interface provides a straightforward way to select which graph you want to test through the dropdown menu at the top left. The Manage Configuration button at the bottom lets you set up specific testing parameters before you begin. This development environment provides everything you need to thoroughly test and debug your multi-agent system with real-time feedback and monitoring capabilities.

Testing multi-agent travel assistantFigure 3: LangGraph studio with Destination Agent recommendation

LangGraph Studio offers flexible configuration management through its intuitive interface. As shown in the following screenshot, you can create and manage multiple configuration versions (v1, v2, v3) for your graph execution. For example, in this scenario, we want to use user_id to fetch historic use information. This versioning system makes it simple to track and switch between different test configurations while debugging your multi-agent system.

Create and manage multiple configuration versions (v1, v2, v3) for your graph executionFigure 4: Runnable configuration details

In the preceding example, we set up the user_id that tools can use to retrieve history or other details.

Let’s test the Planner Agent. This agent has the compare_and_recommend_destination tool, which can check past travel data and recommend travel destinations based on the user profile. We use user_id in the configuration so that can it be used by the tool.

LangGraph has concept of checkpoint memory that is managed using a thread. The following screenshot shows that you can quickly manage threads in LangGraph Studio.

Manage threads in LangGraph StudioFigure 5: View graph state in the thread

In this example, destination_agent is using a tool; you can also check the tool’s output. Similarly, you can test flight_agent and hotel_agent to verify each agent.

When all the agents are working well, you’re ready to test the full workflow. You can evaluate the state a verify input and output of each agent.

The following screenshot shows the full view of the Supervisor Agent with its sub-agents.

Figure 6: Supervisor Agent with complete workflow

Considerations

Multi-agent architectures must consider agent coordination, state management, communication, output consolidation, and guardrails, maintaining processing context, error handling, and orchestration. Graph-based architectures offer significant advantages over linear pipelines, enabling complex workflows with nonlinear communication patterns and clearer system visualization. These structures allow for dynamic pathways and adaptive communication, ideal for large-scale deployments with simultaneous agent interactions. They excel in parallel processing and resource allocation but require sophisticated setup and might demand higher computational resources. Implementing these systems necessitates careful planning of system topology, robust monitoring, and well-designed fallback mechanisms for failed interactions.

When implementing multi-agent architectures in your organization, it’s crucial to align with your company’s established generative AI operations and governance frameworks. Prior to deployment, verify alignment with your organization’s AI safety protocols, data handling policies, and model deployment guidelines. Although this architectural pattern offers significant benefits, its implementation should be tailored to fit within your organization’s specific AI governance structure and risk management frameworks.

Clean up

Delete any IAM roles and policies created specifically for this post. Delete the local copy of this post’s code. If you no longer need access to an Amazon Bedrock FM, you can remove access from it. For instructions, see Add or remove access to Amazon Bedrock foundation models

Conclusion

The integration of LangGraph with Amazon Bedrock significantly advances multi-agent system development by providing a robust framework for sophisticated AI applications. This combination uses LangGraph’s orchestration capabilities and FMs in Amazon Bedrock to create scalable, efficient systems. It addresses challenges in multi-agent architectures through state management, agent coordination, and workflow orchestration, offering features like memory management, error handling, and human-in-the-loop capabilities. LangGraph Studio’s visualization and debugging tools enable efficient design and maintenance of complex agent interactions. This integration offers a powerful foundation for next-generation multi-agent systems, providing effective workflow handling, context maintenance, reliable results, and optimal resource utilization.

For the example code and demonstration discussed in this post, refer to the accompanying GitHub repository. You can also refer to the following GitHub repo for Amazon Bedrock multi-agent collaboration code samples.


About the Authors

Jagdeep Singh Soni is a Senior Partner Solutions Architect at AWS based in the Netherlands. He uses his passion for generative AI to help customers and partners build generative AI applications using AWS services. Jagdeep has 15 years of experience in innovation, experience engineering, digital transformation, cloud architecture, and ML applications.

Ajeet Tewari is a Senior Solutions Architect for Amazon Web Services. He works with enterprise customers to help them navigate their journey to AWS. His specialties include architecting and implementing scalable OLTP systems and leading strategic AWS initiatives.

Rupinder Grewal is a Senior AI/ML Specialist Solutions Architect with AWS. He currently focuses on serving of models and MLOps on Amazon SageMaker. Prior to this role, he worked as a Machine Learning Engineer building and hosting models. Outside of work, he enjoys playing tennis and biking on mountain trails.

Read More

Dynamic text-to-SQL for enterprise workloads with Amazon Bedrock Agents

Dynamic text-to-SQL for enterprise workloads with Amazon Bedrock Agents

Generative AI enables us to accomplish more in less time. Text-to-SQL empowers people to explore data and draw insights using natural language, without requiring specialized database knowledge. Amazon Web Services (AWS) has helped many customers connect this text-to-SQL capability with their own data, which means more employees can generate insights. In this process, we discovered that a different approach is needed in enterprise environments where there are over 100 tables, each with dozens of columns. We also learned that robust error handling is critical when errors occur in the generated SQL query based on users’ questions.

This post demonstrates how enterprises can implement a scalable agentic text-to-SQL solution using Amazon Bedrock Agents, with advanced error-handling tools and automated schema discovery to enhance database query efficiency. Our agent-based solution offers two key strengths:

  1. Automated scalable schema discovery – The schema and table metadata can be dynamically updated to generate SQL when the initial attempt to execute the query fails. This is important for enterprise customers who have a lot of tables and columns and many queries patterns.
  2. Automated error handling – The error message is directly fed back to the agent to improve the success rate of running queries.

You’ll find that these features help you tackle enterprise-scale database challenges while making your text-to-SQL experience more robust and efficient.

Use case

An agentic text-to-SQL solution can benefit enterprises with complex data structures. In this post, to understand the mechanics and benefits of the agentic text-to-SQL solution in a complex enterprise environment, imagine you’re a business analyst on the risk management team in a bank. You need to answer questions such as “Find all transactions that occurred in the United States and were flagged as fraudulent, along with the device information used for those transactions,” or “Retrieve all transactions for John Doe that occurred between January 1, 2023, and December 31, 2023, including fraud flags and merchant details.” For this, there are dozens—or sometimes hundreds—of tables that you need to not only be aware but also craft complex JOIN queries. The following diagram illustrates a sample table schema that might be needed for fraud investigations.

Sample schema for fraud detection

The key pain points of implementing a text-to-SQL solution in this complex environment include the following, but aren’t limited to:

  1. The amount of table information and schema will get excessive, which will entail manual updates on the prompts and limit its scale.
  2. As a result, the solution might require additional validation, impacting the quality and performance of generating SQL.

Now, consider our solution and how it addresses these problems.

Solution overview

Amazon Bedrock Agents seamlessly manages the entire process from question interpretation to query execution and result interpretation, without manual intervention. It seamlessly incorporates multiple tools, and the agent analyzes and responds to unexpected results. When queries fail, the agent autonomously analyzes error messages, modifies queries, and retries—a key benefit over static systems.

As of December 2024, the Amazon Bedrock with structured data feature provides built-in support for Amazon Redshift, offering seamless text-to-SQL capabilities without custom implementation. This is recommended as the primary solution for Amazon Redshift users.

Here are the capabilities that this solution offers:

  1. Executing text-to-SQL with autonomous troubleshooting:
    1. The agent can interpret natural language questions and convert them into SQL queries. It then executes these queries against an Amazon Athena database and returns the results.
    2. If a query execution fails, the agent can analyze the error messages returned by AWS Lambda and automatically retries the modified query when appropriate.
  2. Dynamic schema discovery
    1. Listing tables – The agent can provide a comprehensive list of the tables in the fraud detection database. This helps users understand the available data structures.
    2. Describing table schemas – Users can request detailed information about the schema of specific tables. The agent will provide column names, data types, and associated comments, giving users a clear understanding of the data structure.

The solution uses direct database tools for schema discovery instead of vector store–based retrieval or static schema definitions. This approach provides complete accuracy with lower operational overhead because it doesn’t require a synchronization mechanism and continually reflects the current database structure. Direct schema access through tools is more maintainable than hardcoded approaches that require manual updates, and it provides better performance and cost-efficiency through real-time database interaction.

The workflow is as follows:

  1. A user asks questions to Amazon Bedrock Agents.
  2. To serve the user’s questions, the agent determines the appropriate action to invoke:
    1. To execute the generated query with confidence, the agent will invoke the athena-query
    2. To confirm the database schema first, the agent will invoke the athena-schema-reader tool:
      • Retrieve a list of available tables using its /list_tables endpoint.
      • Obtain the specific schema of a certain table using its /describe_table endpoint.
    3. The Lambda function sends the query to Athena to execute.
    4. Athena queries the data from the Amazon Simple Storage Service (Amazon S3) data bucket and stores the query results in the S3 output bucket.
    5. The Lambda function retrieves and processes the results. If an error occurs:
      • The Lambda function captures and formats the error message for the agent to understand.
      • The error message is returned to Amazon Bedrock Agents.
      • The agent analyzes the error message and tries to resolve it. To retry with the modified query, the agent may repeat steps 2–5.
    6. The agent formats and presents the final responses to the user.

The following architecture diagram shows this workflow.

Architecture diagram

Implementation walkthrough

To implement the solution, use the instructions in the following sections.

Intelligent error handling

Our agentic text-to-SQL solution implements practical error handling that helps agents understand and recover from issues. By structuring errors with consistent elements, returning nonbreaking errors where possible, and providing contextual hints, the system enables agents to self-correct and continue their reasoning process.

Agent instructions

Consider the key prompt components that make this solution unique. Intelligent error handling helps automate troubleshooting and refine the query by letting the agent understand the type of errors and what to do when error happens:

Execution and Error Handling:
   - Execute the query via the /athena_query endpoint
   - If the execution fails, carefully analyze the error message and hint provided by the Lambda function
   - Based on the error type received from the Lambda function, take appropriate action:
   - After identifying the issue based on the error message and hint:
     1. Modify your query or API request to address the specific problem
     2. If needed, use schema discovery tools (/list_tables, /describe_table) to gather updated information
     3. Reconstruct the query with the necessary corrections
     4. Retry the execution with the modified query or request

The prompt gives guidance on how to approach the errors. It also states that the error types and hints will be provided by Lambda. In the next section, we explain how Lambda processes the errors and passes them to the agent.

Implementation details

Here are some key examples from our error handling system:

ERROR_MESSAGES = {
    'QUERY_EXECUTION_FAILED': {
        'message': 'Failed to execute query',
        'hint': 'Please use fully qualified table names. Example: SELECT * FROM fraud_data.customers LIMIT 1'
    },
    'QUERY_RESULT_ERROR': {
        'message': 'Error occurred while getting query results',
        'hint': 'Check if the tables and columns in your query exist and you have proper permissions. Examples: "customers", "transactions", or "devices".'
    },
    'MISSING_QUERY': {
        'message': 'Query is required',
        'hint': 'No query was provided. Please provide a SQL query to execute'
    }
}

def create_query_response(query_result, status_code=200):
    if query_result.get('error'):
        error_info = ERROR_MESSAGES.get(query_result['error'])
        return {
            'error': query_result['error'],
            'message': error_info['message'],
            'hint': error_info['hint']
        }
    return query_result

These error types cover the main scenarios in text-to-SQL interactions:

  1. Query execution failures – Handles syntax errors and table reference issues, guiding the agent to use the correct table names and SQL syntax
  2. Result retrieval issues – Addresses permission problems and invalid column references, helping the agent verify the schema and access rights
  3. API validation – Verifies that basic requirements are met before query execution, minimizing unnecessary API calls

Each error type includes both an explanatory message and an actionable hint, enabling the agent to take appropriate corrective steps. This implementation shows how straightforward it can be to enable intelligent error handling; instead of handling errors traditionally within Lambda, we return structured error messages that the agent can understand and act upon.

Dynamic schema discovery

The schema discovery is pivotal to keeping Amazon Bedrock Agents consuming the most recent and relevant schema information.

Agent instructions

Instead of hardcoded database schema information, we allow the agent to discover the database schema dynamically. We’ve created two API endpoints for this purpose:

Schema Discovery: 
    - Use /list_tables endpoint to identify available tables in the database 
    - Use /describe_table endpoint to get detailed schema information for specific tables 
    - Always use the most recent and relevant table schemas, as the database structure may change frequently 
    - Before constructing queries, ensure you have up-to-date schema information

Implementation details

Based on the agent instructions, the agent will invoke the appropriate API endpoint.

The /list_tables endpoint lists the tables in a specified database. This is particularly useful when you have multiple databases or frequently add new tables:

@app.post("/list_tables", description="Retrieve a list of all tables in the specified database")
def list_tables(event, database_name):
    query = f"SHOW TABLES IN {database_name}"
    result = execute_and_get_results(query, s3_output)
    if isinstance(result, dict) and 'error' in result:
        return create_api_response(event, 400, get_error_response('QUERY_RESULT_ERROR'))
    return create_api_response(event, 200, result)

The /describe_table endpoint reads a specific table’s schema with details. We use the “DESCRIBE” command, which includes column comments along with other schema details. These comments help the agent better understand the meaning of the individual columns:

@app.post("/describe_table", description="Retrieve the schema information of a specific table")
def describe_table(event, database_name, table_name):
    query = f"DESCRIBE {database_name}.{table_name}"
    result = execute_and_get_results(query, s3_output)
    
    if isinstance(result, dict) and 'error' in result:
        return create_api_response(event, 400, get_error_response('QUERY_RESULT_ERROR'))
    
    formatted_result = {
        "table_name": table_name,
        "database": database_name,
        "columns": result
    }
    return create_api_response(event, 200, formatted_result)

When implementing a dynamic schema reader, consider including comprehensive column descriptions to enhance the agent’s understanding of the data model.

These endpoints enable the agent to maintain an up-to-date understanding of the database structure, improving its ability to generate accurate queries and adapt to changes in the schema.

Demonstration

You might not experience the exact same response with the presented screenshot due to the indeterministic nature of large language models (LLMs).

The solution is available for you to deploy in your environment with sample data. Clone the repository from this GitHub link and follow the README guidance. After you deploy the two stacks—AwsText2Sql-DbStack and AwsText2Sql-AgentStack—follow these steps to put the solution in action:

  1. Go to Amazon Bedrock and select Agents.
  2. Select AwsText-to-SQL-AgentStack-DynamicAgent and test by asking questions in the Test window on the right.
  3. Example interactions:
    • Which demographic groups or industries are most frequently targeted by fraudsters? Present aggregated data.
    • What specific methods or techniques are commonly used by perpetrators in the reported fraud cases?
    • What patterns or trends can we identify in the timing and location of fraud incidents?
    • Show the details of customers who have made transactions with merchants located in Denver.
    • Provide a list of all merchants along with the total number of transactions they’ve processed and the number of those transactions that were flagged as fraudulent.
    • List the top five customers based on the highest transaction amounts they’ve made.

Agent Builder screen shot

  1. Choose Show trace and examine each step to understand what tools are used and the agent’s rationale for approaching your question, as shown in the following screenshot.

Trace example screen shot

  1. (Optional) You can test the Amazon Bedrock Agents code interpreter by enabling it in Agent settings. Follow the instructions at Enable code interpretation in Amazon Bedrock and ask the agent “Create a bar chart showing the top three cities that have the most fraud cases.”

Code interpreter screen shot

Best practices

Building on our discussion of dynamic schema discovery and intelligent error handling, here are key practices to optimize your agentic text-to-SQL solution:

  1. Use dynamic schema discovery and error handling – Use endpoints such as /list_tables and /describe_table to allow the agent to dynamically adapt to your database structure. Implement comprehensive error handling as demonstrated earlier, enabling the agent to interpret and respond to various error types effectively.
  2. Balance static and dynamic information – Although dynamic discovery is powerful, consider including crucial, stable information in the prompt. This might include database names, key table relationships, or frequently used tables that rarely change. Striking this balance can improve performance without sacrificing flexibility.
  3. Tailoring to your environment – We designed the sample to always invoke /list_tables and /describe_table, and your implementation might need adjustments. Consider your specific database engine’s capabilities and limitations. You might need to provide additional context beyond only column comments. Think about including database descriptions, table relationships, or common query patterns. The key is to give your agent as much relevant information as possible about your data model and business context, whether through extended metadata, custom endpoints, or detailed instructions.
  4. Implement robust data protection – Although our solution uses Athena, which inherently doesn’t support write operations, it’s crucial to consider data protection in your specific environment. Start with clear instructions in the prompt (for example, “read-only operations only”), and consider additional layers such as Amazon Bedrock Guardrails or an LLM-based review system to make sure that generated queries align with your security policies.
  5. Implement layered authorization – To enhance data privacy when using Amazon Bedrock Agents, you can use services such as Amazon Verified Permissions to validate user access before the agent processes sensitive data. Pass user identity information, such as a JWT token, to the agent and its associated Lambda function, enabling fine-grained authorization checks against pre-built policies. By enforcing access control at the application level based on the Verified Permissions decision, you can mitigate unintended data disclosure and maintain strong data isolation. To learn more, refer to Enhancing data privacy with layered authorization for Amazon Bedrock Agents in the AWS Security Blog.
  6. Identify the best orchestration strategy for your agent – Amazon Bedrock provides you with an option to customize your agent’s orchestration strategy. Custom orchestration gives you full control of how you want your agents to handle multistep tasks, make decisions, and execute workflows.

By implementing these practices, you can create a text-to-SQL solution that not only uses the full potential of AI agents, it also maintains the security and integrity of your data systems.

Conclusion

In conclusion, the implementation of a scalable agentic text-to-SQL solution using AWS services offers significant advantages for enterprise workloads. By using automated schema discovery and robust error handling, organizations can efficiently manage complex databases with numerous tables and columns. The agent-based approach promotes dynamic query generation and refinement, leading to higher success rates in data querying. We’d like to invite you to try this solution out today! Visit GitHub to dive deeper into the details of the solution, and follow the deployment guide to test in your AWS account.


About the Authors

Jimin Kim is a Prototyping Architect on the AWS Prototyping and Cloud Engineering (PACE) team, based in Los Angeles. With specialties in Generative AI and SaaS, she loves helping her customers succeed in their business. Outside of work, she cherishes moments with her wife and three adorable calico cats.

Jiwon Yeom is a Solutions Architect at AWS, based in New York City. She focuses on Generative AI in the financial services industry and is passionate about helping customers build scalable, secure, and human-centered AI solutions. Outside of work, she enjoys writing, and exploring hidden bookstores.

Read More