In AWS, you can host a trained model multiple ways, such as via Amazon SageMaker deployment, deploying to an Amazon Elastic Compute Cloud (Amazon EC2) instance (running a Flask + NGINX, for example), AWS Fargate, Amazon Elastic Kubernetes Service (Amazon EKS), or AWS Lambda.
SageMaker provides convenient model hosting services for model deployment, and provides an HTTPS endpoint where your machine learning (ML) model is available to provide inferences. This lets you focus on your deployment options such as instance type, automatic scaling policies, model versions, inference pipelines, and other features that make deployment easy and effective for handling production workloads. The other deployment options we mentioned require additional heavy lifting, such as launching a cluster or an instance, maintaining Docker containers with the inference code, or even creating your own APIs to simplify operations.
This post shows you how to use AWS Lambda to host an ML model for inference and explores several options to build layers and containers, including manually packaging and uploading a layer, and using AWS CloudFormation, AWS Serverless Application Model (AWS SAM), and containers.
Using Lambda for ML inference is an excellent alternative for some use cases for the following reasons:
- Lambda lets you run code without provisioning or managing servers.
- You pay only for the compute time you consume—there is no charge when you’re not doing inference.
- Lambda automatically scales by running code in response to each trigger (or in this case, an inference call from a client application for making a prediction using the trained model). Your code runs in parallel and processes each trigger individually, scaling with the size of the workload.
- You can limit the number of concurrent calls to an account-level default of 1,000, or request an appropriate limit increase.
- The inference code in this case is just the Lambda code, which you can edit directly on the Lambda console or using AWS Cloud9.
- You can store the model in the Lambda package or container, or pulled down from Amazon Simple Storage Service (Amazon S3). The latter method introduces additional latency, but it’s very low for small models.
- You can trigger Lambda via various services internally, or via Amazon API Gateway.
One limitation of this approach when using Lambda layers is that only small models can be accommodated (50 MB zipped layer size limit for Lambda), but with SageMaker Neo, you can potentially obtain a 10x reduction in the amount of memory required by the framework to run a model. The model and framework are compiled into a single executable that can be deployed in production to make fast, low-latency predictions. Additionally, the recently launched container image support allows you to use up to a 10 GB size container for Lambda tasks. Later in this post, we discuss how to overcome some of the limitations on size. Let’s get started by looking at Lambda layers first!
Inference using Lambda layers
A Lambda layer is a .zip archive that contains libraries, a custom runtime, or other dependencies. With layers, you can use libraries in your function without needing to include them in your deployment package.
Layers let you keep your deployment package small, which makes development easier. You can avoid errors that can occur when you install and package dependencies with your function code. For Node.js, Python, and Ruby functions, you can develop your function code on the Lambda console as long as you keep your deployment package under 3 MB. A function can use up to five layers at a time. The total unzipped size of the function and all layers can’t exceed the unzipped deployment package size limit of 250 MB. For more information, see Lambda quotas.
Building a common ML Lambda layer that can be used with multiple inference functions reduces effort and streamlines the process of deployment. In the next section, we describe how to build a layer for scikit-learn, a small yet powerful ML framework.
Build a scikit-learn ML layer
The purpose of this section is to explore the process of manually building a layer step by step. In production, you will likely use AWS SAM or another option such as AWS Cloud Development Kit (AWS CDK), AWS CloudFormation, or your own container build pipeline to do the same. After we go through these steps manually, you may be able to appreciate how some of the other tools like AWS SAM simplify and automate these steps.
To ensure that you have a smooth and reliable experience building a custom layer, we recommend that you log in to an EC2 instance running Amazon Linux to build this layer. For instructions, see Connect to your Linux instance.
When you’re are logged in to your EC2 instance, follow these steps to build a sklearn layer:
Step 1 – Upgrade pip and awscli
Enter the following code to upgrade pip and awscli:
pip install --upgrade pip
pip install awscli --upgrade
Step 2 – Install pipenv and create a new Python environment
Install pipnv and create a new Python environment with the following code:
pip install pipenv
pipenv --python 3.6
Step 3 – Install your ML framework
To install your preferred ML framework (for this post, sklearn), enter the following code:
pipenv install sklearnStep 4 – Create a build folder with the installed package and dependencies
Create a build folder with the installed package and dependencies with the following code:
ls $VIRTUAL_ENV
PY_DIR='build/python/lib/python3.6/site-packages'
mkdir -p $PY_DIR
pipenv lock -r > requirements.txt
pip install -r requirements.txt -t $PY_DIR
Step 5 – Reduce the size of the deployment package
You reduce the size of the deployment package by stripping symbols from compiled binaries and removing data files required only for training:
cd build/
find . -name "*.so" | xargs strip
find . -name '*.dat' -delete
find . -name '*.npz' -delete
Step 6 – Add a model file to the layer
If applicable, add your model file (usually a pickle (.pkl) file, joblib file, or model.tar.gz file) to the build folder. As mentioned earlier, you can also pull your model down from Amazon S3 within the Lambda function before performing inference.
Step 7 – Use 7z or zip to compress the build folder
You have two options for compressing your folder. One option is the following code:
7z a -mm=Deflate -mfb=258 -mpass=15 -r ../sklearn_layer.zip *Alternatively, enter the following:
7z a -tzip -mx=9 -mfb=258 -mpass=20 -r ../sklearn_layer.zip *Step 8 – Push the newly created layer to Lambda
Push your new layer to Lambda with the following code:
cd ..
rm -r build/


aws lambda publish-layer-version --layer-name sklearn_layer --zip-file fileb://sklearn_layer.zip
Step 9 – Use the newly created layer for inference
To use your new layer for inference, complete the following steps:
- On the Lambda console, navigate to an existing function.
- In the Layers section, choose Add a layer.

- Select Select from list of runtime compatible layers.
- Choose the layer you just uploaded (the sklearn layer).
You can also provide the layer’s ARN.
- Choose Add.
Step 10 – Add inference code to load the model and make predictions
Within the Lambda function, add some code to import the sklearn library and perform inference. We provide two examples: one using a model stored in Amazon S3 and the pickle library, and another using a locally stored model and the joblib library.
1.	from sklearn.externals import joblib
2.	import boto3
3.	import json
4.	import pickle
5.
6.	s3_client = boto3.client("s3")
7.
8.	def lambda_handler(event, context):
9.
10.	     #Using Pickle + load model from s3
11.	     filename = "pickled_model.pkl"
12.	     s3_client.download_file('bucket-withmodels', filename, '/tmp/' + filename)
13.	       loaded_model = pickle.load(open('/tmp/' + filename, 'rb'))
14.	       result = loaded_model.predict(X_test)
15.
16.	       # Using Joblib + load the model from local storage
17.	       loaded_model = joblib.load(“filename.joblib”)
18.	       result = loaded_model.score(X_test, Y_test)
19.	       print(result)
20.	       return {'statusCode': 200, 'body': json.dumps(result)}
Package the ML Lambda layer code as a shell script
Alternatively, you can run a shell script with only 10 lines of code to create your Lambda layer .zip file (without all the manual steps we described).
- Create a shell script (.sh file) with the following code:
createlayer.sh
#!/bin/bash

if [ "$1" != "" ] || [$# -gt 1]; then
	echo "Creating layer compatible with python version $1"
	docker run -v "$PWD":/var/task "lambci/lambda:build-python$1" /bin/sh -c "pip install -r requirements.txt -t python/lib/python$1/site-packages/; exit"
	zip -r layer.zip python > /dev/null
	rm -r python
	echo "Done creating layer!"
	ls -lah layer.zip

else
	echo "Enter python version as argument - ./createlayer.sh 3.6"
fi
- Name the file
createlayer.shand save it.
The script requires an argument for the Python version that you want to use for the layer; the script checks for this argument and requires the following:
- If you’re using a local machine, EC2 instance, or a laptop, you need to install Docker. When using an SageMaker notebook instance terminal window or an AWS Cloud9 terminal, Docker is already installed.
- You need a requirements.txt file that is in the same path as the
createlayer.shscript that you created and has the packages that you need to install. For more information about creating this file, see https://pip.pypa.io/en/stable/user_guide/#requirements-files.
For this example, our requirements.txt file has a single line, and looks like the following:
scikit-learn- Add any other packages you may need, with version numbers with one package name per line.
- Make sure that your
createlayer.shscript is executable; on Linux or macOS terminal window, navigate to where you saved thecreatelayer.shfile and enter the following:
chmod +x createlayer.shNow you’re ready to create a layer.
- In the terminal, enter the following:
./createlayer.sh 3.6This command pulls the container that matches the Lambda runtime (which ensures that your layer is compatible by default), creates the layer using packages specified in the requirements.txt file, and saves a layer.zip that you can upload to a Lambda function.
The following code shows example logs when running this script to create a Lambda-compatible sklearn layer:
./createlayer.sh 3.6
Creating layer compatible with python version 3.6
Unable to find image 'lambci/lambda:build-python3.6' locally
build-python3.6: Pulling from lambci/lambda
d7ca5f5e6604: Pull complete
5e23dc432ea7: Pull complete
fd755da454b3: Pull complete
c81981d73e17: Pull complete
Digest: sha256:059229f10b177349539cd14d4e148b45becf01070afbba8b3a8647a8bd57371e
Status: Downloaded newer image for lambci/lambda:build-python3.6
Collecting scikit-learn
  Downloading scikit_learn-0.22.1-cp36-cp36m-manylinux1_x86_64.whl (7.0 MB)
Collecting joblib>=0.11
  Downloading joblib-0.14.1-py2.py3-none-any.whl (294 kB)
Collecting scipy>=0.17.0
  Downloading scipy-1.4.1-cp36-cp36m-manylinux1_x86_64.whl (26.1 MB)
Collecting numpy>=1.11.0
  Downloading numpy-1.18.1-cp36-cp36m-manylinux1_x86_64.whl (20.1 MB)
Installing collected packages: joblib, numpy, scipy, scikit-learn
Successfully installed joblib-0.14.1 numpy-1.18.1 scikit-learn-0.22.1 scipy-1.4.1
Done creating layer!
-rw-r--r--  1 user  ANTDomain Users    60M Feb 23 21:53 layer.zip
Managing ML Lambda layers using the AWS SAM CLI
AWS SAM is an open-source framework that you can use to build serverless applications on AWS, including Lambda functions, event sources, and other resources that work together to perform tasks. Because AWS SAM is an extension of AWS CloudFormation, you get the reliable deployment capabilities of AWS CloudFormation. In this post, we focus on how to use AWS SAM to build layers for your Python functions. For more information about getting started with AWS SAM, see the AWS SAM Developer Guide.
- Make sure you have the AWS SAM CLI installed by running the following code:
sam --version
SAM CLI, version 1.20.0
- Then, assume you have the following file structure:
./
├── my_layer
│   ├── makefile
│   └── requirements.txt
└── template.yml
Let’s look at files inside the my_layer folder individually:
template.yml– Defines the layer resource and compatible runtimes, and points to a makefile:
AWSTemplateFormatVersion: '2010-09-09'
Transform: 'AWS::Serverless-2016-10-31'
Resources:
  MyLayer:
    Type: AWS::Serverless::LayerVersion
    Properties:
      ContentUri: my_layer
      CompatibleRuntimes:
        - python3.8
    Metadata:
      BuildMethod: makefile
- makefile – Defines build instructions (uses the requirements.txt file to install specific libraries in the layer):
build-MyLayer:
    mkdir -p "$(ARTIFACTS_DIR)/python"
python -m pip install -r requirements.txt -t "$(ARTIFACTS_DIR)/python"requirements.txt– Contains packages (with optional version numbers):
sklearnYou can also clone this example and modify as required. For more information, see https://github.com/aws-samples/aws-lambda-layer-create-script
- Run
sam build:
sam build
Building layer 'MyLayer'
Running CustomMakeBuilder:CopySource
Running CustomMakeBuilder:MakeBuild
Current Artifacts Directory : /Users/path/to/samexample/.aws-sam/build/MyLayer

Build Succeeded

Built Artifacts  : .aws-sam/build
Built Template   : .aws-sam/build/template.yaml

Commands you can use next
=========================
[*] Invoke Function: sam local invoke
[*] Deploy: sam deploy --guided
- Run
sam deploy –guided:
sam deploy --guided
Configuring SAM deploy
======================

	Looking for config file [samconfig.toml] :  Not found

	Setting default arguments for 'sam deploy'
	=========================================
	Stack Name [sam-app]:
	AWS Region [us-east-1]:
	#Shows you resources changes to be deployed and require a 'Y' to initiate deploy
	Confirm changes before deploy [y/N]: y
	#SAM needs permission to be able to create roles to connect to the resources in your template
	Allow SAM CLI IAM role creation [Y/n]: y
	Save arguments to configuration file [Y/n]: y
	SAM configuration file [samconfig.toml]:
	SAM configuration environment [default]:

	Looking for resources needed for deployment: Not found.
	Creating the required resources...
	Successfully created!

		Managed S3 bucket: aws-sam-cli-managed-default-samclisourcebucket-18scin0trolbw
		A different default S3 bucket can be set in samconfig.toml

	Saved arguments to config file
	Running 'sam deploy' for future deployments will use the parameters saved above.
	The above parameters can be changed by modifying samconfig.toml
	Learn more about samconfig.toml syntax at
	https://docs.aws.amazon.com/serverless-application-model/latest/developerguide/serverless-sam-cli-config.html
Initiating deployment
=====================
Uploading to sam-app/1061dc436524b10ad192d1306d2ab001.template  366 / 366  (100.00%)

Waiting for changeset to be created..

CloudFormation stack changeset
-----------------------------------------------------------------------------------------------------------------------------------------
Operation                          LogicalResourceId                  ResourceType                       Replacement
-----------------------------------------------------------------------------------------------------------------------------------------
+ Add                              MyLayer3fa5e96c85                  AWS::Lambda::LayerVersion          N/A
-----------------------------------------------------------------------------------------------------------------------------------------

Changeset created successfully. arn:aws:cloudformation:us-east-1:497456752804:changeSet/samcli-deploy1615226109/ec665854-7440-42b7-8a9c-4c604ff565cb


Previewing CloudFormation changeset before deployment
======================================================
Deploy this changeset? [y/N]: y

2021-03-08 12:55:49 - Waiting for stack create/update to complete

CloudFormation events from changeset
-----------------------------------------------------------------------------------------------------------------------------------------
ResourceStatus                     ResourceType                       LogicalResourceId                  ResourceStatusReason
-----------------------------------------------------------------------------------------------------------------------------------------
CREATE_IN_PROGRESS                 AWS::Lambda::LayerVersion          MyLayer3fa5e96c85                  -
CREATE_COMPLETE                    AWS::Lambda::LayerVersion          MyLayer3fa5e96c85                  -
CREATE_IN_PROGRESS                 AWS::Lambda::LayerVersion          MyLayer3fa5e96c85                  Resource creation Initiated
CREATE_COMPLETE                    AWS::CloudFormation::Stack         sam-app                            -
-----------------------------------------------------------------------------------------------------------------------------------------
Now you can view these updates to your stack on the AWS CloudFormation console.
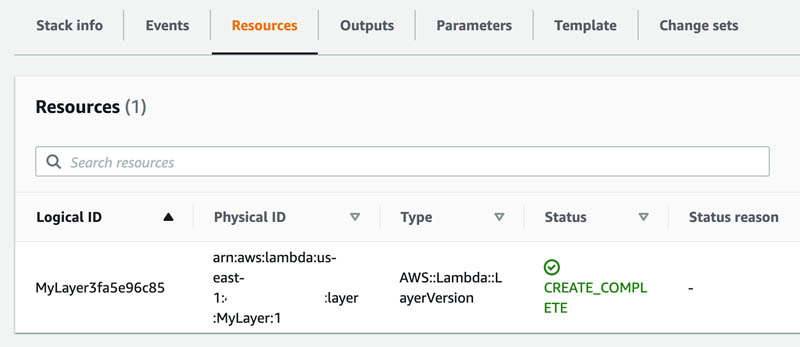
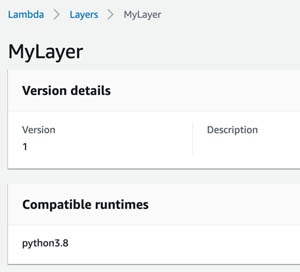
You can also view the created Lambda layer on the Lambda console.
Package the ML Lambda layer and Lambda function creation as CloudFormation templates
To automate and reuse already built layers, it’s useful to have a set of CloudFormation templates. In this section, we describe two templates that build several different ML Lambda layers and launch a Lambda function within a selected layer.
Build multiple ML layers for Lambda
When building and maintaining a standard set of layers, and when the preferred route is to work directly with AWS CloudFormation, this section may be interesting to you. We present two stacks to do the following:
- Build all layers specified in the yaml file using AWS CodeBuild
- Create a new Lambda function with an appropriate layer attached
Typically, you run the first stack infrequently and run the second stack whenever you need to create a new Lambda function with a layer attached.
Make sure you either use Serverless-ML-1 (default name) in Step 1, or change the stack name to be used from Step 1 within the CloudFormation stack in Step 2.
Step 1 – Launch the first stack
To launch the first CloudFormation stack, choose Launch Stack:
The following diagram shows the architecture of the resources that the stack builds. We can see that multiple layers (MXNet, GluonNLP, GuonCV, Pillow, SciPy and SkLearn) are being built and created as versions. In general, you would use only one of these layers in your ML inference function. If you have a layer that uses multiple libraries, consider building a single layer that contains all the libraries you need.

Step 2 – Create a Lambda function with an existing layer
Every time you want to set up a Lambda function with the appropriate ML layer attached, you can launch the following CloudFormation stack:
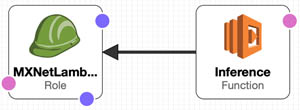
The following diagram shows the new resources that the stack builds.
Inference using containers on Lambda
When dealing with the limitations introduced while using layers, such as size limitations, and when you’re invested in container-based tooling, it may be useful to use containers for building Lambda functions. Lambda functions built as container images can be as large as 10 GB, and can comfortably fit most, if not all, popular ML frameworks. Lambda functions deployed as container images benefit from the same operational simplicity, automatic scaling, high availability, and native integrations with many services. For ML frameworks to work with Lambda, these images must implement the Lambda runtime API. However, it’s still important to keep your inference container size small, so that overall latency is minimized; using large ML frameworks such as PyTorch and TensorFlow may result in larger container sizes and higher overall latencies. To make it easier to build your own base images, the Lambda team released Lambda runtime interface clients, which we use to create a sample TensorFlow container for inference. You can also follow these steps using the accompanying notebook.
Step 1 – Train your model using TensorFlow
Train your model with the following code:
model.fit(train_set,
                    steps_per_epoch=int(0.75 * dataset_size / batch_size),
                    validation_data=valid_set,
                    validation_steps=int(0.15 * dataset_size / batch_size),
                    epochs=5)
Step 2 – Save your model as a H5 file
Save the model as an H5 file with the following code:
model.save('model/1/model.h5') #saving the modelStep 3 – Build and push the Dockerfile to Amazon ECR
We start with a base TensorFlow image, enter the inference code and model file, and add the runtime interface client and emulator:
FROM tensorflow/tensorflow

ARG FUNCTION_DIR="/function"
# Set working directory to function root directory
WORKDIR ${FUNCTION_DIR}
COPY app/* ${FUNCTION_DIR}

# Copy our model folder to the container
COPY model/1 /opt/ml/model/1

RUN pip3 install --target ${FUNCTION_DIR} awslambdaric

ADD https://github.com/aws/aws-lambda-runtime-interface-emulator/releases/latest/download/aws-lambda-rie /usr/bin/aws-lambda-rie
RUN chmod 755 /usr/bin/aws-lambda-rie
COPY entry.sh /
ENTRYPOINT [ "/entry.sh" ]
CMD [ "app.handler" ]
You can use the script included in the notebook to build and push the container to Amazon Elastic Container Registry (Amazon ECR). For this post, we add the model directly to the container. For production use cases, consider downloading the latest model you want to use from Amazon S3, from within the handler function.
Step 4 – Create a function using the container on Lambda
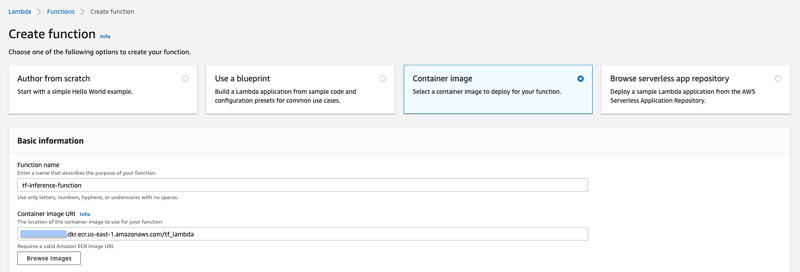
To create a new Lambda function using the container, complete the following steps:
- On the Lambda console, choose Functions.
- Choose Create function.
- Select Container image.
- For Function name, enter a name for your function.
- For Container image URI, enter the URI of your container image.
Step 5 – Create a test event and test your Lambda function
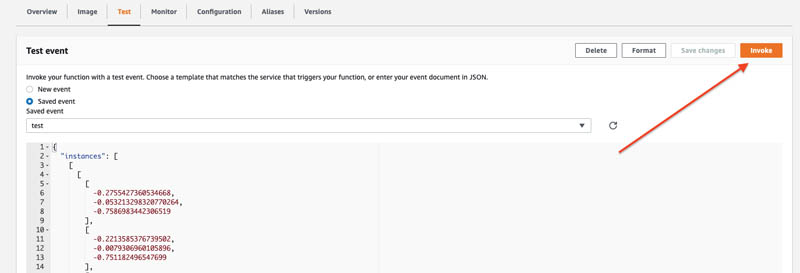
On the Test tab of the function, choose Invoke to create a test event and test your function. Use the sample payload provided in the notebook.
Conclusion
In this post, we showed how to use Lambda layers and containers to load an ML framework like scikit-learn and TensorFlow for inference. You can use the same procedure to create functions for other frameworks like PyTorch and MXNet. Larger frameworks like TensorFlow and PyTorch may not fit into the current size limit for a Lambda deployment package, so it’s beneficial to use the newly launched container options for Lambda. Another workaround is to use a model format exchange framework like ONNX to convert your model to another format before using it in a layer or in a deployment package.
Now that you know how to create an ML Lambda layer and container, you can, for example, build a serverless model exchange function using ONNX in a layer. Also consider using the Amazon SageMaker Neo runtime, treelite, or similar light versions of ML runtimes to place in your Lambda layer. Consider using a framework like SageMaker Neo to help compress your models for use with specific instance types with a dedicated runtime (called deep learning runtime or DLR).
Cost is also an important consideration when deciding what option to use (layers or containers), and this is related to the overall latency. For example, the cost of running inferences at 1 TPS for an entire month on Lambda at an average latency per inference of 50 milliseconds is about $7 [(0.0000000500*50 + 0.20/1e6) *60*60*24*30* TPS ~ $7)]. Latency depends on various factors, such as function configuration (memory, vCPUs, layers, containers used), model size, framework size, input size, additional pre- and postprocessing, and more. To save on costs and have an end-to-end ML training, tuning, monitoring and deployment solution, check out other SageMaker features, including multi-model endpoints to host and dynamically load and unload multiple models within a single endpoint.
Additionally, consider disabling the model cache in multi-model endpoints on Amazon SageMaker when you have a large number of models that are called infrequently—this allows for a higher TPS than the default mode. For a fully managed set of APIs around model deployment, see Deploy a Model in Amazon SageMaker.
Finally, the ability to work with and load larger models and frameworks from Amazon Elastic File System (Amazon EFS) volumes attached to your Lambda function can help certain use cases. For more information, see Using Amazon EFS for AWS Lambda in your serverless applications.
About the Authors
 Shreyas Subramanian is a AI/ML specialist Solutions Architect, and helps customers by using Machine Learning to solve their business challenges on the AWS platform.
 Andrea Morandi is an AI/ML specialist solutions architect in the Strategic Specialist team. He helps customers to deliver and optimize ML applications on AWS. Andrea holds a Ph.D. in Astrophysics from the University of Bologna (Italy), he lives with his wife in the Bay area, and in his free time he likes hiking.

