University of San Francisco Data Science Conference 2023 Datathon in partnership with AWS and Amazon SageMaker Studio Lab

University of San Francisco Data Science Conference 2023 Datathon in partnership with AWS and Amazon SageMaker Studio Lab

As part of the 2023 Data Science Conference (DSCO 23), AWS partnered with the Data Institute at the University of San Francisco (USF) to conduct a datathon. Participants, both high school and undergraduate students, competed on a data science project that focused on air quality and sustainability. The Data Institute at the USF aims to support cross-disciplinary research and education in the field of data science. The Data Institute and the Data Science Conference provide a distinctive fusion of cutting-edge academic research and the entrepreneurial culture of the technology industry in the San Francisco Bay Area.

The students used Amazon SageMaker Studio Lab, which is a free platform that provides a JupyterLab environment with compute (CPU and GPU) and storage (up to 15GB). Because most of the students were unfamiliar with machine learning (ML), they were given a brief tutorial illustrating how to set up an ML pipeline: how to conduct exploratory data analysis, feature engineering, model building, and model evaluation, and how to set up inference and monitoring. The tutorial referenced Amazon Sustainability Data Initiative (ASDI) datasets from the National Oceanic and Atmospheric Administration (NOAA) and OpenAQ to build an ML model to predict air quality levels using weather data via a binary classification AutoGluon model. Next, the students were turned loose to work on their own projects in their teams. The winning teams were led by Peter Ma, Ben Welner, and Ei Coltin, who were all awarded prizes at the opening ceremony of the Data Science Conference at USF.

Response from the event

“This was a fun event, and a great way to work with others. I learned some Python coding in class but this helped make it real. During the datathon, my team member and I conducted research on different ML models (LightGBM, logistic regression, SVM models, Random Forest Classifier, etc.) and their performance on an AQI dataset from NOAA aimed at detecting the toxicity of the atmosphere under specific weather conditions. We built a gradient boosting classifier to predict air quality from weather statistics.”

– Anay Pant, a junior at the Athenian School, Danville, California, and one of the winners of the datathon.

“AI is becoming increasingly important in the workplace, and 82% of companies need employees with machine learning skills. It’s critical that we develop the talent needed to build products and experiences that we will all benefit from, this includes software engineering, data science, domain knowledge, and more. We were thrilled to help the next generation of builders explore machine learning and experiment with its capabilities. Our hope is that they take this forward and expand their ML knowledge. I personally hope to one day use an app built by one of the students at this datathon!”

– Sherry Marcus, Director of AWS ML Solutions Lab.

“This is the first year we used SageMaker Studio Lab. We were pleased by how quickly high school/undergraduate students and our graduate student mentors could start their projects and collaborate using SageMaker Studio.”

– Diane Woodbridge from the Data Institute of the University of San Francisco.

Get started with Studio Lab

If you missed this datathon, you can still register for your own Studio Lab account and work on your own project. If you’re interested in running your own hackathon, reach out to your AWS representative for a Studio Lab referral code, which will give your participants immediate access to the service. Finally, you can look for next year’s challenge at the USF Data Institute.


About the Authors

Neha Narwal is a Machine Learning Engineer at AWS Bedrock where she contributes to development of large language models for generative AI applications. Her focus lies at the intersection of science and engineering to influence research in Natural Language Processing domain.

Vidya Sagar Ravipati is a Applied Science Manager at the Generative AI Innovation Center, where he leverages his vast experience in large-scale distributed systems and his passion for machine learning to help AWS customers across different industry verticals accelerate their AI and cloud adoption.

Read More

Announcing the Preview of Amazon SageMaker Profiler: Track and visualize detailed hardware performance data for your model training workloads

Announcing the Preview of Amazon SageMaker Profiler: Track and visualize detailed hardware performance data for your model training workloads

Today, we’re pleased to announce the preview of Amazon SageMaker Profiler, a capability of Amazon SageMaker that provides a detailed view into the AWS compute resources provisioned during training deep learning models on SageMaker. With SageMaker Profiler, you can track all activities on CPUs and GPUs, such as CPU and GPU utilizations, kernel runs on GPUs, kernel launches on CPUs, sync operations, memory operations across GPUs, latencies between kernel launches and corresponding runs, and data transfer between CPUs and GPUs. In this post, we walk you through the capabilities of SageMaker Profiler.

SageMaker Profiler provides Python modules for annotating PyTorch or TensorFlow training scripts and activating SageMaker Profiler. It also offers a user interface (UI) that visualizes the profile, a statistical summary of profiled events, and the timeline of a training job for tracking and understanding the time relationship of the events between GPUs and CPUs.

The need for profiling training jobs

With the rise of deep learning (DL), machine learning (ML) has become compute and data intensive, typically requiring multi-node, multi-GPU clusters. As state-of-the-art models grow in size in the order of trillions of parameters, their computational complexity and cost also increase rapidly. ML practitioners have to cope with common challenges of efficient resource utilization when training such large models. This is particularly evident in large language models (LLMs), which typically have billions of parameters and therefore require large multi-node GPU clusters in order to train them efficiently.

When training these models on large compute clusters, we can encounter compute resource optimization challenges such as I/O bottlenecks, kernel launch latencies, memory limits, and low resource utilizations. If the training job configuration is not optimized, these challenges can result in inefficient hardware utilization and longer training times or incomplete training runs, which increase the overall costs and timelines for the project.

Prerequisites

The following are the prerequisites to start using SageMaker Profiler:

  • A SageMaker domain in your AWS account – For instructions on setting up a domain, see Onboard to Amazon SageMaker Domain using quick setup. You also need to add domain user profiles for individual users to access the SageMaker Profiler UI application. For more information, see Add and remove SageMaker Domain user profiles.
  • Permissions – The following list is the minimum set of permissions that should be assigned to the execution role for using the SageMaker Profiler UI application:
    • sagemaker:CreateApp
    • sagemaker:DeleteApp
    • sagemaker:DescribeTrainingJob
    • sagemaker:SearchTrainingJobs
    • s3:GetObject
    • s3:ListBucket

Prepare and run a training job with SageMaker Profiler

To start capturing kernel runs on GPUs while the training job is running, modify your training script using the SageMaker Profiler Python modules. Import the library and add the start_profiling() and stop_profiling() methods to define the beginning and the end of profiling. You can also use optional custom annotations to add markers in the training script to visualize hardware activities during particular operations in each step.

There are two approaches that you can take to profile your training scripts with SageMaker Profiler. The first approach is based on profiling full functions; the second approach is based on profiling specific code lines in functions.

To profile by functions, use the context manager smppy.annotate to annotate full functions. The following example script shows how to implement the context manager to wrap the training loop and full functions in each iteration:

import smppy

sm_prof = smppy.SMProfiler.instance()
config = smppy.Config()
config.profiler = {
    "EnableCuda": "1",
}
sm_prof.configure(config)
sm_prof.start_profiling()

for epoch in range(args.epochs):
    if world_size > 1:
        sampler.set_epoch(epoch)
    tstart = time.perf_counter()
    for i, data in enumerate(trainloader, 0):
        with smppy.annotate("step_"+str(i)):
            inputs, labels = data
            inputs = inputs.to("cuda", non_blocking=True)
            labels = labels.to("cuda", non_blocking=True)
    
            optimizer.zero_grad()
    
            with smppy.annotate("Forward"):
                outputs = net(inputs)
            with smppy.annotate("Loss"):
                loss = criterion(outputs, labels)
            with smppy.annotate("Backward"):
                loss.backward()
            with smppy.annotate("Optimizer"):
                optimizer.step()

sm_prof.stop_profiling()

You can also use smppy.annotation_begin() and smppy.annotation_end() to annotate specific lines of code in functions. For more information, refer to documentation.

Configure the SageMaker training job launcher

After you’re done annotating and setting up the profiler initiation modules, save the training script and prepare the SageMaker framework estimator for training using the SageMaker Python SDK.

  1. Set up a profiler_config object using the ProfilerConfig and Profiler modules as follows:
    from sagemaker import ProfilerConfig, Profiler
    profiler_config = ProfilerConfig(
        profiler_params = Profiler(cpu_profiling_duration=3600))

  2. Create a SageMaker estimator with the profiler_config object created in the previous step. The following code shows an example of creating a PyTorch estimator:
    import sagemaker
    from sagemaker.pytorch import PyTorch
    
    estimator = PyTorch(
        framework_version="2.0.0",
        image_uri="763104351884.dkr.ecr.<region>.amazonaws.com/pytorch-training:2.0.0-gpu-py310-cu118-ubuntu20.04-sagemaker",
        role=sagemaker.get_execution_role(),
        entry_point="train_with_profiler_demo.py", # your training job entry point
        source_dir=source_dir, # source dir for your training script
        output_path=output_path,
        base_job_name="sagemaker-profiler-demo",
        hyperparameters=hyperparameters, # if any
        instance_count=1, 
        instance_type=ml.p4d.24xlarge,
        profiler_config=profiler_config
    )

If you want to create a TensorFlow estimator, import sagemaker.tensorflow.TensorFlow instead, and specify one of the TensorFlow versions supported by SageMaker Profiler. For more information about supported frameworks and instance types, see Supported frameworks.

  1. Start the training job by running the fit method:
    estimator.fit(wait=False)

Launch the SageMaker Profiler UI

When the training job is complete, you can launch the SageMaker Profiler UI to visualize and explore the profile of the training job. You can access the SageMaker Profiler UI application through the SageMaker Profiler landing page on the SageMaker console or through the SageMaker domain.

To launch the SageMaker Profiler UI application on the SageMaker console, complete the following steps:

  1. On the SageMaker console, choose Profiler in the navigation pane.
  2. Under Get started, select the domain in which you want to launch the SageMaker Profiler UI application.

If your user profile only belongs to one domain, you will not see the option for selecting a domain.

  1. Select the user profile for which you want to launch the SageMaker Profiler UI application.

If there is no user profile in the domain, choose Create user profile. For more information about creating a new user profile, see Add and Remove User Profiles.

  1. Choose Open Profiler.

You can also launch the SageMaker Profiler UI from the domain details page.

Gain insights from the SageMaker Profiler

When you open the SageMaker Profiler UI, the Select and load a profile page opens, as shown in the following screenshot.

You can view a list of all the training jobs that have been submitted to SageMaker Profiler and search for a particular training job by its name, creation time, and run status (In Progress, Completed, Failed, Stopped, or Stopping). To load a profile, select the training job you want to view and choose Load. The job name should appear in the Loaded profile section at the top.

Choose the job name to generate the dashboard and timeline. Note that when you choose the job, the UI automatically opens the dashboard. You can load and visualize one profile at a time. To load another profile, you must first unload the previously loaded profile. To unload a profile, choose the trash bin icon in the Loaded profile section.

For this post, we view the profile of an ALBEF training job on two ml.p4d.24xlarge instances.

After you finish loading and selecting the training job, the UI opens the Dashboard page, as shown in the following screenshot.

You can see the plots for key metrics, namely the GPU active time, GPU utilization over time, CPU active time, and CPU utilization over time. The GPU active time pie chart shows the percentage of GPU active time vs. GPU idle time, which enables us to check if the GPUs are more active than idle throughout the entire training job. The GPU utilization over time timeline graph shows the average GPU utilization rate over time per node, aggregating all the nodes in a single chart. You can check if the GPUs have an unbalanced workload, under-utilization issues, bottlenecks, or idle issues during certain time intervals. For more details on interpreting these metrics, refer to documentation.

The dashboard provides you with additional plots, including time spent by all GPU kernels, time spent by the top 15 GPU kernels, launch counts of all GPU kernels, and launch counts of the top 15 GPU kernels, as shown in the following screenshot.

Lastly, the dashboard enables you to visualize additional metrics, such as the step time distribution, which is a histogram that shows the distribution of step durations on GPUs, and the kernel precision distribution pie chart, which shows the percentage of time spent on running kernels in different data types such as FP32, FP16, INT32, and INT8.

You can also obtain a pie chart on the GPU activity distribution that shows the percentage of time spent on GPU activities, such as running kernels, memory (memcpy and memset), and synchronization (sync). You can visualize the percentage of time spent on GPU memory operations from the GPU memory operations distribution pie chart.

You can also create your own histograms based on a custom metric that you annotated manually as described earlier in this post. When adding a custom annotation to a new histogram, select or enter the name of the annotation you added in the training script.

Timeline interface

The SageMaker Profiler UI also includes a timeline interface, which provides you with a detailed view into the compute resources at the level of operations and kernels scheduled on the CPUs and run on the GPUs. The timeline is organized in a tree structure, giving you information from the host level to the device level, as shown in the following screenshot.

For each CPU, you can track the CPU performance counters, such as clk_unhalted_ref.tsc and itlb_misses.miss_causes_a_walk. For each GPU on the 2x p4d.24xlarge instance, you can see a host timeline and a device timeline. Kernel launches are on the host timeline and kernel runs are on the device timeline.

You can also zoom in to the individual steps. In the following screenshot, we have zoomed in to step_41. The timeline strip selected in the following screenshot is the AllReduce operation, an essential communication and synchronization step in distributed training, run on GPU-0. In the screenshot, note that the kernel launch in the GPU-0 host connects to the kernel run in the GPU-0 device stream 1, indicated with the arrow in cyan.

Availability and considerations

SageMaker Profiler is available in PyTorch (version 2.0.0 and 1.13.1) and TensorFlow (version 2.12.0 and 2.11.1). The following table provides the links to the supported AWS Deep Learning Containers for SageMaker.

Framework Version AWS DLC Image URI
PyTorch 2.0.0 763104351884.dkr.ecr.<region>.amazonaws.com/pytorch-training:2.0.0-gpu-py310-cu118-ubuntu20.04-sagemaker
PyTorch 1.13.1 763104351884.dkr.ecr.<region>.amazonaws.com/pytorch-training:1.13.1-gpu-py39-cu117-ubuntu20.04-sagemaker
TensorFlow 2.12.0 763104351884.dkr.ecr.<region>.amazonaws.com/tensorflow-training:2.12.0-gpu-py310-cu118-ubuntu20.04-sagemaker
TensorFlow 2.11.1 763104351884.dkr.ecr.<region>.amazonaws.com/tensorflow-training:2.11.1-gpu-py39-cu112-ubuntu20.04-sagemaker

SageMaker Profiler is currently available in the following Regions: US East (Ohio, N. Virginia), US West (Oregon), and Europe (Frankfurt, Ireland).

SageMaker Profiler is available in the training instance types ml.p4d.24xlarge, ml.p3dn.24xlarge, and ml.g4dn.12xlarge.

For the full list of supported frameworks and versions, refer to documentation.

SageMaker Profiler incurs charges after the SageMaker Free Tier or the free trial period of the feature ends. For more information, see Amazon SageMaker Pricing.

Performance of SageMaker Profiler

We compared the overhead of SageMaker Profiler against various open-source profilers. The baseline used for the comparison was obtained from running the training job without a profiler.

Our key finding revealed that SageMaker Profiler generally resulted in a shorter billable training duration because it had less overhead time on the end-to-end training runs. It also generated less profiling data (up to 10 times less) when compared against open-source alternatives. The smaller profiling artifacts generated by SageMaker Profiler require less storage, thereby also saving on costs.

Conclusion

SageMaker Profiler enables you to get detailed insights into the utilization of compute resources when training your deep learning models. This can enable you to resolve performance hotspots and bottlenecks to ensure efficient resource utilization that would ultimately drive down training costs and reduce the overall training duration.

To get started with SageMaker Profiler, refer to documentation.


About the Authors

 Roy Allela is a Senior AI/ML Specialist Solutions Architect at AWS based in Munich, Germany. Roy helps AWS customers—from small startups to large enterprises—train and deploy large language models efficiently on AWS. Roy is passionate about computational optimization problems and improving the performance of AI workloads.

Sushant Moon is a Data Scientist at AWS, India, specializing in guiding customers through their AI/ML endeavors. With a diverse background spanning retail, finance, and insurance domains, he delivers innovative and tailored solutions. Beyond his professional life, Sushant finds rejuvenation in swimming and seeks inspiration from his travels to diverse locales.

Diksha Sharma is an AI/ML Specialist Solutions Architect in the Worldwide Specialist Organization. She works with public sector customers to help them architect efficient, secure, and scalable machine learning applications including generative AI solutions on AWS. In her spare time, Diksha loves to read, paint, and spend time with her family.

Read More

Persistent Systems shapes the future of software engineering with Amazon CodeWhisperer

Persistent Systems shapes the future of software engineering with Amazon CodeWhisperer

Amazon CodeWhisperer, the AWS AI coding companion, is a step change in developer productivity tools. Based on generative AI technology, Amazon CodeWhisperer offers contextualized code snippets or recommendations based on natural language prompts to build software quickly, responsibly, and securely. It enables productivity gains and increases accuracy for accelerated digital transformations. Amazon CodeWhisperer ensures enterprises have greater control over AI-generated code, especially the code written by developers who may have a limited understanding of code attribution, quality, and security requirements.

Persistent Systems, a global digital engineering provider, has run several pilots and formal studies with Amazon CodeWhisperer that point to shifts in software engineering, generative AI-led modernization, responsible innovation, and more. This post highlights four themes emerging from Persistent’s Amazon CodeWhisperer experiments that could change software engineering as we know it.

Beyond productivity gains: Reimagining coding with Amazon CodeWhisperer

In this section, we discuss some of the ways that Amazon CodeWhisperer is reimagining coding.

Improving responsible delivery

Ownership, explainability, and transparency of AI-generated code are the most contentious points for the commercial adoption of coding companions such as Amazon CodeWhisperer. Amazon gives developers complete ownership of the code they write using Amazon CodeWhisperer. The Amazon CodeWhisperer team has carefully curated the training data and omitted restrictive licenses, ensuring developers don’t inadvertently use restrictively licensed code when they use Amazon CodeWhisperer. In addition, because recommender pipelines can be strongly influenced by open-source code, if Amazon CodeWhisperer detects a lineage, it flags the license references (for example, MIT or Apache, an open-source project). This enables the developer to attribute code snippets to the source owners, instituting coding best practices. Although Amazon collects data such as code snippets, recommendations, and comments from files open in the integrated development environment, for Amazon CodeWhisperer Professional users, these are not stored or used to train the model. Also, Amazon CodeWhisperer Individual users can opt out of sharing content with AWS, limiting the chances of this being reproduced as recommendations to other users.

Persistent’s approach to generative AI mirrors Richard P. Feynman’s thinking, who said, “I would rather have questions that can’t be answered than answers that can’t be questioned.” Persistent prioritizes responsibility, accountability, and transparency to build client trust. One example of the potential of Amazon CodeWhisperer lies in its ability to reference code, helping clients circumvent legal liabilities that could derail other rewards. For more information about Persistent’s approach to generative AI, refer to Generative AI Services and Solutions.

Moving code security upstream and upfront

Seasoned developers will tell you that security cannot be tested-in; it must be built from the ground up. Although some approaches, such as DevSecOps, make it easier for developers, code security experts, and operations teams to embed security testing while the code is written, Amazon CodeWhisperer takes this one step further. It runs security scans on the code directly in the integrated development environment (IDE), allowing a single developer resource to test the code for quality and security. This highly automated, shift-left scenario for security testing enables enterprises to arrest defects upstream and remedy them at a fraction of the cost and time. Especially now, when coding, with the advent of generative AI moving closer to business users, the automated, in-line security scans in Amazon CodeWhisperer will provide less rework, faster time to production, and resilient code.

Persistent helps leading global organizations fortify their business applications with code embedded with security guardrails. It believes security testing has to shift closer to the developer (professional or citizen) and be encoded into applications as they are written. Amazon CodeWhisperer, with its transformative power to fast-track not just coding but secure coding, fits well into the narrative.

Enabling developer skills to undergo a reboot

Most developers must undergo at least 4 months of training before being tagged to projects. In our pilot, Amazon CodeWhisperer condensed the training period to 1 month with reduced cognitive load concerning understanding the context or coding language. We see this bearing on how companies hire developers, evaluating not the coding knowledge, which has been largely abstracted, but on the prompt engineering expertise and the ability to be creative with tools such as Amazon CodeWhisperer.

The parameters for professional developers will change, and quickly depending on their ability to tune the input to get the desired answer. This also opens the field for citizen developers or business technologists, bringing coding closer to the business.

Driving implementation closer to strategy

With so many moving parts, businesses and their technology partners will return to the whiteboard together. The engagement model will evolve to factor in these new variables (such as faster coding timelines, secure code, more citizen developers, or domain-oriented developers) unleashed by Amazon CodeWhisperer. Coding will now move closer to the business, automatically incorporating security guardrails and mandatory regulations into software applications as they are written, all at scale. And with verticalized workloads, success will depend on the development team’s domain expertise and the ability to translate code into innovation. This means the implementation of the company’s vision through this code will become even more watertight because it adheres to strategic pillars of security, quality, and speed.

From long shots to offshoots – what the future holds

We extrapolated these themes to map a future where Amazon CodeWhisperer can help realize “delivery moon shots” that, up until now, were aspirational. The future looks something like this:

  • Zero-wastage – Amazon CodeWhisperer, especially with its proactive security scans and reference tracker tool, will ensure the code is of shippable quality, enabling every allied function—from business to developers—to add value and minimize wastage in terms of effort, time to value, or rework. This will bring a singular focus on the core job for each stakeholder, further enforcing a value-first mindset.
  • Zero ramp-up – The ability to support multiple coding languages, factor in developer notes and comments into code suggestions, and offer lines of code on the fly makes Amazon CodeWhisperer the perfect antidote to the cold start problem for developers. As mentioned, developers don’t need a gestation period before being onboarded on a project. This dramatically cuts down the time to value, allowing implementation partners to deploy resources across projects for better monetization dynamically.
  • Zero-shot translation – Amazon CodeWhisperer supports multiple programming languages, such as Python, Java, JavaScript, TypeScript, SQL, and more. It will be able to translate code from one programming language to another, or what is called zero-shot translation ability, where it uses reference code in language A to write code in language B more accurately. This unleashes significant changes in how legacy modernization projects are planned and implemented. With the zero-shot translation ability of Amazon CodeWhisperer, Persistent is confident legacy modernization will become faster and no longer be a moon shot.
  • Zero lifting – Amazon CodeWhisperer is optimized to generate accurate code for other AWS offerings, such as Amazon Simple Storage Service (Amazon S3) and Amazon DynamoDB. The accurate code generation makes the lift easy. Because AWS and other major cloud service providers are now pushing forward a multi-cloud narrative, Persistent expects Amazon CodeWhisperer to improve accuracy while recommending code for other solutions offered by AWS peers. This makes the road smoother for multi-cloud or multi-platform settings, eliminating the heavy lifting required while shifting workloads from one service vendor to another—supercharging digital transformation 2.0.

Conclusion

Amazon CodeWhisperer goes beyond improving developer productivity: it democratizes coding and brings it closer to business users while ensuring best practices such as code attribution and enhanced security are never out of the purview.

Persistent is excited about Amazon CodeWhisperer and its potential impact on businesses and partners. It is working to create an Amazon CodeWhisperer-ready developer workforce and alerting its customers about its benefits to drive adoption. Persistent’s strong partnership with AWS makes it the best-fit technology partner to help businesses capitalize on the intrinsic value of Amazon CodeWhisperer.

To learn more about Persistent’s generative AI philosophy that reimagines the way software is engineered today and how Amazon CodeWhisperer aligns with it, refer to Generative AI Services and Solutions.


About the authors

Dr. Pandurang Kamat is Chief Technology Officer, responsible for advanced technology research focused on unlocking business value through innovation at scale. He is a seasoned technology leader who helps customers improve user experience, optimize business processes, and create new digital products. His vision for Persistent is to be an innovation powerhouse that anchors a global and diverse innovation ecosystem, comprising of academia and start-ups. He holds a bachelor’s degree in Computer Engineering from Goa University and Ph.D. in Computer Science from Rutgers University. He is a well-published author with several international research publications, an ACM-India Eminent Speaker, serves on the board of studies at universities, and mentors technology start-ups.

Ankur Desai is a Principal Product Manager within the AWS AI Services team.

Kiran Randhi works for Amazon Web Services as a Principal Partner Solutions Architect in Seattle, Washington. He works closely with AWS Global Strategic SI partners to develop and implement effective cloud strategies that allow them to fully leverage the benefits of cloud technology. Kiran helps CIOs, CTOs, and architects turn their cloud visions into reality by providing architectural guidance and expertise throughout the implementation of strategic cloud solutions. He focuses on AWS security, Migration & Modernization, Data & Analytics, and other technologies to build solutions for different industries in the cloud.

Read More

Announcing Amazon S3 access point support for Amazon SageMaker Data Wrangler

Announcing Amazon S3 access point support for Amazon SageMaker Data Wrangler

We’re excited to announce Amazon SageMaker Data Wrangler support for Amazon S3 Access Points. With its visual point and clikc interface, SageMaker Data Wrangler simplifies the process of data preparation and feature engineering including data selection, cleansing, exploration, and visualization, while S3 Access Points simplifies data access by providing unique hostnames with specific access policies.

Starting today, SageMaker Data Wrangler is making it easier for users to prepare data from shared datasets stored in Amazon Simple Storage Service (Amazon S3) while enabling organizations to securely control data access in their organization. With S3 Access Points, data administrators can now create application- and team-specific access points to facilitate data sharing, rather than managing complex bucket policies with many different permission rules.

In this post, we walk you through importing data from, and exporting data to, an S3 access point in SageMaker Data Wrangler.

Solution Overview

Imagine you, as an administrator, have to manage data for multiple data science teams running their own data preparation workflows in SageMaker Data Wrangler. Administrators often face three challenges:

  • Data science teams need to access their datasets without compromising the security of others
  • Data science teams need access to some datasets with sensitive data, which further complicates managing permissions
  • Security policy only permits data access through specific endpoints to prevent unauthorized access and to reduce the exposure of data

With traditional bucket policies, you would struggle setting up granular access because bucket policies apply the same permissions to all objects within the bucket. Traditional bucket policies also can’t support securing access at the endpoint level.

S3 Access Points solves these problems by granting fine-grained access control at a granular level, making it easier to manage permissions for different teams without impacting other parts of the bucket. Instead of modifying a single bucket policy, you can create multiple access points with individual policies tailored to specific use cases, reducing the risk of misconfiguration or unintended access to sensitive data. Lastly, you can enforce endpoint policies on access points to define rules that control which VPCs or IP addresses can access the data through a specific access point.

We demonstrate how to use S3 Access Points with SageMaker Data Wrangler with the following steps:

  1. Upload data to an S3 bucket.
  2. Create an S3 access point.
  3. Configure your AWS Identity and Access Management (IAM) role with the necessary policies.
  4. Create a SageMaker Data Wrangler flow.
  5. Export data from SageMaker Data Wrangler to the access point.

For this post, we use the Bank Marketing dataset for our sample data. However, you can use any other dataset you prefer.

Prerequisites

For this walkthrough, you should have the following prerequisites:

Upload data to an S3 bucket

Upload your data to an S3 bucket. For instructions, refer to Uploading objects. For this post, we use the Bank Marketing dataset.

Create an S3 access point

To create an S3 access point, complete the following steps. For more information, refer to Creating access points.

  1. On the Amazon S3 console, choose Access Points in the navigation pane.
  2. Choose Create access point.
  3. For Access point name, enter a name for your access point.
  4. For Bucket, select Choose a bucket in this account.
  5. For Bucket name, enter the name of the bucket you created.
  6. Leave the remaining settings as default and choose Create access point.

On the access point details page, note the Amazon Resource Name (ARN) and access point alias. You use these later when you interact with the access point in SageMaker Data Wrangler.

Configure your IAM role

If you have a SageMaker Studio domain up and ready, complete the following steps to edit the execution role:

  1. On the SageMaker console, choose Domains in the navigation pane.
  2. Choose your domain.
  3. On the Domain settings tab, choose Edit.

By default, the IAM role that you use to access Data Wrangler is SageMakerExecutionRole. We need to add the following two policies to use S3 access points:

  • Policy 1 – This IAM policy grants SageMaker Data Wrangler access to perform PutObject, GetObject, and DeleteObject:
    {
        "Version": "2012-10-17",
        "Statement": [
            {
                "Sid": "S3AccessPointAccess",
                "Effect": "Allow",
                "Action": [
                    "s3:PutObject",
                    "s3:GetObject",
                    "s3:DeleteObject"
                ],
                "Resource": "arn:aws:s3:us-east-1:<<accountID>>:accesspoint/<<s3-dw-accesspoint>>"
            }
        ]
    }

  • Policy 2 – This IAM policy grants SageMaker Data Wrangler access to get the S3 access point:
    {
        "Version": "2012-10-17",
        "Statement": [
            {
                "Sid": "GetAccessPoint",
                "Effect": "Allow",
                "Action": "s3:GetAccessPoint",
                "Resource": "arn:aws:s3:us-east-1:<<accountID>>:accesspoint/<<s3-dw-accesspoint>>"
            }
        ]
    }

  1. Create these two policies and attach them to the role.

Using S3 Access Points in SageMaker Data Wrangler

To create a new SageMaker Data Wrangler flow, complete the following steps:

  1. Launch SageMaker Studio.
  2. On the File menu, choose New and Data Wrangler Flow.

  1. Choose Amazon S3 as the data source.

  1. For S3 source, enter the S3 access point using the ARN or alias that you noted down earlier.

For this post, we use the ARN to import data using the S3 access point. However, the ARN only works for S3 access points and SageMaker Studio domains within the same Region.

Alternatively, you can use the alias, as shown in the following screenshot. Unlike ARNs, aliases can be referenced across Regions.

Export data from SageMaker Data Wrangler to S3 access points

After we complete the necessary transformations, we can export the results to the S3 access point. In our case, we simply dropped a column. When you complete whatever transformations you need for your use case, complete the following steps:

  1. In the data flow, choose the plus sign.
  2. Choose Add destination and Amazon S3.

  1. Enter the dataset name and the S3 location, referencing the ARN.

Now you have used S3 access points to import and export data securely and efficiently without having to manage complex bucket policies and navigate multiple folder structures.

Clean up

If you created a new SageMaker domain to follow along, be sure to stop any running apps and delete your domain to stop incurring charges. Also, delete any S3 access points and delete any S3 buckets.

Conclusion

In this post, we introduced the availability of S3 Access Points for SageMaker Data Wrangler and showed you how you can use this feature to simplify data control within SageMaker Studio. We accessed the dataset from, and saved the resulting transformations to, an S3 access point alias across AWS accounts. We hope that you take advantage of this feature to remove any bottlenecks with data access for your SageMaker Studio users, and encourage you to give it a try!


About the authors

Peter Chung is a Solutions Architect serving enterprise customers at AWS. He loves to help customers use technology to solve business problems on various topics like cutting costs and leveraging artificial intelligence. He wrote a book on AWS FinOps, and enjoys reading and building solutions.

Neelam Koshiya is an Enterprise Solution Architect at AWS. Her current focus is to help enterprise customers with their cloud adoption journey for strategic business outcomes. In her spare time, she enjoys reading and being outdoors.

Read More

Machine learning with decentralized training data using federated learning on Amazon SageMaker

Machine learning with decentralized training data using federated learning on Amazon SageMaker

Machine learning (ML) is revolutionizing solutions across industries and driving new forms of insights and intelligence from data. Many ML algorithms train over large datasets, generalizing patterns it finds in the data and inferring results from those patterns as new unseen records are processed. Usually, if the dataset or model is too large to be trained on a single instance, distributed training allows for multiple instances within a cluster to be used and distribute either data or model partitions across those instances during the training process. Native support for distributed training is offered through the Amazon SageMaker SDK, along with example notebooks in popular frameworks.

However, sometimes due to security and privacy regulations within or across organizations, the data is decentralized across multiple accounts or in different Regions and it can’t be centralized into one account or across Regions. In this case, federated learning (FL) should be considered to get a generalized model on the whole data.

In this post, we discuss how to implement federated learning on Amazon SageMaker to run ML with decentralized training data.

What is federated learning?

Federated learning is an ML approach that allows for multiple separate training sessions running in parallel to run across large boundaries, for example geographically, and aggregate the results to build a generalized model (global model) in the process. More specifically, each training session uses its own dataset and gets its own local model. Local models in different training sessions will be aggregated (for example, model weight aggregation) into a global model during the training process. This approach stands in contrast to centralized ML techniques where datasets are merged for one training session.

Federated learning vs. distributed training on the cloud

When these two approaches are running on the cloud, distributed training happens in one Region on one account, and training data starts with a centralized training session or job. During distributed training process, the dataset gets split into smaller subsets and, depending on the strategy (data parallelism or model parallelism), subsets are sent to different training nodes or go through nodes in a training cluster, which means individual data doesn’t necessarily stay in one node of the cluster.

In contrast, with federated learning, training usually occurs in multiple separate accounts or across Regions. Each account or Region has its own training instances. The training data is decentralized across accounts or Regions from the beginning to the end, and individual data is only read by its respective training session or job between different accounts or Regions during the federated learning process.

Flower federated learning framework

Several open-source frameworks are available for federated learning, such as FATE, Flower, PySyft, OpenFL, FedML, NVFlare, and Tensorflow Federated. When choosing an FL framework, we usually consider its support for model category, ML framework, and device or operation system. We also need to consider the FL framework’s extensibility and package size so as to run it on the cloud efficiently. In this post, we choose an easily extensible, customizable, and lightweight framework, Flower, to do the FL implementation using SageMaker.

Flower is a comprehensive FL framework that distinguishes itself from existing frameworks by offering new facilities to run large-scale FL experiments, and enables richly heterogeneous FL device scenarios. FL solves challenges related to data privacy and scalability in scenarios where sharing data is not possible.

Design principles and implementation of Flower FL

Flower FL is language-agnostic and ML framework-agnostic by design, is fully extensible, and can incorporate emerging algorithms, training strategies, and communication protocols. Flower is open-sourced under Apache 2.0 License.

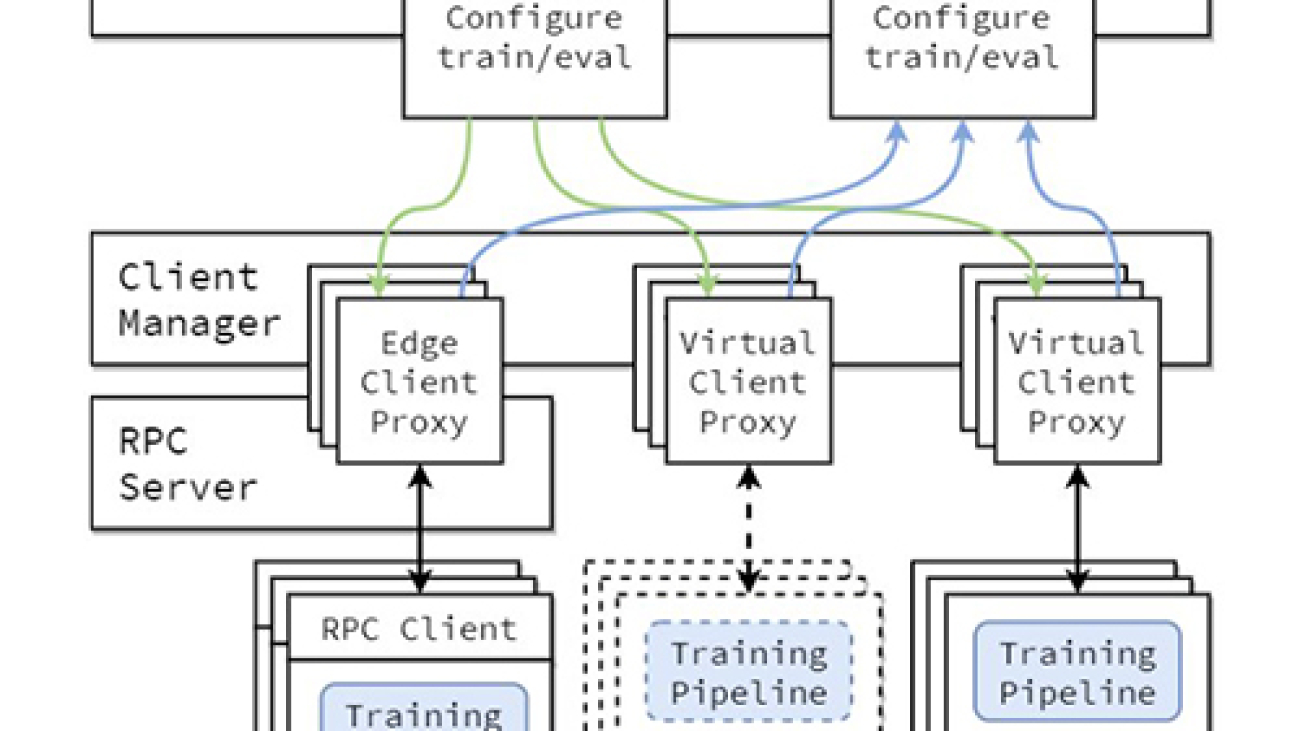
The conceptual architecture of the FL implementation is described in the paper Flower: A friendly Federated Learning Framework and is highlighted in the following figure.

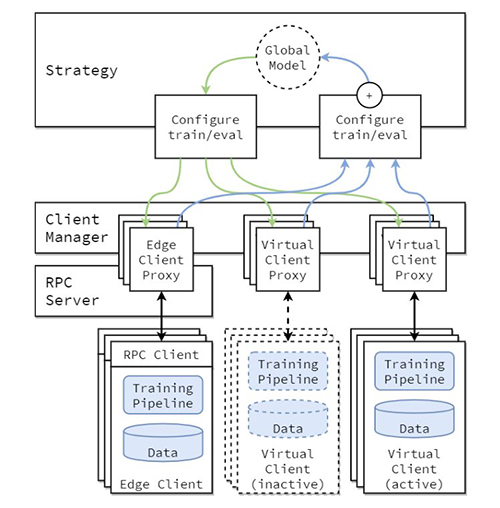
In this architecture, edge clients live on real edge devices and communicate with the server over RPC. Virtual clients, on the other hand, consume close to zero resources when inactive and only load model and data into memory when the client is being selected for training or evaluation.

The Flower server builds the strategy and configurations to be sent to the Flower clients. It serializes these configuration dictionaries (or config dict for short) to their ProtoBuf representation, transports them to the client using gRPC, and then deserializes them back to Python dictionaries.

Flower FL strategies

Flower allows customization of the learning process through the strategy abstraction. The strategy defines the entire federation process specifying parameter initialization (whether it’s server or client initialized), the minimum number of clients available required to initialize a run, the weight of the client’s contributions, and training and evaluation details.

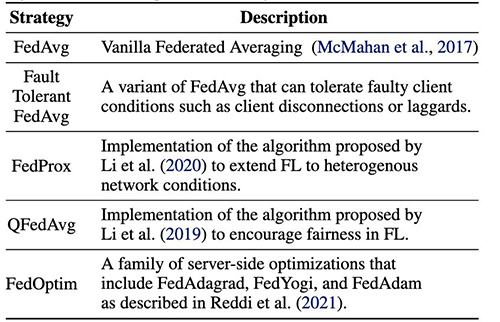
Flower has an extensive implementation of FL averaging algorithms and a robust communication stack. For a list of averaging algorithms implemented and associated research papers, refer to the following table, from Flower: A friendly Federated Learning Framework.

Federated learning with SageMaker: Solution architecture

A federated learning architecture using SageMaker with the Flower framework is implemented on top of bi-directional gRPC (foundation) streams. gRPC defines the types of messages exchanged and uses compilers to then generate efficient implementation for Python, but it can also generate the implementation for other languages, such as Java or C++.

The Flower clients receive instructions (messages) as raw byte arrays via the network. Then the clients deserialize and run the instruction (training on local data). The results (model parameters and weights) are then serialized and communicated back to the server.

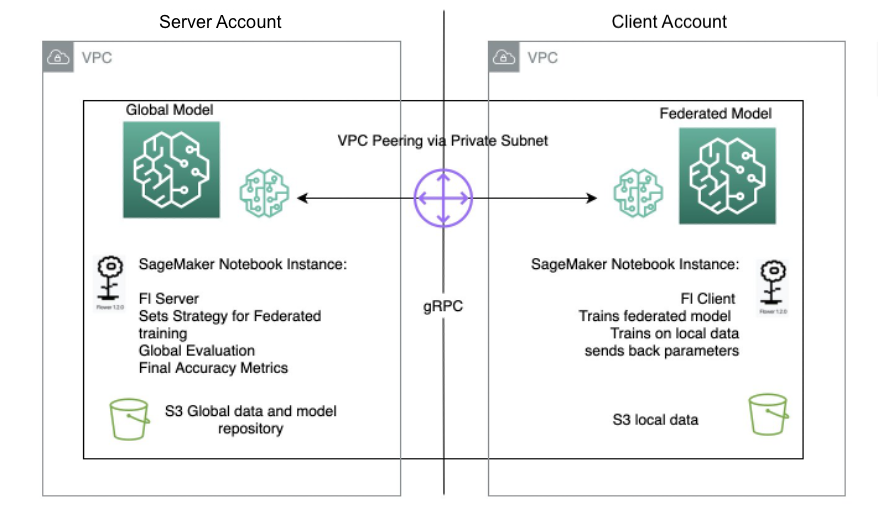
The server/client architecture for Flower FL is defined in SageMaker using notebook instances in different accounts in the same Region as the Flower server and Flower client. The training and evaluation strategies are defined on the server as well as the global parameters, then the configuration is serialized and sent to the client over VPC peering.

The notebook instance client starts a SageMaker training job that runs a custom script to trigger the instantiation of the Flower client, which deserializes and reads the server configuration, triggers the training job, and sends the parameters response.

The last step occurs on the server when the evaluation of the newly aggregated parameters is triggered upon completion of the number of runs and clients stipulated on the server strategy. The evaluation takes place on a testing dataset existing only on the server, and the new improved accuracy metrics are produced.

The following diagram illustrates the architecture of the FL setup on SageMaker with the Flower package.

Arch-on-sagemaker

Implement federated learning using SageMaker

SageMaker is a fully managed ML service. With SageMaker, data scientists and developers can quickly build and train ML models, and then deploy them into a production-ready hosted environment.

In this post, we demonstrate how to use the managed ML platform to provide a notebook experience environment and perform federated learning across AWS accounts, using SageMaker training jobs. The raw training data never leaves the account that owns the data and only the derived weights are sent across the peered connection.

We highlight the following core components in this post:

  • Networking – SageMaker allows for quick setup of default networking configuration while also allowing you to fully customize the networking depending on your organization’s requirements. We use a VPC peering configuration within the Region in this example.
  • Cross-account access settings – In order to allow a user in the server account to start a model training job in the client account, we delegate access across accounts using AWS Identity and Access Management (IAM) roles. This way, a user in the server account doesn’t have to sign out of the account and sign in to the client account to perform actions on SageMaker. This setting is only for purposes of starting SageMaker training jobs, and it doesn’t have any cross-account data access permission or sharing.
  • Implementing federated learning client code in the client account and server code in the server account – We implement federated learning client code in the client account by using the Flower package and SageMaker managed training. Meanwhile, we implement server code in the server account by using the Flower package.

Set up VPC peering

A VPC peering connection is a networking connection between two VPCs that enables you to route traffic between them using private IPv4 addresses or IPv6 addresses. Instances in either VPC can communicate with each other as if they are within the same network.

To set up a VPC peering connection, first create a request to peer with another VPC. You can request a VPC peering connection with another VPC in the same account, or in our use case, connect with a VPC in a different AWS account. To activate the request, the owner of the VPC must accept the request. For more details about VPC peering, refer to Create a VPC peering connection.

Launch SageMaker notebook instances in VPCs

A SageMaker notebook instance provides a Jupyter notebook app through a fully managed ML Amazon Elastic Compute Cloud (Amazon EC2) instance. SageMaker Jupyter notebooks are used to perform advanced data exploration, create training jobs, deploy models to SageMaker hosting, and test or validate your models.

The notebook instance has a variety of networking configurations available to it. In this setup, we have the notebook instance run within a private subnet of the VPC and don’t have direct internet access.

Configure cross-account access settings

Cross-account access settings include two steps to delegate access from the server account to client account by using IAM roles:

  1. Create an IAM role in the client account.
  2. Grant access to the role in the server account.

For detailed steps to set up a similar scenario, refer to Delegate access across AWS accounts using IAM roles.

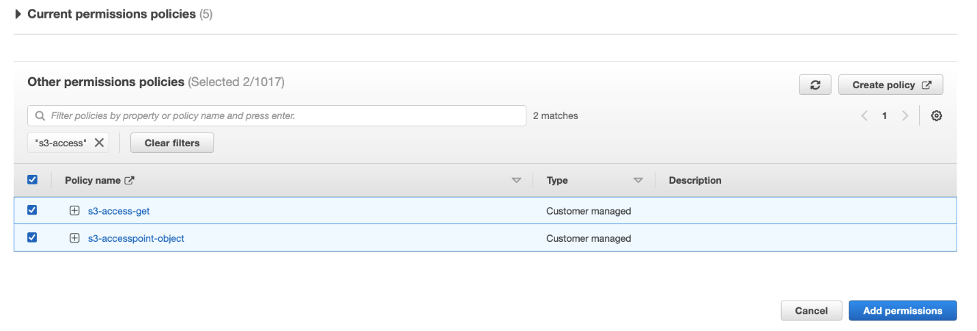
In the client account, we create an IAM role called FL-kickoff-client-job with the policy FL-sagemaker-actions attached to the role. The FL-sagemaker-actions policy has JSON content as follows:

{
    "Version": "2012-10-17",
    "Statement": [
        {
            "Effect": "Allow",
            "Action": [
                "sagemaker:CreateTrainingJob",
                "sagemaker:DescribeTrainingJob",
                "sagemaker:StopTrainingJob",
                "sagemaker:UpdateTrainingJob"
            ],
            "Resource": "*"
        },
        {
            "Effect": "Allow",
            "Action": [
                "ec2:DescribeSubnets",
                "ec2:DescribeVpcs",
                "ec2:DescribeNetworkInterfaces"
            ],
            "Resource": "*"
        },
        {
            "Effect": "Allow",
            "Action": [
                "iam:GetRole",
                "iam:PassRole"
            ],
            "Resource": "arn:aws:iam::<client-account-number>:role/service-role/AmazonSageMaker-ExecutionRole-<xxxxxxxxxxxxxxx>"
        }
    ]
}

We then modify the trust policy in the trust relationships of the FL-kickoff-client-job role:

{
    "Version": "2012-10-17",
    "Statement": [
        {
            "Effect": "Allow",
            "Principal": {
                "AWS": "arn:aws:iam::<server-account-number>:root"
            },
            "Action": "sts:AssumeRole",
            "Condition": {}
        }
    ]
}

In the server account, permissions are added to an existing user (for example, developer) to allow switching to the FL-kickoff-client-job role in client account. To do this, we create an inline policy called FL-allow-kickoff-client-job and attach it to the user. The following is the policy JSON content:

{
    "Version": "2012-10-17",
    "Statement": {
        "Effect": "Allow",
        "Action": "sts:AssumeRole",
        "Resource": "arn:aws:iam::<client-account-number>:role/FL-kickoff-client-job"
    }
}

Sample dataset and data preparation

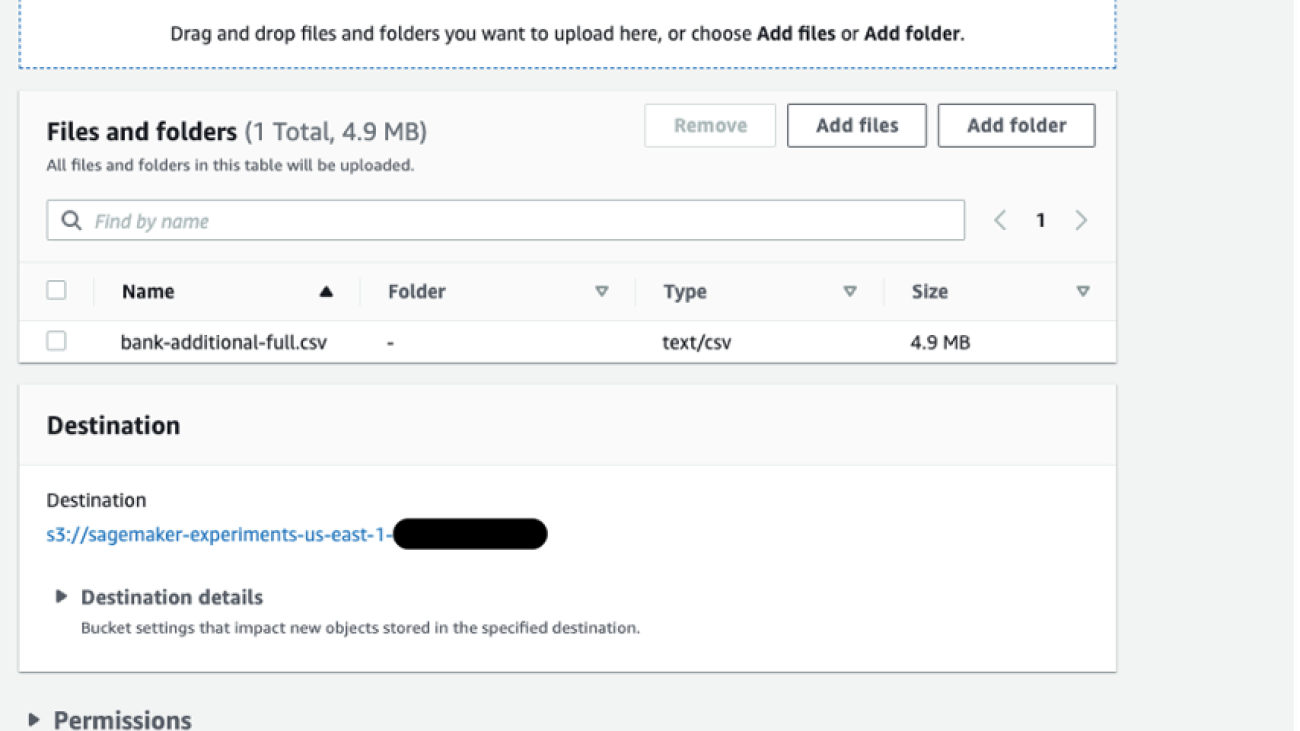
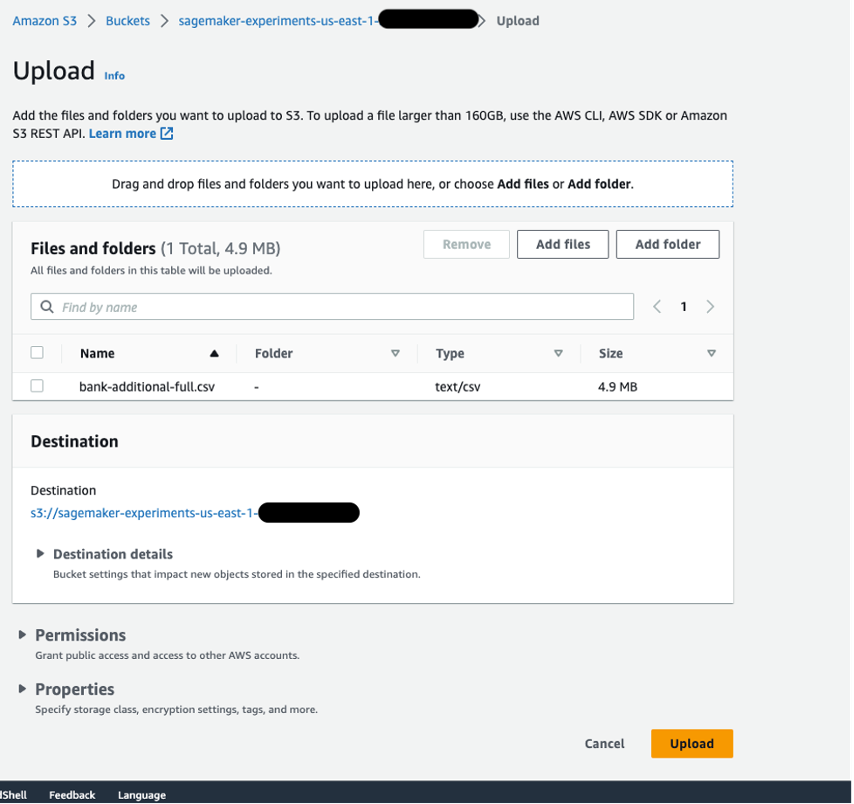
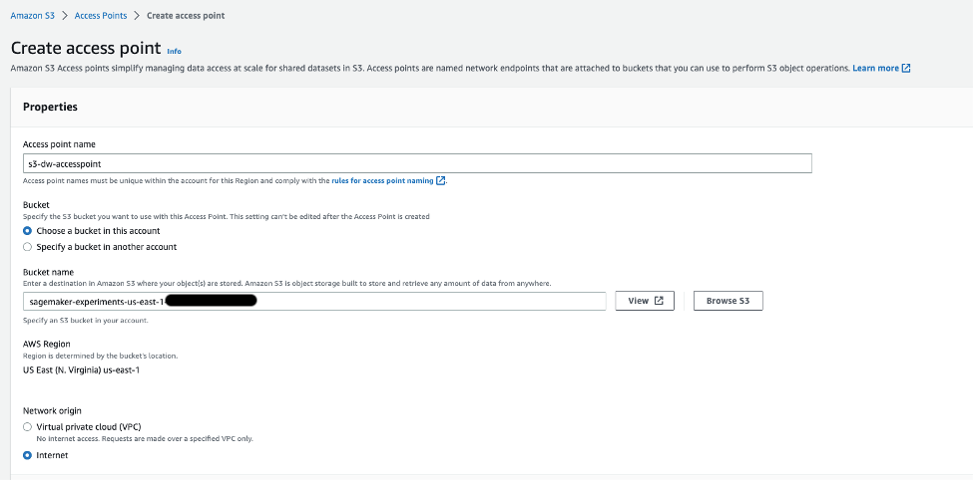
In this post, we use a curated dataset for fraud detection in Medicare providers’ data released by the Centers for Medicare & Medicaid Services (CMS). Data is split into a training dataset and a testing dataset. Because the majority of the data is non-fraud, we apply SMOTE to balance the training dataset, and further split the training dataset into training and validation parts. Both the training and validation data are uploaded to an Amazon Simple Storage Service (Amazon S3) bucket for model training in the client account, and the testing dataset is used in the server account for testing purposes only. Details of the data preparation code are in the following notebook.

With the SageMaker pre-built Docker images for the scikit-learn framework and SageMaker managed training process, we train a logistic regression model on this dataset using federated learning.

Implement a federated learning client in the client account

In the client account’s SageMaker notebook instance, we prepare a client.py script and a utils.py script. The client.py file contains code for the client, and the utils.py file contains code for some of the utility functions that will be needed for our training. We use the scikit-learn package to build the logistic regression model.

In client.py, we define a Flower client. The client is derived from the class fl.client.NumPyClient. It needs to define the following three methods:

  • get_parameters – It returns the current local model parameters. The utility function get_model_parameters will do this.
  • fit – It defines the steps to train the model on the training data in client’s account. It also receives global model parameters and other configuration information from the server. We update the local model’s parameters using the received global parameters and continue training it on the dataset in the client account. This method also sends the local model’s parameters after training, the size of the training set, and a dictionary communicating arbitrary values back to the server.
  • evaluate – It evaluates the provided parameters using the validation data in the client account. It returns the loss together with other details such as the size of the validation set and accuracy back to the server.

The following is a code snippet for the Flower client definition:

"""Client interface"""
class FlowerClient(fl.client.NumPyClient):
    def get_parameters(self, config):  
        return utils.get_model_parameters(model)

    def fit(self, parameters, config): 
        utils.set_model_params(model, parameters)
        with warnings.catch_warnings():
            warnings.simplefilter("ignore")
            model.fit(X_train, y_train)
        return utils.get_model_parameters(model), len(X_train), {}

    def evaluate(self, parameters, config):
        utils.set_model_params(model, parameters)
        loss = log_loss(y_test, model.predict_proba(X_test))
        accuracy = model.score(X_test, y_test)
        return loss, len(X_test),  {"accuracy": accuracy}

We then use SageMaker script mode to prepare the rest of the client.py file. This includes defining parameters that will be passed to SageMaker training, loading training and validation data, initializing and training the model on the client, setting up the Flower client to communicate with the server, and finally saving the trained model.

utils.py includes a few utility functions that are called in client.py:

  • get_model_parameters – It returns the scikit-learn LogisticRegression model parameters.
  • set_model_params – It sets the model’s parameters.
  • set_initial_params – It initializes the parameters of the model as zeros. This is required because the server asks for initial model parameters from the client at launch. However, in the scikit-learn framework, LogisticRegression model parameters are not initialized until model.fit() is called.
  • load_data – It loads the training and testing data.
  • save_model – It saves model as a .joblib file.

Because Flower is not a package installed in the SageMaker pre-built scikit-learn Docker container, we list flwr==1.3.0 in a requirements.txt file.

We put all three files (client.py, utils.py, and requirements.txt) under a folder and tar zip it. The .tar.gz file (named source.tar.gz in this post) is then uploaded to an S3 bucket in the client account.

Implement a federated learning server in the server account

In the server account, we prepare code on a Jupyter notebook. This includes two parts: the server first assumes a role to start a training job in the client account, then the server federates the model using Flower.

Assume a role to run the training job in the client account

We use the Boto3 Python SDK to set up an AWS Security Token Service (AWS STS) client to assume the FL-kickoff-client-job role and set up a SageMaker client so as to run a training job in the client account by using the SageMaker managed training process:

sts_client = boto3.client('sts')
assumed_role_object = sts_client.assume_role(
    RoleArn = "arn:aws:iam::<client-account-number>:role/FL-kickoff-client-job",
    RoleSessionName = "AssumeRoleSession1"
)

credentials = assumed_role_object['Credentials']

sagemaker_client = boto3.client(
    'sagemaker',
    aws_access_key_id = credentials['AccessKeyId'],
    aws_secret_access_key = credentials['SecretAccessKey'],
    aws_session_token = credentials['SessionToken'],
)

Using the assumed role, we create a SageMaker training job in client account. The training job uses the SageMaker built-in scikit-learn framework. Note that all S3 buckets and the SageMaker IAM role in the following code snippet are related to the client account:

sagemaker_client.create_training_job(
    TrainingJobName = training_job_name,
    HyperParameters = {
        "penalty": "l2",
        "max-iter": "10",
        "server-address":"<server-ip-address>:8080",
        "sagemaker_program": "client.py",
        "sagemaker_submit_directory": "s3://<client-account-s3-code-bucket>/client_code/source.tar.gz",
    },
    AlgorithmSpecification = {
        "TrainingImage": training_image,
        "TrainingInputMode": "File",
    },
    RoleArn = "arn:aws:iam::<client-account-number>:role/service-role/AmazonSageMaker-ExecutionRole-<xxxxxxxxxxxxxxx>",
    InputDataConfig=[
        {
            "ChannelName": "train",
            "DataSource": {
                "S3DataSource": {
                    "S3DataType": "S3Prefix",
                    "S3Uri": "s3://<client-account-s3-data-bucket>/data_prep/",
                    "S3DataDistributionType": "FullyReplicated",
                }
            },
        },
    ],
    OutputDataConfig = {
        "S3OutputPath": "s3://<client-account-s3-bucket-for-model-artifact>/client_artifact/"
    },
    ResourceConfig = {
        "InstanceType": "ml.m5.xlarge", 
        "InstanceCount": 1, 
        "VolumeSizeInGB": 10,
    },
    VpcConfig={
        'SecurityGroupIds': [
            "<client-account-notebook-instance-security-group>",
        ],
        'Subnets': [
            "<client-account-notebook-instance-sunbet>",
        ]
    },
    StoppingCondition = {
        "MaxRuntimeInSeconds": 86400
    },
)

Aggregate local models into a global model using Flower

We prepare code to federate the model on the server. This includes defining the strategy for federation and its initialization parameters. We use utility functions in the utils.py script described earlier to initialize and set model parameters. Flower allows you to define your own callback functions to customize an existing strategy. We use the FedAvg strategy with custom callbacks for evaluation and fit configuration. See the following code:

    """Initialize the model and federation strategy, then start the server"""
    model = LogisticRegression()
    utils.set_initial_params(model)
    
    strategy = fl.server.strategy.FedAvg(
        min_available_clients = 1,  # Minimum number of clients that need to be connected to the server before a training round can start
        min_fit_clients = 1,  # Minimum number of clients to be sampled for the next round
        min_evaluate_clients = 1,
        evaluate_fn = get_evaluate_fn(model, X_test, y_test),
        on_fit_config_fn = fit_round,
    )
    
    fl.server.start_server(
        server_address = args.server_address, 
        strategy = strategy, 
        config = fl.server.ServerConfig(num_rounds=3)  # run for 3 rounds
    )
    
    utils.save_model(args.model_dir, model)

The following two functions are mentioned in the preceding code snippet:

  • fit_round – It’s used to send the round number to the client. We pass this callback as the on_fit_config_fn parameter of the strategy. We do this simply to demonstrate the use of the on_fit_config_fn parameter.
  • get_evaluate_fn – It’s used for model evaluation on the server.

For demo purposes, we use the testing dataset that we set aside in data preparation to evaluate the model federated from the client’s account and communicate the result back to the client. However, it’s worth noting that in almost all real use cases, the data used in the server account is not split from the dataset used in the client account.

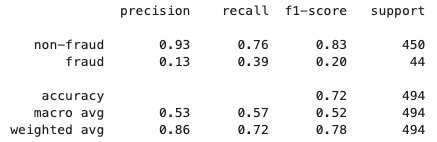
After the federated learning process is finished, a model.tar.gz file is saved by SageMaker as a model artifact in an S3 bucket in the client account. Meanwhile, a model.joblib file is saved on the SageMaker notebook instance in the server account. Lastly, we use the testing dataset to test the final model (model.joblib) on the server. Testing output of the final model is as follows:

fl-result

Clean up

After you are done, clean up the resources in both the server account and client account to avoid additional charges:

  1. Stop the SageMaker notebook instances.
  2. Delete VPC peering connections and corresponding VPCs.
  3. Empty and delete the S3 bucket you created for data storage.

Conclusion

In this post, we walked through how to implement federated learning on SageMaker by using the Flower package. We showed how to configure VPC peering, set up cross-account access, and implement the FL client and server. This post is useful for those who need to train ML models on SageMaker using decentralized data across accounts with restricted data sharing. Because the FL in this post is implemented using SageMaker, it’s worth noting that a lot more features in SageMaker can be brought into the process.

Implementing federated learning on SageMaker can take advantage of all the advanced features that SageMaker provides through the ML lifecycle. There are other ways to achieve or apply federated learning on the AWS Cloud, such as using EC2 instances or on the edge. For details about these alternative approaches, refer to Federated Learning on AWS with FedML and Applying Federated Learning for ML at the Edge.


About the authors

Sherry Ding is a senior AI/ML specialist solutions architect at Amazon Web Services (AWS). She has extensive experience in machine learning with a PhD degree in computer science. She mainly works with public sector customers on various AI/ML-related business challenges, helping them accelerate their machine learning journey on the AWS Cloud. When not helping customers, she enjoys outdoor activities.

Lorea Arrizabalaga is a Solutions Architect aligned to the UK Public Sector, where she helps customers design ML solutions with Amazon SageMaker. She is also part of the Technical Field Community dedicated to hardware acceleration and helps with testing and benchmarking AWS Inferentia and AWS Trainium workloads.

Ben Snively is an AWS Public Sector Senior Principal Specialist Solutions Architect. He works with government, non-profit, and education customers on big data, analytical, and AI/ML projects, helping them build solutions using AWS.

Read More