With little training data and no mapping of speech to phonemes, Amazon researchers used voice conversion to generate Irish-accented training data in Alexa’s own voice.Read More
Retain original PDF formatting to view translated documents with Amazon Textract, Amazon Translate, and PDFBox
Companies across various industries create, scan, and store large volumes of PDF documents. In many cases, the content is text-heavy and often written in a different language and requires translation. To address this, you need an automated solution to extract the contents within these PDFs and translate them quickly and cost-efficiently.
Many businesses have diverse global users and need to translate text to enable cross-lingual communication between them. This is a manual, slow, and expensive human effort. There’s a need to find a scalable, reliable, and cost-effective solution to translate documents while retaining the original document formatting.
For verticals such as healthcare, due to regulatory requirements, the translated documents require an additional human in the loop to verify the validity of the machine-translated document.
If the translated document doesn’t retain the original formatting and structure, it loses its context. This can make it difficult for a human reviewer to validate and make corrections.
In this post, we demonstrate how to create a new translated PDF from a scanned PDF while retaining the original document structure and formatting using a geometry-based approach with Amazon Textract, Amazon Translate, and Apache PDFBox.
Solution overview
The solution presented in this post uses the following components:
- Amazon Textract – A fully managed machine learning (ML) service that automatically extracts printed text, handwriting, and other data from scanned documents that goes beyond simple optical character recognition (OCR) to identify, understand, and extract data from forms and tables. Amazon Textract can detect text in a variety of documents, including financial reports, medical records, and tax forms.
- Amazon Translate – A neural machine translation service that delivers fast, high-quality, and affordable language translation. Amazon Translate provides high-quality on-demand and batch translation capabilities across more than 2,970 language pairs, while decreasing your translation costs.
- PDF Translate – An open-source library written in Java and published on AWS Samples in GitHub. This library contains logic to generate translated PDF documents in your desired language with Amazon Textract and Amazon Translate. It also uses the open-source Java library Apache PDFBox to create PDF documents. There are similar PDF processing libraries available in other programming languages, for example Node PDFBox.
While performing machine translations, you may have situations where you wish to preserve specific sections of text from being translated, such as names or unique identifiers. Amazon Translate allows tag modifications, which allows you to specify what text should not be translated. Amazon Translate also supports formality customization, which allows you to customize the level of formality in your translation output.
For details on Amazon Textract limits, refer to Quotas in Amazon Textract.
The solution is restricted to the languages that can be extracted by Amazon Textract, which currently supports English, Spanish, Italian, Portuguese, French, and German. These languages are also supported by Amazon Translate. For the full list of languages supported by Amazon Translate, refer to Supported languages and language codes.
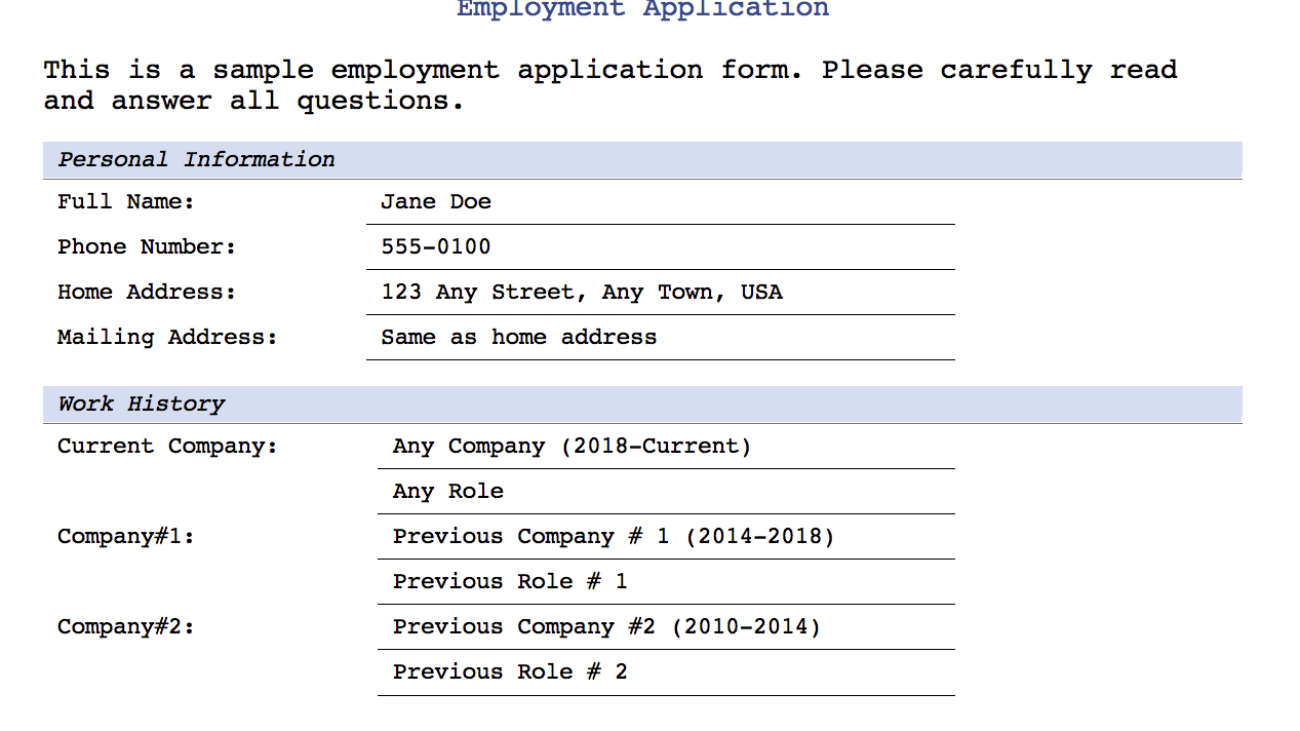
We use the following PDF to demonstrate translating the text from English to Spanish. The solution also supports generating the translated document without any formatting. The position of the translated text is maintained. The source and translated PDF documents can also be found in the AWS Samples GitHub repo.
In the following sections, we demonstrate how to run the translation code on a local machine and look at the translation code in more detail.

Prerequisites
Before you get started, set up your AWS account and the AWS Command Line Interface (AWS CLI). For access to any AWS Services such as Textract and Translate, appropriate IAM permissions are needed. We recommend utilizing least privilege permissions. To learn more about IAM permissions see Policies and permissions in IAM as well as How Amazon Textract works with IAM and How Amazon Translate works with IAM.
Run the translation code on a local machine
This solution focuses on the standalone Java code to extract and translate a PDF document. This is for easier testing and customizations to get the best-rendered translated PDF document. The code can then be integrated into an automated solution to deploy and run in AWS. See Translating PDF documents using Amazon Translate and Amazon Textract for a sample architecture that uses Amazon Simple Storage Service (Amazon S3) to store the documents and AWS Lambda to run the code.
To run the code on a local machine, complete the following steps. The code examples are available on the GitHub repo.
- Clone the GitHub repo:
- Run the following command:
- Run the following command to translate from English to Spanish:
Two translated PDF documents are created in the documents folder, with and without the original formatting (SampleOutput-es.pdf and SampleOutput-min-es.pdf).
Code to generate the translated PDF
The following code snippets show how to take a PDF document and generate a corresponding translated PDF document. It extracts the text using Amazon Textract and creates the translated PDF by adding the translated text as a layer to the image. It builds on the solution shown in the post Generating searchable PDFs from scanned documents automatically with Amazon Textract.
The code first gets each line of text with Amazon Textract. Amazon Translate is used to get translated text and save the geometry of the translated text.
The font size is calculated as follows and can easily be configured:
The translated PDF is created from the saved geometry and translated text. Changes to the color of the translated text can easily be configured.
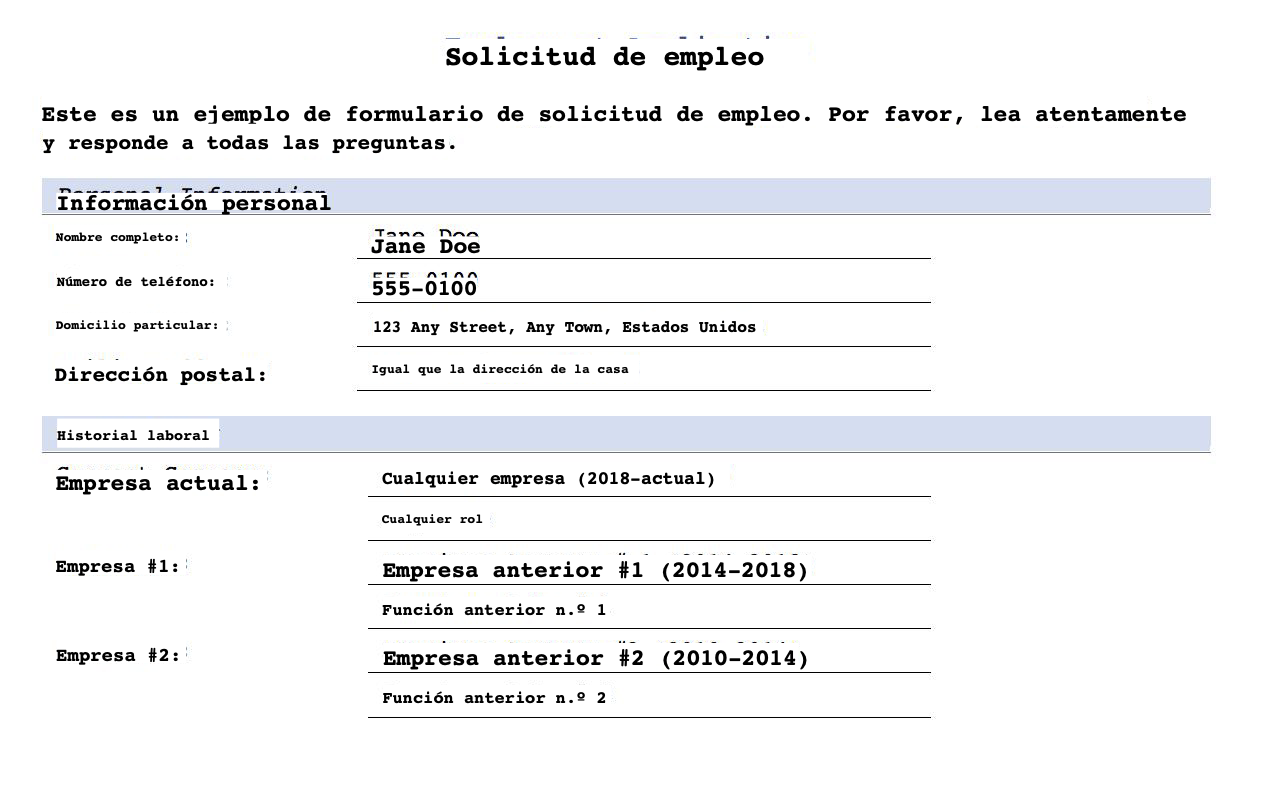
The following image shows the document translated into Spanish with the original formatting (SampleOutput-es.pdf).
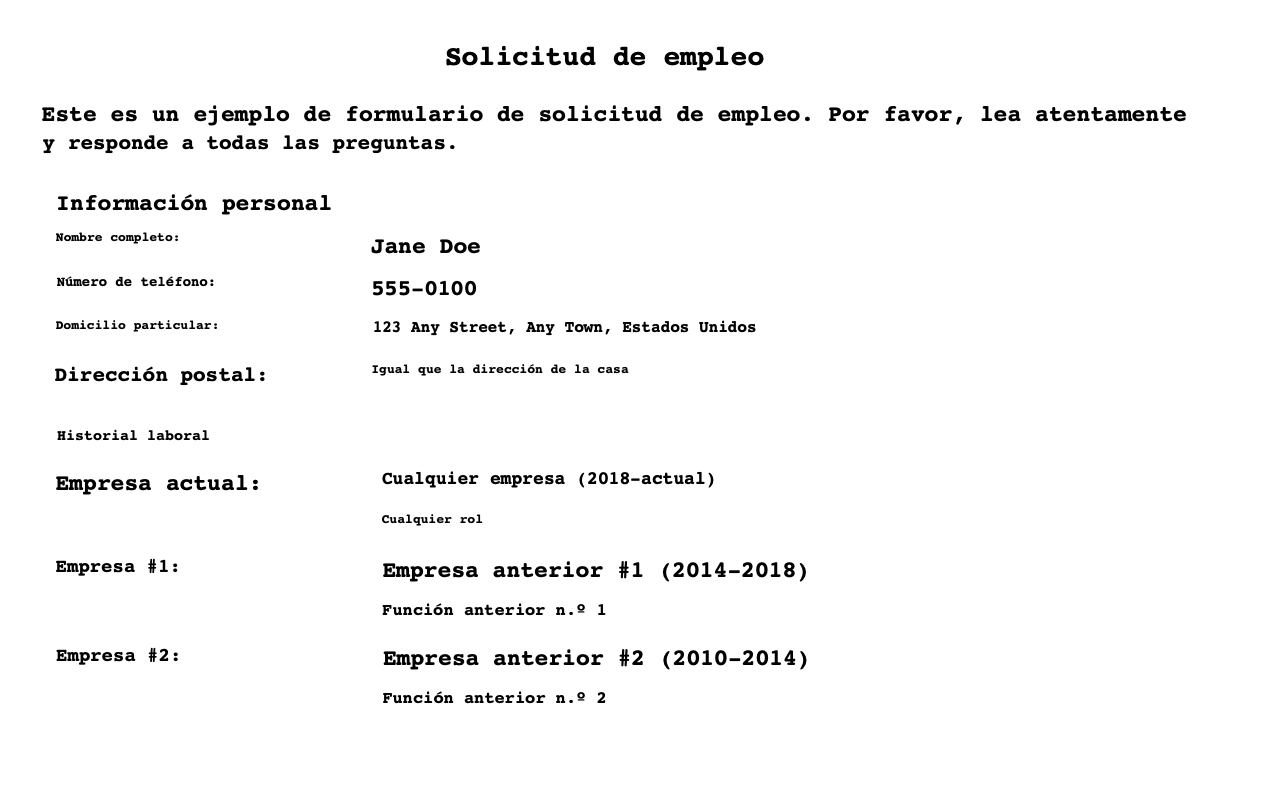
The following image shows the translated PDF in Spanish without any formatting (SampleOutput-min-es.pdf).
Processing time
The employment application pdf took about 10 seconds to extract, process and render the translated pdf. The processing time for text heavy document such as the Declaration of Independence PDF took less than a minute.
Cost
With Amazon Textract, you pay as you go based on the number of pages and images processed. With Amazon Translate, you pay as you go based on the number of text characters that are processed. Refer to Amazon Textract pricing and Amazon Translate pricing for actual costs.
Conclusion
This post showed how to use Amazon Textract and Amazon Translate to generate translated PDF documents while retaining the original document structure. You can optionally postprocess Amazon Textract results to improve the quality of the translation, for example extracted words can be passed through ML-based spellchecks such as SymSpell for data validation, or clustering algorithms can be used to preserve reading order. You can also use Amazon Augmented AI (Amazon A2I) to build human review workflows where you can use your own private workforce to review the original and translated PDF documents to provide more accuracy and context. See Designing human review workflows with Amazon Translate and Amazon Augmented AI and Building a multi-lingual document translation workflow with domain-specific and language-specific customization to get started.
About the Authors
 Anubha Singhal is a Senior Cloud Architect at Amazon Web Services in the AWS Professional Services organization.
 Sean Lawrence was formerly a Front End Engineer at AWS. He specialized in front end development in the AWS Professional Services organization and the Amazon Privacy team.
Auto-labeling module for deep learning-based Advanced Driver Assistance Systems on AWS
In computer vision (CV), adding tags to identify objects of interest or bounding boxes to locate the objects is called labeling. It’s one of the prerequisite tasks to prepare training data to train a deep learning model. Hundreds of thousands of work hours are spent generating high-quality labels from images and videos for various CV use cases. You can use Amazon SageMaker Data Labeling in two ways to create these labels:
- Amazon SageMaker Ground Truth Plus – This service provides an expert workforce that is trained on ML tasks and can help meet your data security, privacy, and compliance requirements. You upload your data, and the Ground Truth Plus team creates and manages data labeling workflows and the workforce on your behalf.
- Amazon SageMaker Ground Truth – Alternatively, you can manage your own data labeling workflows and workforce to label data.
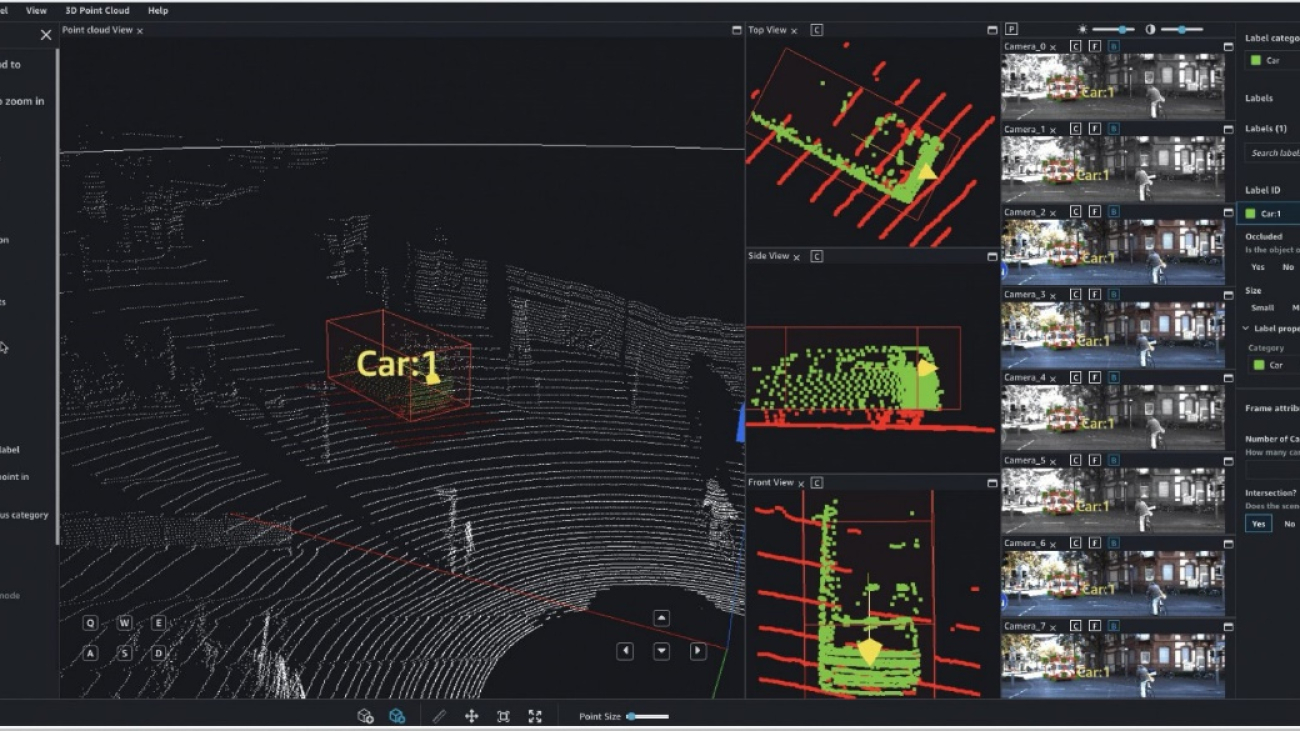
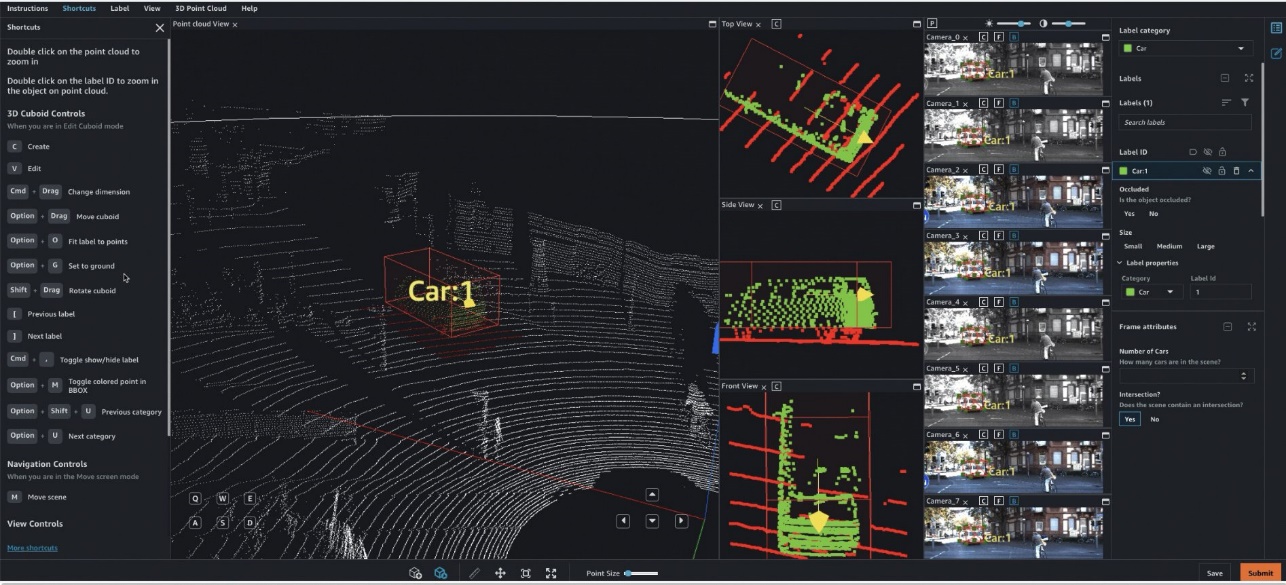
Specifically, for deep learning-based autonomous vehicle (AV) and Advanced Driver Assistance Systems (ADAS), there is a need to label complex multi-modal data from scratch, including synchronized LiDAR, RADAR, and multi-camera streams. For example, the following figure shows a 3D bounding box around a car in the Point Cloud view for LiDAR data, aligned orthogonal LiDAR views on the side, and seven different camera streams with projected labels of the bounding box.
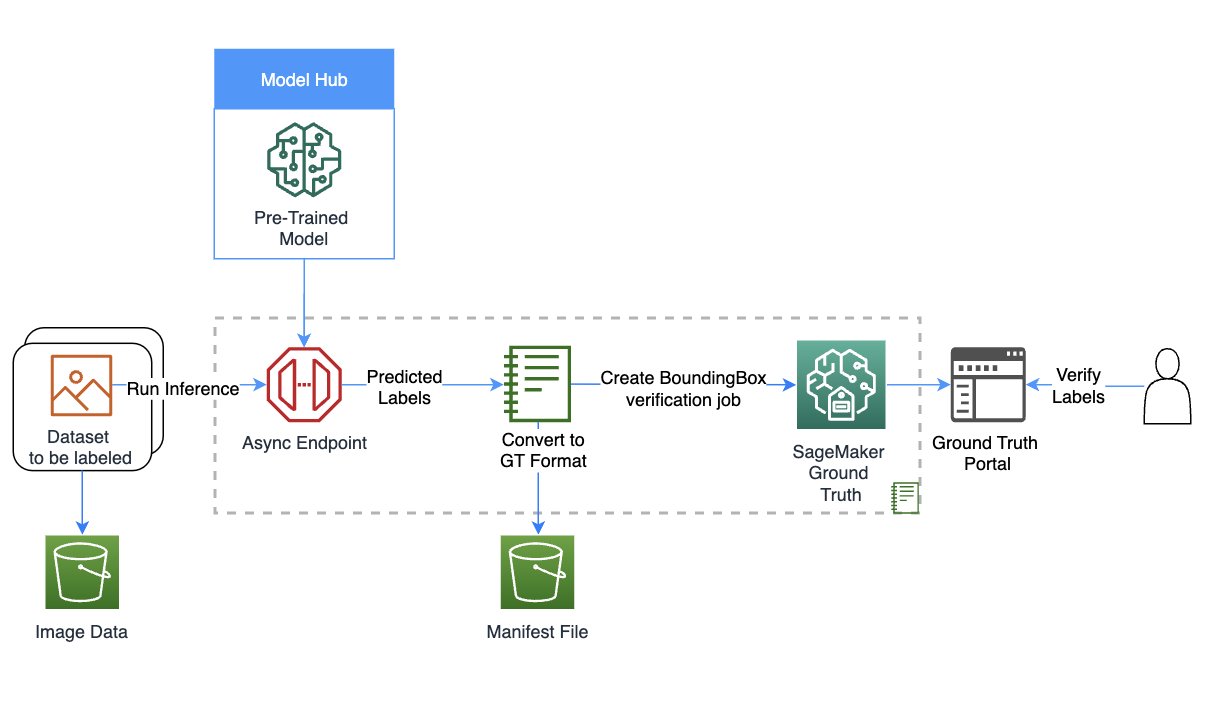
AV/ADAS teams need to label several thousand frames from scratch, and rely on techniques like label consolidation, automatic calibration, frame selection, frame sequence interpolation, and active learning to get a single labeled dataset. Ground Truth supports these features. For a full list of features, refer to Amazon SageMaker Data Labeling Features. However, it can be challenging, expensive, and time-consuming to label tens of thousands of miles of recorded video and LiDAR data for companies that are in the business of creating AV/ADAS systems. One technique used to solve this problem today is auto-labeling, which is highlighted in the following diagram for a modular functions design for ADAS on AWS.

In this post, we demonstrate how to use SageMaker features such as Amazon SageMaker JumpStart models and asynchronous inference capabilities along with Ground Truth’s functionality to perform auto-labeling.
Auto-labeling overview
Auto-labeling (sometimes referred to as pre-labeling) occurs before or alongside manual labeling tasks. In this module, the best-so-far model trained for a particular task (for example, pedestrian detection or lane segmentation) is used to generate high-quality labels. Manual labelers simply verify or adjust the automatically created labels from the resulting dataset. This is easier, faster and cheaper than labeling these large datasets from scratch. Downstream modules such as the training or validation modules can use these labels as is.
Active learning is another concept that is closely related to auto-labeling. It’s a machine learning (ML) technique that identifies data that should be labeled by your workers. Ground Truth’s automated data labeling functionality is an example of active learning. When Ground Truth starts an automated data labeling job, it selects a random sample of input data objects and sends them to human workers. When the labeled data is returned, it’s used to create a training set and a validation set. Ground Truth uses these datasets to train and validate the model used for auto-labeling. Ground Truth then runs a batch transform job to generate labels for unlabeled data, along with confidence scores for new data. Labeled data with low confidence scores is sent to human labelers. This process of training, validating, and batch transform is repeated until the full dataset is labeled.
In contrast, auto-labeling assumes that a high-quality, pre-trained model exists (either privately within the company, or publicly in a hub). This model is used to generate labels that can be trusted and used for downstream tasks such as label verification tasks, training, or simulation. This pre-trained model in the case of AV/ADAS systems is deployed onto the car at the edge, and can be used within large-scale, batch inference jobs on the cloud to generate high-quality labels.
JumpStart provides pretrained, open-source models for a wide range of problem types to help you get started with machine learning. You can use JumpStart to share models within your organization. Let’s get started!
Solution overview
For this post, we outline the major steps without going over every cell in our example notebook. To follow along or try it on your own, you can run the Jupyter notebook in Amazon SageMaker Studio.
The following diagram provides a solution overview.
Set up the role and session
For this example, we used a Data Science 3.0 kernel in Studio on an ml.m5.large instance type. First, we do some basic imports and set up the role and session for use later in the notebook:
Create your model using SageMaker
In this step, we create a model for the auto-labeling task. You can choose from three options to create a model:
- Create a model from JumpStart – With JumpStart, we can perform inference on the pre-trained model, even without fine-tuning it first on a new dataset
- Use a model shared via JumpStart with your team or organization – You can use this option if you want to use a model developed by one of the teams within your organization
- Use an existing endpoint – You can use this option if you have an existing model already deployed in your account
To use the first option, we select a model from JumpStart (here, we use mxnet-is-mask-rcnn-fpn-resnet101-v1d-coco. A list of models is available in the models_manifest.json file provided by JumpStart.
We use this JumpStart model that is publicly available and trained on the instance segmentation task, but you are free to use a private model as well. In the following code, we use the image_uris, model_uris, and script_uris to retrieve the right parameter values to use this MXNet model in the sagemaker.model.Model API to create the model:
Set up asynchronous inference and scaling
Here we set up an asynchronous inference config before deploying the model. We chose asynchronous inference because it can handle large payload sizes and can meet near-real-time latency requirements. In addition, you can configure the endpoint to auto scale and apply a scaling policy to set the instance count to zero when there are no requests to process. In the following code, we set max_concurrent_invocations_per_instance to 4. We also set up auto scaling such that the endpoint scales up when needed and scales down to zero after the auto-labeling job is complete.
Download data and perform inference
We use the Ford Multi-AV Seasonal dataset from the AWS Open Data Catalog.
First, we download and prepare the date for inference. We have provided preprocessing steps to process the dataset in the notebook; you can change it to process your dataset. Then, using the SageMaker API, we can start the asynchronous inference job as follows:
This may take up to 30 minutes or more depending on how much data you have uploaded for asynchronous inference. You can visualize one of these inferences as follows:

Convert the asynchronous inference output to a Ground Truth input manifest
In this step, we create an input manifest for a bounding box verification job on Ground Truth. We upload the Ground Truth UI template and label categories file, and create the verification job. The notebook linked to this post uses a private workforce to perform the labeling; you can change this if you’re using other types of workforces. For more details, refer to the full code in the notebook.
Verify labels from the auto-labeling process in Ground Truth
In this step, we complete the verification by accessing the labeling portal. For more details, refer to here.
When you access the portal as a workforce member, you will be able to see the bounding boxes created by the JumpStart model and make adjustments as required.

You can use this template to repeat auto-labeling with many task-specific models, potentially merge labels, and use the resulting labeled dataset in downstream tasks.
Clean up
In this step, we clean up by deleting the endpoint and the model created in previous steps:
Conclusion
In this post, we walked through an auto-labeling process involving JumpStart and asynchronous inference. We used the results of the auto-labeling process to convert and visualize labeled data on a real-world dataset. You can use the solution to perform auto-labeling with many task-specific models, potentially merge labels, and use the resulting labeled dataset in downstream tasks. You can also explore using tools like the Segment Anything Model for generating segment masks as part of the auto-labeling process. In future posts in this series, we will cover the perception module and segmentation. For more information on JumpStart and asynchronous inference, refer to SageMaker JumpStart and Asynchronous inference, respectively. We encourage you to reuse this content for use cases beyond AV/ADAS, and reach out to AWS for any help.
About the authors
 Gopi Krishnamurthy is a Senior AI/ML Solutions Architect at Amazon Web Services based in New York City. He works with large Automotive customers as their trusted advisor to transform their Machine Learning workloads and migrate to the cloud. His core interests include deep learning and serverless technologies. Outside of work, he likes to spend time with his family and explore a wide range of music.
 Shreyas Subramanian is a Principal AI/ML specialist Solutions Architect, and helps customers by using Machine Learning to solve their business challenges using the AWS platform. Shreyas has a background in large scale optimization and Machine Learning, and in use of Machine Learning and Reinforcement Learning for accelerating optimization tasks.

Democratize computer vision defect detection for manufacturing quality using no-code machine learning with Amazon SageMaker Canvas
Cost of poor quality is top of mind for manufacturers. Quality defects increase scrap and rework costs, decrease throughput, and can impact customers and company reputation. Quality inspection on the production line is crucial for maintaining quality standards. In many cases, human visual inspection is used to assess the quality and detect defects, which can limit the throughput of the line due to limitations of human inspectors.
The advent of machine learning (ML) and artificial intelligence (AI) brings additional visual inspection capabilities using computer vision (CV) ML models. Complimenting human inspection with CV-based ML can reduce detection errors, speed up production, reduce the cost of quality, and positively impact customers. Building CV ML models typically requires expertise in data science and coding, which are often rare resources in manufacturing organizations. Now, quality engineers and others on the shop floor can build and evaluate these models using no-code ML services, which can accelerate exploration and adoption of these models more broadly in manufacturing operations.
Amazon SageMaker Canvas is a visual interface that enables quality, process, and production engineers to generate accurate ML predictions on their own—without requiring any ML experience or having to write a single line of code. You can use SageMaker Canvas to create single-label image classification models for identifying common manufacturing defects using your own image datasets.
In this post, you will learn how to use SageMaker Canvas to build a single-label image classification model to identify defects in manufactured magnetic tiles based on their image.
Solution overview
This post assumes the viewpoint of a quality engineer exploring CV ML inspection, and you will work with sample data of magnetic tile images to build an image classification ML model to predict defects in the tiles for the quality check. The dataset contains more than 1,200 images of magnetic tiles, which have defects such as blowhole, break, crack, fray, and uneven surface. The following images provide an example of single-label defect classification, with a cracked tile on the left and a tile free of defects on the right.
 |
 |
In a real-world example, you can collect such images from the finished products in the production line. In this post, you use SageMaker Canvas to build a single-label image classification model that will predict and classify defects for a given magnetic tile image.
SageMaker Canvas can import image data from a local disk file or Amazon Simple Storage Service (Amazon S3). For this post, multiple folders have been created (one per defect type such as blowhole, break, or crack) in an S3 bucket, and magnetic tile images are uploaded to their respective folders. The folder called Free contains defect-free images.

There are four steps involved in building the ML model using SageMaker Canvas:
- Import the dataset of the images.
- Build and train the model.
- Analyze the model insights, such as accuracy.
- Make predictions.
Prerequisites
Before starting, you need to set up and launch SageMaker Canvas. This setup is performed by an IT administrator and involves three steps:
- Set up an Amazon SageMaker domain.
- Set up the users.
- Set up permissions to use specific features in SageMaker Canvas.
Refer to Getting started with using Amazon SageMaker Canvas and Setting Up and Managing Amazon SageMaker Canvas (for IT Administrators) to configure SageMaker Canvas for your organization.
When SageMaker Canvas is set up, the user can navigate to the SageMaker console, choose Canvas in the navigation pane, and choose Open Canvas to launch SageMaker Canvas.

The SageMaker Canvas application is launched in a new browser window.

After the SageMaker Canvas application is launched, you start the steps of building the ML model.
Import the dataset
Importing the dataset is the first step when building an ML model with SageMaker Canvas.
- In the SageMaker Canvas application, choose Datasets in the navigation pane.
- On the Create menu, choose Image.

- For Dataset name, enter a name, such as
Magnetic-Tiles-Dataset. - Choose Create to create the dataset.

After the dataset is created, you need to import images in the dataset.
- On the Import page, choose Amazon S3 (the magnetic tiles images are in an S3 bucket).
You have the choice to upload the images from your local computer as well.

- Select the folder in the S3 bucket where the magnetic tile images are stored and chose Import Data.

SageMaker Canvas starts importing the images into the dataset. When the import is complete, you can see the image dataset created with 1,266 images.

You can choose the dataset to check the details, such as a preview of the images and their label for the defect type. Because the images were organized in folders and each folder was named with the defect type, SageMaker Canvas automatically completed the labeling of the images based on the folder names. As an alternative, you can import unlabeled images, add labels, and perform labeling of the individual images at a later point of time. You can also modify the labels of the existing labeled images.

The image import is complete and you now have an images dataset created in the SageMaker Canvas. You can move to the next step to build an ML model to predict defects in the magnetic tiles.
Build and train the model
You train the model using the imported dataset.
- Choose the dataset (
Magnetic-tiles-Dataset) and choose Create a model. - For Model name, enter a name, such as
Magnetic-Tiles-Defect-Model. - Select Image analysis for the problem type and choose Create to configure the model build.

On the model’s Build tab, you can see various details about the dataset, such as label distribution, count of labeled vs. unlabeled images, and also model type, which is single-label image prediction in this case. If you have imported unlabeled images or you want to modify or correct the labels of certain images, you can choose Edit dataset to modify the labels.

You can build model in two ways: Quick build and Standard build. The Quick build option prioritizes speed over accuracy. It trains the model in 15–30 minutes. The model can be used for the prediction but it can’t be shared. It’s a good option to quickly check feasibility and accuracy of training a model with a given dataset. The Standard build chooses accuracy over speed, and model training can take between 2–4 hours.
For this post, you train the model using the Standard build option.
- Choose Standard build on the Build tab to start training the model.

The model training starts instantly. You can see the expected build time and training progress on the Analyze tab.

Wait until the model training is complete, then you can analyze model performance for the accuracy.
Analyze the model
In this case, it took less than an hour to complete the model training. When the model training is complete, you can check model accuracy on the Analyze tab to determine if the model can accurately predict defects. You see the overall model accuracy is 97.7% in this case. You can also check the model accuracy for each of the individual label or defect type, for instance 100% for Fray and Uneven but approximately 95% for Blowhole. This level of accuracy is encouraging, so we can continue the evaluation.

To better understand and trust the model, enable Heatmap to see the areas of interest in the image that the model uses to differentiate the labels. It’s based on the class activation map (CAM) technique. You can use the heatmap to identify patterns from your incorrectly predicted images, which can help improve the quality of your model.

On the Scoring tab, you can check precision and recall for the model for each of the labels (or class or defect type). Precision and recall are evaluation metrics used to measure the performance of a binary and multiclass classification model. Precision tells how good the model is at predicting a specific class (defect type, in this example). Recall tells how many times the model was able to detect a specific class.

Model analysis helps you understand the accuracy of the model before you use it for prediction.
Make predictions
After the model analysis, you can now make predictions using this model to identify defects in the magnetic tiles.
On the Predict tab, you can choose Single prediction and Batch prediction. In a single prediction, you import a single image from your local computer or S3 bucket to make a prediction about the defect. In batch prediction, you can make predictions for multiple images that are stored in a SageMaker Canvas dataset. You can create a separate dataset in SageMaker Canvas with the test or inference images for the batch prediction. For this post, we use both single and batch prediction.
For single prediction, on the Predict tab, choose Single prediction, then choose Import image to upload the test or inference image from your local computer.

After the image is imported, the model makes a prediction about the defect. For the first inference, it might take few minutes because the model is loading for the first time. But after the model is loaded, it makes instant predictions about the images. You can see the image and the confidence level of the prediction for each label type. For instance, in this case, the magnetic tile image is predicted to have an uneven surface defect (the Uneven label) and the model is 94% confident about it.

Similarly, you can use other images or a dataset of images to make predictions about the defect.
For the batch prediction, we use the dataset of unlabeled images called Magnetic-Tiles-Test-Dataset by uploading 12 test images from your local computer to the dataset.

On the Predict tab, choose Batch prediction and choose Select dataset.

Select the Magnetic-Tiles-Test-Dataset dataset and choose Generate predictions.

It will take some time to generate the predictions for all the images. When the status is Ready, choose the dataset link to see the predictions.

You can see predictions for all the images with confidence levels. You can choose any of the individual images to see image-level prediction details.

You can download the prediction in CSV or .zip file format to work offline. You can also verify the predicted labels and add them to your training dataset. To verify the predicted labels, choose Verify prediction.

In the prediction dataset, you can update labels of the individual images if you don’t find the predicted label correct. When you have updated the labels as required, choose Add to trained dataset to merge the images into your training dataset (in this example, Magnetic-Tiles-Dataset).

This updates the training dataset, which includes both your existing training images and the new images with predicted labels. You can train a new model version with the updated dataset and potentially improve the model’s performance. The new model version won’t be an incremental training, but a new training from scratch with the updated dataset. This helps keep the model refreshed with new sources of data.
Clean up
After you have completed your work with SageMaker Canvas, choose Log out to close the session and avoid any further cost.

When you log out, your work such as datasets and models remains saved, and you can launch a SageMaker Canvas session again to continue the work later.
SageMaker Canvas creates an asynchronous SageMaker endpoint for generating the predictions. To delete the endpoint, endpoint configuration, and model created by SageMaker Canvas, refer to Delete Endpoints and Resources.
Conclusion
In this post, you learned how to use SageMaker Canvas to build an image classification model to predict defects in manufactured products, to compliment and improve the visual inspection quality process. You can use SageMaker Canvas with different image datasets from your manufacturing environment to build models for use cases like predictive maintenance, package inspection, worker safety, goods tracking, and more. SageMaker Canvas gives you the ability to use ML to generate predictions without needing to write any code, accelerating the evaluation and adoption of CV ML capabilities.
To get started and learn more about SageMaker Canvas, refer to the following resources:
- Amazon SageMaker Canvas Developer Guide
- Announcing Amazon SageMaker Canvas – a Visual, No Code Machine Learning Capability for Business Analysts
About the authors
 Brajendra Singh is solution architect in Amazon Web Services working with enterprise customers. He has strong developer background and is a keen enthusiast for data and machine learning solutions.
 Danny Smith is Principal, ML Strategist for Automotive and Manufacturing Industries, serving as a strategic advisor for customers. His career focus has been on helping key decision-makers leverage data, technology and mathematics to make better decisions, from the board room to the shop floor. Lately most of his conversations are on democratizing machine learning and generative AI.
 Davide Gallitelli is a Specialist Solutions Architect for AI/ML in the EMEA region. He is based in Brussels and works closely with customers throughout Benelux. He has been a developer since he was very young, starting to code at the age of 7. He started learning AI/ML at university, and has fallen in love with it since then.
Recommend and dynamically filter items based on user context in Amazon Personalize
Organizations are continuously investing time and effort in developing intelligent recommendation solutions to serve customized and relevant content to their users. The goals can be many: transform the user experience, generate meaningful interaction, and drive content consumption. Some of these solutions use common machine learning (ML) models built on historical interaction patterns, user demographic attributes, product similarities, and group behavior. Besides these attributes, context (such as weather, location, and so on) at the time of interaction can influence users’ decisions while navigating content.
In this post, we show how to use the user’s current device type as context to enhance the effectiveness of your Amazon Personalize-based recommendations. In addition, we show how to use such context to dynamically filter recommendations. Although this post shows how Amazon Personalize can be used for a video on demand (VOD) use case, it’s worth noting that Amazon Personalize can be used across multiple industries.
What is Amazon Personalize?
Amazon Personalize enables developers to build applications powered by the same type of ML technology used by Amazon.com for real-time personalized recommendations. Amazon Personalize is capable of delivering a wide array of personalization experiences, including specific product recommendations, personalized product reranking, and customized direct marketing. Additionally, as a fully managed AI service, Amazon Personalize accelerates customer digital transformations with ML, making it easier to integrate personalized recommendations into existing websites, applications, email marketing systems, and more.
Why is context important?
Using a user’s contextual metadata such as location, time of day, device type, and weather provides personalized experiences for existing users and helps improve the cold-start phase for new or unidentified users. The cold-start phase refers to the period when your recommendation engine provides non-personalized recommendations due to the lack of historical information regarding that user. In situations where there are other requirements to filter and promote items (say in news and weather), adding a user’s current context (season or time of day) helps improve accuracy by including and excluding recommendations.
Let’s take the example of a VOD platform recommending shows, documentaries, and movies to the user. Based on behavior analysis, we know VOD users tend to consume shorter-length content like sitcoms on mobile devices and longer-form content like movies on their TV or desktop.
Solution overview
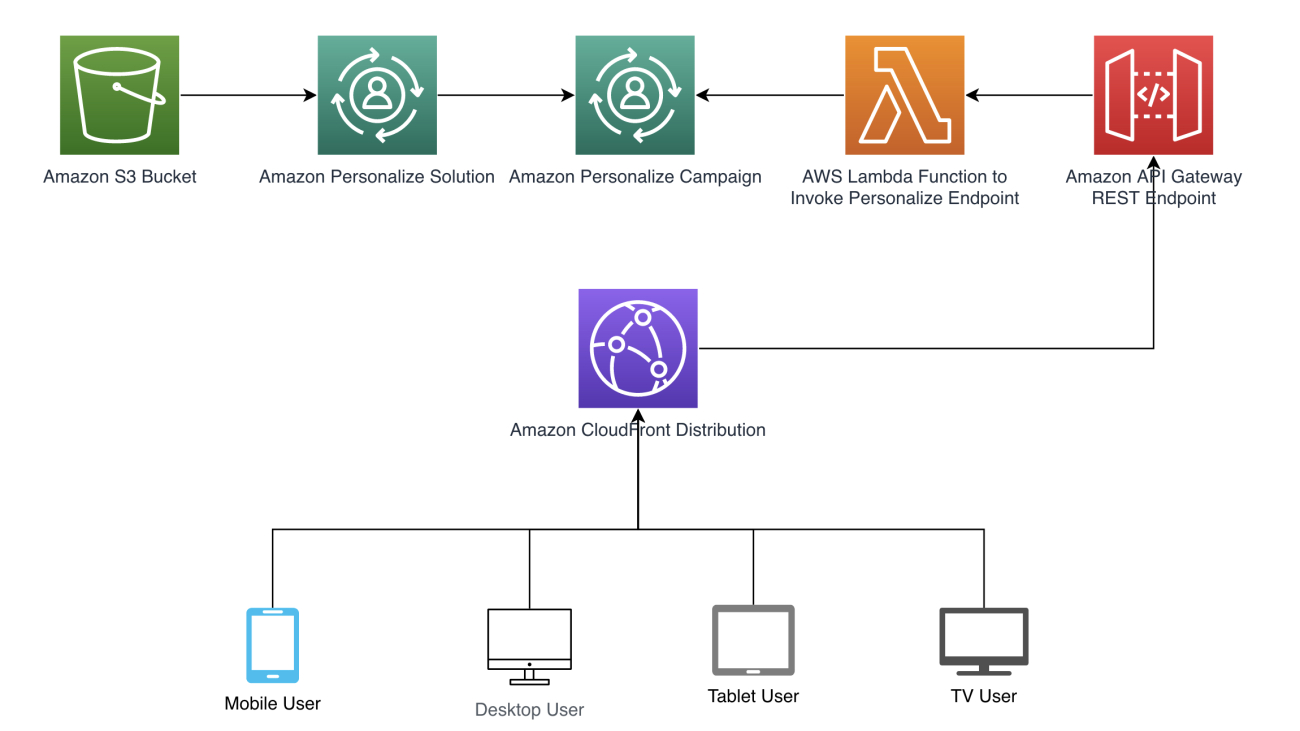
Expanding on the example of considering a user’s device type, we show how to provide this information as context so that Amazon Personalize can automatically learn the influence of a user’s device on their preferred types of content.
We follow the architecture pattern shown in the following diagram to illustrate how context can automatically be passed to Amazon Personalize. Automatically deriving context is achieved through Amazon CloudFront headers that are included in requests such as a REST API in Amazon API Gateway that calls an AWS Lambda function to retrieve recommendations. Refer to the full code example available at our GitHub repository. We provide a AWS CloudFormation template to create the necessary resources.
In following sections, we walk through how to set up each step of the sample architecture pattern.
Choose a recipe
Recipes are Amazon Personalize algorithms that are prepared for specific use cases. Amazon Personalize provides recipes based on common use cases for training models. For our use case, we build a simple Amazon Personalize custom recommender using the User-Personalization recipe. It predicts the items that a user will interact with based on the interactions dataset. Additionally, this recipe also uses items and users datasets to influence recommendations, if provided. To learn more about how this recipe works, refer to User-Personalization recipe.
Create and import a dataset
Taking advantage of context requires specifying context values with interactions so recommenders can use context as features when training models. We also have to provide the user’s current context at inference time. The interactions schema (see the following code) defines the structure of historical and real-time users-to-items interaction data. The USER_ID, ITEM_ID, and TIMESTAMP fields are required by Amazon Personalize for this dataset. DEVICE_TYPE is a custom categorical field that we are adding for this example to capture the user’s current context and include it in model training. Amazon Personalize uses this interactions dataset to train models and create recommendation campaigns.
Similarly, the items schema (see the following code) defines the structure of product and video catalog data. The ITEM_ID is required by Amazon Personalize for this dataset. CREATION_TIMESTAMP is a reserved column name but it is not required. GENRE and ALLOWED_COUNTRIES are custom fields that we are adding for this example to capture the video’s genre and countries where the videos are allowed to be played. Amazon Personalize uses this items dataset to train models and create recommendation campaigns.
In our context, historical data refers to end-user interaction history with videos and items on the VOD platform. This data is usually gathered and stored in application’s database.
For demo purposes, we use Python’s Faker library to generate some test data mocking the interactions dataset with different items, users, and device types over a 3-month period. After the schema and input interactions file location are defined, the next steps are to create a dataset group, include the interactions dataset within the dataset group, and finally import the training data into the dataset, as illustrated in the following code snippets:
Gather historical data and train the model
In this step, we define the chosen recipe and create a solution and solution version referring to the previously defined dataset group. When you create a custom solution, you specify a recipe and configure training parameters. When you create a solution version for the solution, Amazon Personalize trains the model backing the solution version based on the recipe and training configuration. See the following code:
Create a campaign endpoint
After you train your model, you deploy it into a campaign. A campaign creates and manages an auto-scaling endpoint for your trained model that you can use to get personalized recommendations using the GetRecommendations API. In a later step, we use this campaign endpoint to automatically pass the device type as a context as a parameter and receive personalized recommendations. See the following code:
Create a dynamic filter
When getting recommendations from the created campaign, you can filter results based on custom criteria. For our example, we create a filter to satisfy the requirement of recommending videos that are only allowed to be played from user’s current country. The country information is passed dynamically from the CloudFront HTTP header.
Create a Lambda function
The next step in our architecture is to create a Lambda function to process API requests coming from the CloudFront distribution and respond by invoking the Amazon Personalize campaign endpoint. In this Lambda function, we define logic to analyze the following CloudFront request’s HTTP headers and query string parameters to determine the user’s device type and user ID, respectively:
CloudFront-Is-Desktop-ViewerCloudFront-Is-Mobile-ViewerCloudFront-Is-SmartTV-ViewerCloudFront-Is-Tablet-ViewerCloudFront-Viewer-Country
The code to create this function is deployed through the CloudFormation template.
Create a REST API
To make the Lambda function and Amazon Personalize campaign endpoint accessible to the CloudFront distribution, we create a REST API endpoint set up as a Lambda proxy. API Gateway provides tools for creating and documenting APIs that route HTTP requests to Lambda functions. The Lambda proxy integration feature allows CloudFront to call a single Lambda function abstracting requests to the Amazon Personalize campaign endpoint. The code to create this function is deployed through the CloudFormation template.
Create a CloudFront distribution
When creating a CloudFront distribution, because this is a demo setup, we disable caching using a custom caching policy, ensuring the request goes to the origin every time. Additionally, we use an origin request policy specifying the required HTTP headers and query string parameters that are included in an origin request. The code to create this function is deployed through the CloudFormation template.
Test recommendations
When the CloudFront distribution’s URL is accessed from different devices (desktop, tablet, phone, and so on), we can see personalized video recommendations that are most relevant to their device. Also, if a cold user is presented, the recommendations tailored for user’s device are presented. In the following sample outputs, names of videos are only used for representation of their genre and runtime to make it relatable.
In the following code, a known user who loves comedy based on past interactions and is accessing from a phone device is presented with shorter sitcoms:
The following known user is presented with feature films when accessing from a smart TV device based on past interactions:
A cold (unknown) user accessing from a phone is presented with shorter but popular shows:
Recommendations for user:  666

ITEM_ID  GENRE                ALLOWED_COUNTRIES
940      Satire               US|FI|CN|ES|HK|AE
760      Satire               US|FI|CN|ES|HK|AE
160      Sitcom               US|FI|CN|ES|HK|AE
880      Comedy               US|FI|CN|ES|HK|AE
360      Satire               US|PK|NI|JM|IN|DK
840      Satire               US|PK|NI|JM|IN|DK
420      Satire               US|PK|NI|JM|IN|DK
A cold (unknown) user accessing from a desktop is presented with top science fiction films and documentaries:
The following known user accessing from a phone is returning filtered recommendations based on location (US):
Conclusion
In this post, we described how to use user device type as contextual data to make your recommendations more relevant. Using contextual metadata to train Amazon Personalize models will help you recommend products that are relevant to both new and existing users, not just from the profile data but also from a browsing device platform. Not only that, context like location (country, city, region, postal code) and time (day of the week, weekend, weekday, season) opens up the opportunity to make recommendations relatable to the user. You can run the full code example by using the CloudFormation template provided in our GitHub repository and cloning the notebooks into Amazon SageMaker Studio.
About the Authors
 Gilles-Kuessan Satchivi is an AWS Enterprise Solutions Architect with a background in networking, infrastructure, security, and IT operations. He is passionate about helping customers build Well-Architected systems on AWS. Before joining AWS, he worked in ecommerce for 17 years. Outside of work, he likes to spend time with his family and cheer on his children’s soccer team.
 Aditya Pendyala is a Senior Solutions Architect at AWS based out of NYC. He has extensive experience in architecting cloud-based applications. He is currently working with large enterprises to help them craft highly scalable, flexible, and resilient cloud architectures, and guides them on all things cloud. He has a Master of Science degree in Computer Science from Shippensburg University and believes in the quote “When you cease to learn, you cease to grow.”
 Prabhakar Chandrasekaran is a Senior Technical Account Manager with AWS Enterprise Support. Prabhakar enjoys helping customers build cutting-edge AI/ML solutions on the cloud. He also works with enterprise customers providing proactive guidance and operational assistance, helping them improve the value of their solutions when using AWS. Prabhakar holds six AWS and six other professional certifications. With over 20 years of professional experience, Prabhakar was a data engineer and a program leader in the financial services space prior to joining AWS.
Interactively fine-tune Falcon-40B and other LLMs on Amazon SageMaker Studio notebooks using QLoRA
Fine-tuning large language models (LLMs) allows you to adjust open-source foundational models to achieve improved performance on your domain-specific tasks. In this post, we discuss the advantages of using Amazon SageMaker notebooks to fine-tune state-of-the-art open-source models. We utilize Hugging Face’s parameter-efficient fine-tuning (PEFT) library and quantization techniques through bitsandbytes to support interactive fine-tuning of extremely large models using a single notebook instance. Specifically, we show how to fine-tune Falcon-40B using a single ml.g5.12xlarge instance (4 A10G GPUs), but the same strategy works to tune even larger models on p4d/p4de notebook instances.
Typically, the full precision representations of these very large models don’t fit into memory on a single or even several GPUs. To support an interactive notebook environment to fine-tune and run inference on models of this size, we use a new technique known as Quantized LLMs with Low-Rank Adapters (QLoRA). QLoRA is an efficient fine-tuning approach that reduces memory usage of LLMs while maintaining solid performance. Hugging Face and the authors of the paper mentioned have published a detailed blog post that covers the fundamentals and integrations with the Transformers and PEFT libraries.
Using notebooks to fine-tune LLMs
SageMaker comes with two options to spin up fully managed notebooks for exploring data and building machine learning (ML) models. The first option is fast start, collaborative notebooks accessible within Amazon SageMaker Studio, a fully integrated development environment (IDE) for ML. You can quickly launch notebooks in SageMaker Studio, dial up or down the underlying compute resources without interrupting your work, and even co-edit and collaborate on your notebooks in real time. In addition to creating notebooks, you can perform all the ML development steps to build, train, debug, track, deploy, and monitor your models in a single pane of glass in SageMaker Studio. The second option is a SageMaker notebook instance, a single, fully managed ML compute instance running notebooks in the cloud, which offers you more control over your notebook configurations.
For the remainder of this post, we use SageMaker Studio notebooks because we want to utilize SageMaker Studio’s managed TensorBoard experiment tracking with Hugging Face Transformer’s support for TensorBoard. However, the same concepts shown throughout the example code will work on notebook instances using the conda_pytorch_p310 kernel. It’s worth noting that SageMaker Studio’s Amazon Elastic File System (Amazon EFS) volume means you don’t need to provision a preordained Amazon Elastic Block Store (Amazon EBS) volume size, which is useful given the large size of model weights in LLMs.
Using notebooks backed by large GPU instances enables rapid prototyping and debugging without cold start container launches. However, it also means that you need to shut down your notebook instances when you’re done using them to avoid extra costs. Other options such as Amazon SageMaker JumpStart and SageMaker Hugging Face containers can be used for fine-tuning, and we recommend you refer to the following posts on the aforementioned methods to choose the best option for you and your team:
- Domain-adaptation Fine-tuning of Foundation Models in Amazon SageMaker JumpStart on Financial data
- Train a Large Language Model on a single Amazon SageMaker GPU with Hugging Face and LoRA
Prerequisites
If this is your first time working with SageMaker Studio, you first need to create a SageMaker domain. We also use a managed TensorBoard instance for experiment tracking, though that is optional for this tutorial.
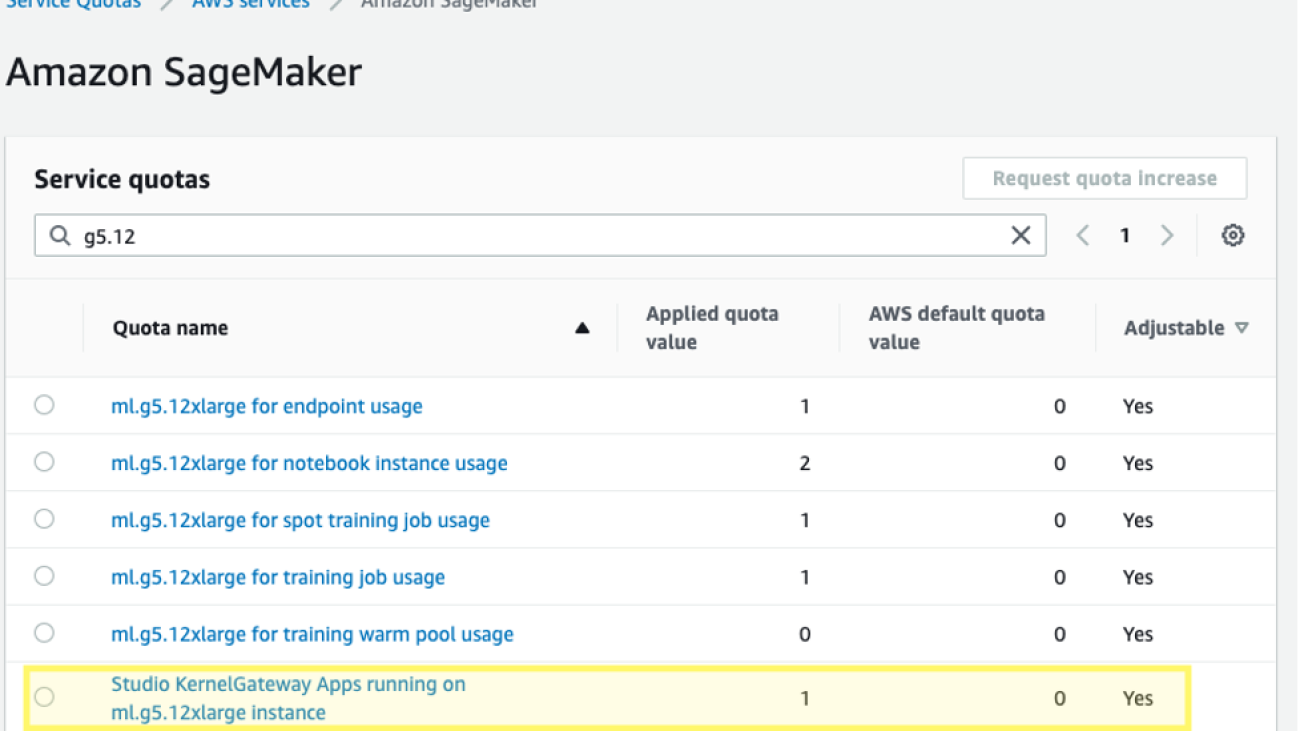
Additionally, you may need to request a service quota increase for the corresponding SageMaker Studio KernelGateway apps. For fine-tuning Falcon-40B, we use a ml.g5.12xlarge instance.
To request a service quota increase, on the AWS Service Quotas console, navigate to AWS services, Amazon SageMaker, and select Studio KernelGateway Apps running on ml.g5.12xlarge instances. 
Get started
The code sample for this post can be found in the following GitHub repository. To begin, we choose the Data Science 3.0 image and Python 3 kernel from SageMaker Studio so that we have a recent Python 3.10 environment to install our packages.

We install PyTorch and the required Hugging Face and bitsandbytes libraries:
Next, we set the CUDA environment path using the installed CUDA that was a dependency of PyTorch installation. This is a required step for the bitsandbytes library to correctly find and load the correct CUDA shared object binary.
Load the pre-trained foundational model
We use bitsandbytes to quantize the Falcon-40B model into 4-bit precision so that we can load the model into memory on 4 A10G GPUs using Hugging Face Accelerate’s naive pipeline parallelism. As described in the previously mentioned Hugging Face post, QLoRA tuning is shown to match 16-bit fine-tuning methods in a wide range of experiments because model weights are stored as 4-bit NormalFloat, but are dequantized to the computation bfloat16 on forward and backward passes as needed.
When loading the pretrained weights, we specify device_map=”auto" so that Hugging Face Accelerate will automatically determine which GPU to put each layer of the model on. This process is known as model parallelism.
With Hugging Face’s PEFT library, you can freeze most of the original model weights and replace or extend model layers by training an additional, much smaller, set of parameters. This makes training much less expensive in terms of required compute. We set the Falcon modules that we want to fine-tune as target_modules in the LoRA configuration:
Notice that we’re only fine-tuning 0.26% of the model’s parameters, which makes this feasible in a reasonable amount of time.
Load a dataset
We use the samsum dataset for our fine-tuning. Samsum is a collection of 16,000 messenger-like conversations with labeled summaries. The following is an example of the dataset:
In practice, you’ll want to use a dataset that has specific knowledge to the task you are hoping to tune your model on. The process of building such a dataset can be accelerated by using Amazon SageMaker Ground Truth Plus, as described in High-quality human feedback for your generative AI applications from Amazon SageMaker Ground Truth Plus.
Fine-tune the model
Prior to fine-tuning, we define the hyperparameters we want to use and train the model. We can also log our metrics to TensorBoard by defining the parameter logging_dir and requesting the Hugging Face transformer to report_to="tensorboard":
Monitor the fine-tuning
With the preceding setup, we can monitor our fine-tuning in real time. To monitor GPU usage in real time, we can run nvidia-smi directly from the kernel’s container. To launch a terminal running on the image container, simply choose the terminal icon at the top of your notebook.

From here, we can use the Linux watch command to repeatedly run nvidia-smi every half second:
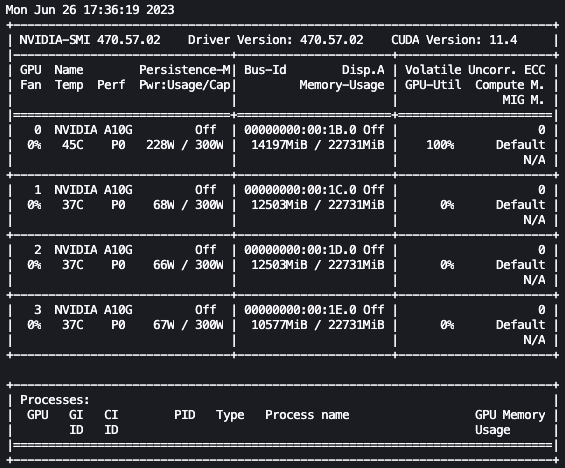
In the preceding animation, we can see that the model weights are distributed across the 4 GPUs and computation is being distributed across them as layers are processed serially.
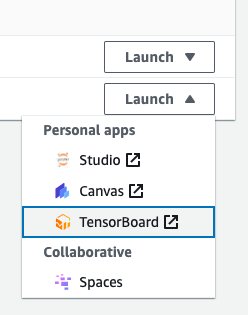
To monitor the training metrics, we utilize the TensorBoard logs that we write to the specified Amazon Simple Storage Service (Amazon S3) bucket. We can launch our SageMaker Studio domain user’s TensorBoard from the AWS SageMaker console:
After loading, you can specify the S3 bucket that you instructed the Hugging Face transformer to log to in order to view training and evaluation metrics.

Evaluate the model
After our model is finished training, we can run systematic evaluations or simply generate responses:
After you are satisfied with the model’s performance, you can save the model:
You can also choose to host it in a dedicated SageMaker endpoint.
Clean up
Complete the following steps to clean up your resources:
- Shut down the SageMaker Studio instances to avoid incurring additional costs.
- Shut down your TensorBoard application.
- Clean up your EFS directory by clearing the Hugging Face cache directory:
Conclusion
SageMaker notebooks allow you to fine-tune LLMs in a quick and efficient manner in an interactive environment. In this post, we showed how you can use Hugging Face PEFT with bitsandbtyes to fine-tune Falcon-40B models using QLoRA on SageMaker Studio notebooks. Try it out, and let us know your thoughts in the comments section!
We also encourage you to learn more about Amazon generative AI capabilities by exploring SageMaker JumpStart, Amazon Titan models, and Amazon Bedrock.
About the Authors
 Sean Morgan is a Senior ML Solutions Architect at AWS. He has experience in the semiconductor and academic research fields, and uses his experience to help customers reach their goals on AWS. In his free time, Sean is an active open-source contributor and maintainer, and is the special interest group lead for TensorFlow Addons.
 Lauren Mullennex is a Senior AI/ML Specialist Solutions Architect at AWS. She has a decade of experience in DevOps, infrastructure, and ML. She is also the author of a book on computer vision. Her other areas of focus include MLOps and generative AI.
 Philipp Schmid is a Technical Lead at Hugging Face with the mission to democratize good machine learning through open source and open science. Philipp is passionate about productionizing cutting-edge and generative AI machine learning models. He loves to share his knowledge on AI and NLP at various meetups such as Data Science on AWS, and on his technical blog.
Amazon and UW announce new fellows, research awards
Ongoing collaboration includes Amazon joining the UW Center for the Future of Cloud Infrastructure.Read More

Capture public health insights more quickly with no-code machine learning using Amazon SageMaker Canvas
Public health organizations have a wealth of data about different types of diseases, health trends, and risk factors. Their staff has long used statistical models and regression analyses to make important decisions such as targeting populations with the highest risk factors for a disease with therapeutics, or forecasting the progression of concerning outbreaks.
When public health threats emerge, data velocity increases, incoming datasets can grow larger, and data management becomes more challenging. This makes it more difficult to analyze data holistically and capture insights from it. And when time is of the essence, speed and agility in analyzing data and drawing insights from it are key blockers to forming rapid and robust health responses.
Typical questions public health organizations face during times of stress include:
- Will there be sufficient therapeutics in a certain location?
- What risk factors are driving health outcomes?
- Which populations have a higher risk of reinfection?
Because answering these questions requires understanding complex relationships between many different factors—often changing and dynamic—one powerful tool we have at our disposal is machine learning (ML), which can be deployed to analyze, predict, and solve these complex quantitative problems. We have increasingly seen ML applied to address difficult health-related problems such as classifying brain tumors with image analysis and predicting the need for mental health to deploy early intervention programs.
But what happens if public health organizations are in short supply of the skills required to apply ML to these questions? The application of ML to public health problems is impeded, and public health organizations lose the ability to apply powerful quantitative tools to address their challenges.
So how do we remove these bottlenecks? The answer is to democratize ML and allow a larger number of health professionals with deep domain expertise to use it and apply it to the questions they want to solve.
Amazon SageMaker Canvas is a no-code ML tool that empowers public health professionals such as epidemiologists, informaticians, and bio-statisticians to apply ML to their questions, without requiring a data science background or ML expertise. They can spend their time on the data, apply their domain expertise, quickly test hypothesis, and quantify insights. Canvas helps make public health more equitable by democratizing ML, allowing health experts to evaluate large datasets and empowering them with advanced insights using ML.
In this post, we show how public health experts can forecast on-hand demand for a certain therapeutic for the next 30 days using Canvas. Canvas provides you with a visual interface that allows you to generate accurate ML predictions on your own without requiring any ML experience or having to write a single line of code.
Solution overview
Let’s say we are working on data that we collected from states across the US. We may form a hypothesis that a certain municipality or location doesn’t have enough therapeutics in the coming weeks. How can we test this quickly and with a high degree of accuracy?
For this post, we use a publicly available dataset from the US Department of Health and Human Services, which contains state-aggregated time series data related to COVID-19, including hospital utilization, availability of certain therapeutics, and much more. The dataset (COVID-19 Reported Patient Impact and Hospital Capacity by State Timeseries (RAW)) is downloadable from healthdata.gov, and has 135 columns and over 60,000 rows. The dataset is updated periodically.
In the following sections, we demonstrate how to perform exploratory data analysis and preparation, build the ML forecasting model, and generate predictions using Canvas.
Perform exploratory data analysis and preparation
When doing a time series forecast in Canvas, we need to reduce the number of features or columns according to the service quotas. Initially, we reduce the number of columns to the 12 that are likely to be the most relevant. For example, we dropped the age-specific columns because we’re looking to forecast total demand. We also dropped columns whose data was similar to other columns we kept. In future iterations, it is reasonable to experiment with retaining other columns and using feature explainability in Canvas to quantify the importance of these features and which we want to keep. We also rename the state column to location.
Looking at the dataset, we also decide to remove all the rows for 2020, because there were limited therapeutics available at that time. This allows us to reduce the noise and improve the quality of the data for the ML model to learn from.
Reducing the number of columns can be done in different ways. You can edit the dataset in a spreadsheet, or directly inside Canvas using the user interface.
You can import data into Canvas from various sources, including from local files from your computer, Amazon Simple Storage Service (Amazon S3) buckets, Amazon Athena, Snowflake (see Prepare training and validation dataset for facies classification using Snowflake integration and train using Amazon SageMaker Canvas), and over 40 additional data sources.
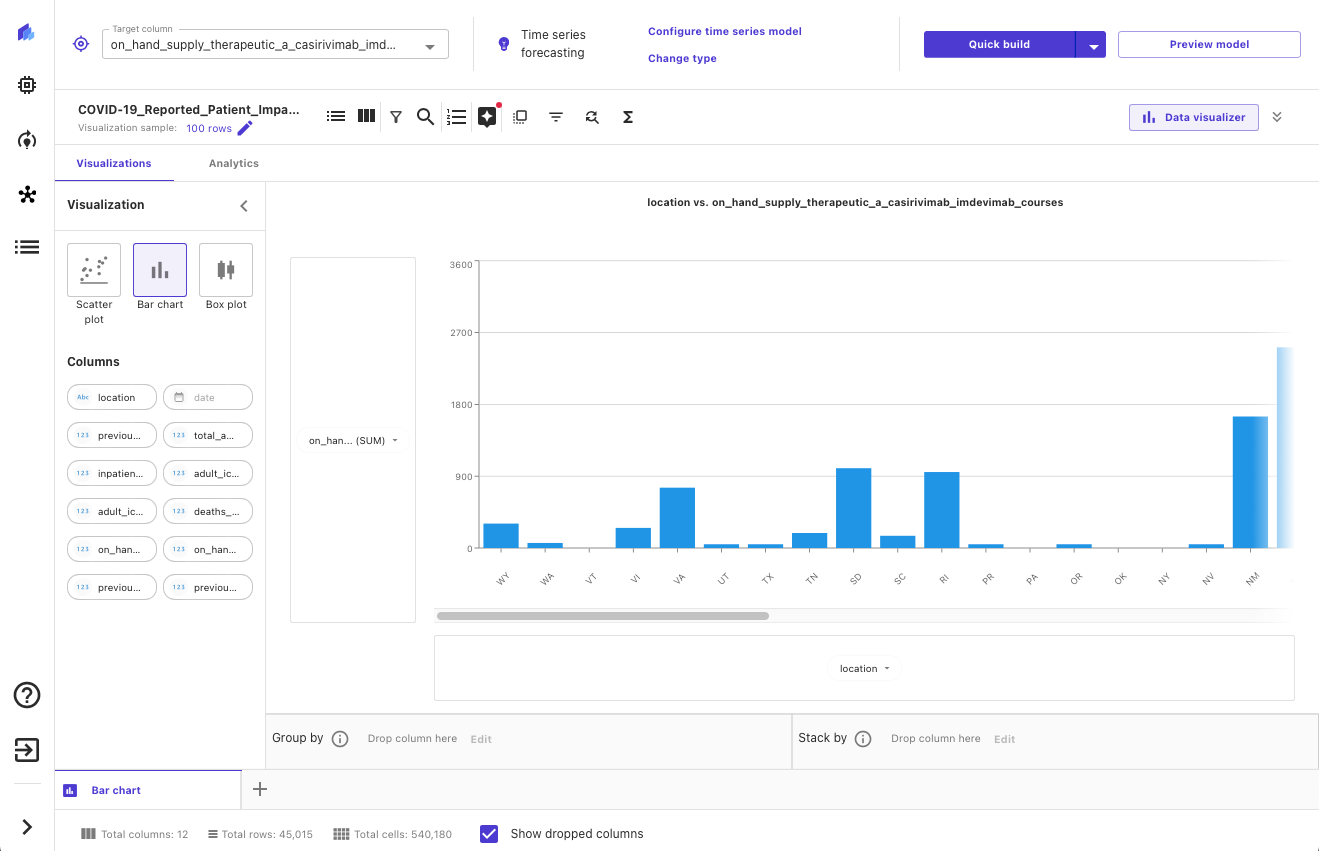
After our data has been imported, we can explore and visualize our data to get additional insights into it, such as with scatterplots or bar charts. We also look at the correlation between different features to ensure that we have selected what we think are the best ones. The following screenshot shows an example visualization.
Build the ML forecasting model
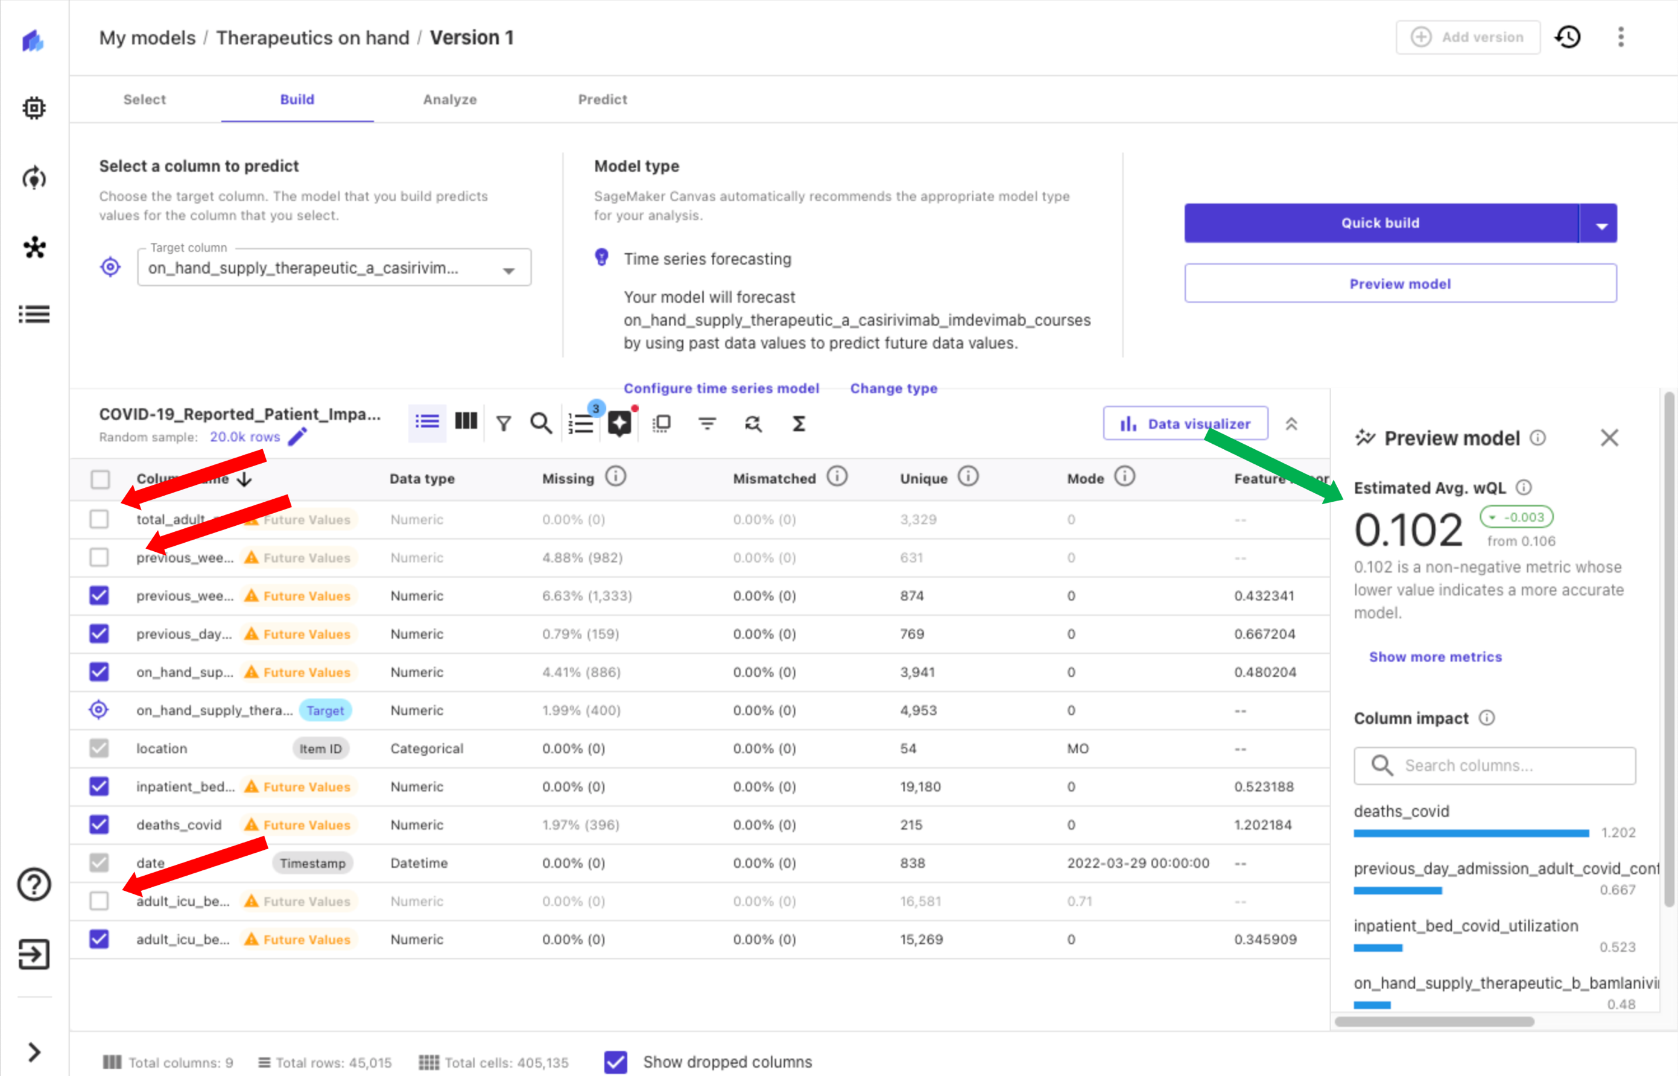
Now we’re ready to create our model, which we can do with just a few clicks. We choose the column identifying on-hand therapeutics as our target. Canvas automatically identifies our problem as a time series forecast based on the target column we just selected, and we can configure the parameters needed.
We configure the item_id, the unique identifier, as location because our dataset is provided by location (US states). Because we’re creating a time series forecast, we need to select a time stamp, which is date in our dataset. Finally, we specify how many days into the future we want to forecast (for this example, we choose 30 days). Canvas also offers the ability to include a holiday schedule to improve accuracy. In this case, we use US holidays because this is a US-based dataset.
With Canvas, you can get insights from your data before you build a model by choosing Preview model. This saves you time and cost by not building a model if the results are unlikely to be satisfactory. By previewing our model, we realize that the impact of some columns is low, meaning the expected value of the column to the model is low. We remove columns by deselecting them in Canvas (red arrows in the following screenshot) and see an improvement in an estimated quality metric (green arrow).
Moving on to building our model, we have two options, Quick build and Standard build. Quick build produces a trained model in less than 20 minutes, prioritizing speed over accuracy. This is great for experimentation, and is a more thorough model than the preview model. Standard build produces a trained model in under 4 hours, prioritizing accuracy over latency, iterating through a number of model configurations to automatically select the best model.
First, we experiment with Quick build to validate our model preview. Then, because we’re happy with the model, we choose Standard build to have Canvas help build the best possible model for our dataset. If the Quick build model had produced unsatisfactory results, then we would go back and adjust the input data to capture a higher level of accuracy. We could accomplish this by, for instance, adding or removing columns or rows in our original dataset. The Quick build model supports rapid experimentation without having to rely on scarce data science resources or wait for a full model to be completed.
Generate predictions
Now that the model has been built, we can predict the availability of therapeutics by location. Let’s look at what our estimated on-hand inventory looks like for the next 30 days, in this case for Washington, DC.
Canvas outputs probabilistic forecasts for therapeutic demand, allowing us to understand both the median value as well as upper and lower bounds. In the following screenshot, you can see the tail end of the historical data (the data from the original dataset). You can then see three new lines: the median (50th quantile) forecast in purple, the lower bound (10th quantile) in light blue, and upper bound (90th quantile) in dark blue.
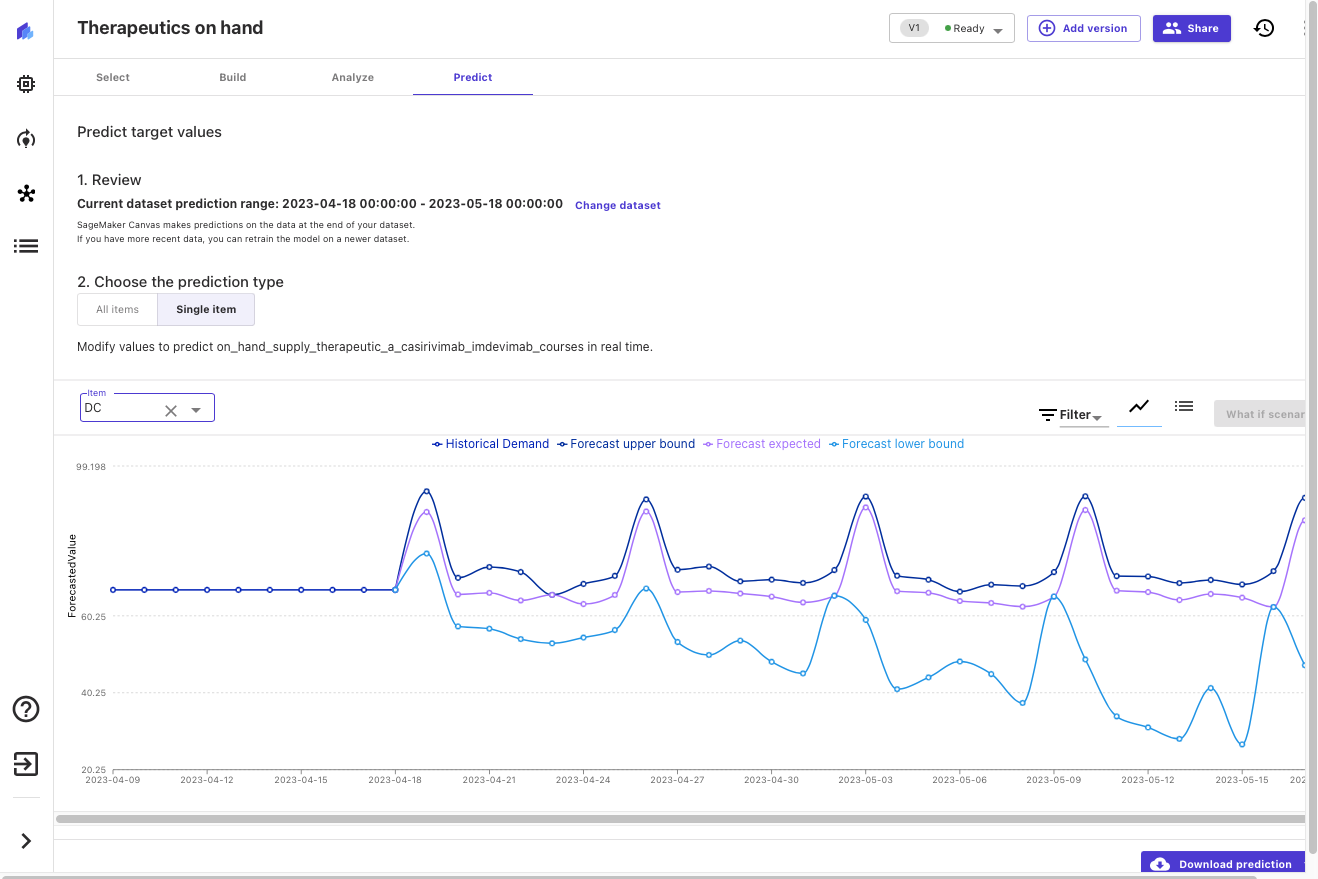
Examining upper and lower bounds provides insight into the probability distribution of the forecast and allows us to make informed decisions about desired levels of local inventory for this therapeutic. We can add this insight to other data (for example, disease progression forecasts, or therapeutic efficacy and uptake) to make informed decisions about future orders and inventory levels.
Conclusion
No-code ML tools empower public health experts to quickly and effectively apply ML to public health threats. This democratization of ML makes public health organizations more agile and more efficient in their mission of protecting public health. Ad hoc analyses that can identify important trends or inflection points in public health concerns can now be performed directly by specialists, without having to compete for limited ML expert resources and slowing down response times and decision-making.
In this post, we showed how someone without any knowledge of ML can use Canvas to forecast the on-hand inventory of a certain therapeutic. This analysis can be performed by any analyst in the field, through the power of cloud technologies and no-code ML. Doing so distributes capabilities broadly and allows public health agencies to be more responsive, and to more efficiently use centralized and field office resources to deliver better public health outcomes.
What are some of the questions you might be asking, and how may low-code/no-code tools be able to help you answer them? If you are interested in learning more about Canvas, refer to Amazon SageMaker Canvas and start applying ML to your own quantitative health questions.
About the authors
 Henrik Balle is a Sr. Solutions Architect at AWS supporting the US Public Sector. He works closely with customers on a range of topics from machine learning to security and governance at scale. In his spare time, he loves road biking, motorcycling, or you might find him working on yet another home improvement project.
 Dan Sinnreich leads Go to Market product management for Amazon SageMaker Canvas and Amazon Forecast. He is focused on democratizing low-code/no-code machine learning and applying it to improve business outcomes. Previous to AWS Dan built enterprise SaaS platforms and time-series risk models used by institutional investors to manage risk and construct portfolios. Outside of work, he can be found playing hockey, scuba diving, traveling, and reading science fiction.

Safe image generation and diffusion models with Amazon AI content moderation services
Generative AI technology is improving rapidly, and it’s now possible to generate text and images based on text input. Stable Diffusion is a text-to-image model that empowers you to create photorealistic applications. You can easily generate images from text using Stable Diffusion models through Amazon SageMaker JumpStart.
The following are examples of input texts and the corresponding output images generated by Stable Diffusion. The inputs are “A boxer dancing on a table,” “A lady on the beach in swimming wear, water color style,” and “A dog in a suit.”

Although generative AI solutions are powerful and useful, they can also be vulnerable to manipulation and abuse. Customers using them for image generation must prioritize content moderation to protect their users, platform, and brand by implementing strong moderation practices to create a safe and positive user experience while safeguarding their platform and brand reputation.
In this post, we explore using AWS AI services Amazon Rekognition and Amazon Comprehend, along with other techniques, to effectively moderate Stable Diffusion model-generated content in near-real time. To learn how to launch and generate images from text using a Stable Diffusion model on AWS, refer to Generate images from text with the stable diffusion model on Amazon SageMaker JumpStart.
Solution overview
Amazon Rekognition and Amazon Comprehend are managed AI services that provide pre-trained and customizable ML models via an API interface, eliminating the need for machine learning (ML) expertise. Amazon Rekognition Content Moderation automates and streamlines image and video moderation. Amazon Comprehend utilizes ML to analyze text and uncover valuable insights and relationships.
The following reference illustrates the creation of a RESTful proxy API for moderating Stable Diffusion text-to-image model-generated images in near-real time. In this solution, we launched and deployed a Stable Diffusion model (v2-1 base) using JumpStart. The solution uses negative prompts and text moderation solutions such as Amazon Comprehend and a rule-based filter to moderate input prompts. It also utilizes Amazon Rekognition to moderate the generated images. The RESTful API will return the generated image and the moderation warnings to the client if unsafe information is detected.

The steps in the workflow are as follows:
- The user send a prompt to generate an image.
- An AWS Lambda function coordinates image generation and moderation using Amazon Comprehend, JumpStart, and Amazon Rekognition:
- Apply a rule-based condition to input prompts in Lambda functions, enforcing content moderation with forbidden word detection.
- Use the Amazon Comprehend custom classifier to analyze the prompt text for toxicity classification.
- Send the prompt to the Stable Diffusion model through the SageMaker endpoint, passing both the prompts as user input and negative prompts from a predefined list.
- Send the image bytes returned from the SageMaker endpoint to the Amazon Rekognition
DetectModerationLabelAPI for image moderation. - Construct a response message that includes image bytes and warnings if the previous steps detected any inappropriate information in the prompt or generative image.
- Send the response back to the client.
The following screenshot shows a sample app built using the described architecture. The web UI sends user input prompts to the RESTful proxy API and displays the image and any moderation warnings received in the response. The demo app blurs the actual generated image if it contains unsafe content. We tested the app with the sample prompt “A sexy lady.”

You can implement more sophisticated logic for a better user experience, such as rejecting the request if the prompts contain unsafe information. Additionally, you could have a retry policy to regenerate the image if the prompt is safe, but the output is unsafe.
Predefine a list of negative prompts
Stable Diffusion supports negative prompts, which lets you specify prompts to avoid during image generation. Creating a predefined list of negative prompts is a practical and proactive approach to prevent the model from producing unsafe images. By including prompts like “naked,” “sexy,” and “nudity,” which are known to lead to inappropriate or offensive images, the model can recognize and avoid them, reducing the risk of generating unsafe content.
The implementation can be managed in the Lambda function when calling the SageMaker endpoint to run inference of the Stable Diffusion model, passing both the prompts from user input and the negative prompts from a predefined list.
Although this approach is effective, it could impact the results generated by the Stable Diffusion model and limit its functionality. It’s important to consider it as one of the moderation techniques, combined with other approaches such as text and image moderation using Amazon Comprehend and Amazon Rekognition.
Moderate input prompts
A common approach to text moderation is to use a rule-based keyword lookup method to identify whether the input text contains any forbidden words or phrases from a predefined list. This method is relatively easy to implement, with minimal performance impact and lower costs. However, the major drawback of this approach is that it’s limited to only detecting words included in the predefined list and can’t detect new or modified variations of forbidden words not included in the list. Users can also attempt to bypass the rules by using alternative spellings or special characters to replace letters.
To address the limitations of a rule-based text moderation, many solutions have adopted a hybrid approach that combines rule-based keyword lookup with ML-based toxicity detection. The combination of both approaches allows for a more comprehensive and effective text moderation solution, capable of detecting a wider range of inappropriate content and improving the accuracy of moderation outcomes.
In this solution, we use an Amazon Comprehend custom classifier to train a toxicity detection model, which we use to detect potentially harmful content in input prompts in cases where no explicit forbidden words are detected. With the power of machine learning, we can teach the model to recognize patterns in text that may indicate toxicity, even when such patterns aren’t easily detectable by a rule-based approach.
With Amazon Comprehend as a managed AI service, training and inference are simplified. You can easily train and deploy Amazon Comprehend custom classification with just two steps. Check out our workshop lab for more information about the toxicity detection model using an Amazon Comprehend custom classifier. The lab provides a step-by-step guide to creating and integrating a custom toxicity classifier into your application. The following diagram illustrates this solution architecture.

This sample classifier uses a social media training dataset and performs binary classification. However, if you have more specific requirements for your text moderation needs, consider using a more tailored dataset to train your Amazon Comprehend custom classifier.
Moderate output images
Although moderating input text prompts is important, it doesn’t guarantee that all images generated by the Stable Diffusion model will be safe for the intended audience, because the model’s outputs can contain a certain level of randomness. Therefore, it’s equally important to moderate the images generated by the Stable Diffusion model.
In this solution, we utilize Amazon Rekognition Content Moderation, which employs pre-trained ML models, to detect inappropriate content in images and videos. In this solution, we use the Amazon Rekognition DetectModerationLabel API to moderate images generated by the Stable Diffusion model in near-real time. Amazon Rekognition Content Moderation provides pre-trained APIs to analyze a wide range of inappropriate or offensive content, such as violence, nudity, hate symbols, and more. For a comprehensive list of Amazon Rekognition Content Moderation taxonomies, refer to Moderating content.
The following code demonstrates how to call the Amazon Rekognition DetectModerationLabel API to moderate images within an Lambda function using the Python Boto3 library. This function takes the image bytes returned from SageMaker and sends them to the Image Moderation API for moderation.
For additional examples of the Amazon Rekognition Image Moderation API, refer to our Content Moderation Image Lab.
Effective image moderation techniques for fine-tuning models
Fine-tuning is a common technique used to adapt pre-trained models to specific tasks. In the case of Stable Diffusion, fine-tuning can be used to generate images that incorporate specific objects, styles, and characters. Content moderation is critical when training a Stable Diffusion model to prevent the creation of inappropriate or offensive images. This involves carefully reviewing and filtering out any data that could lead to the generation of such images. By doing so, the model learns from a more diverse and representative range of data points, improving its accuracy and preventing the propagation of harmful content.
JumpStart makes fine-tuning the Stable Diffusion Model easy by providing the transfer learning scripts using the DreamBooth method. You just need to prepare your training data, define the hyperparameters, and start the training job. For more details, refer to Fine-tune text-to-image Stable Diffusion models with Amazon SageMaker JumpStart.
The dataset for fine-tuning needs to be a single Amazon Simple Storage Service (Amazon S3) directory including your images and instance configuration file dataset_info.json, as shown in the following code. The JSON file will associate the images with the instance prompt like this: {'instance_prompt':<<instance_prompt>>}.
Obviously, you can manually review and filter the images, but this can be time-consuming and even impractical when you do this at scale across many projects and teams. In such cases, you can automate a batch process to centrally check all the images against the Amazon Rekognition DetectModerationLabel API and automatically flag or remove images so they don’t contaminate your training.
Moderation latency and cost
In this solution, a sequential pattern is used to moderate text and images. A rule-based function and Amazon Comprehend are called for text moderation, and Amazon Rekognition is used for image moderation, both before and after invoking Stable Diffusion. Although this approach effectively moderates input prompts and output images, it may increase the overall cost and latency of the solution, which is something to consider.
Latency
Both Amazon Rekognition and Amazon Comprehend offer managed APIs that are highly available and have built-in scalability. Despite potential latency variations due to input size and network speed, the APIs used in this solution from both services offer near-real-time inference. Amazon Comprehend custom classifier endpoints can offer a speed of less than 200 milliseconds for input text sizes of less than 100 characters, while the Amazon Rekognition Image Moderation API serves approximately 500 milliseconds for average file sizes of less than 1 MB. (The results are based on the test conducted using the sample application, which qualifies as a near-real-time requirement.)
In total, the moderation API calls to Amazon Rekognition and Amazon Comprehend will add up to 700 milliseconds to the API call. It’s important to note that the Stable Diffusion request usually takes longer depending on the complexity of the prompts and the underlying infrastructure capability. In the test account, using an instance type of ml.p3.2xlarge, the average response time for the Stable Diffusion model via a SageMaker endpoint was around 15 seconds. Therefore, the latency introduced by moderation is approximately 5% of the overall response time, making it a minimal impact on the overall performance of the system.
Cost
The Amazon Rekognition Image Moderation API employs a pay-as-you-go model based on the number of requests. The cost varies depending on the AWS Region used and follows a tiered pricing structure. As the volume of requests increases, the cost per request decreases. For more information, refer to Amazon Rekognition pricing.
In this solution, we utilized an Amazon Comprehend custom classifier and deployed it as an Amazon Comprehend endpoint to facilitate real-time inference. This implementation incurs both a one-time training cost and ongoing inference costs. For detailed information, refer to Amazon Comprehend Pricing.
Jumpstart enables you to quickly launch and deploy the Stable Diffusion model as a single package. Running inference on the Stable Diffusion model will incur costs for the underlying Amazon Elastic Compute Cloud (Amazon EC2) instance as well as inbound and outbound data transfer. For detailed information, refer to Amazon SageMaker Pricing.
Summary
In this post, we provided an overview of a sample solution that showcases how to moderate Stable Diffusion input prompts and output images using Amazon Comprehend and Amazon Rekognition. Additionally, you can define negative prompts in Stable Diffusion to prevent generating unsafe content. By implementing multiple moderation layers, the risk of producing unsafe content can be greatly reduced, ensuring a safer and more dependable user experience.
Learn more about content moderation on AWS and our content moderation ML use cases, and take the first step towards streamlining your content moderation operations with AWS.
About the Authors
 Lana Zhang is a Senior Solutions Architect at AWS WWSO AI Services team, specializing in AI and ML for content moderation, computer vision, and natural language processing. With her expertise, she is dedicated to promoting AWS AI/ML solutions and assisting customers in transforming their business solutions across diverse industries, including social media, gaming, e-commerce, and advertising & marketing.
 James Wu is a Senior AI/ML Specialist Solution Architect at AWS. helping customers design and build AI/ML solutions. James’s work covers a wide range of ML use cases, with a primary interest in computer vision, deep learning, and scaling ML across the enterprise. Prior to joining AWS, James was an architect, developer, and technology leader for over 10 years, including 6 years in engineering and 4 years in marketing and advertising industries.
 Kevin Carlson is a Principal AI/ML Specialist with a focus on Computer Vision at AWS, where he leads Business Development and GTM for Amazon Rekognition. Prior to joining AWS, he led Digital Transformation globally at Fortune 500 Engineering company AECOM, with a focus on artificial intelligence and machine learning for generative design and infrastructure assessment. He is based in Chicago, where outside of work he enjoys time with his family, and is passionate about flying airplanes and coaching youth baseball.
 John Rouse is a Senior AI/ML Specialist at AWS, where he leads global business development for AI services focused on Content Moderation and Compliance use cases. Prior to joining AWS, he has held senior level business development and leadership roles with cutting edge technology companies. John is working to put machine learning in the hands of every developer with AWS AI/ML stack. Small ideas bring about small impact. John’s goal for customers is to empower them with big ideas and opportunities that open doors so they can make a major impact with their customer.
Long-form-video understanding and synthesis
Four CVPR papers from Prime Video examine a broad set of topics related to efficient model training for understanding and synthesizing long-form cinematic content.Read More