The requirement that at any given time, all customers see the same prices for the same products necessitates innovation in the design of A/B experiments.Read More

Announcing New Tools for Building with Generative AI on AWS
The seeds of a machine learning (ML) paradigm shift have existed for decades, but with the ready availability of scalable compute capacity, a massive proliferation of data, and the rapid advancement of ML technologies, customers across industries are transforming their businesses. Just recently, generative AI applications like ChatGPT have captured widespread attention and imagination. We are truly at an exciting inflection point in the widespread adoption of ML, and we believe most customer experiences and applications will be reinvented with generative AI.
AI and ML have been a focus for Amazon for over 20 years, and many of the capabilities customers use with Amazon are driven by ML. Our e-commerce recommendations engine is driven by ML; the paths that optimize robotic picking routes in our fulfillment centers are driven by ML; and our supply chain, forecasting, and capacity planning are informed by ML. Prime Air (our drones) and the computer vision technology in Amazon Go (our physical retail experience that lets consumers select items off a shelf and leave the store without having to formally check out) use deep learning. Alexa, powered by more than 30 different ML systems, helps customers billions of times each week to manage smart homes, shop, get information and entertainment, and more. We have thousands of engineers at Amazon committed to ML, and it’s a big part of our heritage, current ethos, and future.
At AWS, we have played a key role in democratizing ML and making it accessible to anyone who wants to use it, including more than 100,000 customers of all sizes and industries. AWS has the broadest and deepest portfolio of AI and ML services at all three layers of the stack. We’ve invested and innovated to offer the most performant, scalable infrastructure for cost-effective ML training and inference; developed Amazon SageMaker, which is the easiest way for all developers to build, train, and deploy models; and launched a wide range of services that allow customers to add AI capabilities like image recognition, forecasting, and intelligent search to applications with a simple API call. This is why customers like Intuit, Thomson Reuters, AstraZeneca, Ferrari, Bundesliga, 3M, and BMW, as well as thousands of startups and government agencies around the world, are transforming themselves, their industries, and their missions with ML. We take the same democratizing approach to generative AI: we work to take these technologies out of the realm of research and experiments and extend their availability far beyond a handful of startups and large, well-funded tech companies. That’s why today I’m excited to announce several new innovations that will make it easy and practical for our customers to use generative AI in their businesses.
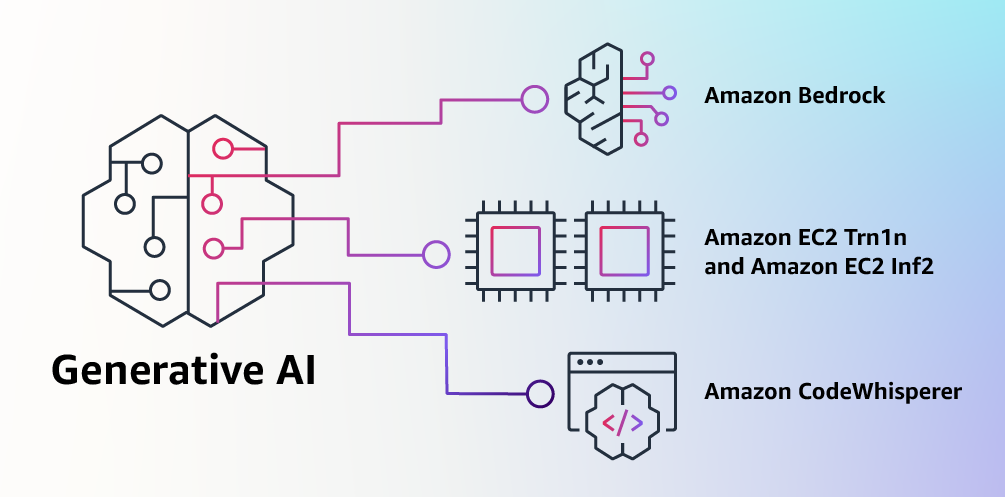
Building with Generative AI on AWS
Generative AI and foundation models
Generative AI is a type of AI that can create new content and ideas, including conversations, stories, images, videos, and music. Like all AI, generative AI is powered by ML models—very large models that are pre-trained on vast amounts of data and commonly referred to as Foundation Models (FMs). Recent advancements in ML (specifically the invention of the transformer-based neural network architecture) have led to the rise of models that contain billions of parameters or variables. To give a sense for the change in scale, the largest pre-trained model in 2019 was 330M parameters. Now, the largest models are more than 500B parameters—a 1,600x increase in size in just a few years. Today’s FMs, such as the large language models (LLMs) GPT3.5 or BLOOM, and the text-to-image model Stable Diffusion from Stability AI, can perform a wide range of tasks that span multiple domains, like writing blog posts, generating images, solving math problems, engaging in dialog, and answering questions based on a document. The size and general-purpose nature of FMs make them different from traditional ML models, which typically perform specific tasks, like analyzing text for sentiment, classifying images, and forecasting trends.
FMs can perform so many more tasks because they contain such a large number of parameters that make them capable of learning complex concepts. And through their pre-training exposure to internet-scale data in all its various forms and myriad of patterns, FMs learn to apply their knowledge within a wide range of contexts. While the capabilities and resulting possibilities of a pre-trained FM are amazing, customers get really excited because these generally capable models can also be customized to perform domain-specific functions that are differentiating to their businesses, using only a small fraction of the data and compute required to train a model from scratch. The customized FMs can create a unique customer experience, embodying the company’s voice, style, and services across a wide variety of consumer industries, like banking, travel, and healthcare. For instance, a financial firm that needs to auto-generate a daily activity report for internal circulation using all the relevant transactions can customize the model with proprietary data, which will include past reports, so that the FM learns how these reports should read and what data was used to generate them.
The potential of FMs is incredibly exciting. But, we are still in the very early days. While ChatGPT has been the first broad generative AI experience to catch customers’ attention, most folks studying generative AI have quickly come to realize that several companies have been working on FMs for years, and there are several different FMs available—each with unique strengths and characteristics. As we’ve seen over the years with fast-moving technologies, and in the evolution of ML, things change rapidly. We expect new architectures to arise in the future, and this diversity of FMs will set off a wave of innovation. We’re already seeing new application experiences never seen before. AWS customers have asked us how they can quickly take advantage of what is out there today (and what is likely coming tomorrow) and quickly begin using FMs and generative AI within their businesses and organizations to drive new levels of productivity and transform their offerings.
Announcing Amazon Bedrock and Amazon Titan models, the easiest way to build and scale generative AI applications with FMs
Customers have told us there are a few big things standing in their way today. First, they need a straightforward way to find and access high-performing FMs that give outstanding results and are best-suited for their purposes. Second, customers want integration into applications to be seamless, without having to manage huge clusters of infrastructure or incur large costs. Finally, customers want it to be easy to take the base FM, and build differentiated apps using their own data (a little data or a lot). Since the data customers want to use for customization is incredibly valuable IP, they need it to stay completely protected, secure, and private during that process, and they want control over how their data is shared and used.
We took all of that feedback from customers, and today we are excited to announce Amazon Bedrock, a new service that makes FMs from AI21 Labs, Anthropic, Stability AI, and Amazon accessible via an API. Bedrock is the easiest way for customers to build and scale generative AI-based applications using FMs, democratizing access for all builders. Bedrock will offer the ability to access a range of powerful FMs for text and images—including Amazon’s Titan FMs, which consist of two new LLMs we’re also announcing today—through a scalable, reliable, and secure AWS managed service. With Bedrock’s serverless experience, customers can easily find the right model for what they’re trying to get done, get started quickly, privately customize FMs with their own data, and easily integrate and deploy them into their applications using the AWS tools and capabilities they are familiar with (including integrations with Amazon SageMaker ML features like Experiments to test different models and Pipelines to manage their FMs at scale) without having to manage any infrastructure.
Bedrock customers can choose from some of the most cutting-edge FMs available today. This includes the Jurassic-2 family of multilingual LLMs from AI21 Labs, which follow natural language instructions to generate text in Spanish, French, German, Portuguese, Italian, and Dutch. Claude, Anthropic’s LLM, can perform a wide variety of conversational and text processing tasks and is based on Anthropic’s extensive research into training honest and responsible AI systems. Bedrock also makes it easy to access Stability AI’s suite of text-to-image foundation models, including Stable Diffusion (the most popular of its kind), which is capable of generating unique, realistic, high-quality images, art, logos, and designs.
One of the most important capabilities of Bedrock is how easy it is to customize a model. Customers simply point Bedrock at a few labeled examples in Amazon S3, and the service can fine-tune the model for a particular task without having to annotate large volumes of data (as few as 20 examples is enough). Imagine a content marketing manager who works at a leading fashion retailer and needs to develop fresh, targeted ad and campaign copy for an upcoming new line of handbags. To do this, they provide Bedrock a few labeled examples of their best performing taglines from past campaigns, along with the associated product descriptions, and Bedrock will automatically start generating effective social media, display ad, and web copy for the new handbags. None of the customer’s data is used to train the underlying models, and since all data is encrypted and does not leave a customer’s Virtual Private Cloud (VPC), customers can trust that their data will remain private and confidential.
Bedrock is now in limited preview, and customers like Coda are excited about how fast their development teams have gotten up and running. Shishir Mehrotra, Co-founder and CEO of Coda, says, “As a longtime happy AWS customer, we’re excited about how Amazon Bedrock can bring quality, scalability, and performance to Coda AI. Since all our data is already on AWS, we are able to quickly incorporate generative AI using Bedrock, with all the security and privacy we need to protect our data built-in. With over tens of thousands of teams running on Coda, including large teams like Uber, the New York Times, and Square, reliability and scalability are really important.”
We have been previewing Amazon’s new Titan FMs with a few customers before we make them available more broadly in the coming months. We’ll initially have two Titan models. The first is a generative LLM for tasks such as summarization, text generation (for example, creating a blog post), classification, open-ended Q&A, and information extraction. The second is an embeddings LLM that translates text inputs (words, phrases or possibly large units of text) into numerical representations (known as embeddings) that contain the semantic meaning of the text. While this LLM will not generate text, it is useful for applications like personalization and search because by comparing embeddings the model will produce more relevant and contextual responses than word matching. In fact, Amazon.com’s product search capability uses a similar embeddings model among others to help customers find the products they’re looking for. To continue supporting best practices in the responsible use of AI, Titan FMs are built to detect and remove harmful content in the data that customers provide for customization, reject inappropriate content in the user input, and filter the models’ outputs that contain inappropriate content (such as hate speech, profanity, and violence).
Bedrock makes the power of FMs accessible to companies of all sizes so that they can accelerate the use of ML across their organizations and build their own generative AI applications because it will be easy for all developers. We think Bedrock will be a massive step forward in democratizing FMs, and our partners like Accenture, Deloitte, Infosys, and Slalom are building practices to help enterprises go faster with generative AI. Independent Software Vendors (ISVs) like C3 AI and Pega are excited to leverage Bedrock for easy access to its great selection of FMs with all of the security, privacy, and reliability they expect from AWS.
Announcing the general availability of Amazon EC2 Trn1n instances powered by AWS Trainium and Amazon EC2 Inf2 instances powered by AWS Inferentia2, the most cost-effective cloud infrastructure for generative AI
Whatever customers are trying to do with FMs—running them, building them, customizing them—they need the most performant, cost-effective infrastructure that is purpose-built for ML. Over the last five years, AWS has been investing in our own silicon to push the envelope on performance and price performance for demanding workloads like ML training and Inference, and our AWS Trainium and AWS Inferentia chips offer the lowest cost for training models and running inference in the cloud. This ability to maximize performance and control costs by choosing the optimal ML infrastructure is why leading AI startups, like AI21 Labs, Anthropic, Cohere, Grammarly, Hugging Face, Runway, and Stability AI run on AWS.
Trn1 instances, powered by Trainium, can deliver up to 50% savings on training costs over any other EC2 instance, and are optimized to distribute training across multiple servers connected with 800 Gbps of second-generation Elastic Fabric Adapter (EFA) networking. Customers can deploy Trn1 instances in UltraClusters that can scale up to 30,000 Trainium chips (more than 6 exaflops of compute) located in the same AWS Availability Zone with petabit scale networking. Many AWS customers, including Helixon, Money Forward, and the Amazon Search team, use Trn1 instances to help reduce the time required to train the largest-scale deep learning models from months to weeks or even days while lowering their costs. 800 Gbps is a lot of bandwidth, but we have continued to innovate to deliver more, and today we are announcing the general availability of new, network-optimized Trn1n instances, which offer 1600 Gbps of network bandwidth and are designed to deliver 20% higher performance over Trn1 for large, network-intensive models.
Today, most of the time and money spent on FMs goes into training them. This is because many customers are only just starting to deploy FMs into production. However, in the future, when FMs are deployed at scale, most costs will be associated with running the models and doing inference. While you typically train a model periodically, a production application can be constantly generating predictions, known as inferences, potentially generating millions per hour. And these predictions need to happen in real-time, which requires very low-latency and high-throughput networking. Alexa is a great example with millions of requests coming in every minute, which accounts for 40% of all compute costs.
Because we knew that most of the future ML costs would come from running inferences, we prioritized inference-optimized silicon when we started investing in new chips a few years ago. In 2018, we announced Inferentia, the first purpose-built chip for inference. Every year, Inferentia helps Amazon run trillions of inferences and has saved companies like Amazon over a hundred million dollars in capital expense already. The results are impressive, and we see many opportunities to keep innovating as workloads will only increase in size and complexity as more customers integrate generative AI into their applications.
That’s why we’re announcing today the general availability of Inf2 instances powered by AWS Inferentia2, which are optimized specifically for large-scale generative AI applications with models containing hundreds of billions of parameters. Inf2 instances deliver up to 4x higher throughput and up to 10x lower latency compared to the prior generation Inferentia-based instances. They also have ultra-high-speed connectivity between accelerators to support large-scale distributed inference. These capabilities drive up to 40% better inference price performance than other comparable Amazon EC2 instances and the lowest cost for inference in the cloud. Customers like Runway are seeing up to 2x higher throughput with Inf2 than comparable Amazon EC2 instances for some of their models. This high-performance, low-cost inference will enable Runway to introduce more features, deploy more complex models, and ultimately deliver a better experience for the millions of creators using Runway.
Announcing the general availability of Amazon CodeWhisperer, free for individual developers
We know that building with the right FMs and running Generative AI applications at scale on the most performant cloud infrastructure will be transformative for customers. The new wave of experiences will also be transformative for users. With generative AI built-in, users will be able to have more natural and seamless interactions with applications and systems. Think of how we can unlock our mobile phones just by looking at them, without needing to know anything about the powerful ML models that make this feature possible.
One area where we foresee the use of generative AI growing rapidly is in coding. Software developers today spend a significant amount of their time writing code that is pretty straightforward and undifferentiated. They also spend a lot of time trying to keep up with a complex and ever-changing tool and technology landscape. All of this leaves developers less time to develop new, innovative capabilities and services. Developers try to overcome this by copying and modifying code snippets from the web, which can result in inadvertently copying code that doesn’t work, contains security vulnerabilities, or doesn’t track usage of open source software. And, ultimately, searching and copying still takes time away from the good stuff.
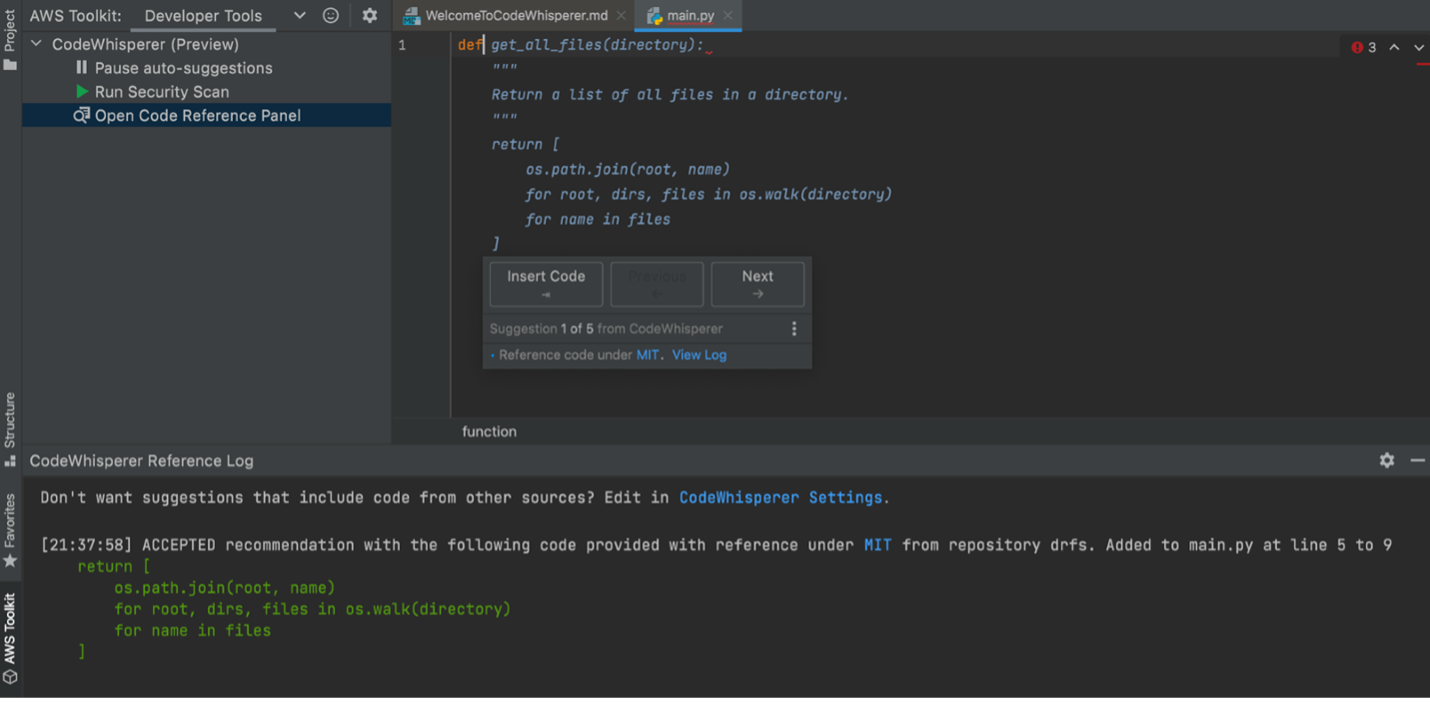
Generative AI can take this heavy lifting out of the equation by “writing” much of the undifferentiated code, allowing developers to build faster while freeing them up to focus on the more creative aspects of coding. This is why, last year, we announced the preview of Amazon CodeWhisperer, an AI coding companion that uses a FM under the hood to radically improve developer productivity by generating code suggestions in real-time based on developers’ comments in natural language and prior code in their Integrated Development Environment (IDE). Developers can simply tell CodeWhisperer to do a task, such as “parse a CSV string of songs” and ask it to return a structured list based on values such as artist, title, and highest chart rank. CodeWhisperer provides a productivity boost by generating an entire function that parses the string and returns the list as specified. Developer response to the preview has been overwhelmingly positive, and we continue to believe that helping developers code could end up being one of the most powerful uses of generative AI we’ll see in the coming years. During the preview, we ran a productivity challenge, and participants who used CodeWhisperer completed tasks 57% faster, on average, and were 27% more likely to complete them successfully than those who didn’t use CodeWhisperer. This is a giant leap forward in developer productivity, and we believe this is only the beginning.
Today, we’re excited to announce the general availability of Amazon CodeWhisperer for Python, Java, JavaScript, TypeScript, and C#—plus ten new languages, including Go, Kotlin, Rust, PHP, and SQL. CodeWhisperer can be accessed from IDEs such as VS Code, IntelliJ IDEA, AWS Cloud9, and many more via the AWS Toolkit IDE extensions. CodeWhisperer is also available in the AWS Lambda console. In addition to learning from the billions of lines of publicly available code, CodeWhisperer has been trained on Amazon code. We believe CodeWhisperer is now the most accurate, fastest, and most secure way to generate code for AWS services, including Amazon EC2, AWS Lambda, and Amazon S3.
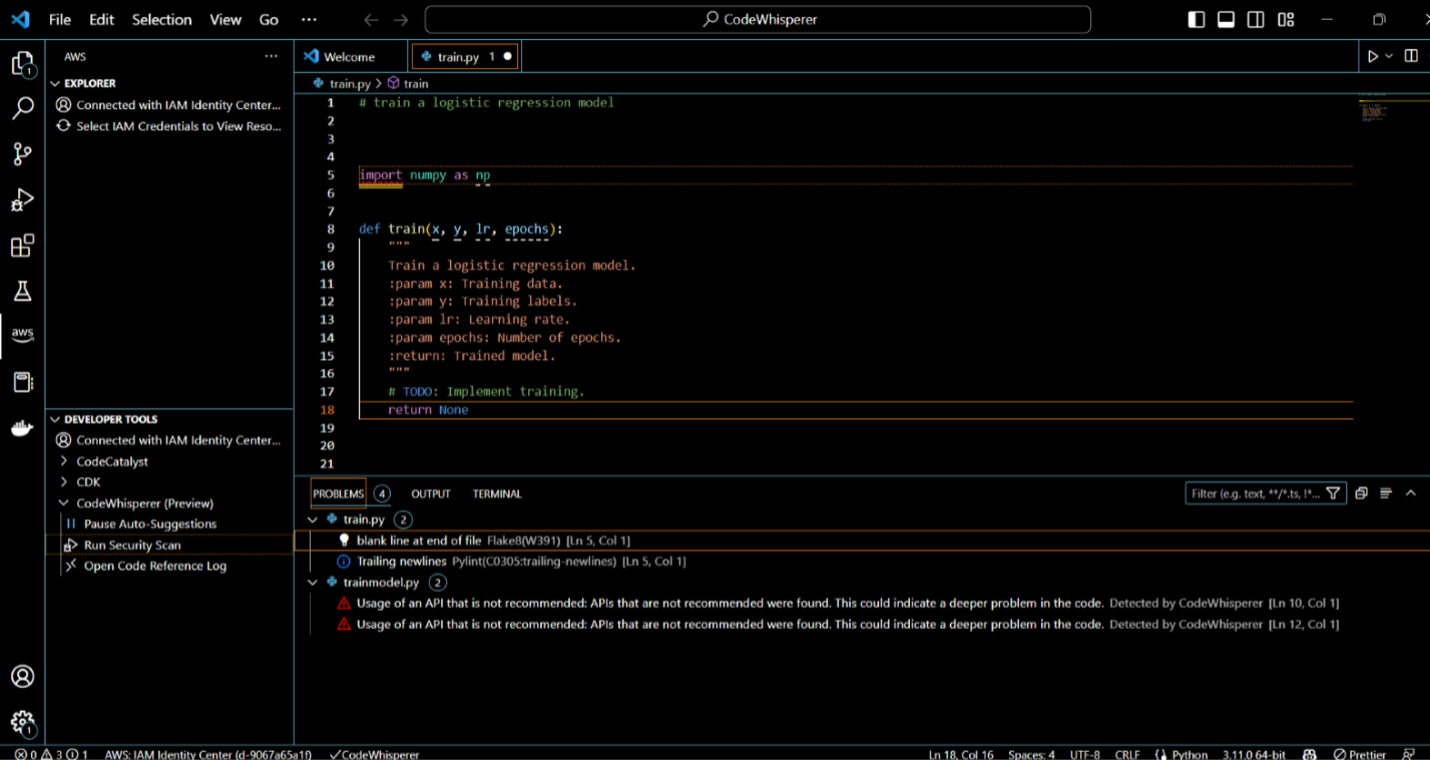
Developers aren’t truly going to be more productive if code suggested by their generative AI tool contains hidden security vulnerabilities or fails to handle open source responsibly. CodeWhisperer is the only AI coding companion with built-in security scanning (powered by automated reasoning) for finding and suggesting remediations for hard-to-detect vulnerabilities, such as those in the top ten Open Worldwide Application Security Project (OWASP), those that don’t meet crypto library best practices, and others. To help developers code responsibly, CodeWhisperer filters out code suggestions that might be considered biased or unfair, and CodeWhisperer is the only coding companion that can filter and flag code suggestions that resemble open source code that customers may want to reference or license for use.
We know generative AI is going to change the game for developers, and we want it to be useful to as many as possible. This is why CodeWhisperer is free for all individual users with no qualifications or time limits for generating code! Anyone can sign up for CodeWhisperer with just an email account and become more productive within minutes. You don’t even have to have an AWS account. For business users, we’re offering a CodeWhisperer Professional Tier that includes administration features like single sign-on (SSO) with AWS Identity and Access Management (IAM) integration, as well as higher limits on security scanning.
Building powerful applications like CodeWhisperer is transformative for developers and all our customers. We have a lot more coming, and we are excited about what you will build with generative AI on AWS. Our mission is to make it possible for developers of all skill levels and for organizations of all sizes to innovate using generative AI. This is just the beginning of what we believe will be the next wave of ML powering new possibilities for you.
Resources
Check out the following resources to learn more about generative AI on AWS and these announcements:
- Explore generative AI on AWS
- An introduction to generative AI: Read what Werner Vogels, Amazon.com CTO, has to say about Generative AI
- Demystifying generative AI: Listen to Werner Vogels and I discuss the impact of generative AI to businesses
- Learn about Amazon Bedrock, the easiest way to build and scale generative AI applications with FMs
- Learn about Amazon Titan, high-performing FMs from Amazon to innovate responsibly
- Discover the new AWS Trainium based Trn1n instance and the AWS Inferentia based Inf2 instance
- Learn how you can use Amazon CodeWhisperer as your coding companion
About the author
 Swami Sivasubramanian is Vice President of Data and Machine Learning at AWS. In this role, Swami oversees all AWS Database, Analytics, and AI & Machine Learning services. His team’s mission is to help organizations put their data to work with a complete, end-to-end data solution to store, access, analyze, and visualize, and predict.
How Accenture is using Amazon CodeWhisperer to improve developer productivity
Amazon CodeWhisperer is an AI coding companion that helps improve developer productivity by generating code recommendations based on their comments in natural language and code in the integrated development environment (IDE). CodeWhisperer accelerates completion of coding tasks by reducing context-switches between the IDE and documentation or developer forums. With real-time code recommendations from CodeWhisperer, you can stay focused in the IDE and finish your coding tasks faster.
CodeWhisperer is powered by a Large Language Model (LLM) that is trained on billions of lines of code, and as a result, has learned how to write code in 15 programming languages. You can simply write a comment that outlines a specific task in plain English, such as “upload a file to S3.” Based on this, CodeWhisperer automatically determines which cloud services and public libraries are best suited for the specified task, builds the specific code on the fly, and recommends the generated code snippets directly in the IDE. Moreover, CodeWhisperer seamlessly integrates with your Visual Studio Code and JetBrains IDEs so that you can stay focused and never leave the IDE. At the time of this writing, CodeWhisperer supports Java, Python, JavaScript, TypeScript, C#, Go, Ruby, Rust, Scala, Kotlin, PHP, C, C++, Shell, and SQL.
In this post, we illustrate how Accenture uses CodeWhisperer in practice to improve developer productivity.
“Accenture is using Amazon CodeWhisperer to accelerate coding as part of our software engineering best practices initiative in our Velocity platform,” says Balakrishnan Viswanathan, Senior Manager, Tech Architecture at Accenture. “The Velocity team was looking for ways to improve developer productivity. After searching for multiple options, we came across Amazon CodeWhisperer to reduce our development efforts by 30% and we are now focusing more on improving security, quality, and performance.”
Benefits of CodeWhisperer
The Accenture Velocity team has been using CodeWhisperer to accelerate their artificial intelligence (AI) and machine learning (ML) projects. The following summary highlights the benefits:
- The team is spending less time creating boilerplate and repetitive code patterns, and more time on what matters: building great software
- CodeWhisperer empowers developers to responsibly use AI to create syntactically correct and secure applications
- The team can generate entire functions and logical code blocks without having to search for and customize code snippets from the web
- They can accelerate onboarding for novice developers or developers working with an unfamiliar codebase
- They can detect security threats early in the development process by shifting the security scanning left to the developer’s IDE
In the following sections, we discuss some of the ways that the Accenture Velocity team has been using CodeWhisperer in more detail.
Onboarding developers on new projects
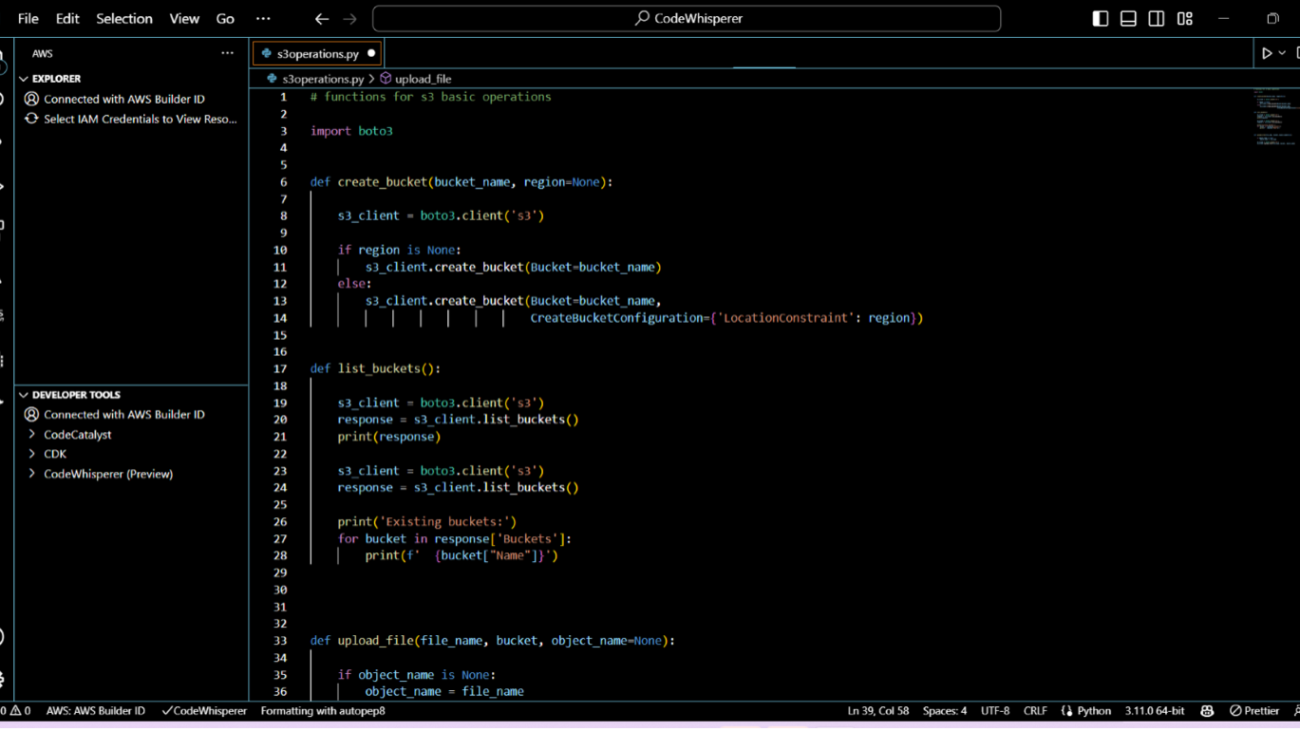
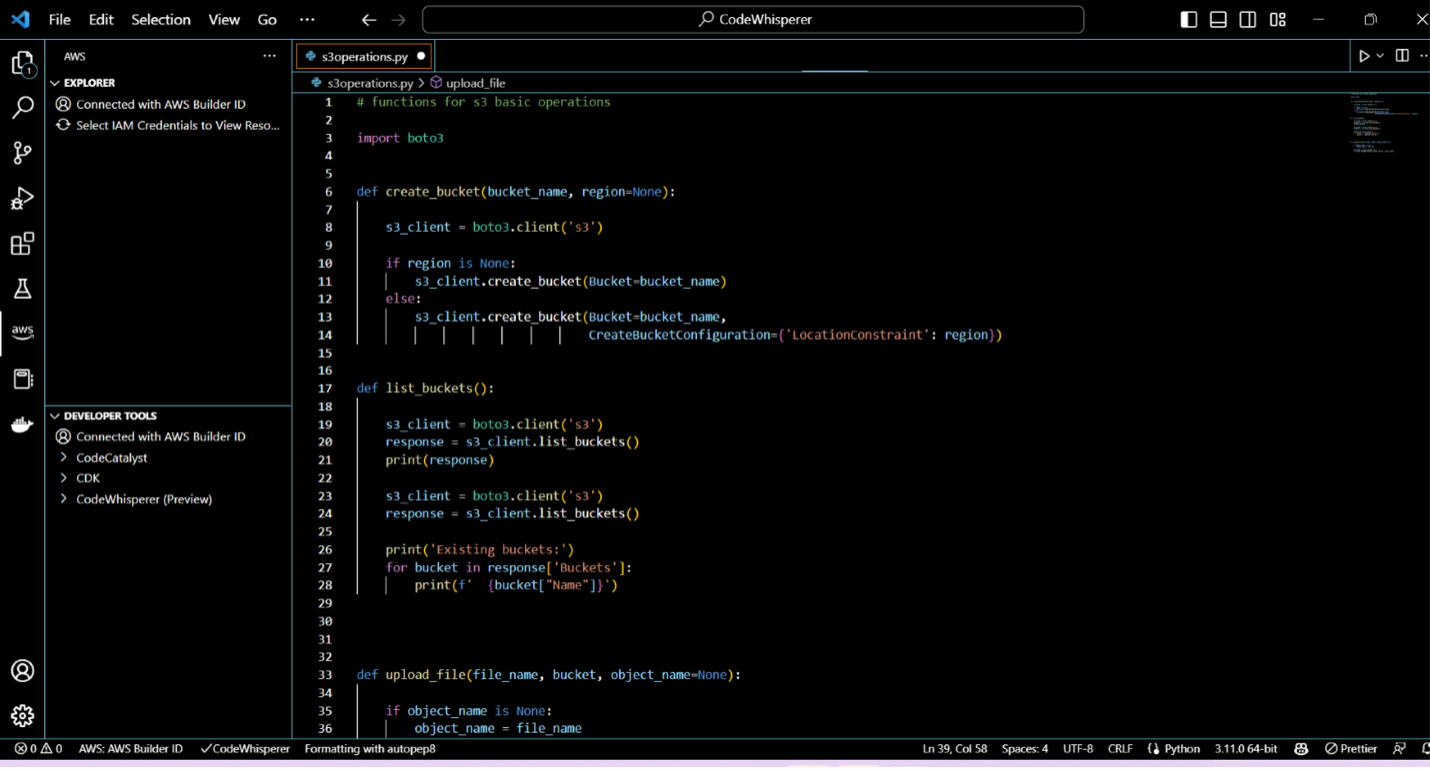
CodeWhisperer helps developers unfamiliar with AWS to ramp up faster on projects that use AWS services. New developers in Accenture were able to write code for AWS services such as Amazon Simple Storage Service (Amazon S3) and Amazon DynamoDB. In a short amount of time, they were able to be productive and contribute to the project. CodeWhisperer assisted developers by providing code blocks or line-by-line suggestions. It is also context-aware. Changing the instructions (comments) to be more specific results in CodeWhisperer generating more relevant code.
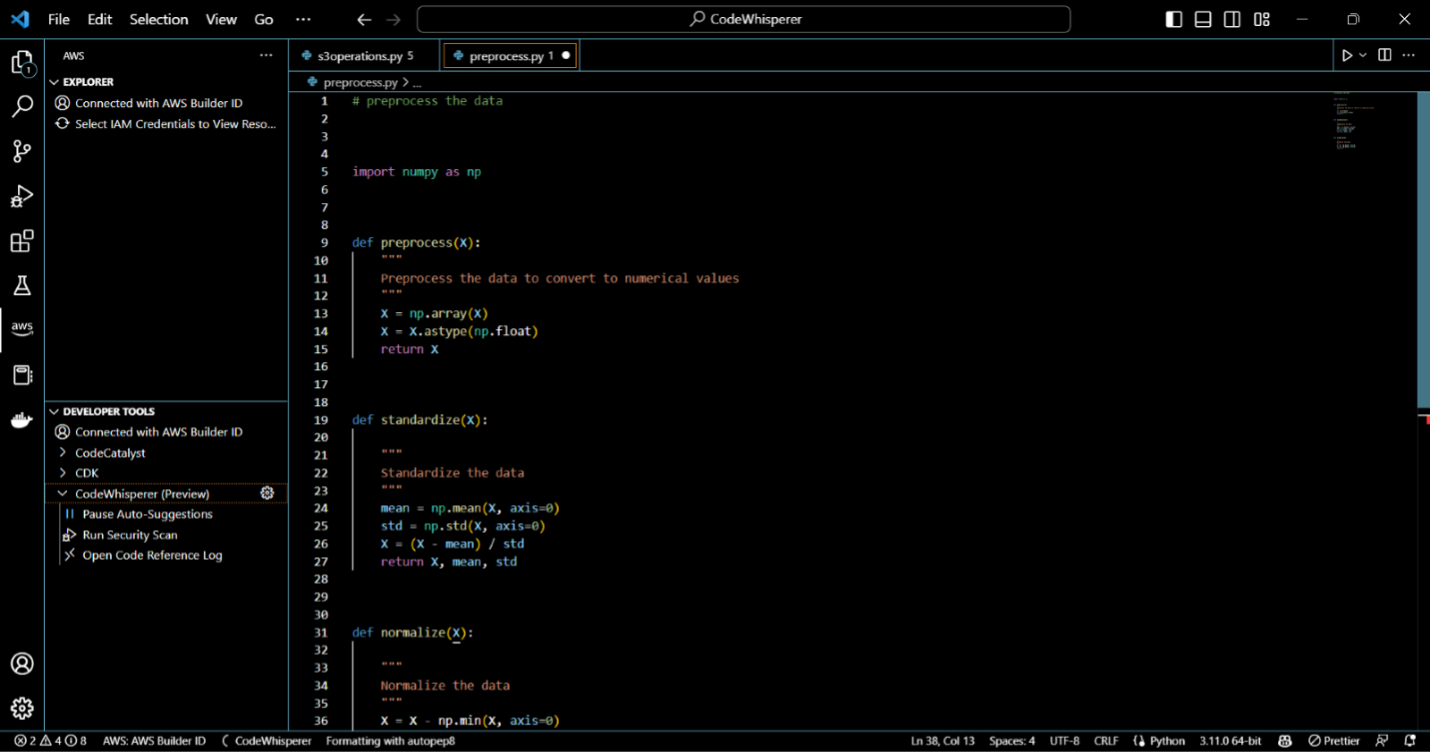
Writing boilerplate code
Developers were able to use CodeWhisperer to complete prerequisites. They were able to create a preprocessing data class just by typing “class to create preprocessing script for ML data.” Writing the preprocessing script took only a couple of minutes, and CodeWhisperer was able to generate entire code blocks.
Helping developers code in unfamiliar languages
A Java user new to the team was able to easily start writing Python code with the help of CodeWhisperer without worrying about the syntax.
Detecting security vulnerabilities in the code
Developers were able to detect security issues by choosing Run security scan in their IDE. Detailed insights on the security issues found are provided directly in the IDE. This helps developers detect and fix issues early.
“As a developer, using CodeWhisperer enables you to write code more quickly,” says Nino Leenus, AI Engineering Consultant at Accenture. “In addition, CodeWhisperer will help you code more accurately by eliminating typos and other typical errors with the aid of artificial intelligence. For a developer, writing the same code multiple times is tedious. By recommending the subsequent code pieces that you may need, AI code completion technologies reduce such repetitious coding.”
Conclusion
This post introduces CodeWhisperer, an AI coding companion by Amazon. The tool uses ML models trained on large datasets to provide suggestions and autocompletion for code, as well as generate entire functions and classes based on natural language descriptions. This post also highlights some of the benefits seen by Accenture when using CodeWhisperer, such as increased productivity and the ability to reduce the time and effort required for common coding tasks. You can activate CodeWhisperer in your favorite IDE today. CodeWhisperer automatically generates suggestions based on your existing code and comments. Visit Amazon CodeWhisperer to get started.
About the Authors
 Balakrishnan Viswanathan is an AI/ML Solution Architect at Accenture. Collaborating with AABG, he devises and executes cutting-edge cloud-based strategies to tackle various AI/ML related challenges. Bala’s interests lie in both cooking and Photoshop, which he is passionate about.
 Shikhar Kwatra is an AI/ML specialist solutions architect at Amazon Web Services, working with a leading Global System Integrator. He has earned the title of one of the Youngest Indian Master Inventors with over 500 patents in the AI/ML and IoT domains. Shikhar aids in architecting, building, and maintaining cost-efficient, scalable cloud environments for the organization, and supports the GSI partner in building strategic industry solutions on AWS. Shikhar enjoys playing guitar, composing music, and practicing mindfulness in his spare time.
 Ankur Desai is a Principal Product Manager within the AWS AI Services team.
 Nino Leenus is an AI Consultant at Accenture. She is expertise on developing End-to-End Machine learning solutions and its deployment using cloud. She is curious about latest tools and technologies in ML-Ops field. She loves traveling and trekking.
Deploy a predictive maintenance solution for airport baggage handling systems with Amazon Lookout for Equipment
This is a guest post co-written with Moulham Zahabi from Matarat.
Probably everyone has checked their baggage when flying, and waited anxiously for their bags to appear at the carousel. Successful and timely delivery of your bags depends on a massive infrastructure called the baggage handling system (BHS). This infrastructure is one of the key functions of successful airport operations. Successfully handling baggage and cargo for departing and arriving flights is critical to ensure customer satisfaction and deliver airport operational excellence. This function is heavily dependent on the continuous operation of the BHS and the effectiveness of maintenance operations. As the lifeline of the airports, a BHS is a linear asset that can exceed 34,000 meters in length (for a single airport) handling over 70 million bags annually, making it one of the most complex automated systems and a vital component of airport operations.
Unplanned downtime of a baggage handling system, whether be it a conveyor belt, carousel, or sorter unit, can disrupt airport operations. Such disruption is bound to create an unpleasant passenger experience and possibly impose penalties on airport service providers.
The prevalent challenge with maintaining a baggage handling system is how to operate an integrated system of over 7,000 assets and over a million setpoints continuously. These systems also handle millions of bags in different shapes and sizes. It’s safe to assume that baggage handling systems are prone to error. Because the elements function in a closed loop, if one element breaks down, it affects the entire line. Traditional maintenance activities rely on a sizable workforce distributed across key locations along the BHS dispatched by operators in the event of an operational fault. Maintenance teams also rely heavily on supplier recommendations to schedule downtime for preventive maintenance. Determining if preventive maintenance activities are properly implemented or monitoring the performance of this type of asset may be unreliable and doesn’t reduce the risk of unanticipated downtime.
Spare parts management is an additional challenge as lead times are increasing due to global supply chain disruptions, yet inventory replenishment decisions are based on historical trends. In addition, these trends don’t incorporate the volatile dynamic environment of operating BHS assets as they age. To address these challenges, a seismic shift needs to happen in maintenance strategies—moving from a reactive to proactive mindset. This shift requires operators to utilize the latest technology to streamline maintenance activities, optimize operations, and minimize operating expenses.
In this post, we describe how AWS Partner Airis Solutions used Amazon Lookout for Equipment, AWS Internet of Things (IoT) services, and CloudRail sensor technologies to provide a state-of-the-art solution to address these challenges.
Baggage handling system overview
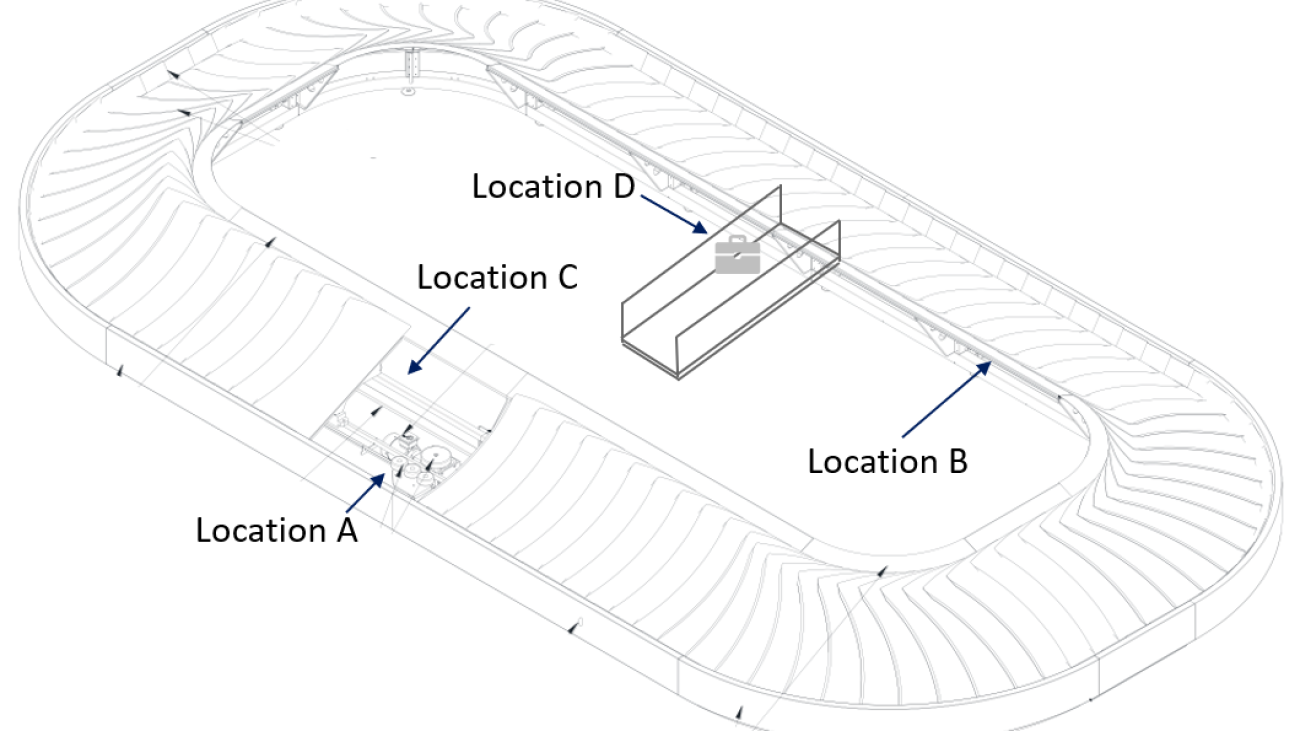
The following diagram and table illustrate the measurements taken across a typical carousel in King Khalid International Airport in Riyadh.

Data is collected at the different locations illustrated in the diagram.
| Sensor Type | Business value | Datasets | Location |
| IO Link Speed Sensors | Homogeneous Carousel Speed | PDV1 (1 per min) | C |
|
Vibration Sensor with Integrated Temperature Sensor |
Loose Screw, Shaft Misaligned, Bearing Damage, Motor Winding Damage |
Fatigue (v-RMS) (m/s) Impact (a-Peak) (m/s^2) Friction (a-RMS) (m/s^2) Temperature (C) Crest |
A and B |
| Distance PEC Sensor | Baggage Throughput | Distance (cm) | D |
The following images show the environment and monitoring equipment for the various measurements.

Vibration sensor mounted on one of the conveyor motors |

Proximity probe measuring carousel speed |
|

Line of sight of the baggage throughput counter (using a distance sensor) |

Thermal image of one of the conveyor motors |
|
Solution overview
The predictive maintenance system (PdMS) for baggage handling systems is a reference architecture that aids airport maintenance operators in their journey to have data as an enabler in improving unplanned downtime. It contains building blocks to accelerate the development and deployment of connected sensors and services. The PdMS includes AWS services to securely manage the lifecycle of edge compute devices and BHS assets, cloud data ingestion, storage, machine learning (ML) inference models, and business logic to power proactive equipment maintenance in the cloud.
This architecture was built from lessons learned while working with airport operations over several years. The proposed solution was developed with the support of Northbay Solutions, an AWS Premier Partner, and can be deployed to airports of all sizes and scales to thousands of connected devices within 90 days.
The following architecture diagram exposes the underlying components used to build the predictive maintenance solution:

We use the following services to assemble our architecture:
- CloudRail.DMC is a software as a service (SaaS) solution by the German IoT expert CloudRail GmbH. This organization manages fleets of globally distributed edge gateways. With this service, industrial sensors, smart meters, and OPC UA servers can be connected to an AWS data lake with just a few clicks.
- AWS IoT Core lets you connect billions of IoT devices and route trillions of messages to AWS services without managing infrastructure. It securely transmits messages to and from all of your IoT devices and applications with low latency and high throughput. We use AWS IoT Core to connect to the CloudRail sensors and forward their measurements to the AWS Cloud.
- AWS IoT Analytics is a fully managed service that makes it easy to run and operationalize sophisticated analytics on massive volumes of IoT data without having to worry about the cost and complexity typically required to build an IoT analytics platform. It’s an easy way to run analytics on IoT data to gain accurate insights.
- Amazon Lookout for Equipment analyzes data from equipment sensors to create an ML model automatically for your equipment based on asset specific data—no data science skills necessary. Lookout for Equipment analyzes incoming sensor data in real time and accurately identifies early warning signals that could lead to unexpected downtime.
- Amazon QuickSight allows everyone in the organization to understand the data by asking questions in natural language, visualizing information through interactive dashboards, and automatically looking for patterns and outliers powered by ML.
As illustrated in the following diagram, this architecture enables sensor data to flow to operational insights.

Data points are collected using IO-Link sensors: IO-Link is a standardized interface to enable seamless communication from the control level of an industrial asset (in our case, the baggage handling system) to the sensor level. This protocol is used to feed sensor data into a CloudRail edge gateway and loaded into AWS IoT Core. The latter then provides equipment data to ML models to identify operational and equipment issues that can be used to determine optimal timing for asset maintenance or replacement without incurring unnecessary costs.
Data collection
Retrofitting existing assets and their controls systems to the cloud remains a challenging approach for operators of equipment. Adding secondary sensors provides a fast and secure way to acquire the necessary data while not interfering with existing systems. Therefore, it’s easier, faster, and non-invasive compared to the direct connection of a machine’s PLCs. Additionally, retrofitted sensors can be selected to precisely measure the data points required for specific failure modes.
With CloudRail, every industrial IO-Link sensor can be connected to AWS services like AWS IoT Core, AWS IoT SiteWise, or AWS IoT Greengrass within a few seconds through a cloud-based device management portal (CloudRail.DMC). This enables IoT experts to work from centralized locations and onboard physical systems that are globally distributed. The solution solves the challenges of data connectivity for predictive maintenance systems through an easy plug-and-play mechanism.
The gateway acts as the Industrial Demilitarized Zone (IDMZ) between the equipment (OT) and the cloud service (IT). Through an integrated fleet management application, CloudRail ensures that the latest security patches are rolled out automatically to thousands of installations.
The following image shows an IO-Link sensor and the CloudRail edge gateway (in orange):

Training an anomaly detection model
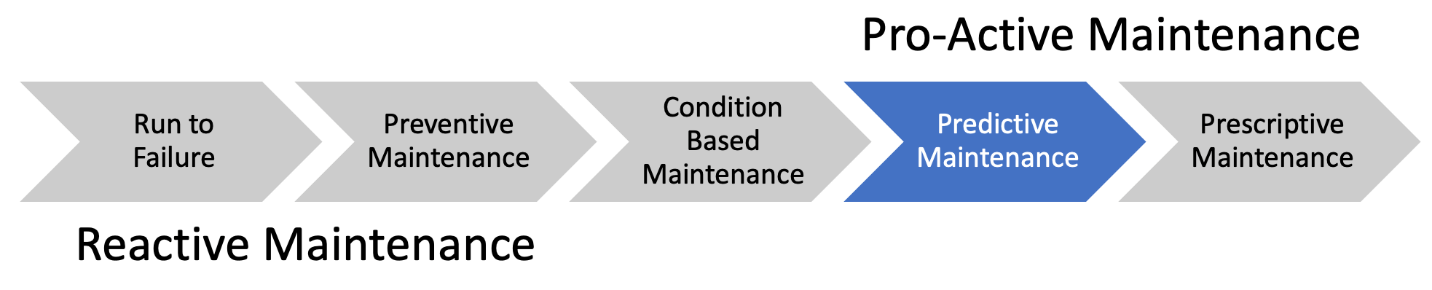
Organizations from most industrial segments see modern maintenance strategies moving away from the run-to-failure, reactive approaches and progressing towards more predictive methods. However, moving to a condition-based or predictive maintenance approach requires data collected from sensors installed throughout facilities. Using historical data captured by these sensors in conjunction with analytics helps identify precursors to equipment failures, which allows maintenance personnel to act accordingly before breakdown.
Predictive maintenance systems rely on the capability to identify when failures could occur. Equipment OEMs usually provide datasheets for their equipment and recommend monitoring certain operational metrics based on near-perfect conditions. However, these conditions are rarely realistic because of the natural wear of the asset, the environmental conditions it operates in, its past maintenance history, or just the way you need to operate it to achieve your business outcomes. For instance, two identical motors (make, model, production date) were installed in the same carousel for this proof of concept. These motors operated at different temperature ranges due to different weather exposure (one part of the conveyor belt on the inside and the other outside of the airport terminal).
Motor 1 operated in a temperature ranging from 32–35°C. Vibration velocity RMS can change due to motor fatigue (for example, alignment errors or imbalance problems). As shown in the following figure, this motor shows fatigue levels ranging between 2–6, with some peaks at 9.
Motor 2 operated in a cooler environment, where the temperature was ranging between 20–25°C. In this context, motor 2 shows fatigue levels between 4–8, with some peaks at 10:

Most ML approaches expect very specific domain knowledge and information (often difficult to obtain) that must be extracted from the way you operate and maintain each asset (for example, failure degradation patterns). This work needs to be performed each time you want to monitor a new asset, or if the asset conditions change significantly (such as when you replace a part). This means that a great model delivered at the prototyping phase will likely see a performance hit when rolled out on other assets, drastically reducing the accuracy of the system and in the end, losing the end-users’ confidence. This may also cause many false positives, and you would need the skills necessary to find your valid signals in all the noise.
Lookout for Equipment only analyzes your time series data to learn the normal relationships between your signals. Then, when these relationships start to deviate from the normal operating conditions (captured at training state), the service will flag the anomaly. We found that strictly using historical data for each asset lets you focus on technologies that can learn the operating conditions that will be unique to a given asset in the very environment it’s operating in. This lets you deliver predictions supporting root cause analysis and predictive maintenance practices at a granular, per-asset level and macro level (by assembling the appropriate dashboard to let you get an overview of multiple assets at once). This is the approach we took and the reason we decided to use Lookout for Equipment.
Training strategy: Addressing the cold start challenge
The BHS we targeted wasn’t instrumented at first. We installed CloudRail sensors to start collecting new measurements from our system, but this meant we only had a limited historical depth to train our ML model. We addressed the cold start challenge in this case by recognizing that we are building a continuously improving system. After the sensors were installed, we collected an hour of data and duplicated this information to start using Lookout for Equipment as soon as possible and test our overall pipeline.
As expected, the first results were quite unstable because the ML model was exposed to a very small period of operations. This meant that any new behavior not seen during the first hour would be flagged. When looking at the top-ranking sensors, the temperature on one of the motors seemed to be the main suspect (T2_MUC_ES_MTRL_TMP in orange in the following figure). Because the initial data capture was very narrow (1 hour), over the course of the day, the main change was coming from the temperature values (which is consistent with the environmental conditions at that time).

When matching this with the environmental conditions around this specific conveyor belt, we confirmed that the outside temperature increased severely, which, in turn, increased the temperature measured by this sensor. In this case, after the new data (accounting for the outside temperature increase) is incorporated into the training dataset, it will be part of the normal behavior as captured by Lookout for Equipment and similar behavior in the future will be less likely to raise any events.
After 5 days, the model was retrained and the false positive rates immediately fell drastically:

Although this cold start problem was an initial challenge to obtain actionable insights, we used this opportunity to build a retraining mechanism the end-user can trigger easily. A month into the experimentation, we trained a new model by duplicating a month’s worth of sensor data into 3 months. This continued to reduce the false positive rates as the model was exposed to a broader set of conditions. A similar false positive rate drop happened after this retraining: the condition modeled by the system was closer to what users are experiencing in real life. After 3 months, we finally had a dataset that we could use without using this duplication trick.
From now on, we will launch a retraining every 3 months and, as soon as possible, will use up to 1 year of data to account for the environmental condition seasonality. When deploying this system on other assets, we will be able to reuse this automated process and use the initial training to validate our sensor data pipeline.
After the model was trained, we deployed the model and started sending live data to Lookout for Equipment. Lookout for Equipment lets you configure a scheduler that wakes up regularly (for example, every hour) to send fresh data to the trained model and collect the results.
Now that we know how to train, improve, and deploy a model, let’s look at the operational dashboards implemented for the end-users.
Data visualization and insights
End-users need a way to extract more value from their operational data to better improve their asset utilization. With QuickSight, we connected the dashboard to the raw measurement data provided by our IoT system, allowing users to compare and contrast key pieces of equipment on a given BHS.
In the following dashboard, users can check the key sensors used to monitor the condition of the BHS and obtain period-over-period metrics changes.
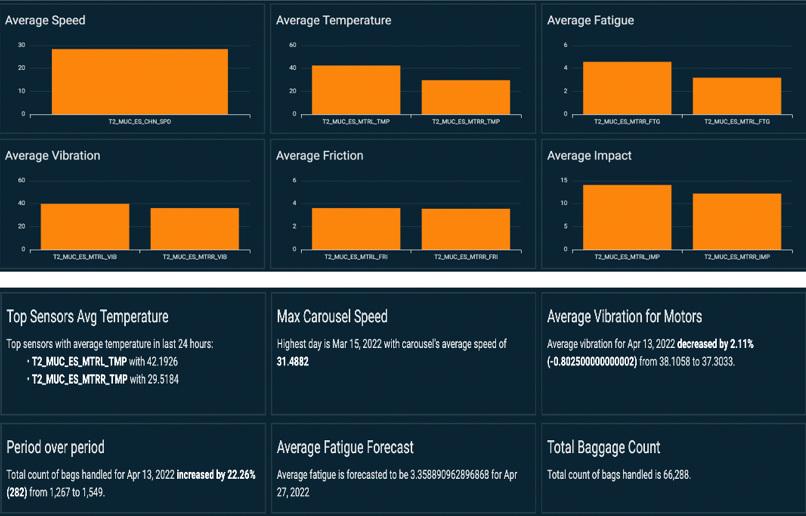
In the preceding plot, users can visualize any unexpected imbalance of the measurement for each motor (left and right plots for temperature, fatigue, vibration, friction, and impact). At the bottom, key performance indicators are summarized, with forecast and period-over-period trends called out.
End-users can access information for the following purposes:
- View historical data in intervals of 2 hours up to 24 hours.
- Extract raw data via CSV format for external integration.
- Visualize asset performance over a set period of time.
- Produce insights for operational planning and improve asset utilization.
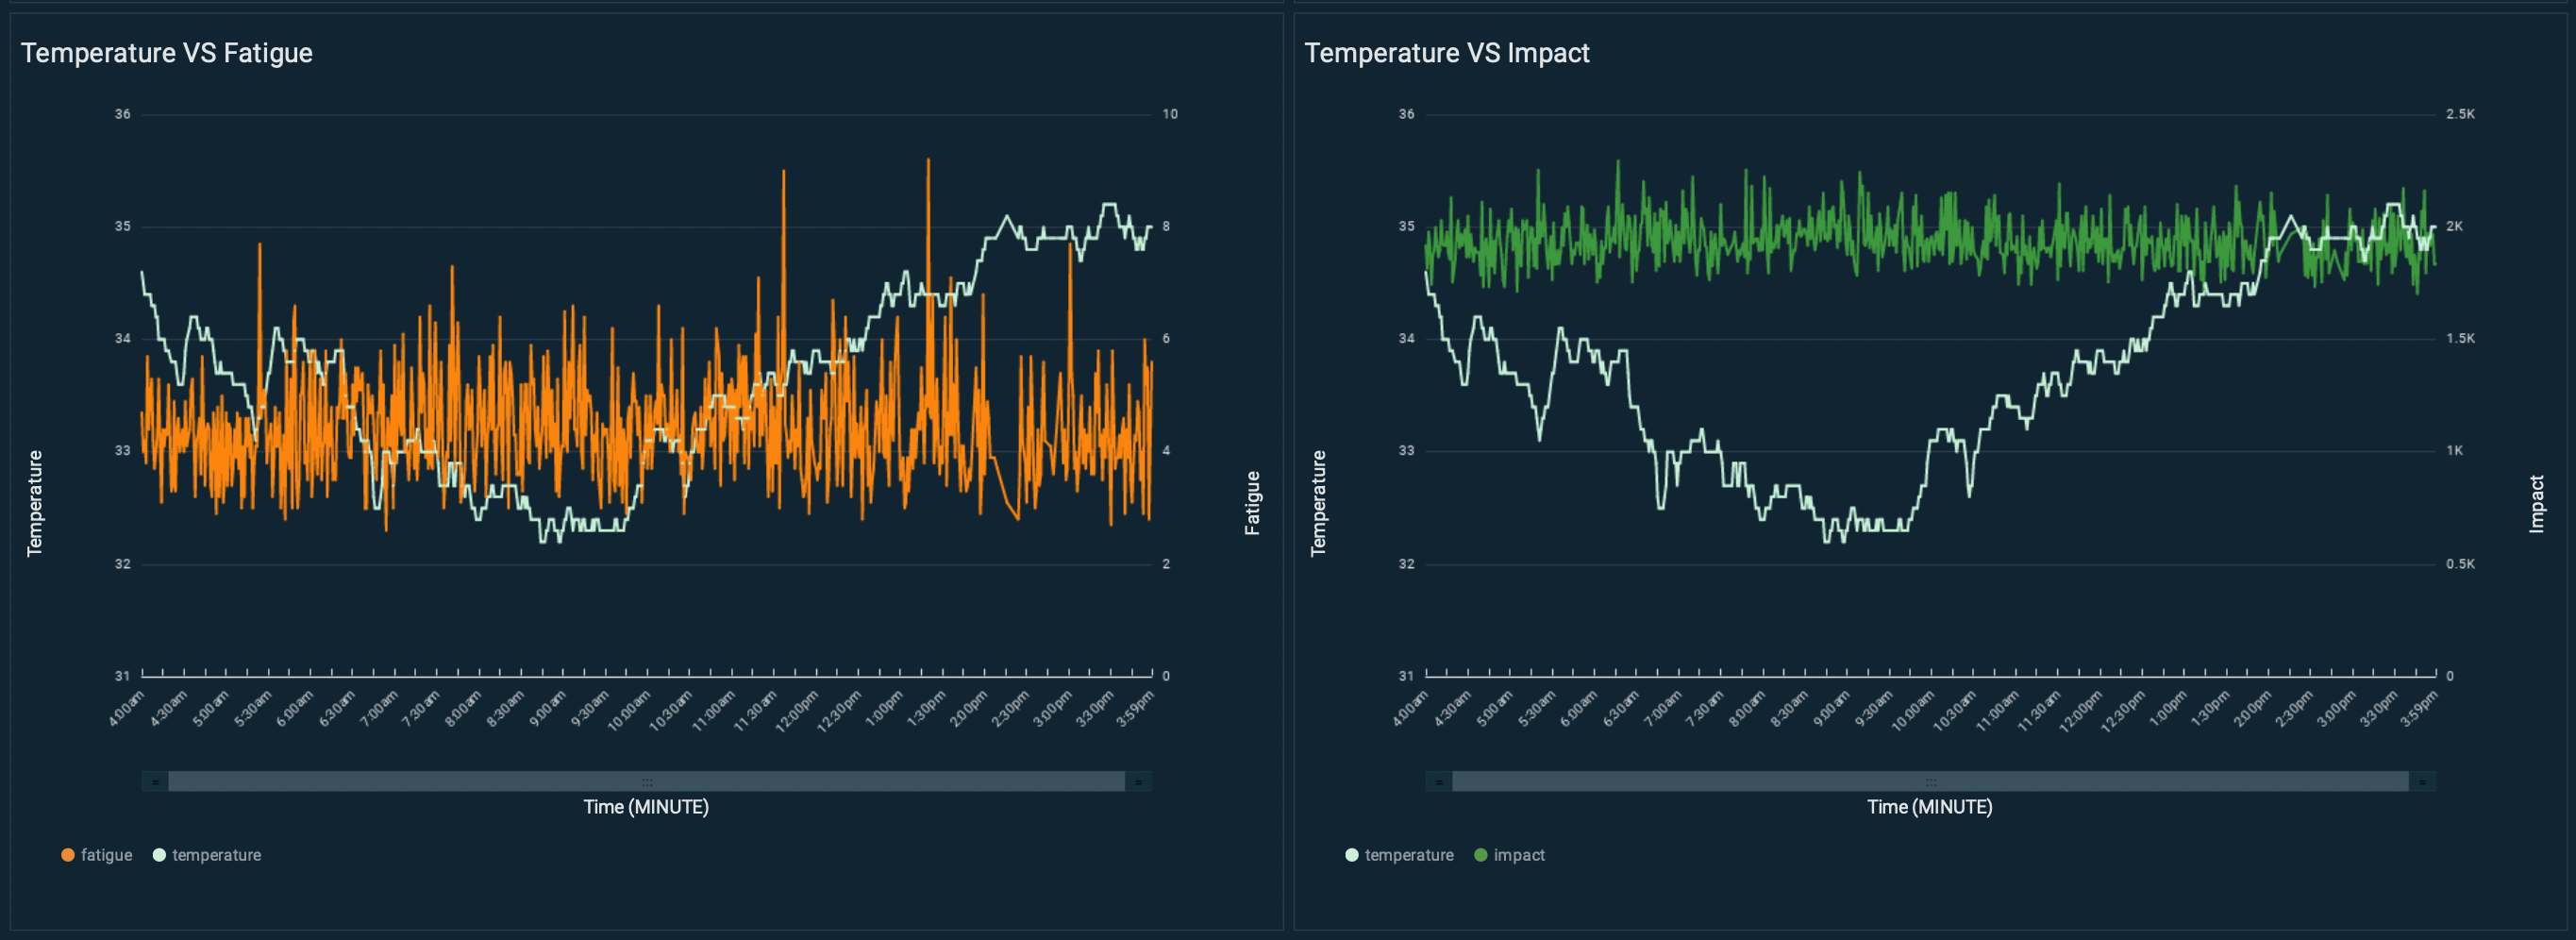
- Perform correlation analysis. In the following plot, the user can visualize several measurements (such as motor fatigue vs. temperature, or baggage throughput vs. carousel speed) and use this dashboard to better inform the next best maintenance action.


Eliminating noise from the data
After a few weeks, we noticed that Lookout for Equipment was emitting some events thought to be false positives.

When analyzing these events, we discovered irregular drops in the speed of the carousel motor.

We met with the maintenance team and they informed us these stops were either emergency stops or planned downtime maintenance activities. With this information, we labeled the emergency stops as anomalies and fed them to Lookout for Equipment, while the planned downtimes were considered normal behavior for this carousel.
Understanding such scenarios where abnormal data can be influenced by controlled external actions is critical to improve the anomaly detection model accuracy over time.
Smoke testing
After a few hours from retraining the model and achieving relatively no anomalies, our team physically stressed the assets, which was immediately detected by the system. This is a common request from users because they need to familiarize themselves with the system and how it reacts.

We built our dashboard to allow end-users to visualize historical anomalies with an unlimited period. Using a business intelligence service let them organize their data at will, and we have found that bar charts over a 24-hour period or pie charts are the best way to get a good view of the condition of the BHS. In addition to the dashboards that users can view whenever they need, we set up automated alerts sent to a designated email address and via text message.
Extracting deeper insights from anomaly detection models
In the future, we intend to extract deeper insights from the anomaly detection models trained with Lookout for Equipment. We will continue to use QuickSight to build an expanded set of widgets. For instance, we have found that the data visualization widgets exposed in the GitHub samples for Lookout for Equipment allow us to extract even more insights from the raw outputs of our models.

Results
Reactive maintenance in baggage handling systems translates to the following:
- Lower passenger satisfaction due to lengthy wait times or damaged baggage
- Lower asset availability due to the unplanned failures and inventory shortage of critical spare parts
- Higher operating expenses due to rising inventory levels in addition to higher maintenance costs
Evolving your maintenance strategy to incorporate reliable, predictive analytics into the cycle of decision-making aims to improve asset operation and help avoid forced shutdowns.
The monitoring equipment was installed locally in 1 day and configured completely remotely by IoT experts. The cloud architecture described in the solution overview was then successfully deployed within 90 days. A fast implementation time proves the benefits proposed to the end-user, quickly leading to a shift in maintenance strategy from human-based reactive (fixing breakdowns) to machine-based, data-driven proactive (preventing downtimes).
Conclusion
The cooperation between Airis, CloudRail, Northbay Solutions, and AWS led to new achievement at the King Khalid International Airport (see the press release for more details). As part of their digital transformation strategy, the Riyadh Airport plans on further deployments to cover other electro-mechanical systems like passenger boarding bridges and HVAC systems.
If you have comments about this post, please submit them in the comments section. If you have questions about this solution or its implementation, please start a new thread on re:Post, where AWS experts and the broader community can support you.
About the authors
 Moulham Zahabi is an aviation specialist with over 11 years of experience in designing and managing aviation projects, and managing critical airport assets in the GCC region. He is also one of the co-founders of Airis-Solutions.ai, which aims to lead the aviation industry’s digital transformation through innovative AI/ML solutions for airports and logistical centers. Today, Moulham is heading the Asset Management Directorate in the Saudi Civil Aviation Holding Company (Matarat).
 Fauzan Khan is a Senior Solutions Architect working with public sector customers, providing guidance to design, deploy, and manage their AWS workloads and architectures. Fauzan is passionate about helping customers adopt innovative cloud technologies in the area of HPC and AI/ML to address business challenges. Outside of work, Fauzan enjoys spending time in nature.
 Michaël Hoarau is an AI/ML Specialist Solutions Architect at AWS who alternates between data scientist and machine learning architect, depending on the moment. He is passionate about bringing the AI/ML power to the shop floors of his industrial customers and has worked on a wide range of ML use cases, ranging from anomaly detection to predictive product quality or manufacturing optimization. He published a book on time series analysis in 2022 and regularly writes about this topic on LinkedIn and Medium. When not helping customers develop the next best machine learning experiences, he enjoys observing the stars, traveling, or playing the piano.

Modulate makes voice chat safer while reducing infrastructure costs by a factor of 5 with Amazon EC2 G5g instances
This is a guest post by Carter Huffman, CTO and Co-founder at Modulate.
Modulate is a Boston-based startup on a mission to build richer, safer, more inclusive online gaming experiences for everyone. We’re a team of world-class audio experts, gamers, allies, and futurists who are eager to build a better online world and make voice chat safer for all players. We’re doing just that with ToxMod, our proactive, voice-native moderation platform. Game publishers and developers use ToxMod to proactively moderate voice chat in their games according to their own content policies, codes of conduct, and community guidelines.
We chose AWS for the scalability and elasticity that our application needed as well as the great customer service it offers. Using Amazon Elastic Compute Cloud (Amazon EC2) G5g instances featuring NVIDIA T4G Tensor Core GPUs as the infrastructure for ToxMod has helped us lower our costs by a factor of 5 (compared to G4dn instances) while achieving our goals on throughput and latency. As a nimble startup, we can reinvest these cost savings into further innovation to help serve our mission. In this post, we cover our use case, challenges, and alternative paths, and a brief overview of our solution using AWS.
The changing metaverse and need for ToxMod

Modern online games and metaverse platforms have become far more social than their predecessors. Historically, games have focused on providing a specific curated experience to players. Today, they have evolved to be more of a communal space, where players and their friends can congregate and choose a variety of experiences to partake in. With this evolution, toxicity and verbal abuse can often ruin otherwise great online experiences.
In fact, according to a recent study from the Anti-Defamation League, toxicity in games is worse than ever: exposure to white supremacist ideologies in games more than doubled in 2022. Over three-quarters of adult gamers reported experiencing severe harassment in online games. More than 17 million young gamers were exposed to harm and harassment in the past year. The problem is only getting worse, and with upcoming regulations that will require studios to take a more active role in managing and reporting on toxicity, the need for proactive voice moderation is more urgent than ever.
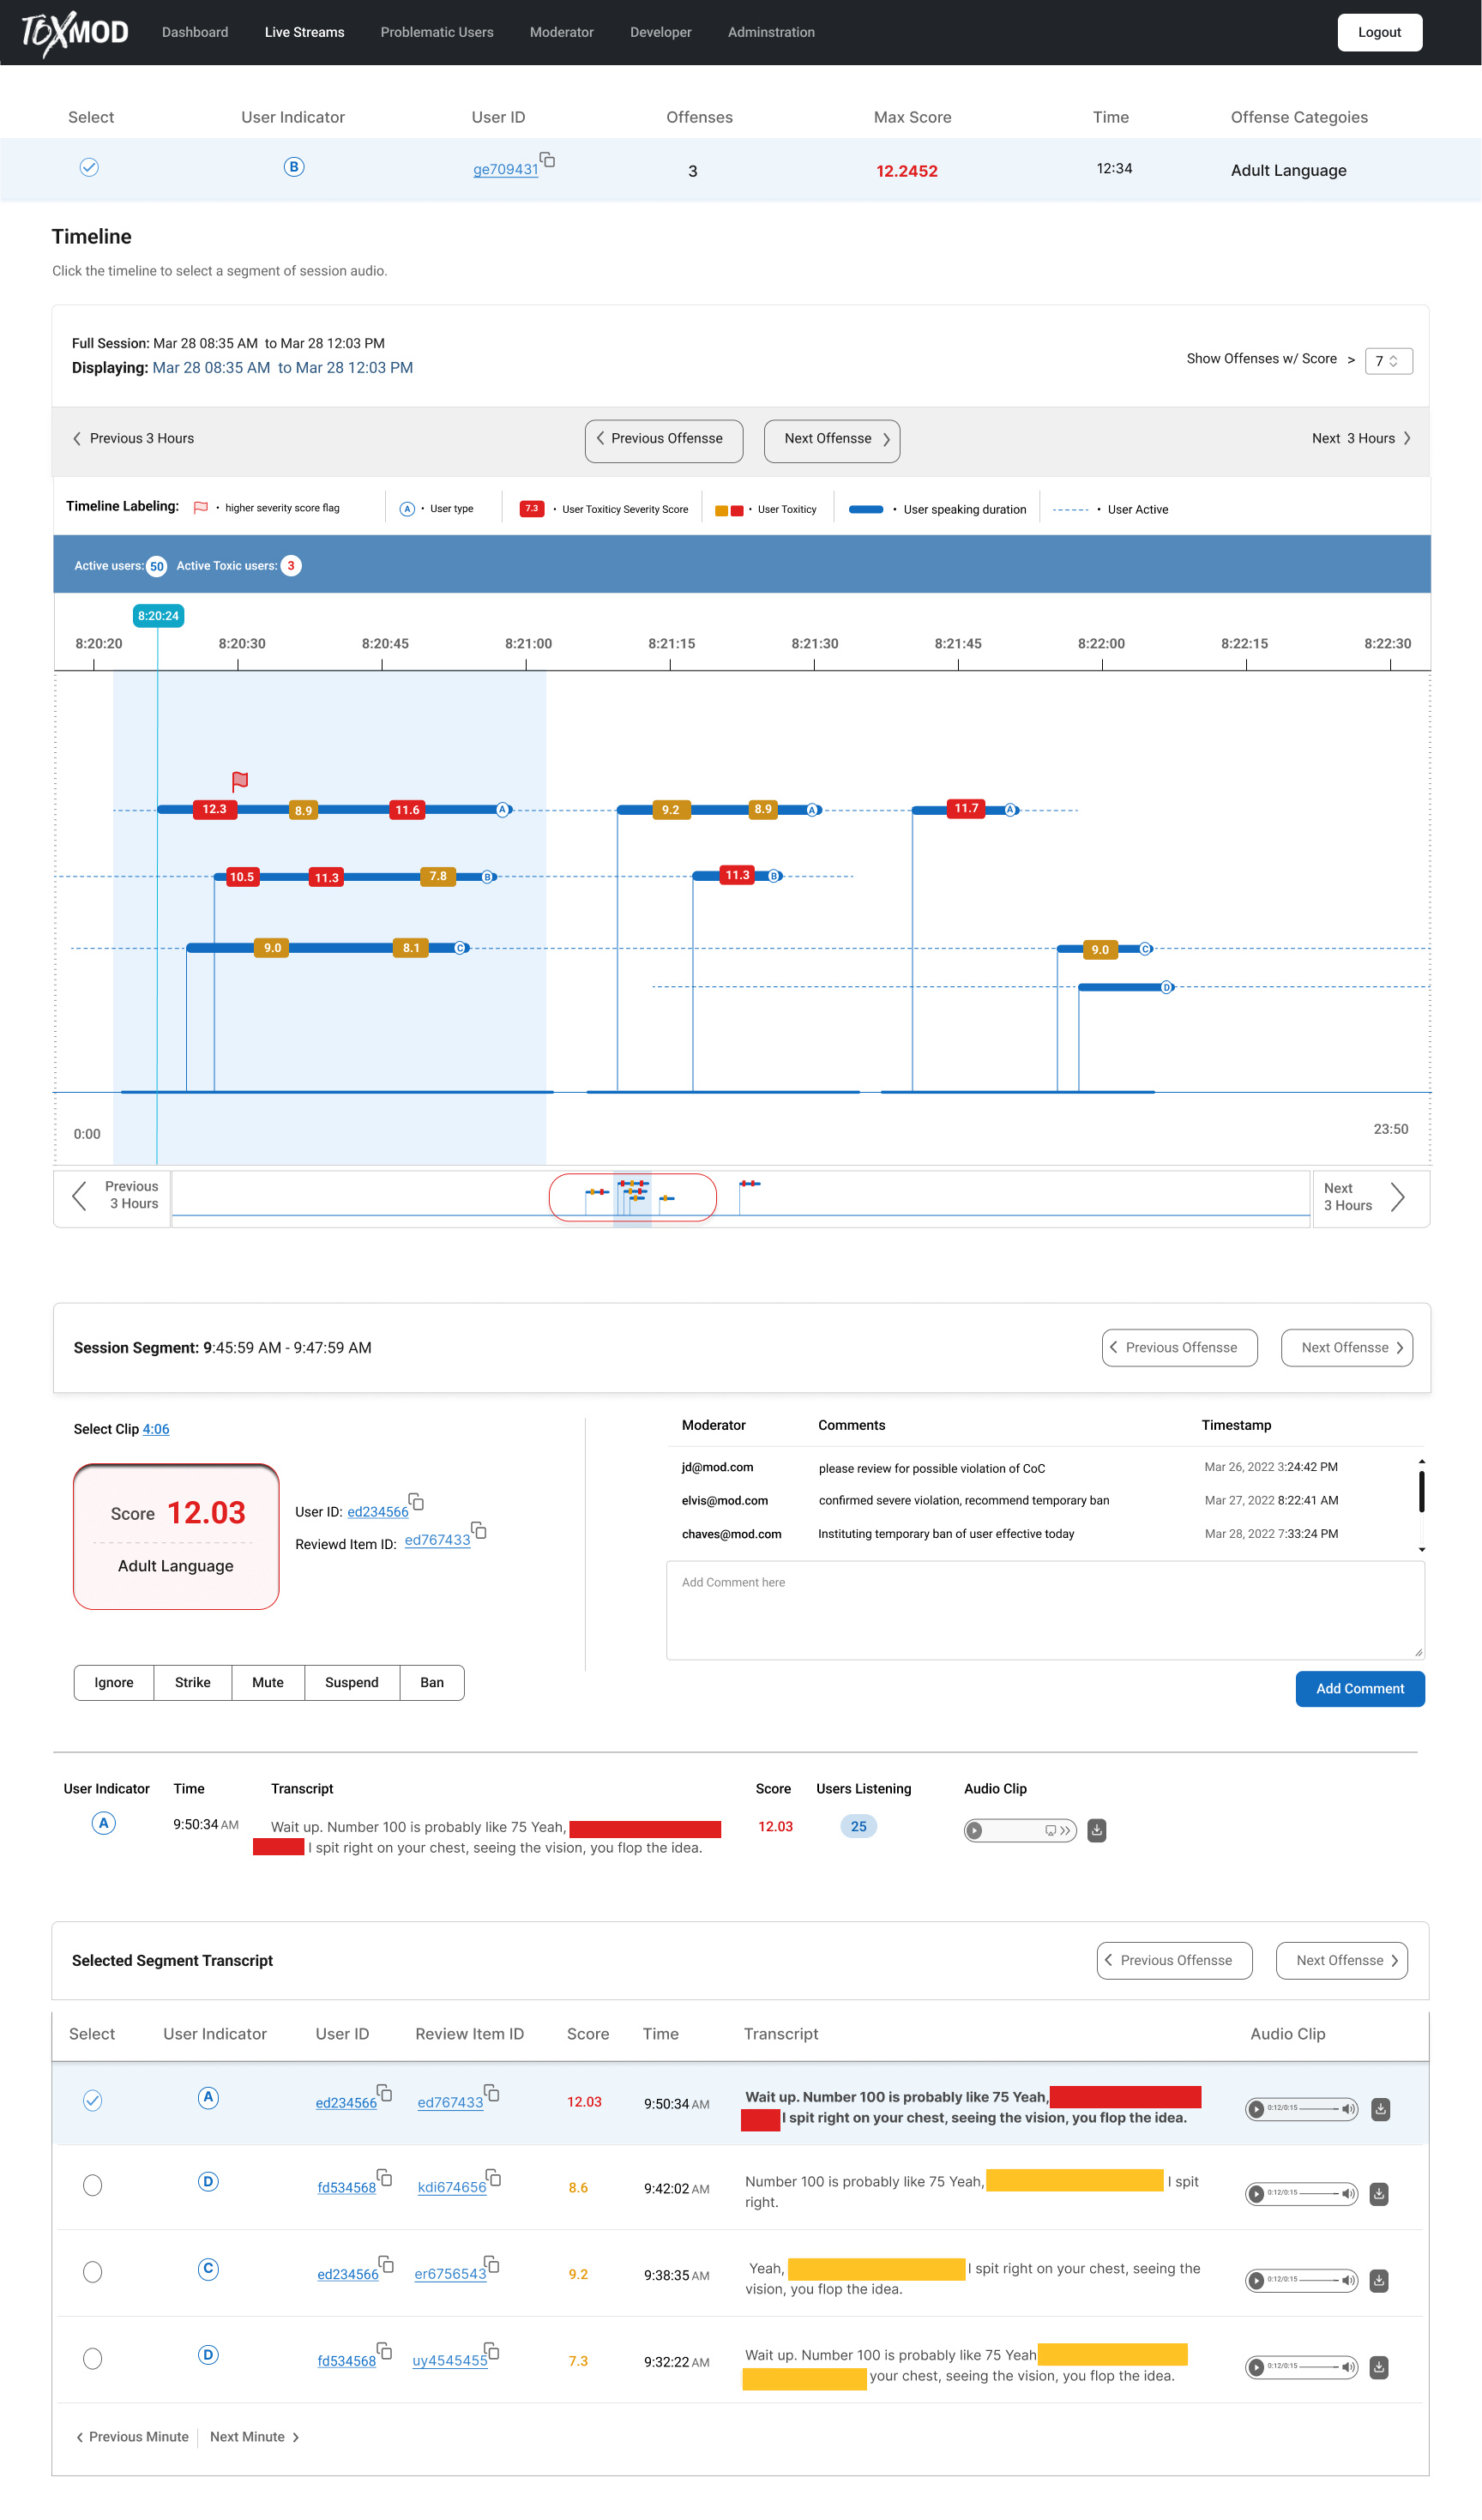
ToxMod helps game publishers and platforms proactively moderate their voice chat according to their own policies and guidelines, keeping their communities safe and positive. ToxMod runs a series of machine learning (ML) models that analyze the emotional, textual, and conversational aspects of voice conversations to determine if there are any violations of the publisher’s or platform’s content policies. Violations are flagged to human moderators who can take action against bad actors. Our ML models include emotion detection, transcription, and NLP-powered conversational analysis that categorizes violations and provides a rank score to determine how confident it is that a violation has occurred. These detections occur in real time and enable game publishers to proactively moderate their communities as toxicity is occurring, preventing harm to players and dangerous conversations from escalating.
Economic and technical considerations
We have two types of constraints: economic and technical. On the economic side, our problem is variable demand and the uncertain scale of the required compute infrastructure. In the games industry, developers and publishers launch games with minimal margins and only scale up as the game becomes more successful. That success can mean that our largest customers are processing millions of hours of voice chat per month. ToxMod’s costs scale with the number of hours of audio processed, which is very dynamic based on players’ behavior and external factors affecting a game’s popularity. Operating our own servers to power ToxMod is prohibitively expensive in terms of both cost and team bandwidth. On-premise servers lack this scalability and would often go underutilized, meaning the right choice for ToxMod is the cloud. With AWS, we can dynamically scale to match our customers’ demand while keeping costs at a minimum.
On the technical side, as with building any voice process application, we need to strike a balance between latency and throughput. Some of our users want the ability to address situations that may arise in their communities within a minute or two of them happening. To meet our latency budgets, we go as low level as possible. We happen to have a lot of experience with ARM devices because a lot of the ToxMod code base runs on client-side devices that often run on an ARM processor. The EC2 G5g instances powered by NVIDIA T4G Tensor Core GPUs and featuring AWS Graviton2 processors were a natural fit for some of the custom neural network inference code that had developed for client-side usage.
EC2 G5g instances for cost-efficiency and AWS reliability
With these considerations, we decided to use G5g instances as the infrastructure for ToxMod because they are cost-effective and provide familiar environments to test and deploy our models. This choice ultimately helped us lower our costs by a factor of 5 (compared to G4dn instances). To be able to iterate quickly, we needed a compute environment that was familiar to our data scientists and ML engineers. We were able to get our machine image with all the relevant drivers, libraries, and environment variables running on G5g instances within a day. We started off on G4dn instances, and our initial tests on G5g enabled us to lower our costs by 40%. Many of our most expensive models to run are GPU-bound, so we were able to further optimize our costs by right-sizing to an instance size that enabled us to maximize the CPU utilization while still having access to a single GPU.
Beyond G5g instances working particularly well for our configuration, we knew we could count on AWS’s technical support and account management to help us resolve issues quickly and maintain extremely high uptime while experiencing highly variable load. When we started, we were spending less than double digits per month, and yet a real person reached out to learn about our use case and a team of people worked with us to make our application not only work, but work in the most cost-efficient manner.
Overview of our solution
ToxMod’s solution begins with audio ingestion, which is accomplished through integration of our SDK into a game’s or platform’s voice chat infrastructure. The use of an SDK (over an API or other interface) is critical because when you process audio, you have to be extremely resource-efficient. For any single audio stream, we need to process it and hand it back to the rest of the system quickly or customers will encounter glitches in the audio, which is something we want to avoid at all costs. A lot of things can cause glitches—including memory allocation, garbage collection, and system calls—so we’ve developed the ToxMod SDK to ensure the smoothest audio processing possible.
From the SDK, voice chats are encoded in short buffers and sent over the internet. On the ingestion side, we buffer a couple of seconds of audio, and we try to find natural break points in voice conversations before sending the package to the AWS Cloud, where we save the incoming data via AWS Lambda functions. From there, analysis of the audio conversation is done via processing on G5g instances running our variety of ML audio models. We minimize overhead by batching all the packets we receive and sending those off to the GPUs in the G5g instances. The G5g instances are fed through queues of audio clips to process, which we have hooked up to auto scaling groups that efficiently scale up or down as traffic varies throughout the day.
Looking ahead
ToxMod is built for studios of all sizes, from small indie dev teams to AAA, multi-team developers and publishers. Today, we’re better positioned than ever to provide the level of support, product development, and robust features that enterprise teams at the largest studios expect from their software partners. With multilingual support for 18 languages, 24/7 enterprise-grade support, available single-tenant licenses for studios with multiple games, and the support of the scalable ML infrastructure that AWS provides, we’re here to help AAA studios make voice chat safe for their players.
If you would like to learn more about how EC2 G5g instances can help you cost-effectively deploy your ML workloads, refer to Amazon EC2 G5g instances.
About the Authors
 Carter Huffman is the CTO and co-founder of Modulate, a voice technology startup that aims to fight online toxicity and enhance voice communication in games. He has a background in physics, machine learning, and data analysis, and previously worked at NASA’s Jet Propulsion Laboratory. He is passionate about understanding and manipulating human speech using deep neural networks. He graduated from MIT with a Bachelor of Science in Physics.
 Shruti Koparkar is a Senior Product Marketing Manager at AWS. She helps customers explore, evaluate, and adopt EC2 accelerated computing infrastructure for their machine learning needs.
Secure your Amazon Kendra indexes with the ACL using a JWT shared secret key
Globally, many organizations have critical business data dispersed among various content repositories, making it difficult to access this information in a streamlined and cohesive manner. Creating a unified and secure search experience is a significant challenge for organizations because each repository contains a wide range of document formats and access control mechanisms.
Amazon Kendra is an intelligent enterprise search service that allows users to search across different content repositories. Customers are responsible for authenticating and authorizing users to gain access to their search application, and Amazon Kendra enables secure search for enterprise applications, making sure that the results of a user’s search query only include documents the user is authorized to read. Amazon Kendra can easily validate the identity of individual users as well as user groups who perform searches with the addition of secure search tokens. By adding user tokens for secure search, performing access-based filtered searches in Amazon Kendra is simplified and secured. You can securely pass user access information in the query payload instead of using attribute filters to accomplish this. With this feature, Amazon Kendra can validate the token information and automatically apply it to the search results for accurate and secure access-based filtering.
Amazon Kendra supports token-based user access control using the following token types:
- Open ID
- JWT with a shared secret
- JWT with a public key
- JSON
Previously, we saw a demonstration of token-based user access control in Amazon Kendra with Open ID. In this post, we demonstrate token-based user access control in Amazon Kendra with JWT with a shared secret. JWT, or JSON Web Token, is an open standard used to share security information between a client and a server. It contains encoded JSON objects, including a set of claims. JWTs are signed using a cryptographic algorithm to ensure that the claims can’t be altered after the token is issued. JWTs are useful in scenarios regarding authorization and information exchange.
JWTs consist of three parts separated by dots (.):
- Header – It contains parts like type of the token, which is JWT, the signing algorithm being used, such as HMAC SHA256 or RSA, and an optional key identifier.
- Payload – This contains several key-value pairs, called claims, which are issued by the identity provider. In addition to several claims relating to the issuance and expiration of the token, the token can also contain information about the individual principal and tenant.
- Signature – To create the signature part, you take the encoded header, the encoded payload, a secret, the algorithm specified in the header, and sign that.
Therefore, a JWT looks like the following:
The following is a sample header:
The following is the sample payload:
The JWT is created with a secret key, and that secret key is private to you, which means you will never reveal that to the public or inject it inside the JWT. When you receive a JWT from the client, you can verify the JWT with the secret key stored on the server. Any modification to the JWT will result in verification (JWT validation) failure.
This post demonstrates the sample use of a JWT using a shared access key and its usage to secure Amazon Kendra indexes with access controls. In production, you use a secure authentication service provider of your choice and based on your requirements to generate JWTs.
To learn more about JWTs, refer to Introduction to JSON Web Tokens.
Solution overview
Similar to the post with Open ID, this solution is designed for a set of users and groups to make search queries to a document repository, and results are returned only from those documents that are authorized for access within that group. The following table outlines which documents each user is authorized to access for our use case. The documents being used in this example are a subset of AWS public documents.
| User | Group | Document Type Authorized for Access |
| Guest | . | Blogs |
| Patricia | Customer | Blogs, user guides |
| James | Sales | Blogs, user guides, case studies |
| John | Marketing | Blogs, user guides, case studies, analyst reports |
| Mary | Solutions Architect | Blogs, user guides, case studies, analyst reports, whitepapers |
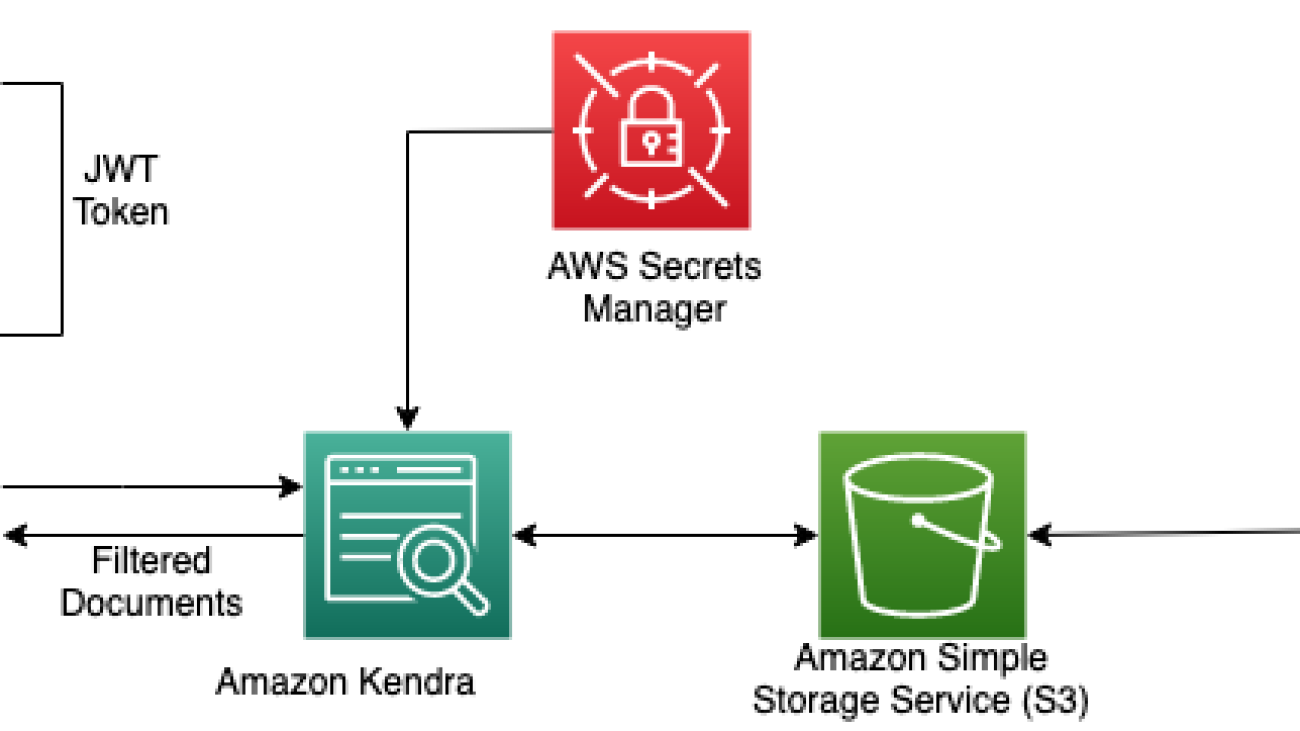
The following diagram illustrates the creation of a JWT with a shared access key to control access to users to the specific documents in the Amazon Kendra index.
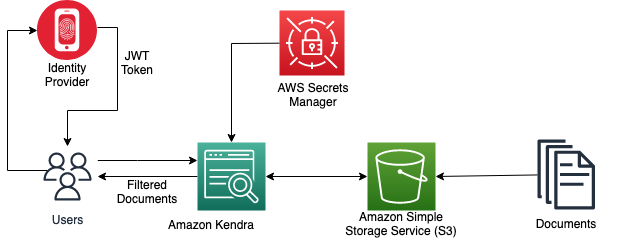
When an Amazon Kendra index receives a query API call with a user access token, it validates the token using a shared secret key (stored securely in AWS Secrets Manager) and gets parameters such as username and groups in the payload. The Amazon Kendra index filters the search results based on the stored Access Control List (ACL) and the information received in the user’s JWT. These filtered results are returned in response to the query API call made by the application.
Prerequisites
In order to follow the steps in this post, make sure you have the following:
- Basic knowledge of AWS.
- An AWS account with access to Amazon Simple Storage Service (Amazon S3), Amazon Kendra, and Secrets Manager.
- An S3 bucket to store your documents. For more information, see Creating a bucket and the Amazon S3 User Guide.
Generate a JWT with a shared secret key
The following sample Java code shows how to create a JWT with a shared secret key using the open-source jsonwebtoken package. In production, you will be using a secure authentication service provider of your choice and based on your requirements to generate JWTs.
We pass the username and groups information as claims in the payload, sign the JWT with the shared secret, and generate a JWT specific for that user. Provide a 256 bit string as your secret and retain the value of the base64 URL encoded shared secret to use in a later step.
Create an Amazon Kendra index with a JWT shared secret
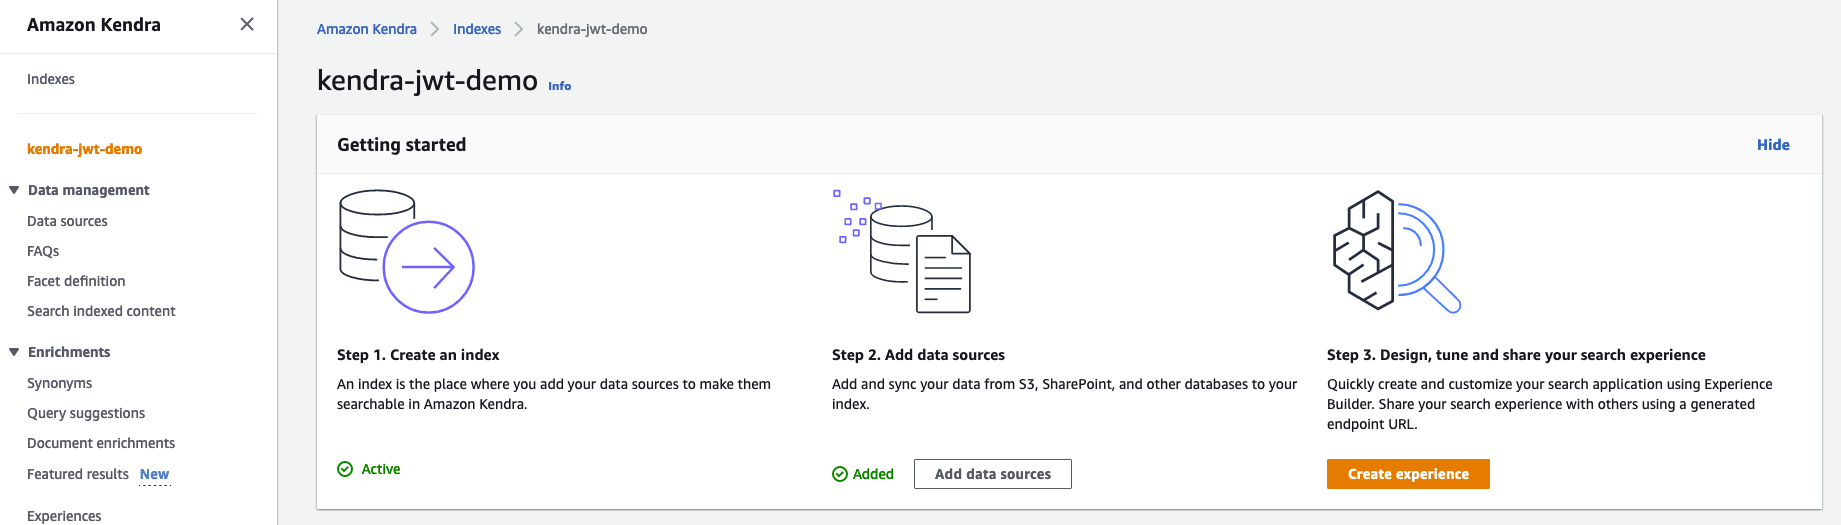
For instructions on creating an Amazon Kendra index, refer to Creating an index. Note down the AWS Identity and Access Management (IAM) role that you created during the process. Provide the role access to the S3 bucket and Secrets Manager following the principle of least privilege. For example policies, refer to Example IAM identity-based policies. After you create the index, your Amazon Kendra console should look like the following screenshot.
Complete the following steps to add your secret:
- On the Amazon Kendra console, navigate to the User access control tab on your index detail page.
- Choose Edit settings.
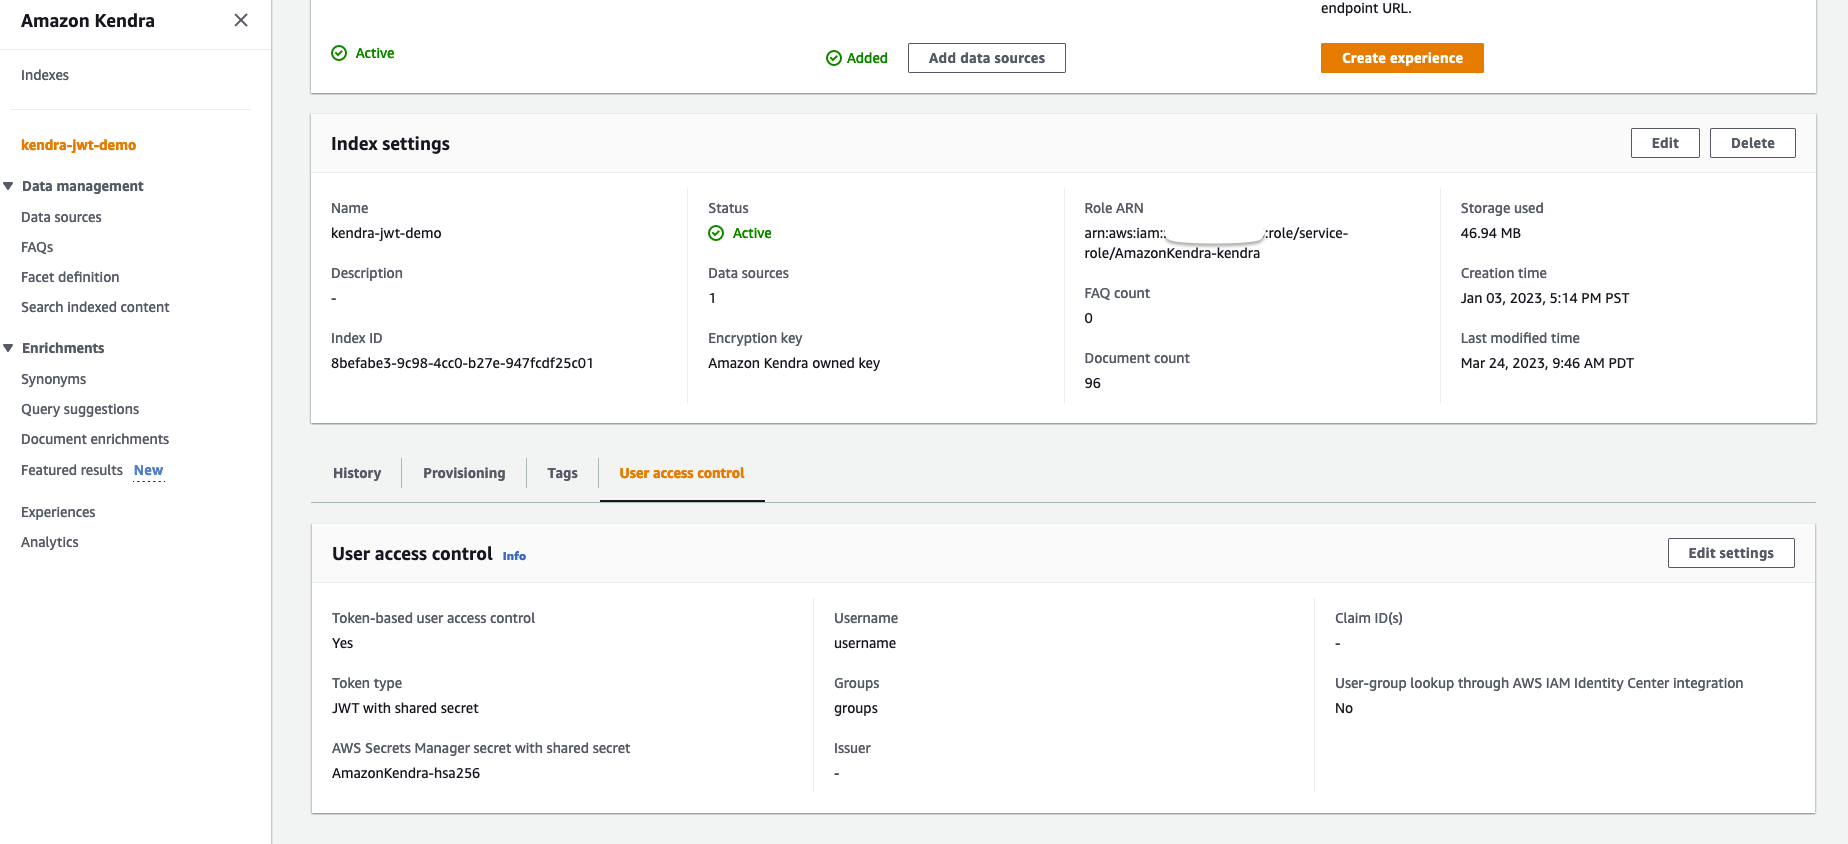
- Because we’re implementing token-based access control, select Yes under Access control settings.

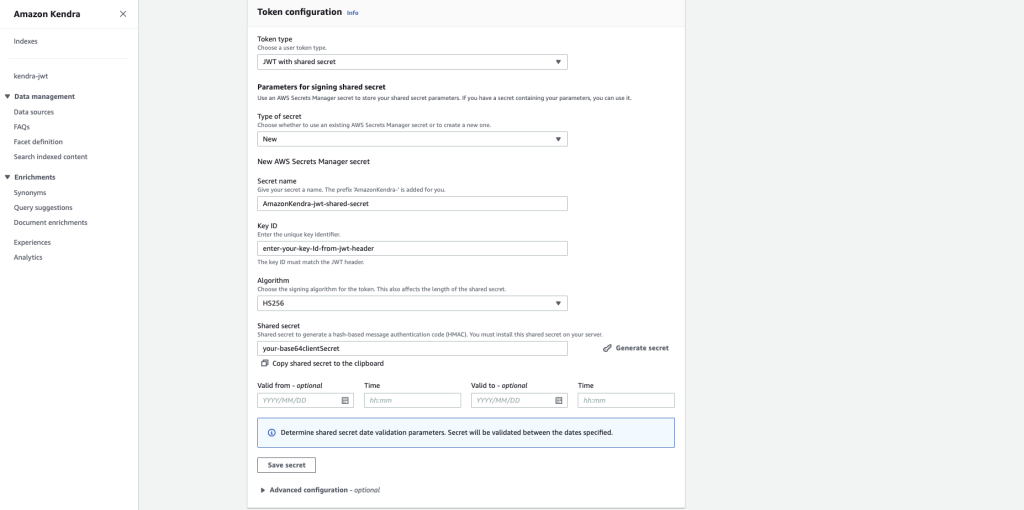
- Under Token configuration, choose JWT with shared secret for Token type.
- For Type of secret, choose New.
- For Secret name, enter
AmazonKendra-jwt-shared-secretor any name of your choice. - For Key ID, enter the key ID to match your JWT that you created in the sample Java code.
- For Algorithm, choose the HS256 algorithm.
- For Shared secret, enter your retained base64 URL encoded secret generated from the Java code previously.
- Choose Save secret.
The secret will now be stored in Secrets Manager as a JSON Web Key Set (JWKS). You can locate it on the Secrets Manager console. For more details, refer to Using a JSON Web Token (JWT) with a shared secret.
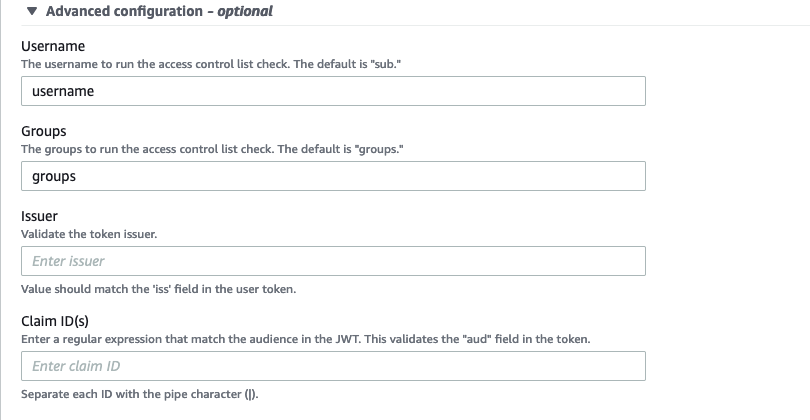
- Expand the Advanced configuration section.
In this step, we set up the user name and groups that will be extracted from JWT claims and matched with the ACL when the signature is valid.
- For Username¸ enter username.
- For Groups, enter groups.
- Leave the optional fields as default.
- Choose Next, then choose Update.
Prepare your S3 bucket as a data source
To prepare an S3 bucket as a data source, create an S3 bucket. In the terminal with the AWS Command Line Interface (AWS CLI) or AWS CloudShell, run the following commands to upload the documents and metadata to the data source bucket:
The documents being queried are stored in an S3 bucket. Each document type has a separate folder: blogs, case-studies, analyst-reports, user-guides, and white-papers. This folder structure is contained in a folder named Data. Metadata files including the ACLs are in a folder named Meta.
We use the Amazon Kendra S3 connector to configure this S3 bucket as the data source. When the data source is synced with the Amazon Kendra index, it crawls and indexes all documents as well as collects the ACLs and document attributes from the metadata files. To learn more about ACLs using metadata files, refer to Amazon S3 document metadata. For this example, we use the custom attribute DocumentType to denote the type of the document. After the upload, your S3 bucket structure should look like the following screenshot.

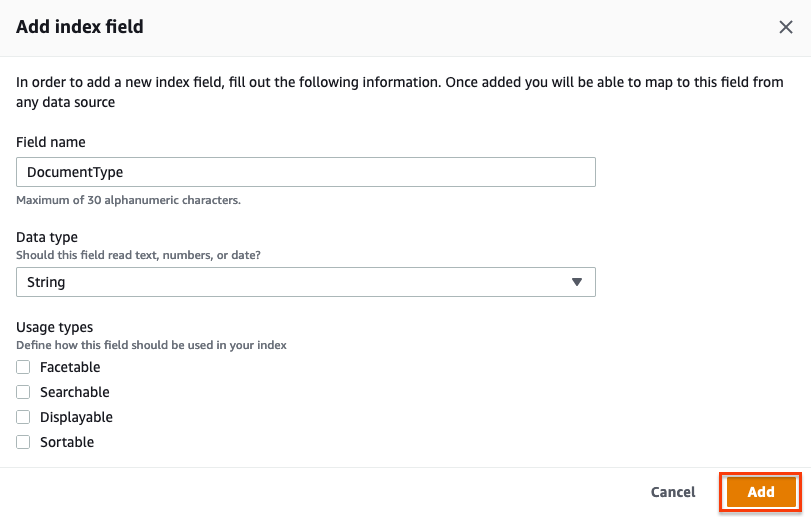
To set the custom attribute DocumentType, complete the following steps:
- Choose your Kendra index and choose Facet definition in the navigation pane.
- Choose Add field.

- For Field name, enter
DocumentType. - For Data type, choose String.
- Choose Add.
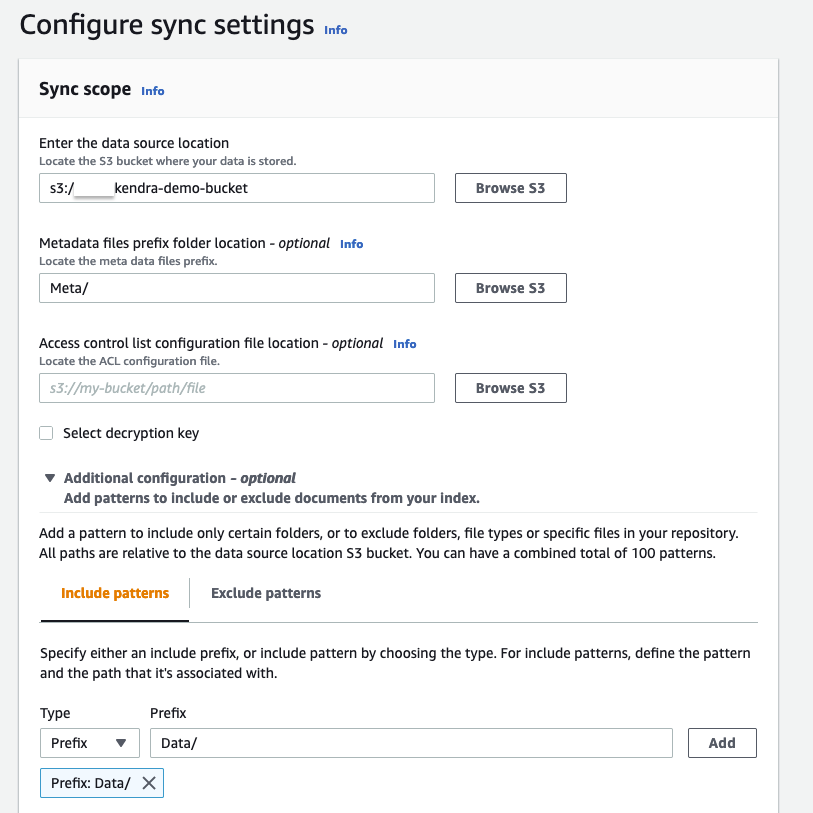
Now you can ingest documents from the bucket you created to the Amazon Kendra index using the S3 connector. For full instructions, refer to Ingesting Documents through the Amazon Kendra S3 Connector.
- In the Configure sync settings section, for Enter the data source location, enter your S3 bucket (
s3://kendra-demo-bucket/). - For Metadata files prefix folder location, enter
Meta/. - Expand Additional configuration.
- On the Include patterns tab, for Prefix, enter
Data/.
For more information about supported connectors, see Connectors.
- Choose Next, then Next again, then Update.
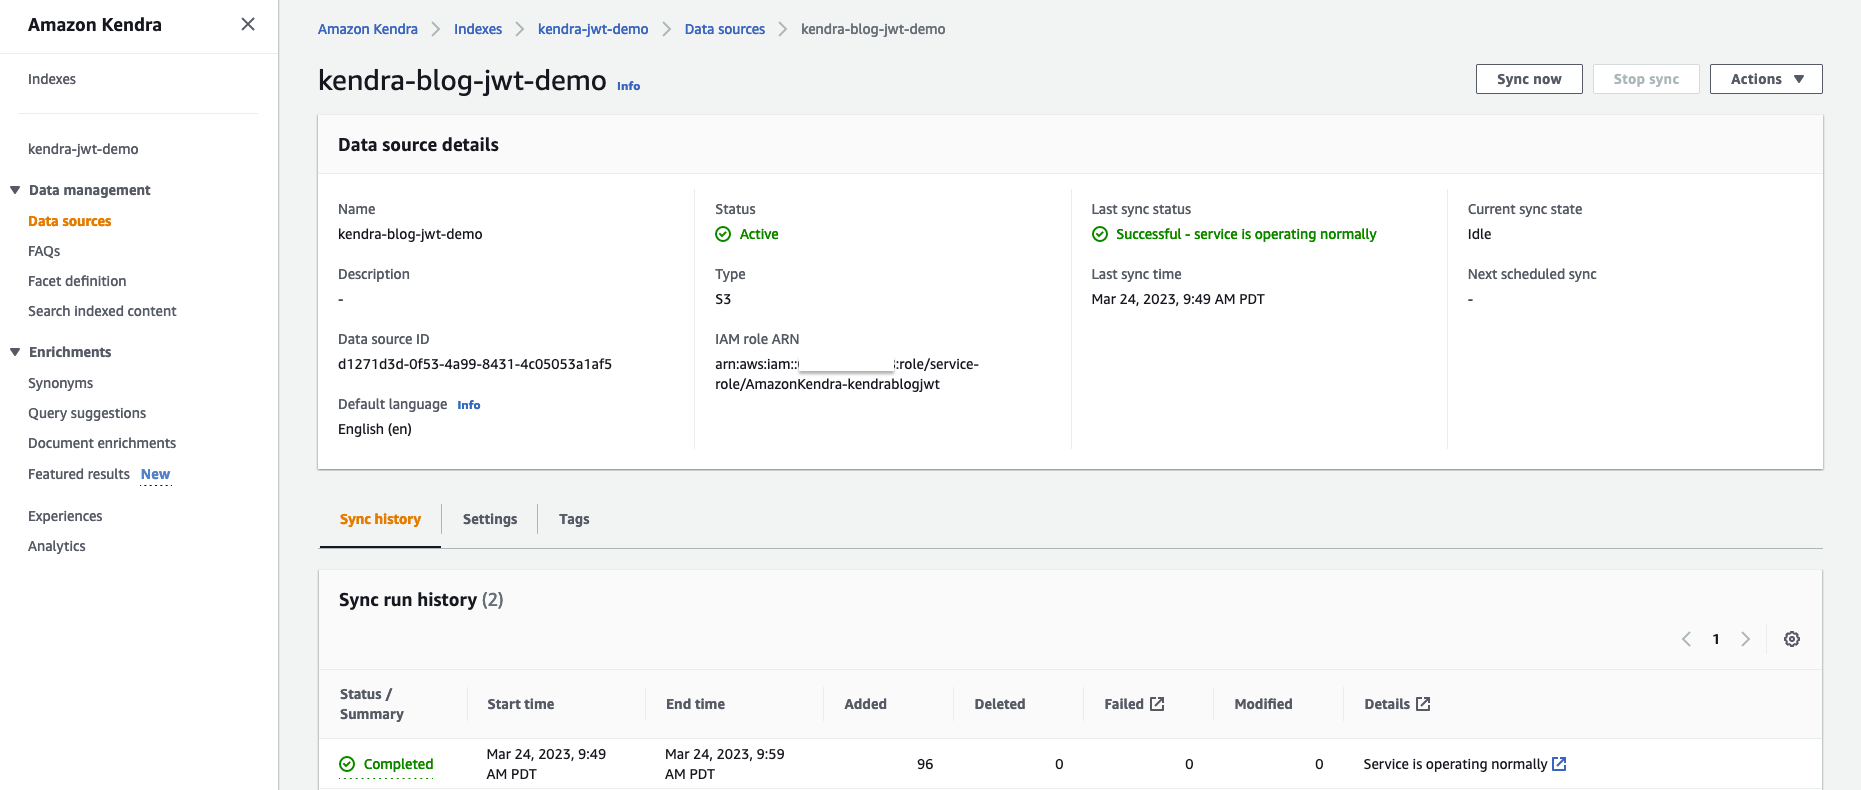
- Wait for the data source to be created, then select the data source and choose Sync now.
The data source sync can take 10–15 minutes to complete. When your sync is complete, Last sync status should show as Successful.
Query an Amazon Kendra index
To run a test query on your index, complete the following steps:
- On the Amazon Kendra console, choose Search indexed content in the navigation pane.
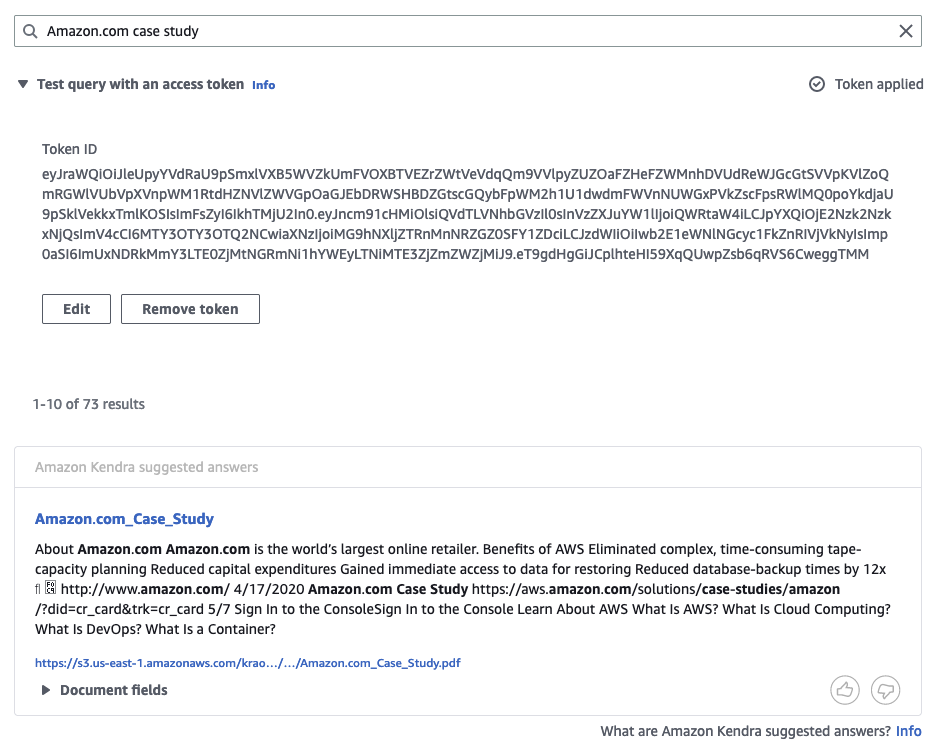
- Expand Test query with an access token.
- Choose Apply token.

- We can generate a JWT for the user and group. In this example, we create a JWT for the
AWS-SAgroup. We replace username as Mary and groups asAWS-SAin the JWT generation step. - Enter the generated token and choose Apply.

Based on the ACL, we should be results from all the folders: blogs, user guides, case studies, analyst reports, and whitepapers.

Similarly, when logged in as James from the AWS-Sales group and passing the corresponding JWT, we have access to only blogs, user guides, and case studies.
We can also search the index as a guest without passing a token. The guest is only able to access contents in the blogs folder.
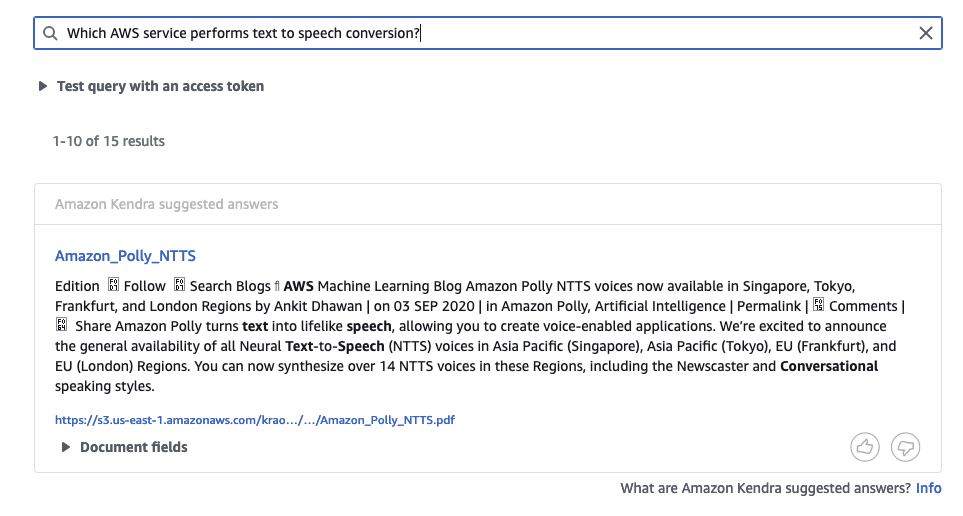
Experiment using other queries you can think of while logged in as different users and groups and observe the results.
Clean up
To avoid incurring future costs, clean up the resources you created as part of this solution. To delete the Amazon Kendra index and S3 bucket created while testing the solution, refer to Cleanup. To delete the Secrets Manager secret, refer to Delete an AWS Secrets Manager secret.
Conclusion
In this post, we saw how Amazon Kendra can perform secure searches that only return search results based on user access. With the addition of a JWT with a shared secret key, we can easily validate the identity of individual users as well as user groups who perform searches. This similar approach can be extended to a JWT with a public key. To learn more, refer to Using a JSON Web Token (JWT) with a shared secret.
About the Authors
 Nitin Eusebius is a Sr. Enterprise Solutions Architect at AWS with over 18 years of experience in Software Engineering and Enterprise Architecture. He works with customers on helping them build well-architected applications on the AWS platform. He is passionate about solving technology challenges and helping customers with their cloud journey.
 Kruthi Jayasimha Rao is a Partner Solutions Architect with a focus in AI and ML. She provides technical guidance to AWS Partners in following best practices to build secure, resilient, and highly available solutions in the AWS Cloud.
 Ishaan Berry is a Software Engineer at Amazon Web Services, working on Amazon Kendra, an enterprise search engine. He is passionate about security and has worked on key components of Kendra’s Access Control features over the past 2 years.
 Akash Bhatia is a Principal Solutions architect with AWS. His current focus is helping enterprise customers achieve their business outcomes through architecting and implementing innovative and resilient solutions at scale. He has been working in technology for over 15 years at companies ranging from Fortune 100 to start-ups in Manufacturing, Aerospace and Retail verticals.

How Games24x7 transformed their retraining MLOps pipelines with Amazon SageMaker
This is a guest blog post co-written with Hussain Jagirdar from Games24x7.
Games24x7 is one of India’s most valuable multi-game platforms and entertains over 100 million gamers across various skill games. With “Science of Gaming” as their core philosophy, they have enabled a vision of end-to-end informatics around game dynamics, game platforms, and players by consolidating orthogonal research directions of game AI, game data science, and game user research. The AI and data science team dive into a plethora of multi-dimensional data and run a variety of use cases like player journey optimization, game action detection, hyper-personalization, customer 360, and more on AWS.
Games24x7 employs an automated, data-driven, AI powered framework for the assessment of each player’s behavior through interactions on the platform and flags users with anomalous behavior. They’ve built a deep-learning model ScarceGAN, which focuses on identification of extremely rare or scarce samples from multi-dimensional longitudinal telemetry data with small and weak labels. This work has been published in CIKM’21 and is open source for rare class identification for any longitudinal telemetry data. The need for productionization and adoption of the model was paramount to create a backbone behind enabling responsible game play in their platform, where the flagged users can be taken through a different journey of moderation and control.
In this post, we share how Games24x7 improved their training pipelines for their responsible gaming platform using Amazon SageMaker.
Customer challenges
The DS/AI team at Games24x7 used multiple services provided by AWS, including SageMaker notebooks, AWS Step Functions, AWS Lambda, and Amazon EMR, for building pipelines for various use cases. To handle the drift in data distribution, and therefore to retrain their ScarceGAN model, they discovered that the existing system needed a better MLOps solution.
In the previous pipeline through Step Functions, a single monolith codebase ran data preprocessing, retraining, and evaluation. This became a bottleneck in troubleshooting, adding, or removing a step, or even in making some small changes in the overall infrastructure. This step-function instantiated a cluster of instances to extract and process data from S3 and the further steps of pre-processing, training, evaluation would run on a single large EC2 instance. In scenarios where the pipeline failed at any step the whole workflow needed to be restarted from the beginning, which resulted in repeated runs and increased cost. All the training and evaluation metrics were inspected manually from Amazon Simple Storage Service (Amazon S3). There was no mechanism to pass and store the metadata of the multiple experiments done on the model. Due to the decentralized model monitoring, thorough investigation and cherry-picking the best model required hours from the data science team. Accumulation of all these efforts had resulted in lower team productivity and increased overhead. Additionally, with a fast-growing team, it was very challenging to share this knowledge across the team.
Because MLOps concepts are very extensive and implementing all the steps would need time, we decided that in the first stage we would address the following core issues:
- A secure, controlled, and templatized environment to retrain our in-house deep learning model using industry best practices
- A parameterized training environment to send a different set of parameters for each retraining job and audit the last-runs
- The ability to visually track training metrics and evaluation metrics, and have metadata to track and compare experiments
- The ability to scale each step individually and reuse the previous steps in cases of step failures
- A single dedicated environment to register models, store features, and invoke inferencing pipelines
- A modern toolset that could minimize compute requirements, drive down costs, and drive sustainable ML development and operations by incorporating the flexibility of using different instances for different steps
- Creating a benchmark template of state-of-the-art MLOps pipeline that could be used across various data science teams
Games24x7 started evaluating other solutions, including Amazon SageMaker Studio Pipelines. The already existing solution through Step Functions had limitations. Studio pipelines had the flexibility of adding or removing a step at any point of time. Also, the overall architecture and their data dependencies between each step can be visualized through DAGs. The evaluation and fine-tuning of the retraining steps became quite efficient after we adopted different Amazon SageMaker functionalities such as the Amazon SageMaker Studio, Pipelines, Processing, Training, model registry and experiments and trials. The AWS Solution Architecture team showed great deep dive and was really instrumental in the design and implementation of this solution.
Solution overview
The following diagram illustrates the solution architecture.

The solution uses a SageMaker Studio environment to run the retraining experiments. The code to invoke the pipeline script is available in the Studio notebooks, and we can change the hyperparameters and input/output when invoking the pipeline. This is quite different from our earlier method where we had all the parameters hard coded within the scripts and all the processes were inextricably linked. This required modularization of the monolithic code into different steps.
The following diagram illustrates our original monolithic process.

Modularization
In order to scale, track, and run each step individually, the monolithic code needed to be modularized. Parameters, data, and code dependencies between each step were removed, and shared modules for the shared components across the steps was created. An illustration of the modularization is shown below:-

For every single module , testing was done locally using SageMaker SDK’s Script mode for training, processing and evaluation which required minor changes in the code to run with SageMaker. The local mode testing for deep learning scripts can be done either on SageMaker notebooks if already being used or by using Local Mode using SageMaker Pipelines in case of directly starting with Pipelines. This helps in validating if our custom scripts will run on SageMaker instances.
Each module was then tested in isolation using SageMaker Training/processing SDK’s using Script mode and ran them in a sequence manually using the SageMaker instances for each step like below training step:
Amazon S3 was used to get the source data to process and then store the intermediate data, data frames, and NumPy results back to Amazon S3 for the next step. After the integration testing between individual modules for pre-processing, training, evaluation was complete, the SageMaker Pipeline SDK’s which is integrated with the SageMaker Python SDK’s that we already used in the above steps, allowed us to chain all these modules programmatically by passing the input parameters, data, metadata and output of each step as an input to the next steps.
We could re-use the previous Sagemaker Python SDK code to run the modules individually into Sagemaker Pipeline SDK based runs. The relationships between each steps of the pipeline are determined by the data dependencies between steps.
The final steps of the pipeline are as follows:
- Data preprocessing
- Retraining
- Evaluation
- Model registration

In the following sections, we discuss each of the steps in more detail when run with the SageMaker Pipeline SDK’s.
Data preprocessing
This step transforms the raw input data and preprocesses and splits into train, validation, and test sets. For this processing step, we instantiated a SageMaker processing job with TensorFlow Framework Processor, which takes our script, copies the data from Amazon S3, and then pulls a Docker image provided and maintained by SageMaker. This Docker container allowed us to pass our library dependencies in the requirements.txt file while having all the TensorFlow libraries already included, and pass the path for source_dir for the script. The train and validation data goes to the training step, and the test data gets forwarded to the evaluation step. The best part of using this container was that it allowed us to pass a variety of inputs and outputs as different S3 locations, which could then be passed as a step dependency to the next steps in the SageMaker pipeline.
Retraining
We wrapped the training module through the SageMaker Pipelines TrainingStep API and used already available deep learning container images through the TensorFlow Framework estimator (also known as Script mode) for SageMaker training. Script mode allowed us to have minimal changes in our training code, and the SageMaker pre-built Docker container handles the Python, Framework versions, and so on. The ProcessingOutputs from the Data_Preprocessing step were forwarded as the TrainingInput of this step.
All the hyperparameters were passed through the estimator through a JSON file. For every epoch in our training, we were already sending our training metrics through stdOut in the script. Because we wanted to track the metrics of an ongoing training job and compare them with previous training jobs, we just had to parse this StdOut by defining the metric definitions through regex to fetch the metrics from StdOut for every epoch.
It was interesting to understand that SageMaker Pipelines automatically integrates with SageMaker Experiments API, which by default creates an experiment, trial, and trial component for every run. This allows us to compare training metrics like accuracy and precision across multiple runs as shown below.

For each training job run, we generate four different models to Amazon S3 based on our custom business definition.
Evaluation
This step loads the trained models from Amazon S3 and evaluates on our custom metrics. This ProcessingStep takes the model and the test data as its input and dumps the reports of the model performance on Amazon S3.
We’re using custom metrics, so in order to register these custom metrics to the model registry, we needed to convert the schema of the evaluation metrics stored in Amazon S3 as CSV to the SageMaker Model quality JSON output. Then we can register the location of this evaluation JSON metrics to the model registry.
The following screenshots show an example of how we converted a CSV to Sagemaker Model quality JSON format.


Model registration
As mentioned earlier, we were creating multiple models in a single training step, so we had to use a SageMaker Pipelines Lambda integration to register all four models into a model registry. For a single model registration we can use the ModelStep API to create a SageMaker model in registry. For each model, the Lambda function retrieves the model artifact and evaluation metric from Amazon S3 and creates a model package to a specific ARN, so that all four models can be registered into a single model registry. The SageMaker Python APIs also allowed us to send custom metadata that we wanted to pass to select the best models. This proved to be a major milestone for productivity because all the models can now be compared and audited from a single window. We provided metadata to uniquely distinguish the model from each other. This also helped in approving a single model with the help of peer-reviews and management reviews based on model metrics.
The above code block shows an example of how we added metadata through model package input to the model registry along with the model metrics.
The screenshot below shows how easily we can compare metrics of different model versions once they are registered.

Pipeline Invocation
The pipeline can be invoked through EventBridge , Sagemaker Studio or the SDK itself. The invocation runs the jobs based on the data dependencies between steps.
Conclusion
In this post, we demonstrated how Games24x7 transformed their MLOps assets through SageMaker pipelines. The ability to visually track training metrics and evaluation metrics, with parameterized environment, scaling the steps individually with the right processing platform and a central model registry proved to be a major milestone in standardizing and advancing to an auditable, reusable, efficient, and explainable workflow. This project is a blueprint across different data science teams and has increased the overall productivity by allowing members to operate, manage, and collaborate with best practices.
If you have a similar use case and want to get started then we would recommend to go through SageMaker Script mode and the SageMaker end to end examples using Sagemaker Studio. These examples have the technical details which has been covered in this blog.
A modern data strategy gives you a comprehensive plan to manage, access, analyze, and act on data. AWS provides the most complete set of services for the entire end-to-end data journey for all workloads, all types of data and all desired business outcomes. In turn, this makes AWS the best place to unlock value from your data and turn it into insight.
About the Authors
 Hussain Jagirdar is a Senior Scientist – Applied Research at Games24x7. He is currently involved in research efforts in the area of explainable AI and deep learning. His recent work has involved deep generative modeling, time-series modeling, and related subareas of machine learning and AI. He is also passionate about MLOps and standardizing projects that demand constraints such as scalability, reliability, and sensitivity.
 Sumir Kumar is a Solutions Architect at AWS and has over 13 years of experience in technology industry. At AWS, he works closely with key AWS customers to design and implement cloud based solutions that solve complex business problems. He is very passionate about data analytics and machine learning and has a proven track record of helping organizations unlock the full potential of their data using AWS Cloud.
How Amazon scientists are driving success for Alexa in the car
Dozens of models now have the popular voice assistant on board for help with navigation and other tasks.Read More

Detect real and live users and deter bad actors using Amazon Rekognition Face Liveness
Financial services, the gig economy, telco, healthcare, social networking, and other customers use face verification during online onboarding, step-up authentication, age-based access restriction, and bot detection. These customers verify user identity by matching the user’s face in a selfie captured by a device camera with a government-issued identity card photo or preestablished profile photo. They also estimate the user’s age using facial analysis before allowing access to age-restricted content. However, bad actors increasingly deploy spoof attacks using the user’s face images or videos posted publicly, captured secretly, or created synthetically to gain unauthorized access to the user’s account. To deter this fraud, as well as reduce the costs associated with it, customers need to add liveness detection before face matching or age estimation is performed in their face verification workflow to confirm that the user in front of the camera is a real and live person.
We are excited to introduce Amazon Rekognition Face Liveness to help you easily and accurately deter fraud during face verification. In this post, we start with an overview of the Face Liveness feature, its use cases, and the end-user experience; provide an overview of its spoof detection capabilities; and show how you can add Face Liveness to your web and mobile applications.
Face Liveness overview
Today, customers detect liveness using various solutions. Some customers use open-source or commercial facial landmark detection machine learning (ML) models in their web and mobile applications to check if users correctly perform specific gestures such as smiling, nodding, shaking their head, blinking their eyes, or opening their mouth. These solutions are costly to build and maintain, fail to deter advanced spoof attacks performed using physical 3D masks or injected videos, and require high user effort to complete. Some customers use third-party face liveness features that can only detect spoof attacks presented to the camera (such as printed or digital photos or videos on a screen), which work well for users in select geographies, and are often completely customer-managed. Lastly, some customer solutions rely on hardware-based infrared and other sensors in phone or computer cameras to detect face liveness, but these solutions are costly, hardware-specific, and work only for users with select high-end devices.
With Face Liveness, you can detect in seconds that real users, and not bad actors using spoofs, are accessing your services. Face Liveness includes these key features:
- Analyzes a short selfie video from the user in real time to detect whether the user is real or a spoof
- Returns a liveness confidence score—a metric for the confidence level from 0–100 that indicates the probability for a person being real and live
- Returns a high-quality reference image—a selfie frame with quality checks that can be used for downstream Amazon Rekognition face matching or age estimation analysis
- Returns up to four audit images—frames from the selfie video that can be used for maintaining audit trails
- Detects spoofs presented to the camera, such as a printed photo, digital photo, digital video, or 3D mask, as well as spoofs that bypass the camera, such as a pre-recorded or deepfake video
- Can easily be added to applications running on most devices with a front-facing camera using open-source pre-built AWS Amplify UI components
In addition, no infrastructure management, hardware-specific implementation, or ML expertise is required. The feature automatically scales up or down in response to demand, and you only pay for the face liveness checks you perform. Face Liveness uses ML models trained on diverse datasets to provide high accuracy across user skin tones, ancestries, and devices.
Use cases
The following diagram illustrates a typical workflow using Face Liveness.

You can use Face Liveness in the following user verification workflows:
- User onboarding – You can reduce fraudulent account creation on your service by validating new users with Face Liveness before downstream processing. For example, a financial services customer can use Face Liveness to detect a real and live user and then perform face matching to check that this is the right user prior to opening an online account. This can deter a bad actor using social media pictures of another person to open fraudulent bank accounts.
- Step-up authentication – You can strengthen the verification of high-value user activities on your services, such as device change, password change, and money transfers, with Face Liveness before the activity is performed. For example, a ride-sharing or food-delivery customer can use Face Liveness to detect a real and live user and then perform face matching using an established profile picture to verify a driver’s or delivery associate’s identity before a ride or delivery to promote safety. This can deter unauthorized delivery associates and drivers from engaging with end-users.
- User age verification – You can deter underage users from accessing restricted online content. For example, online tobacco retailers or online gambling customers can use Face Liveness to detect a real and live user and then perform age estimation using facial analysis to verify the user’s age before granting them access to the service content. This can deter an underage user from using their parent’s credit cards or photo and gaining access to harmful or inappropriate content.
- Bot detection – You can avoid bots from engaging with your service by using Face Liveness in place of “real human” captcha checks. For example, social media customers can use Face Liveness for posing real human checks to keep bots at bay. This significantly increases the cost and effort required by users driving bot activity because key bot actions now need to pass a face liveness check.
End-user experience
When end-users need to onboard or authenticate themselves on your application, Face Liveness provides the user interface and real-time feedback for the user to quickly capture a short selfie video of moving their face into an oval rendered on their device’s screen. As the user’s face moves into the oval, a series of colored lights is displayed on the device’s screen and the selfie video is securely streamed to the cloud APIs, where advanced ML models analyze the video in real time. After the analysis is complete, you receive a liveness prediction score (a value between 0–100), a reference image, and audit images. Depending on whether the liveness confidence score is above or below the customer-set thresholds, you can perform downstream verification tasks for the user. If liveness score is below threshold, you can ask the user to retry or route them to an alternative verification method.
The sequence of screens that the end-user will be exposed to is as follows:
- The sequence begins with a start screen that includes an introduction and photosensitive warning. It prompts the end-user to follow instructions to prove they are a real person.
- After the end-user chooses Begin check, a camera screen is displayed and the check starts a countdown from 3.
- At the end of the countdown, a video recording begins, and an oval appears on the screen. The end-user is prompted to move their face into the oval. When Face Liveness detects that the face is in the correct position, the end-user is prompted to hold still for a sequence of colors that are displayed.
- The video is submitted for liveness detection and a loading screen with the message “Verifying” appears.
- The end-user receives a notification of success or a prompt to try again.

Here is what the user experience in action looks like in a sample implementation of Face Liveness.
Spoof detection
Face Liveness can deter presentation and bypass spoof attacks. Let’s outline the key spoof types and see Face Liveness deterring them.
Presentation spoof attacks
These are spoof attacks where a bad actor presents the face of another user to camera using printed or digital artifacts. The bad actor can use a print-out of a user’s face, display the user’s face on their device display using a photo or video, or wear a 3D face mask that looks like the user. Face Liveness can successfully detect these types of presentation spoof attacks, as we demonstrate in the following example.
The following shows a presentation spoof attack using a digital video on the device display.
The following shows an example of a presentation spoof attack using a digital photo on the device display.
The following example shows a presentation spoof attack using a 3D mask.
The following example shows a presentation spoof attack using a printed photo.
Bypass or video injection attacks
These are spoof attacks where a bad actor bypasses the camera to send a selfie video directly to the application using a virtual camera.
Face Liveness components
Amazon Rekognition Face Liveness uses multiple components:
- AWS Amplify web and mobile SDKs with the
FaceLivenessDetectorcomponent - AWS SDKs
- Cloud APIs
Let’s review the role of each component and how you can easily use these components together to add Face Liveness in your applications in just a few days.
Amplify web and mobile SDKs with the FaceLivenessDetector component
The Amplify FaceLivenessDetector component integrates the Face Liveness feature into your application. It handles the user interface and real-time feedback for users while they capture their video selfie.
When a client application renders the FaceLivenessDetector component, it establishes a connection to the Amazon Rekognition streaming service, renders an oval on the end-user’s screen, and displays a sequence of colored lights. It also records and streams video in real-time to the Amazon Rekognition streaming service, and appropriately renders the success or failure message.
AWS SDKs and cloud APIs
When you configure your application to integrate with the Face Liveness feature, it uses the following API operations:
- CreateFaceLivenessSession – Starts a Face Liveness session, letting the Face Liveness detection model be used in your application. Returns a
SessionIdfor the created session. - StartFaceLivenessSession – Is called by the
FaceLivenessDetectorcomponent. Starts an event stream containing information about relevant events and attributes in the current session. - GetFaceLivenessSessionResults – Retrieves the results of a specific Face Liveness session, including a Face Liveness confidence score, reference image, and audit images.
You can test Amazon Rekognition Face Liveness with any supported AWS SDK like the AWS Python SDK Boto3 or the AWS SDK for Java V2.
Developer experience
The following diagram illustrates the solution architecture.

The Face Liveness check process involves several steps:
- The end-user initiates a Face Liveness check in the client app.
- The client app calls the customer’s backend, which in turn calls Amazon Rekognition. The service creates a Face Liveness session and returns a unique
SessionId. - The client app renders the
FaceLivenessDetectorcomponent using the obtainedSessionIdand appropriate callbacks. - The
FaceLivenessDetectorcomponent establishes a connection to the Amazon Rekognition streaming service, renders an oval on the user’s screen, and displays a sequence of colored lights.FaceLivenessDetectorrecords and streams video in real time to the Amazon Rekognition streaming service. - Amazon Rekognition processes the video in real time, stores the results including the reference image and audit images which are stored in an Amazon Simple Storage Service (S3) bucket, and returns a
DisconnectEventto theFaceLivenessDetectorcomponent when the streaming is complete. - The
FaceLivenessDetectorcomponent calls the appropriate callbacks to signal to the client app that the streaming is complete and that scores are ready for retrieval. - The client app calls the customer’s backend to get a Boolean flag indicating whether the user was live or not. The customer backend makes the request to Amazon Rekognition to get the confidence score, reference, and audit images. The customer backend uses these attributes to determine whether the user is live and returns an appropriate response to the client app.
- Finally, the client app passes the response to the
FaceLivenessDetectorcomponent, which appropriately renders the success or failure message to complete the flow.
Conclusion
In this post, we showed how the new Face Liveness feature in Amazon Rekognition detects if a user going through a face verification process is physically present in front of a camera and not a bad actor using a spoof attack. Using Face Liveness, you can deter fraud in your face-based user verification workflows.
Get started today by visiting the Face Liveness feature page for more information and to access the developer guide. Amazon Rekognition Face Liveness cloud APIs are available in the US East (N. Virginia), US West (Oregon), Europe (Ireland), Asia Pacific (Mumbai), and Asia Pacific (Tokyo) Regions.
About the Authors
 Zuhayr Raghib is an AI Services Solutions Architect at AWS. Specializing in applied AI/ML, he is passionate about enabling customers to use the cloud to innovate faster and transform their businesses.
 Pavan Prasanna Kumar is a Senior Product Manager at AWS. He is passionate about helping customers solve their business challenges through artificial intelligence. In his spare time, he enjoys playing squash, listening to business podcasts, and exploring new cafes and restaurants.
 Tushar Agrawal leads Product Management for Amazon Rekognition. In this role, he focuses on building computer vision capabilities that solve critical business problems for AWS customers. He enjoys spending time with family and listening to music.
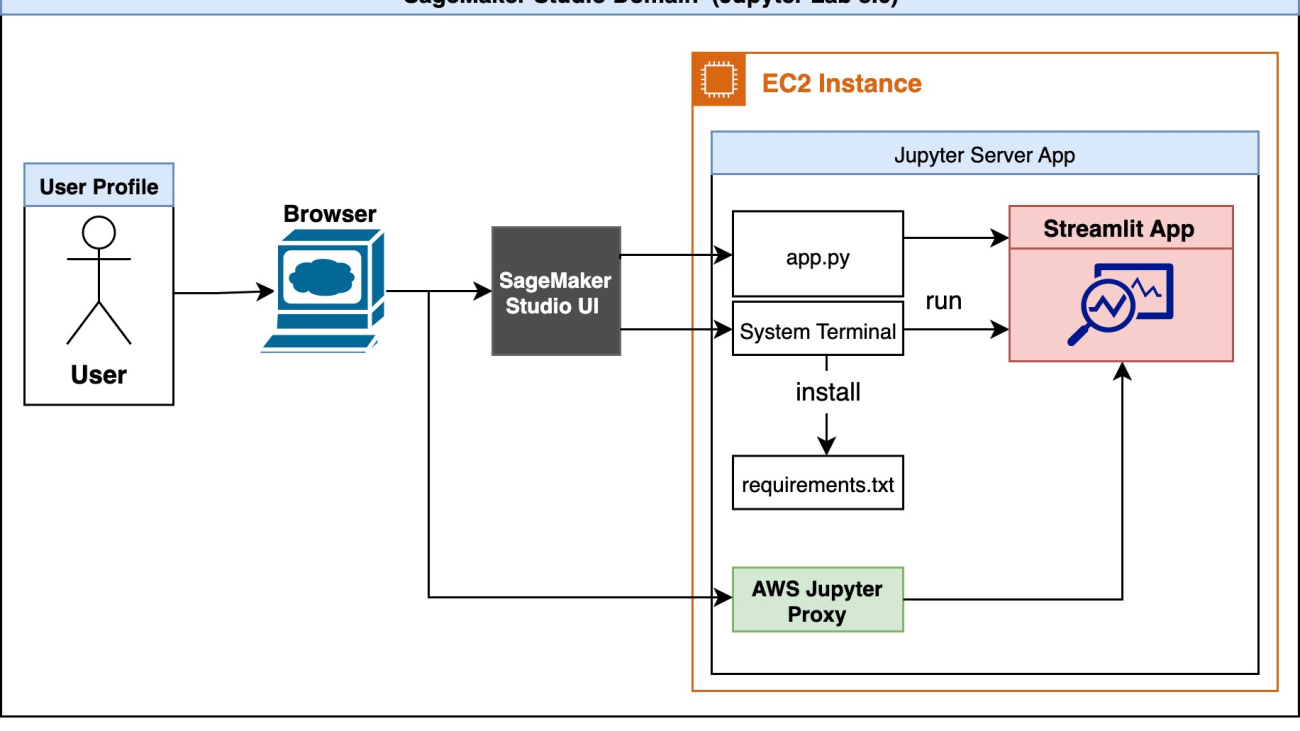
Build Streamlit apps in Amazon SageMaker Studio
Developing web interfaces to interact with a machine learning (ML) model is a tedious task. With Streamlit, developing demo applications for your ML solution is easy. Streamlit is an open-source Python library that makes it easy to create and share web apps for ML and data science. As a data scientist, you may want to showcase your findings for a dataset, or deploy a trained model. Streamlit applications are useful for presenting progress on a project to your team, gaining and sharing insights to your managers, and even getting feedback from customers.
With the integrated development environment (IDE) of Amazon SageMaker Studio with Jupyter Lab 3, we can build, run, and serve Streamlit web apps from within that same environment for development purposes. This post outlines how to build and host Streamlit apps in Studio in a secure and reproducible manner without any time-consuming front-end development. As an example, we use a custom Amazon Rekognition demo, which will annotate and label an uploaded image. This will serve as a starting point, and it can be generalized to demo any custom ML model. The code for this blog can be found in this GitHub repository.
Solution overview
The following is the architecture diagram of our solution.

A user first accesses Studio through the browser. The Jupyter Server associated with the user profile runs inside the Studio Amazon Elastic Compute Cloud (Amazon EC2) instance. Inside the Studio EC2 instance exists the example code and dependencies list. The user can run the Streamlit app, app.py, in the system terminal. Studio runs the JupyterLab UI in a Jupyter Server, decoupled from notebook kernels. The Jupyter Server comes with a proxy and allows us to access our Streamlit app. Once the app is running, the user can initiate a separate session through the AWS Jupyter Proxy by adjusting the URL.
From a security aspect, the AWS Jupyter Proxy is extended by AWS authentication. As long as a user has access to the AWS account, Studio domain ID, and user profile, they can access the link.
Create Studio using JupyterLab 3.0
Studio with JupyterLab 3 must be installed for this solution to work. Older versions might not support features outlined in this post. For more information, refer to Amazon SageMaker Studio and SageMaker Notebook Instance now come with JupyterLab 3 notebooks to boost developer productivity. By default, Studio comes with JupyterLab 3. You should check the version and change it if running an older version. For more information, refer to JupyterLab Versioning.
You can set up Studio using the AWS Cloud Development Kit (AWS CDK); for more information, refer to Set up Amazon SageMaker Studio with Jupyter Lab 3 using the AWS CDK. Alternatively, you can use the SageMaker console to change the domain settings. Complete the following steps:
- On the SageMaker console, choose Domains in the navigation pane.
- Select your domain and choose Edit.

- For Default Jupyter Lab version, make sure the version is set to Jupyter Lab 3.0.

(Optional) Create a Shared Space
We can use the SageMaker console or the AWS CLI to add support for shared spaces to an existing Domain by following the steps in the docs or in this blog. Creating a shared space in AWS has the following benefits:
- Collaboration: A shared space allows multiple users or teams to collaborate on a project or set of resources, without having to duplicate data or infrastructure.
- Cost savings: Instead of each user or team creating and managing their own resources, a shared space can be more cost-effective, as resources can be pooled and shared across multiple users.
- Simplified management: With a shared space, administrators can manage resources centrally, rather than having to manage multiple instances of the same resources for each user or team.
- Improved scalability: A shared space can be more easily scaled up or down to meet changing demands, as resources can be allocated dynamically to meet the needs of different users or teams.
- Enhanced security: By centralizing resources in a shared space, security can be improved, as access controls and monitoring can be applied more easily and consistently.
Install dependencies and clone the example on Studio
Next, we launch Studio and open the system terminal. We use the SageMaker IDE to clone our example and the system terminal to launch our app. The code for this blog can be found in this GitHub repository. We start with cloning the repository:

Next, we open the System Terminal.

Once cloned, in the system terminal install dependencies to run our example code by running the following command. This will first pip install the dependences by running pip install --no-cache-dir -r requirements.txt. The no-cache-dir flag will disable the cache. Caching helps store the installation files (.whl) of the modules that you install through pip. It also stores the source files (.tar.gz) to avoid re-download when they haven’t expired. If there isn’t space on our hard drive or if we want to keep a Docker image as small as possible, we can use this flag so the command runs to completion with minimal memory usage. Next the script will install packages iproute and jq , which will be used in the following step.sh setup.sh
Run Streamlit Demo and Create Shareable Link
To verify all dependencies are successfully installed and to view the Amazon Rekognition demo, run the following command:
The port number hosting the app will be displayed.
Note that while developing, it might be helpful to automatically rerun the script when app.py is modified on disk. To do, so we can modify the runOnSave configuration option by adding the --server.runOnSave true flag to our command:
The following screenshot shows an example of what should be displayed on the terminal.

From the above example we see the port number, domain ID, and studio URL we are running our app on. Finally, we can see the URL we need to use to access our streamlit app. This script is modifying the Studio URL, replacing lab? with proxy/[PORT NUMBER]/ . The Rekognition Object Detection Demo will be displayed, as shown in the following screenshot.

Now that we have the Streamlit app working, we can share this URL with anyone who has access to this Studio domain ID and user profile. To make sharing these demos easier, we can check the status and list all running streamlit apps by running the following command: sh status.sh
We can use lifecycle scripts or shared spaces to extend this work. Instead of manually running the shell scripts and installing dependencies, use lifecycle scripts to streamline this process. To develop and extend this app with a team and share dashboards with peers, use shared spaces. By creating shared spaces in Studio, users can collaborate in the shared space to develop a Streamlit app in real time. All resources in a shared space are filtered and tagged, making it easier to focus on ML projects and manage costs. Refer to the following code to make your own applications in Studio.
Cleanup
Once we are done using the app, we want to free up the listening ports. To get all the processes running streamlit and free them up for use we can run our cleanup script: sh cleanup.sh
Conclusion
In this post, we showed an end-to-end example of hosting a Streamlit demo for an object detection task using Amazon Rekognition. We detailed the motivations for building quick web applications, security considerations, and setup required to run our own Streamlit app in Studio. Finally, we modified the URL pattern in our web browser to initiate a separate session through the AWS Jupyter Proxy.
This demo allows you to upload any image and visualize the outputs from Amazon Rekognition. The results are also processed, and you can download a CSV file with all the bounding boxes through the app. You can extend this work to annotate and label your own dataset, or modify the code to showcase your custom model!
About the Authors
 Dipika Khullar is an ML Engineer in the Amazon ML Solutions Lab. She helps customers integrate ML solutions to solve their business problems. Most recently, she has built training and inference pipelines for media customers and predictive models for marketing.
 Marcelo Aberle is an ML Engineer in the AWS AI organization. He is leading MLOps efforts at the Amazon ML Solutions Lab, helping customers design and implement scalable ML systems. His mission is to guide customers on their enterprise ML journey and accelerate their ML path to production.
 Yash Shah is a Science Manager in the Amazon ML Solutions Lab. He and his team of applied scientists and ML engineers work on a range of ML use cases from healthcare, sports, automotive, and manufacturing.