University of Wisconsin-Madison associate professor and ARA recipient has authored a series of pioneering papers on real-time object instance segmentation.Read More
LightOn Lyra-fr model is now available on Amazon SageMaker
We are thrilled to announce the availability of the LightOn Lyra-fr foundation model for customers using Amazon SageMaker. LightOn is a leader in building foundation models specializing in European languages. Lyra-fr is a state-of-the-art French language model that can be used to build conversational AI, copywriting tools, text classifiers, semantic search, and more. You can easily try out this model and use it with Amazon SageMaker JumpStart. JumpStart is the machine learning (ML) hub of SageMaker that provides access to foundation models in addition to built-in algorithms and end-to-end solution templates to help you quickly get started with ML.
In this blog, we will demonstrate how to use the Lyra-fr model in SageMaker.
Foundation models
Foundation models are typically trained on billions of parameters and are adaptable to a wide category of use cases. The most well-known foundation models today are used to summarize articles, create digital art, and generate code from simple text instructions. These models are expensive to train, so customers want to use existing pre-trained foundation models and fine-tune them as needed rather than train these models themselves. SageMaker provides a curated list of models that you can choose from on the SageMaker console. You can test these models directly on the web interface. When you want to use a foundation model at scale, you can do so easily without leaving SageMaker by using pre-built notebooks from model providers. Because the models are hosted and deployed on AWS, you can rest assured that your data, whether used for evaluating or using the model at scale, is never shared with third parties.
Lyra-fr is the largest French language model available on the market today. It is a 10 billion parameter model, trained and made accessible by LightOn. Lyra-fr was trained on a large corpus of French curated data, and it is capable of writing human-like text and solving complex tasks such as classification, question answering, and summarization. All of this while maintaining reasonable inference speed, in the range of 1–2 seconds for the average request. You can simply describe the task you want to perform in natural language, and Lyra-fr will generate responses of the level of a native French speaker. Lyra-fr offers business-ready intelligence primitives, such as steerable generation and text classification, in just a few lines of code. For more challenging tasks, performance can be improved in a “few shot” learning mode, providing in the prompt a couple of input-output examples.
Using Lyra-fr on SageMaker
We’ll take you on a walkthrough of how to use the Lyra-fr model in 3 simple steps:
- Discover – Find the Lyra-fr model on the AWS Management Console for SageMaker.
- Test – Test the model using the web interface.
- Deploy – Use a notebook to deploy and test the advanced capabilities of the model.
Discover
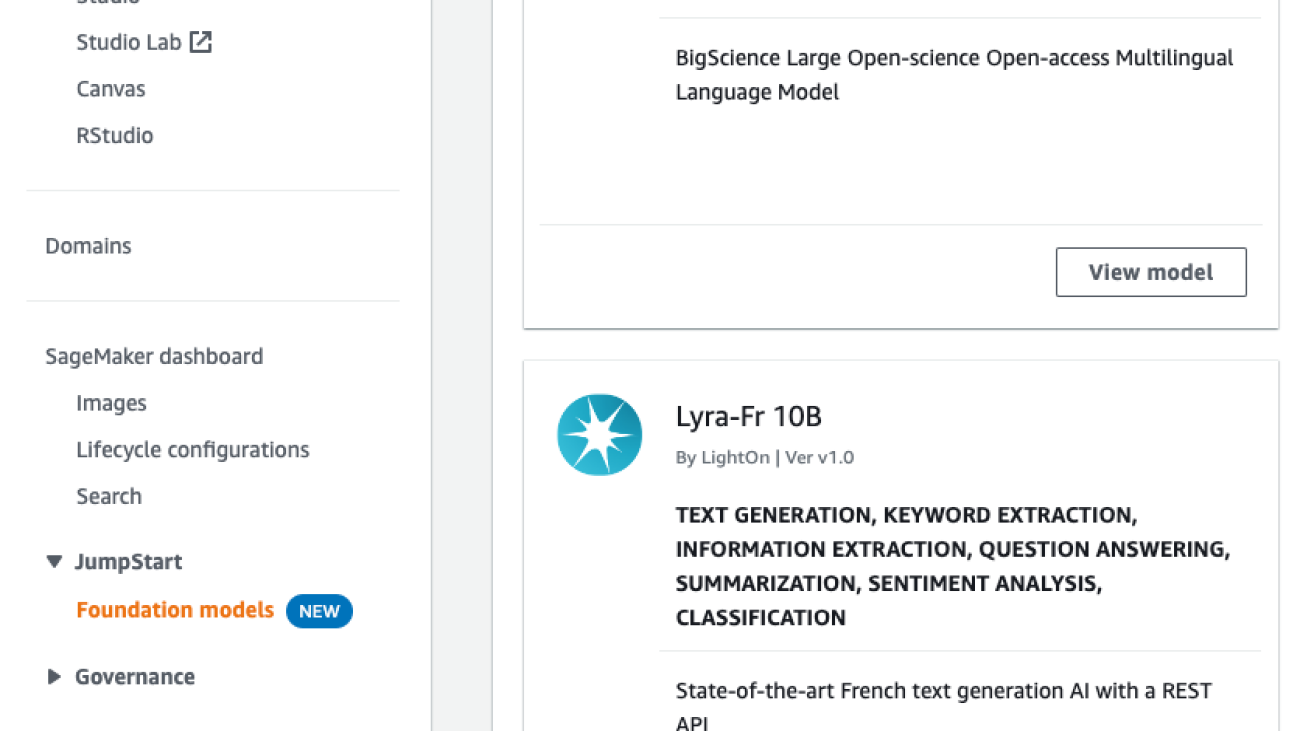
To make it easy to discover foundation models like the Lyra-fr, we have consolidated all the foundation models in one place. To find the Lyra-fr model:
- Sign in to the AWS Management Console for SageMaker.
- On the left navigation panel, you should see a section called JumpStart with Foundation models under it. Request access to this feature if you don’t have access yet.
- Once your account is allowlisted, you will see a list of models on the right. This is where you will find the Lyra-fr 10B model.

- Clicking on View model will show the full model card with additional options.

Test
A common use case is to run ad hoc tests to make sure the model meets your needs. You can test the Lyra-fr model directly from the SageMaker console. In this example, we’re going to use a simple text prompt by asking the model to generate a list of article ideas for the topic of “watercolor” or “l’aquarelle” in French.
- From the model card shown in the previous section, select Try out model. This will open a new tab with the test interface.
- On this interface, provide the text input you would like to pass to the model. You can also tune any parameters you would like using the sliders on the right. Once you’re satisfied, select Generate text.
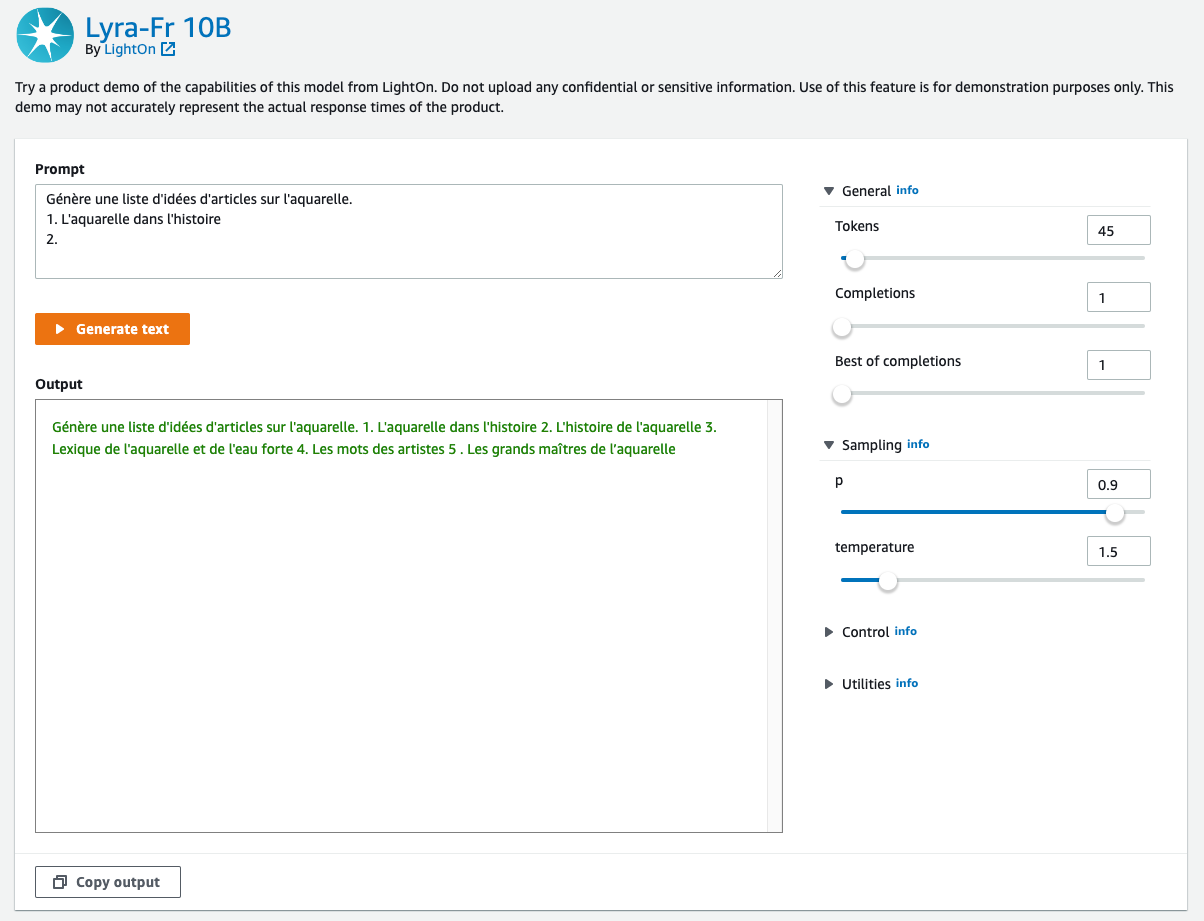
Note that foundation models and their output are from the model provider, and AWS is not responsible for the content or accuracy therein.
Deploy
Text generation models work best when you provide examples of information you want the model to provide. This is called few-shot learning. We will demo this capability using the Lyra-fr sample notebook. The sample notebook goes through how to deploy the Lyra-fr model on SageMaker, how to summarize and generate text, and few-shot learning.
It also includes examples of making the inference requests directly using JSON or with the Lyra Python SDK. The Lyra Python SDK takes care of formatting the input, calling the endpoint, and unpacking the output. There is one class per endpoint: Create, Analyze, Select, Embed, Compare, and Tokenize. Note that this example uses an ml.p4d.24xlarge instance. If your default limit for your AWS account is 0, you need to request a limit increase for this GPU instance.
SageMaker offers a managed notebook experience through SageMaker Studio. For details on how to set up SageMaker Studio, see the Amazon SageMaker Developer Guide. We’re going to clone this GitHub repo into the SageMaker Studio in this demo, but the notebook will work in other environments as well.
Let’s take a look at how to run the notebook:
- Go to the model card from the Discover section in this blog post, and select View notebook. You should see a new tab open in GitHub with the Lyra-fr notebook.
- In GitHub, select lightonmuse-sagemaker-sdk; this will bring you to the repo. Select the Code button and copy the HTTPS URL.

- Open SageMaker Studio. Select Clone a Repository and then paste in the URL copied from above.

- Navigate to the Lyra-fr notebook using the file browser on the left.
- This notebook runs end to end without additional input needed and also cleans up the resources it creates. We can take a look at the “using Create for sentiment analysis” example. This example uses the Lyra Python SDK and demonstrates few-shot learning by teaching the model with a few examples of what text should be categorized as positive (positifs), negative (négatifs), or mixed (mitigés).
- You can see that, with the Lyra Python SDK, all you have to do is provide the name of the SageMaker endpoint and the input. The SDK handles all the parsing, formatting, and setup for you.

- Running this prompt returns that the last statement is a positive one.

Clean up
After you have tested the endpoint, make sure you delete the SageMaker inference endpoint and delete the model to avoid incurring charges.
Conclusion
In this post, we showed you how to discover, test, and deploy the Lyra-fr model using Amazon SageMaker. Request access to try out the foundation model in SageMaker today, and let us know your feedback!
About the authors
 Iacopo Poli is the CTO of LightOn, responsible for strategic technical choices for the company in building very large language models and offering them to the public. He is passionate about democratization of Machine Learning through intuitive interfaces. In his spare time, he enjoys the quest for the best restaurants in Paris.
 Alan Tan is a Senior Product Manager with SageMaker, leading efforts on large model inference. He’s passionate about applying machine learning to the area of analytics. Outside of work, he enjoys the outdoors.
Machine Learning University debuts responsible AI course
New, free offering provides students of any level practical skills and code examples for every stage, from the machine learning problem all the way to deployment.Read More
Cognixion gives voice to a user’s thoughts
Alexa Fund company’s assisted reality tech could unlock speech for hundreds of millions of people who struggle to communicate.Read More
Automatically identify languages in multi-lingual audio using Amazon Transcribe
If you operate in a country with multiple official languages or across multiple regions, your audio files can contain different languages. Participants may be speaking entirely different languages or may switch between languages. Consider a customer service call to report a problem in an area with a substantial multi-lingual population. Although the conversation could begin in one language, it’s feasible that the customer might change to another language to describe the problem, depending on comfort level or usage preferences with other languages. In a similar vein, the customer care representative may transition between languages while conveying operating or troubleshooting instructions.
With a minimum of 3 seconds of audio, Amazon Transcribe can automatically identify and efficiently generate transcripts in the languages spoken in the audio without needing humans to specify the languages. This applies to various use cases such as transcribing customer calls, converting voicemails to text, capturing meeting interactions, tracking user forum communications, or monitoring media content production and localization workflows.
This post walks through the steps for transcribing a multi-language audio file using Amazon Transcribe. We discuss how to make audio files available to Amazon Transcribe and enable transcription of multi-lingual audio files when calling Amazon Transcribe APIs.
Solution overview
Amazon Transcribe is an AWS service that makes it easy for you to convert speech to text. Adding speech to text functionality to any application is simple with the help of Amazon Transcribe, an automated speech recognition (ASR) service. You can ingest audio input using Amazon Transcribe, create clear transcripts that are easy to read and review, increase accuracy with customization, and filter information to protect client privacy.
The solution also uses Amazon Simple Storage Service (Amazon S3), an object storage service built to store and retrieve any amount of data from anywhere. It’s a simple storage service that offers industry-leading durability, availability, performance, security, and virtually unlimited scalability at very low cost. When you store data in Amazon S3, you work with resources known as buckets and objects. A bucket is a container for objects. An object is a file and any metadata that describes the file.
In this post, we walk you through the following steps to implement a multi-multilingual audio transcription solution:
- Create an S3 bucket.
- Upload your audio file to the bucket.
- Create the transcription job.
- Review the job output.
Prerequisites
For this walkthrough, you should have the following prerequisites:
- An AWS account
- AWS Identity and Access Management (IAM) permissions to:
- Create S3 buckets as well as read and write bucket data
- Access the Amazon Transcribe console and call Amazon Transcribe APIs
Amazon Transcribe provide the option to store transcribed output in either a service managed or customer managed S3 bucket. For this post, we have Amazon Transcribe write the results to a service managed S3 bucket.
Note that Amazon Transcribe is a Regional service and the Amazon Transcribe API endpoints being called need to be in the same Region as the S3 buckets.
Create an S3 bucket to store your audio input files
To create your S3 bucket, complete the following steps:
- On the Amazon S3 console, choose Create bucket.

- For Bucket name, enter a globally unique name for the bucket.
- For AWS Region, choose the same Region as your Amazon Transcribe API endpoints.
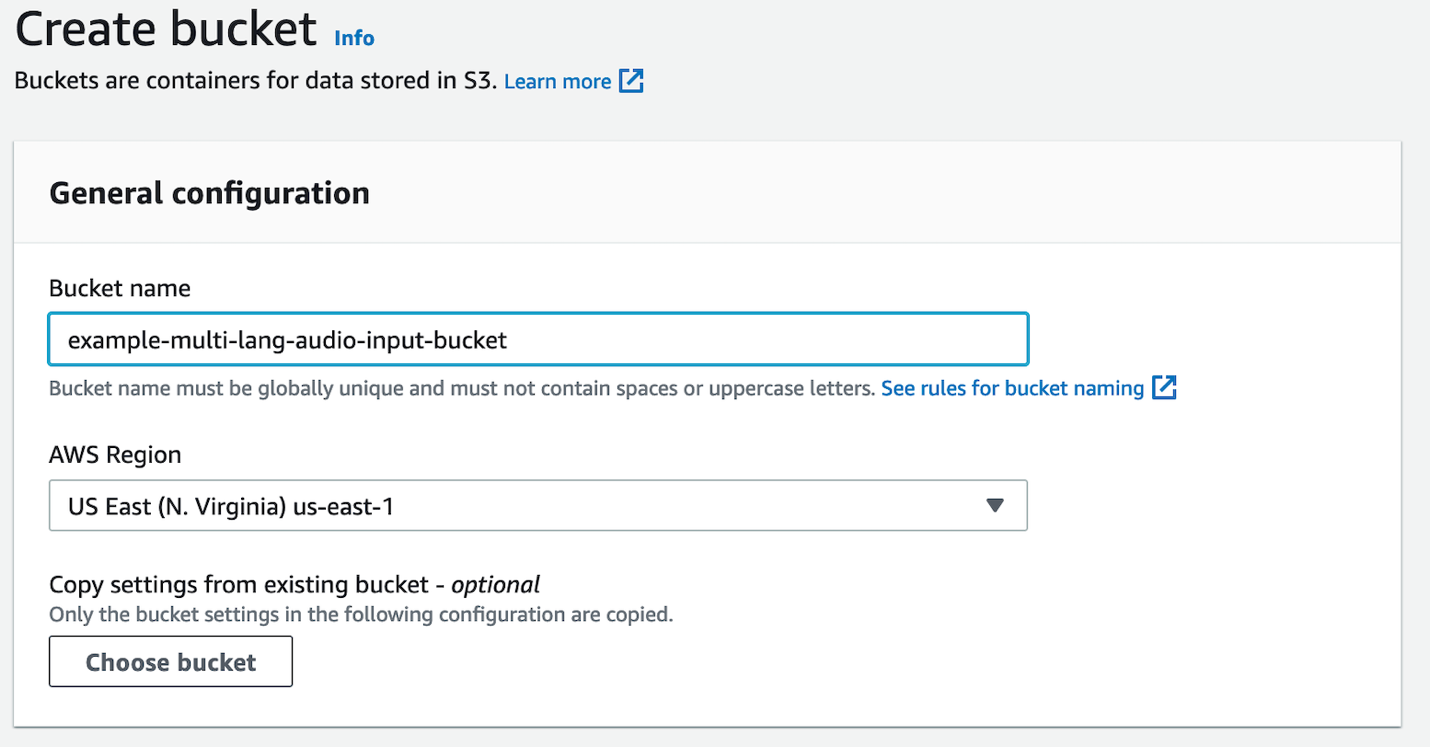
- Leave all defaults as is.
- Choose Create bucket.

Upload your audio file to the S3 bucket
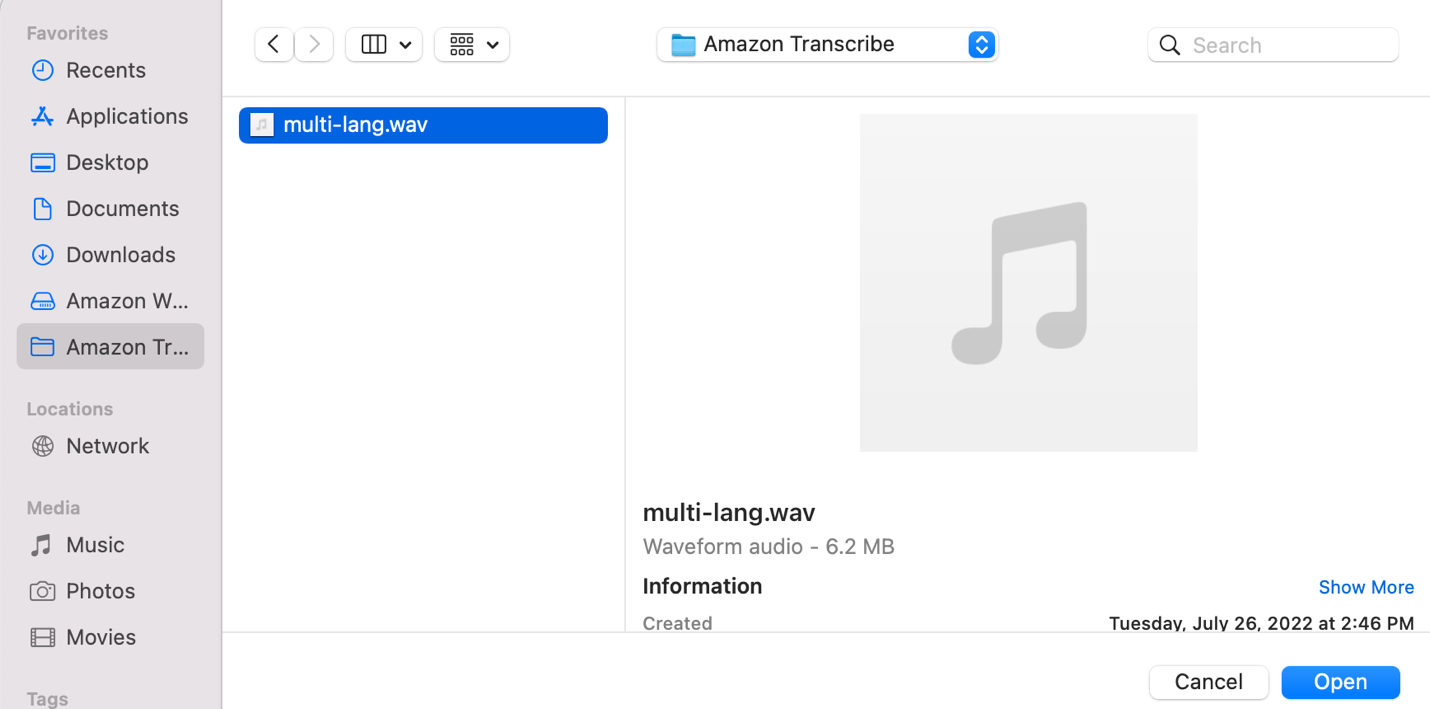
Upload your multi-lingual audio file to the S3 bucket in your AWS account. For the purpose of this exercise, we use the following sample multi-lingual audio file. It captures a customer support call involving English and Spanish languages.
- On the Amazon S3 console, choose Buckets in the navigation pane.
- Choose the bucket you created previously for storing the input audio files.
- Choose Upload.

- Choose Add files.
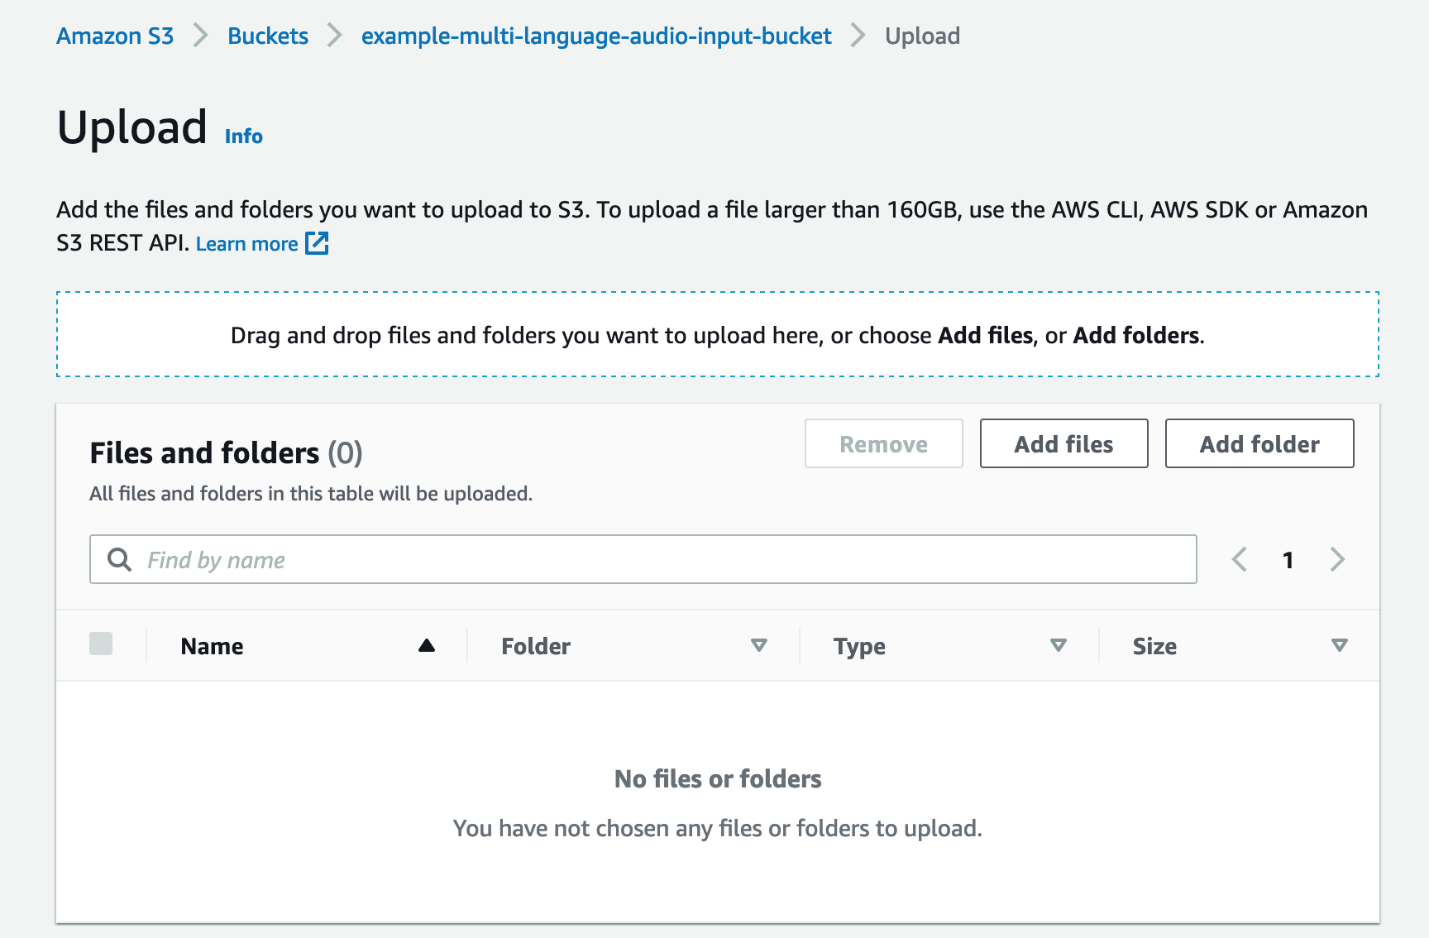
- Choose the audio file you want to transcribe from your local computer.
- Choose Upload.

Your audio file will shortly be available in the S3 bucket.
Create the transcription job
With the audio file uploaded, we now create a transcription job.
- On the Amazon Transcribe console, choose Transcription jobs in the navigation pane.
- Choose Create job.

- For Name, enter a unique name for the job.
This will also be the name of the output transcript file. - For Language settings, select Automatic multiple languages identification.
This feature enables Amazon Transcribe to automatically identify and transcribe all languages spoken in the audio file.
- For Language options for automatic language identification, leave it unselected.
Amazon Transcribe automatically identifies and transcribes all languages spoken in the audio. To improve transcription accuracy, you can optionally select two or more languages you know were spoken in the audio.
- For Model type, only the General model option is available at the time of writing this post.
- For Input data, choose Browse S3.
- Choose the audio source file we uploaded previously.

- For Output data, you can select either Service-managed S3 bucket or Customer specified S3 bucket. For this post, select Service-managed S3 bucket.

- Choose Next.
- Choose Create job.
Review the job output
When the transcription job is complete, open the transcription job.
Scroll down to the Transcription preview section. The audio transcription is displayed on the Text tab. The transcription includes both the English and Spanish portions of the conversation.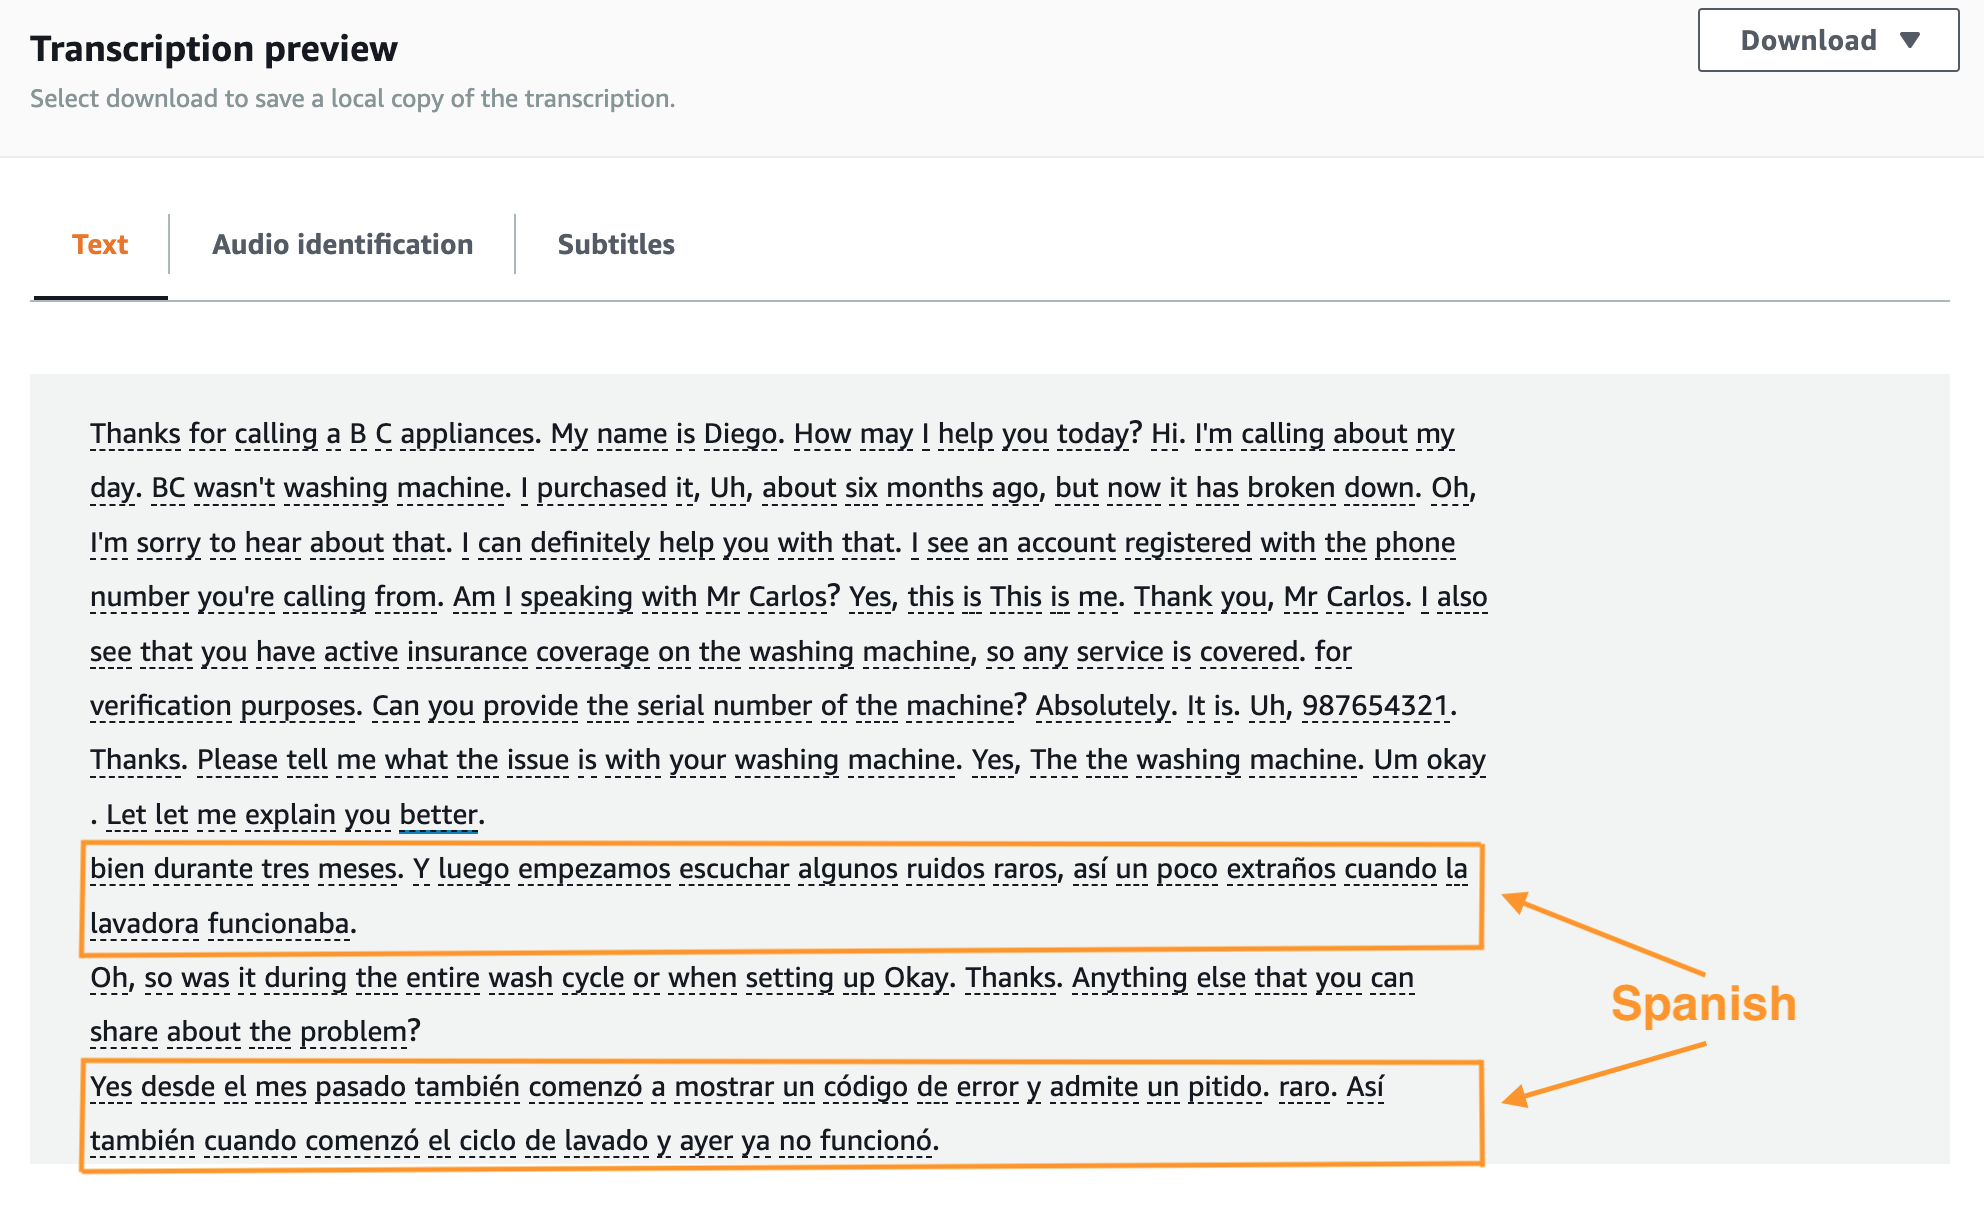
You can optionally download a copy of the transcript as a JSON file, which you could use for further post-call analytics.
Clean up
To avoid incurring future charges, empty and delete the S3 bucket you created for storing the input audio source file. Make sure you have the files stored elsewhere because this will permanently remove all objects contained within the bucket. On the Amazon Transcribe console, select and delete the job previously created for the transcription.
Conclusion
In this post, we created an end-to-end workflow to automate identification and transcription of multi-lingual audio files, without writing any code. We used the new functionality in Amazon Transcribe to automatically identify different languages in an audio file and transcribe each language correctly.
For more information, refer to Language identification with batch transcription jobs.
About the Authors
 Murtuza Bootwala is a Senior Solutions Architect at AWS with an interest in AI/ML technologies. He enjoys working with customers to help them achieve their business outcomes. Outside of work, he enjoys outdoor activities and spending time with family.
 Victor Rojo is passionate about AI/ML and software development. He helped get Amazon Alexa up and running in the US and Mexico. He also brought Amazon Textract to AWS Partners and got AWS Contact Center Intelligence (CCI) off the ground. He’s currently the Global Tech Leader for Conversational AI Partners.
 Babu Srinivasan is an AWS Sr. Specialist SA (Language AI Services) based out of Chicago. He focuses on Amazon Transcribe (speech to text), helping our customers use AI services to solve business problems. Outside of work, he enjoys woodworking and performing magic shows.
Translate multiple source language documents to multiple target languages using Amazon Translate
Enterprises need to translate business-critical content such as marketing materials, instruction manuals, and product catalogs across multiple languages to communicate with a global audience of customers, partners, and stakeholders. Identifying the source language in each document before calling a translate job creates complexities and adds another step to your workflow. For example, an international product company with its customer support operations located in their corporate office requires their agents to translate emails or documents to support customer requests. Previously, they had to set up workflows to identify dominant language in each document, group them by language type, and set up a batch translate job for each source language. Now, Amazon Translate’s automatic language detection feature for batch translation jobs allows you to translate a batch of documents in various languages with a single translate job. This removes the need for you to orchestrate the document translate workflow that required dominant language identification and grouping. Amazon Translate also allows translation to multiple target languages for translation (up to 10 languages). A single translation job can translate documents to multiple target languages. This feature eliminates the need to create separate batch jobs for individual target languages. Customers can now create documentation in multiple languages, all with a single API call.
In this post, we demonstrate how to translate documents into multiple target languages in a batch translation job.
Solution overview
Automatic detection of source language for batch translate jobs allows you to translate documents written in various supported languages in a single operation. You can also provide up to 10 languages as targets. The job processes each document, identifies the dominant source language, and translates it to the target language. Amazon Translate uses Amazon Comprehend to determine the dominant language in each of your source documents, and uses it as the source language.
In the following sections, we demonstrate how to create a batch translation job via the AWS Management Console or the AWS SDK.
Create a batch translation job via console
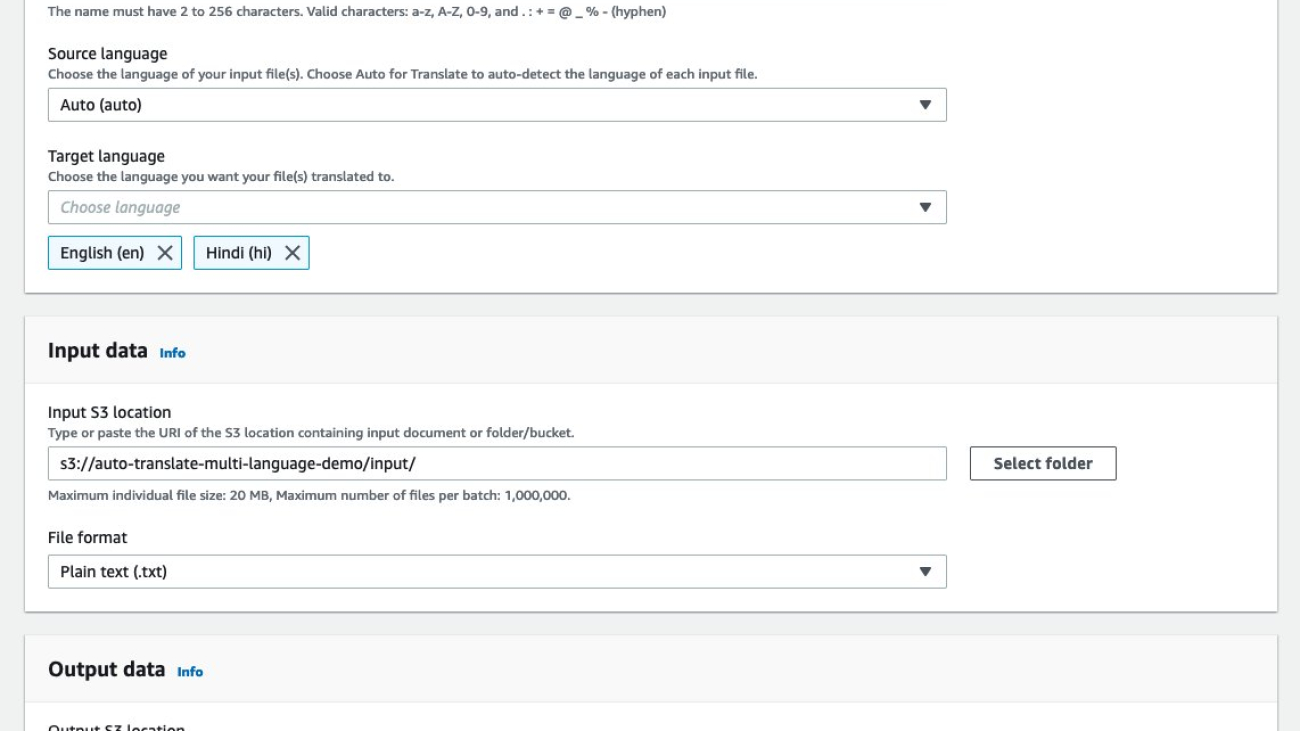
In this example, we configure Amazon Translate batch translation to automatically detect the source language and translate it to English and Hindi, using the input and output Amazon Simple Storage Service (Amazon S3) bucket locations provided.

Next, we create an AWS Identity and Access Management (IAM) role that gets provisioned as part of the configuration. The role is given access to the input and output S3 buckets.
After the job is created, you can monitor the progress of the batch translation job in the Translation jobs section.

When the translation job is complete, you can navigate to the output S3 bucket location and observe that the documents have been translated to their target language. Our input consisted of two files, sample-doc.txt and sample-doc-2.txt, in two different languages. Each document was translated into two target languages, for a total of four documents.

Create a batch translation job via the AWS SDK
The following Python Boto3 code uses the batch translation call to translate documents in your source S3 bucket. Specify the following parameters:
- InputDataConfig – Provide the S3 bucket location of your input documents
- OutputDataConfig – Provide the S3 bucket location of your output documents
- DataAccessRoleArn – Create an IAM role that gives Amazon Translate permission to access your input and output S3 buckets
- SourceLanguageCode: Use
auto - TargetLanguageCodes: Choose up to 10 target languages
Clean up
To clean up after using this solution, complete the following steps:
- Delete the S3 buckets that you created.
- Delete IAM roles that you set up.
- Delete any other resources that you set up for this post.
Conclusion
With today’s need to have a global reach with limited resources, Amazon Translate helps you simplify your multi-language processing workflows. With the introduction of automatically detecting the dominant language in your source document for batch translation jobs, and translating them to up to 10 target languages, you can focus on your business logic rather than dealing with the operational burden of sorting documents and managing multiple batch translation jobs.
We strive to add features to our service that make it easier for our customers innovate. Try this solution and let us know how this helped simplify your document processing workloads.
About the authors
 Kishore Dhamodaran is a Senior Solutions Architect at AWS. Kishore helps strategic customers with their cloud enterprise strategy and migration journey, leveraging his years of industry and cloud experience.
 Sid Padgaonkar is the Sr. Product Manager for Amazon Translate, AWS’s natural language processing service. On weekends you will find him playing squash and exploring the food scene in the Pacific NW.
Data-efficient continual learning in Alexa
EMNLP papers examine constrained generation of rewrite candidates and automatic selection of information-rich training data.Read More
Introducing Amazon SageMaker Data Wrangler’s new embedded visualizations
Manually inspecting data quality and cleaning data is a painful and time-consuming process that can take a huge chunk of a data scientist’s time on a project. According to a 2020 survey of data scientists conducted by Anaconda, data scientists spend approximately 66% of their time on data preparation and analysis tasks, including loading (19%), cleaning (26%), and visualizing data (21%). Amazon SageMaker offers a range of data preparation tools to meet different customer needs and preferences. For users who prefer a GUI-based interactive interface, SageMaker Data Wrangler offers 300+ built-in visualizations, analyses, and transformations to efficiently process data backed by Spark without writing a single line of code.
Data visualization in machine learning (ML) is an iterative process and requires continuous visualization of the dataset for discovery, investigation and validation. Putting data into perspective entails seeing each of the columns to comprehend possible data errors, missing values, wrong data types, misleading/incorrect data, outlier data, and more.
In this post, we’ll show you how Amazon SageMaker Data Wrangler automatically generates key visualizations of data distribution, detects data quality issues, and surfaces data insights such as outliers for each feature without writing a single line of code. It helps improve the data grid experience with automatic quality warnings (for example, missing values or invalid values). The automatically-generated visualizations are also interactive. For example, you can show a tabulation of the top five most frequent items ordered by percent, and hover over the bar to switch between count and percentage.
Prerequisites
Amazon SageMaker Data Wrangler is a SageMaker feature available within SageMaker Studio. You can follow the Studio onboarding process to spin up the Studio environment and notebooks. Although you can choose from a few authentication methods, the simplest way to create a Studio domain is to follow the Quick start instructions. The Quick start uses the same default settings as the standard Studio setup. You can also choose to onboard using AWS Identity and Access Management (IAM) Identity Center (successor to AWS Single Sign-On) for authentication (see Onboard to Amazon SageMaker Domain Using IAM Identity Center).
Solution Walkthrough
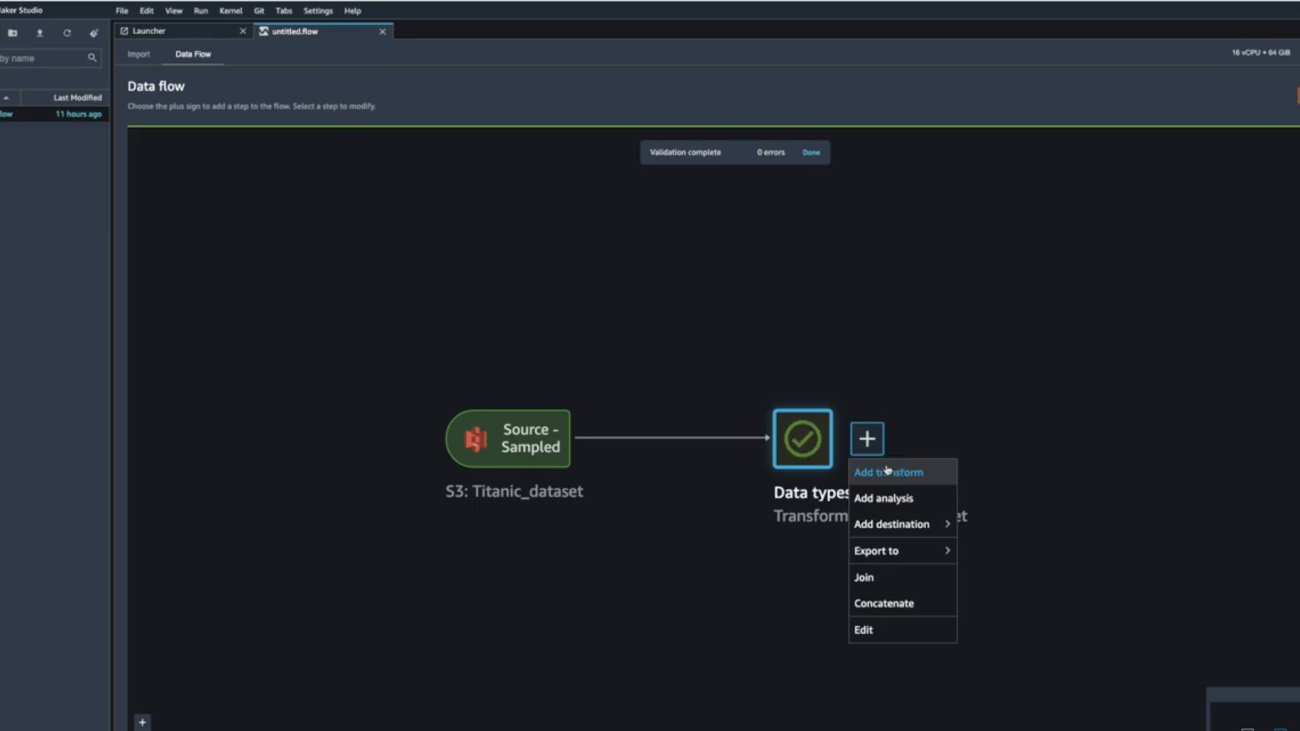
Start your SageMaker Studio Environment and create a new Data Wrangler flow. You can either import your own dataset or use a sample dataset (Titanic) as seen in the following image. These two nodes (the source node and the data type node) are clickable – when you double-click these two nodes, Data Wrangler will display the table.
In our case, let’s right-click on the Data Types icon and Add a transform:

You should now see visualizations on top of each column. Please allow for some time for the charts to load. The latency depends on the size of the dataset (for the Titanic dataset, it should take 1-2 seconds in the default instance).

Scroll to the horizontal top bar by hovering over tooltip. Now that the charts have loaded, you can see the data distribution, invalid values, and missing values. Outliers and missing values are characteristics of erroneous data, and it’s critical to identify them because they could affect your results. This means that because your data came from an unrepresentative sample, your findings may not be generalizable to situations outside of your study. Classification of values can be seen on the charts on the bottom where valid values are represented in white, invalid values in blue, and missing values in purple. You can also look at the outliers depicted by the blue dots to the left or right of a chart.

All the visualizations come in the form of histograms. For non-categorical data, a bucket set is defined for each bin. For categorical data, each unique value is treated as a bin. On top of the histogram, there’s a bar chart showing you the invalid and missing values. We can view the ratio of valid values for Numeric, Categorical, Binary, Text, and Datetime types, as well as the ratio of missing values based on the total null and empty cells and, finally, the ratio of invalid values. Let’s look at some examples to understand how you can see these using Data Wrangler’s pre-loaded sample Titanic Dataset.
Example 1 – We can look at the 20% missing values for the AGE feature/column. It’s crucial to deal with missing data in the field of data-related research/ML, either by removing it or imputing it (handling the missing values with some estimation).

You can process missing values using the Handle missing values transform group. Use the Impute missing transform to generate imputed values where missing values were found in input column. The configuration depends on your data type.
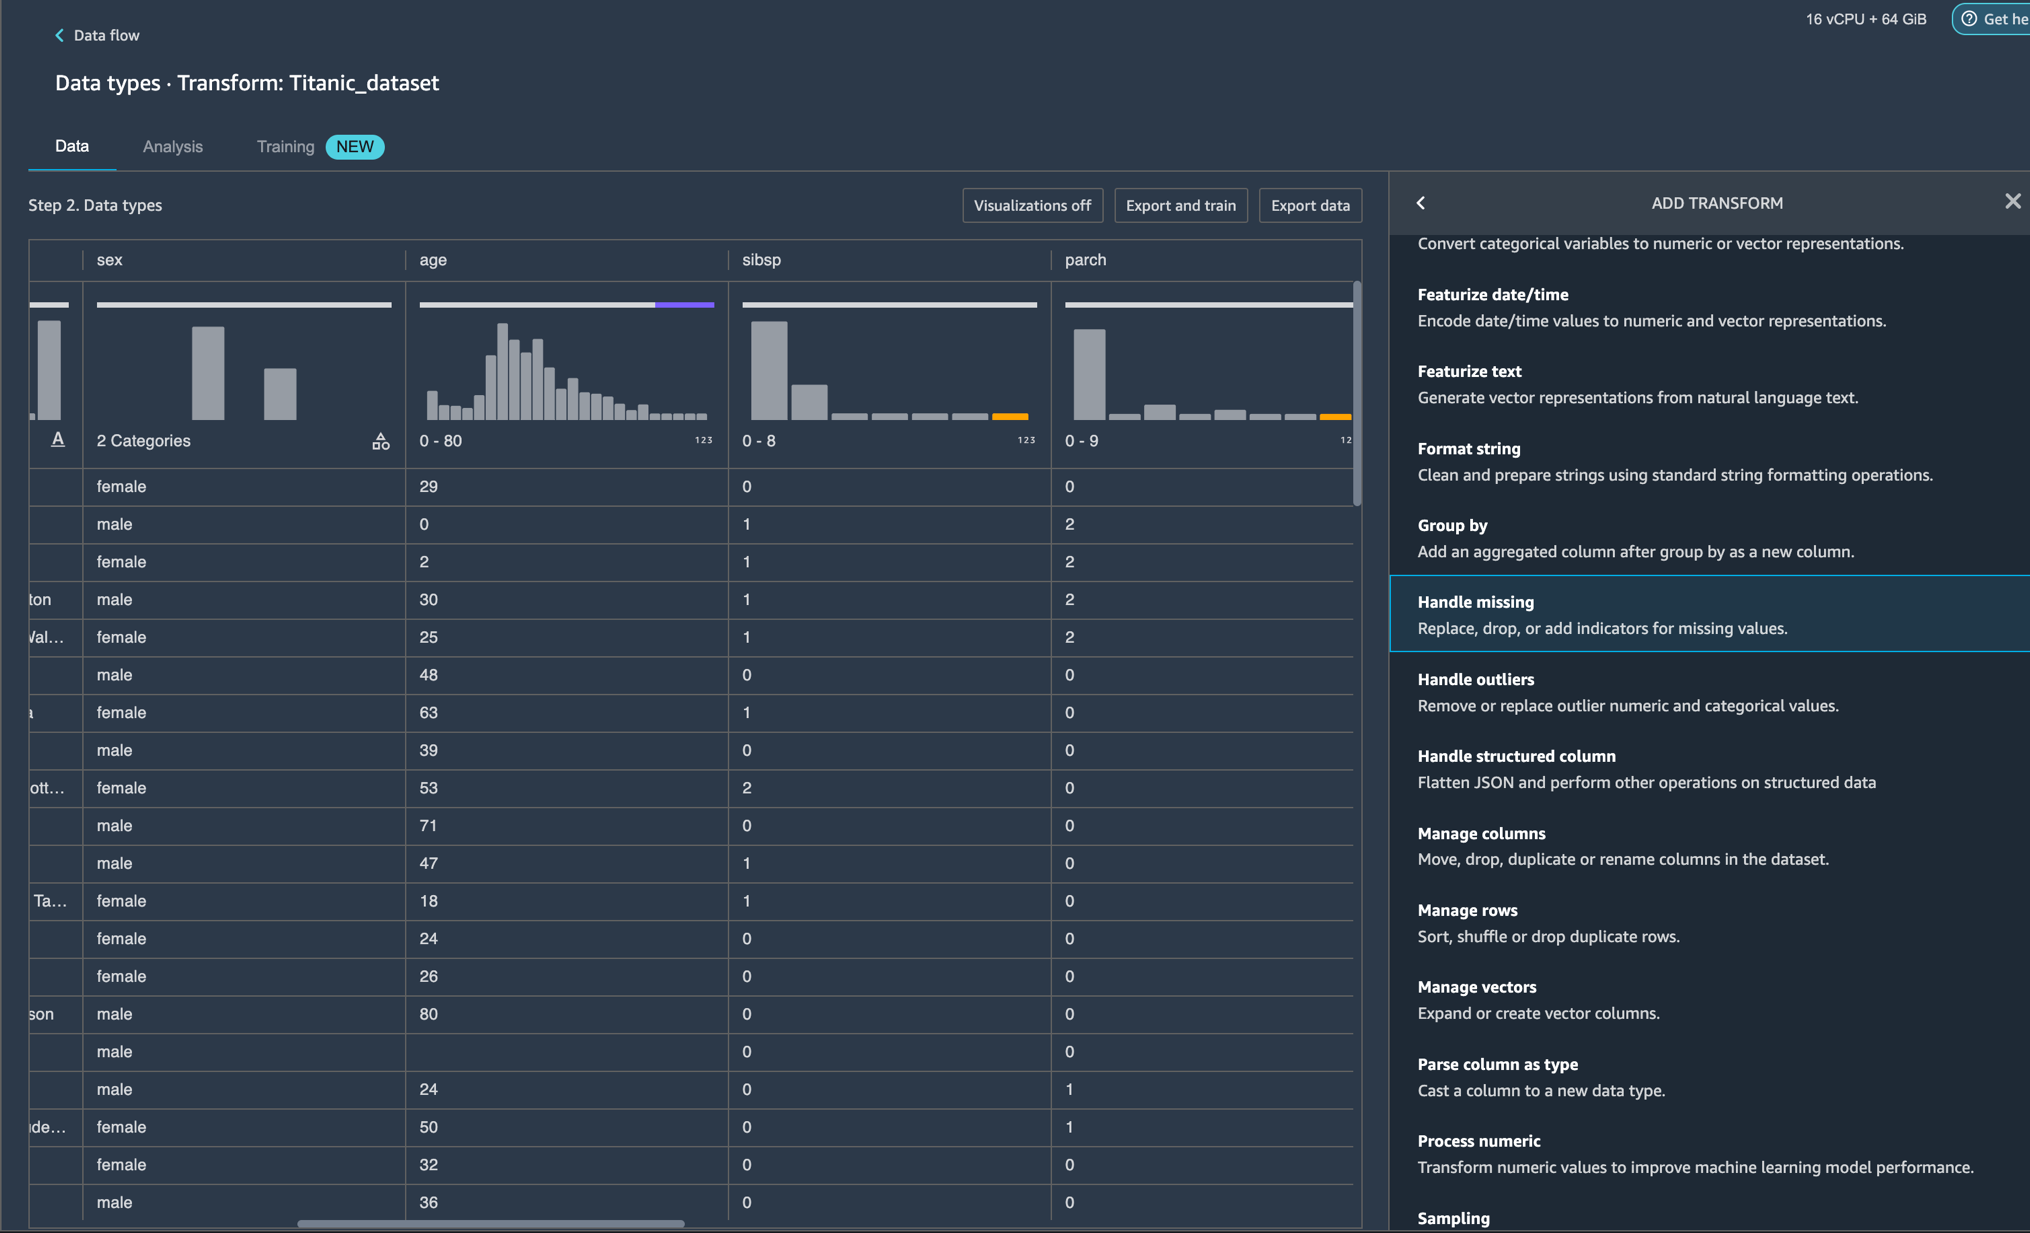
In this example, the AGE column has numeric data type. For imputing strategy, we can choose to impute the mean or the approximate median over the values that are present in your dataset.

Now that we have added the transformation, we can see that the AGE column no longer has missing values.

Example 2 – We can look at the 27% invalid values for the TICKET feature/column which is of the STRING type. Invalid data can produce biased estimates, which can reduce a model’s accuracy and result in false conclusions. Let us explore some transforms that we can utilize to handle the invalid data in the TICKET column.

Looking at the screenshot, we see that some of the inputs are written in a format that contains alphabets before numerals “PC 17318” and others are just numerals such as “11769”.
We can choose to apply a transform to search for and edit specific patterns within strings such as “PC” and replace them. Next, we can cast our string column to a new type such as Long for ease of use.


This still leaves us with 19% missing values on the TICKET feature. Similar to example 1, we can now impute the missing values using mean or approximate median. The feature TICKET should no longer have invalid or missing values as per the image below.

Clean Up
To make sure that you don’t incur charges after following this tutorial, make sure that you shut down the Data Wrangler app.
Conclusion
In this post, we presented the new Amazon Sagemaker Data Wrangler widget that will help remove the undifferentiated heavy lifting for end users during data preparation with automatically surfacing visualizations and data profiling insights for each feature. This widget makes it easy to visualize data (for example, categorical/non-categorical histogram), detect data quality issues (for example, missing values and invalid values), and surface data insights (for example, outliers and top N item).
You can start using this capability today in all of the regions where SageMaker Studio is available. Give it a try, and let us know what you think. We’re always looking forward to your feedback, either through your usual AWS support contacts, or on the AWS Forum for SageMaker.
About the Authors
 Isha Dua is a Senior Solutions Architect based in the San Francisco Bay Area. She helps AWS Enterprise customers grow by understanding their goals and challenges, and guides them on how they can architect their applications in a cloud-native manner while making sure they are resilient and scalable. She’s passionate about machine learning technologies and environmental sustainability.
 Parth Patel is a Solutions Architect at AWS in the San Francisco Bay Area. Parth guides customers to accelerate their journey to the cloud and helps them adopt the AWS Cloud successfully. He focuses on ML and application modernization.
How we count carbon emissions from electricity matters
Amazon advocates for updating carbon accounting to measure where renewable-energy projects will have the greatest impact.Read More
Start your successful journey with time series forecasting with Amazon Forecast
Organizations of all sizes are striving to grow their business, improve efficiency, and serve their customers better than ever before. Even though the future is uncertain, a data-driven, science-based approach can help anticipate what lies ahead to successfully navigate through a sea of choices.
Every industry uses time series forecasting to address a variety of planning needs, including but not limited to:
- Developing a cash flow projection based on future expected revenues and expenses
- Estimating how many items to manufacture or purchase from suppliers to meet future demand
- Knowing where to stock inventory in retail settings to meet on-shelf availability while also minimizing stock-outs and product waste
- In wholesale or ecommerce settings, knowing where to position inventory within the supply chain network to maximize regional availability while also minimizing final mile delivery costs
- Having a system for detecting outliers in which future actuals far exceed or fall short of the expected plan
- Establishing specialized workforces in response to anticipated customer foot traffic, call center operations, manufacturing plans, and other similar workforce demand curves
In this post, we outline five best practices to get started with Amazon Forecast, and apply the power of highly-accurate machine learning (ML) forecasting to your business.
Why Amazon Forecast
AWS offers a fully managed time series forecasting service called Amazon Forecast that allows you to generate and maintain ongoing automated time series forecasts without requiring ML expertise. In addition, you can build and deploy repeatable forecasting operations without the need to write code, build ML models, or manage infrastructure.
The capabilities of Forecast allow it to serve a wide range of customer roles, from analysts and supply chain managers to developers and ML experts. There are several reasons why customers favor Forecast: it offers high accuracy, repeatable results, and the ability to self-serve without waiting on specialized technical resource availability. Forecast is also selected by data science experts because it provides highly accurate results, based on an ensemble of self-tuned models, and the flexibility to experiment quickly without having to deploy or manage clusters of any particular size. Its ML models also make it easier to support forecasts for a large number of items, and can generate accurate forecasts for cold-start items with no history.
Five best practices when getting started with Forecast
Forecast provides high accuracy and quick time-to-market for developers and data scientists. Although developing highly accurate time series models has been made easy, this post provides best practices to speed up your onboarding and time to value. A little rigor and perhaps a couple of rounds of experimentation must be applied to reach success. A successful forecasting journey depends on multiple factors, some subtle.
These are some key items you should consider when starting to work with Forecast.
Start simple
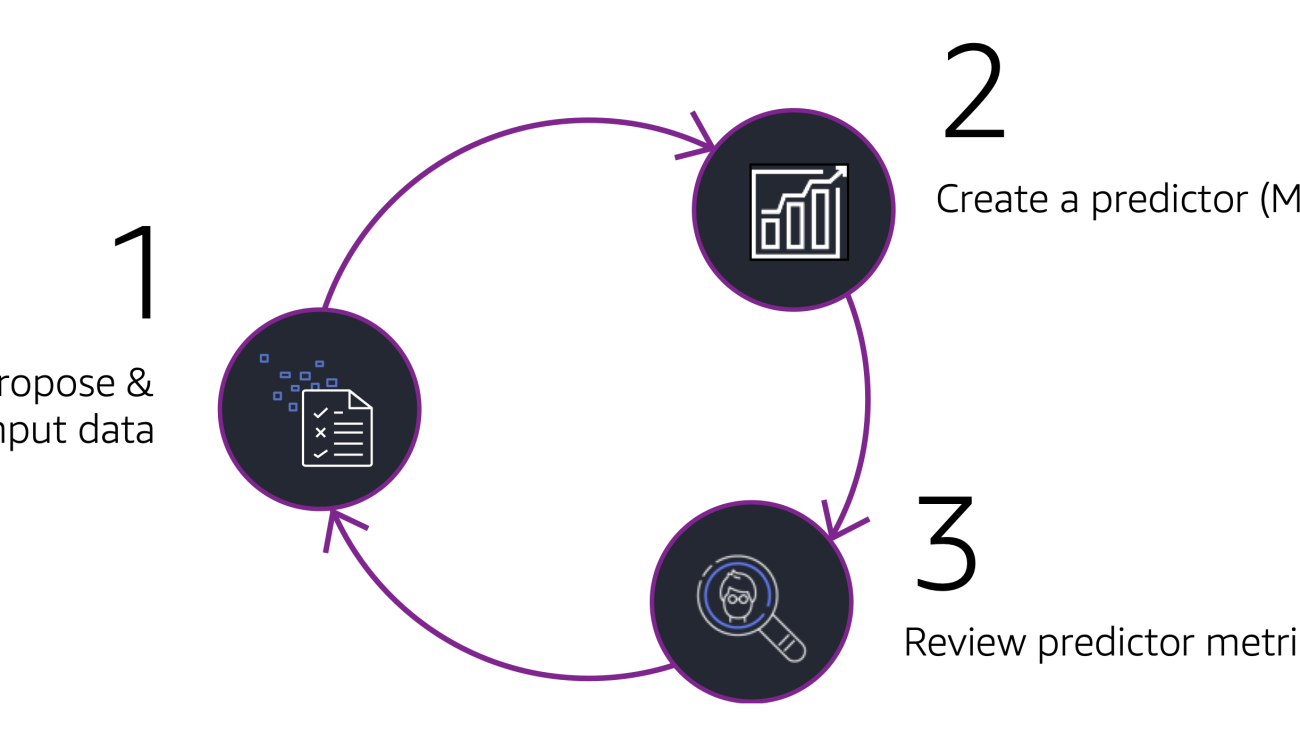
As shown in the following flywheel, consider beginning with a simple model that uses a target time series dataset to develop a baseline as you propose your first set of input data. Subsequent experiments can add in other temporal features and static metadata with a goal of improving model accuracy. Each time a change is made, you can measure and learn how much the change has helped, if at all. Depending on your assessment, you may decide to keep the new set of features provided, or pivot and try another option.

Focus on the outliers
With Forecast, you can obtain accuracy statistics for the entire dataset. It’s important to recognize that although this top-level statistic is interesting, it should be viewed as being only directionally correct. You should concentrate on item-level accuracy statistics rather than top-level statistics. Consider the following scatterplot as a guide. Some of the items in the dataset will have high accuracy; for these no action is required.
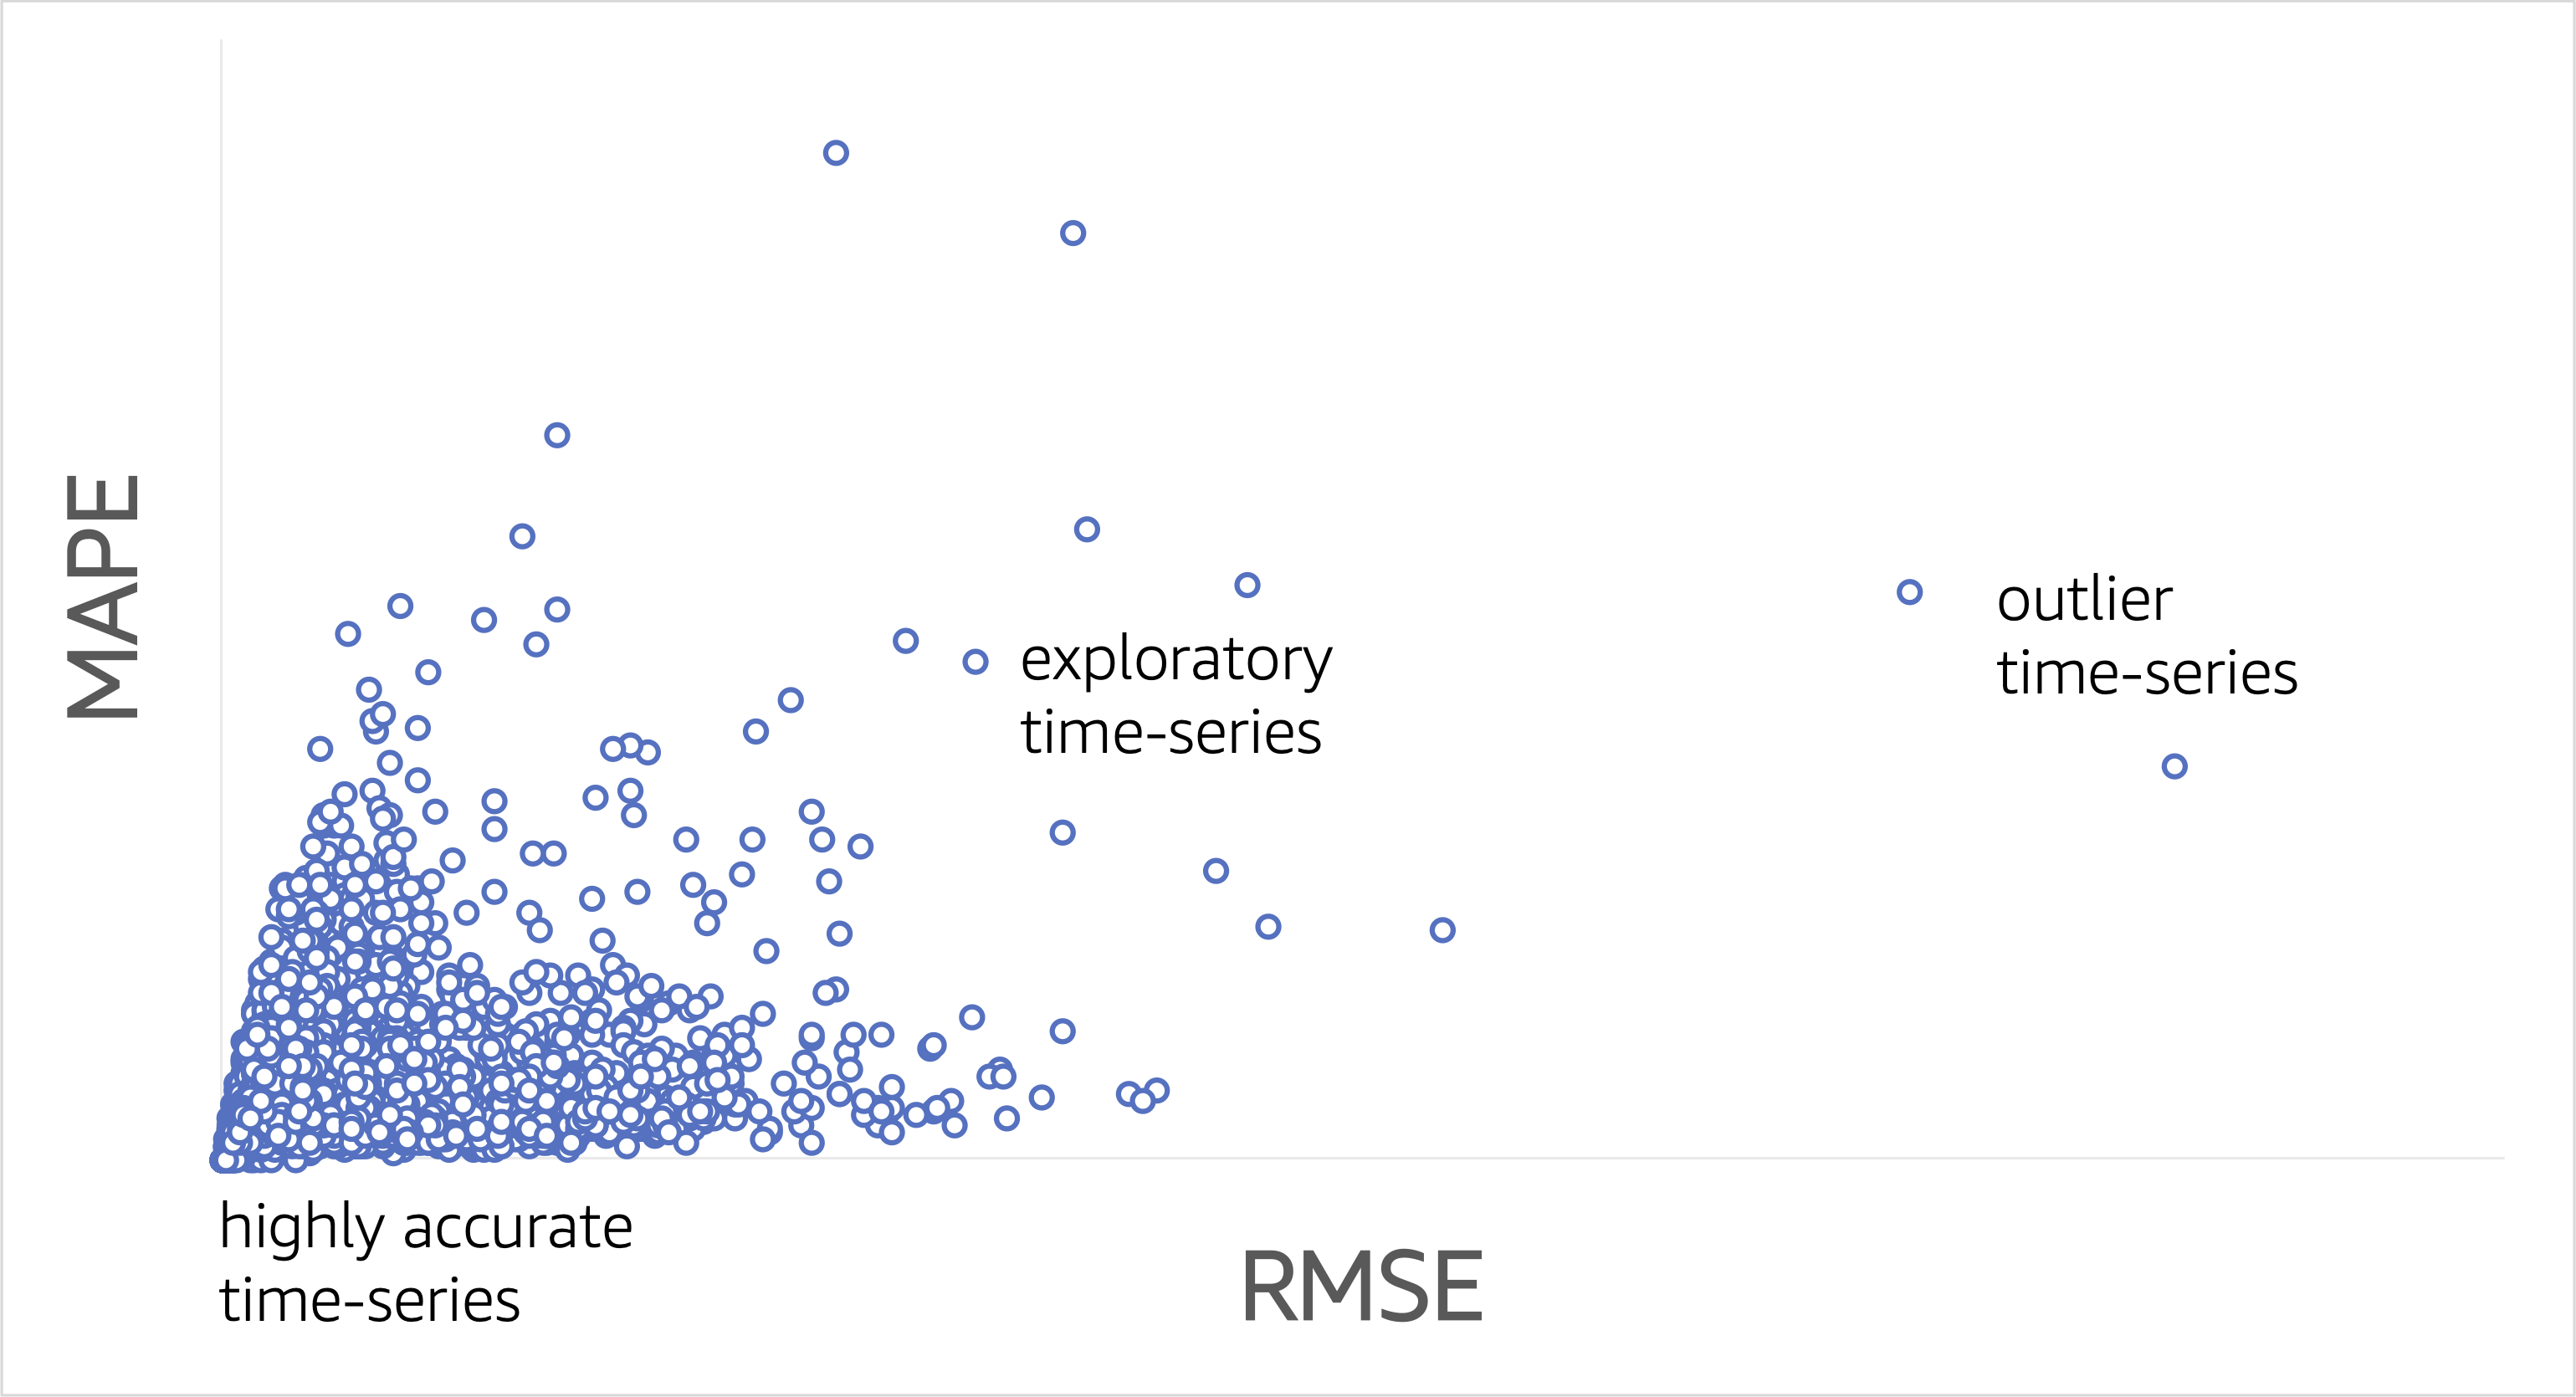
While building a model, you should explore some of the points labeled as “exploratory time-series.” In these exploratory cases, determine how to improve accuracy by incorporating more input data, such as price variations, promotional spend, explicit seasonality features, and the inclusion of local, market, global, and other real-world events and conditions.
Review predictor accuracy before creating forecasts
Don’t create future dated forecasts with Forecast until you have reviewed prediction accuracy during the backtest period. The preceding scatterplot illustrates time series level accuracy, which is your best indication for what future dated predictions will look like, all other things being the same. If this period isn’t providing your required level of accuracy, don’t proceed with the future dated forecast operation, because this may lead to inefficient spend. Instead, focus on augmenting your input data and trying another round at the innovation flywheel, as discussed earlier.
Reduce training time
You can reduce training time through two mechanisms. First, use Forecast’s retrain function to help reduce training time through transfer learning. Second, prevent model drift with predictor monitoring by training only when necessary.
Build repeatable processes
We encourage you not to build Forecast workflows through the AWS Management Console or using APIs from scratch until you have at least evaluated our AWS samples GitHub repo. Our mission with GitHub samples is to help remove friction and expedite your time-to-market with repeatable workflows that have already been thoughtfully designed. These workflows are serverless and can be scheduled to run on a regular schedule.
Visit our official GitHub repo, where you can quickly deploy our solution guidance by following the steps provided. As shown in the following figure, the workflow provides a complete end-to-end pipeline that can retrieve historical data, import it, build models, and produce inference against the models—all without needing to write code.

The following figure offers a deeper view into just one module, which is able to harvest historical data for model training from a myriad of database sources that are supported by Amazon Athena Federated Query.

Get started today
You can implement a fully automated production workflow in a matter of days to weeks, especially when paired with our workflow orchestration pipeline available at our GitHub sample repository.
This re:Invent video highlights a use case of a customer who automated their workflow using this GitHub model:
Forecast has many built-in capabilities to help you achieve your business goals through highly accurate ML-based forecasting. We encourage you to contact your AWS account team if you have any questions and let them know that you would like to speak with a time series specialist in order to provide guidance and direction. We can also offer workshops to assist you in learning how to use Forecast.
We are here to support you and your organization as you endeavor to automate and improve demand forecasting in your company. A more accurate forecast can result in higher sales, a significant reduction in waste, a reduction in idle inventory, and ultimately higher levels of customer service.
Take action today; there is no better time than the present to begin creating a better tomorrow.
About the Author
 Charles Laughlin is a Principal AI/ML Specialist Solution Architect and works inside the Time Series ML team at AWS. He helps shape the Amazon Forecast service roadmap and collaborates daily with diverse AWS customers to help transform their businesses using cutting-edge AWS technologies and thought leadership. Charles holds a M.S. in Supply Chain Management and has spent the past decade working in the consumer packaged goods industry.
 Dan Sinnreich is a Sr. Product Manager for Amazon Forecast. He is focused on democratizing low-code/no-code machine learning and applying it to improve business outcomes. Outside of work, he can be found playing hockey, trying to improve his tennis serve, scuba diving, and reading science fiction.