In this post, we demonstrate Kubeflow on AWS (an AWS-specific distribution of Kubeflow) and the value it adds over open-source Kubeflow through the integration of highly optimized, cloud-native, enterprise-ready AWS services.
Kubeflow is the open-source machine learning (ML) platform dedicated to making deployments of ML workflows on Kubernetes simple, portable and scalable. Kubeflow provides many components, including a central dashboard, multi-user Jupyter notebooks, Kubeflow Pipelines, KFServing, and Katib, as well as distributed training operators for TensorFlow, PyTorch, MXNet, and XGBoost, to build simple, scalable, and portable ML workflows.
AWS recently launched Kubeflow v1.4 as part of its own Kubeflow distribution (called Kubeflow on AWS), which streamlines data science tasks and helps build highly reliable, secure, portable, and scalable ML systems with reduced operational overheads through integrations with AWS managed services. You can use this Kubeflow distribution to build ML systems on top of Amazon Elastic Kubernetes Service (Amazon EKS) to build, train, tune, and deploy ML models for a wide variety of use cases, including computer vision, natural language processing, speech translation, and financial modeling.
Challenges with open-source Kubeflow
When you use an open-source Kubeflow project, it deploys all Kubeflow control plane and data plane components on Kubernetes worker nodes. Kubeflow component services are deployed as part of the Kubeflow control plane, and all resource deployments related to Jupyter, model training, tuning, and hosting are deployed on the Kubeflow data plane. The Kubeflow control plane and data plane can run on the same or different Kubernetes worker nodes. This post focuses on Kubeflow control plane components, as illustrated in the following diagram.
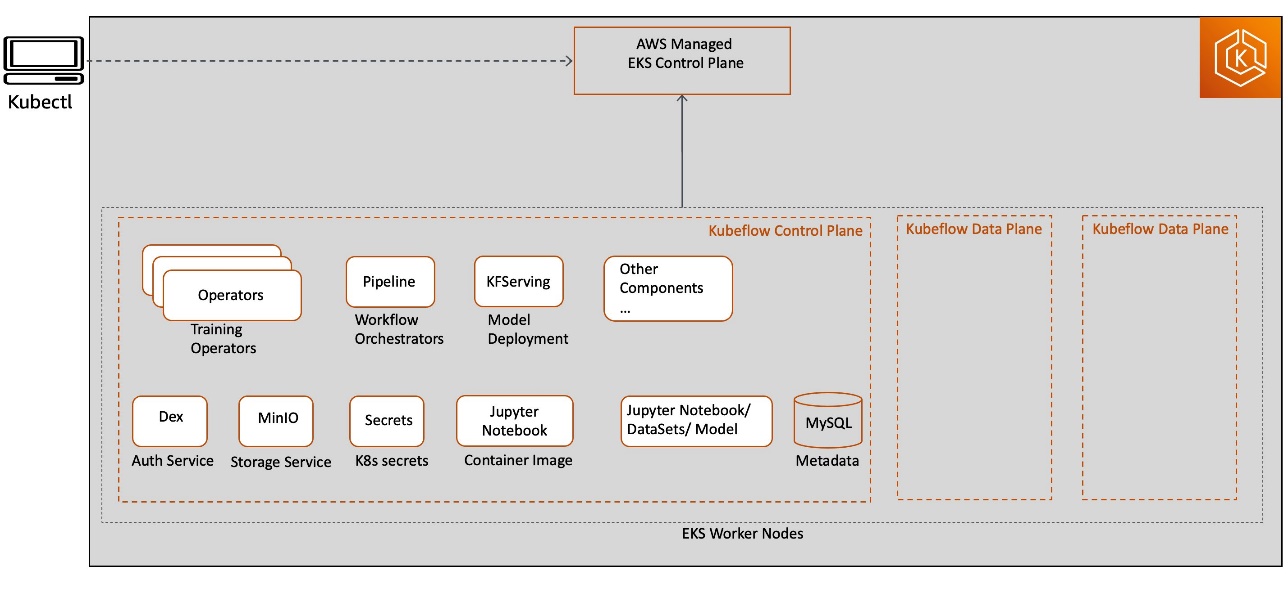
This deployment model may not provide an enterprise-ready experience due to the following reasons:
- All Kubeflow control plane heavy lifting infrastructure components, including database, storage, and authentication, are deployed in the Kubernetes cluster worker node itself. This makes it challenging to implement a highly available Kubeflow control plane design architecture with a persistent state in the event of worker node failure.
- Kubeflow control plane generated artifacts (such as MySQL instances, pod logs, or MinIO storage) grow over time and need resizable storage volumes with continuous monitoring capabilities to meet the growing storage demand. Because the Kubeflow control plane shares resources with Kubeflow data plane workloads (for example, for training jobs, pipelines, and deployments), right-sizing and scaling Kubernetes cluster and storage volumes can become challenging and result in increased operational cost.
- Kubernetes restricts the log file size, with most installations keeping the most recent limit of 10 MB. By default, the pod logs become inaccessible after they reach this upper limit. The logs could also become inaccessible if pods are evicted, crashed, deleted, or scheduled on a different node, which could impact your application log availability and monitoring capabilities.
Kubeflow on AWS
Kubeflow on AWS provides a clear path to use Kubeflow, with the following AWS services:
These AWS service integrations with Kubeflow (as shown in the following diagram) allow us to decouple critical parts of the Kubeflow control plane from Kubernetes, providing a secure, scalable, resilient, and cost-optimized design.
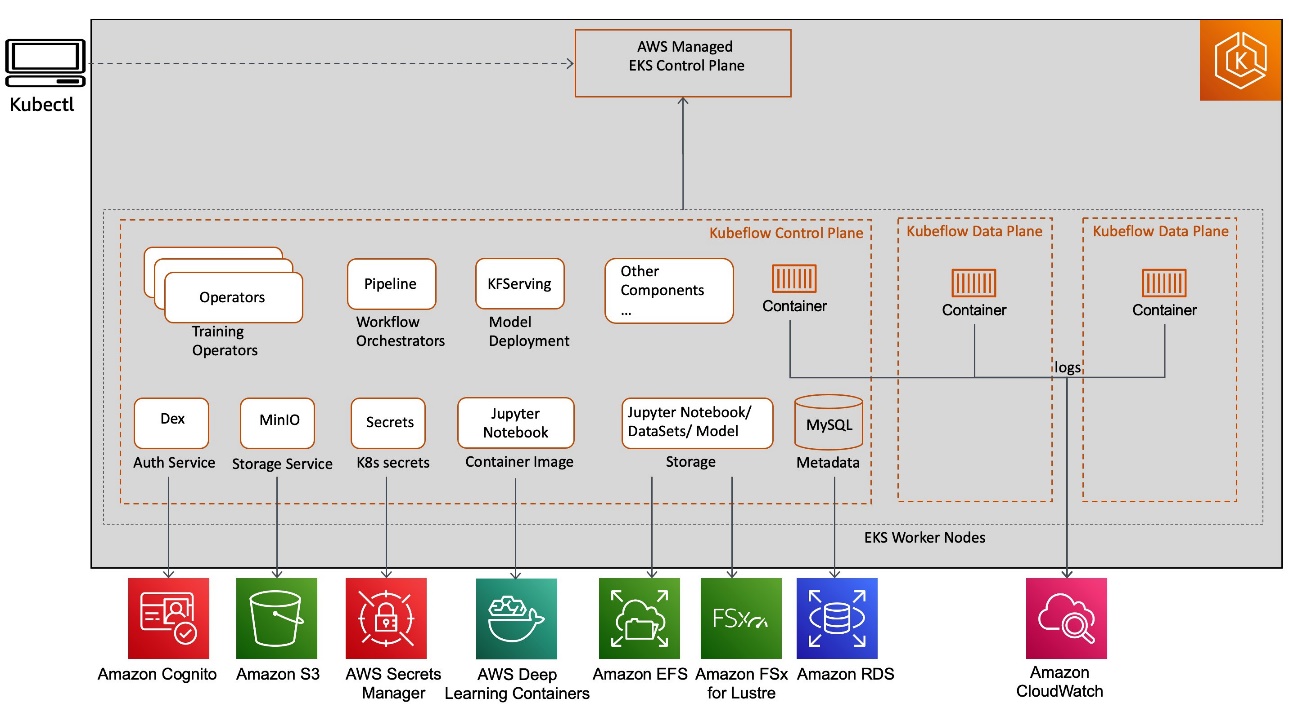
Let’s discuss the benefits of each service integration and their solutions around security, running ML pipelines, and storage.
Secure authentication of Kubeflow users with Amazon Cognito
Cloud security at AWS is the highest priority, and we’re investing in tightly integrating Kubeflow security directly into the AWS shared-responsibility security services, such as the following:
In this section, we focus on AWS Kubeflow control plane integration with Amazon Cognito. Amazon Cognito removes the need to manage and maintain a native Dex (open-source OpenID Connect (OIDC) provider backed by local LDAP) solution for user authentication and makes secret management easier.
You can also use Amazon Cognito to add user sign-up, sign-in, and access control to your Kubeflow UI quickly and easily. Amazon Cognito scales to millions of users and supports sign-in with social identity providers (IdPs), such as Facebook, Google, and Amazon, and enterprise IdPs via SAML 2.0. This reduces the complexity in your Kubeflow setup, making it operationally lean and easier to operate to achieve multi-user isolation.
Let’s look at a multi-user authentication flow with Amazon Cognito, ALB, and ACM integrations with Kubeflow on AWS. There are a number of key components as part of this integration. Amazon Cognito is configured as an IdP with an authentication callback configured to route the request to Kubeflow after user authentication. As part of the Kubeflow setup, a Kubernetes ingress resource is created to manage external traffic to the Istio Gateway service. The AWS ALB Ingress Controller provisions a load balancer for that ingress. We use Amazon Route 53 to configure a public DNS for the registered domain and create certificates using ACM to enable TLS authentication at the load balancer.
The following diagram shows the typical user workflow of logging in to Amazon Cognito and getting redirected to Kubeflow in their respective namespace.
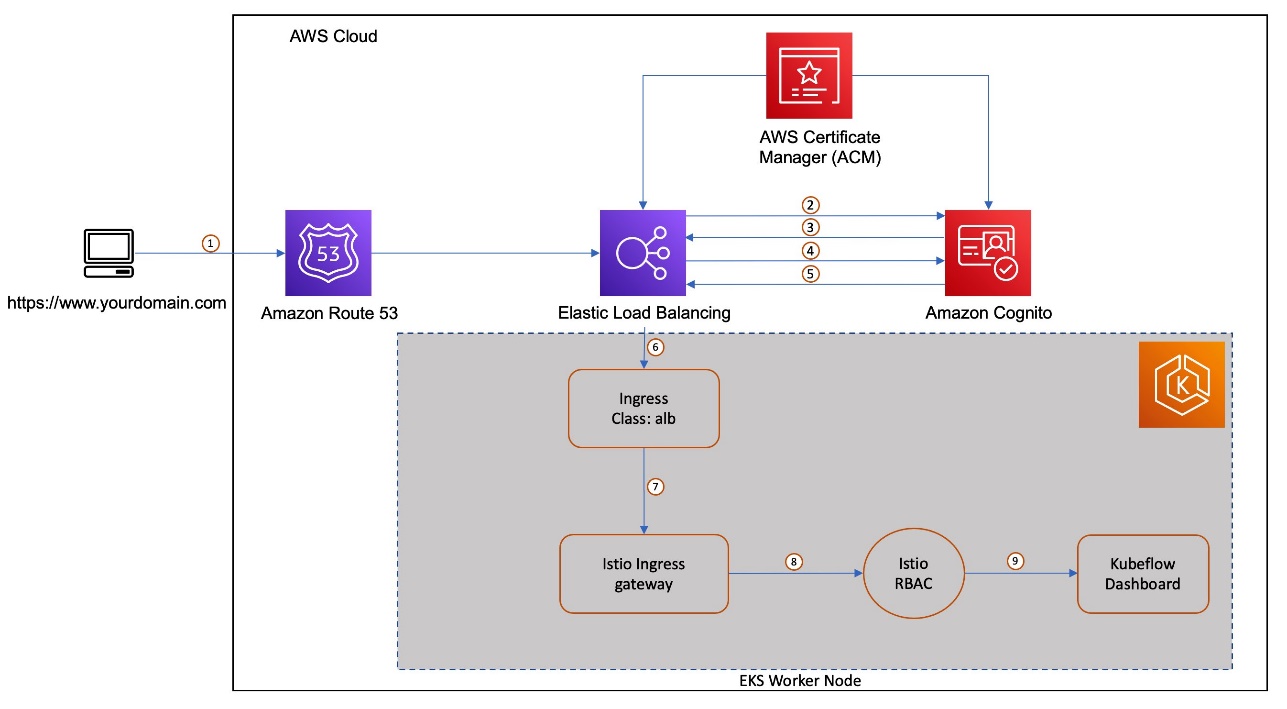
The workflow contains the following steps:
- The user sends an HTTPS request to the Kubeflow central dashboard hosted behind a load balancer. Route 53 resolves the FQDN to the ALB alias record.
- If the cookie isn’t present, the load balancer redirects the user to the Amazon Cognito authorization endpoint so that Amazon Cognito can authenticate the user.
- After the user is authenticated, Amazon Cognito sends the user back to the load balancer with an authorization grant code.
- The load balancer presents the authorization grant code to the Amazon Cognito token endpoint.
- Upon receiving a valid authorization grant code, Amazon Cognito provides the ID token and access token to load balancer.
- After your load balancer authenticates a user successfully, it sends the access token to the Amazon Cognito user info endpoint and receives user claims. The load balancer signs and adds user claims to the HTTP header
x-amzn-oidc-* in a JSON web token (JWT) request format.
- The request from the load balancer is sent to the Istio Ingress Gateway’s pod.
- Using an envoy filter, Istio Gateway decodes the
x-amzn-oidc-data value, retrieves the email field, and adds the custom HTTP header kubeflow-userid, which is used by the Kubeflow authorization layer.
- The Istio resource-based access control policies are applied to the incoming request to validate the access to the Kubeflow Dashboard. If either of those are inaccessible to the user, an error response is sent back. If the request is validated, it’s forwarded to the appropriate Kubeflow service and provides access to the Kubeflow Dashboard
Persisting Kubeflow component metadata and artifact storage with Amazon RDS and Amazon S3
Kubeflow on AWS provides integration with Amazon Relational Database Service (Amazon RDS) in Kubeflow Pipelines and AutoML (Katib) for persistent metadata storage, and Amazon S3 in Kubeflow Pipelines for persistent artifact storage. Let’s continue to discuss Kubeflow Pipelines in more detail.
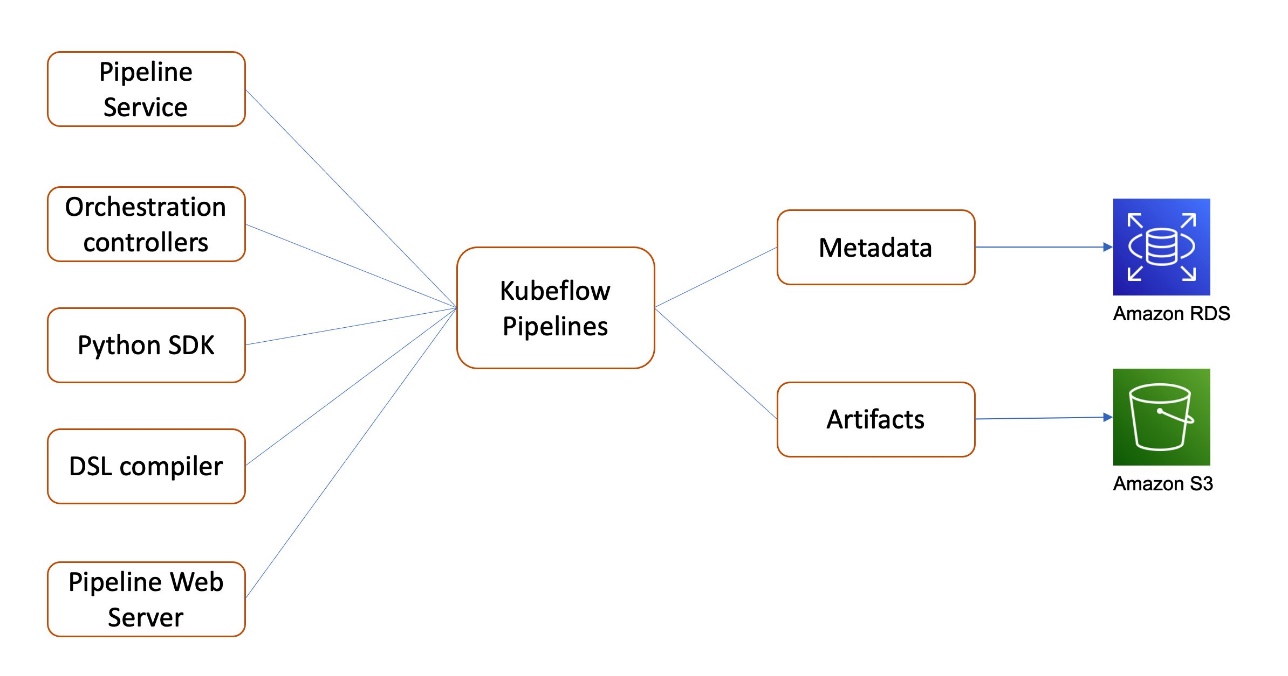
Kubeflow Pipelines is a platform for building and deploying portable, scalable ML workflows. These workflows can help automate complex ML pipelines using built-in and custom Kubeflow components. Kubeflow Pipelines includes Python SDK, a DSL compiler to convert Python code into a static config, a Pipelines service that runs pipelines from the static configuration, and a set of controllers to run the containers within the Kubernetes Pods needed to complete the pipeline.
Kubeflow Pipelines metadata for pipeline experiments and runs are stored in MySQL, and artifacts including pipeline packages and metrics are stored in MinIO.
As shown in the following diagram, Kubeflow on AWS lets you store the following components with AWS managed services:
-
Pipeline metadata in Amazon RDS – Amazon RDS provides a scalable, highly available, and reliable Multi-AZ deployment architecture with a built-in automated failover mechanism and resizable capacity for an industry-standard relational database like MySQL. It manages common database administration tasks without needing to provision infrastructure or maintain software.
-
Pipeline artifacts in Amazon S3 – Amazon S3 offers industry-leading scalability, data availability, security, and performance, and could be used to meet your compliance requirements.
These integrations help offload the management and maintenance of the metadata and artifact storage from self-managed Kubeflow to AWS managed services, which is easier to set up, operate, and scale.
Support for distributed file systems with Amazon EFS and Amazon FSx
Kubeflow builds upon Kubernetes, which provides an infrastructure for large-scale, distributed data processing, including training and tuning large models with a deep network with millions or even billions of parameters. To support such distributed data processing ML systems, Kubeflow on AWS provides integration with the following storage services:
-
Amazon EFS – A high-performance, cloud-native, distributed file system, which you could manage through an Amazon EFS CSI driver. Amazon EFS provides
ReadWriteMany access mode, and you can now use it to mount into pods (Jupyter, model training, model tuning) running in a Kubeflow data plane to provide a persistent, scalable, and shareable workspace that automatically grows and shrinks as you add and remove files with no need for management.
-
Amazon FSx for Lustre – An optimized file system for compute-intensive workloads, such as high-performance computing and ML, that you can manage through the Amazon FSx CSI driver. FSx for Lustre provides
ReadWriteMany access mode as well, and you can use it to cache training data with direct connectivity to Amazon S3 as the backing store, which you can use to support Jupyter notebook servers or distributed training running in a Kubeflow data plane. With this configuration, you don’t need to transfer data to the file system before using the volume. FSx for Lustre provides consistent submillisecond latencies and high concurrency, and can scale to TB/s of throughput and millions of IOPS.
Kubeflow deployment options
AWS provides various Kubeflow deployment options:
- Deployment with Amazon Cognito
- Deployment with Amazon RDS and Amazon S3
- Deployment with Amazon Cognito, Amazon RDS, and Amazon S3
- Vanilla deployment
For details on service integration and available add-ons for each of these options, refer to Deployment Options. You can fit the option that best fits your use case.
In the following section, we walk through the steps to install AWS Kubeflow v1.4 distribution on Amazon EKS. Then we use the existing XGBoost pipeline example available on the Kubeflow central UI dashboard to demonstrate the integration and usage of AWS Kubeflow with Amazon Cognito, Amazon RDS, and Amazon S3, with Secrets Manager as an add-on.
Prerequisites
For this walkthrough, you should have the following prerequisites:
Install the following tools on the client machine used to access your Kubernetes cluster. You can use AWS Cloud9, a cloud-based integrated development environment (IDE) for the Kubernetes cluster setup.
Install Kubeflow on AWS
Configure kubectl so that you can connect to an Amazon EKS cluster:
# Copyright Amazon.com, Inc. or its affiliates. All Rights Reserved.
# SPDX-License-Identifier: MIT-0

# Set the cluster name, region where the cluster exists
export CLUSTER_NAME=<CLUSTER_NAME>
export CLUSTER_REGION=<CLUSTER_REGION>

aws eks update-kubeconfig --name $CLUSTER_NAME --region $CLUSTER_REGION
kubectl config current-context
Various controllers in Kubeflow deployment use IAM roles for service accounts (IRSA). An OIDC provider must exist for your cluster to use IRSA. Create an OIDC provider and associate it with for your Amazon EKS cluster by running the following command, if your cluster doesn’t already have one:
eksctl utils associate-iam-oidc-provider --cluster ${CLUSTER_NAME}
--region ${CLUSTER_REGION} --approve
Clone the AWS manifests repo and Kubeflow manifests repo, and checkout the respective release branches:
git clone https://github.com/awslabs/kubeflow-manifests.git
cd kubeflow-manifests
git checkout v1.4.1-aws-b1.0.0
git clone --branch v1.4.1 https://github.com/kubeflow/manifests.git upstream

export kubeflow_manifest_dir=$PWD
For more information about these versions, refer to Releases and Versioning.
Set up Amazon RDS, Amazon S3, and Secrets Manager
You create Amazon RDS and Amazon S3 resources before you deploy the Kubeflow manifests. We use automated Python scripts that take care of creating the S3 bucket, RDS database, and required secrets in Secrets Manager. It also edits the required configuration files for the Kubeflow pipeline and AutoML to be properly configured for the RDS database and S3 bucket during Kubeflow installation.
Create an IAM user with permissions to allow GetBucketLocation and read and write access to objects in an S3 bucket where you want to store the Kubeflow artifacts. Use the AWS_ACCESS_KEY_ID and AWS_SECRET_ACCESS_KEY of the IAM user in the following code:
cd ${kubeflow_manifest_dir}/tests/e2e/
export BUCKET_NAME=<S3_BUCKET_NAME>
export S3_ACCESS_KEY_ID=<YOUR_ACCESS_KEY_ID_FOR_S3>
export S3_SECRET_ACCESS_KEY=<YOUR_SECRET_ACCESS_KEY_FOR_S3>

#Install the dependencies for the script
pip install -r requirements.txt

#Replace YOUR_CLUSTER_REGION, YOUR_CLUSTER_NAME and YOUR_S3_BUCKET with your values.
PYTHONPATH=.. python utils/rds-s3/auto-rds-s3-setup.py --region ${CLUSTER_REGION} --cluster ${CLUSTER_NAME} --bucket ${BUCKET_NAME} --db_name kubeflow --db_root_user admin --db_root_password password --s3_aws_access_key_id ${S3_ACCESS_KEY_ID} --s3_aws_secret_access_key ${S3_SECRET_ACCESS_KEY}
Set up Amazon Cognito as the authentication provider
In this section, we create a custom domain in Route 53 and ALB to route external traffic to Kubeflow Istio Gateway. We use ACM to create a certificate to enable TLS authentication at ALB and Amazon Cognito to maintain the user pool and manage user authentication.
Substitute the following values in
${kubeflow_manifest_dir}/tests/e2e/utils/cognito_bootstrap/config.yaml:
-
route53.rootDomain.name – The registered domain. Let’s assume this domain is
example.com.
-
route53.rootDomain.hostedZoneId – If your domain is managed in Route53, enter the hosted zone ID found under the hosted zone details. Skip this step if your domain is managed by another domain provider.
-
route53.subDomain.name – The name of the subdomain where you want to host Kubeflow (for example,
platform.example.com). For more information about subdomains, refer to Deploying Kubeflow with AWS Cognito as IdP.
-
cluster.name – The cluster name and where Kubeflow is deployed.
-
cluster.region – The cluster Region where Kubeflow is deployed (for example,
us-west-2).
-
cognitoUserpool.name – The name of the Amazon Cognito user pool (for example,
kubeflow-users).
The config file looks something like the following code:
cognitoUserpool:
     name: kubeflow-users
 cluster:
     name: kube-eks-cluster
     region: us-west-2
 route53:
     rootDomain:
         hostedZoneId: XXXX
         name: example.com
     subDomain:
         name: platform.example.com
Run the script to create the resources:
cd ${kubeflow_manifest_dir}/tests/e2e/
PYTHONPATH=.. python utils/cognito_bootstrap/cognito_pre_deployment.py
The script updates the config.yaml file with the resource names, IDs, and ARNs it created. It looks something like the following code:
cognitoUserpool:
     ARN: arn:aws:cognito-idp:us-west-2:123456789012:userpool/us-west-2_yasI9dbxF
     appClientId: 5jmk7ljl2a74jk3n0a0fvj3l31
     domainAliasTarget: xxxxxxxxxx.cloudfront.net
     domain: auth.platform.example.com
     name: kubeflow-users
 kubeflow:
     alb:
         serviceAccount:
             name: alb-ingress-controller
             policyArn: arn:aws:iam::123456789012:policy/alb_ingress_controller_kube-eks-clusterxxx
 cluster:
     name: kube-eks-cluster
     region: us-west-2
 route53:
     rootDomain:
         certARN: arn:aws:acm:us-east-1:123456789012:certificate/9d8c4bbc-3b02-4a48-8c7d-d91441c6e5af
         hostedZoneId: XXXXX
         name: example.com
     subDomain:
         us-west-2-certARN: arn:aws:acm:us-west-2:123456789012:certificate/d1d7b641c238-4bc7-f525-b7bf-373cc726
         hostedZoneId: XXXXX
         name: platform.example.com
         us-east-1-certARN: arn:aws:acm:us-east-1:123456789012:certificate/373cc726-f525-4bc7-b7bf-d1d7b641c238
Build manifests and deploy Kubeflow
Deploy Kubeflow using the following command:
while ! kustomize build ${kubeflow_manifest_dir}/docs/deployment/cognito-rds-s3 | kubectl apply -f -; do echo "Retrying to apply resources"; sleep 10; done
Update the domain with the ALB address
The deployment creates an ingress-managed AWS application load balancer. We update the DNS entries for the subdomain in Route 53 with the DNS of the load balancer. Run the following command to check if the load balancer is provisioned (this takes around 3–5 minutes):
kubectl get ingress -n istio-system

NAME            CLASS    HOSTS   ADDRESS                                                                  PORTS   AGE
istio-ingress   <none>   *       ebde55ee-istiosystem-istio-2af2-1100502020.us-west-2.elb.amazonaws.com   80      15d
If the ADDRESS field is empty after a few minutes, check the logs of alb-ingress-controller. For instructions, refer to ALB fails to provision.
When the load balancer is provisioned, copy the DNS name of the load balancer and substitute the address for kubeflow.alb.dns in ${kubeflow_manifest_dir}/tests/e2e/utils/cognito_bootstrap/config.yaml. The Kubeflow section of the config file looks like the following code:
 kubeflow:
     alb:
         dns: ebde55ee-istiosystem-istio-2af2-1100502020.us-west-2.elb.amazonaws.com
         serviceAccount:
             name: alb-ingress-controller
             policyArn: arn:aws:iam::123456789012:policy/alb_ingress_controller_kube-eks-clusterxxx
Run the following script to update the DNS entries for the subdomain in Route 53 with the DNS of the provisioned load balancer:
cd ${kubeflow_manifest_dir}/tests/e2e/
PYTHONPATH=.. python utils/cognito_bootstrap/cognito_post_deployment.py
Troubleshooting
If you run into any issues during the installation, refer to the troubleshooting guide or start fresh by following the “Clean up” section in this blog.
Use case walkthrough
Now that we have completed installing the required Kubeflow components, let’s see them in action using one of the existing examples provided by Kubeflow Pipelines on the dashboard.
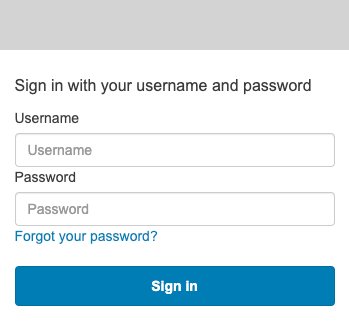
Access the Kubeflow Dashboard using Amazon Cognito
To get started, let’s get access to the Kubeflow Dashboard. Because we used Amazon Cognito as the IdP, use the information provided in the official README file. We first create some users on the Amazon Cognito console. These are the users who will log in to the central dashboard. Next, create a profile for the user you created. Then you should be able to access the dashboard through the login page at https://kubeflow.platform.example.com.
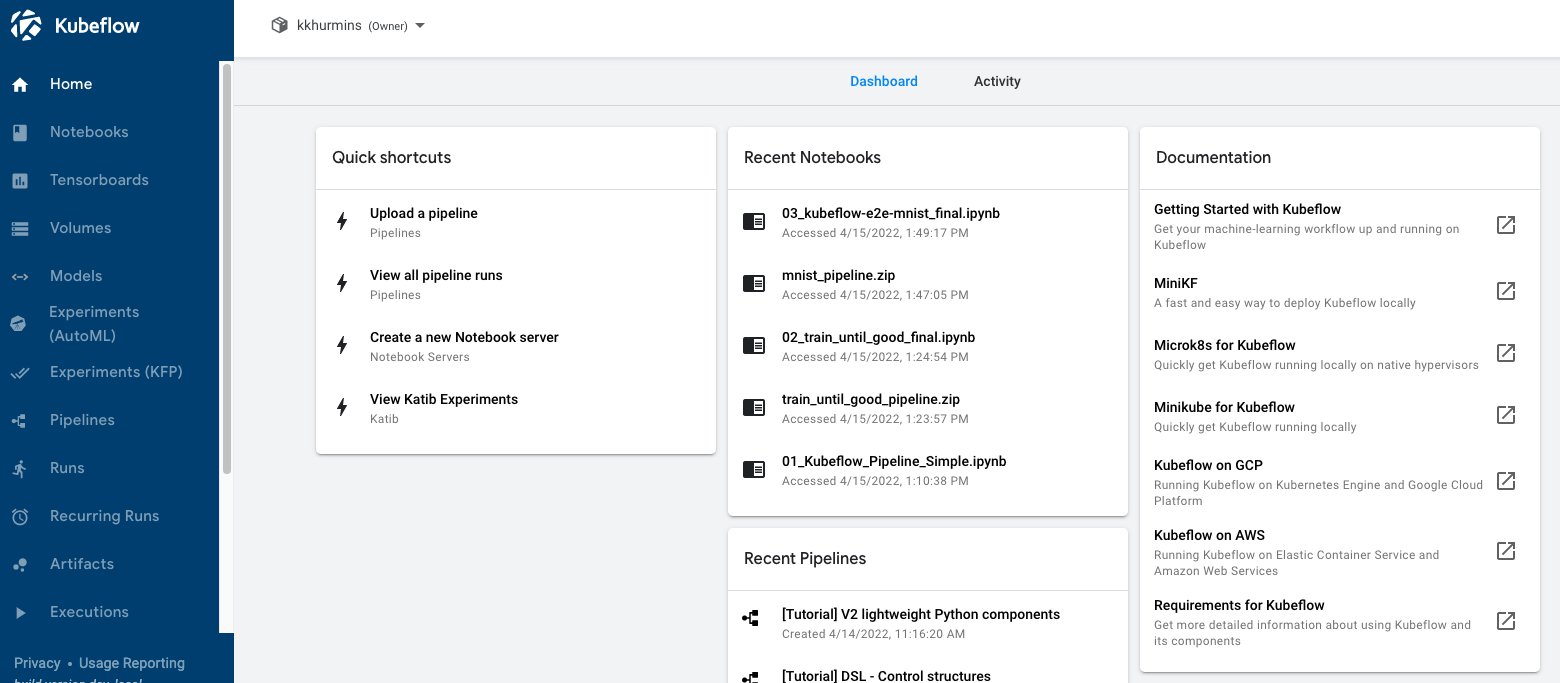
The following screenshot shows our Kubeflow Dashboard.
Run the pipeline
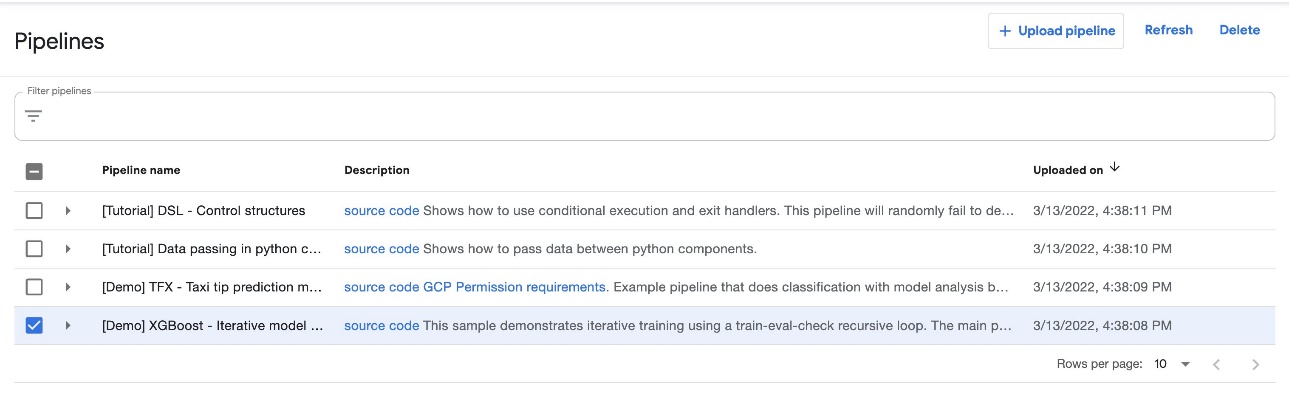
On the Kubeflow Dashboard, choose Pipelines in the navigation name. You should see four examples provided by Kubeflow Pipelines that you can run directly to explore various Pipelines features.
For this post, we use the XGBoost sample called [Demo] XGBoost – Iterative model training. You can find the source code on GitHub. This is a simple pipeline that uses the existing XGBoost/Train and XGBoost/Predict Kubeflow pipeline components to iteratively train a model until the metrics are considered good based on specified metrics.
To run the pipeline, complete the following steps:
- Select the pipeline and choose Create experiment.

- Under Experiment details, enter a name (for this post,
demo-blog) and optional description.
- Choose Next.

- Under Run details¸ choose your pipeline and pipeline version.
- For Run name, enter a name.
- For Experiment, choose the experiment you created.
- For Run type, select One-off.
- Choose Start.

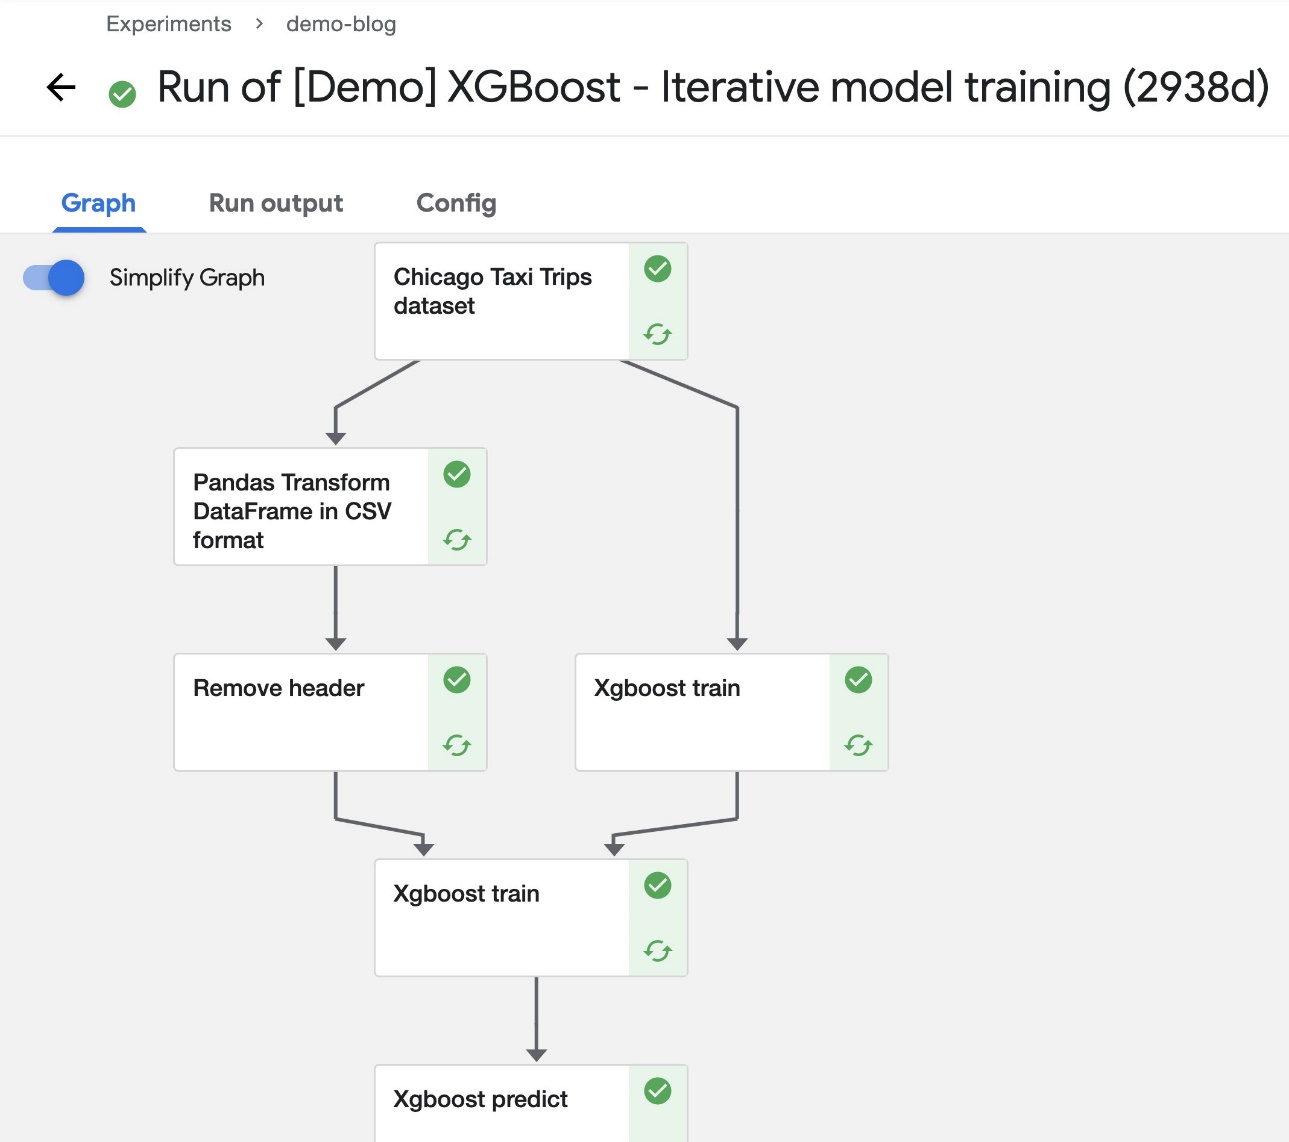
After the pipeline starts running, you should see components completing (within a few seconds). At this stage, you can choose any of the completed components to see more details.
Access the artifacts in Amazon S3
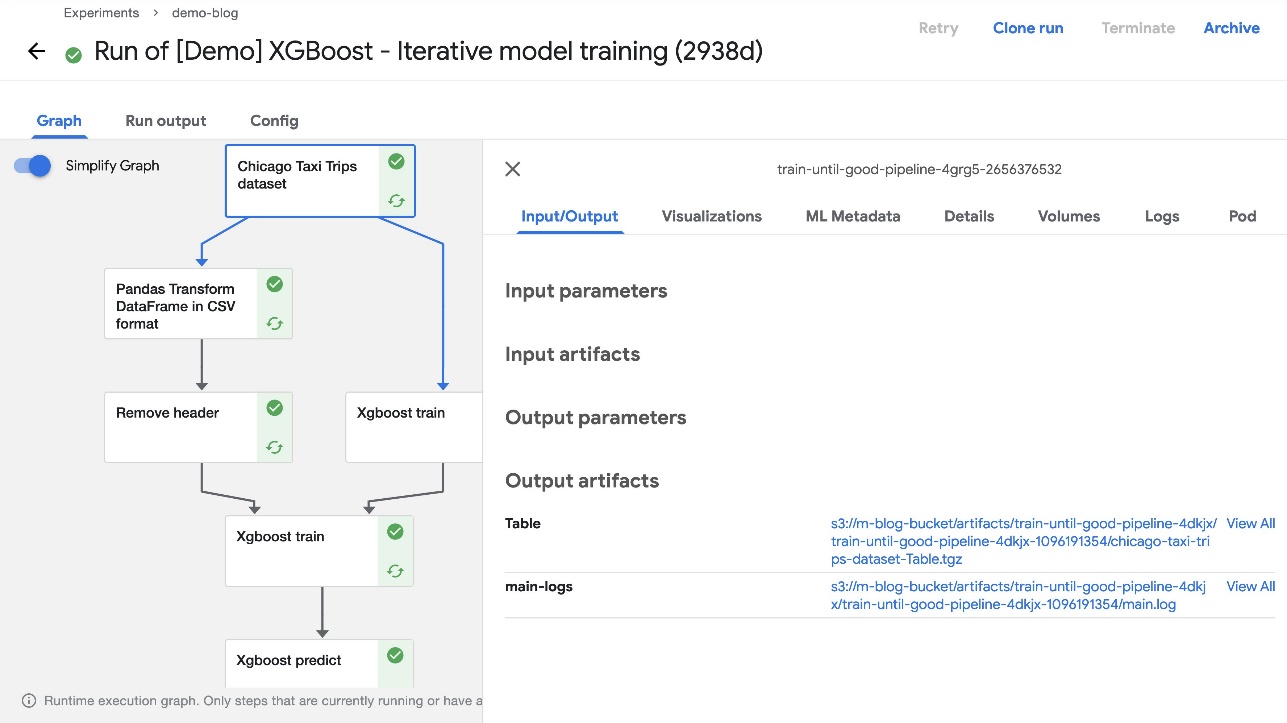
While deploying Kubeflow, we specified Kubeflow Pipelines should use Amazon S3 to store its artifacts. This includes all pipeline output artifacts, cached runs, and pipeline graphs—all of which can then be used for rich visualizations and performance evaluation.
When the pipeline run is complete, you should be able to see the artifacts in the S3 bucket you created during installation. To confirm this, choose any completed component of the pipeline and check the Input/Output section on the default Graph tab. The artifact URLs should point to the S3 bucket that you specified during deployment.
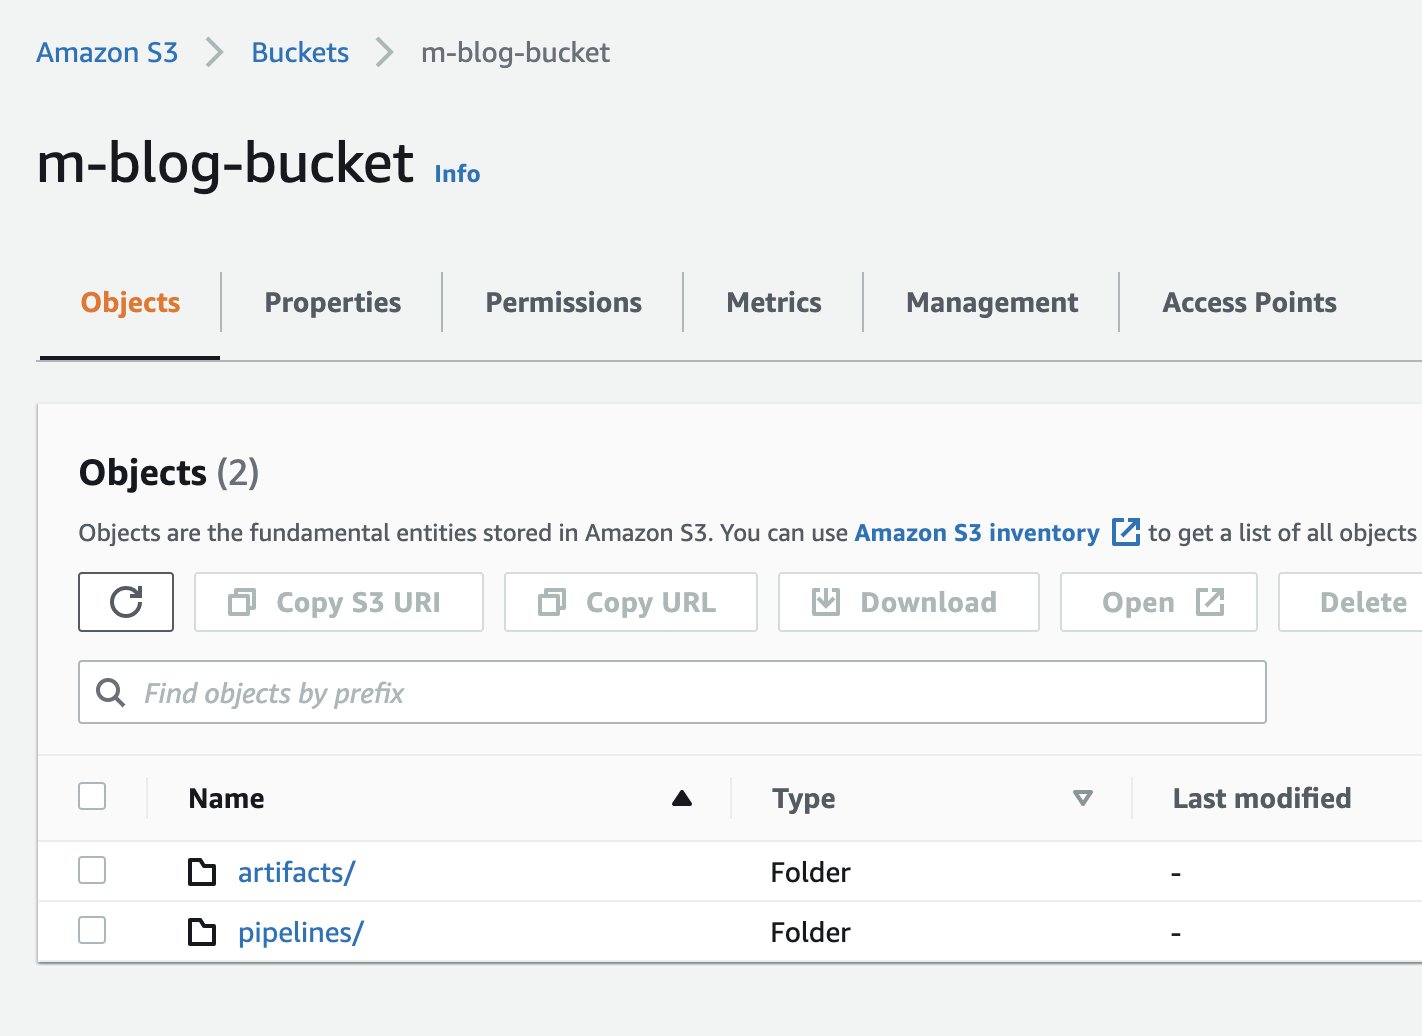
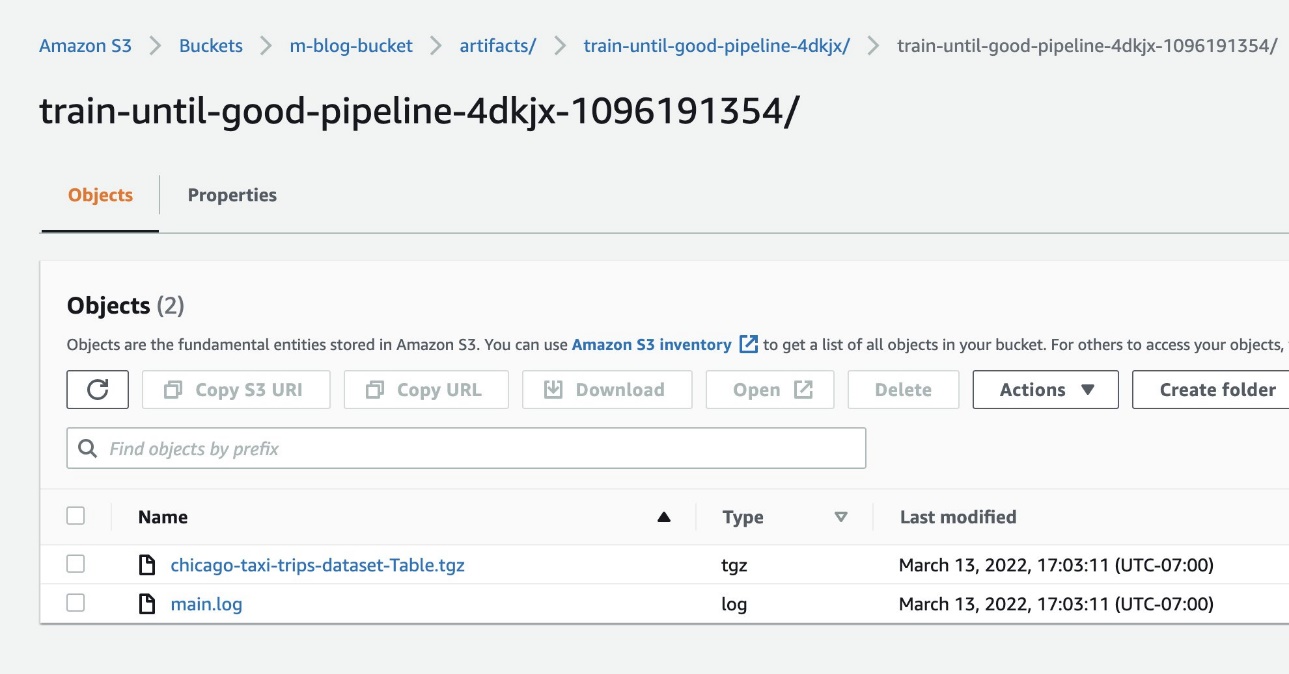
To confirm that the resources were added to Amazon S3, we can also check the S3 bucket in our AWS account via the Amazon S3 console.
The following screenshot shows our files.
Verify ML metadata in Amazon RDS
We also integrated Kubeflow Pipelines with Amazon RDS during deployment, which means that any pipeline metadata should be stored in Amazon RDS. This includes any runtime information such as the status of a task, availability of artifacts, custom properties associated with the run or artifacts, and more.
To verify the Amazon RDS integration, follow the steps provided in the official README file. Specifically, complete the following steps:
- Get the Amazon RDS user name and password from the secret that was created during the installation:
export CLUSTER_REGION=<region>

aws secretsmanager get-secret-value
    --region $CLUSTER_REGION
    --secret-id rds-secret
    --query 'SecretString'
    --output text
- Use these credentials to connect to Amazon RDS from within the cluster:
kubectl run -it --rm --image=mysql:5.7 --restart=Never mysql-client -- mysql -h <YOUR RDS ENDPOINT> -u admin -pKubefl0w
- When the MySQL prompt opens, we can verify the
mlpipelines database as follows:
mysql> use mlpipeline; show tables;

+----------------------+
| Tables_in_mlpipeline |
+----------------------+
| db_statuses          |
| default_experiments  |
| experiments          |
| jobs                 |
| pipeline_versions    |
| pipelines            |
| resource_references  |
| run_details          |
| run_metrics          |
+----------------------+
- Now we can read the content of specific tables, to make sure that we can see metadata information about the experiments that ran the pipelines:
mysql> select * from experiments;
+--------------------------------------+---------+-------------------------------------------------------------------------+----------------+---------------------------+------------------------+
| UUID                                 | Name    | Description                                                             | CreatedAtInSec | Namespace                 | StorageState           |
+--------------------------------------+---------+-------------------------------------------------------------------------+----------------+---------------------------+------------------------+
| 36ed05cf-e341-4ff4-917a-87c43be8afce | Default | All runs created without specifying an experiment will be grouped here. |     1647214692 |                           | STORAGESTATE_AVAILABLE |
| 7a1d6b85-4c97-40dd-988b-b3b91cf31545 | run-1   |                                                                         |     1647216152 | kubeflow-user-example-com | STORAGESTATE_AVAILABLE |
+--------------------------------------+---------+-------------------------------------------------------------------------+----------------+---------------------------+------------------------+
2 rows in set (0.00 sec)
Clean up
To uninstall Kubeflow and delete the AWS resources you created, complete the following steps:
- Delete the ingress and ingress-managed load balancer by running the following command:
kubectl delete ingress -n istio-system istio-ingress
- Delete the rest of the Kubeflow components:
kustomize build ${kubeflow_manifest_dir}/docs/deployment/cognito-rds-s3 | kubectl delete -f -
- Delete the AWS resources created by scripts:
- Resources created for Amazon RDS and Amazon S3 integration. Make sure you have the configuration file created by the script in
${kubeflow_manifest_dir}/tests/e2e/utils/rds-s3/metadata.yaml:
cd ${kubeflow_manifest_dir}/tests/e2e/
PYTHONPATH=.. python utils/rds-s3/auto-rds-s3-cleanup.py
- Resources created for Amazon Cognito integration. Make sure you have the configuration file created by the script in
${kubeflow_manifest_dir}/tests/e2e/utils/cognito_bootstrap/config.yaml:
cd ${kubeflow_manifest_dir}/tests/e2e/
PYTHONPATH=.. python utils/cognito_bootstrap/cognito_resources_cleanup.py
- If you created a dedicated Amazon EKS cluster for Kubeflow using eksctl, you can delete it with the following command:
eksctl delete cluster --region $CLUSTER_REGION --name $CLUSTER_NAME
Summary
In this post, we highlighted the value that Kubeflow on AWS provides through native AWS-managed service integrations for secure, scalable, and enterprise-ready AI and ML workloads. You can choose from several deployment options to install Kubeflow on AWS with various service integrations. The use case in this post demonstrated Kubeflow integration with Amazon Cognito, Secrets Manager, Amazon RDS, and Amazon S3. To get started with Kubeflow on AWS, refer to the available AWS-integrated deployment options in Kubeflow on AWS.
Starting with v1.3, you can follow the AWS Labs repository to track all AWS contributions to Kubeflow. You can also find us on the Kubeflow #AWS Slack Channel; your feedback there will help us prioritize the next features to contribute to the Kubeflow project.
About the Authors
 Kanwaljit Khurmi is an AI/ML Specialist Solutions Architect at Amazon Web Services. He works with the AWS product, engineering and customers to provide guidance and technical assistance helping them improve the value of their hybrid ML solutions when using AWS. Kanwaljit specializes in helping customers with containerized and machine learning applications.
 Meghna Baijal is a Software Engineer with AWS AI making it easier for users to onboard their Machine Learning workloads onto AWS by building ML products and platforms such as the Deep Learning Containers, the Deep Learning AMIs, the AWS Controllers for Kubernetes (ACK) and Kubeflow on AWS. Outside of work she enjoys reading, traveling and dabbling in painting.
 Suraj Kota is a Software Engineer specialized in Machine Learning infrastructure. He builds tools to easily get started and scale machine learning workload on AWS. He worked on the AWS Deep Learning Containers, Deep Learning AMI, SageMaker Operators for Kubernetes, and other open source integrations like Kubeflow.
Read More


 Prathyusha Cheruku is an AI/ML Computer Vision Principal Product Manager at AWS. She focuses on building powerful, easy-to-use, no-code/low-code deep learning-based image and video analysis services for AWS customers. Outside of work, she has a passion for music, karaoke, painting, and traveling.


 Sharon Dahan is a Software & Cloud Architect at Moovit. He is responsible for bringing innovative and creative solutions which can stand within Moovit’s tremendous scale. In his spare time, Sharon makes tasty hoppy beer.
 Miron Perel is a Senior Machine Learning Business Development Manager with Amazon Web Services. Miron helps enterprise organizations harness the power of data and Machine Learning to innovate and grow their business.
 Eitan Sela is a Machine Learning Specialist Solutions Architect with Amazon Web Services. He works with AWS customers to provide guidance and technical assistance, helping them build and operate machine learning solutions on AWS. In his spare time, Eitan enjoys jogging and reading the latest machine learning articles.