Customers need machine learning (ML) models to detect objects that are interesting for their business. In most cases doing so is hard as these models needs thousands of labelled images and deep learning expertise. Generating this data can take months to gather, and can require large teams of labelers to prepare it for use. In addition, setting up a workflow for auditing or reviewing model predictions to validate adherence to your requirements can further add to the overall complexity.
With Amazon Rekognition Custom Labels, which is built on the existing capabilities of Amazon Rekognition, you can identify the objects and scenes in images that are specific to your business needs. For example, you can find your logo in social media posts, identify your products on store shelves, classify machine parts in an assembly line, distinguish healthy and infected plants, or detect animated characters in videos.
But what if the custom label model you trained can’t recognize images with a high level of confidence, or you need your team of experts to validate the results from your model during the testing phase or review the results in production? You can easily send predictions from Amazon Rekognition Custom Labels to Amazon Augmented AI (Amazon A2I). Amazon A2I makes it easy to integrate a human review into your ML workflow. This allows you to automatically have humans step into your ML pipeline to review results below a confidence threshold, set up review and auditing workflows, and augment the prediction results to improve model accuracy.
In this post, we show you to how to build a custom object detection model trained to detect pepperoni slices in a pizza using Amazon Rekognition Custom Labels with a dataset labeled using Amazon SageMaker Ground Truth. We then show how to create your own private workforce and set up an Amazon A2I workflow definition to conditionally trigger human loops for review and augmenting tasks. You can use the annotations created by Amazon A2I for model retraining.
We walk you through the following steps using the accompanying Amazon SageMaker Jupyter Notebook:
- Complete prerequisites.
- Create an Amazon Rekognition custom model.
- Set up an Amazon A2I workflow and send predictions to an Amazon A2I human loop.
- Evaluate results and retrain the model.
Prerequisites
Before getting started, set up your Amazon SageMaker notebook. Follow the steps in the accompanying Amazon SageMaker Jupyter Notebook to create your human workforce and download the datasets.
- Create a notebook instance in Amazon SageMaker.
Make sure your Amazon SageMaker notebook has the necessary AWS Identity and Access Management (IAM) roles and permissions mentioned in the prerequisite section of the notebook.
- When the notebook is active, choose Open Jupyter.
- On the Jupyter dashboard, choose New, and choose Terminal.
- In the terminal, enter the following code:
cd SageMaker
git clone https://github.com/aws-samples/amazon-a2i-sample-jupyter-notebooks
- Open the notebook by choosing Amazon-A2I-Rekognition-Custom-Label.ipynb in the root folder.
For this post, you create a private work team and add one user (you) to it.
- Create your human workforce by following the appropriate section of the notebook.
Alternatively, you can create your private workforce using Amazon Cognito. For instructions, see Create an Amazon Cognito Workforce Using the Labeling Workforces Page.
- After you create the private workforce, find the workforce ARN and enter the ARN in step 4 of the notebook.
The dataset is composed of 12 images for training that contain pepperoni pizza in the data/images folder and 3 images for testing in the data/testimages folder. We sourced our images from pexels.com. We labeled this dataset for this post using Ground Truth custom labeling workflows. A Ground Truth labeled manifest template is available in data/manifest.
- Download the dataset.
- Run the notebook steps Download the Amazon SageMaker GroundTruth object detection manifest to Amazon S3 to process and upload the manifest in your Amazon Simple Storage Service (Amazon S3) bucket.
Creating an Amazon Rekognition custom model
To create our custom model, we follow these steps:
- Create a project in Amazon Rekognition Custom Labels.
- Create a dataset with images containing one or more pizzas and label them by applying bounding boxes.
Because we already have a dataset labeled using Ground Truth, we just point to that labeled dataset in this step. Alternatively, you can label the images using the user interface provided by Amazon Rekognition Custom Labels.
- Train the model.
- Evaluate the model’s performance.
- Test the deployed model using a sample image.
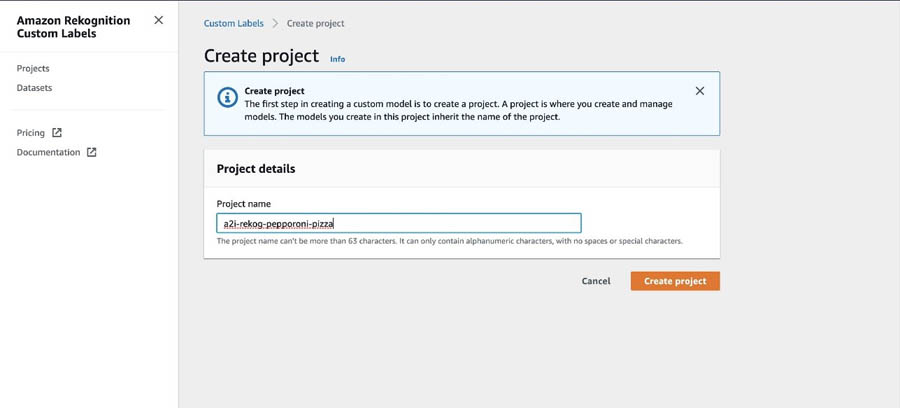
Creating a project
In this step, we create a project to detect peperoni pizza slices. For instructions on creating a project, see Creating an Amazon Rekognition Custom Labels Project.
- On the Amazon Rekognition console, choose Custom Labels.
- Choose Get started.
- For Project name, enter
a2i-rekog-pepperoni-pizza.
- Choose Create project.
Creating a dataset
To create your dataset, complete the following steps:
- On the Amazon Rekognition Custom Labels console, choose Datasets.
- Choose Create dataset.
- For Dataset name, enter
rekog-a2i-pizza-dataset.
- Select Import images labeled by Amazon SageMaker Ground Truth.
- For .manifest file location, enter the S3 bucket location of your .manifest file.
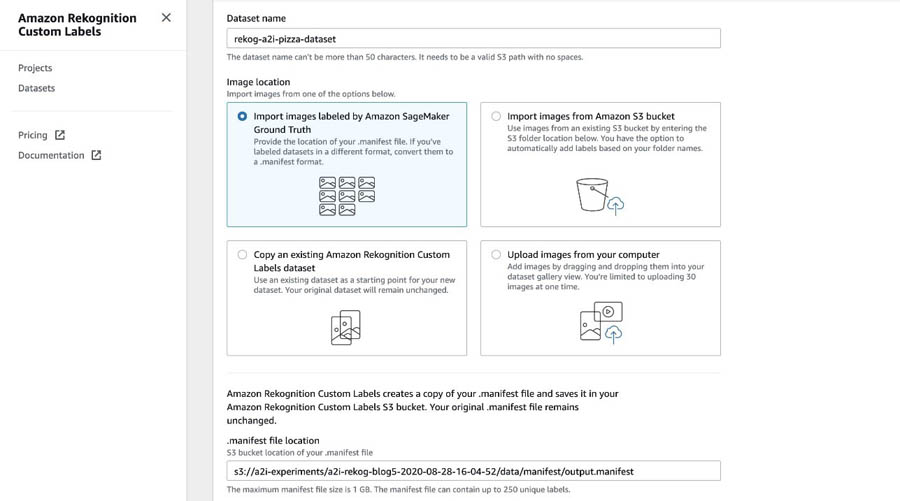
- Choose Submit.
You should get a prompt to provide the S3 bucket policy when you provide the S3 path. For more information about these steps, see SageMaker Ground Truth.
After you create the dataset, you should see the images with the bounding boxes and labels, as in the following screenshot.

Make sure to upload the images for our dataset (that you downloaded in the Prerequisites section) to the console S3 bucket for Amazon Rekognition Custom Labels.
Training an Amazon Rekognition custom model
You’re now ready to train your model.
- On the Amazon Rekognition console, choose Train model.
- For Choose project, choose your newly created project.
- For Choose training dataset, choose your newly created dataset.
- Select Split training dataset.
- Choose Train.
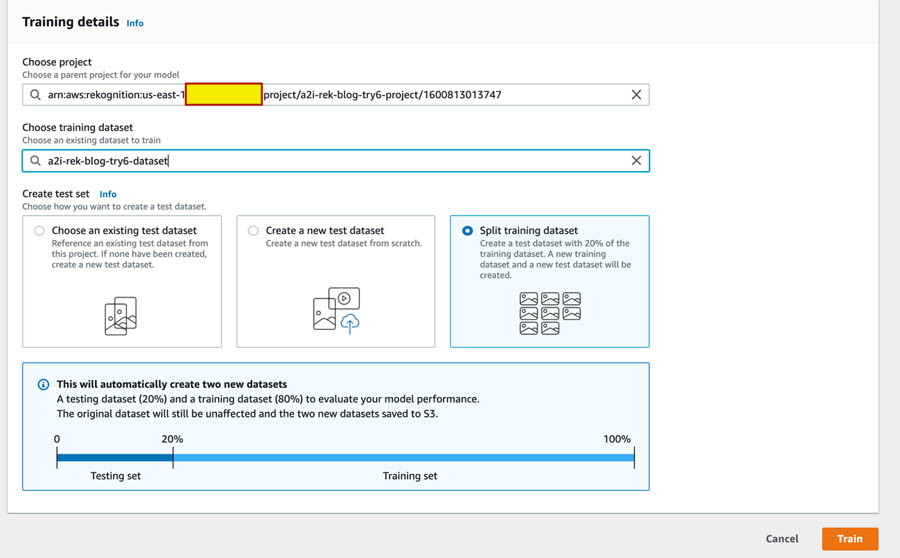
The training takes approximately 45 minutes to complete.
Checking training status
Run the following notebook cell to get information about the project you created using the describe-projects API:
!aws rekognition describe-projects
Use the accompanying Amazon SageMaker Jupyter notebook to follow the steps in this post.
To get the project ARN using the describe-project versions API, run the following cell:
#Replace the project-arn below with the project-arn of your project from the describe-projects output above
!aws rekognition describe-project-versions —project-arn "<project-arn>"
Enter the ARN in <project-version-arn-of-your-model> in the following code and run this cell to start running of the version of a model using the start-project-version API:
# Copy/paste the ProjectVersionArn for your model from the describe-project-versions cell output above to the --project-version-arn parameter here
!aws rekognition start-project-version
--project-version-arn <project-version-arn-of-your-model>
--min-inference-units 1
--region us-east-1
Evaluating performance
When training is complete, you can evaluate the performance of the model. To help you, Amazon Rekognition Custom Labels provides summary metrics and evaluation metrics for each label. For information about the available metrics, see Metrics for Evaluating Your Model. To improve your model using metrics, see Improving an Amazon Rekognition Custom Labels Model.
The following screenshot shows our evaluation results and label performance.
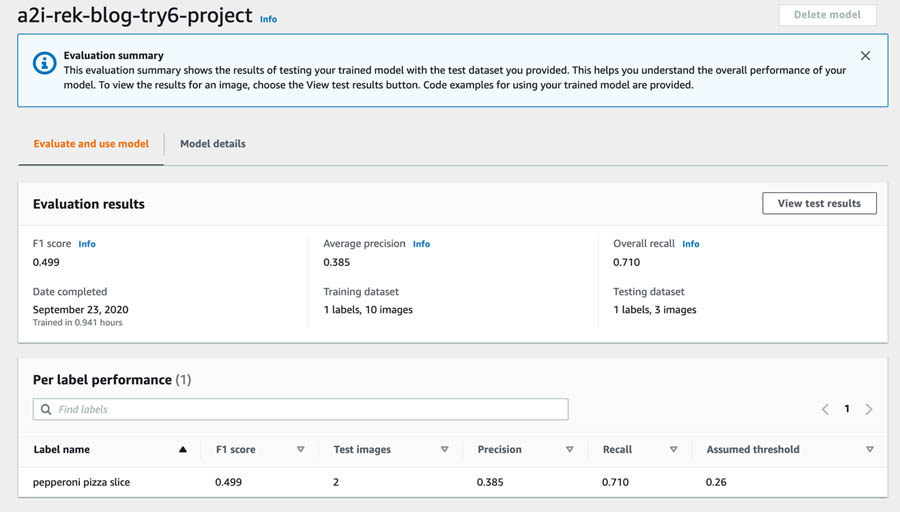
Custom Labels determines the assumed threshold for each label based on maximum precision and recall achieved. Your model defaults to returning predictions above that threshold. You can reset this when you start your model. For information about adjusting your assumed threshold (such as looking at predictions either below or above your assumed threshold) and optimizing the model for your use case, see Training a custom single class object detection model with Amazon Rekognition Custom Labels.
For a demonstration of the Amazon Rekognition Custom Labels solution, see Custom Labels Demonstration. The demo shows you how you can analyze an image from your local computer.
Testing the deployed model
Run following notebook cell to load the test image. Use the accompanying Amazon SageMaker Jupyter Notebook to follow the steps in this post.
from PIL import Image, ImageDraw, ExifTags, ImageColor, ImageFont
image=Image.open('./data/images/pexels_brett_jordan_825661__1_.jpg')
display(image)
Enter the project version model ARN from previous notebook step aws rekognition start-project-version and run the following cell to analyze the response from the detect_custom_labels API:
model_arn = '<project-version-arn-of-your-model>'
min_confidence=40
#Call DetectCustomLabels
response = client.detect_custom_labels(Image={'S3Object': {'Bucket': BUCKET, 'Name': PREFIX + test_photo}},
MinConfidence=min_confidence,
ProjectVersionArn=model_arn)
Run the next cell in the notebook to display results (see the following screenshot).
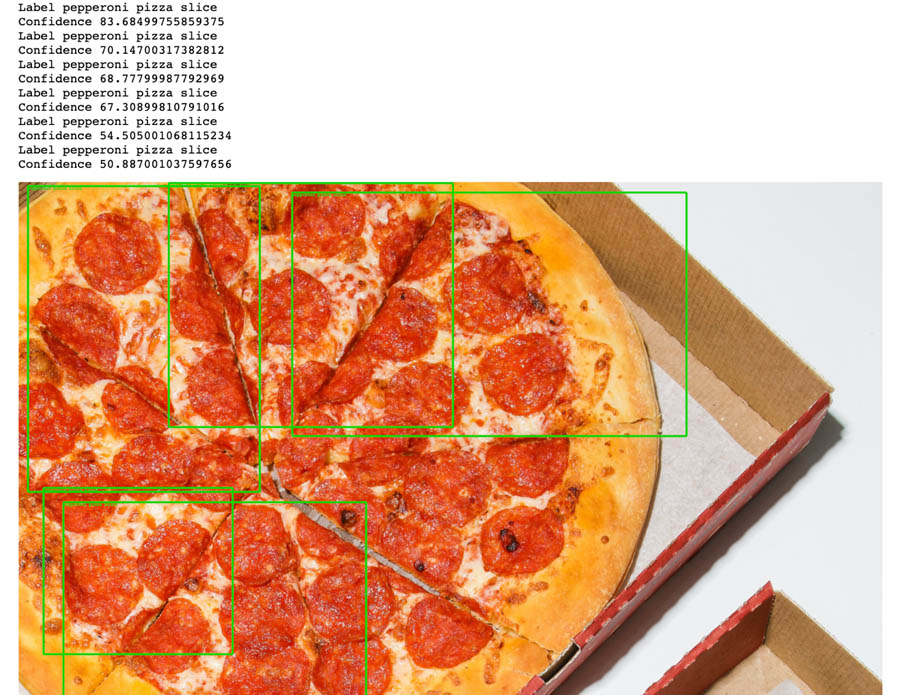
The model detected the pepperoni pizza slices in our test image and drew bounding boxes. We can use Amazon A2I to send the prediction results from our model to a human loop consisting of our private workforce to review and audit the results.
Setting up an Amazon A2I human loop
In this section, you set up a human review loop for low-confidence detection in Amazon A2I. It includes the following steps:
- Create a human task UI.
- Create a worker task template and workflowflow definition.
- Send predictions to Amazon A2I human loops.
- Check the human loop status.
Use the accompanying Amazon SageMaker Jupyter notebook to follow the steps in this post.
Creating a human task UI
Create a human task UI resource with a UI template in liquid HTML. This template is used whenever a human loop is required.
For this post, we take an object detection UI and fill in the object categories in the labels variable in the template. Run the following template to create the human task AI for object detection:
def create_task_ui():
    '''
    Creates a Human Task UI resource.

    Returns:
    struct: HumanTaskUiArn
    '''
    response = sagemaker_client.create_human_task_ui(
        HumanTaskUiName=taskUIName,
        UiTemplate={'Content': template})
    return response
# Create task UI
humanTaskUiResponse = create_task_ui()
humanTaskUiArn = humanTaskUiResponse['HumanTaskUiArn']
print(humanTaskUiArn)
For over 70 pre-built UIs, see the Amazon Augmented AI Sample Task UIs GitHub repo.
Creating a worker task template and workflow definition
Workflow definitions allow you to specify the following:
- The workforce that your tasks are sent to
- The instructions that your workforce receives
This post uses the following API to create a workflow definition:
create_workflow_definition_response = sagemaker.create_flow_definition(
        FlowDefinitionName= flowDefinitionName,
        RoleArn= ROLE,
        HumanLoopConfig= {
            "WorkteamArn": WORKTEAM_ARN,
            "HumanTaskUiArn": humanTaskUiArn,
            "TaskCount": 1,
            "TaskDescription": "Identify custom labels in the image",
            "TaskTitle": "Identify custom image"
        },
        OutputConfig={
            "S3OutputPath" : OUTPUT_PATH
        }
    )
flowDefinitionArn = create_workflow_definition_response['FlowDefinitionArn'] # let's save this ARN for future use
Optionally, you can create this workflow definition on the Amazon A2I console. For instructions, see Create a Human Review Workflow.
Sending predictions to Amazon A2I human loops
We now loop through our test images and invoke the trained model endpoint to detect the custom label pepperoni pizza slice using the detect_custom_labels API. If the confidence score is less than 60% for the detected labels in our test dataset, we send that data for human review and start the human review A2I loop with the start-human-loop API. When using Amazon A2I for a custom task, a human loops starts when StartHumanLoop is called in your application. Use the accompanying Amazon SageMaker Jupyter notebook to follow the steps in this post.
You can change the value of the SCORE_THRESHOLD based on what confidence level you want to trigger the human review. See the following code:
import uuid

human_loops_started = []
SCORE_THRESHOLD = 60

folderpath = r"data/testimages" # make sure to put the 'r' in front and provide the folder where your files are
filepaths  = [os.path.join(folderpath, name) for name in os.listdir(folderpath) if not name.startswith('.')] # do not select hidden directories
for path in filepaths:
    # Call custom label endpoint and not display any object detected with probability lower than 0.01
    response = client.detect_custom_labels(Image={'S3Object': {'Bucket': BUCKET, 'Name': PREFIX+'/'+path}},
        MinConfidence=20,
        ProjectVersionArn=model_arn)

    #Get the custom labels
    labels=response['CustomLabels']
    if labels and labels[0]['Confidence'] < SCORE_THRESHOLD:
        s3_fname='s3://%s/%s' % (BUCKET, PREFIX+'/'+path)
        print("Images with labels less than 60% confidence score: " + s3_fname)
        humanLoopName = str(uuid.uuid4())
        inputContent = {
            "initialValue": 'null',
            "taskObject": s3_fname
        }
        start_loop_response = a2i.start_human_loop(
            HumanLoopName=humanLoopName,
            FlowDefinitionArn=flowDefinitionArn,
            HumanLoopInput={
                "InputContent": json.dumps(inputContent)
            }
        )
        human_loops_started.append(humanLoopName)
        print(f'Starting human loop with name: {humanLoopName}  n')
The following screenshot shows the output.

Checking the status of human loop
Run the steps in the notebook to check the status of the human loop. You can use the accompanying Amazon SageMaker Jupyter notebook to follow the steps in this post.
- Run the following notebook cell to get a login link to navigate to the private workforce portal:
workteamName = WORKTEAM_ARN[WORKTEAM_ARN.rfind('/') + 1:]
print("Navigate to the private worker portal and do the tasks. Make sure you've invited yourself to your workteam!")
print('https://' + sagemaker_client.describe_workteam(WorkteamName=workteamName)['Workteam']['SubDomain'])
- Choose the login link to the private worker portal.
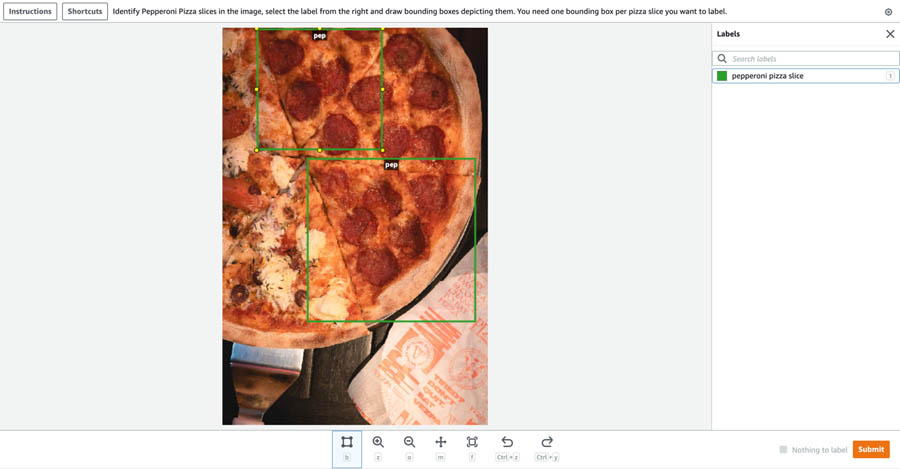
After you log in, you can start working on the task assigned.
- Draw bounding boxes with respect to the label as required and choose Submit.
- To check if the workers have completed the labeling task, enter the following code:
completed_human_loops = []
for human_loop_name in human_loops_started:
    resp = a2i.describe_human_loop(HumanLoopName=human_loop_name)
    print(f'HumanLoop Name: {human_loop_name}')
    print(f'HumanLoop Status: {resp["HumanLoopStatus"]}')
    print(f'HumanLoop Output Destination: {resp["HumanLoopOutput"]}')
    print('n')

    if resp["HumanLoopStatus"] == "Completed":
        completed_human_loops.append(resp)
The following screenshot shows the output.

Evaluating the results and retraining your model
When the labeling work is complete, your results should be available in the Amazon S3 output path specified in the human review workflow definition. The human answer, label, and bounding box are returned and saved in the JSON file. Run the notebook cell to get the results from Amazon S3. The following screenshot shows the Amazon A2I annotation output JSON file.

Because we created our training set using Ground Truth, it’s in the form of an output.manifest file in the data/manifest folder. We need to do the following:
- Convert the Amazon A2I labeled JSON output to a .manifest file for retraining.
- Merge the
output.manifest file with the existing training dataset .manifest file in data/manifest.
- Train the new model using the augmented file.
Converting the JSON output to an augmented .manifest file
You can loop through all the Amazon A2I output, convert the JSON file, and concatenate them into a JSON Lines file, in which each line represents the results of one image. Run the following code in the Amazon SageMaker Jupyter notebook to convert the Amazon A2I results into an augmented manifest:
object_categories = ['pepperoni pizza slice'] # if you have more labels, add them here
object_categories_dict = {str(i): j for i, j in enumerate(object_categories)}

dsname = 'pepperoni_pizza'

def convert_a2i_to_augmented_manifest(a2i_output):
    annotations = []
    confidence = []
    for i, bbox in enumerate(a2i_output['humanAnswers'][0]['answerContent']['annotatedResult']['boundingBoxes']):
        object_class_key = [key for (key, value) in object_categories_dict.items() if value == bbox['label']][0]
        obj = {'class_id': int(object_class_key),
               'width': bbox['width'],
               'top': bbox['top'],
               'height': bbox['height'],
               'left': bbox['left']}
        annotations.append(obj)
        confidence.append({'confidence': 1})

    # Change the attribute name to the dataset-name_BB for this dataset. This will later be used in setting the training data
    augmented_manifest={'source-ref': a2i_output['inputContent']['taskObject'],
                        dsname+'_BB': {'annotations': annotations,
                                           'image_size': [{'width': a2i_output['humanAnswers'][0]['answerContent']['annotatedResult']['inputImageProperties']['width'],
                                                           'depth':3,
                                                           'height': a2i_output['humanAnswers'][0]['answerContent']['annotatedResult']['inputImageProperties']['height']}]},
                        dsname+'_BB-metadata': {'job-name': 'a2i/%s' % a2i_output['humanLoopName'],
                                                    'class-map': object_categories_dict,
                                                    'human-annotated':'yes',
                                                    'objects': confidence,
                                                    'creation-date': a2i_output['humanAnswers'][0]['submissionTime'],
                                                    'type':'groundtruth/object-detection'}}
    return augmented_manifest
Merging the augmented manifest with the existing training manifest
You now need to merge the output.manifest file, which consists of the existing training dataset manifest in data/manifest, with the Amazon A2I augmented .manifest file you generated from the JSON output.
Run the following notebook cell in the Amazon SageMaker Jupyter notebook to generate this file for training a new model:
f4 = open('./augmented-temp.manifest', 'r')
with open('augmented.manifest', 'w') as outfl:
    for lin1 in f4:
        z_json = json.loads(lin1)
        done_json = json.loads(lin1)
        done_json['source-ref'] = 'a'
        f3 = open('./data/manifest/output.manifest', 'r')
        for lin2 in f3:
            x_json = json.loads(lin2)
            if z_json['source-ref'] == x_json['source-ref']:
                print("replacing the annotations")
                x_json[dsname+'_BB'] = z_json[dsname+'_BB']
                x_json[dsname+'_BB-metadata'] = z_json[dsname+'_BB-metadata']
            elif done_json['source-ref'] != z_json['source-ref']:
                print("This is a net new annotation to augmented file")
                json.dump(z_json, outfl)
                outfl.write('n')
                print(str(z_json))
                done_json = z_json
            json.dump(x_json, outfl)
            outfl.write('n')
        f3.close()
f4.close()
Training a new model
To train a new model with the augmented manifest, enter the following code:
# upload the manifest file to S3
s3r.meta.client.upload_file('./augmented.manifest', BUCKET, PREFIX+'/'+'data/manifest/augmented.manifest')
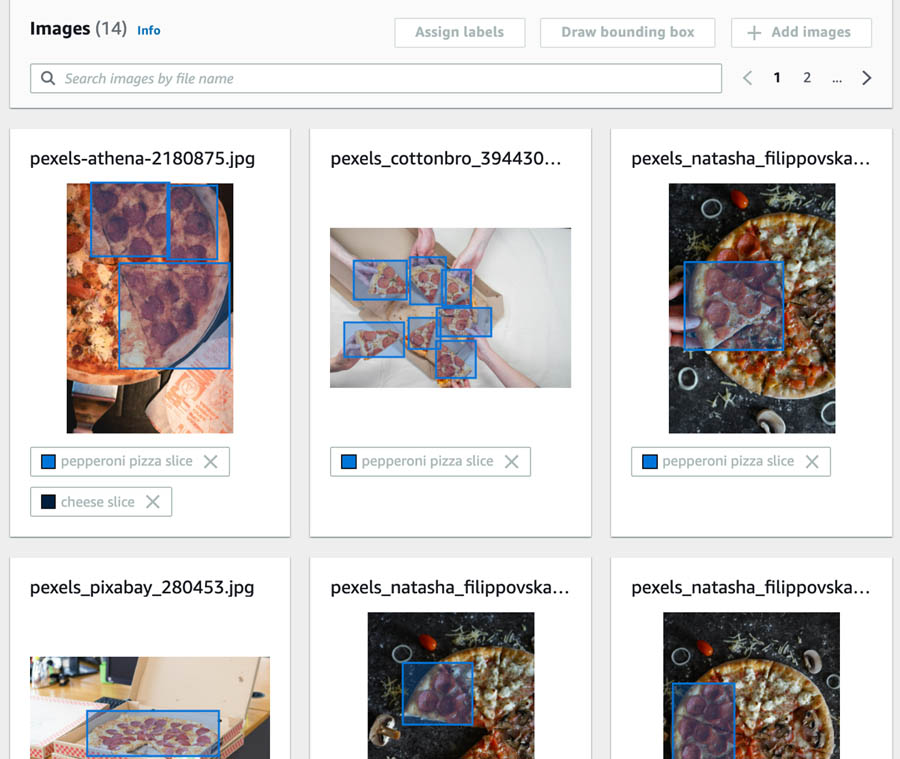
We uploaded the augmented .manifest file from Amazon A2I to the S3 bucket. You can train a new model by creating a new dataset by following the Creating a dataset step in this post using this augmented manifest. The following screenshot shows some of the results from the dataset.
Follow the instructions provided in the section Creating an Amazon Rekognition custom label model of this post. After you train a new model using this augmented dataset, you can inspect the model metrics for accuracy improvement.
The following screenshot shows the metrics for the trained model using the Amazon AI labeled dataset.
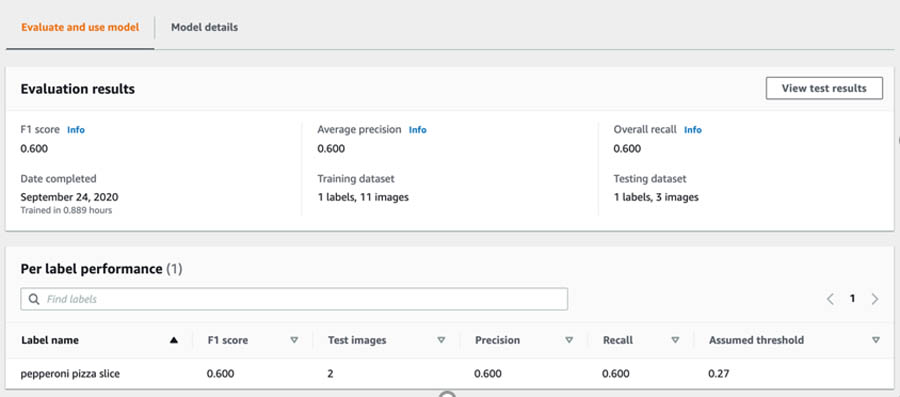
We noticed an overall improvement in the metrics after retraining using the augmented dataset. Moreover, we used only 12 images to achieve these performance metrics.
Cleaning up
To avoid incurring unnecessary charges, delete the resources used in this walkthrough when not in use. For instructions, see the following:
Conclusion
This post demonstrated how you can use Amazon Rekognition Custom Labels and Amazon A2I to train models to detect objects and images unique to your business and define conditions to send the predictions to a human workflow with labelers to review and update the results. You can use the human labeled output to augment the training dataset for retraining, which improves model accuracy, or you can send it to downstream applications for analytics and insights.
About the Authors
 Mona Mona is an AI/ML Specialist Solutions Architect based out of Arlington, VA. She works with the World Wide Public Sector team and helps customers adopt machine learning on a large scale. She is passionate about NLP and ML Explainability areas in AI/ML.
 Prem Ranga is an Enterprise Solutions Architect based out of Houston, Texas. He is part of the Machine Learning Technical Field Community and loves working with customers on their ML and AI journey. Prem is passionate about robotics, is an autonomous vehicles researcher, and also built the Alexa-controlled Beer Pours in Houston and other locations.
 Neel Sendas is a Senior Technical Account Manager at Amazon Web Services. Neel works with enterprise customers to design, deploy, and scale cloud applications to achieve their business goals. He has worked on various ML use cases, ranging from anomaly detection to predictive product quality for manufacturing and logistics optimization. When he is not helping customers, he dabbles in golf and salsa dancing.
Read More


 Dan McCorriston is a Senior Product Marketing Manager for AWS Machine Learning. He is passionate about technology, collaborating with developers, and creating new methods of expanding technology education. Out of the office he likes to hike, cook and spend time with his family.


 Yanwei Cui, PhD, is a Machine Learning Specialist Solution Architect at AWS. He started machine learning research at IRISA (Research Institute of Computer Science and Random Systems), and has several years of experience building artificial intelligence powered industrial applications in computer vision, natural language processing and online user behavior prediction. At AWS, he shares the domain expertise and helps customers to unlock business potentials, and to drive actionable outcomes with machine learning at scale. Outside of work, he enjoys reading and traveling.


 Maryam Rezapoor is a Senior Product Manager with AWS AI Ecosystem team. As a former biomedical researcher and entrepreneur, she finds her passion in working backward from customers’ needs to create new impactful solutions. Outside of work, she enjoys hiking, photography, and gardening.


 Laura Jones is a product marketing lead for AWS AI/ML where she focuses on sharing the stories of AWS’s customers and educating organizations on the impact of machine learning. As a Florida native living and surviving in rainy Seattle, she enjoys coffee, attempting to ski and enjoying the great outdoors.
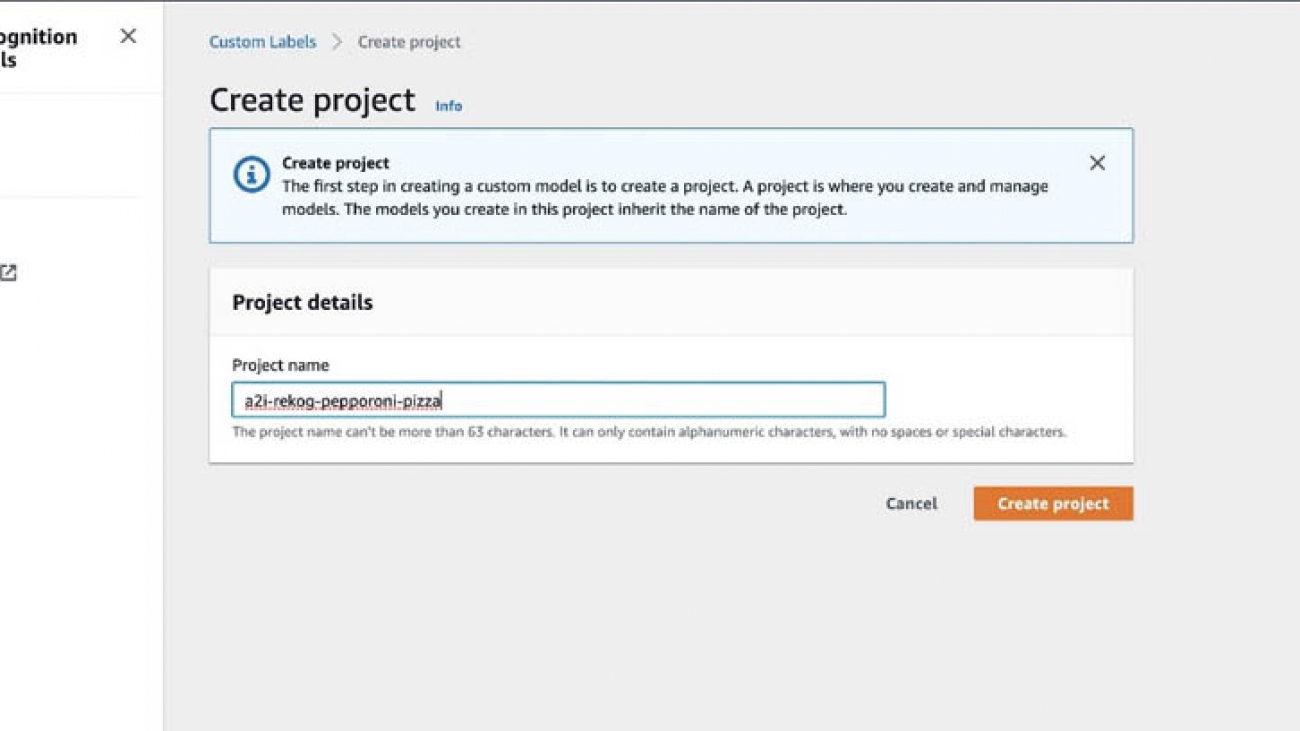


 Paul Zhao is Lead Product Manager at AWS Machine Learning. He manages speech recognition services like Amazon Transcribe and Amazon Transcribe Medical. He was formerly a serial entrepreneur, having launched, operated, and exited two successful businesses in the areas of IoT and FinTech, respectively.
 Vivek Govindan is Senior Software Development engineer at AWS Machine Learning. Outside of work, Vivek is an ardent soccer fan.


 Shreyas Subramanian is a AI/ML specialist Solutions Architect, and helps customers by using Machine Learning to solve their business challenges using the AWS platform.
 Andrew Packer is a Software Engineer in Amazon AI where he is excited about building scalable, distributed machine learning infrastructure for the masses. In his spare time, he likes playing guitar and exploring the PNW.
 Vidhi Kastuar is a Sr. Product Manager for Amazon SageMaker, focusing on making machine learning and artificial intelligence simple, easy to use and scalable for all users and businesses. Prior to AWS, Vidhi was Director of Product Management at Veritas Technologies. For fun outside work, Vidhi loves to sketch and paint, work as a career coach, and spend time with her family and friends.
 Gadi Hutt is a Sr. Director, Business Development at AWS. Gadi has over 20 years’ experience in engineering and business disciplines. He started his career as an embedded software engineer, and later on moved to product lead positions. Since 2013, Gadi leads Annapurna Labs technical business development and product management focused on hardware acceleration software and hardware products like the EC2 FPGA F1 instances and AWS Inferentia along side with its Neuron SDK, accelerating machine learning in the cloud.