Fine-tune multimodal models for vision and text use cases on Amazon SageMaker JumpStart

Fine-tune multimodal models for vision and text use cases on Amazon SageMaker JumpStart

In the rapidly evolving landscape of AI, generative models have emerged as a transformative technology, empowering users to explore new frontiers of creativity and problem-solving. These advanced AI systems have transcended their traditional text-based capabilities, now seamlessly integrating multimodal functionalities that expand their reach into diverse applications. models have become increasingly powerful, enabling a wide range of applications beyond just text generation. These models can now create striking images, generate engaging summaries, answer complex questions, and even produce code—all while maintaining a high level of accuracy and coherence. The integration of these multimodal capabilities has unlocked new possibilities for businesses and individuals, revolutionizing fields such as content creation, visual analytics, and software development.

In this post, we showcase how to fine-tune a text and vision model, such as Meta Llama 3.2, to better perform at visual question answering tasks. The Meta Llama 3.2 Vision Instruct models demonstrated impressive performance on the challenging DocVQA benchmark for visual question answering. The non-fine-tuned 11B and 90B models achieved strong ANLS (Aggregated Normalized Levenshtein Similarity) scores of 88.4 and 90.1, respectively, on the DocVQA test set. ANLS is a metric used to evaluate the performance of models on visual question answering tasks, which measures the similarity between the model’s predicted answer and the ground truth answer. However, by using the power of Amazon SageMaker JumpStart, we demonstrate the process of adapting these generative AI models to excel at understanding and responding to natural language questions about images. By fine-tuning these models using SageMaker JumpStart, we were able to further enhance their abilities, boosting the ANLS scores to 91 and 92.4. This significant improvement showcases how the fine-tuning process can equip these powerful multimodal AI systems with specialized skills for excelling at understanding and answering natural language questions about complex, document-based visual information.

For a detailed walkthrough on fine-tuning the Meta Llama 3.2 Vision models, refer to the accompanying notebook.

Overview of Meta Llama 3.2 11B and 90B Vision models

The Meta Llama 3.2 collection of multimodal and multilingual large language models (LLMs) is a collection of pre-trained and instruction-tuned generative models in a variety of sizes. The 11B and 90B models are multimodal—they support text in/text out, and text+image in/text out.

Meta Llama 3.2 11B and 90B are the first Llama models to support vision tasks, with a new model architecture that integrates image encoder representations into the language model. The new models are designed to be more efficient for AI workloads, with reduced latency and improved performance, making them suitable for a wide range of applications. All Meta Llama 3.2 models support a 128,000 context length, maintaining the expanded token capacity introduced in Meta Llama 3.1. Additionally, the models offer improved multilingual support for eight languages, including English, German, French, Italian, Portuguese, Hindi, Spanish, and Thai.

DocVQA dataset

The DocVQA (Document Visual Question Answering) dataset is a widely used benchmark for evaluating the performance of multimodal AI models on visual question answering tasks involving document-style images. This dataset consists of a diverse collection of document images paired with a series of natural language questions that require both visual and textual understanding to answer correctly. By fine-tuning a generative AI model like Meta Llama 3.2 on the DocVQA dataset using Amazon SageMaker, you can equip the model with the specialized skills needed to excel at answering questions about the content and structure of complex, document-based visual information.

For more information on the dataset used in this post, see DocVQA – Datasets.

Dataset preparation for visual question and answering tasks

The Meta Llama 3.2 Vision models can be fine-tuned on image-text datasets for vision and language tasks such as visual question answering (VQA). The training data should be structured with the image, the question about the image, and the expected answer. This data format allows the fine-tuning process to adapt the model’s multimodal understanding and reasoning abilities to excel at answering natural language questions about visual content.

The input includes the following:

  • A train and an optional validation directory. Train and validation directories should contain one directory named images hosting all the image data and one JSON Lines (.jsonl) file named metadata.jsonl.
  • In the metadata.jsonl file, each example is a dictionary that contains three keys named file_name, prompt, and completion. The file_name defines the path to image data. prompt defines the text input prompt and completion defines the text completion corresponding to the input prompt. The following code is an example of the contents in the metadata.jsonl file:
{"file_name": "images/img_0.jpg", "prompt": "what is the date mentioned in this letter?", "completion": "1/8/93"}
{"file_name": "images/img_1.jpg", "prompt": "what is the contact person name mentioned in letter?", "completion": "P. Carter"}
{"file_name": "images/img_2.jpg", "prompt": "Which part of Virginia is this letter sent from", "completion": "Richmond"}

SageMaker JumpStart

SageMaker JumpStart is a powerful feature within the SageMaker machine learning (ML) environment that provides ML practitioners a comprehensive hub of publicly available and proprietary foundation models (FMs). With this managed service, ML practitioners get access to a growing list of cutting-edge models from leading model hubs and providers that you can deploy to dedicated SageMaker instances within a network isolated environment, and customize models using SageMaker for model training and deployment.

Solution overview

In the following sections, we discuss the steps to fine-tune Meta Llama 3.2 Vision models. We cover two approaches: using the Amazon SageMaker Studio UI for a no-code solution, and using the SageMaker Python SDK.

Prerequisites

To try out this solution using SageMaker JumpStart, you need the following prerequisites:

  • An AWS account that will contain all of your AWS resources.
  • An AWS Identity and Access Management (IAM) role to access SageMaker. To learn more about how IAM works with SageMaker, refer to Identity and Access Management for Amazon SageMaker.
  • Access to SageMaker Studio or a SageMaker notebook instance, or an interactive development environment (IDE) such as PyCharm or Visual Studio Code. We recommend using SageMaker Studio for straightforward deployment and inference.

No-code fine-tuning through the SageMaker Studio UI

SageMaker JumpStart provides access to publicly available and proprietary FMs from third-party and proprietary providers. Data scientists and developers can quickly prototype and experiment with various ML use cases, accelerating the development and deployment of ML applications. It helps reduce the time and effort required to build ML models from scratch, allowing teams to focus on fine-tuning and customizing the models for their specific use cases. These models are released under different licenses designated by their respective sources. It’s essential to review and adhere to the applicable license terms before downloading or using these models to make sure they’re suitable for your intended use case.

You can access the Meta Llama 3.2 FMs through SageMaker JumpStart in the SageMaker Studio UI and the SageMaker Python SDK. In this section, we cover how to discover these models in SageMaker Studio.

SageMaker Studio is an IDE that offers a web-based visual interface for performing the ML development steps, from data preparation to model building, training, and deployment. For instructions on getting started and setting up SageMaker Studio, refer to Amazon SageMaker Studio.

When you’re in SageMaker Studio, you can access SageMaker JumpStart by choosing JumpStart in the navigation pane.

In the JumpStart view, you’re presented with the list of public models offered by SageMaker. You can explore other models from other providers in this view. To start using the Meta Llama 3 models, under Providers, choose Meta.

You’re presented with a list of the models available. Choose one of the Vision Instruct models, for example the Meta Llama 3.2 90B Vision Instruct model.

Here you can view the model details, as well as train, deploy, optimize, and evaluate the model. For this demonstration, we choose Train.

On this page, you can point to the Amazon Simple Storage Service (Amazon S3) bucket containing the training and validation datasets for fine-tuning. In addition, you can configure deployment configuration, hyperparameters, and security settings for fine-tuning. Choose Submit to start the training job on a SageMaker ML instance.
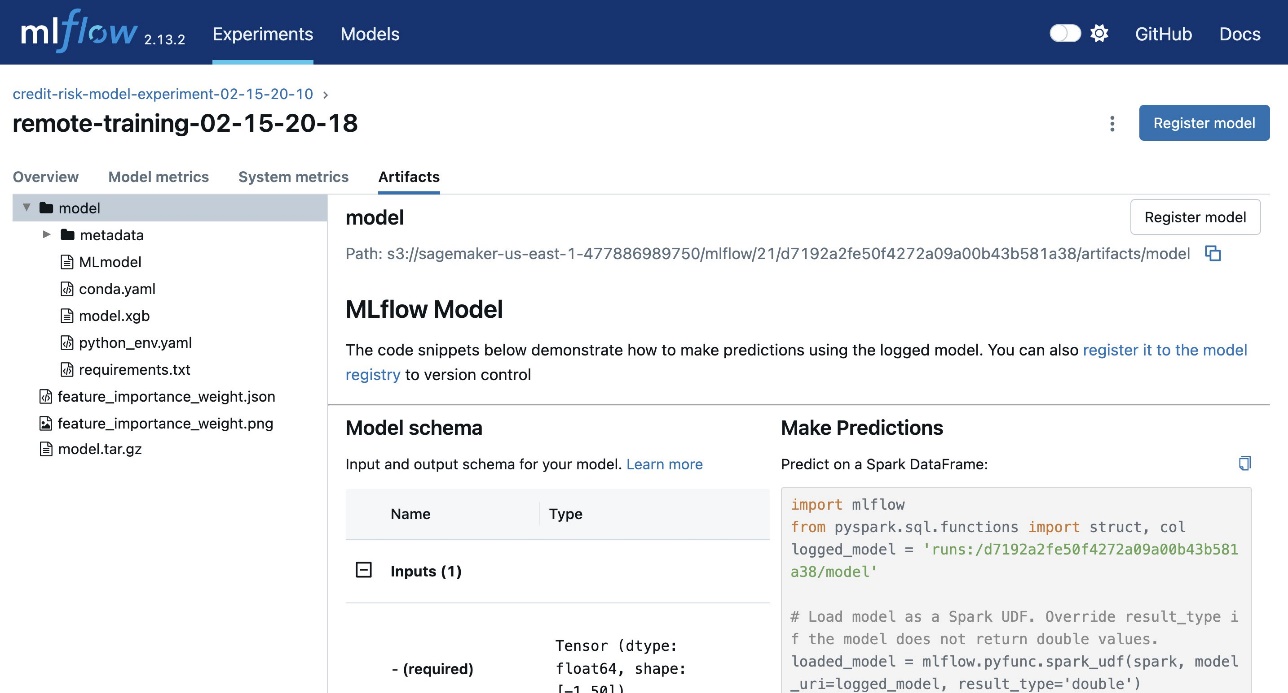
Deploy the model

After the model is fine-tuned, you can deploy it using the model page on SageMaker JumpStart. The option to deploy the fine-tuned model will appear when fine-tuning is finished, as shown in the following screenshot.

You can also deploy the model from this view. You can configure endpoint settings such as the instance type, number of instances, and endpoint name. You will need to accept the End User License Agreement (EULA) before you can deploy the model.

Fine-tune using the SageMaker Python SDK

You can also fine-tune Meta Llama 3.2 Vision Instruct models using the SageMaker Python SDK. A sample notebook with the full instructions can be found on GitHub. The following code example demonstrates how to fine-tune the Meta Llama 3.2 11B Vision Instruct model:

import os
import boto3
from sagemaker.jumpstart.estimator import JumpStartEstimator
model_id, model_version = "meta-vlm-llama-3-2-11b-vision-instruct", "*"

from sagemaker import hyperparameters
my_hyperparameters = hyperparameters.retrieve_default(
    model_id=model_id, model_version=model_version
)
my_hyperparameters["epoch"] = "1"
estimator = JumpStartEstimator(
    model_id=model_id,
    model_version=model_version,
    environment={"accept_eula": "true"},  # Please change {"accept_eula": "true"}
    disable_output_compression=True,
    instance_type="ml.p5.48xlarge",
    hyperparameters=my_hyperparameters,
)
estimator.fit({"training": train_data_location})

The code sets up a SageMaker JumpStart estimator for fine-tuning the Meta Llama 3.2 Vision Instruct model on a custom training dataset. It configures the estimator with the desired model ID, accepts the EULA, sets the number of training epochs as a hyperparameter, and initiates the fine-tuning process.

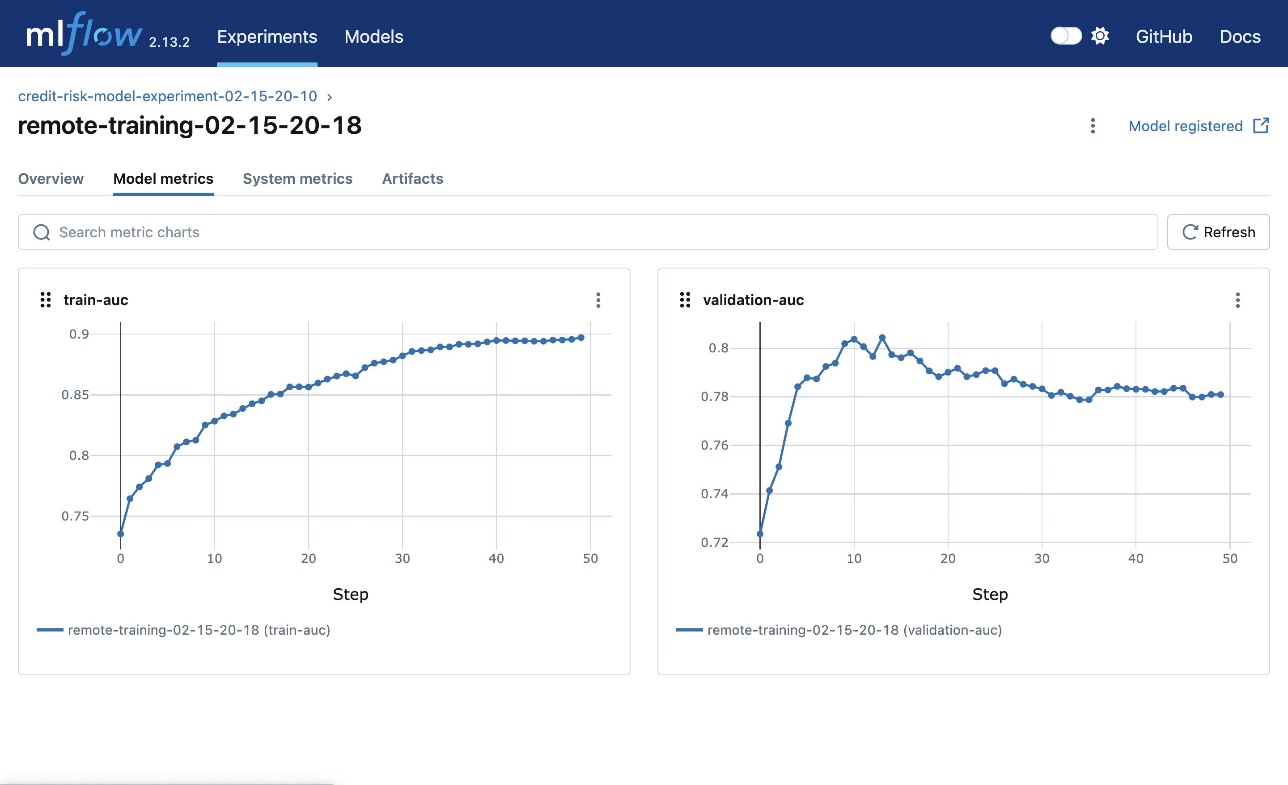
When the fine-tuning process is complete, you can review the evaluation metrics for the model. These metrics will provide insights into the performance of the fine-tuned model on the validation dataset, allowing you to assess how well the model has adapted. We discuss these metrics more in the following sections.

You can then deploy the fine-tuned model directly from the estimator, as shown in the following code:

estimator = attached_estimator
finetuned_predictor = estimator.deploy()

As part of the deploy settings, you can define the instance type you want to deploy the model on. For the full list of deployment parameters, refer to the deploy parameters in the SageMaker SDK documentation.

After the endpoint is up and running, you can perform an inference request against it using the predictor object as follows:

q, a, image = each["prompt"], each['completion'], get_image_decode_64base(image_path=f"./docvqa/validation/{each['file_name']}")
payload = formulate_payload(q=q, image=image, instruct=is_chat_template)

ft_response = finetuned_predictor.predict(
    JumpStartSerializablePayload(payload)
)

For the full list of predictor parameters, refer to the predictor object in the SageMaker SDK documentation.

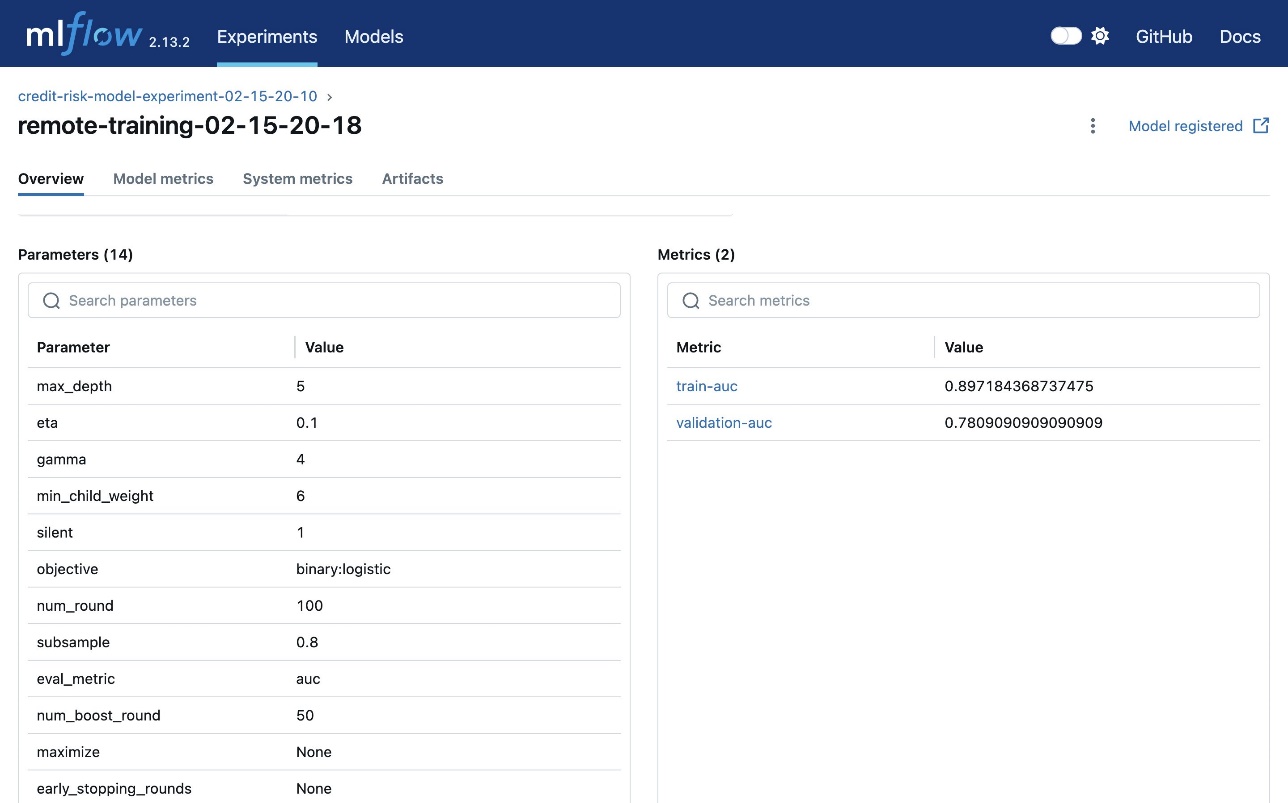
Fine-tuning quantitative metrics

SageMaker JumpStart automatically outputs various training and validation metrics, such as loss, during the fine-tuning process to help evaluate the model’s performance.

The DocVQA dataset is a widely used benchmark for evaluating the performance of multimodal AI models on visual question answering tasks involving document-style images. As shown in the following table, the non-fine-tuned Meta Llama 3.2 11B and 90B models achieved ANLS scores of 88.4 and 90.1 respectively on the DocVQA test set, as reported in the post Llama 3.2: Revolutionizing edge AI and vision with open, customizable models on the Meta AI website. After fine-tuning the 11B and 90B Vision Instruct models using SageMaker JumpStart, the fine-tuned models achieved improved ANLS scores of 91 and 92.4, demonstrating that the fine-tuning process significantly enhanced the models’ ability to understand and answer natural language questions about complex document-based visual information.

DocVQA test set (5138 examples, metric: ANLS) 11B-Instruct 90B-Instruct
Non-fine-tuned 88.4 90.1
SageMaker JumpStart Fine-tuned 91 92.4

For the fine-tuning results shown in the table, the models were trained using the DeepSpeed framework on a single P5.48xlarge instance with multi-GPU distributed training. The fine-tuning process used Low-Rank Adaptation (LoRA) on all linear layers, with a LoRA alpha of 8, LoRA dropout of 0.05, and a LoRA rank of 16. The 90B Instruct model was trained for 6 epochs, while the 11B Instruct model was trained for 4 epochs. Both models used a learning rate of 5e-5 with a linear learning rate schedule. Importantly, the Instruct models were fine-tuned using the built-in chat template format, where the loss was computed on the last turn of the conversation (the assistant’s response)

For the base model fine-tuning, you have the choice of using chat completion format or text completion format, controlled by the hyperparameter chat_template. For text completion, it is simply a concatenation of image token, prompt, and completion, where the prompt and completion part are connected by a response key ###Response:nn and loss values are computed on the completion part only.

Fine-tuning qualitative results

In addition to the quantitative evaluation metrics, you can observe qualitative differences in the model’s outputs after the fine-tuning process.

For the non-Instruct models, the fine-tuning was performed using a specific prompt template that doesn’t use the chat format. The prompt template was structured as follows:

prompt = f"![]({image})<|image|><|begin_of_text|>Read the text in the image carefully and answer the question with the text as seen exactly in the image. For yes/no questions, just respond Yes or No. If the answer is numeric, just respond with the number and nothing else. If the answer has multiple words, just respond with the words and absolutely nothing else. Never respond in a sentence or a phrase.n Question: {q}### Response:nn"

This prompt template required the model to generate a direct, concise response based on the visual information in the image, without producing additional context or commentary. The results of fine-tuning a 11 B Vision non-Instruct base model using this prompt template are shown in the following qualitative examples, demonstrating how the fine-tuning process improved the models’ ability to accurately extract and reproduce the relevant information from the document images.

Image Input prompt Pre-trained response Fine-tuned response Ground truth
What is the name of the company? ### Response:
### Response:
### Response:
### Response:
### Response:
### Response:
### Response:
###
ITC Limited itc limited
Where is the company located? 1) Opening Stock :
a) Cigarette Filter Rods
Current Year
Previous year
b) Poly Propelene
CHENNAI chennai
What the location address of NSDA? Source: https://www.
industrydocuments.ucsf
.edu/docs/qqvf0227.
<OCR/> The best thing between
1128 SIXTEENTH ST., N. W., WASHINGTON, D. C. 20036 1128 SIXTEENTH ST., N. W., WASHINGTON, D. C. 20036
What is the ‘no. of persons present’ for the sustainability committee meeting held on 5th April, 2012? 1
2
3
4
5
6
7
8
9
10
11
12
13
6 6

Clean up

After you’re done running the notebook, make sure to delete all the resources that you created in the process so your billing is stopped:

# Delete resources
finetuned_predictor.delete_model()
finetuned_predictor.delete_endpoint()

Conclusion

In this post, we discussed fine-tuning Meta Llama 3.2 Vision Instruct models using SageMaker JumpStart. We showed that you can use the SageMaker JumpStart console in SageMaker Studio or the SageMaker Python SDK to fine-tune and deploy these models. We also discussed the fine-tuning technique, instance types, and supported hyperparameters. Finally, we showcased both the quantitative metrics and qualitative results of fine-tuning the Meta Llama 3.2 Vision model on the DocVQA dataset, highlighting the model’s improved performance on visual question answering tasks involving complex document-style images.

As a next step, you can try fine-tuning these models on your own dataset using the code provided in the notebook to test and benchmark the results for your use cases.


About the Authors

Marc Karp is an ML Architect with the Amazon SageMaker Service team. He focuses on helping customers design, deploy, and manage ML workloads at scale. In his spare time, he enjoys traveling and exploring new places.

Dr. Xin Huang is a Senior Applied Scientist for Amazon SageMaker JumpStart and Amazon SageMaker built-in algorithms. He focuses on developing scalable machine learning algorithms. His research interests are in the area of natural language processing, explainable deep learning on tabular data, and robust analysis of non-parametric space-time clustering. He has published many papers in ACL, ICDM, KDD conferences, and Royal Statistical Society: Series A.


Appendix

Language models such as Meta Llama are more than 10 GB or even 100 GB in size. Fine-tuning such large models requires instances with significantly higher CUDA memory. Furthermore, training these models can be very slow due to their size. Therefore, for efficient fine-tuning, we use the following optimizations:

  • Low-Rank Adaptation (LoRA) – To efficiently fine-tune the LLM, we employ LoRA, a type of parameter-efficient fine-tuning (PEFT) technique. Instead of training all the model parameters, LoRA introduces a small set of adaptable parameters that are added to the pre-trained model. This significantly reduces the memory footprint and training time compared to fine-tuning the entire model.
  • Mixed precision training (bf16) – To further optimize memory usage, we use mixed precision training using bfloat16 (bf16) data type. bf16 provides similar performance to full-precision float32 while using only half the memory, enabling us to train larger batch sizes and fit the model on available hardware.

The default hyperparameters are as follows:

  • Peft Type: lora – LoRA fine-tuning, which can efficiently adapt a pre-trained language model to a specific task
  • Chat Template: True – Enables the use of a chat-based template for the fine-tuning process
  • Gradient Checkpointing: True – Reduces the memory footprint during training by recomputing the activations during the backward pass, rather than storing them during the forward pass
  • Per Device Train Batch Size: 2 – The batch size for training on each device
  • Per Device Evaluation Batch Size: 2 – The batch size for evaluation on each device
  • Gradient Accumulation Steps: 2 – The number of steps to accumulate gradients for before performing an update
  • Bf16 16-Bit (Mixed) Precision Training: True – Enables the use of bfloat16 (bf16) data type for mixed precision training, which can speed up training and reduce memory usage
  • Fp16 16-Bit (Mixed) Precision Training: False – Disables the use of float16 (fp16) data type for mixed precision training
  • Deepspeed: True – Enables the use of the Deepspeed library for efficient distributed training
  • Epochs: 10 – The number of training epochs
  • Learning Rate: 6e-06 – The learning rate to be used during training
  • Lora R: 64 – The rank parameter for the LoRA fine-tuning
  • Lora Alpha: 16 – The alpha parameter for the LoRA fine-tuning
  • Lora Dropout: 0 – The dropout rate for the LoRA fine-tuning
  • Warmup Ratio: 0.1 – The ratio of the total number of steps to use for a linear warmup from 0 to the learning rate
  • Evaluation Strategy: steps – The strategy for evaluating the model during training
  • Evaluation Steps: 20 – The number of steps to use for evaluating the model during training
  • Logging Steps: 20 – The number of steps between logging training metrics
  • Weight Decay: 0.2 – The weight decay to be used during training
  • Load Best Model At End: False – Disables loading the best performing model at the end of training
  • Seed: 42 – The random seed to use for reproducibility
  • Max Input Length: -1 – The maximum length of the input sequence
  • Validation Split Ratio: 0.2 – The ratio of the training dataset to use for validation
  • Train Data Split Seed: 0 – The random seed to use for splitting the training data
  • Preprocessing Num Workers: None – The number of worker processes to use for data preprocessing
  • Max Steps: -1 – The maximum number of training steps to perform
  • Adam Beta1: 0.9 – The beta1 parameter for the Adam optimizer
  • Adam Beta2: 0.999 – The beta2 parameter for the Adam optimizer
  • Adam Epsilon: 1e-08 – The epsilon parameter for the Adam optimizer
  • Max Grad Norm: 1.0 – The maximum gradient norm to be used for gradient clipping
  • Label Smoothing Factor: 0 – The label smoothing factor to be used during training
  • Logging First Step: False – Disables logging the first step of training
  • Logging Nan Inf Filter: True – Enables filtering out NaN and Inf values from the training logs
  • Saving Strategy: no – Disables automatic saving of the model during training
  • Save Steps: 500 – The number of steps between saving the model during training
  • Save Total Limit: 1 – The maximum number of saved models to keep
  • Dataloader Drop Last: False – Disables dropping the last incomplete batch during data loading
  • Dataloader Num Workers: 32 – The number of worker processes to use for data loading
  • Eval Accumulation Steps: None – The number of steps to accumulate gradients for before performing an evaluation
  • Auto Find Batch Size: False – Disables automatically finding the optimal batch size
  • Lr Scheduler Type: constant_with_warmup – The type of learning rate scheduler to use (for example, constant with warmup)
  • Warm Up Steps: 0 – The number of steps to use for linear warmup of the learning rate

Read More

Principal Financial Group uses QnABot on AWS and Amazon Q Business to enhance workforce productivity with generative AI

Principal Financial Group uses QnABot on AWS and Amazon Q Business to enhance workforce productivity with generative AI

Principal is a global financial company with nearly 20,000 employees passionate about improving the wealth and well-being of people and businesses. In business for 145 years, Principal is helping approximately 64 million customers (as of Q2, 2024) plan, protect, invest, and retire, while working to support the communities where it does business and build a diverse, inclusive workforce.

As Principal grew, its internal support knowledge base considerably expanded. This wealth of content provides an opportunity to streamline access to information in a compliant and responsible way. Principal wanted to use existing internal FAQs, documentation, and unstructured data and build an intelligent chatbot that could provide quick access to the right information for different roles. With the QnABot on AWS (QnABot), integrated with Microsoft Azure Entra ID access controls, Principal launched an intelligent self-service solution rooted in generative AI. Now, employees at Principal can receive role-based answers in real time through a conversational chatbot interface. The chatbot improved access to enterprise data and increased productivity across the organization.

In this post, we explore how Principal used QnABot paired with Amazon Q Business and Amazon Bedrock to create Principal AI Generative Experience: a user-friendly, secure internal chatbot for faster access to information.

QnABot is a multilanguage, multichannel conversational interface (chatbot) that responds to customers’ questions, answers, and feedback. It allows companies to deploy a fully functional chatbot integrated with generative AI offerings from Amazon, including Amazon Bedrock, Amazon Q Business, and intelligent search services, with natural language understanding (NLU) such as Amazon OpenSearch Service and Amazon Bedrock Knowledge Bases. With QnABot, companies have the flexibility to tier questions and answers based on need, from static FAQs to generating answers on the fly based on documents, webpages, indexed data, operational manuals, and more.

Amazon Q Business is a generative AI-powered assistant that can answer questions, provide summaries, generate content, and securely complete tasks based on data and information in your enterprise systems. It empowers employees to be more creative, data-driven, efficient, prepared, and productive.

Amazon Bedrock is a fully managed service that offers a choice of high-performing foundation models (FMs) from leading AI companies like AI21 Labs, Anthropic, Cohere, Meta, Mistral AI, Stability AI, and Amazon through a single API, along with a broad set of capabilities to build generative AI applications with security, privacy, and responsible AI.

Challenges, opportunities, and constraints

Principal team members need insights from vast amounts of unstructured data to serve their customers. This data includes manuals, communications, documents, and other content across various systems like SharePoint, OneNote, and the company’s intranet. The information exists in various formats such as Word documents, ASPX pages, PDFs, Excel spreadsheets, and PowerPoint presentations that were previously difficult to systematically search and analyze. Principal sought to develop natural language processing (NLP) and question-answering capabilities to accurately query and summarize this unstructured data at scale. This solution would allow for greater understanding of a wide range of employee questions by searching internal documentation for responses and suggesting answers—all through a user-friendly interface. The solution had to adhere to compliance, privacy, and ethics regulations and brand standards and use existing compliance-approved responses without additional summarization. It was important for Principal to maintain fine-grained access controls and make sure all data and sources remained secure within its environment.

Principal needed a solution that could be rapidly deployed without extensive custom coding. It also wanted a flexible platform that it could own and customize for the long term. As a leader in financial services, Principal wanted to make sure all data and responses adhered to strict risk management and responsible AI guidelines. This included preventing any data from leaving its source or being accessible to third parties.

The chatbot solution deployed by Principal had to address two use cases. The first use case, treated as a proof of concept, was to respond to customers’ request for proposal (RFP) inquiries. This first use case was chosen because the RFP process relies on reviewing multiple types of information to generate an accurate response based on the most up-to-date information, which can be time-consuming.

The second use case applied to Principal employees in charge of responding to customer inquiries using a vast well of SharePoint data. The extensive amount of data employees must search to find appropriate answers for customers made it difficult and time-consuming to navigate. It is estimated these employees collectively spent hundreds of hours each year searching for information. As the volume and complexity of customer requests grows, without a solution to enhance search capabilities, costs were projected to significantly rise.

Principal saw an opportunity for an internal generic AI assistant to allow employees to use AI in their daily work without risking exposure of sensitive information through any unapproved or unregulated external AI vendors.

The solution: Principal AI Generative Experience with QnABot

Principal began its development of an AI assistant by using the core question-answering capabilities in QnABot. Within QnABot, company subject matter experts authored hard-coded questions and answers using the QnABot editor. Principal also used the AWS open source repository Lex Web UI to build a frontend chat interface with Principal branding.

Initially, Principal relied on the built-in capabilities of QnABot, using Anthropic’s Claude on Amazon Bedrock for information summarization and retrieval. Upon the release of Amazon Q Business in preview, Principal integrated QnABot with Amazon Q Business to take advantage of its advanced response aggregation algorithms and more complete AI assistant features. Integration enhanced the solution by providing a more human-like interaction for end-users.

Principal implemented several measures to improve the security, governance, and performance of its conversational AI platform. By integrating QnABot with Azure Active Directory, Principal facilitated single sign-on capabilities and role-based access controls. This allowed fine-tuned management of user access to content and systems. Generative AI models (for example, Amazon Titan) hosted on Amazon Bedrock were used for query disambiguation and semantic matching for answer lookups and responses.

Usability and continual improvement were top priorities, and Principal enhanced the standard user feedback from QnABot to gain input from end-users on answer accuracy, outdated content, and relevance. This input made it straightforward for administrators and developers to identify and improve answer relevancy. Custom monitoring dashboards in Amazon OpenSearch Service provided real-time visibility into platform performance. Additional integrations with services like Amazon Data Firehose, AWS Glue, and Amazon Athena allowed for historical reporting, user activity analytics, and sentiment trends over time through Amazon QuickSight.

Adherence to responsible and ethical AI practices were a priority for Principal. The Principal AI Enablement team, which was building the generative AI experience, consulted with governance and security teams to make sure security and data privacy standards were met. Model monitoring of key NLP metrics was incorporated and controls were implemented to prevent unsafe, unethical, or off-topic responses. The flexible, scalable nature of AWS services makes it straightforward to continually refine the platform through improvements to the machine learning models and addition of new features.

The initial proof of concept was deployed in a preproduction environment within 3 months. The first data source connected was an Amazon Simple Storage Service (Amazon S3) bucket, where a 100-page RFP manual was uploaded for natural language querying by users. The data source allowed accurate results to be returned based on indexed content.

The first large-scale use case directly interfaced with SharePoint data, indexing over 8,000 pages. The Principal team partnered with Amazon Q Business data connector developers to implement improvements to the SharePoint connector. Improvements included the ability to index pages in SharePoint lists and add data security features. The use case was piloted with 10 users during 1 month, while working to onboard an additional 300 users over the next 3 months.

During the initial pilot, the Principal AI Enablement team worked with business users to gather feedback. The first round of testers needed more training on fine-tuning the prompts to improve returned results. The enablement team took this feedback and partnered with training and development teams to design learning plans to help new users more quickly gain proficiency with the AI assistant. The goal was to onboard future users faster through improved guidance on how to properly frame questions for the assistant and additional coaching resources for those who needed more guidance to learn the system.

Some users lacked access to corporate data, but they used the platform as a generative AI chatbot to securely attach internal-use documentation (also called initial generic entitlement) and query it in real time or to ask questions of the model’s foundational knowledge without risk of data leaving the tenant. Queries from users were also analyzed to identify beneficial future features to implement.

The following diagram illustrates the Principal generative AI chatbot architecture with AWS services.

Principal-AWS-GenAI-Architecture
Principal started by deploying QnABot, which draws on numerous services including Amazon Bedrock, Amazon Q Business, QuickSight, and others. All AWS services are high-performing, secure, scalable, and purpose-built. AWS services are designed to meet your specific industry, cross-industry, and technology use cases and are developed, maintained, and supported by AWS. AWS solutions (for example, QnABot) bring together AWS services into preconfigured deployable products, with architecture diagrams and implementation guides. Developed, maintained, and supported by AWS, AWS solutions simplify the deployment of optimized infrastructure tailored to meet customer use cases.

Principal strategically worked with the Amazon Q Business and QnABot teams to test and improve the Amazon Q Business conversational AI platform. The QnABot team worked closely with the Principal AI Enablement team on the implementation of QnABot, helping to define and build out capabilities to meet the incoming use cases. As an early adopter of Amazon Q Business, engineers from Principal worked directly with the Amazon Q Business team to validate updates and new features. When Amazon Q Business became generally available, Principal collaborated with the team to implement the integration of AWS IAM Identity Center, helping to define the process for IAM Identity Center implementation and software development kit (SDK) integration. The results of the IAM Identity Center integration were contributed back to the QnABot Amazon Q Business plugin repository so other customers could benefit from this work.

Results

The initial proof of concept was highly successful in driving efficiencies for users. It achieved an estimated 50% reduction in time required for users to respond to client inquiries and requests for proposals. This reduction in time stemmed from the platform’s ability to search for and summarize the data needed to quickly and accurately respond to inquiries. This early success demonstrated the solution’s effectiveness, generating excitement within the organization to broaden use cases.

The initial generic entitlement option allowed users to attach files to their chat sessions and dynamically query content. This option proved popular because of large productivity gains across various roles, including project management, enterprise architecture, communications, and education. Users interacting with the application in their daily work have received it well. Some users have reported up to a 50% reduction in the time spent conducting rote work. Removing the time spent on routine work allows employees to focus on human judgement-based and strategic decisions.

The platform has delivered strong results across several key metrics. Over 95% of queries received answers users accepted or built upon, with only 4% of answers receiving negative feedback. For queries earning negative feedback, less than 1% involved answers or documentation deemed irrelevant to the original question. Over 99% of documents provided through the system were evaluated as relevant and containing up-to-date information. 56% of total queries were addressed through either sourcing documentation related to the question or having the user attach a relevant file through the chat interface. The remaining queries were answered based on foundational knowledge built into the platform or from the current session’s chat history. These results indicate that users benefit from both Retrieval Augmented Generation (RAG) functionality and Amazon Q Business foundational knowledge, which provide helpful responses based on past experiences.

The positive feedback validates the application’s ability to deliver timely, accurate information to users, optimizing processes and empowering employees with data-driven insights. Metrics indicate a high level of success in delivering the right information, reducing time spent on client inquiries and tasks and producing significant savings in hours and dollars. The platform effectively and quickly resolves issues by surfacing relevant information faster than manual searches, improving processes, productivity, and the customer experience. As usage expands, it is expected that the benefits will multiply for both users and stakeholders. This initial proof of concept provides a strong foundation for continued optimization and value, with potential expansion to maximize benefits for Principal employees.

Roadmap

The Principal AI Enablement team has an ambitious roadmap for 2024 focused on expanding the capabilities of its conversational AI platform. There is a commitment to scale and accelerate development of generative AI technology to meet the growing needs of the enterprise.

Numerous use cases are currently in development by the AI Enablement team. Many future use cases are expected to use the Principal AI Generative Experience application due to its success in automating processes and empowering users with self-service insights. As adoption increases, ongoing feature additions will further strengthen the platform’s value.

At Principal, the roadmap indicates a commitment to delivering continual innovation. Innovation will drive further optimization of operations and workflows. It could also create new opportunities to enhance customer and employee experiences through advanced AI applications.

Principal is well positioned to build upon early successes by fulfilling its vision. The roadmap provides a strategic framework to maximize the platform’s business impact and differentiate solutions in the years ahead.

Conclusion

Principal utilized QnABot on AWS paired with Amazon Q Business and Amazon Bedrock, to deliver a generative AI experience for its users, thereby reducing manual time spent on client inquiries and tasks and producing significant savings in hours and dollars. Using generative AI, Principal’s employees can now focus on deeper human judgment based decisioning, instead of time spent scouring for answers from data sources manually. Get started with QnABot on AWS, Amazon Q Business and Amazon Bedrock.


About the Authors

Ajay Swamy is the Global Product Leader for Data, AIML and Generative AI AWS Solutions. He specializes in building AWS Solutions (production-ready software packages) that deliver compelling value to customers by solving for their unique business needs. Other than QnABot on AWS, he manages Generative AI Application BuilderEnhanced Document UnderstandingDiscovering Hot Topics using Machine Learning and other AWS Solutions. He lives with his wife (Tina) and dog (Figaro), in New York, NY.

Dr. Nicki Susman is a Senior Machine Learning Engineer and the Technical Lead of the Principal AI Enablement team. She has extensive experience in data and analytics, application development, infrastructure engineering, and DevSecOps.

Joel Elscott is a Senior Data Engineer on the Principal AI Enablement team. He has over 20 years of software development experience in the financial services industry, specializing in ML/AI application development and cloud data architecture. Joel lives in Des Moines, Iowa, with his wife and five children, and is also a group fitness instructor.

Bob StrahanBob Strahan is a Principal Solutions Architect in the AWS Generative AI Innovation Center team.

Austin Johnson is a Solutions Architect, maintaining the Lex Web UI open source library.


The subject matter in this communication is educational only and provided with the understanding that Principal is not endorsing, or necessarily recommending use of artificial intelligence. You should consult with appropriate counsel, compliance, and information security for your business needs.

Insurance products and plan administrative services provided through Principal Life Insurance Company, a member of the Principal Financial Group, Des Moines, IA 50392.
2024, Principal Financial Services, Inc.
3778998-082024

Read More

Governing ML lifecycle at scale: Best practices to set up cost and usage visibility of ML workloads in multi-account environments

Governing ML lifecycle at scale: Best practices to set up cost and usage visibility of ML workloads in multi-account environments

Cloud costs can significantly impact your business operations. Gaining real-time visibility into infrastructure expenses, usage patterns, and cost drivers is essential. This insight enables agile decision-making, optimized scalability, and maximizes the value derived from cloud investments, providing cost-effective and efficient cloud utilization for your organization’s future growth. What makes cost visibility even more important for the cloud is that cloud usage is dynamic. This requires continuous cost reporting and monitoring to make sure costs don’t exceed expectations and you only pay for the usage you need. Additionally, you can measure the value the cloud delivers to your organization by quantifying the associated cloud costs.

For a multi-account environment, you can track costs at an AWS account level to associate expenses. However, to allocate costs to cloud resources, a tagging strategy is essential. A combination of an AWS account and tags provides the best results. Implementing a cost allocation strategy early is critical for managing your expenses and future optimization activities that will reduce your spend.

This post outlines steps you can take to implement a comprehensive tagging governance strategy across accounts, using AWS tools and services that provide visibility and control. By setting up automated policy enforcement and checks, you can achieve cost optimization across your machine learning (ML) environment.

Implement a tagging strategy

A tag is a label you assign to an AWS resource. Tags consist of a customer-defined key and an optional value to help manage, search for, and filter resources. Tag keys and values are case sensitive. A tag value (for example, Production) is also case sensitive, like the keys.

It’s important to define a tagging strategy for your resources as soon as possible when establishing your cloud foundation. Tagging is an effective scaling mechanism for implementing cloud management and governance strategies. When defining your tagging strategy, you need to determine the right tags that will gather all the necessary information in your environment. You can remove tags when they’re no longer needed and apply new tags whenever required.

Categories for designing tags

Some of the common categories used for designing tags are as follows:

  • Cost allocation tags – These help track costs by different attributes like department, environment, or application. This allows reporting and filtering costs in billing consoles based on tags.
  • Automation tags – These are used during resource creation or management workflows. For example, tagging resources with their environment allows automating tasks like stopping non-production instances after hours.
  • Access control tags – These enable restricting access and permissions based on tags. AWS Identity and Access Management (IAM) roles and policies can reference tags to control which users or services can access specific tagged resources.
  • Technical tags – These provide metadata about resources. For example, tags like environment or owner help identify technical attributes. The AWS reserved prefix aws: tags provide additional metadata tracked by AWS.
  • Compliance tags – These may be needed to adhere to regulatory requirements, such as tagging with classification levels or whether data is encrypted or not.
  • Business tags – These represent business-related attributes, not technical metadata, such as cost centers, business lines, and products. This helps track spending for cost allocation purposes.

A tagging strategy also defines a standardized convention and implementation of tags across all resource types.

When defining tags, use the following conventions:

  • Use all lowercase for consistency and to avoid confusion
  • Separate words with hyphens
  • Use a prefix to identify and separate AWS generated tags from third-party tool generated tags

Tagging dictionary

When defining a tagging dictionary, delineate between mandatory and discretionary tags. Mandatory tags help identify resources and their metadata, regardless of purpose. Discretionary tags are the tags that your tagging strategy defines, and they should be made available to assign to resources as needed. The following table provides examples of a tagging dictionary used for tagging ML resources.

Tag Type Tag Key Purpose Cost Allocation Mandatory
Workload anycompany:workload:application-id Identifies disparate resources that are related to a specific application Y Y
Workload anycompany:workload:environment Distinguishes between dev, test, and production Y Y
Financial anycompany:finance:owner Indicates who is responsible for the resource, for example SecurityLead, SecOps, Workload-1-Development-team Y Y
Financial anycompany:finance:business-unit Identifies the business unit the resource belongs to, for example Finance, Retail, Sales, DevOps, Shared Y Y
Financial anycompany:finance:cost-center Indicates cost allocation and tracking, for example 5045, Sales-5045, HR-2045 Y Y
Security anycompany:security:data-classification Indicates data confidentiality that the resource supports N Y
Automation anycompany:automation:encryption Indicates if the resource needs to store encrypted data N N
Workload anycompany:workload:name Identifies an individual resource N N
Workload anycompany:workload:cluster Identifies resources that share a common configuration or perform a specific function for the application N N
Workload anycompany:workload:version Distinguishes between different versions of a resource or application component N N
Operations anycompany:operations:backup Identifies if the resource needs to be backed up based on the type of workload and the data that it manages N N
Regulatory anycompany:regulatory:framework Requirements for compliance to specific standards and frameworks, for example NIST, HIPAA, or GDPR N N

You need to define what resources require tagging and implement mechanisms to enforce mandatory tags on all necessary resources. For multiple accounts, assign mandatory tags to each one, identifying its purpose and the owner responsible. Avoid personally identifiable information (PII) when labeling resources because tags remain unencrypted and visible.

Tagging ML workloads on AWS

When running ML workloads on AWS, primary costs are incurred from compute resources required, such as Amazon Elastic Compute Cloud (Amazon EC2) instances for hosting notebooks, running training jobs, or deploying hosted models. You also incur storage costs for datasets, notebooks, models, and so on stored in Amazon Simple Storage Service (Amazon S3).

A reference architecture for the ML platform with various AWS services is shown in the following diagram. This framework considers multiple personas and services to govern the ML lifecycle at scale. For more information about the reference architecture in detail, see Governing the ML lifecycle at scale, Part 1: A framework for architecting ML workloads using Amazon SageMaker.

Machine Learning Platform Reference Architecture

The reference architecture includes a landing zone and multi-account landing zone accounts. These should be tagged to track costs for governance and shared services.

The key contributors towards recurring ML cost that should be tagged and tracked are as follows:

  • Amazon DataZone Amazon DataZone allows you to catalog, discover, govern, share, and analyze data across various AWS services. Tags can be added at an Amazon DataZone domain and used for organizing data assets, users, and projects. Usage of data is tracked through the data consumers, such as Amazon Athena, Amazon Redshift, or Amazon SageMaker.
  • AWS Lake Formation AWS Lake Formation helps manage data lakes and integrate them with other AWS analytics services. You can define metadata tags and assign them to resources like databases and tables. This identifies teams or cost centers responsible for those resources. Automating resource tags when creating databases or tables with the AWS Command Line Interface (AWS CLI) or SDKs provides consistent tagging. This enables accurate tracking of costs incurred by different teams.
  • Amazon SageMaker Amazon SageMaker uses a domain to provide access to an environment and resources. When a domain is created, tags are automatically generated with a DomainId key by SageMaker, and administrators can add a custom ProjectId Together, these tags can be used for project-level resource isolation. Tags on a SageMaker domain are automatically propagated to any SageMaker resources created in the domain.
  • Amazon SageMaker Feature Store Amazon SageMaker Feature Store allows you to tag your feature groups and search for feature groups using tags. You can add tags when creating a new feature group or edit the tags of an existing feature group.
  • Amazon SageMaker resources – When you tag SageMaker resources such as jobs or endpoints, you can track spending based on attributes like project, team, or environment. For example, you can specify tags when creating the SageMaker Estimator that launches a training job.

Using tags allows you to incur costs that align with business needs. Monitoring expenses this way gives insight into how budgets are consumed.

Enforce a tagging strategy

An effective tagging strategy uses mandatory tags and applies them consistently and programmatically across AWS resources. You can use both reactive and proactive approaches for governing tags in your AWS environment.

Proactive governance uses tools such as AWS CloudFormation, AWS Service Catalog, tag policies in AWS Organizations, or IAM resource-level permissions to make sure you apply mandatory tags consistently at resource creation. For example, you can use the CloudFormation Resource Tags property to apply tags to resource types. In Service Catalog, you can add tags that automatically apply when you launch the service.

Reactive governance is for finding resources that lack proper tags using tools such as the AWS Resource Groups tagging API, AWS Config rules, and custom scripts. To find resources manually, you can use Tag Editor and detailed billing reports.

Proactive governance

Proactive governance uses the following tools:

  • Service catalog – You can apply tags to all resources created when a product launches from the service catalog. The service catalog provides a TagOptions Use this to define the tag key-pairs to associate with the product.
  • CloudFormation Resource Tags – You can apply tags to resources using the AWS CloudFormation Resource Tags property. Tag only those resources that support tagging through AWS CloudFormation.
  • Tag policiesTag policies standardize tags across your organization’s account resources. Define tagging rules in a tag policy that apply when resources get tagged. For example, specify that a CostCenter tag attached to a resource must match the case and values the policy defines. Also specify that noncompliant tagging operations on some resources get enforced, preventing noncompliant requests from completing. The policy doesn’t evaluate untagged resources or undefined tags for compliance. Tag policies involve working with multiple AWS services:
    • To enable the tag policies feature, use AWS Organizations. You can create tag policies and then attach those policies to organization entities to put the tagging rules into effect.
    • Use AWS Resource Groups to find noncompliant tags on account resources. Correct the noncompliant tags in the AWS service where you created the resource.
  • Service Control Policies – You can restrict the creation of an AWS resource without proper tags. Use Service Control Policies (SCPs) to set guardrails around requests to create resources. SCPs allow you to enforce tagging policies on resource creation. To create an SCP, navigate to the AWS Organizations console, choose Policies in the navigation pane, then choose Service Control Policies.

Reactive governance

Reactive governance uses the following tools:

  • AWS Config rules – Check resources regularly for improper tagging. The AWS Config rule required-tags examines resources to make sure they contain specified tags. You should take action when resources lack necessary tags.
  • AWS Resource Groups tagging API – The AWS Resource Groups Tagging API lets you tag or untag resources. It also enables searching for resources in a specified AWS Region or account using tag-based filters. Additionally, you can search for existing tags in a Region or account, or find existing values for a key within a specific Region or account. To create a resource tag group, refer to Creating query-based groups in AWS Resource Groups.
  • Tag Editor – With Tag Editor, you build a query to find resources in one or more Regions that are available for tagging. To find resources to tag, see Finding resources to tag.

SageMaker tag propagation

Amazon SageMaker Studio provides a single, web-based visual interface where you can perform all ML development steps required to prepare data, as well as build, train, and deploy models. SageMaker Studio automatically copies and assign tags to the SageMaker Studio notebooks created by the users, so you can track and categorize the cost of SageMaker Studio notebooks.

Amazon SageMaker Pipelines allows you to create end-to-end workflows for managing and deploying SageMaker jobs. Each pipeline is composed of a sequence of steps that transform data into a trained model. Tags can be applied to pipelines similarly to how they are used for other SageMaker resources. When a pipeline is run, its tags can potentially propagate to the underlying jobs launched as part of the pipeline steps.

When models are registered in Amazon SageMaker Model Registry, tags can be propagated from model packages to other related resources like endpoints. Model packages in the registry can be tagged when registering a model version. These tags become associated with the model package. Tags on model packages can potentially propagate to other resources that reference the model, such as endpoints created using the model.

Tag policy quotas

The number of policies that you can attach to an entity (root, OU, and account) is subject to quotas for AWS Organizations. See Quotas and service limits for AWS Organizations for the number of tags that you can attach.

Monitor resources

To achieve financial success and accelerate business value realization in the cloud, you need complete, near real-time visibility of cost and usage information to make informed decisions.

Cost organization

You can apply meaningful metadata to your AWS usage with AWS cost allocation tags. Use AWS Cost Categories to create rules that logically group cost and usage information by account, tags, service, charge type, or other categories. Access the metadata and groupings in services like AWS Cost Explorer, AWS Cost and Usage Reports, and AWS Budgets to trace costs and usage back to specific teams, projects, and business initiatives.

Cost visualization

You can view and analyze your AWS costs and usage over the past 13 months using Cost Explorer. You can also forecast your likely spending for the next 12 months and receive recommendations for Reserved Instance purchases that may reduce your costs. Using Cost Explorer enables you to identify areas needing further inquiry and to view trends to understand your costs. For more detailed cost and usage data, use AWS Data Exports to create exports of your billing and cost management data by selecting SQL columns and rows to filter the data you want to receive. Data exports get delivered on a recurring basis to your S3 bucket for you to use with your business intelligence (BI) or data analytics solutions.

You can use AWS Budgets to set custom budgets that track cost and usage for simple or complex use cases. AWS Budgets also lets you enable email or Amazon Simple Notification Service (Amazon SNS) notifications when actual or forecasted cost and usage exceed your set budget threshold. In addition, AWS Budgets integrates with Cost Explorer.

Cost allocation

Cost Explorer enables you to view and analyze your costs and usage data over time, up to 13 months, through the AWS Management Console. It provides premade views displaying quick information about your cost trends to help you customize views suiting your needs. You can apply various available filters to view specific costs. Also, you can save any view as a report.

Monitoring in a multi-account setup

SageMaker supports cross-account lineage tracking. This allows you to associate and query lineage entities, like models and training jobs, owned by different accounts. It helps you track related resources and costs across accounts. Use the AWS Cost and Usage Report to track costs for SageMaker and other services across accounts. The report aggregates usage and costs based on tags, resources, and more so you can analyze spending per team, project, or other criteria spanning multiple accounts.

Cost Explorer allows you to visualize and analyze SageMaker costs from different accounts. You can filter costs by tags, resources, or other dimensions. You can also export the data to third-party BI tools for customized reporting.

Conclusion

In this post, we discussed how to implement a comprehensive tagging strategy to track costs for ML workloads across multiple accounts. We discussed implementing tagging best practices by logically grouping resources and tracking costs by dimensions like environment, application, team, and more. We also looked at enforcing the tagging strategy using proactive and reactive approaches. Additionally, we explored the capabilities within SageMaker to apply tags. Lastly, we examined approaches to provide visibility of cost and usage for your ML workloads.

For more information about how to govern your ML lifecycle, see Part 1 and Part 2 of this series.


About the authors

Gunjan JainGunjan Jain, an AWS Solutions Architect based in Southern California, specializes in guiding large financial services companies through their cloud transformation journeys. He expertly facilitates cloud adoption, optimization, and implementation of Well-Architected best practices. Gunjan’s professional focus extends to machine learning and cloud resilience, areas where he demonstrates particular enthusiasm. Outside of his professional commitments, he finds balance by spending time in nature.

Ram Vittal is a Principal Generative AI Solutions Architect at AWS. He has over 3 decades of experience architecting and building distributed, hybrid, and cloud applications. He is passionate about building secure, reliable and scalable GenAI/ML systems to help enterprise customers improve their business outcomes. In his spare time, he rides motorcycle and enjoys walking with his dogs!

Read More

Automate invoice processing with Streamlit and Amazon Bedrock

Automate invoice processing with Streamlit and Amazon Bedrock

Invoice processing is a critical yet often cumbersome task for businesses of all sizes, especially for large enterprises dealing with invoices from multiple vendors with varying formats. The sheer volume of data, coupled with the need for accuracy and efficiency, can make invoice processing a significant challenge. Invoices can vary widely in format, structure, and content, making efficient processing at scale difficult. Traditional methods relying on manual data entry or custom scripts for each vendor’s format can not only lead to inefficiencies, but can also increase the potential for errors, resulting in financial discrepancies, operational bottlenecks, and backlogs.

To extract key details such as invoice numbers, dates, and amounts, we use Amazon Bedrock, a fully managed service that offers a choice of high-performing foundation models (FMs) from leading AI companies such as AI21 Labs, Anthropic, Cohere, Meta, Mistral AI, Stability AI, and Amazon through a single API, along with a broad set of capabilities you need to build generative AI applications with security, privacy, and responsible AI.

In this post, we provide a step-by-step guide with the building blocks needed for creating a Streamlit application to process and review invoices from multiple vendors. Streamlit is an open source framework for data scientists to efficiently create interactive web-based data applications in pure Python. We use Anthropic’s Claude 3 Sonnet model in Amazon Bedrock and Streamlit for building the application front-end.

Solution overview

This solution uses the Amazon Bedrock Knowledge Bases chat with document feature to analyze and extract key details from your invoices, without needing a knowledge base. The results are shown in a Streamlit app, with the invoices and extracted information displayed side-by-side for quick review. Importantly, your document and data are not stored after processing.

The storage layer uses Amazon Simple Storage Service (Amazon S3) to hold the invoices that business users upload. After uploading, you can set up a regular batch job to process these invoices, extract key information, and save the results in a JSON file. In this post, we save the data in JSON format, but you can also choose to store it in your preferred SQL or NoSQL database.

The application layer uses Streamlit to display the PDF invoices alongside the extracted data from Amazon Bedrock. For simplicity, we deploy the app locally, but you can also run it on Amazon SageMaker Studio, Amazon Elastic Compute Cloud (Amazon EC2), or Amazon Elastic Container Service (Amazon ECS) if needed.

Prerequisites

To perform this solution, complete the following:

Install dependencies and clone the example

To get started, install the necessary packages on your local machine or on an EC2 instance. If you’re new to Amazon EC2, refer to the Amazon EC2 User Guide. This tutorial we will use the local machine for project setup.

To install dependencies and clone the example, follow these steps:

  1. Clone the repository into a local folder:
    git clone https://github.com/aws-samples/genai-invoice-processor.git

  2. Install Python dependencies
    • Navigate to the project directory:
      cd </path/to/your/folder>/genai-invoice-processor

    • Upgrade pip
      python3 -m pip install --upgrade pip

    • (Optional) Create a virtual environment isolate dependencies:
      python3 -m venv venv

    • Activate the virtual environment:
      1. Mac/Linux:
        source venv/bin/activate

      2. Windows:
        venv/Scripts/activate

  3. In the cloned directory, invoke the following to install the necessary Python packages:
    pip install -r requirements.txt

    This will install the necessary packages, including Boto3 (AWS SDK for Python), Streamlit, and other dependencies.

  4. Update the region in the config.yaml file to the same Region set for your AWS CLI where Amazon Bedrock and Anthropic’s Claude 3 Sonnet model are available.

After completing these steps, the invoice processor code will be set up in your local environment and will be ready for the next stages to process invoices using Amazon Bedrock.

Process invoices using Amazon Bedrock

Now that the environment setup is done, you’re ready to start processing invoices and deploying the Streamlit app. To process invoices using Amazon Bedrock, follow these steps:

Store invoices in Amazon S3

Store invoices from different vendors in an S3 bucket. You can upload them directly using the console, API, or as part of your regular business process. Follow these steps to upload using the CLI:

  1. Create an S3 bucket:
    aws s3 mb s3://<your-bucket-name> --region <your-region>

    Replace your-bucket-name with the name of the bucket you created and your-region with the Region set for your AWS CLI and in config.yaml (for example, us-east-1)

  2. Upload invoices to S3 bucket. Use one of the following commands to upload the invoice to S3.
    • To upload invoices to the root of the bucket:
      aws s3 cp </path/to/your/folder> s3://<your-bucket-name>/ --recursive

    • To upload invoices to a specific folder (for example, invoices):
      aws s3 cp </path/to/your/folder> s3://<your-bucket-name>/<prefix>/ --recursive

    • Validate the upload:
      aws s3 ls s3://<your-bucket-name>/

Process invoices with Amazon Bedrock

In this section, you will process the invoices in Amazon S3 and store the results in a JSON file (processed_invoice_output.json). You will extract the key details from the invoices (such as invoice numbers, dates, and amounts) and generate summaries.

You can trigger the processing of these invoices using the AWS CLI or automate the process with an Amazon EventBridge rule or AWS Lambda trigger. For this walkthrough, we will use the AWS CLI to trigger the processing.

We packaged the processing logic in the Python script invoices_processor.py, which can be run as follows:

python invoices_processor.py --bucket_name=<your-bucket-name> --prefix=<your-folder>

The --prefix argument is optional. If omitted, all of the PDFs in the bucket will be processed. For example:

python invoices_processor.py --bucket_name=’gen_ai_demo_bucket’

or

python invoices_processor.py --bucket_name='gen_ai_demo_bucket' --prefix='invoice'

Use the solution

This section examines the invoices_processor.py code. You can chat with your document either on the Amazon Bedrock console or by using the Amazon Bedrock RetrieveAndGenerate API (SDK). In this tutorial, we use the API approach.

    1. Initialize the environment: The script imports the necessary libraries and initializes the Amazon Bedrock and Amazon S3 client.
      import boto3
      import os
      import json
      import shutil
      import argparse
      import time
      import datetime
      import yaml
      from typing import Dict, Any, Tuple
      from concurrent.futures import ThreadPoolExecutor, as_completed
      from threading import Lock
      from mypy_boto3_bedrock_runtime.client import BedrockRuntimeClient
      from mypy_boto3_s3.client import S3Client
      
      # Load configuration from YAML file
      def load_config():
          """
          Load and return the configuration from the 'config.yaml' file.
          """
          with open('config.yaml', 'r') as file:
              return yaml.safe_load(file)
      
      CONFIG = load_config()
      
      write_lock = Lock() # Lock for managing concurrent writes to the output file
      
      def initialize_aws_clients() -> Tuple[S3Client, BedrockRuntimeClient]:
          """
          Initialize and return AWS S3 and Bedrock clients.
      
          Returns:
              Tuple[S3Client, BedrockRuntimeClient]
          """
          return (
              boto3.client('s3', region_name=CONFIG['aws']['region_name']),
              boto3.client(service_name='bedrock-agent-runtime', 
                           region_name=CONFIG['aws']['region_name'])
          )

    2. Configure : The config.yaml file specifies the model ID, Region, prompts for entity extraction, and the output file location for processing.
      aws: 
          region_name: us-west-2 
          model_id: anthropic.claude-3-sonnet-20240229-v1:0
          prompts: 
              full: Extract data from attached invoice in key-value format. 
              structured: | 
                  Process the pdf invoice and list all metadata and values in json format for the variables with descriptions in <variables></variables> tags. The result should be returned as JSON as given in the <output></output> tags. 
      
                  <variables> 
                      Vendor: Name of the company or entity the invoice is from. 
                      InvoiceDate: Date the invoice was created.
                      DueDate: Date the invoice is due and needs to be paid by. 
                      CurrencyCode: Currency code for the invoice amount based on the symbol and vendor details.
                      TotalAmountDue: Total amount due for the invoice
                      Description: a concise summary of the invoice description within 20 words 
                  </variables> 
      
                  Format your analysis as a JSON object in following structure: 
                      <output> {
                      "Vendor": "<vendor name>", 
                      "InvoiceDate":"<DD-MM-YYYY>", 
                      "DueDate":"<DD-MM-YYYY>",
                      "CurrencyCode":"<Currency code based on the symbol and vendor details>", 
                      "TotalAmountDue":"<100.90>" # should be a decimal number in string 
                      "Description":"<Concise summary of the invoice description within 20 words>" 
                      } </output> 
                  Please proceed with the analysis based on the above instructions. Please don't state "Based on the .."
              summary: Process the pdf invoice and summarize the invoice under 3 lines 
      
      processing: 
          output_file: processed_invoice_output.json
          local_download_folder: invoices

    3. Set up API calls: The RetrieveAndGenerate API fetches the invoice from Amazon S3 and processes it using the FM. It takes several parameters, such as prompt, source type (S3), model ID, AWS Region, and S3 URI of the invoice.
      def retrieve_and_generate(bedrock_client: BedrockRuntimeClient, input_prompt: str, document_s3_uri: str) -> Dict[str, Any]: 
          """ 
          Use AWS Bedrock to retrieve and generate invoice data based on the provided prompt and S3 document URI.
      
          Args: 
              bedrock_client (BedrockRuntimeClient): AWS Bedrock client 
              input_prompt (str): Prompt for the AI model
              document_s3_uri (str): S3 URI of the invoice document 
      
          Returns: 
              Dict[str, Any]: Generated data from Bedrock 
          """ 
          model_arn = f'arn:aws:bedrock:{CONFIG["aws"]["region_name"]}::foundation-model/{CONFIG["aws"]["model_id"]}' 
          return bedrock_client.retrieve_and_generate( 
              input={'text': input_prompt}, retrieveAndGenerateConfiguration={ 
                  'type': 'EXTERNAL_SOURCES',
                  'externalSourcesConfiguration': { 
                      'modelArn': model_arn, 
                      'sources': [ 
                          { 
                              "sourceType": "S3", 
                              "s3Location": {"uri": document_s3_uri} 
                          }
                      ] 
                  } 
              } 
          )

    4. Batch processing: The batch_process_s3_bucket_invoices function batch process the invoices in parallel in the specified S3 bucket and writes the results to the output file (processed_invoice_output.json as specified by output_file in config.yaml). It relies on the process_invoice function, which calls the Amazon Bedrock RetrieveAndGenerate API for each invoice and prompt.
      def process_invoice(s3_client: S3Client, bedrock_client: BedrockRuntimeClient, bucket_name: str, pdf_file_key: str) -> Dict[str, str]: 
          """ 
          Process a single invoice by downloading it from S3 and using Bedrock to analyze it. 
      
          Args: 
              s3_client (S3Client): AWS S3 client 
              bedrock_client (BedrockRuntimeClient): AWS Bedrock client 
              bucket_name (str): Name of the S3 bucket
              pdf_file_key (str): S3 key of the PDF invoice 
      
          Returns: 
              Dict[str, Any]: Processed invoice data 
          """ 
          document_uri = f"s3://{bucket_name}/{pdf_file_key}"
          local_file_path = os.path.join(CONFIG['processing']['local_download_folder'], pdf_file_key) 
      
          # Ensure the local directory exists and download the invoice from S3
          os.makedirs(os.path.dirname(local_file_path), exist_ok=True) 
          s3_client.download_file(bucket_name, pdf_file_key, local_file_path) 
      
          # Process invoice with different prompts 
          results = {} 
          for prompt_name in ["full", "structured", "summary"]:
              response = retrieve_and_generate(bedrock_client, CONFIG['aws']['prompts'][prompt_name], document_uri)
              results[prompt_name] = response['output']['text']
      
          return results

      def batch_process_s3_bucket_invoices(s3_client: S3Client, bedrock_client: BedrockRuntimeClient, bucket_name: str, prefix: str = "") -> int: 
          """ 
          Batch process all invoices in an S3 bucket or a specific prefix within the bucket. 
      
          Args: 
              s3_client (S3Client): AWS S3 client 
              bedrock_client (BedrockRuntimeClient): AWS Bedrock client 
              bucket_name (str): Name of the S3 bucket 
              prefix (str, optional): S3 prefix to filter invoices. Defaults to "". 
      
          Returns: 
              int: Number of processed invoices 
          """ 
          # Clear and recreate local download folder
          shutil.rmtree(CONFIG['processing']['local_download_folder'], ignore_errors=True)
          os.makedirs(CONFIG['processing']['local_download_folder'], exist_ok=True) 
      
          # Prepare to iterate through all objects in the S3 bucket
          continuation_token = None # Pagination handling
          pdf_file_keys = [] 
      
          while True: 
              list_kwargs = {'Bucket': bucket_name, 'Prefix': prefix}
              if continuation_token:
                  list_kwargs['ContinuationToken'] = continuation_token 
      
              response = s3_client.list_objects_v2(**list_kwargs)
      
              for obj in response.get('Contents', []): 
                  pdf_file_key = obj['Key'] 
                  if pdf_file_key.lower().endswith('.pdf'): # Skip folders or non-PDF files
                      pdf_file_keys.append(pdf_file_key) 
      
              if not response.get('IsTruncated'): 
                  break 
                  continuation_token = response.get('NextContinuationToken') 
      
          # Process invoices in parallel 
          processed_count = 0 
          with ThreadPoolExecutor() as executor: 
              future_to_key = { 
                  executor.submit(process_invoice, s3_client, bedrock_client, bucket_name, pdf_file_key): pdf_file_key
                  for pdf_file_key in pdf_file_keys 
              } 
      
              for future in as_completed(future_to_key):
                  pdf_file_key = future_to_key[future] 
                  try: 
                      result = future.result() 
                      # Write result to the JSON output file as soon as it's available 
                      write_to_json_file(CONFIG['processing']['output_file'], {pdf_file_key: result}) 
                      processed_count += 1 
                      print(f"Processed file: s3://{bucket_name}/{pdf_file_key}") 
                  except Exception as e: 
                      print(f"Failed to process s3://{bucket_name}/{pdf_file_key}: {str(e)}") 
      
          return processed_count

    5. Post-processing: The extracted data in processed_invoice_output.json can be further structured or customized to suit your needs.

This approach allows invoice handling from multiple vendors, each with its own unique format and structure. By using large language models (LLMs), it extracts important details such as invoice numbers, dates, amounts, and vendor information without requiring custom scripts for each vendor format.

Run the Streamlit demo

Now that you have the components in place and the invoices processed using Amazon Bedrock, it’s time to deploy the Streamlit application. You can launch the app by invoking the following command:

streamlit run review-invoice-data.py

or

python -m streamlit run review-invoice-data.py

When the app is up, it will open in your default web browser. From there, you can review the invoices and the extracted data side-by-side. Use the Previous and Next arrows to seamlessly navigate through the processed invoices so you can interact with and analyze the results efficiently. The following screenshot shows the UI.

There are quotas for Amazon Bedrock (of which some are adjustable) that you need to consider when building at scale with Amazon Bedrock.

Cleanup

To clean up after running the demo, follow these steps:

  • Delete the S3 bucket containing your invoices using the command
    aws s3 rb s3://<your-bucket-name> --force

  • If you set up a virtual environment, deactivate it by invoking deactivate
  • Remove any local files created during the process, including the cloned repository and output files
  • If you used any AWS resources such as an EC2 instance, terminate them to avoid unnecessary charges

Conclusion

In this post, we walked through a step-by-step guide to automating invoice processing using Streamlit and Amazon Bedrock, addressing the challenge of handling invoices from multiple vendors with different formats. We showed how to set up the environment, process invoices stored in Amazon S3, and deploy a user-friendly Streamlit application to review and interact with the processed data.

If you are looking to further enhance this solution, consider integrating additional features or deploying the app on scalable AWS services such as Amazon SageMaker, Amazon EC2, or Amazon ECS. Due to this flexibility, your invoice processing solution can evolve with your business, providing long-term value and efficiency.

We encourage you to learn more by exploring Amazon Bedrock, Access Amazon Bedrock foundation models, RetrieveAndGenerate API, and Quotas for Amazon Bedrock and building a solution using the sample implementation provided in this post and a dataset relevant to your business. If you have questions or suggestions, leave a comment.


About the Authors

Deepika Kumar is a Solution Architect at AWS. She has over 13 years of experience in the technology industry and has helped enterprises and SaaS organizations build and securely deploy their workloads on the cloud securely. She is passionate about using Generative AI in a responsible manner whether that is driving product innovation, boost productivity or enhancing customer experiences.

Jobandeep Singh is an Associate Solution Architect at AWS specializing in Machine Learning. He supports customers across a wide range of industries to leverage AWS, driving innovation and efficiency in their operations. In his free time, he enjoys playing sports, with a particular love for hockey.

Ratan Kumar is a solutions architect based out of Auckland, New Zealand. He works with large enterprise customers helping them design and build secure, cost-effective, and reliable internet scale applications using the AWS cloud. He is passionate about technology and likes sharing knowledge through blog posts and twitch sessions.

Read More

Centralize model governance with SageMaker Model Registry Resource Access Manager sharing

Centralize model governance with SageMaker Model Registry Resource Access Manager sharing

We recently announced the general availability of cross-account sharing of Amazon SageMaker Model Registry using AWS Resource Access Manager (AWS RAM), making it easier to securely share and discover machine learning (ML) models across your AWS accounts.

Customers find it challenging to share and access ML models across AWS accounts because they have to set up complex AWS Identity and Access Management (IAM) policies and create custom integrations. With this launch, customers can now seamlessly share and access ML models registered in SageMaker Model Registry between different AWS accounts.

Customers can use the SageMaker Studio UI or APIs to specify the SageMaker Model Registry model to be shared and grant access to specific AWS accounts or to everyone in the organization. Authorized users can then quickly discover and use those shared models in their own AWS accounts. This streamlines the ML workflows, enables better visibility and governance, and accelerates the adoption of ML models across the organization.

In this post, we will show you how to use this new cross-account model sharing feature to build your own centralized model governance capability, which is often needed for centralized model approval, deployment, auditing, and monitoring workflows. Before we dive into the details of the architecture for sharing models, let’s review what use case and model governance is and why it’s needed.

Use case governance is essential to help ensure that AI systems are developed and used in ways that respect values, rights, and regulations. According to the EU AI Act, use case governance refers to the process of overseeing and managing the development, deployment, and use of AI systems in specific contexts or applications. This includes:

  • Risk assessment: Identifying and evaluating potential risks associated with AI systems.
  • Mitigation strategies: Implementing measures to minimize or eliminate risks.
  • Transparency and explainability: Making sure that AI systems are transparent, explainable, and accountable.
  • Human oversight: Including human involvement in AI decision-making processes.
  • Monitoring and evaluation: Continuously monitoring and evaluating AI systems to help ensure compliance with regulations and ethical standards.

Model governance involves overseeing the development, deployment, and maintenance of ML models to help ensure that they meet business objectives and are accurate, fair, and compliant with regulations. It includes processes for monitoring model performance, managing risks, ensuring data quality, and maintaining transparency and accountability throughout the model’s lifecycle. In AWS, these model lifecycle activities can be performed over multiple AWS accounts (for example, development, test, and production accounts) at the use case or business unit level. However, model governance functions in an organization are centralized and to perform those functions, teams need access to metadata about model lifecycle activities across those accounts for validation, approval, auditing, and monitoring to manage risk and compliance.

Use case and model governance plays a crucial role in implementing responsible AI and helps with the reliability, fairness, compliance, and risk management of ML models across use cases in the organization. It helps prevent biases, manage risks, protect against misuse, and maintain transparency. By establishing robust oversight, organizations can build trust, meet regulatory requirements, and help ensure ethical use of AI technologies.

Use case and model lifecycle governance overview

In the context of regulations such as the European Union’s Artificial Intelligence Act (EU AI Act), a use case refers to a specific application or scenario where AI is used to achieve a particular goal or solve a problem. The EU AI Act proposes to regulate AI systems based on their intended use cases, which are categorized into four levels of risk:

  1. Unacceptable risk: Significant threat to safety, livelihoods, or rights
  2. High risk: Significant impacts on lives (for example, use of AI in healthcare and transportation)
  3. Limited risk: Minimal impacts (for example, chatbots and virtual assistants)
  4. Minimal risk: Negligible risks (for example, entertainment and gaming)

An AI system is built to satisfy a use case such as credit risk, which can be comprised of workflows orchestrated with one or more ML models—such as credit risk and fraud detection models. You can build a use case (or AI system) using existing models, newly built models, or combination of both. Regardless of how the AI system is built, governance will be applied at the AI system level where use case decisions (for example, denying a loan application) are being made. However, explaining why that decision was made requires next-level detailed reports from each affected model component of that AI system. Therefore, governance applies both at the use case and model level and is driven by each of their lifecycle stages.

Use case lifecycle stages

A use case has its own set of lifecycle stages from development through deployment to production, shown in the following figure. A use case typically starts with an experimentation or proof-of-concept (POC) stage where the idea is explored for feasibility. When the use case is determined to be feasible, it’s approved and moves to the next stage for development. The use case is then developed using various components including ML models and unit testing, and then moved to the next stage—quality assurance (QA)—after approval. Next, the use case is tested, validated, and approved to be moved to the pre-production stage where it’s A/B tested with production-like settings and approved for the next stage. Now, the use case is deployed and operational in production. When the use case is no longer needed for business, it’s retired and decommissioned. Even though these stages are depicted as linear in the diagram, they are frequently iterative.

Model lifecycle stages

When an ML model is developed it goes through a similar set of lifecycle stages as a use case. In the case of an ML model, shown in the following figure, the lifecycle starts with the development or candidate model. Prior to that stage, there would be several experiments performed to build the candidate model. From a governance perspective, tracking starts from the candidate or dev model stage. After approval in dev, the model moves into the QA stage where it’s validated and integration tested to make sure that it meets the use case requirements and then is approved for promotion to the next stage. The model is then A/B tested along with the use case in pre-production with production-like data settings and approved for deployment to the next stage. The model is finally deployed to production. When the model is no longer needed, it’s retired and removed from deployed endpoints.

Stage status types

In the preceding use case and model stages discussion, we mentioned approving the model to go to the next stage. However, there are two other possible states—pending and rejected, as depicted in the following figure. These stages are applicable to both use case and model stages. For example, a use case that’s been moved from the QA stage to pre-production could be rejected and sent back to the development stage for rework because of missing documentation related to meeting certain regulatory controls.

Multi-account architecture for sharing models

A multi-account strategy improves security, scalability, and reliability of your systems. It also helps achieve data, project, and team isolation while supporting software development lifecycle best practices. Cross-account model sharing supports a multi-account strategy, removing the overhead of assuming roles into multiple accounts. Furthermore, sharing model resources directly across multiple accounts helps improve ML model approval, deployment, and auditing.

The following diagram depicts an architecture for centralizing model governance using AWS RAM for sharing models using a SageMaker Model Group, a core construct within SageMaker Model Registry where you register your model version.

Figure 1:  Centralizing Model Governance using AWS RAM Share

Figure 1:  Centralizing Model Governance using AWS RAM Share

In the architecture presented in the preceding figure, the use case stakeholder, data scientist (DS) and ML engineer (MLE) perform the following steps:

  1. The use case stakeholder, that is the DS team lead, receives the request to build an AI use case such as credit risk from their line of business lead.
    • The DS team lead records the credit risk use case in the POC stage in the stage governance table.
    • The MLE is notified to set up a model group for new model development. The MLE creates the necessary infrastructure pipeline to set up a new model group.
  2. The MLE sets up the pipeline to share the model group with the necessary permissions (create and update the model version) to the ML project team’s development account. Optionally, this model group can also be shared with their test and production accounts if local account access to model versions is needed.
  3. The DS uses SageMaker Training jobs to generate metrics captured by , selects a candidate model, and registers the model version inside the shared model group in their local model registry.
  4. Because this is a shared model group, the actual model version will be recorded in the shared services account model registry and a link will be maintained in the development account. The Amazon S3 model artifacts associated to the model will be copied to the shared services account when the model is registered in the shared services model registry.
  5. The model group and associated model version will be synced into the model stage governance Amazon DynamoDB table with attributes such as model group, model version, model stage (development, test, production, and so on), model status (pending, approved, or rejected), and model metrics (in JSON format). The ML admin sets up this table with the necessary attributes based on their central governance requirements.
  6. The model version is approved for deployment into the test stage and is deployed into the test account along with necessary infrastructure for invoking the model, such as an Amazon API gateway and AWS Lambda
  7. Model is integration tested in the test environment and model test metrics are updated in the model stage governance table
  8. Model test results are validated, and the model version is approved for deployment into the production stage and is deployed into the production account along with the necessary infrastructure for invoking the model such as an API gateway and Lambda functions.
  9. The model is A/B tested or optionally shadow tested in the production environment and model production metrics are updated in the model stage governance table. When satisfactory production results are attained, the model version is rolled out in the production environment.
  10. The model governance (compliance) officer uses the governance dashboard to act on model governance functions such as reviewing the model to validate compliance and monitoring for risk mitigation.

Building a central model registry using model group resource sharing

Model group resource sharing makes it possible to build a central model registry with few clicks or API calls without needing to write complex IAM policies. We will demonstrate how to set up a central model registry based on the architecture we described in the previous sections. We will start by using the SageMaker Studio UI and then by using APIs. In both cases, we will demonstrate how to create a model package group in the ML Shared Services account (Account A) and share it with the ML Dev account (Account B) so that any updates to model versions in Account B automatically update the corresponding model versions in Account A.

Prerequisites

You need to have the following prerequisites in place to implement the solution in this post.

After you have the prerequisites set up, start by creating and sharing a model group across accounts. The basic steps are:

  1. In Account A, create a model group.
  2. In Account A, create a resource share for the model group, and then attach permissions and specify the target account to share the resource. Permissions can be standard or custom.
  3. Account B should accept the resource sharing invitation to start using the shared resource from Account A.
  4. Optionally, if Account A and Account B are part of the same AWS Organizations, and the resource sharing is enabled within AWS Organizations, then the resource sharing invitation are auto accepted without any manual intervention.

Create and share a model group across accounts using SageMaker Studio

The following section shows how to use SageMaker Studio to share models in a multi-account environment to build a central model registry. The following are instructions for using the AWS Management Console for SageMaker Studio to create a model package group in the shared services account, adding the necessary permissions, with the ML Dev account.

To use the console to create and share a model package:

  1. In the SageMaker Studio console, sign in to Account A and navigate to the model registry, select the model package group (in this example, the credit-risk-package-group-1724904598), and choose Share.
  2. In Account A, select the appropriate permissions to share the model package group with Account B. If you need to allow custom policy, navigate to the AWS RAM console and create the policy.
  3. After selecting the permission policy, specify Account B (and any other accounts) to share the resource, then choose Share.
  4. In Account B, navigate to the model registry, choose Shared with me, and then choose View pending approvals to see the model shared from Account A.
  5. Accept the model invitation from Account A to access the shared model package group and its versions. When accounts are set up in the same organization, invitations will be accepted without requiring user intervention.

Create and share the model group across accounts using APIs

The following section shows how to use APIs to share models in a multi-account environment to build a central model registry. Create a model package group in the ML Shared Services account (Account A) and share it with the ML Dev account (Account B).

Following are the steps completed by using APIs to create and share a model package group across accounts.

  1. In Account A, create a model package group.
  2. In Account A, if needed, create custom sharing permissions; otherwise use standard sharing permissions.
  3. In Account A, create a resource share for the model package group, attach permissions, and specify the target account to share the resource.
  4. In Account B, accept the resource sharing invitation to start using the resource.
  5. If Account A and B are part of the same organization, then the resource sharing invitation can be accepted without any manual intervention.

Run the following code in the ML Shared Services account (Account A).

import json
import time
import os
import boto3

region = boto3.Session().region_name

sm_client = boto3.client('sagemaker', region_name=region)

# Replace model package group name as per use case
model_package_group_name = "model-group-" + str(round(time.time()))
model_package_group_input_dict = {
 "ModelPackageGroupName" : model_package_group_name,
 "ModelPackageGroupDescription" : "Sample model package group"
}

# Create Model package group with Sagemaker client
create_model_package_group_response = sm_client.create_model_package_group(**model_package_group_input_dict)
model_package_group_arn = create_model_package_group_response['ModelPackageGroupArn']
print('ModelPackageGroup Arn : {}'.format(model_package_group_arn))

ram_client = boto3.client('ram')

# # Use this code path to create custom permission
# # Custom permission template resource policy string
# policy_template = '{nt"Effect": "Allow",nt"Action": [ntt"sagemaker:DescribeModelPackageGroup"nt]n}'
# permission = ram_client.create_permission(
#     name = "custom-permission" + str(round(time.time())),
#     resourceType = "sagemaker:ModelPackageGroup",
#     policyTemplate = policy_template
# )
# print('Created Permission: {}'.format(permission['permission']['arn']))
# permission = permission['permission']['arn']


# Use this code path to use managed Permission
# It can be one of:
# 1. arn:aws:ram::aws:permission/AWSRAMDefaultPermissionSageMakerModelPackageGroup
# 2. arn:aws:ram::aws:permission/AWSRAMPermissionSageMakerModelPackageGroupAllowDeploy
# 3. arn:aws:ram::aws:permission/AWSRAMPermissionSageMakerModelPackageGroupAllowRegister
# More details : 
permission = 'arn:aws:ram::aws:permission/AWSRAMDefaultPermissionSageMakerModelPackageGroup'

# Principals can be IAM User, Role, Account or Organization ID. Ref: https://boto3.amazonaws.com/v1/documentation/api/latest/reference/services/ram/client/create_resource_share.html
response = ram_client.create_resource_share(
    name="model-group-resource-share",
    resourceArns=[create_model_package_group_response['ModelPackageGroupArn']],
    principals=['12345'],
    permissionArns = [permission]
)

resource_share_arn = response['resourceShare']['resourceShareArn']
print('Resource Share Arn : {}'.format(resource_share_arn))

Run the following code in the ML Dev account (Account B).

import json
import os
import boto3
from time import gmtime, strftime 

region = boto3.Session().region_name

ram_client = boto3.client('ram')
response = ram_client.get_resource_share_invitations()
pending_invitations = []
# Review all pending invitations
for i in response['resourceShareInvitations']:
    if i['status'] == "PENDING":
        pending_invitations.append(i)
print(pending_invitations,sep='n')

# Accept the resource share invitation from central account
# Replace with the intended invitation arn for acceptance from the central account
if pending_invitations:
    response = ram_client.accept_resource_share_invitation(resourceShareInvitationArn=pending_invitations[0]['resourceShareInvitationArn'])
    print(response) 

sm_client = boto3.client('sagemaker', region_name=region)

response = sm_client.list_model_package_groups(CrossAccountFilterOption="CrossAccount")

MLflow experimentation with the shared model group

The following section shows you how to use Amazon SageMaker with MLflow to track your experiments in the development account and save candidate models in the shared model group while developing a credit risk model. It’s a binary classification problem where the goal is to predict whether a customer is a credit risk. If you want to run the code in your own environment, check out the notebook in this GitHub repository.

SageMaker with MLflow is a capability of SageMaker that you can use to create, manage, analyze, and compare your ML experiments. To get started with MLflow, you need to set up an MLflow tracking server to monitor your experiments and runs. You can set up the server programmatically or by using the SageMaker Studio UI. It can take up to 20 minutes for the setup to complete. The following code snippet shows how to create a tracking server.

sagemaker_client = boto3.client("sagemaker")
timestamp = strftime('%d-%H-%M-%S', gmtime())
server_name = f"mlflow-{domain_id}-{timestamp}"
response = sagemaker_client.create_mlflow_tracking_server(
    TrackingServerName=server_name,
    ArtifactStoreUri=f"s3://{bucket_name}/mlflow/{timestamp}",
    RoleArn=sm_role,
    AutomaticModelRegistration=True,
)

mlflow_arn = response['TrackingServerArn']

To set up an MLflow tracking server in SageMaker Studio, choose the MLflow application icon. When your server is running, click on the ellipses button and then click on Open MLflow button to open the MLflow UI.

Now that your MLflow tracking server is running, you can start tracking your experiments. MLflow tracking allows you to programmatically track the inputs, parameters, configurations, and models of your iterations as experiments and runs.

  • Runs are executions of some piece of data science code and record metadata and generated artifacts.
  • An experiment collects multiple runs with the same objective.

The following code shows you how to set up an experiment and track your executions while developing the credit risk model.

Data preparation

For this example, you will use the South German Credit dataset open source dataset. To use the dataset to train the model, you need to first do some pre-processing, You can run the pre-processing code in your JupyterLab application or on a SageMaker ephemeral cluster as a SageMaker Training job using the @remote decorator. In both cases, you can track your experiments using MLflow.

The following code demonstrates how to track your experiments when executing your code on a SageMaker ephemeral cluster using the @remote decorator. To get started, set-up a name for your experiment.

from time import gmtime, strftime
experiment_suffix = strftime('%d-%H-%M-%S', gmtime())
experiment_name = f"credit-risk-model-experiment-{experiment_suffix}"

The processing script creates a new MLflow active experiment by calling the mlflow.set_experiment() method with the experiment name above. After that, it invokes mlflow.start_run() to launch an MLflow run under that experiment.

@remote(s3_root_uri=f"s3://{bucket_name}/{prefix}", dependencies=f"requirements.txt", instance_type="ml.m5.large")
def preprocess(df, experiment_name, mlflow_arn, bucket_name, prefix, run_id=None): 
    try:
        suffix = strftime('%d-%H-%M-%S', gmtime())
        mlflow.set_tracking_uri(mlflow_arn)
        mlflow.set_experiment(experiment_name=experiment_name if experiment_name else f"credit-risk-model-experiment-{suffix}")
        run = mlflow.start_run(run_id=run_id) if run_id else mlflow.start_run(run_name=f"remote-processing-{suffix}", nested=True)
        .....
     except Exception as e:
        print(f"Exception in processing script: {e}")
        raise e
    finally:
        mlflow.end_run()

You can also log the input dataset and the sklearn model used to fit the training set during pre-processing as part of the same script.

model_dataset = mlflow.data.from_pandas(df)
mlflow.log_input(model_dataset, context="model_dataset")

.....

featurizer_model = transformer.fit(X)
features = featurizer_model.transform(X)
labels = LabelEncoder().fit_transform(y)

.....

mlflow.sklearn.log_model(
    sk_model=featurizer_model,
    artifact_path=f"processing/model",
    registered_model_name="sk-learn-model",
)

In the MLflow UI, use the Experiments to locate your experiment. Its name should start with “credit-risk-model-experiment”.

Click on the experiment name to reveal the table with the associated Runs and then click on the Run whose name starts with “remote-processing”. You will see its details as sin the following figure.

Click on the Artifacts tab to see the MLFlow model generated.

Model training

You can continue experimenting with different feature engineering techniques in your JupyterLab environment and track your experiments in MLflow. After you have completed the data preparation step, it’s time to train the classification model. You can use the xgboost algorithm for this purpose and run your code either in your JupyterLab environment or as a SageMaker Training job. Again, you can track your experiments using MLflow in both cases. The following example shows how to use MLflow with a SageMaker Training job in your code. You can use the method mlflow.autolog() to log metrics, parameters, and models without the need for explicit log statements.

import xgboost
import pickle as pkl
import os
import mlflow
import tarfile

@remote(s3_root_uri=f"s3://{bucket_name}/{prefix}", dependencies=f"requirements.txt", instance_type="ml.m5.large")
def train(X, val_X, y, val_y, num_round, params, mlflow_arn, experiment_name,run_id=None):
    output_path = "/opt/ml/model"
    mlflow.set_tracking_uri(mlflow_arn)
    mlflow.autolog()
    
    suffix = strftime('%d-%H-%M-%S', gmtime())
    mlflow.set_experiment(experiment_name=experiment_name if experiment_name else f"credit-risk-model-experiment-{suffix}")
    run = mlflow.start_run(run_id=run_id) if run_id else mlflow.start_run(run_name=f"remote-training-{suffix}", nested=True)

    try:
        os.makedirs(output_path, exist_ok=True)
        print(f"Directory '{output_path}' created successfully.")
    except OSError as e:
        print(f"Error creating directory '{output_path}': {e}")
        
    dtrain = xgboost.DMatrix(X, label=y)
    dval = xgboost.DMatrix(val_X, label=val_y)

    dtrain = xgboost.DMatrix(X, label=y)
    dval = xgboost.DMatrix(val_X, label=val_y)

    watchlist = [(dtrain, "train"), (dval, "validation")]
    mlflow.log_params(params)

    print("Training the model")
    evaluation__results = {}
    bst = xgboost.train(
        params=params, dtrain=dtrain, evals=watchlist, num_boost_round=num_round
    )
    pkl.dump(bst, open(output_path + "/model.bin", "wb"))

     # Compress the model.bin artifact to a tar file
    tar_filename = f"{output_path}/model.tar.gz"
    with tarfile.open(tar_filename, "w:gz") as tar:
        tar.add(f"{output_path}/model.bin", arcname="model.bin")

    mlflow.log_artifact(local_path=tar_filename)

In addition, you can use the mlflow.log_artifact() method to save the model.tar.gz file in MLflow so that you can directly use it later when you register the model to the model registry.

Navigate back to the MLflow UI. Click on the name of your experiment at the top of your screen starting with “credit-risk-model-experiment” to see the updated Runs table. Click on the name of your remote-training Run to see the overview of the training run including the associated hyperparameters, model metrics, and generated model artifacts.

The following figure shows the overview of a training run.

Click on the Model metrics tab to view the metrics tracked during the training run. The figure below shows the metrics of a training run.

Click on the Artifacts tab to view the artifacts generated during the training run. The following figure shows an example of the generated artifacts.

Registering the model to the model registry

ML experimentation is an iterative process and you typically end up with a number of candidate models. With MLflow, you can compare these models to identify the one that you want to move to quality assurance for approval. The following is an example of how to retrieve the best candidate using the MLflow API based on a specific metric.

from mlflow.entities import ViewType

run_filter = f"""
attributes.run_name LIKE "%training%"
attributes.status = 'FINISHED'
"""

runs_with_filter = mlflow.search_runs(
    experiment_names=[experiment_name],
    run_view_type=ViewType.ACTIVE_ONLY,
    filter_string=run_filter,
    order_by=["metrics.`validation-auc` DESC"],
)
best_run = runs_with_filter[:1]
artifact_uri = best_run['artifact_uri'][0]

After you have selected a model, you can register it to the shared model group in the shared services account. You can discover the model groups that are available to you either through the SageMaker Studio UI or programmatically.

The final step is to register the candidate model to the model group as a new model version.

modelpackage_inference_specification =  {
    "InferenceSpecification": {
      "Containers": [
         {
            "Image": "885854791233.dkr.ecr.us-east-1.amazonaws.com/sagemaker-distribution-prod@sha256:9e7622bbe2f3ee9dd516797bfe3ed310983b96190eeefbdeeeea69519d3946fe",
            "ModelDataUrl": f"{artifact_uri}/model.tar.gz"
         }
      ],
      "SupportedContentTypes": [ "text/csv" ],
      "SupportedResponseMIMETypes": [ "text/csv" ],
   },
    "ModelPackageGroupName" : model_package_group_arn,
    "ModelPackageDescription" : "Model to detect credit risk",
    "ModelApprovalStatus" : "PendingManualApproval"
}

model_package_group_name = "model-group-" + str(round(time.time()))

create_model_package_input_dict = {
    "ModelPackageGroupName" : model_package_group_name,
    "ModelPackageDescription" : "Model to detect credit risk",
    "ModelApprovalStatus" : "PendingManualApproval"
}
create_model_package_input_dict.update(modelpackage_inference_specification)

create_model_package_response = sagemaker_client.create_model_package(**create_model_package_input_dict)
model_package_arn = create_model_package_response["ModelPackageArn"]
print('ModelPackage Version ARN : {}'.format(model_package_arn))

Design considerations for use case and model stage governance

Use case and model stage governance is a construct to track governance information of a use case or model across various stages in its journey to production. Also, periodic tracking of key model performance and drift metrics is used to surface those metrics for governance functions.

There are several use case and model stage governance attributes that need to be tracked, such as the following:

  1. Use case ID: Unique OD of the use case.
  2. Use case name: Name of the use case.
  3. Use case stage: Current stage of the use case. For example, proof of concept, development, QA, and so on.
  4. Model group: SageMaker model group name.
  5. Model version: SageMaker model version name.
  6. Model owner: Person or entity who owns the model.
  7. Model LoB: Model owner’s line of business.
  8. Model project: Project or use case that the model is part of.
  9. Model stage: Stage where the model version is deployed. For example, development, test, or production.
  10. Model status: Status of the model version in a given stage. For example, pending or approved.
  11. Model risk: Risk categorization of the model version. For example, high, medium, or low.
  12. Model validation metrics: Model validation metrics in JSON format.
  13. Model monitoring metrics: Model monitoring metrics in JSON format. This needs to include the endpoint from which this metrics was captured.
  14. Model audit timestamp: Timestamp when this record was updated.
  15. Model audit user: User who updated this record.

Create a use case or model stage governance construct with the preceding set of attributes and drive your deployment and governance workflows using this table. Next, we will describe the design considerations for deployment and governance workflows.

Design considerations for deployment and governance workflows

Following are the design consideration for the deployment and governance workflows:

  1. The model version is built in the development account and registered with pending status in the central model registry or model group.
  2. A sync process is triggered to capture the key model attributes, derive additional governance attributes, and create a development stage record in the model governance stage table. Model artifacts from the development account are synced into the central model registry account.
  3. The model owner approves the model version in the development stage for deployment to the test stage in the central model registry.
  4. A deployment pipeline is triggered and the model is deployed to the test environment and a new test stage record is created for that model version.
  5. The model version is tested and validated in the test environment and validation metrics are captured in the test stage record in the model governance stage construct.
  6. The governance officer verifies the model validation results and approves the model version for deployment to production. The production stage record is created for the model version in the model governance stage table.
  7. A deployment pipeline is triggered and the model is deployed to the production environment and the production stage record model status is updated to deployed for that model version.
  8. After the model monitoring jobs are set up, model inference metrics are periodically captured and aggregated and model metrics are updated in model stage governance table.
  9. The use case stage value is updated to the next stage when all models for that use case are approved in the previous stage.

Conclusion

In this post, we have discussed how to centralize your use case and model governance function in a multi-account environment using the new model group sharing feature of SageMaker Model Registry. We shared an architecture for setting up central use case and model governance and walked through the steps involved in building that architecture. We provided practical guidance for setting up cross-account model group sharing using SageMaker Studio and APIs. Finally, we discussed key design considerations for building the centralized use case and model governance functions to extend the native SageMaker capabilities. We encourage you to try this model-sharing feature along with centralizing your use case and model governance functions. You can leave feedback in the comments section.


About the authors

Ram Vittal is a Principal ML Solutions Architect at AWS. He has over 3 decades of experience architecting and building distributed, hybrid, and cloud applications. He is passionate about building secure and scalable AI/ML and big data solutions to help enterprise customers with their cloud adoption and optimization journey to improve their business outcomes. In his spare time, he rides his motorcycle and walks with his 3-year-old Sheepadoodle.

Anastasia Tzeveleka is a Senior Generative AI/ML Specialist Solutions Architect at AWS. As part of her work, she helps customers across EMEA build foundation models and create scalable generative AI and machine learning solutions using AWS services.

Siamak Nariman is a Senior Product Manager at AWS. He is focused on AI/ML technology, ML model management, and ML governance to improve overall organizational efficiency and productivity. He has extensive experience automating processes and deploying various technologies.

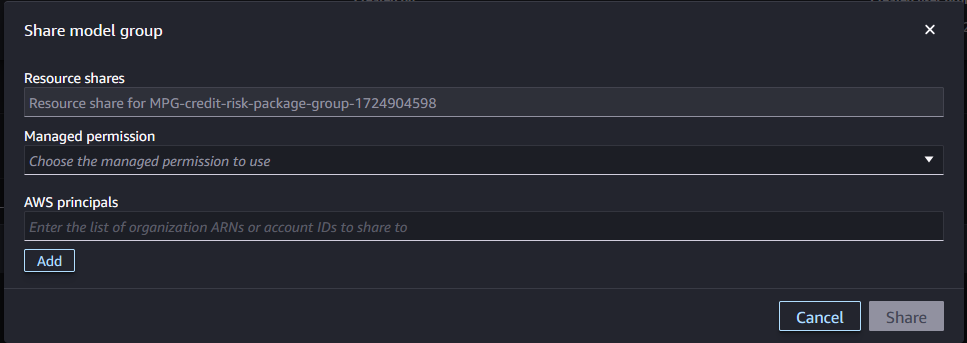
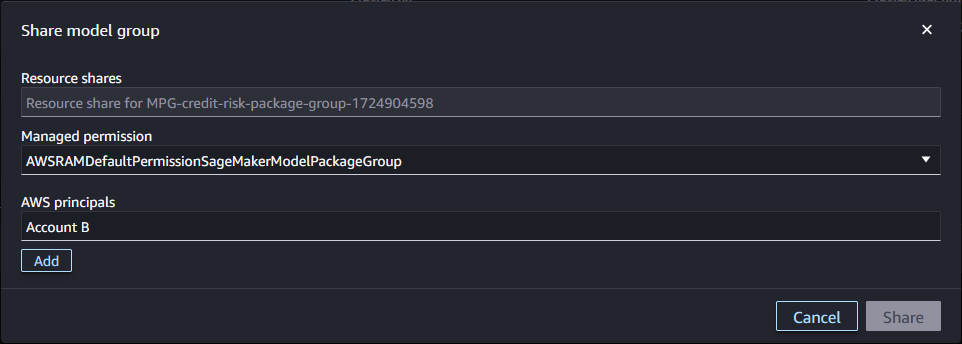
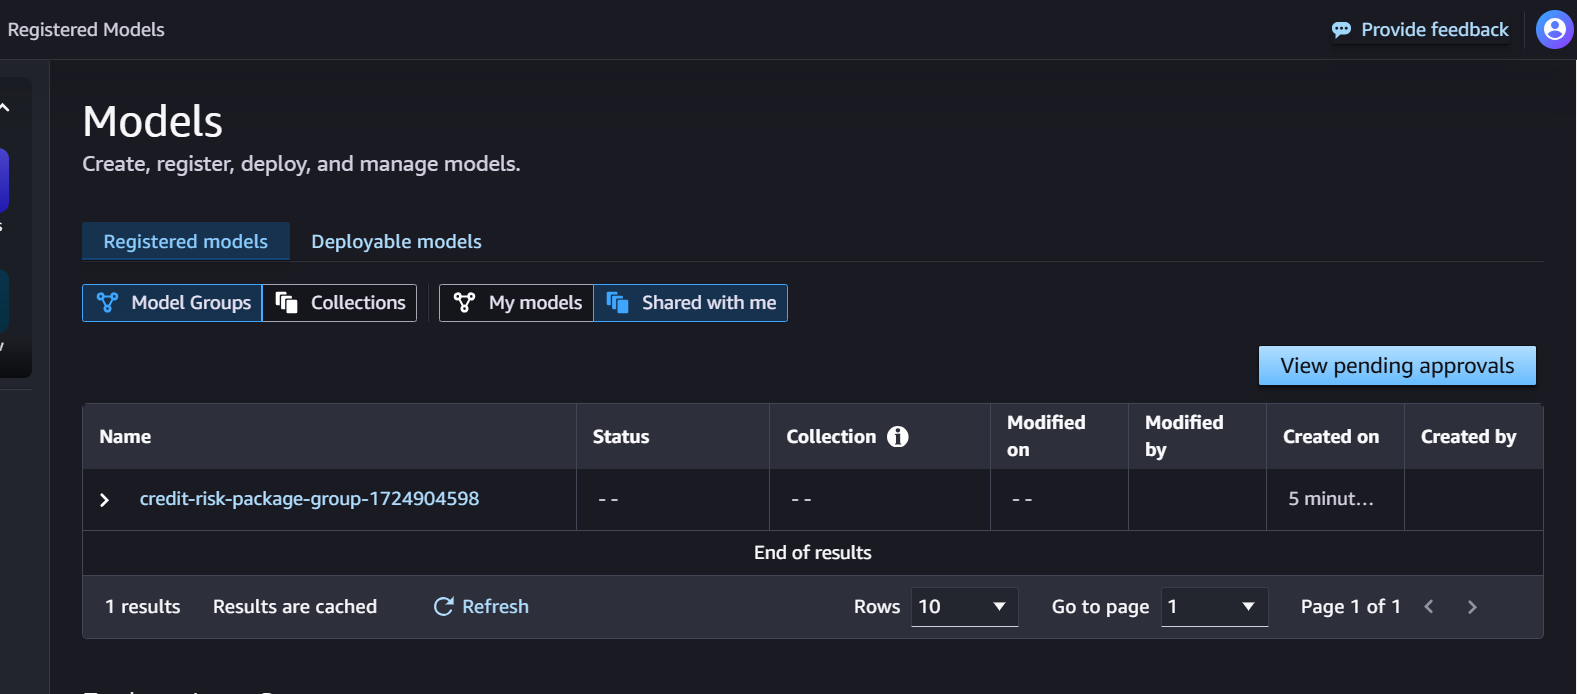
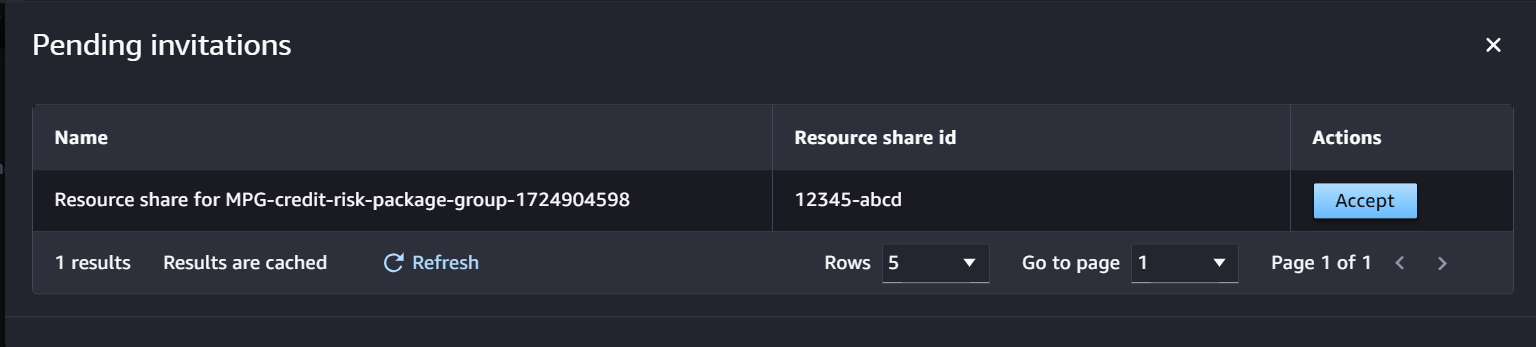
Madhubalasri B. is a Software Development Engineer at Amazon Web Services (AWS), focusing on the SageMaker Model Registry and machine learning governance domain. She has expertise in cross-account access and model sharing, ensuring secure, scalable, and compliant deployment of machine learning models. Madhubalasri is dedicated to driving innovation in ML governance and optimizing model management processes

Saumitra Vikaram is a Senior Software Engineer at AWS. He is focused on AI/ML technology, ML model management, ML governance, and MLOps to improve overall organizational efficiency and productivity.

Keshav Chandakis a Software Engineer at AWS with a focus on the SageMaker Repository Service. He specializes in developing capabilities to enhance governance and management of ML models.

Read More

Revolutionize trip planning with Amazon Bedrock and Amazon Location Service

Revolutionize trip planning with Amazon Bedrock and Amazon Location Service

Have you ever stumbled upon a breathtaking travel photo and instantly wondered where it was and how to get there? With 1.3 billion international arrivals in 2023, international travel is poised to exceed pre-pandemic levels and break tourism records in the coming years. Each one of these millions of travelers need to plan where they’ll stay, what they’ll see, and how they’ll get from place to place. This is where AWS and generative AI can revolutionize the way we plan and prepare for our next adventure. With the significant developments in the field of generative AI, intelligent applications powered by foundation models (FMs) can help users map out an itinerary through an intuitive natural conversation interface. It’s like having your own personal travel agent whenever you need it.

Amazon Bedrock is the place to start when building applications that will amaze and inspire your users. Amazon Bedrock is a fully managed service that empowers developers with an uncomplicated solution to build and scale generative AI applications by offering a choice of high-performing FMs from leading companies like AI21 Labs, Anthropic, Cohere, Meta, Stability AI, and Amazon through a single API, along with a broad set of capabilities that you need to build generative AI applications with security, privacy, and responsible AI. It enables you to privately customize the FM of your choice with your data using techniques such as fine-tuning, prompt engineering, and retrieval augmented generation (RAG) and build agents that run tasks using your enterprise systems and data sources while adhering to security and privacy requirements.

In this post, we show you how to build a generative AI-powered trip-planning service that revolutionizes the way travelers discover and explore destinations. By using advanced AI technology and Amazon Location Service, the trip planner lets users translate inspiration into personalized travel itineraries. This innovative service goes beyond traditional trip planning methods, offering real-time interaction through a chat-based interface and maintaining scalability, reliability, and data security through AWS native services.

Architecture

The following figure shows the architecture of the solution.

The workflow of the solution uses the following steps.

  1. A user interacts with an AWS Amplify frontend to initiate a trip planning request, either through text or by uploading an image. The user can access and interact with the generated trip itinerary through the frontend application, which includes visualizations on maps powered by Amazon Location Service and Amplify.
  2. If an image is uploaded, it is stored in Amazon Simple Storage Service (Amazon S3), and a custom AWS Lambda function will use a machine learning model deployed on Amazon SageMaker to analyze the image to extract a list of place names and the similarity score of each place name. It will then return the place name with the highest similarity score. The user’s request is sent to AWS API Gateway, which triggers a Lambda function to interact with Amazon Bedrock using Anthropic’s Claude Instant V1 FM to process the user’s request and generate a natural language response of the place location.
  3. If the user interacts using text, it will trigger the Amazon Bedrock FM directly, providing the natural language response of the place location.
  4. Amazon Location Service is integrated to provide precise location (location coordinates) data based on the place name. If the user prompt consists of suggestions such as searching for places of interests (POIs), it will pinpoint these POIs on the map within the chat interface as well.
  5. A Lambda function combines the generative AI response from Amazon Bedrock with the location data from Amazon Location Service to create a personalized and context-aware trip itinerary.
  6. The conversation history of the user is stored in Amazon DynamoDB.

Core benefits of Amazon Bedrock and Amazon Location Service

Amazon Bedrock provides capabilities to build generative AI applications with security, privacy, and responsible AI practices. Being serverless, it allows secure integration and deployment of generative AI capabilities without managing infrastructure.

Amazon Location Service offers cost-effective, high-quality location-based services. It provides geospatial data based on coordinates, enabling accurate mapping, geofencing, and tracking capabilities for various applications. With a single API across multiple providers, it offers seamless integration, flexibility, and efficient application development with built-in health monitoring and AWS service integration.

By integrating Amazon Bedrock with Amazon Location Service, the virtual trip planning application uses the strengths of both services. Amazon Bedrock enables the use of top FMs for specific use cases and customization for generating contextual responses, while Amazon Location Service provides location data and mapping capabilities. This integration offers tailored trip recommendations through engaging responses powered by generative AI and intuitive visualization on maps.

Key features

Other currently available search engines often require multiple customer touch points and actions to gather information; this virtual trip planner streamlines the process into a seamless, intuitive experience. With a few clicks, users can access location coordinates, personalized itineraries, and real-time assistance, eliminating the need for cumbersome navigation across various sites and internet tabs. These features are presented in a web UI that was designed as a one-stop solution for our users. The following figure shows the start of a trip-planning chat.

Within this innovative generative AI solution, there’s a key feature of chat-based natural language interaction that enhances the solution by introducing a user-friendly conversational interface. This capability enables users to engage in dynamic conversations, articulating their preferences, interests, and constraints in a conversational manner. Notably, this functionality eliminates the need for navigating through complex tasks solely to plan a trip, fostering a more personalized and human-like interaction. The following figure shows the first question and response in the solution.

This application uses Anthropic’s Claude Instant V1 on Amazon Bedrock, where it’s designed to respond with context-specific insights, dynamically adapting to the ongoing conversation. Through natural language processing algorithms and machine learning techniques, the large language model (LLM) analyzes the user’s queries in real time, extracting relevant context and intent to deliver tailored responses. Whether the user is seeking recommendations for accommodations, exploring POIs, or inquiring about transportation options, the model will use contextual understanding to provide accurate and personalized assistance to the user. This responsiveness makes sure that each interaction feels intuitive and fluid, mimicking the experience of conversing with a knowledgeable travel expert who anticipates and addresses the user’s needs seamlessly throughout the conversation. The following figure shows the continuation of the interaction and depicts the user’s question, the response, and a map that reflects the information in the response.

This innovative feature harmonizes with the evolving needs of users, providing a comprehensive solution that significantly enhances the overall travel experience. The user-centric approach of the solution reflects a commitment to simplifying the trip planning process, allowing travelers to seamlessly translate inspiration into personalized and enjoyable travel itineraries.

Project conceptual walkthrough: Virtual trip planner

LangChain is a framework for developing applications powered by LLMs that can be used to build applications that are context-aware through connecting an LLM to sources of context (prompt instructions, few shot examples, and other content to ground its response to the users). The application also relies on the LLM to reason with the user, such as answering based on provided context and the actions to take.

LangChain enables you to create your own customized agent. The core idea of agents is to use a language model to choose a sequence of actions to take. These actions can invoke certain functions, from a simple calculation to complex internet search or API call. You can write a prompt template, providing a list of tool names that it can use, and ask the agent to make a decision based on certain inputs. An agent uses the power of an LLM to determine which function to execute, and output the result based on the prompt guide. Here is an example from LangChain.

The following code snippet imports the necessary libraries, including the Amazon Bedrock module from the LangChain LLM. It then initializes the Amazon Bedrock client using the necessary parameters, which involves the selection of the model_id, region_name, and keyword arguments.

from langchain.llms.bedrock import Bedrock
llm=Bedrock(
    model_id="anthropic.claude-instant-v1",
    # model_id="anthropic.claude-v2:1",
    model_kwargs={
        "max_tokens_to_sample": 20000,
        "temperature": 0.
    },
    region_name = REGION,
    verbose=True
)

Amazon Location Service offers cost-effective location-based services (LBS) with high-quality data from trusted providers like Esri, HERE, and GrabMaps. This enables developers to build advanced location-enabled applications that include location data and functionality such as such as maps, POIs, geocoding, routing, geofences, tracking, and health monitoring metrics. This virtual trip planner highlights the integration of Amazon Location Service with Amazon Bedrock to build location-enabled applications.

The tool SearchPlaceIndexForText from Amazon Location Service enables users to geocode free-form text, such as addresses, names, cities, or regions, facilitating the search for places or POIs. By using optional parameters, such as bounding box or country filters, and biasing searches towards specific positions globally, users can refine their search results. Notably, the tool allows users to search for places near a given position using BiasPosition or filter results within a bounding box using FilterBBox. The search results are presented in descending order of relevance, providing users with a list of POIs along with their coordinates for visualization on maps in the user interface.

To use this functionality, the user input needs to be translated into the appropriate Action and parameters required by Amazon Location Service. For instance, if a user enters “Find coffee shops near Central Park, New York City,” the application would parse this input and convert it into the corresponding Action and parameters for the SearchPlaceIndexForText tool. This could involve setting the SearchText to coffee shops, the BiasPosition to the coordinates of Central Park, and potentially applying filters or bounding boxes to narrow down the search area.

After the user input is translated into the required Action and parameters, Amazon Location Service processes the request and provides the relevant location coordinates and names of coffee shops near Central Park. This information is then passed to the generative AI component of the application, which uses it to generate human-friendly responses or visualizations for the user interface.

By seamlessly integrating Amazon Location Service with generative AI, the application delivers a natural and intuitive experience for users, allowing them to search for places using conversational language while using its powerful geocoding capabilities.

USER'S INPUT
--------------------
Here is the user's input (remember to respond with a markdown code snippet of a json blob with a single action, and NOTHING else):
Recommend me places in Marina Bay Sands
AI:  ```json
{
  "action": "FindPlaceRecommendations",
  "action_input": "Marina Bay Sands, Singapore"
}
```
Human: TOOL RESPONSE:
---------------------
[{'Place': {'AddressNumber': '10', 'Categories': ['PointOfInterestType', 'Hotel'], 'Country': 'SGP', 'Geometry': {'Point': [103.8585399, 1.2821027]}, 'Interpolated': False, 'Label': 'Marina Bay Sands, 10 Bayfront Avenue, Singapore, SGP', 'Municipality': 'Singapore', 'Neighborhood': 'Marina', 'Region': 'Singapore', 'Street': 'Bayfront Avenue'}, 'Relevance': 1}, {'Place': {'AddressNumber': '1', 'Categories': ['PointOfInterestType'], 'Country': 'SGP', 'Geometry': {'Point': [103.8610554, 1.2849601]}, 'Interpolated': False, 'Label': 'Marina Bay Sands, 1 Bayfront Avenue, Singapore, SGP', 'Municipality': 'Singapore', 'Neighborhood': 'Marina', 'Region': 'Singapore', 'Street': 'Bayfront Avenue', 'SupplementalCategories': ['EV Charging Station']}, 'Relevance': 1}, {'Place': {'AddressNumber': '1', 'Categories': ['PointOfInterestType'], 'Country': 'SGP', 'Geometry': {'Point': [103.8601178, 1.2825414]}, 'Interpolated': False, 'Label': 'Marina Bay Sands, 1 Bayfront Avenue, 018971, Singapore, SGP', 'Municipality': 'Singapore', 'Neighborhood': 'Marina', 'PostalCode': '018971', 'Region': 'Singapore', 'Street': 'Bayfront Avenue', 'SupplementalCategories': ['Building']}, 'Relevance': 1}, {'Place': {'Categories': ['PointOfInterestType', 'Hotel'], 'Country': 'SGP', 'Geometry': {'Point': [103.85976, 1.28411]}, 'Interpolated': False, 'Label': 'Marina Bay Sands, SGP'}, 'Relevance': 1}, {'Place': {'AddressNumber': '8', 'Categories': ['PointOfInterestType'], 'Country': 'SGP', 'Geometry': {'Point': [103.8592831, 1.2832098]}, 'Interpolated': False, 'Label': 'Marina Bay Sands Casino, 8 Bayfront Avenue, 018956, Singapore, SGP', 'Municipality': 'Singapore', 'Neighborhood': 'Marina', 'PostalCode': '018956', 'Region': 'Singapore', 'Street': 'Bayfront Avenue', 'SupplementalCategories': ['Casino']}, 'Relevance': 0.9997}, {'Place': {'AddressNumber': '1', 'Categories': ['PointOfInterestType', 'Hotel'], 'Country': 'SGP', 'Geometry': {'Point': [103.8601305, 1.2825665]}, 'Interpolated': False, 'Label': 'Marina Bay Sands Hotel, 1 Bayfront Avenue, 018971, Singapore, SGP', 'Municipality': 'Singapore', 'Neighborhood': 'Marina', 'PostalCode': '018971', 'Region': 'Singapore', 'Street': 'Bayfront Avenue'}, 'Relevance': 0.9997}, {'Place': {'Categories': ['PointOfInterestType'], 'Country': 'SGP', 'Geometry': {'Point': [103.8600853, 1.2831384]}, 'Interpolated': False, 'Label': 'MARINA BAY SANDS HOTEL, Singapore, SGP', 'Municipality': 'Singapore', 'Neighborhood': 'Marina', 'Region': 'Singapore', 'SupplementalCategories': ['Bus Stop']}, 'Relevance': 0.9997}, {'Place': {'AddressNumber': '2', 'Categories': ['PointOfInterestType'], 'Country': 'SGP', 'Geometry': {'Point': [103.8585042, 1.2828475]}, 'Interpolated': False, 'Label': 'Marina Bay Sands Skating Rink, 2 Bayfront Avenue, 018970, Singapore, SGP', 'Municipality': 'Singapore', 'Neighborhood': 'Marina', 'PostalCode': '018970', 'Region': 'Singapore', 'Street': 'Bayfront Avenue', 'SupplementalCategories': ['Ice Skating Rink']}, 'Relevance': 0.9995}, {'Place': {'AddressNumber': '1', 'Categories': ['PointOfInterestType', 'Pharmacy'], 'Country': 'SGP', 'Geometry': {'Point': [103.8601178, 1.2825414]}, 'Interpolated': False, 'Label': "Nature's Farm Marina Bay Sands, 1 Bayfront Avenue, 018971, Singapore, SGP", 'Municipality': 'Singapore', 'Neighborhood': 'Marina', 'PostalCode': '018971', 'Region': 'Singapore', 'Street': 'Bayfront Avenue'}, 'Relevance': 0.9704999999999999}, {'Place': {'AddressNumber': '10', 'Categories': ['PointOfInterestType', 'Tourist Attraction'], 'Country': 'SGP', 'Geometry': {'Point': [103.861031, 1.285204]}, 'Interpolated': False, 'Label': 'Marina Bay Sands Skypark, 10 Bayfront Avenue, Singapore, SGP', 'Municipality': 'Singapore', 'Neighborhood': 'Marina', 'Region': 'Singapore', 'Street': 'Bayfront Avenue'}, 'Relevance': 0.9653}]

The following code sample is a function that queries locations using Amazon Location Service and takes parameters such as the index name, text, country, maximum results, categories, and region. The function initializes the Amazon Location Service client, sets search parameters based on the input, performs the search using search_place_index_for_text, and returns the results. In case of a ResourceNotFoundException, it prints an error message and returns an empty list.

def query_locations(
    index_name: str,
    text: str = None,
    country: str = None,
    max_results: int =10,
    categories: List=[],
    region='ap-northeast-1'
):
    # Initialize the Amazon Location Service client
    client = boto3.client('location', region_name=region)
    # Specify the parameters for the search
    parameters = {
        'IndexName': index_name,
        'MaxResults': max_results
    }
    if text is not None:
        parameters['Text'] = text
    if len(categories) > 0:
        parameters['FilterCategories'] = categories
    if country is not None:
        parameters['FilterCountries'] = [country]
    try:
        # Perform the search
        response = client.search_place_index_for_text(**parameters)
        # Extract and return the results
        locations = response['Results']
        return locations
    except client.exceptions.ResourceNotFoundException as e:
        print(f"Error: {e}")
        return []

In a LangChain agent, an LLM is used as a reasoning engine to determine which actions to take and in which order. You can also customize the prompt template (known as prompt engineering) to make the model generate the desired contents. Building an agent requires you to customize the agent methods to form an appropriate prompt. LangChain provides some prebuilt classes, such as ConversationalChatAgent. In the following code snippet, a ConversationalChatAgent class that inherits the Agent class from LangChain is defined. The class definition is similar to the LangChain ConversationalChatAgent class.

from langchain.agents.agent import Agent, AgentOutputParser
class ConversationalChatAgent(Agent):
    """An agent designed to hold a conversation in addition to using tools."""
    output_parser: AgentOutputParser = Field(default_factory=ConvoOutputParser)
    template_tool_response: str = TEMPLATE_TOOL_RESPONSE
    @classmethod
    def _get_default_output_parser(cls, **kwargs: Any) -> AgentOutputParser:
        return ConvoOutputParser()
    @property
    def _agent_type(self) -> str:
        raise NotImplementedError
    @property
    def observation_prefix(self) -> str:
        """Prefix to append the observation with."""
        return "Observation: "
    @property
    def llm_prefix(self) -> str:
        """Prefix to append the llm call with."""
        return "Thought:"
    @classmethod
    def _validate_tools(cls, tools: Sequence[BaseTool]) -> None:
        super()._validate_tools(tools)
        validate_tools_single_input(cls.__name__, tools)
     
    # ... other methods

Note from_llm_and_tools This method creates a prompt template and initiates an LLM model to use a prompt and provided functionalities (tools) to generate the content. This is where you can customize the prompt template.

    @classmethod
    def from_llm_and_tools(
        cls,
        llm: BaseLanguageModel,
        tools: Sequence[BaseTool],
        callback_manager: Optional[BaseCallbackManager] = None,
        output_parser: Optional[AgentOutputParser] = None,
        system_message: str = PREFIX,
        human_message: str = SUFFIX,
        input_variables: Optional[List[str]] = None,
        **kwargs: Any,
    ) -> Agent:
        """Construct an agent from an LLM and tools."""
        cls._validate_tools(tools)
        _output_parser = output_parser or cls._get_default_output_parser()
        prompt = cls.create_prompt(
            tools,
            system_message=system_message,
            human_message=human_message,
            input_variables=input_variables,
            output_parser=_output_parser,
        )
        llm_chain = LLMChain(
            llm=llm,
            prompt=prompt,
            callback_manager=callback_manager,
        )
        tool_names = [tool.name for tool in tools]
        return cls(
            llm_chain=llm_chain,
            allowed_tools=tool_names,
            output_parser=_output_parser,
            **kwargs,
        )

cls.create_prompt will create a BasePromptTemplate object, which is the object that LangChain used to create the actual prompt for the LLM. Instead of the provided BasePromptTemplate object, you can modify the human_message and system_message values in the from_llm_and_tools method, as shown in the preceding example.

As you progress through the code, it’s important to understand how the different components work together to create an agent capable of finding POIs based on user queries.

The following code defines a class named FindPOIsByCountry, which is a subclass of BaseTool. This class is designed to find POIs in a specific country and includes a description of when to use the tool and examples of queries that it can handle. The _run method within this class takes a query and attempts to identify the country mentioned in the query using the pycountry library. It then calls the query_locations function, passing parameters such as the Amazon Location Service index name, text (query), maximum results, categories of interest (for example, amusement park or museum), identified country code, and region.

class FindPOIsByCountry(BaseTool):
    name = "FindPOIsByCountry"
    description = "Only use this tool when you need to find a list of points of interests like mountains or scenic locations in a certain country. Never use this tool until users explicitly ask about finding points of interests like mountains or scenic locations. A 'landmark' is also a point of interest. An example of a sentence that uses landmark is: 'I want to see the Eiffel Tower'. An example of a question that uses landmarks or points of interests is: 'What cool places are there in Japan?'"

    def _run(
        self, query: str, run_manager: Optional[CallbackManagerForToolRun] = None
    ) -> str:
        """Use the tool."""
        print("FindPOIsByCountry query", query)
        country_code = None
        try:
            countries = pycountry.countries.search_fuzzy(query)
            country_code = countries[0].alpha_3
        except Exception as e:
            print(e)
            print("Setting country to None")
        return query_locations(
            index_name=AMAZON_LOCATION_INDEX_NAME,
            text=query,
            max_results=10,
            categories=["Amusement Park", "Aquarium", "Museum", "Shopping Mall", "Tourist Attraction"],
            country=country_code,
            region=REGION
        )

We take this further by implementing a query_nearby_locations feature that uses BiasPosition and FilterBBox. BiasPosition is an optional parameter from Amazon Location Service that indicates a preference for places that are closer to a specified position. FilterBBox is an optional parameter that limits the search results by returning only places that are within the provided bounding box. By setting a 10 km radius around the bias position, it narrows the search to locations within this range. The key difference lies in how locations are filtered based on proximity in query_nearby_locations.

def query_nearby_locations(
        index_name: str,
        bias_position: List[float],
        text: str = None,
        filter_country: str = None,
        max_results: int = 10,
        categories: List = [],
        region='ap-northeast-1'
):
    # Initialize the Amazon Location Service client
    client = boto3.client('location', region_name=region)
    # 10km radius from the bias position
    filterbbox = [bias_position[0] - 3, bias_position[1] - 3, bias_position[0] + 3, bias_position[1] + 3]
    # Specify the parameters for the search
    parameters = {
        'IndexName': index_name,
        'MaxResults': max_results,
        # 'BiasPosition': bias_position,
        'FilterBBox': filterbbox
    }
    print(text, categories)
    if text is not None:
        parameters['Text'] = text
    if len(categories) > 0:
        parameters['FilterCategories'] = categories
    if filter_country is not None:
        parameters['FilterCountries'] = [filter_country]
    try:
        # Perform the search
        response = client.search_place_index_for_text(**parameters)
        print(response)
        # Extract and return the results
        locations = response['Results']
        return locations
    except client.exceptions.ResourceNotFoundException as e:
        print(f"Error: {e}")
        return []

The functions discussed in this section can be integrated into the backend of your project, tightly coupled with the generative AI component. With the implementation details and guidance provided, you can use the power of Amazon Location Service and LangChain’s generative AI capabilities to build a conversational application that allows users to search for nearby points of interest using natural language queries. By integrating the query_nearby_locations function, parsing user input, customizing the LangChain agent’s prompt template, and developing a user-friendly interface, you can create an intuitive experience where users can discover relevant locations within specified proximities or bounding boxes. As you build your application, focus on implementing robust error handling, considering edge cases, and thoroughly testing the application before deploying it to a production environment. With this foundation, you can create innovative location-based applications that seamlessly blend the power of Amazon Location Service and Amazon Bedrock using Anthropic’s Claude V1

Conclusion

Harnessing the power of generative AI enables this web solution to interpret user queries and dynamically generate personalized travel itineraries. This application offers a user-friendly experience, where users can interact with the system through a chat-based interface providing relevant responses based on context. This application serves as a transformative tool that seamlessly guides users to discover more information about locations and explore additional points of interest. To get started on building your own innovative solutions, explore Amazon Bedrock now and start your journey today.


About the Authors

Yao Cong (YC) Yeo is a Solutions Architect at Amazon Web Services, empowering Singapore’s ISVs and SMBs in their cloud transformation journeys, guiding customers to optimize workloads and maximize their AWS cloud potential. YC specialises in the Application Security domain in Cloud Security, ensuring robust and secure cloud implementations. In the Generative AI space, YC delivers thought leadership content to bridge the gap between technical possibilities and business objectives in the evolving digital landscape.

Loke Jun Kai is an AI/ML Specialist Solutions Architect in AWS. He works on Go-To-Market motions and Strategic Opportunities in the ASEAN Region. Jun Kai have provided technical and visionary guidance for customers across industries and segments, from large enterprises to Startups. Outside of work, he enjoys looking at all things related to Venture Capital, or having Tennis sessions.

Abhi Fabhian is a Solutions Architect at Amazon Web Services based in Indonesia, providing expert technical guidance on cloud technologies to clients across various sectors in Indonesia, helping them optimize their cloud experience. Outside of work he enjoys sports, cars, music and playing games.

Tung Cao is a Solutions Architect at Amazon Web Services based in Vietnam, covering Vietnam’s SMB and ISVs on their journey to the cloud, helping them optimize and innovate their business processes. Tung specializes in AI/ML, which helps in providing cutting-edge solutions to enhance customer experiences, streamline operations, and drive data-driven decision-making. enabling businesses to leverage advanced technologies like machine learning and deep learning to gain competitive advantages.

Siraphop (Fufu) Thaisangsa-nga is a Solutions Architect at Amazon Web Services based in Thailand, dedicated to guiding local businesses through their cloud transformation journeys. With a deep understanding of the Thai market, Fufu helps companies leverage AWS services to innovate, scale, and improve their operational efficiency, excelling in tailoring cloud solutions to meet the unique needs of Thai businesses across various industries.

Read More

Simplify automotive damage processing with Amazon Bedrock and vector databases

Simplify automotive damage processing with Amazon Bedrock and vector databases

In the automotive industry, the ability to efficiently assess and address vehicle damage is crucial for efficient operations, customer satisfaction, and cost management. However, manual inspection and damage detection can be a time-consuming and error-prone process, especially when dealing with large volumes of vehicle data, the complexity of assessing vehicle damage, and the potential for human error in the assessment.

This post explores a solution that uses the power of AWS generative AI capabilities like Amazon Bedrock and OpenSearch vector search to perform damage appraisals for insurers, repair shops, and fleet managers.

Amazon Bedrock is a fully managed service that offers a choice of high-performing foundation models (FMs) from leading AI companies like AI21 Labs, Anthropic, Cohere, Meta, Mistral, Stability AI, and Amazon through a single API, along with a broad set of capabilities to build generative AI applications with security, privacy, and responsible AI. Amazon OpenSearch Service is a powerful, highly flexible search engine that allows you to retrieve data based on a variety of lexical and semantic retrieval approaches.

By combining these powerful tools, we have developed a comprehensive solution that streamlines the process of identifying and categorizing automotive damage. This approach not only enhances efficiency, but also provides valuable insights that can help automotive businesses make more informed decisions.

The traditional way to solve these problems is to use computer vision machine learning (ML) models to classify the damage and its severity and complement with regression models that predict numerical outcomes based on input features like the make and model of the car, damage severity, damaged part, and more.

This approach creates challenges to maintain multiple models for classifying damage severity and creating estimates. Although these models can provide precise estimates based on historical data, they can’t be generalized to provide a quick range of estimates and any changes to the damage dataset (which includes updated makes and models) or varying repair estimates based on parts, labor, and facility. Any generalization to provide such estimates using traditional models will lead to feature engineering complexity.

This is where large language models (LLMs) come into play to look at the features both visually and based on text descriptions and find the closest match semantically.

Solution overview

Automotive companies have large datasets that include damages that have happened to their vehicle assets, which include images of the vehicles, the damage, and detailed information about that damage. This metadata includes details such as make, model, year, area of the damage, severity of the damage, parts replacement cost, and labor required to repair.

The information contained in these datasets—the images and the corresponding metadata—is converted to numerical vectors using a process called multimodal embedding. These embedding vectors contain the necessary information of the image and the text metadata encoded in numerical representation. We query against these embedding vectors to find the closest match to the incoming damaged vehicle image. This technique is called semantic search. In this solution, we use OpenSearch Service, a powerful, highly flexible search engine that allows you to retrieve data based on a variety of lexical and semantic retrieval approaches, including vector search. We generate the embeddings using the Amazon Titan Multimodal Embeddings model, available on Amazon Bedrock.

This solution is available in our GitHub repo, including detailed instructions about its deployment and testing.

The following architecture diagram illustrates the proposed solution. It contains two flows:

  • Data ingestion – The data ingestion flow converts the damage datasets (images and metadata) into vector embeddings and stores them in the OpenSearch vector store. We need to initially invoke this flow to load all the historic data into OpenSearch. We can also schedule it to load the updated dataset on a regular basis, or invoke it in near real time whenever new data flows in.
  • Damage assessment inference – The inference processing flow runs every time there is a new damage image to find the closest match from the current dataset stored in OpenSearch.

The data ingestion flow consists of the following steps:

  1. The ingestion process starts with the ingestion processor taking each damaged image from the existing damage repair cost dataset and passing it to Anthropic’s Claude 3 on Amazon Bedrock. The invoice details of the repair costs could be in various formats, like PDF, images, tables, and so on. These images are passed to Anthropic’s Claude 3 Haiku to be analyzed and output into a standardized JSON format. The step of creating the metadata during the ingestion process is optional if the repair invoices are already present in a standardized format.

In this solution, Anthropic’s Claude 3 creates the JSON metadata for each image. The dataset provided in this example only contains images. In a production scenario, the metadata would ideally contain relevant data from existing invoices, where Amazon Bedrock could be used to extract the relevant information and create the standardized metadata, if it doesn’t exist yet.

The following is an example image.

The following code shows an example of the ingested metadata:

{
  "make": "Make_1",
  "model": "Model_1",
  "year": 2015,
  "state": "FL",
  "damage": "Right Front",
  "repair_cost": 750,
  "damage_severity": "moderate",
  "damage_description": "Dent and scratches on the right fender",
  "parts_for_repair": [
    "Right fender",
    "Paint"
  ],
  "labor_hours": 4,
  "parts_cost": 400,
  "labor_cost": 350,
  "s3_location": "repair-data/203.jpeg"
}
  1. The JSON output from the previous step along with the actual damage image are sent to the Amazon Titan Multimodal Embeddings model to generate embedding vectors. Each vector is of 1,024 dimensions, and it encodes both the image and the repair cost JSON data.
  2. The outputs generated in the previous steps (the text representation and vector embeddings of the damage data) are stored in an Amazon OpenSearch Serverless vector search collection. By storing both the text representation and vector embeddings, you can use the power of hybrid search (text search and semantic search) to optimize the search results.
  3. Finally, the ingestion processor stores the raw images in Amazon Simple Storage Service (Amazon S3), which we use later in the inference flow to show the closest matches to the user.

The user performing the damage assessment interacts with the UI by providing the image of the damaged vehicle and some basic information needed for the assessment. The inference processing flow includes the following steps:

Inference Flow Steps:

  1. The inference processor takes each damaged image provided by the user and passes it to Anthropic’s Claude 3 to be analyzed and output into a standardized JSON format.
  2. The JSON output from the previous step along with the damage image are sent to the Amazon Titan Multimodal Embeddings model to generate embedding vectors.
  3. The embeddings are queried against all the embeddings of the existing damage data inside the OpenSearch Serverless collection to find the closest matches. For the top k (k=3 in our sample application) closest matches, it returns the JSON data that contains the repair costs and other damage expenses. With that information, several stats like median expenses and repair costs upper and lower bounds are calculated.
  4. In our scenario, the solution takes the metadata from each of the matches and sends that metadata to Anthropic’s Claude 3 Haiku hosted on Amazon Bedrock. The prompt is engineered to get the LLM to consider the total repair cost of each match and calculate an average. Production implementations of this solution could have variations of how this final step is done. Calculation of the repair costs could be done on different ways, in this case using generative AI, or by retrieving further information from other datasets, such as current parts and labor costs, to calculate a new repair cost average.
  5. The UI displays the repair expenses estimates along with the accuracy. The front end also pulls the images from Amazon S3 that are closest in match to the queried image.

Prompts and datasets

Our solution consists of automotive damage images, which are provided as part of our repository, and the code provided handles the ingestion of images and the UI that users can interact with. Our sample dataset contains images from different vehicles (for this post, we use three fictitious car brands and models). We use the following prompt to create the JSON metadata that is ingested with the image:

'Instruction: You are a damage repair cost estimator and based on the image you need 
to create a json output as close as possible to the <model>, 
you need to estimate the repair cost to populate within the output and you need to 
provide the damage severity according to the <criteria>, 
you also need to provide a damage description which is short and less than 10 words. 
Just provide the json output in the response, do not explain the reasoning. 
For testing purposes assume the image is from a fictitious car brand "Make_1" and a 
fictitious model "Model_1" in the state of Florida.‘

This prompt instructs the model to create the metadata as JSON output, and an example of that JSON metadata is provided within the <model> tag. The prompt also adds instructions for the model to assess the damage and estimate the cost following the <criteria> tag. The model and criteria are parameters that are created within the code and passed to the model. They are defined in the code from lines 85–106.

For each fictitious vehicle make and model, we have a dataset with 200 images. These images are stored within the /containers/ingestion/data_set path of the repository.

During the inference flow, the first steps that are run by the UI are capturing the image from the user and creating new metadata based on this new image and some basic information that the user provides. The following prompt is part of the inference code, which is used to create the initial metadata:

Instruction: You are a car damage assessor that needs to create a short description 
for the damage in the image. Analyze the image and populate the json output adding an 
extra field called damage description, this description has to be short and less than 
10 words, provide ONLY the json as a response and no other data, the xml tags also 
must not be in the response.

These prompts are examples provided with the solution to create basic metadata, which is then used to increase the accuracy of the vector search. There might be different use cases where more detailed prompts are required, and for that, this solution can serve as a base.

Prerequisites

To deploy the proposed sample solution, some prerequisites are needed:

Deploy the solution

Complete the following steps to deploy this solution:

  1. Run the provided CloudFormation template.
  2. Download the dataset from the public dataset repository. Specific instructions can be found on the AWS Samples repository.
  3. Upload the dataset to the S3 source bucket. Specific instructions can be found on the AWS Samples repository.
  4. Run the ECS task, which runs the image ingestion process following the steps mentioned on the GitHub repo.
  5. To access the inference code, open the AWS CloudFormation console, navigate to the stack’s Outputs tab, and choose the CloudFront distribution link for the InferenceUIURL key to go to the inference UI.

  1. Test the solution by following the testing procedures in our GitHub repo.

Clean up

To clean up the resources you created, complete the following steps:

  1. On the AWS CloudFormation console, navigate to the Outputs tab of the stack you deployed.
  2. Note the name of your ECR repository and S3 bucket.
  3. On the Amazon S3 console, delete the contents of the bucket.
  4. On the Amazon ECR console, delete the images in the repository.
  5. On the AWS CloudFormation console, delete the stack.

Deleting the stack removes all other related resources from your AWS account. The bucket and repository must be empty in order to delete them.

Conclusion

The integration of Amazon Bedrock and vector databases like OpenSearch presents a powerful solution for simplifying automotive damage processing. This innovative approach offers several key benefits:

  • Efficiency – By using generative AI and semantic search capabilities, the system can quickly process and analyze damage reports, significantly reducing the time required for assessments
  • Accuracy – The use of multimodal embeddings and vector search makes sure damage assessments are based on comprehensive data, including both visual and textual information, leading to more accurate results
  • Scalability – As the dataset grows, the system’s performance improves, allowing it to handle increasing volumes of data without compromising speed or accuracy
  • Adaptability – The system can be updated with new data, so it remains current with the latest repair costs and damage types without the need to fully train using a traditional ML model

As the automotive industry continues to evolve, solutions like this will play a crucial role in streamlining operations, improving customer satisfaction, and optimizing resource allocation. By embracing AI-driven technologies, automotive businesses can stay ahead of the curve and deliver more efficient, accurate, and cost-effective damage assessment services. The combination of powerful AI models available in Amazon Bedrock and vector search capabilities of OpenSearch Service demonstrates the potential for transformative solutions in the automotive industry. As these technologies continue to advance, we can expect even more innovative applications that will reshape how we approach vehicle damage assessment and repair.

For detailed instructions and deployment steps, refer to our GitHub repo. Let us know in the comments section your thoughts about this solution and potential improvements we can add.


About the Authors

Vinicius Pedroni is a Senior Solutions Architect at AWS for the Travel and Hospitality Industry, with focus on Edge Services and Generative AI. Vinicius is also passionate about assisting customers on their Cloud Journey, allowing them to adopt the right strategies at the right moment.

Manikanth Pasumarti is a Solutions Architect based out of New York City. He works with enterprise customers to architect and design solutions for their business needs. He is passionate about math and loves to teach kids in his free time.

Read More

Understanding prompt engineering: Unlock the creative potential of Stability AI models on AWS

Understanding prompt engineering: Unlock the creative potential of Stability AI models on AWS

In the rapidly evolving world of generative AI image modeling, prompt engineering has become a crucial skill for developers, designers, and content creators. By crafting effective prompts, you can harness the full potential of advanced diffusion transformer text-to-image models, enabling you to produce high-quality images that align closely with your creative vision. Amazon Bedrock offers access to powerful models such as Stable Image Ultra and Stable Diffusion 3 Large, which are designed to transform text descriptions into stunning visual outputs. Stability AI’s newest launch of Stable Diffusion 3.5 Large (SD3.5L) on Amazon SageMaker JumpStart enhances image generation, human anatomy rendering, and typography by producing more diverse outputs and adhering closely to user prompts, making it a significant upgrade over its predecessor.

In this post, we explore advanced prompt engineering techniques that can enhance the performance of these models and facilitate the creation of compelling imagery through text-to-image transformations.

Understanding the Prompt Structure

Prompt engineering is a valuable technique for effectively using generative AI image models. The structure of a prompt directly affects the generated images’ quality, creativity, and accuracy. Stability AI’s latest models enhance productivity by helping users achieve quality results. This guide offers practical prompting tips for the Stable Diffusion 3 family of models, allowing you to refine image concepts quickly and precisely. A well-structured Stable Diffusion prompt typically consists of the following key components:

  1. Subject – This is the main focus of your image. You can provide extensive details, such as the gender of a character, their clothing, and the setting. For example, “A corgi dog sitting on the front porch.”
Generated by SD3 Large Generated by SD Ultra Generated by SD3.5 Large
  1. Medium – This refers to the material or technique used in creating the artwork. Examples include “oil paint,” “digital art,” “voxel art,” or “watercolor.” A complete prompt might read: “3D Voxel Art; wide angle shot of a bright and colorful world.”
Generated by SD3 Large Generated by SD Ultra Generated by SD3.5 Large
  1. Style – You can specify an art style (such as impressionism, realism, or surrealism). A more detailed prompt could be: “Impressionist painting of a lady in a sun hat in a blooming garden.”
Generated by SD3 Large Generated by SD Ultra Generated by SD3.5 Large
  1. Composition and framing – You can describe the desired composition and framing of the image. This could include specifying close-up shots, wide-angle views, or particular compositional techniques. Consider the images generated by the following prompt: “Wide-shot of two friends lying on a hilltop, stargazing against an open sky filled with stars.”
Generated by SD3 Large Generated by SD Ultra Generated by SD3.5 Large
  1. Lighting and color:You can describe the lighting or shadows in the scene. Terms like “backlight,” “hard rim light,” and “dynamic shadows” can enhance the feel of the image. Consider the following prompt and images generated with it: “A yellow umbrella left open on a rainy street, surrounded by neon reflections, with hard rim light outlining its shape against the wet pavement, adding a moody glow.”
Generated by SD3 Large Generated by SD Ultra Generated by SD3.5 Large
  1. Resolution – Specifying resolution helps control image sharpness. For example: “A winding river through a snowy forest in 4K, illuminated by soft winter sunlight, with tree shadows across the snow and icy reflections.”
Generated by SD3 Large Generated by SD Ultra Generated by SD3.5 Large

Treat the SD3 generation of models as a creative partner. By expressing your ideas clearly in natural language, you give the model the best opportunity to generate an image that aligns with your vision.

Prompting techniques

The following are key prompting techniques to employ:

  • Descriptive language – Unlike previous models that required concise prompts, SD3.5 allows for detailed descriptions. For instance, instead of simply stating “a man and woman,” you can specify intricate details such as clothing styles and background settings. This clarity helps in achieving better adherence to the desired output.
  • Negative prompts – Negative prompting offers enhanced control over colors and content by removing unwanted elements, textures, or hues from the image. Whereas the main prompt establishes the image’s broad composition, negative prompts allow for honing in on specific elements, yielding a cleaner, more polished result. This added refinement helps keep distractions to a minimum, aligning the final output closely with your intended vision.
  • Using multiple text encoders –The SD3 generation of models features three text encoders that can accept varied prompts. This allows you to experiment with assigning general themes or styles to one encoder while detailing specific subjects in another.
  • Tokenization – Perfecting the art of prompt engineering for the Stable Diffusion 3 model family requires a deep understanding of several key concepts and techniques. At the core of effective prompting lies the process of tokenization and token analysis. It’s crucial to comprehend how the SD3 family breaks down your prompt text into individual tokens, because this directly impacts the model’s interpretation and subsequent image generation. By analyzing these tokens, you can identify potential issues such as out-of-vocabulary words that might split into sub-word tokens, multi-word phrases that don’t tokenize together as expected, or ambiguous tokens like “3D” that could be interpreted in multiple ways. For instance, in the prompt “A realistic 3D render of a red apple,” the clarity of tokenization can significantly affect the quality of the output image.
Generated by SD3 Large Generated by SD Ultra Generated by SD3.5 Large
  • Prompt weighting – Prompt weighting and emphasis techniques allow you to fine-tune the importance of specific elements within your prompt. By using syntax like “A photo of a (red:1.2) apple,” you can increase the significance of the color “red” in the generated image. Similarly, emphasizing multiple aspects, as in “A (photorealistic:1.4) (3D render:1.2) of a red apple,” can help achieve a more nuanced result that balances photorealism with 3D rendering qualities. “(photorealistic 1.4)” indicates that the image should be photorealistic, with a weight of 1.4. The higher weight (>1.0) emphasizes that the photorealistic quality is more important than usual. Although you can technically set weights higher than 5.0, it’s advisable to stay within the range of 1.5–2.0 for effective results. This level of control enables you to guide the model’s focus more precisely, resulting in outputs that more closely align with your creative vision.
A photo of a (red:1.2) apple A (photorealistic:1.4) (3D render:1.2) of a red apple

Practical settings for optimal results

To optimize the performance for these models, several key settings should be adjusted based on user preferences and hardware capabilities. Start with 28 denoising steps to balance image quality and generation time. For the Guidance Scale (CFG), set it between 3.5–4.5 to maintain fidelity to the prompt without creating overly contrasted images. ComfyUI is an open source, node-based application that empowers users to generate images, videos, and audio using advanced AI models, offering a highly customizable workflow for creative projects. In ComfyUI, using the dpmpp_2m sampler along with the sgm_uniform scheduler yields effective results. Additionally, aim for a resolution of approximately 1 megapixel (for example, 1024×1024 for square images) while making sure that dimensions are divisible by 64 for optimal output quality. These settings provide a solid foundation for generating high-quality images while efficiently utilizing your hardware resources, allowing for further adjustments based on specific requirements.

Prompt programming

Treating prompts as a form of programming language can also yield powerful results. By structuring your prompts with components like subjects, styles, and scenes, you create a modular system that’s simple to adjust and extend. For example, using syntax like “A red apple [SUBJ], photorealistic [STYLE], on a wooden table [SCENE]” allows for systematic modifications and experimentation with different elements of the prompt.

Prompt augmentation and tuning

Lastly, prompt augmentation and tuning can significantly enhance the effectiveness of your prompts. This might involve incorporating additional data such as reference images or rough sketches as conditioning inputs alongside your text prompts. Furthermore, fine-tuning models on carefully curated datasets of prompt-image pairs can improve the associations between textual descriptions and visual outputs, leading to more accurate and refined results. With these advanced techniques, you can push the boundaries of what’s possible with SD3.5, creating increasingly sophisticated and tailored images that truly bring your ideas to life.

Responsible and ethical AI with Amazon Bedrock

When working with Stable Diffusion models through Amazon Bedrock, Amazon Bedrock Guardrails can intercept and evaluate user prompts before they reach the image generation pipeline. This allows for filtering and moderation of input text to prevent the creation of harmful, offensive, or inappropriate images. The system offers configurable content filters that can be adjusted to different strength levels, giving fine-tuned control over what types of image content are permitted to be generated. Organizations can define denied topics specific to image generation, such as blocking requests for violent imagery or explicit content. Word filters can be set up to detect and block specific phrases or terms that may lead to undesirable image outputs. Additionally, sensitive information filters can be applied to protect personally identifiable information (PII) from being incorporated into generated images. This multi-layered approach helps prevent misuse of Stable Diffusion models, maintain compliance with regulations around AI-generated imagery, and provide a consistently safe user experience when using these powerful image generation capabilities. By implementing Amazon Bedrock Guardrails, organizations can confidently deploy Stable Diffusion models while mitigating risks and adhering to ethical AI principles.

Conclusion

In the dynamic realm of generative AI image modeling, understanding prompt engineering is essential for developers, designers, and content creators looking to unlock the full potential of models like Stable Diffusion 3.5 Large. This advanced model, available on Amazon Bedrock, enhances image generation by producing diverse outputs that closely align with user prompts. Effective prompting involves understanding the structure of prompts, which typically includes key components such as the subject, medium, style, and resolution. By clearly defining these elements and employing techniques like prompt weighting and chaining, you can refine your creative vision and achieve high-quality results.

Additionally, the process of tokenization plays a crucial role in how prompts are interpreted by the model. Analyzing tokens can help identify potential issues that may affect output quality. You can also enhance your prompts through modular programming approaches and by incorporating additional data like reference images. By fine-tuning models on datasets of prompt-image pairs, creators can improve the associations between text and visuals, leading to more accurate results.

This post provided practical tips and techniques to optimize performance and elevate the creative possibilities within Stable Diffusion 3.5 Large, empowering you to produce compelling imagery that resonates with their artistic intent. To get started, see Stability AI in Amazon Bedrock. To explore what’s available on SageMaker JumpStart, see Stability AI builds foundation models on Amazon SageMaker.


About the Authors

Isha Dua is a Senior Solutions Architect based in the San Francisco Bay Area working with GENAI Model providers and helping customer optimize their GENAI workloads on AWS. She helps enterprise customers grow by understanding their goals and challenges, and guides them on how they can architect their applications in a cloud-native manner while ensuring resilience and scalability. She’s passionate about machine learning technologies and environmental sustainability.

Sanwal Yousaf is a Solutions Engineer at Stability AI. His work at Stability AI focuses on working with enterprises to architect solutions using Stability AI’s Generative models to solve pressing business problems. He is passionate about creating accessible resources for people to learn and develop proficiency with AI.

Read More

Introducing Stable Diffusion 3.5 Large in Amazon SageMaker JumpStart

Introducing Stable Diffusion 3.5 Large in Amazon SageMaker JumpStart

We are excited to announce the availability of Stability AI’s latest and most advanced text-to-image model, Stable Diffusion 3.5 Large, in Amazon SageMaker JumpStart. This new cutting-edge image generation model, which was trained on Amazon SageMaker HyperPod, empowers AWS customers to generate high-quality images from text descriptions with unprecedented ease, flexibility, and creative potential. By adding Stable Diffusion 3.5 Large to SageMaker JumpStart, we’re taking another significant step towards democratizing access to advanced AI technologies and enabling businesses of all sizes to harness the power of generative AI.

In this post, we provide an implementation guide for subscribing to Stable Diffusion 3.5 Large in SageMaker JumpStart, deploying the model in Amazon SageMaker Studio, and generating images using text-to-image prompts.

Stable Diffusion 3.5 Large capabilities and use cases

At 8.1 billion parameters, with superior quality and prompt adherence, Stable Diffusion 3.5 Large is the most powerful model in the Stable Diffusion family. The model excels at creating diverse, high-quality images across a wide range of styles, making it an excellent tool for media, gaming, advertising, ecommerce, corporate training, retail, and education. For ideation, Stable Diffusion 3.5 Large can accelerate storyboarding, concept art creation, and rapid prototyping of visual effects. For production, you can quickly generate high-quality 1-megapixel images for campaigns, social media posts, and advertisements, saving time and resources while maintaining creative control.

Stable Diffusion 3.5 Large offers users nearly endless creative possibilities, including:

  • Enhanced creativity and photorealism – You can generate exceptional visuals with highly detailed 3D imagery that include fine details like lighting and textures.
  • Exceptional multi-subject proficiency – It offers unrivaled capabilities in generating images with multiple subjects, which is ideal for creating complex scenes.
  • Increased efficiency – Fast, accurate, and quality content production streamlines operations, saving time and money. Despite its power and complexity, Stable Diffusion 3.5 Large is optimized for efficiency, providing accessibility and ease of use across a broad audience.

Solution overview

With SageMaker JumpStart, you can choose from a broad selection of publicly available foundation models (FMs). ML practitioners can deploy FMs to dedicated SageMaker instances from a network isolated environment and customize models using Amazon SageMaker for model training and deployment. You can now discover and deploy the Stable Diffusion 3.5 large model with a few clicks in SageMaker Studio or programmatically through the SageMaker Python SDK, enabling you to derive model performance and MLOps controls with SageMaker features such as Amazon SageMaker Pipelines, Amazon SageMaker Debugger, or container logs. The model is deployed in an AWS secure environment and under your virtual private cloud (VPC) controls, helping provide data security.

The Stable Diffusion 3.5 Large model is available today in the following AWS Regions: US East (N. Virginia, Ohio), US West (Oregon), Asia Pacific (Osaka, Hong Kong), China (Beijing), Middle East (Bahrain), Africa (Cape Town), and Europe (Milan, Stockholm).

SageMaker Studio is an integrated development environment (IDE) that provides a single web-based visual interface where you can access purpose-built tools to perform all machine learning (ML) development steps, from preparing data to building, training, and deploying your ML models. For more details on how to get started and set up SageMaker Studio, refer to Amazon SageMaker Studio.

Prerequisites

Make sure that your AWS Identity and Access Management (IAM) role has AmazonSageMakerFullAccess. To successfully deploy the model, confirm that your IAM role has the following three permissions and you have authority to make AWS Marketplace subscriptions in the AWS account used:

  • aws-marketplace:ViewSubscriptions
  • aws-marketplace:Unsubscribe
  • aws-marketplace:Subscribe

Subscribe to the Stable Diffusion 3.5 Large model package

You can access SageMaker JumpStart through the SageMaker Studio Home page by selecting JumpStart in the Prebuilt and automated solutions section. The JumpStart landing page allows you to explore various resources including solutions, models, and notebooks. You can search for a particular provider. In this following screenshot, we are looking at all the models by Stability AI on SageMaker JumpStart.

Each model is presented with a model card containing key information such as the model name, fine-tuning capability, provider, and a brief description. To find the Stable Diffusion 3.5L model, you can either browse the Foundation Model: Image Generation carousel or use the search function. Select Stable Diffusion 3.5 Large.

Next, we will subscribe to Stable Diffusion 3.5 Large, follow these steps:

  1. Open the model listing page in AWS Marketplace using the link available from the example notebook in SageMaker JumpStart.
  2. On the listing, choose Continue to subscribe.
  3. On the Subscribe to this software page, review and choose Accept Offer if you and your organization accept the EULA, pricing, and support terms.
  4. Choose Continue to configuration to start configuring your model.
  5. Choose a supported Region, and you will see the model package Amazon Resource Name (ARN) that you need to specify when creating an endpoint.

Note: If you don’t have the necessary permissions to view or subscribe to the model, reach out to your AWS administrator or procurement point of contact. Many enterprises may limit AWS Marketplace permissions to control the actions that someone can take in the AWS Marketplace Management Portal.

Deploy the model in SageMaker Studio

Now you’re prepared to follow the notebook example from Stability AI’s GitHub repository to create an endpoint (with the model package ARN from AWS Marketplace) and create a deployable ModelPackage.

For Stable Diffusion 3.5 Large, you’ll need to deploy on an Amazon Elastic Compute Cloud (Amazon EC2) ml.p5.48xlarge instance.

Generate images with a text prompt

Refer to the Stable Diffusion 3.5 Large documentation for more details. From the example notebook, the code to generate an image is as follows:

sm_runtime = boto3.client("sagemaker-runtime")

params = {
    "prompt": " Photography, pink rose flowers in the twilight, glowing, tile houses in the background.",
    "seed": 101,
    "aspect_ratio": "21:9",
    "output_format": "jpeg",
}

payload = json.dumps(params).encode("utf-8")

response = sm_runtime.invoke_endpoint(
    EndpointName=endpoint_name,
    ContentType="application/json",
    Accept="application/json",
    Body=payload,
)

out = json.loads(response["Body"].read().decode("utf-8"))
try:
    base64_string = out["body"]["images"][0]
    image_data = base64.b64decode(base64_string)
    image = Image.open(io.BytesIO(image_data))
    display(image)

except:
    print(out)

The following are examples of images generated from different prompts.

Prompt:

Photography, pink rose flowers in the twilight, glowing, tile houses in the background.

Prompt:

The word “AWS x Stability” in a thick, blocky script surrounded by roots and vines against a solid white background. The scene is lit by flat light, creating a reflective scene with a minimal color palette. Quilling style.

Prompt:

Expressionist painting, side profile of a silhouette of a student seated at a desk, absorbed in reading a book. Her thoughts artistically connect to the stars and the vast universe, symbolizing the expansion of knowledge and a boundless mind.

Prompt:

High-energy street scene in a neon-lit Tokyo alley at night, where steam rises from food carts, and colorful neon signs illuminate the rain-slicked pavement.

Prompt:

3D animation scene of an adventurer traveling the world with his pet dog.

Clean up

When you’ve finished working, you can delete the endpoint to release the EC2 instances associated with it and stop billing.

Get your list of SageMaker endpoints using the AWS Command Line Interface (AWS CLI) as follows:

!aws sagemaker list-endpoints

Then delete the endpoints:

deployed_model.sagemaker_session.delete_endpoint(endpoint_name)

Conclusion

In this post, we walked through subscribing to Stable Diffusion 3.5 Large in SageMaker JumpStart, deploying the model in SageMaker Studio, and generating of a variety of images with Stability AI’s latest text-to-image model.

Start creating amazing images today with Stable Diffusion 3.5 Large on SageMaker JumpStart. To learn more about SageMaker JumpStart, see SageMaker JumpStart pretrained models, Amazon SageMaker JumpStart Foundation Models, and Getting started with Amazon SageMaker JumpStart.

If you’d like to explore advanced prompt engineering techniques that can enhance the performance of text-to-image models from Stability AI and facilitate the creation of compelling imagery, see Understanding prompt engineering: Unlock the creative potential of Stability AI models on AWS.


About the Authors

Tom Yemington is a Senior GenAI Models Specialist focused on helping model providers and customers scale generative AI solutions in AWS. Tom is a Certified Information Systems Security Professional (CISSP). Outside of work, you can find Tom racing vintage cars or teaching people how to race as an instructor at track-day events.

Isha Dua is a Senior Solutions Architect based in the San Francisco Bay Area working with GENAI Model providers and helping customer optimize their GENAI workloads on AWS. She helps enterprise customers grow by understanding their goals and challenges, and guides them on how they can architect their applications in a cloud-native manner while ensuring resilience and scalability. She’s passionate about machine learning technologies and environmental sustainability.

Boshi Huang is a Senior Applied Scientist in Generative AI at Amazon Web Services, where he collaborates with customers to develop and implement generative AI solutions. Boshi’s research focuses on advancing the field of generative AI through automatic prompt engineering, adversarial attack and defense mechanisms, inference acceleration, and developing methods for responsible and reliable visual content generation.

Read More