Organizations generate vast amounts of data that is proprietary to them, and it’s critical to get insights out of the data for better business outcomes. Generative AI and foundation models (FMs) play an important role in creating applications using an organization’s data that improve customer experiences and employee productivity.
The FMs are typically pretrained on a large corpus of data that’s openly available on the internet. They perform well at natural language understanding tasks such as summarization, text generation, and question answering on a broad variety of topics. However, they can sometimes hallucinate or produce inaccurate responses when answering questions that they haven’t been trained on. To prevent incorrect responses and improve response accuracy, a technique called Retrieval Augmented Generation (RAG) is used to provide models with contextual data.
In this post, we provide a step-by-step guide for creating an enterprise ready RAG application such as a question answering bot. We use the Llama3-8B FM for text generation and the BGE Large EN v1.5 text embedding model for generating embeddings from Amazon SageMaker JumpStart. We also showcase how you can use FAISS as an embeddings store and packages such as LangChain for interfacing with the components and run inferences within a SageMaker Studio notebook.
SageMaker JumpStart
SageMaker JumpStart is a powerful feature within the Amazon SageMaker ML platform that provides ML practitioners a comprehensive hub of publicly available and proprietary foundation models.
Llama 3 overview
Llama 3 (developed by Meta) comes in two parameter sizes—8B and 70B with 8K context length—that can support a broad range of use cases with improvements in reasoning, code generation, and instruction following. Llama 3 uses a decoder-only transformer architecture and new tokenizer that provides improved model performance with 128K size. In addition, Meta improved post-training procedures that substantially reduced false refusal rates, improved alignment, and increased diversity in model responses.
BGE Large overview
The embedding model BGE Large stands for BAAI general embedding large. It’s developed by BAAI and is designed to enhance retrieval capabilities within large language models (LLMs). The model supports three retrieval methods:
- Dense retrieval (BGE-M3)
- Lexical retrieval (LLM Embedder)
- Multi-vector retrieval (BGE Embedding Reranker).
You can use the BGE embedding model to retrieve relevant documents and then use the BGE reranker to obtain final results.
On Hugging Face, the Massive Text Embedding Benchmark (MTEB) is provided as a leaderboard for diverse text embedding tasks. It currently provides 129 benchmarking datasets across 8 different tasks on 113 languages. The top text embedding models from the MTEB leaderboard are made available from SageMaker JumpStart, including BGE Large.
For more details about this model, see the official Hugging Face mode card page.
RAG overview
Retrieval-Augmented Generation (RAG) is a technique that enables the integration of external knowledge sources with FM. RAG involves three main steps: retrieval, augmentation, and generation.
First, relevant content is retrieved from an external knowledge base based on the user’s query. Next, this retrieved information is combined or augmented with the user’s original input, creating an augmented prompt. Finally, the FM processes this augmented prompt, which includes both the query and the retrieved contextual information, and generates a response tailored to the specific context, incorporating the relevant knowledge from the external source.
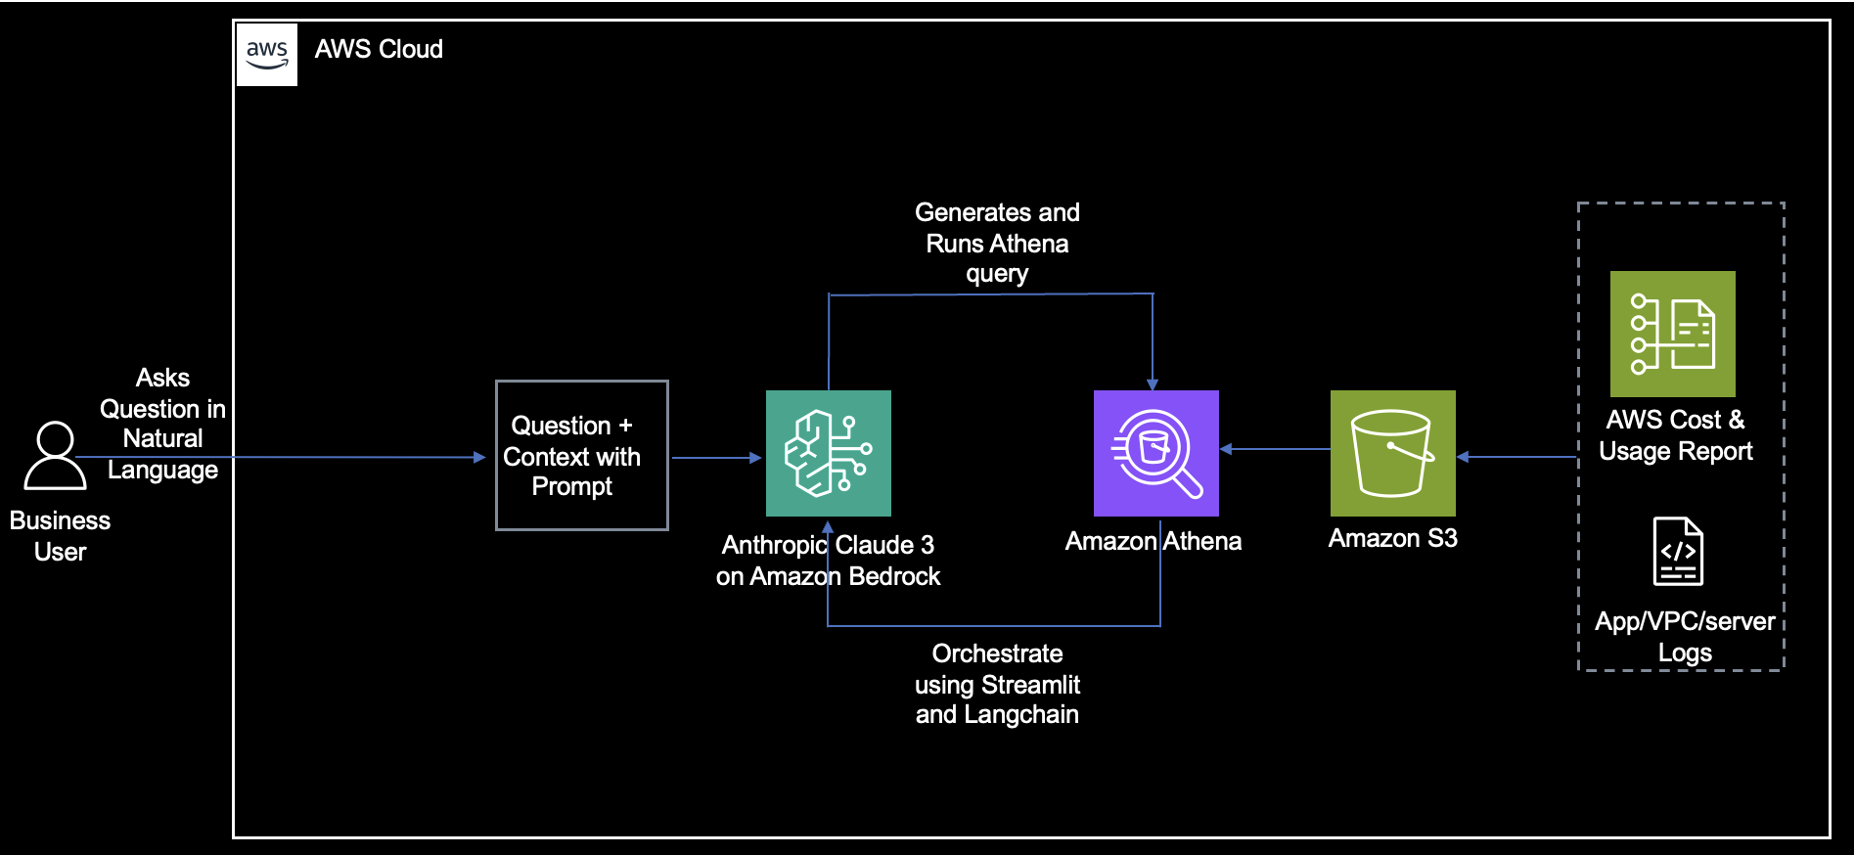
Solution overview
You will construct a RAG QnA system on a SageMaker notebook using the Llama3-8B model and BGE Large embedding model. The following diagram illustrates the step-by-step architecture of this solution, which is described in the following sections.
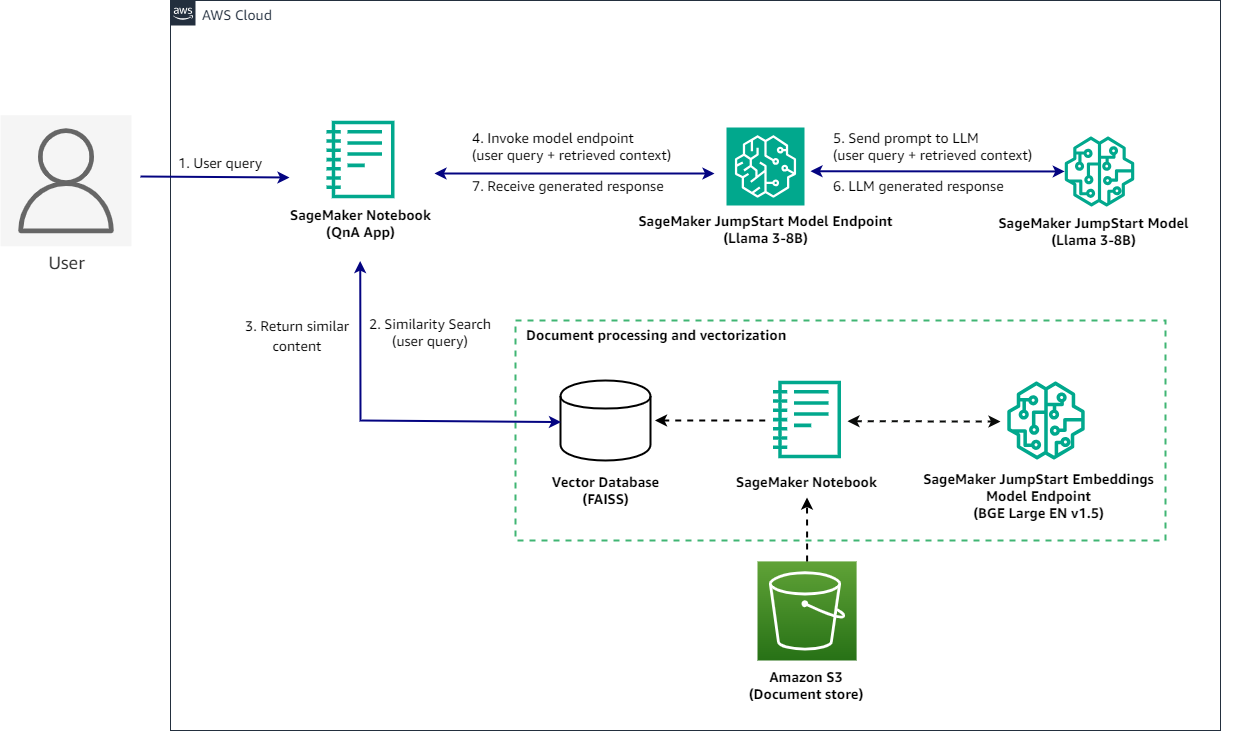
Implementing this solution takes three high level steps: Deploying models, data processing and vectorization, and running inferences.
To demonstrate this solution, a sample notebook is available in the GitHub repo.
The notebook is powered by an ml.t3.medium instance to demonstrate deploying the model as an API endpoint using an SDK through SageMaker JumpStart. You can use these model endpoints to explore, experiment, and optimize for comparing advanced RAG application techniques using LangChain. We also illustrate the integration of the FAISS embeddings store into the RAG workflow, highlighting its role in storing and retrieving embeddings to enhance the application’s performance.
We will also discuss how you can use LangChain to create effective and more efficient RAG applications. LangChain is a Python library designed to build applications with LLMs. It provides a modular and flexible framework for combining LLMs with other components, such as knowledge bases, retrieval systems, and other AI tools, to create powerful and customizable applications.
After everything is set up, when a user interacts with the QnA application, the flow is as follows:
- The user sends a query using the QnA application.
- The application sends the user query to the vector database to find similar documents.
- The documents returned as a context are captured by the QnA application.
- The QnA application submits a request to the SageMaker JumpStart model endpoint with the user query and context returned from the vector database.
- The endpoint sends the request to the SageMaker JumpStart model.
- The LLM processes the request and generates an appropriate response.
- The response is captured by the QnA application and displayed to the user.
Prerequisites
To implement this solution, you need the following:
- An AWS account with privileges to create AWS Identity and Access Management (IAM) roles and policies. For more information, see Overview of access management: Permissions and policies.
- Basic familiarity with SageMaker and AWS services that support LLMs.
- The Jupyter Notebooks needs ml.t3.medium.
- You need access to accelerated instances (GPUs) for hosting the LLMs. This solution needs access to a minimum of the following instance sizes:
- ml.g5.12xlarge for endpoint use when deploying the BGE Large En v1.5 text embedding model
- ml.g5.2xlarge for endpoint use when deploying the Llama-3-8B model endpoint
To increase your quota, refer to Requesting a quota increase.
Prompt template for Llama3
While both Llama 2 and Llama 3 are powerful language models that are optimized for dialogue-based tasks, their prompting formats differ significantly in how they handle multi-turn conversations, specify roles, and mark message boundaries, reflecting distinct design choices and trade-offs.
Llama 3 prompting format: Llama 3 employs a structured format designed for multi-turn conversations involving different roles (system, user, and assistant). It uses dedicated tokens to explicitly mark roles, message boundaries, and the end of the prompt:
- Placeholder tokens:
{{user_message}} and {{assistant_message}}
- Role marking:
<|start_header_id|>{role}<|end_header_id|>
- Message boundaries:
<|eot_id|> signals end of a message within a turn.
- Prompt End Marker:
<|start_header_id|>assistant<|end_header_id|> signals start of assistant’s response.
Llama 2 prompting format: Llama 2 uses a more compact representation with different tokens for handling conversations:
- User message enclosure:
[INST][/INST]
- Start and end of sequence:
<s></s>
- System message enclosure:
<<SYS>><</SYS>>
- Message separation:
<s></s> separates user messages and model responses.
Key differences:
- Role specification: Llama 3 uses a more explicit approach with dedicated tokens, while Llama 2 relies on enclosing tags.
- Message boundary marking: Llama 3 uses
<|eot_id|>, Llama 2 uses <s></s>.
- Prompt end marker: Llama 3 uses
<|start_header_id|>assistant<|end_header_id|>, Llama 2 uses [/INST] and </s>.
The choice depends on the use case and integration requirements. Llama 3’s format is more structured and role-aware and is better suited for conversational AI applications with complex multi-turn conversations. Llama 2’s format, while more compact, might be less explicit in handling roles and message boundaries.
Implement the solution
To implement the solution, you’ll use the following steps:
- Set up a SageMaker Studio notebook
- Deploy models on Amazon SageMaker JumpStart
- Set up Llama3-8b and BGE Large En v1.5 models with LangChain
- Prepare data and generate embeddings
- Load documents of different kind and generate embeddings to create a vector store
- Retrieve documents to the question using the following approaches from LangChain
- Regular Retrieval Chain
- Parent Document Retriever Chain
- Prepare a prompt that goes as input to the LLM and presents an answer in a human friendly manner
Set up a SageMaker Studio notebook
To follow the code in this post:
- Open SageMaker Studio and clone the following GitHub repository.
- Open the notebook RAG-recipes/llama3-rag-langchain-smjs.ipynb and choose the PyTorch 2.0.0 Python 3.10 GPU Optimized image, Python 3 kernel, and
ml.t3.medium as the instance type.
- If this is your first time using SageMaker Studio notebooks, see Create or Open an Amazon SageMaker Studio Notebook.
To set up the development environment, you need to install the necessary Python libraries, as demonstrated in the following code. The example notebook provided includes these commands:
%%writefile requirements.txt
langchain==0.1.14
pypdf==4.1.0
faiss-cpu==1.8.0
boto3==1.34.58
sqlalchemy==2.0.29
After the libraries are written in requirement.txt, install all the libraries:
!pip install -U -r requirements.txt --quiet
Deploy pretrained models
After you’ve imported the required libraries, you can deploy the Llama 3 8B Instruct LLM model on SageMaker JumpStart using the SageMaker SDK:
- Import the
JumpStartModel class from the SageMaker JumpStart library
from sagemaker.jumpstart.model import JumpStartModel
- Specify the model ID for the HuggingFace
Llama 3 8b Instruct LLM model, and deploy the model.
model_id = "meta-textgeneration-llama-3-8b-instruct"
accept_eula = True
model = JumpStartModel(model_id=model_id)
predictor = model.deploy(accept_eula=accept_eula)
- Specify the model ID for the HuggingFace BGE Large EN embedding model and deploy the model.
model_id = "huggingface-sentencesimilarity-bge-large-en-v1-5"
text_embedding_model = JumpStartModel(model_id=model_id)
embedding_predictor = text_embedding_model.deploy()
Set up models with LangChain
For this step, you’ll use the following code to set up models.
import json
import sagemaker

from langchain_core.prompts import PromptTemplate
from langchain_community.llms import SagemakerEndpoint
from langchain_community.embeddings import SagemakerEndpointEmbeddings
from langchain_community.llms.sagemaker_endpoint import LLMContentHandler
from langchain_community.embeddings.sagemaker_endpoint import EmbeddingsContentHandler
- Replace the endpoint names in the below code snippet with the endpoint names that are deployed in your environment. You can get the endpoint names from predictors created in the previous section or view the endpoints created by going to SageMaker Studio, left navigation deployments → endpoints and replace the values for
llm_endpoint_name and embedding_endpoint_name.
sess = sagemaker.session.Session()  # sagemaker session for interacting with different AWS APIs
region = sess._region_name
llm_endpoint_name = "meta-textgeneration-llama-3-8b-instruct-XXXX"
embedding_endpoint_name = "hf-sentencesimilarity-bge-large-en-v1-XXXXX"
- Transform input and output data to process API calls for
Llama 3 8B Instruct on Amazon SageMaker.
from typing import Dict

class Llama38BContentHandler(LLMContentHandler):
    content_type = "application/json"
    accepts = "application/json"

    def transform_input(self, prompt: str, model_kwargs: dict) -> bytes:
        payload = {
            "inputs": prompt,
            "parameters": {
                "max_new_tokens": 1000,
                "top_p": 0.9,
                "temperature": 0.6,
                "stop": ["<|eot_id|>"],
            },
        }
        input_str = json.dumps(
            payload,
        )
        #print(input_str)
        return input_str.encode("utf-8")

    def transform_output(self, output: bytes) -> str:
        response_json = json.loads(output.read().decode("utf-8"))
        #print(response_json)
        content = response_json["generated_text"].strip()
        return content
- Instantiate the LLM with SageMaker and LangChain
# Instantiate the content handler for Llama3-8B
llama_content_handler = Llama38BContentHandler()

# Setup for using the Llama3-8B model with SageMaker Endpoint
llm = SagemakerEndpoint(
     endpoint_name=llm_endpoint_name,
     region_name=region,
     model_kwargs={"max_new_tokens": 1024, "top_p": 0.9, "temperature": 0.7},
     content_handler=llama_content_handler
 )
- Transform input and output data to process API calls for
BGE Large En on SageMaker
from typing import List

class BGEContentHandlerV15(EmbeddingsContentHandler):
    content_type = "application/json"
    accepts = "application/json"

    def transform_input(self, text_inputs: List[str], model_kwargs: dict) -> bytes:
        """
        Transforms the input into bytes that can be consumed by SageMaker endpoint.
        Args:
            text_inputs (list[str]): A list of input text strings to be processed.
            model_kwargs (Dict): Additional keyword arguments to be passed to the endpoint.
               Possible keys and their descriptions:
               - mode (str): Inference method. Valid modes are 'embedding', 'nn_corpus', and 'nn_train_data'.
               - corpus (str): Corpus for Nearest Neighbor. Required when mode is 'nn_corpus'.
               - top_k (int): Top K for Nearest Neighbor. Required when mode is 'nn_corpus'.
               - queries (list[str]): Queries for Nearest Neighbor. Required when mode is 'nn_corpus' or 'nn_train_data'.
        Returns:
            The transformed bytes input.
        """
        input_str = json.dumps(
            {
                "text_inputs": text_inputs,
                **model_kwargs
            }
        )
        return input_str.encode("utf-8")

    def transform_output(self, output: bytes) -> List[List[float]]:
        """
        Transforms the bytes output from the endpoint into a list of embeddings.
        Args:
            output: The bytes output from SageMaker endpoint.
        Returns:
            The transformed output - list of embeddings
        Note:
            The length of the outer list is the number of input strings.
            The length of the inner lists is the embedding dimension.
        """
        response_json = json.loads(output.read().decode("utf-8"))
        return response_json["embedding"]
- Instantiate the embedding model with SageMaker and LangChain
bge_content_handler = BGEContentHandlerV15()
sagemaker_embeddings = SagemakerEndpointEmbeddings(
    endpoint_name=embedding_endpoint_name,
    region_name=region,
    model_kwargs={"mode": "embedding"},
    content_handler=bge_content_handler,
)
Prepare data and generate embeddings
In this example, you will use several years of Amazon’s Annual Reports (SEC filings) for investors as a text corpus to perform QnA on.
- Start by using the following code to download the PDF documents from the provided URLs and create a list of metadata for each downloaded document.
!mkdir -p ./data

from urllib.request import urlretrieve
urls = [
'https://d18rn0p25nwr6d.cloudfront.net/CIK-0001018724/c7c14359-36fa-40c3-b3ca-5bf7f3fa0b96.pdf',
'https://d18rn0p25nwr6d.cloudfront.net/CIK-0001018724/d2fde7ee-05f7-419d-9ce8-186de4c96e25.pdf',
'https://d18rn0p25nwr6d.cloudfront.net/CIK-0001018724/f965e5c3-fded-45d3-bbdb-f750f156dcc9.pdf',
'https://d18rn0p25nwr6d.cloudfront.net/CIK-0001018724/336d8745-ea82-40a5-9acc-1a89df23d0f3.pdf'
]

filenames = [
'AMZN-2024-10-K-Annual-Report.pdf',
'AMZN-2023-10-K-Annual-Report.pdf',
'AMZN-2022-10-K-Annual-Report.pdf',
'AMZN-2021-10-K-Annual-Report.pdf'
]

metadata = [
dict(year=2024, source=filenames[0]),
dict(year=2023, source=filenames[1]),
dict(year=2022, source=filenames[2]),
dict(year=2021, source=filenames[3])]

data_root = "./data/"

for idx, url in enumerate(urls):
file_path = data_root + filenames[idx]
urlretrieve(url, file_path)
If you look at the Amazon 10-Ks, the first four pages are all the very similar and might skew the responses if they are kept in the embeddings. This will cause repetition, take longer to generate embeddings, and might skew your results.
- In the next step, you will take the downloaded data, trim the 10-K (first four pages) and overwrite them as processed files.
from pypdf import PdfReader, PdfWriter
import glob

local_pdfs = glob.glob(data_root + '*.pdf')

# Iterate over each PDF file
for idx, local_pdf in enumerate(local_pdfs):
pdf_reader = PdfReader(local_pdf)
pdf_writer = PdfWriter()

if idx == 0:
# Keep the first 4 pages for the first document
for pagenum in range(len(pdf_reader.pages)):
page = pdf_reader.pages[pagenum]
pdf_writer.add_page(page)
else:
# Remove the first 4 pages for other documents
for pagenum in range(4, len(pdf_reader.pages)):
page = pdf_reader.pages[pagenum]
pdf_writer.add_page(page)

# Write the modified content to a new file
with open(local_pdf, 'wb') as new_file:
new_file.seek(0)
pdf_writer.write(new_file)
new_file.truncate()
- After downloading, you can load the documents with the help of DirectoryLoader from PyPDF available under LangChain and splitting them into smaller chunks. Note: The retrieved document or text should be large enough to contain enough information to answer a question; but small enough to fit into the LLM prompt. Also, the embedding model has a limit on the length of input tokens of 512 tokens, which translates to approximately 2,000 characters. For this use-case, you are creating chunks of approximately 1,000 characters with an overlap of 100 characters using RecursiveCharacterTextSplitter.
import numpy as np
from langchain_community.document_loaders import PyPDFLoader
from langchain.text_splitter import RecursiveCharacterTextSplitter

documents = []

for idx, file in enumerate(filenames):
loader = PyPDFLoader(data_root + file)
document = loader.load()
for document_fragment in document:
document_fragment.metadata = metadata[idx]

documents += document

# - in our testing Character split works better with this PDF data set
text_splitter = RecursiveCharacterTextSplitter(
# Set a really small chunk size, just to show.
chunk_size=1000,
chunk_overlap=100,
)

docs = text_splitter.split_documents(documents)
print(docs[100])
- Before you proceed, look at some of the statistics regarding the document preprocessing you just performed:
avg_doc_length = lambda documents: sum([len(doc.page_content) for doc in documents])//len(documents)

print(f'Average length among {len(documents)} documents loaded is {avg_doc_length(documents)} characters.')
print(f'After the split we have {len(docs)} documents as opposed to the original {len(documents)}.')
print(f'Average length among {len(docs)} documents (after split) is {avg_doc_length(docs)} characters.')
- You started with four PDF documents, which have been split into approximately 500 smaller chunks. Now you can see how a sample embedding would look like for one of those chunks.
sample_embedding = np.array(sagemaker_embeddings.embed_query(docs[0].page_content))
print("Sample embedding of a document chunk: ", sample_embedding)
print("Size of the embedding: ", sample_embedding.shape)
This can be done using FAISS implementation inside LangChain which takes input from the embedding model and the documents to create the entire vector store. Using the Index Wrapper, you can abstract away most of the heavy lifting such as creating the prompt, getting embeddings of the query, sampling the relevant documents, and calling the LLM. VectorStoreIndexWrapper.
from langchain_community.vectorstores import FAISS
from langchain.indexes.vectorstore import VectorStoreIndexWrapper

vectorstore_faiss = FAISS.from_documents(
    docs,
    sagemaker_embeddings,
)
wrapper_store_faiss = VectorStoreIndexWrapper(vectorstore=vectorstore_faiss)
Answer questions using a LangChain vector store wrapper
You use the wrapper provided by LangChain, which wraps around the vector store and takes input from the LLM. This wrapper performs the following steps behind the scenes:
- Inputs the question
- Creates question embedding
- Fetches relevant documents
- Stuffs the documents and the question into a prompt
- Invokes the model with the prompt and generate the answer in a human readable manner.
Note: In this example we are using Llama 3 8B Instruct as the LLM under Amazon SageMaker, this particular model performs best if the inputs are provided under
<|begin_of_text|><|start_header_id|>system<|end_header_id|>,
{{system_message}},
<|eot_id|><|start_header_id|>user<|end_header_id|>,
{{user_message}}, and the model is requested to generate an output after
<|eot_id|><|start_header_id|>assistant<|end_header_id|>.
The following is an example of how to control the prompt so that the LLM stays grounded and doesn’t answer outside the context.
prompt_template = """<|begin_of_text|><|start_header_id|>system<|end_header_id|>
You are a helpful assistant.
<|eot_id|><|start_header_id|>user<|end_header_id|>
{query}
<|eot_id|><|start_header_id|>assistant<|end_header_id|>
"""
PROMPT = PromptTemplate(
    template=prompt_template, input_variables=["query"]
)
query = "How did AWS perform in 2021?"
answer = wrapper_store_faiss.query(question=PROMPT.format(query=query), llm=llm)
print(answer)
You can ask another question.
query_2 = "How much square footage did Amazon have in North America in 2023?"
answer = wrapper_store_faiss.query(question=PROMPT.format(query=query_2), llm=llm)
print(answer)
Retrieval QA chain
We’ve shown you a basic method to get context-aware answers. Now, let’s look at a more customizable option with RetrievalQA. You can customize how fetched documents are added to the prompt using the chain_type parameter, control the number of relevant documents retrieved by changing the k parameter, and get source documents used by the LLM by enabling return_source_documents.RetrievalQA also allows providing custom prompt templates specific to the model.
from langchain.chains import RetrievalQA

prompt_template = """
<|begin_of_text|><|start_header_id|>system<|end_header_id|>

This is a conversation between an AI assistant and a Human.

<|eot_id|><|start_header_id|>user<|end_header_id|>

Use the following pieces of context to provide a concise answer to the question at the end. If you don't know the answer, just say that you don't know, don't try to make up an answer.
#### Context ####
{context}
#### End of Context ####

Question: {question}
<|eot_id|><|start_header_id|>assistant<|end_header_id|>
"""
PROMPT = PromptTemplate(
template=prompt_template, input_variables=["context", "question"]
)

qa = RetrievalQA.from_chain_type(
llm=llm,
chain_type="stuff",
retriever=vectorstore_faiss.as_retriever(
search_type="similarity", search_kwargs={"k": 3}
),
return_source_documents=True,
chain_type_kwargs={"prompt": PROMPT}
)
You can then ask a question:
query = "How did AWS perform in 2023?"
result = qa({"query": query})
print(result['result'])
Parent document retriever chain
Let’s explore a more advanced RAG option with ParentDocumentRetriever. It balances storing small chunks for accurate embeddings and larger chunks to preserve context. First, a parent_splitter divides documents into larger parent chunks. Then, a child_splitter creates smaller child chunks. Child chunks are indexed in a vector store using embeddings for efficient retrieval. To retrieve relevant info, ParentDocumentRetriever fetches child chunks from the vector store, looks up their parent IDs, and returns corresponding larger parent chunks, stored in an InMemoryStore. This approach balances accurate embeddings with contextual information for meaningful retrieval.
from langchain.retrievers import ParentDocumentRetriever
from langchain.storage import InMemoryStore
- Sometimes, the full documents can so large that you don’t want to retrieve them as is. In that case, you can first split the raw documents into larger chunks, and then split it into smaller chunks. You then index the smaller chunks, but on retrieval you retrieve the larger chunks (but still not the full documents).
# This text splitter is used to create the parent documents
parent_splitter = RecursiveCharacterTextSplitter(chunk_size=2000)
# This text splitter is used to create the child documents
# It should create documents smaller than the parent
child_splitter = RecursiveCharacterTextSplitter(chunk_size=400)
# The vectorstore to use to index the child chunks
vectorstore_faiss = FAISS.from_documents(
child_splitter.split_documents(documents),
sagemaker_embeddings,
)
# The storage layer for the parent documents
store = InMemoryStore()

# The storage layer for the parent documents
store = InMemoryStore()
retriever = ParentDocumentRetriever(
vectorstore=vectorstore_faiss,
docstore=store,
child_splitter=child_splitter,
parent_splitter=parent_splitter,
)
retriever.add_documents(documents, ids=None)
- Now, initialize the chain using the
ParentDocumentRetriever. Pass the prompt in using the chain_type_kwargs argument.
qa = RetrievalQA.from_chain_type(
    llm=llm,
    chain_type="stuff",
    retriever=retriever,
    return_source_documents=True,
    chain_type_kwargs={"prompt": PROMPT}
)
- Start asking questions:
query = "How did AWS perform in 2023?"
result = qa({"query": query})
print(result['result'])
Clean up
To avoid incurring unnecessary costs, when you’re done, delete the SageMaker endpoints and OpenSearch Service domain, either using the following code snippets or the SageMaker JumpStart UI.
predictor.delete_model()
predictor.delete_endpoint()
embedding_endpoint.delete_model()
embedding_endpoint.delete_endpoint()
To use the SageMaker console, complete the following steps:
- On the SageMaker console, under Inference in the navigation pane, choose Endpoints.
- Search for the embedding and text generation endpoints.
- On the endpoint details page, choose Delete.
- Choose Delete again to confirm.
Conclusion
In this post, we showed you a powerful RAG solution using SageMaker JumpStart to deploy the Llama 3 8B Instruct model and the BGE Large En v1.5 embedding model.
We showed you how to create a robust vector store by processing documents of various formats and generating embeddings. This vector store facilitates retrieving relevant documents based on user queries using LangChain’s retrieval algorithms. We demonstrated the ability to prepare custom prompts tailored for the Llama 3 model, ensuring context-aware responses, and presented these context-specific answers in a human-friendly manner.
This solution highlights the power of SageMaker JumpStart in deploying cutting-edge models and the versatility of LangChain in creating effective RAG applications. By seamlessly integrating these components, we enabled high-quality, context-specific response generation, enhancing the Llama 3 model’s performance across natural language processing tasks. To explore this solution and embark on your context-aware language generation journey, visit the notebook in the GitHub repository.
To get started now, check out SageMaker JumpStart in SageMaker Studio.
About the Authors
 Supriya Puragundla is a Senior Solutions Architect at AWS. She has over 15 years of IT experience in software development, design and architecture. She helps key enterprise customer accounts on their data, generative AI and AI/ML journeys. She is passionate about data-driven AI and the area of depth in ML and generative AI.
 Dr. Farooq Sabir is a Senior Artificial Intelligence and Machine Learning Specialist Solutions Architect at AWS. He holds PhD and MS degrees in Electrical Engineering from the University of Texas at Austin and an MS in Computer Science from Georgia Institute of Technology. He has over 15 years of work experience and also likes to teach and mentor college students. At AWS, he helps customers formulate and solve their business problems in data science, machine learning, computer vision, artificial intelligence, numerical optimization, and related domains. Based in Dallas, Texas, he and his family love to travel and go on long road trips.
 Marco Punio is a Sr. Specialist Solutions Architect focused on generative AI strategy, applied AI solutions, and conducting research to help customers hyperscale on AWS. Marco is based in Seattle, WA, and enjoys writing, reading, exercising, and building applications in his free time.
 Niithiyn Vijeaswaran is a Solutions Architect at AWS. His area of focus is generative AI and AWS AI Accelerators. He holds a Bachelor’s degree in Computer Science and Bioinformatics. Niithiyn works closely with the Generative AI GTM team to enable AWS customers on multiple fronts and accelerate their adoption of generative AI. He’s an avid fan of the Dallas Mavericks and enjoys collecting sneakers.
 Yousuf Athar is a Solutions Architect at AWS specializing in generative AI and AI/ML. With a Bachelor’s degree in Information Technology and a concentration in Cloud Computing, he helps customers integrate advanced generative AI capabilities into their systems, driving innovation and competitive edge. Outside of work, Yousuf loves to travel, watch sports, and play football.
 Gaurav Parekh is an AWS Solutions Architect specializing in Generative AI, Analytics and Networking technologies.
Read More

 Stuart Gillen is a Sr. Product Manager, Lookout for Equipment, at AWS. Stuart has held a variety of roles in engineering management, business development, product management, and consulting. Most of his career has been focused on industrial applications specifically in reliability practices, maintenance systems, and manufacturing.


 Siddharth Varia is an applied scientist in AWS Bedrock. He is broadly interested in natural language processing and has contributed to AWS products such as Amazon Comprehend. Outside of work, he enjoys exploring new places and reading. He got interested in this project after reading the book The Code Breaker.
 Yudi Zhang is an Applied Scientist at AWS marketing. Her research interests are in the area of graph neural networks, natural language processing, and statistics.
 Erika Pelaez Coyotl is a Sr Applied Scientist in Amazon Bedrock, where she’s currently helping develop the Amazon Titan large language model. Her background is in biomedical science, and she has helped several customers develop ML models in this vertical.
 Zichen Wang is a Sr Applied Scientist in AWS AI Research & Education. He is interested in researching graph neural networks and applying AI to accelerate scientific discovery, specifically on molecules and simulations.
 Rishita Anubhai is a Principal Applied Scientist in Amazon Bedrock. She has deep expertise in natural language processing and has contributed to AWS projects like Amazon Comprehend, Machine Learning Solutions Lab, and development of Amazon Titan models. She’s keenly interested in using machine learning research, specifically deep learning, to create tangible impact.
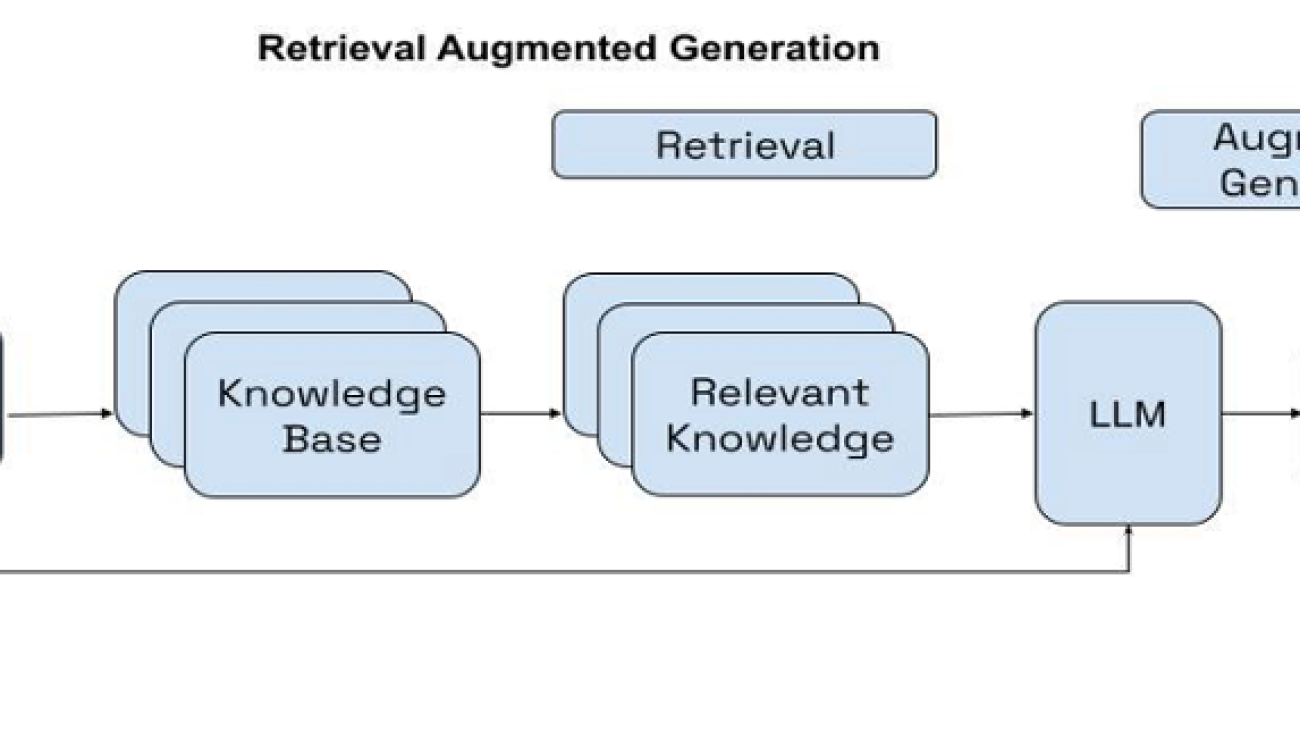


 Shashi Raina is a Senior Partner Solutions Architect at Amazon Web Services (AWS), where he specializes in supporting generative AI (GenAI) startups. With close to 6 years of experience at AWS, Shashi has developed deep expertise across a range of domains, including DevOps, analytics, and generative AI.
 Pradeep Prabhakaran is a Senior Manager – Solutions Architecture at Cohere. In his current role at Cohere, Pradeep acts as a trusted technical advisor to customers and partners, providing guidance and strategies to help them realize the full potential of Cohere’s cutting-edge Generative AI platform.


 Anutosh is a Solutions Architect at AWS India. He loves to dive deep into his customers’ use cases to help them navigate through their journey on AWS. He enjoys building solutions in the cloud to help customers. He is passionate about migration and modernization, data analytics, resilience, cybersecurity, and machine learning.


 Piyali Kamra is a seasoned enterprise architect and a hands-on technologist who has over two decades of experience building and executing large scale enterprise IT projects across geographies. She believes that building large scale enterprise systems is not an exact science but more like an art, where you can’t always choose the best technology that comes to one’s mind but rather tools and technologies must be carefully selected based on the team’s culture , strengths, weaknesses and risks, in tandem with having a futuristic vision as to how you want to shape your product a few years down the road.


 Harish Rao is a senior solutions architect at AWS, specializing in large-scale distributed AI training and inference. He empowers customers to harness the power of AI to drive innovation and solve complex challenges. Outside of work, Harish embraces an active lifestyle, enjoying the tranquility of hiking, the intensity of racquetball, and the mental clarity of mindfulness practices.
 Raghu Ramesha is a Senior GenAI/ML Solutions Architect on the Amazon SageMaker Service team. He focuses on helping customers build, deploy, and migrate ML production workloads to SageMaker at scale. He specializes in machine learning, AI, and computer vision domains, and holds a master’s degree in computer science from UT Dallas. In his free time, he enjoys traveling and photography.
 Lingran Xia is a software development engineer at AWS. He currently focuses on improving inference performance of machine learning models. In his free time, he enjoys traveling and skiing.
 Naman Nandan is a software development engineer at AWS, specializing in enabling large scale AI/ML inference workloads on SageMaker using TorchServe, a project jointly developed by AWS and Meta. In his free time, he enjoys playing tennis and going on hikes.
 Li Ning is a senior software engineer at AWS with a specialization in building large-scale AI solutions. As a tech lead for TorchServe, a project jointly developed by AWS and Meta, her passion lies in leveraging PyTorch and AWS SageMaker to help customers embrace AI for the greater good. Outside of her professional endeavors, Li enjoys swimming, traveling, following the latest advancements in technology, and spending quality time with her family.
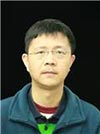 Frank Liu is a Principal Software Engineer for AWS Deep Learning. He focuses on building innovative deep learning tools for software engineers and scientists. Frank has in-depth knowledge on the infrastructure optimization and Deep Learning acceleration.
 Deepika Damojipurapu is a Senior Technical Account Manager at AWS, specializing in distributed AI training and inference. She helps customers unlock the full potential of AWS by providing consultative guidance on architecture and operations, tailored to their specific applications and use cases. When not immersed in her professional responsibilities, Deepika finds joy in spending quality time with her family – exploring outdoors, traveling to new destinations, cooking wholesome meals together, creating cherished memories.
 Alan Tan is a Principal Product Manager with SageMaker, leading efforts on large model inference. He’s passionate about applying machine learning to building novel solutions. Outside of work, he enjoys the outdoors.
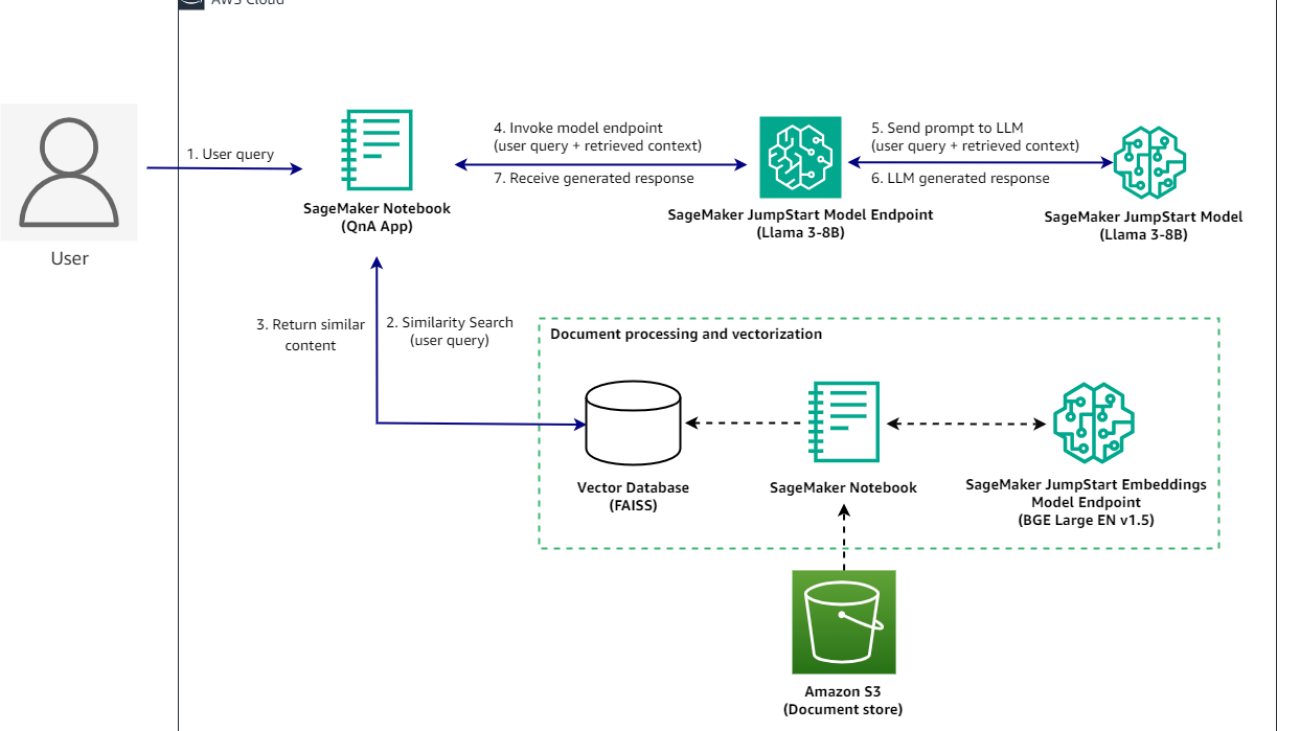


 Sebastian Bustillo is a Solutions Architect at AWS. He focuses on AI/ML technologies with a profound passion for generative AI and compute accelerators. At AWS, he helps customers unlock business value through generative AI. When he’s not at work, he enjoys brewing a perfect cup of specialty coffee and exploring the world with his wife.
 Madhur Prashant is an AI and ML Solutions Architect at Amazon Web Services. He is passionate about the intersection of human thinking and generative AI. His interests lie in generative AI, specifically building solutions that are helpful and harmless, and most of all optimal for customers. Outside of work, he loves doing yoga, hiking, spending time with his twin, and playing the guitar.
 Brayan Montiel is a Solutions Architect at AWS based in Austin, Texas. He supports enterprise customers in the automotive and manufacturing industries, helping to accelerate cloud adoption technologies and modernize IT infrastructure. He specializes in AI/ML technologies, empowering customers to use generative AI and innovative technologies to drive operational growth and efficiencies. Outside of work, he enjoys spending quality time with his family, being outdoors, and traveling.
 Jose Navarro is an AI/ML Solutions Architect at AWS, based in Spain. Jose helps AWS customers—from small startups to large enterprises—architect and take their end-to-end machine learning use cases to production. In his spare time, he loves to exercise, spend quality time with friends and family, and catch up on AI news and papers.


 Sachin Jain is a Senior Solutions Architect at Amazon Web Services (AWS) with focus on helping Healthcare and Life-Sciences customers in their cloud journey. He has over 20 years of experience in technology, healthcare and engineering space.
 Sanjoy Thanneer is a Sr. Technical Account Manager with AWS based out of New York. He has over 20 years of experience working in Database and Analytics Domains. He is passionate about helping enterprise customers build scalable , resilient and cost efficient Applications.
 Sukhomoy Basak is a Sr. Solutions Architect at Amazon Web Services, with a passion for Data, Analytics, and GenAI solutions. Sukhomoy works with enterprise customers to help them architect, build, and scale applications to achieve their business outcomes.