Intelligent document processing using Amazon Bedrock and Anthropic Claude

Intelligent document processing using Amazon Bedrock and Anthropic Claude

Generative artificial intelligence (AI) not only empowers innovation through ideation, content creation, and enhanced customer service, but also streamlines operations and boosts productivity across various domains. To effectively harness this transformative technology, Amazon Bedrock offers a fully managed service that integrates high-performing foundation models (FMs) from leading AI companies, such as AI21 Labs, Anthropic, Cohere, Meta, Stability AI, Mistral AI, and Amazon. By providing access to these advanced models through a single API and supporting the development of generative AI applications with an emphasis on security, privacy, and responsible AI, Amazon Bedrock enables you to use AI to explore new avenues for innovation and improve overall offerings.

Enterprise customers can unlock significant value by harnessing the power of intelligent document processing (IDP) augmented with generative AI. By infusing IDP solutions with generative AI capabilities, organizations can revolutionize their document processing workflows, achieving exceptional levels of automation and reliability. This combination enables advanced document understanding, highly effective structured data extraction, automated document classification, and seamless information retrieval from unstructured text. With these capabilities, organizations can achieve scalable, efficient, and high-value document processing that drives business transformation and competitiveness, ultimately leading to improved productivity, reduced costs, and enhanced decision-making.

In this post, we show how to develop an IDP solution using Anthropic Claude 3 Sonnet on Amazon Bedrock. We demonstrate how to extract data from a scanned document and insert it into a database.

The Anthropic Claude 3 Sonnet model is optimized for speed and efficiency, making it an excellent choice for intelligent tasks—particularly for enterprise workloads. It also possesses sophisticated vision capabilities, demonstrating a strong aptitude for understanding a wide range of visual formats, including photos, charts, graphs, and technical diagrams. Although we demonstrate this solution using the Anthropic Claude 3 Sonnet model, you can alternatively use the Haiku and Opus models if your use case requires them.

Solution overview

The proposed solution uses Amazon Bedrock and the powerful Anthropic Claude 3 Sonnet model to enable IDP capabilities. The architecture consists of several AWS services seamlessly integrated with the Amazon Bedrock, enabling efficient and accurate extraction of data from scanned documents.

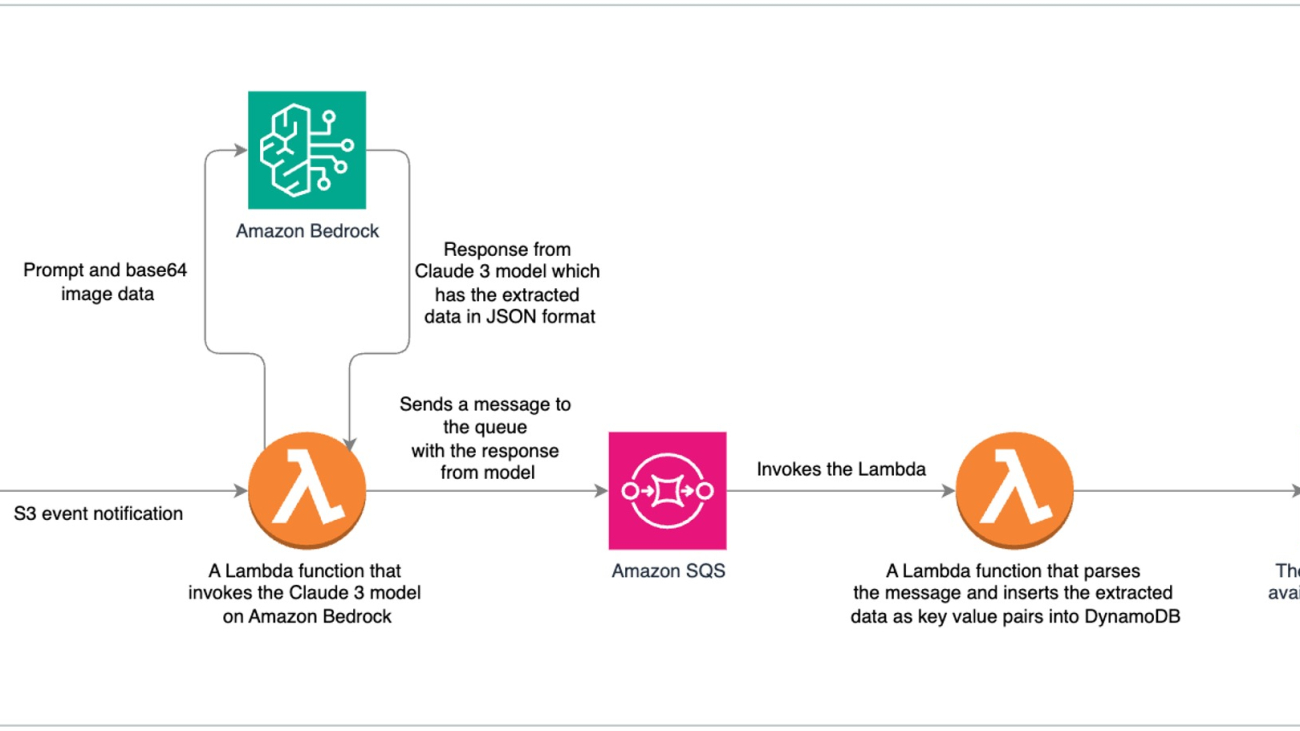
The following diagram illustrates our solution architecture.

The solution consists of the following steps:

  1. The process begins with scanned documents being uploaded and stored in an Amazon Simple Storage Service (Amazon S3) bucket, which invokes an S3 Event Notification on object upload.
  2. This event invokes an AWS Lambda function, responsible for invoking the Anthropic Claude 3 Sonnet model on Amazon Bedrock.
  3. The Anthropic Claude 3 Sonnet model, with its advanced multimodal capabilities, processes the scanned documents and extracts relevant data in a structured JSON format.
  4. The extracted data from the Anthropic Claude 3 model is sent to an Amazon Simple Queue Service (Amazon SQS) queue. Amazon SQS acts as a buffer, allowing components to send and receive messages reliably without being directly coupled, providing scalability and fault tolerance in the system.
  5. Another Lambda function consumes the messages from the SQS queue, parses the JSON data, and stores the extracted key-value pairs in an Amazon DynamoDB table for retrieval and further processing.

This serverless architecture takes advantage of the scalability and cost-effectiveness of AWS services while harnessing the cutting-edge intelligence of Anthropic Claude 3 Sonnet. By combining the robust infrastructure of AWS with Anthropic’s FMs, this solution enables organizations to streamline their document processing workflows, extract valuable insights, and enhance overall operational efficiency.

The solution uses the following services and features:

  • Amazon Bedrock is a fully managed service that provides access to large language models (LLMs), allowing developers to build and deploy their own customized AI applications.
  • The Anthropic Claude 3 family offers a versatile range of models tailored to meet diverse needs. With three options—Opus, Sonnet, and Haiku—you can choose the perfect balance of intelligence, speed, and cost. These models excel at understanding complex enterprise content, including charts, graphs, technical diagrams, and reports.
  • Amazon DynamoDB is a fully managed, serverless, NoSQL database service.
  • AWS Lambda is a serverless computing service that allows you to run code without provisioning or managing servers.
  • Amazon SQS is a fully managed message queuing service.
  • Amazon S3 is a highly scalable, durable, and secure object storage service.

In this solution, we use the generative AI capabilities in Amazon Bedrock to efficiently extract data. As of writing of this post, Anthropic Claude 3 Sonnet only accepts images as input. The supported file types are GIF, JPEG, PNG, and WebP. You can choose to save images during the scanning process or convert the PDF to images.

You can also enhance this solution by implementing human-in-the-loop and model evaluation features. The goal of this post is to demonstrate how you can build an IDP solution using Amazon Bedrock, but to use this as a production-scale solution, additional considerations should be taken into account, such as testing for edge case scenarios, better exception handling, trying additional prompting techniques, model fine-tuning, model evaluation, throughput requirements, number of concurrent requests to be supported, and carefully considering cost and latency implications.

Prerequisites

You need the following prerequisites before you can proceed with this solution. For this post, we use the us-east-1 AWS Region. For details on available Regions, see Amazon Bedrock endpoints and quotas.

Use case and dataset

For our example use case, let’s look at a state agency responsible for issuing birth certificates. The agency may receive birth certificate applications through various methods, such as online applications, forms completed at a physical location, and mailed-in completed paper applications. Today, most agencies spend a considerable amount of time and resources to manually extract the application details. The process begins with scanning the application forms, manually extracting the details, and then entering them into an application that eventually stores the data into a database. This process is time-consuming, inefficient, not scalable, and error-prone. Additionally, it adds complexity if the application form is in a different language (such as Spanish).

For this demonstration, we use sample scanned images of birth certificate application forms. These forms don’t contain any real personal data. Two examples are provided: one in English (handwritten) and another in Spanish (printed). Save these images as .jpeg files to your computer. You need them later for testing the solution.

Create an S3 bucket

On the Amazon S3 console, create a new bucket with a unique name (for example, bedrock-claude3-idp-{random characters to make it globally unique}) and leave the other settings as default. Within the bucket, create a folder named images and a sub-folder named birth_certificates.

Create an SQS queue

On the Amazon SQS console, create a queue with the Standard queue type, provide a name (for example, bedrock-idp-extracted-data), and leave the other settings as default.

Create a Lambda function to invoke the Amazon Bedrock model

On the Lambda console, create a function (for example, invoke_bedrock_claude3), choose Python 3.12 for the runtime, and leave the remaining settings as default. Later, you configure this function to be invoked every time a new image is uploaded into the S3 bucket. You can download the entire Lambda function code from invoke_bedrock_claude3.py. Replace the contents of the lambda_function.py file with the code from the downloaded file. Make sure to substitute {SQS URL} with the URL of the SQS queue you created earlier, then choose Deploy.

The Lambda function should perform the following actions:

s3 = boto3.client('s3')
sqs = boto3.client('sqs')
bedrock = boto3.client('bedrock-runtime', region_name='us-east-1')
QUEUE_URL = {SQS URL}
MODEL_ID = "anthropic.claude-3-sonnet-20240229-v1:0"

The following code gets the image from the S3 bucket using the get_object method and converts it to base64 data:

image_data = s3.get_object(Bucket=bucket_name, Key=object_key)['Body'].read()
base64_image = base64.b64encode(image_data).decode('utf-8')

Prompt engineering is a critical factor in unlocking the full potential of generative AI applications like IDP. Crafting well-structured prompts makes sure that the AI system’s outputs are accurate, relevant, and aligned with your objectives, while mitigating potential risks.

With the Anthropic Claude 3 model integrated into the Amazon Bedrock IDP solution, you can use the model’s impressive visual understanding capabilities to effortlessly extract data from documents. Simply provide the image or document as input, and Anthropic Claude 3 will comprehend its contents, seamlessly extracting the desired information and presenting it in a human-readable format. All Anthropic Claude 3 models are capable of understanding non-English languages such as Spanish, Japanese, and French. In this particular use case, we demonstrate how to translate Spanish application forms into English by providing the appropriate prompt instructions.

However, LLMs like Anthropic Claude 3 can exhibit variability in their response formats. To achieve consistent and structured output, you can tailor your prompts to instruct the model to return the extracted data in a specific format, such as JSON with predefined keys. This approach enhances the interoperability of the model’s output with downstream applications and streamlines data processing workflows.

The following is the prompt with the specific JSON output format:

prompt = """
This image shows a birth certificate application form. 
Please precisely copy all the relevant information from the form.
Leave the field blank if there is no information in corresponding field.
If the image is not a birth certificate application form, simply return an empty JSON object. 
If the application form is not filled, leave the fees attributes blank. 
Translate any non-English text to English. 
Organize and return the extracted data in a JSON format with the following keys:
{
    "applicantDetails":{
        "applicantName": "",
        "dayPhoneNumber": "",
        "address": "",
        "city": "",
        "state": "",
        "zipCode": "",
        "email":""
    },
    "mailingAddress":{
        "mailingAddressApplicantName": "",
        "mailingAddress": "",
        "mailingAddressCity": "",
        "mailingAddressState": "",
        "mailingAddressZipCode": ""
    },
    "relationToApplicant":[""],
    "purposeOfRequest": "",
    
    "BirthCertificateDetails":
    {
        "nameOnBirthCertificate": "",
        "dateOfBirth": "",
        "sex": "",
        "cityOfBirth": "",
        "countyOfBirth": "",
        "mothersMaidenName": "",
        "fathersName": "",
        "mothersPlaceOfBirth": "",
        "fathersPlaceOfBirth": "",
        "parentsMarriedAtBirth": "",
        "numberOfChildrenBornInSCToMother": "",
        "diffNameAtBirth":""
    },
    "fees":{
        "searchFee": "",
        "eachAdditionalCopy": "",
        "expediteFee": "",
        "totalFees": ""
    } 
  }
""" 

Invoke the Anthropic Claude 3 Sonnet model using the Amazon Bedrock API. Pass the prompt and the base64 image data as parameters:

def invoke_claude_3_multimodal(prompt, base64_image_data):
    request_body = {
        "anthropic_version": "bedrock-2023-05-31",
        "max_tokens": 2048,
        "messages": [
            {
                "role": "user",
                "content": [
                    {
                        "type": "text",
                        "text": prompt,
                    },
                    {
                        "type": "image",
                        "source": {
                            "type": "base64",
                            "media_type": "image/png",
                            "data": base64_image_data,
                        },
                    },
                ],
            }
        ],
    }

    try:
        response = bedrock.invoke_model(modelId=MODEL_ID, body=json.dumps(request_body))
        return json.loads(response['body'].read())
    except bedrock.exceptions.ClientError as err:
        print(f"Couldn't invoke Claude 3 Sonnet. Here's why: {err.response['Error']['Code']}: {err.response['Error']['Message']}")
        raise

Send the Amazon Bedrock API response to the SQS queue using the send_message method:

def send_message_to_sqs(message_body):
    try:
        sqs.send_message(QueueUrl=QUEUE_URL, MessageBody=json.dumps(message_body))
    except sqs.exceptions.ClientError as e:
        print(f"Error sending message to SQS: {e.response['Error']['Code']}: {e.response['Error']['Message']}")

Next, modify the IAM role of the Lambda function to grant the required permissions:

  1. On the Lambda console, navigate to the function.
  2. On the Configuration tab, choose Permissions in the left pane.
  3. Choose the IAM role (for example, invoke_bedrock_claude3-role-{random chars}).

This will open the role on a new tab.

  1. In the Permissions policies section, choose Add permissions and Create inline policy.
  2. On the Create policy page, switch to the JSON tab in the policy editor.
  3. Enter the policy from the following code block, replacing {AWS Account ID} with your AWS account ID and {S3 Bucket Name} with your S3 bucket name.
  4. Choose Next.
  5. Enter a name for the policy (for example, invoke_bedrock_claude3-role-policy), and choose Create policy.
{
    "Version": "2012-10-17",
    "Statement": [{
        "Effect": "Allow",
        "Action": "bedrock:InvokeModel",
        "Resource": "arn:aws:bedrock:us-east-1::foundation-model/*"
    }, {
        "Effect": "Allow",
        "Action": "s3:GetObject",
        "Resource": "arn:aws:s3:::{S3 Bucket Name}/*"
    }, {
        "Effect": "Allow",
        "Action": "sqs:SendMessage",
        "Resource": "arn:aws:sqs:us-east-1:{AWS Account ID}:bedrock-idp-extracted-data"
    }]
}

The policy will grant the following permissions:

  • Invoke model access to Amazon Bedrock FMs
  • Retrieve objects from the bedrock-claude3-idp... S3 bucket
  • Send messages to the bedrock-idp-extracted-data SQS queue for processing the extracted data

Additionally, modify the Lambda function’s timeout to 2 minutes. By default, it’s set to 3 seconds.

Create an S3 Event Notification

To create an S3 Event Notification, complete the following steps:

  1. On the Amazon S3 console, open the bedrock-claude3-idp... S3 bucket.
  2. Navigate to Properties, and in the Event notifications section, create an event notification.
  3. Enter a name for Event name (for example, bedrock-claude3-idp-event-notification).
  4. Enter images/birth_certificates/ for the prefix.
  5. For Event Type, select Put in the Object creation section.
  6. For Destination, select Lambda function and choose invoke_bedrock_claude3.
  7. Choose Save changes.

Create a DynamoDB table

To store the extracted data in DynamoDB, you need to create a table. On the DynamoDB console, create a table called birth_certificates with Id as the partition key, and keep the remaining settings as default.

Create a Lambda function to insert records into the DynamoDB table

On the Lambda console, create a Lambda function (for example, insert_into_dynamodb), choose Python 3.12 for the runtime, and leave the remaining settings as default. You can download the entire Lambda function code from insert_into_dynamodb.py. Replace the contents of the lambda_function.py file with the code from the downloaded file and choose Deploy.

The Lambda function should perform the following actions:

Get the message from the SQS queue that contains the response from the Anthropic Claude 3 Sonnet model:

data = json.loads(event['Records'][0]['body'])['content'][0]['text']
event_id = event['Records'][0]['messageId']
data = json.loads(data)

Create objects representing DynamoDB and its table:

dynamodb = boto3.resource('dynamodb')
table = dynamodb.Table('birth_certificates')

Get the key objects from the JSON data:

applicant_details = data.get('applicantDetails', {})
    mailing_address = data.get('mailingAddress', {})
    relation_to_applicant = data.get('relationToApplicant', [])
    birth_certificate_details = data.get('BirthCertificateDetails', {})
    fees = data.get('fees', {})

Insert the extracted data into DynamoDB table using put_item() method:

table.put_item(Item={
'Id': event_id,
'applicantName': applicant_details.get('applicantName', ''),
'dayPhoneNumber': applicant_details.get('dayPhoneNumber', ''),
'address': applicant_details.get('address', ''),
'city': applicant_details.get('city', ''),
'state': applicant_details.get('state', ''),
'zipCode': applicant_details.get('zipCode', ''),
'email': applicant_details.get('email', ''),
'mailingAddressApplicantName': mailing_address.get('mailingAddressApplicantName', ''),
'mailingAddress': mailing_address.get('mailingAddress', ''),
'mailingAddressCity': mailing_address.get('mailingAddressCity', ''),
'mailingAddressState': mailing_address.get('mailingAddressState', ''),
'mailingAddressZipCode': mailing_address.get('mailingAddressZipCode', ''),
'relationToApplicant': ', '.join(relation_to_applicant),
'purposeOfRequest': data.get('purposeOfRequest', ''),
'nameOnBirthCertificate': birth_certificate_details.get('nameOnBirthCertificate', ''),
'dateOfBirth': birth_certificate_details.get('dateOfBirth', ''),
'sex': birth_certificate_details.get('sex', ''),
'cityOfBirth': birth_certificate_details.get('cityOfBirth', ''),
'countyOfBirth': birth_certificate_details.get('countyOfBirth', ''),
'mothersMaidenName': birth_certificate_details.get('mothersMaidenName', ''),
'fathersName': birth_certificate_details.get('fathersName', ''),
'mothersPlaceOfBirth': birth_certificate_details.get('mothersPlaceOfBirth', ''),
'fathersPlaceOfBirth': birth_certificate_details.get('fathersPlaceOfBirth', ''),
'parentsMarriedAtBirth': birth_certificate_details.get('parentsMarriedAtBirth', ''),
'numberOfChildrenBornInSCToMother': birth_certificate_details.get('numberOfChildrenBornInSCToMother', ''),
'diffNameAtBirth': birth_certificate_details.get('diffNameAtBirth', ''),
'searchFee': fees.get('searchFee', ''),
'eachAdditionalCopy': fees.get('eachAdditionalCopy', ''),
'expediteFee': fees.get('expediteFee', ''),
'totalFees': fees.get('totalFees', '')
})

Next, modify the IAM role of the Lambda function to grant the required permissions. Follow the same steps you used to modify the permissions for the invoke_bedrock_claude3 Lambda function, but enter the following JSON as the inline policy:

{
    "Version": "2012-10-17",
    "Statement": [
        {
            "Sid": "VisualEditor0",
            "Effect": "Allow",
            "Action": "dynamodb:PutItem",
            "Resource": "arn:aws:dynamodb:us-east-1::{AWS Account ID}:table/birth_certificates"
        },
        {
            "Sid": "VisualEditor1",
            "Effect": "Allow",
            "Action": [
                "sqs:DeleteMessage",
                "sqs:ReceiveMessage",
                "sqs:GetQueueAttributes"
            ],
            "Resource": "arn:aws:sqs:us-east-1::{AWS Account ID}:bedrock-idp-extracted-data"
        }
    ]
}

Enter a policy name (for example, insert_into_dynamodb-role-policy) and choose Create policy.

The policy will grant the following permissions:

  • Put records into the DynamoDB table
  • Read and delete messages from the SQS queue

Configure the Lambda function trigger for SQS

Complete the following steps to create a trigger for the Lambda function:

  1. On the Amazon SQS console, open the bedrock-idp-extracted-data queue.
  2. On the Lambda triggers tab, choose Configure Lambda function trigger.
  3. Select the insert_into_dynamodb Lambda function and choose Save.

Test the solution

Now that you have created all the necessary resources, permissions, and code, it’s time to test the solution.

In the S3 folder birth_certificates, upload the two scanned images that you downloaded earlier. Then open the DynamoDB console and explore the items in the birth_certificates table.

If everything is configured properly, you should see two items in DynamoDB in just a few seconds, as shown in the following screenshots. For the Spanish form, Anthropic Claude 3 automatically translated the keys and labels from Spanish to English based on the prompt.

Troubleshooting

If you don’t see the extracted data in the DynamoDB table, you can investigate the issue:

  • Check CloudWatch logs – Review the Amazon CloudWatch log streams of the Lambda functions involved in the data extraction and ingestion process. Look for any error messages or exceptions that may indicate the root cause of the issue.
  • Identify missing permissions – In many cases, errors can occur due to missing permissions. Confirm that the Lambda functions have the necessary permissions to access the required AWS resources, such as DynamoDB tables, S3 buckets, or other services involved in the solution.
  • Implement a dead-letter queue – In a production-scale solution, it is recommended to implement a dead letter queue (DLQ) to catch and handle any events or messages that fail to process or encounter errors.

Clean up

Clean up the resources created as part of this post to avoid incurring ongoing charges:

  1. Delete all the objects from the bedrock-claude3-idp... S3 bucket, then delete the bucket.
  2. Delete the two Lambda functions named invoke_bedrock_claude3 and insert_into_dynamodb.
  3. Delete the SQS queue named bedrock-idp-extracted-data.
  4. Delete the DynamoDB table named birth_certificates.

Example use cases and business value

The generative AI-powered IDP solution demonstrated in this post can benefit organizations across various industries, such as:

  • Government and public sector – Process and extract data from citizen applications, immigration documents, legal contracts, and other government-related forms, enabling faster turnaround times and improved service delivery
  • Healthcare – Extract and organize patient information, medical records, insurance claims, and other health-related documents, improving data accuracy and accessibility for better patient care
  • Finance and banking – Automate the extraction and processing of financial documents, loan applications, tax forms, and regulatory filings, reducing manual effort and increasing operational efficiency
  • Logistics and supply chain – Extract and organize data from shipping documents, invoices, purchase orders, and inventory records, streamlining operations and enhancing supply chain visibility
  • Retail and ecommerce – Automate the extraction and processing of customer orders, product catalogs, and marketing materials, enabling personalized experiences and efficient order fulfillment

By using the power of generative AI and Amazon Bedrock, organizations can unlock the true potential of their data, driving operational excellence, enhancing customer experiences, and fostering continuous innovation.

Conclusion

In this post, we demonstrated how to use Amazon Bedrock and the powerful Anthropic Claude 3 Sonnet model to develop an IDP solution. By harnessing the advanced multimodal capabilities of Anthropic Claude 3, we were able to accurately extract data from scanned documents and store it in a structured format in a DynamoDB table.

Although this solution showcases the potential of generative AI in IDP, it may not be suitable for all IDP use cases. The effectiveness of the solution may vary depending on the complexity and quality of the documents, the amount of training data available, and the specific requirements of the organization.

To further enhance the solution, consider implementing a human-in-the-loop workflow to review and validate the extracted data, especially for mission-critical or sensitive applications. This will provide data accuracy and compliance with regulatory requirements. You can also explore the model evaluation feature in Amazon Bedrock to compare model outputs, and then choose the model best suited for your downstream generative AI applications.

For further exploration and learning, we recommend checking out the following resources:


About the Authors

Govind Palanisamy is a Solutions Architect at AWS, where he helps government agencies migrate and modernize their workloads to increase citizen experience. He is passionate about technology and transformation, and he helps customers transform their businesses using AI/ML and generative AI-based solutions.

Bharath Gunapati is a Sr. Solutions architect at AWS, where he helps clinicians, researchers, and staff at academic medical centers to adopt and use cloud technologies. He is passionate about technology and the impact it can make on healthcare and research.

Read More

Metadata filtering for tabular data with Knowledge Bases for Amazon Bedrock

Metadata filtering for tabular data with Knowledge Bases for Amazon Bedrock

Amazon Bedrock is a fully managed service that offers a choice of high-performing foundation models (FMs) from leading artificial intelligence (AI) companies like AI21 Labs, Anthropic, Cohere, Meta, Mistral AI, Stability AI, and Amazon through a single API. To equip FMs with up-to-date and proprietary information, organizations use Retrieval Augmented Generation (RAG), a technique that fetches data from company data sources and enriches the prompt to provide more relevant and accurate responses. Knowledge Bases for Amazon Bedrock is a fully managed capability that helps you implement the entire RAG workflow, from ingestion to retrieval and prompt augmentation. However, information about one dataset can be in another dataset, called metadata. Without using metadata, your retrieval process can cause the retrieval of unrelated results, thereby decreasing FM accuracy and increasing cost in the FM prompt token.

On March 27, 2024, Amazon Bedrock announced a key new feature called metadata filtering and also changed the default engine. This change allows you to use metadata fields during the retrieval process. However, the metadata fields need to be configured during the knowledge base ingestion process. Often, you might have tabular data where details about one field are available in another field. Also, you could have a requirement to cite the exact text document or text field to prevent hallucination. In this post, we show you how to use the new metadata filtering feature with Knowledge Bases for Amazon Bedrock for such tabular data.

Solution overview

The solution consists of the following high-level steps:

  1. Prepare data for metadata filtering.
  2. Create and ingest data and metadata into the knowledge base.
  3. Retrieve data from the knowledge base using metadata filtering.

Prepare data for metadata filtering

As of this writing, Knowledge Bases for Amazon Bedrock supports Amazon OpenSearch Serverless, Amazon Aurora, Pinecone, Redis Enterprise, and MongoDB Atlas as underlying vector store providers. In this post, we create and access an OpenSearch Serverless vector store using the Amazon Bedrock Boto3 SDK. For more details, see Set up a vector index for your knowledge base in a supported vector store.

For this post, we create a knowledge base using the public dataset Food.com – Recipes and Reviews. The following screenshot shows an example of the dataset.

The TotalTime is in ISO 8601 format. You can convert that to minutes using the following logic:

# Function to convert ISO 8601 duration to minutes
def convert_to_minutes(duration):
    hours = 0
    minutes = 0
    
    # Find hours and minutes using regex
    match = re.match(r'PT(?:(d+)H)?(?:(d+)M)?', duration)
    
    if match:
        if match.group(1):
            hours = int(match.group(1))
        if match.group(2):
            minutes = int(match.group(2))
    
    # Convert total time to minutes
    total_minutes = hours * 60 + minutes
    return total_minutes

df['TotalTimeInMinutes'] = df['TotalTime'].apply(convert_to_minutes)

After converting some of the features like CholesterolContent, SugarContent, and RecipeInstructions, the data frame looks like the following screenshot.

To enable the FM to point to a specific menu with a link (cite the document), we split each row of the tabular data in a single text file, with each file containing RecipeInstructions as the data field and TotalTimeInMinutes, CholesterolContent, and SugarContent as metadata. The metadata should be kept in a separate JSON file with the same name as the data file and .metadata.json added to its name. For example, if the data file name is 100.txt, the metadata file name should be 100.txt.metadata.json. For more details, see Add metadata to your files to allow for filtering. Also, the content in the metadata file should be in the following format:

{
"metadataAttributes": {
"${attribute1}": "${value1}",
"${attribute2}": "${value2}",
...
}
}

For the sake of simplicity, we only process the top 2,000 rows to create the knowledge base.

  1. After you import the necessary libraries, create a local directory using the following Python code:
    import pandas as pd
    import os, json, tqdm, boto3
    
    metafolder = 'multi_file_recipe_data'os.mkdir(metafolder)

  2. Iterate over the top 2,000 rows to create data and metadata files to store in the local folder:
    for i in tqdm.trange(2000):
        desc = str(df['RecipeInstructions'][i])
        meta = {
        "metadataAttributes": {
            "Name": str(df['Name'][i]),
            "TotalTimeInMinutes": str(df['TotalTimeInMinutes'][i]),
            "CholesterolContent": str(df['CholesterolContent'][i]),
            "SugarContent": str(df['SugarContent'][i]),
        }
        }
        filename = metafolder+'/' + str(i+1)+ '.txt'
        f = open(filename, 'w')
        f.write(desc)
        f.close()
        metafilename = filename+'.metadata.json'
        with open( metafilename, 'w') as f:
            json.dump(meta, f)
    

  3. Create an Amazon Simple Storage Service (Amazon S3) bucket named food-kb and upload the files:
    # Upload data to s3
    s3_client = boto3.client("s3")
    bucket_name = "recipe-kb"
    data_root = metafolder+'/'
    def uploadDirectory(path,bucket_name):
        for root,dirs,files in os.walk(path):
            for file in tqdm.tqdm(files):
                s3_client.upload_file(os.path.join(root,file),bucket_name,file)
    
    uploadDirectory(data_root, bucket_name)

Create and ingest data and metadata into the knowledge base

When the S3 folder is ready, you can create the knowledge base on the Amazon Bedrock console using the SDK according to this example notebook.

Retrieve data from the knowledge base using metadata filtering

Now let’s retrieve some data from the knowledge base. For this post, we use Anthropic Claude Sonnet on Amazon Bedrock for our FM, but you can choose from a variety of Amazon Bedrock models. First, you need to set the following variables, where kb_id is the ID of your knowledge base. The knowledge base ID can be found programmatically, as shown in the example notebook, or from the Amazon Bedrock console by navigating to the individual knowledge base, as shown in the following screenshot.

Set the required Amazon Bedrock parameters using the following code:

import boto3
import pprint
from botocore.client import Config
import json

pp = pprint.PrettyPrinter(indent=2)
session = boto3.session.Session()
region = session.region_name
bedrock_config = Config(connect_timeout=120, read_timeout=120, retries={'max_attempts': 0})
bedrock_client = boto3.client('bedrock-runtime', region_name = region)
bedrock_agent_client = boto3.client("bedrock-agent-runtime",
                              config=bedrock_config, region_name = region)
kb_id = "EIBBXVFDQP"
model_id = 'anthropic.claude-3-sonnet-20240229-v1:0'

# retrieve api for fetching only the relevant context.

query = " Tell me a recipe that I can make under 30 minutes and has cholesterol less than 10 "

relevant_documents = bedrock_agent_runtime_client.retrieve(
    retrievalQuery= {
        'text': query
    },
    knowledgeBaseId=kb_id,
    retrievalConfiguration= {
        'vectorSearchConfiguration': {
            'numberOfResults': 2 
        }
    }
)
pp.pprint(relevant_documents["retrievalResults"])

The following code is the output of the retrieval from the knowledge base without metadata filtering for the query “Tell me a recipe that I can make under 30 minutes and has cholesterol less than 10.” As we can see, out of the two recipes, the preparation durations are 30 and 480 minutes, respectively, and the cholesterol contents are 86 and 112.4, respectively. Therefore, the retrieval isn’t following the query accurately.

The following code demonstrates how to use the Retrieve API with the metadata filters set to a cholesterol content less than 10 and minutes of preparation less than 30 for the same query:

def retrieve(query, kbId, numberOfResults=5):
    return bedrock_agent_client.retrieve(
        retrievalQuery= {
            'text': query
        },
        knowledgeBaseId=kbId,
        retrievalConfiguration= {
            'vectorSearchConfiguration': {
                'numberOfResults': numberOfResults,
                 "filter": {
                            'andAll':[
                                {
                                "lessThan": {
                                "key": "CholesterolContent",
                                "value": 10
                                }
                            },
                                {
                            "lessThan": {
                                "key": "TotalTimeInMinutes",
                                "value": 30
                            }
                                }
                            ]
                        }
            }
        }
    ) 
query = "Tell me a recipe that I can make under 30 minutes and has cholesterol less than 10" 
response = retrieve(query, kb_id, 2)
retrievalResults = response['retrievalResults']
pp.pprint(retrievalResults)

As we can see in the following results, out of the two  recipes, the preparation times are 27 and 20, respectively, and the cholesterol contents are 0 and 0, respectively. With the use of metadata filtering, we get more accurate results.

The following code shows how to get accurate output using the same metadata filtering with the retrieve_and_generate API. First, we set the prompt, then we set up the API with metadata filtering:

prompt = f"""
Human: You have great knowledge about food, so provide answers to questions by using fact. 
If you don't know the answer, just say that you don't know, don't try to make up an answer.

Assistant:"""

def retrieve_and_generate(query, kb_id,modelId, numberOfResults=10):
    return bedrock_agent_client.retrieve_and_generate(
        input= {
            'text': query,
        },
        retrieveAndGenerateConfiguration={
        'knowledgeBaseConfiguration': {
            'generationConfiguration': {
                'promptTemplate': {
                    'textPromptTemplate': f"{prompt} $search_results$"
                }
            },
            'knowledgeBaseId': kb_id,
            'modelArn': model_id,
            'retrievalConfiguration': {
                'vectorSearchConfiguration': {
                    'numberOfResults': numberOfResults,
                    'overrideSearchType': 'HYBRID',
                     "filter": {
                            'andAll':[
                                {
                                "lessThan": {
                                "key": "CholesterolContent",
                                "value": 10
                                }
                            },
                                {
                            "lessThan": {
                                "key": "TotalTimeInMinutes",
                                "value": 30
                            }
                                }
                            ]
                        },
                }
        }
                    },
        'type': 'KNOWLEDGE_BASE'
    }
    )
    
query = "Tell me a recipe that I can make under 30 minutes and has cholesterol less than 10"
response = retrieve_and_generate(query, kb_id,modelId, numberOfResults=10)
pp.pprint(response['output']['text'])

As we can see in the following output, the model returns a detailed recipe that follows the instructed metadata filtering of less than 30 minutes of preparation time and a cholesterol content less than 10.

Clean up

Make sure to comment the following section if you’re planning to use the knowledge base that you created for building your RAG application. If you only wanted to try out creating the knowledge base using the SDK, make sure to delete all the resources that were created because you will incur costs for storing documents in the OpenSearch Serverless index. See the following code:

bedrock_agent_client.delete_data_source(dataSourceId = ds["dataSourceId"], knowledgeBaseId=kb['knowledgeBaseId'])
bedrock_agent_client.delete_knowledge_base(knowledgeBaseId=kb['knowledgeBaseId'])
oss_client.indices.delete(index=index_name)
aoss_client.delete_collection(id=collection_id)
aoss_client.delete_access_policy(type="data", name=access_policy['accessPolicyDetail']['name'])
aoss_client.delete_security_policy(type="network", name=network_policy['securityPolicyDetail']['name'])
aoss_client.delete_security_policy(type="encryption", name=encryption_policy['securityPolicyDetail']['name'])
# Delete roles and polices 
iam_client.delete_role(RoleName=bedrock_kb_execution_role)
iam_client.delete_policy(PolicyArn=policy_arn)

Conclusion

In this post, we explained how to split a large tabular dataset into rows to set up a knowledge base with metadata for each of those records, and how to then retrieve outputs with metadata filtering. We also showed how retrieving results with metadata is more accurate than retrieving results without metadata filtering. Lastly, we showed how to use the result with an FM to get accurate results.

To further explore the capabilities of Knowledge Bases for Amazon Bedrock, refer to the following resources:


About the Author

Tanay Chowdhury is a Data Scientist at Generative AI Innovation Center at Amazon Web Services. He helps customers to solve their business problem using Generative AI and Machine Learning.

Read More

Secure AccountantAI Chatbot: Lili’s journey with Amazon Bedrock

Secure AccountantAI Chatbot: Lili’s journey with Amazon Bedrock

This post was written in collaboration with Liran Zelkha and Eyal Solnik from Lili.

Small business proprietors tend to prioritize the operational aspects of their enterprises over administrative tasks, such as maintaining financial records and accounting. While hiring a professional accountant can provide valuable guidance and expertise, it can be cost-prohibitive for many small businesses. Moreover, the availability of accountants might not always align with the immediate needs of business owners, leaving them with unanswered questions or delayed decision-making processes.

In the rapidly evolving world of large language models (LLMs) and generative artificial intelligence (AI), Lili recognized an opportunity to use this technology to address the financial advisory needs of their small business customers. Using Anthropic’s Claude 3 Haiku on Amazon Bedrock, Lili developed an intelligent AccountantAI chatbot capable of providing on-demand accounting advice tailored to each customer’s financial history and unique business requirements. The AccountantAI chatbot serves as a virtual assistant, offering affordable and readily available financial guidance, empowering small business owners to focus on their core expertise while ensuring the financial health of their operations.

About Lili

Lili is a financial platform designed specifically for businesses, offering a combination of advanced business banking with built-in accounting and tax preparation software.

By consolidating financial tools into a user-friendly interface, Lili streamlines and simplifies managing business finances and makes it an attractive solution for business owners seeking a centralized and efficient way to manage their financial operations.

In this post, we’ll explore how Lili, a financial platform designed specifically for businesses, used Amazon Bedrock to build a secure and intelligent AccountantAI chatbot for small business owners. Amazon Bedrock is a fully managed service that offers a choice of high-performing foundation models (FMs) from leading AI companies like Anthropic, Meta, Mistral AI, Stability AI, Cohere, AI21 Labs, and Amazon through a single API, along with a broad set of capabilities that you need to build generative AI applications with security, privacy, and responsible AI.

Solution overview

The AccountantAI chatbot provides small business owners with accurate and relevant financial accounting advice in a secure manner. To achieve this, the solution is designed to address two key requirements:

  • Question validation: Implementing guardrails to ensure that the user’s input is a valid and a legitimate financial accounting question. This step helps filter out irrelevant or inappropriate queries, maintaining the integrity of the system.
  • Context enrichment: Augmenting the user’s question with relevant contextual data, such as up-to-date accounting information and user-specific financial data. This step ensures that the chatbot’s responses are tailored to the individual user’s business and financial situation, providing more personalized and actionable advice.

To address the two key requirements of question validation and context enrichment, the AccountantAI solution employs a two-stage architecture comprising an ingestion workflow and a retrieval workflow.

Ingestion workflow

Ingestion Workflow

The ingestion workflow is an offline process that prepares the system for serving customer queries. For this stage, Lili curated a comprehensive golden collection of financial accounting questions, drawing from common inquiries as well as real-world questions from their customer base over the years. This diverse and high-quality collection serves as a reference corpus, ensuring that the chatbot can handle a wide range of relevant queries. The ingestion workflow transforms these curated questions into vector embeddings using Amazon Titan Text Embeddings model API. This process occurs over AWS PrivateLink for Amazon Bedrock, a protected and private connection in your VPC. The vector embeddings are persisted in the application in-memory vector store. These vectors will help to validate user input during the retrieval workflow.

Each curated vector embedding is paired with a matching prompt template that was evaluated during testing to be the most effective.

Example prompt template

<role>
Provides context about the agent's role as Lili's AI assistant for financial questions and outlines the general guidelines applied to all queries.
</role>

<about>
Provides details on Lili platform.
</about>

<features>
Lists out all of Lili's product features in detail. This section aims to explain Lili's features in detail, ensuring that answers are aligned with the Lili platform. For instance, when addressing questions about tax reduction management, highlight the relevant features that Lili offers, which customers should be familiar with.
</features>

<output_format>
Outlines the required formatting for the response to ensure it meets the expected structure.
</output_format>

<user_data>
Data relevant to answering the customer's question.
</user_date>

<knowledge>
Specific accounting knowledge that is relevant to the question and the model is not familiar with, such as updated data for 2024.
<knowledge>

<question>
Contains the user's actual question.
</question>

<instructions>
Provides the core instructions on how to approach answering the question appropriately and meet expectations. It also defines the steps in providing a detailed and high-quality answer.
</instructions>

<reminders>
Important guidelines to remind the agent and make sure it follows them, such as the exact format of the answer.
</reminders>

Retrieval workflow

Retrieval Workflow

Lili’s web chatbot web interface allows users to submit queries and receive real-time responses. When a customer asks a question, it’s sent to the backend system for processing.

  1. The system first converts the query into a vector embedding using the Amazon Titan Text Embeddings model API, which is accessed securely through PrivateLink.
  2. Next, the system performs a similarity search on the pre-computed embeddings of the golden collection, to find the most relevant matches for the user’s query. The system evaluates the similarity scores of the search results against a predetermined threshold. If the user’s question yields matches with low similarity scores, it’s deemed malformed or unclear, and the user is prompted to rephrase or refine their query.
  3. However, if the user’s question produces matches with high similarity scores, it’s considered a legitimate query. In this case, Lili’s backend system proceeds with further processing using the golden question that has the highest similarity score to the user’s query.
  4. Based on the golden question with the highest similarity score, the system retrieves the corresponding prompt template.

This template is augmented with up-to-date accounting information and the customer’s specific financial data from external sources such as Amazon RDS for MySQL. The resulting contextualized prompt is sent to Anthropic’s Claude 3 Haiku on Amazon Bedrock, which generates a tailored response addressing the customer’s query within their unique business context.

Because model providers continually enhance their offerings with innovative updates, Amazon Bedrock simplifies the ability to adopt emerging advancements in generative AI across multiple model providers. This approach has demonstrated its advantages right from the initial rollout of AccountantAI. Lili transitioned from Anthropic’s Claude Instant to Claude 3 within two weeks of its official release on the Amazon Bedrock environment and three weeks after its general availability.

Lili selected Anthropic’s Claude model family for AccountantAI after reviewing industry benchmarks and conducting their own quality assessment. Anthropic Claude on Amazon Bedrock consistently outperformed other models in understanding financial concepts, generating coherent natural language, and providing accurate, tailored recommendations.

After the initial release of AcountantAI, Amazon Bedrock introduced Anthropic’s Claude 3 Haiku model, which Lili evaluated against Anthropic Claude Instant version. The Anthropic Claude 3 Haiku model demonstrated significant improvements across three key evaluation metrics:

  • Quality – Anthropic Claude 3 Haiku delivered higher quality outputs, providing more detailed and better-phrased responses compared to its predecessor.
  • Response time – Anthropic Claude 3 Haiku exhibited a 10 percent to 20 percent improvement in response times over Claude Instant, offering faster performance.
  • Cost – Anthropic Claude 3 Haiku on Amazon Bedrock is the most cost-effective choice. For instance, it is up to 68 percent less costly per 1,000 input/output tokens compared to Anthropic Claude Instant, while delivering higher levels of intelligence and performance. See Anthropic’s Claude 3 models on Amazon Bedrock for more information.

For customers like Lili, this underscores the importance of having access to a fully managed service like Amazon Bedrock, which offers a choice of high-performing foundation models to meet diverse enterprise AI needs. There is no “one size fits all” model, and the ability to select from a range of cutting-edge FMs is crucial for organizations seeking to use the latest advancements in generative AI effectively and cost-efficiently.

Conclusion

The AccountantAI feature, exclusively available to Lili customers, reduces the need for hiring a professional accountant. While professional accountants can provide valuable guidance and expertise, their services can be cost-prohibitive for many small businesses. AccountantAI has already answered thousands of questions, delivering real value to businesses and providing quality responses to financial, tax, and accounting inquiries.

Using Amazon Bedrock for easy, secure, and reliable access to high-performing foundation models from leading AI companies, Lili integrates accounting knowledge at scale with each customer’s unique data. This innovative solution offers affordable expertise on optimizing cash flow, streamlining tax planning, and enabling informed decisions to drive growth. AccountantAI bridges the gap in accounting resources, democratizing access to high-quality financial intelligence for every business.

Explore Lili’s AccountantAI feature powered by Amazon Bedrock to gain affordable and accessible financial intelligence for your business today, or use Amazon Bedrock Playgrounds to experiment with running inference on different models on your data.


About the authors

Doron BleibergDoron Bleiberg is a senior AWS Startups Solution Architect helping Fintech customers in their cloud journey.

Liran ZelkhaLiran Zelkha is the co-founder and CTO at Lili, leading our development and data efforts.

Eyal SolnikEyal Solnik is the head of Data at Lili and leads our AccountantAI product.

Read More

How Mend.io unlocked hidden patterns in CVE data with Anthropic Claude on Amazon Bedrock

How Mend.io unlocked hidden patterns in CVE data with Anthropic Claude on Amazon Bedrock

This post is co-written with Maciej Mensfeld from Mend.io.

In the ever-evolving landscape of cybersecurity, the ability to effectively analyze and categorize Common Vulnerabilities and Exposures (CVEs) is crucial. This post explores how Mend.io, a cybersecurity firm, used Anthropic Claude on Amazon Bedrock to classify and identify CVEs containing specific attack requirements details. By using the power of large language models (LLMs), Mend.io streamlined the analysis of over 70,000 vulnerabilities, automating a process that would have been nearly impossible to accomplish manually. With this capability, they manage to reduce 200 days of human experts’ work. This also allows them to provide higher quality of verdicts to their customers, allowing them to prioritize vulnerabilities better. It gives Mend.io a competitive advantage. This initiative not only underscores the transformative potential of AI in cybersecurity, but also provides valuable insights into the challenges and best practices for integrating LLMs into real-world applications.

The post delves into the challenges faced, such as managing quota limitations, estimating costs, and handling unexpected model responses. We also provide insights into the model selection process, results analysis, conclusions, recommendations, and Mend.io’s future outlook on integrating artificial intelligence (AI) in cybersecurity.

Amazon Bedrock is a fully managed service that offers a choice of high-performing foundation models (FMs) from leading AI companies like AI21 Labs, Anthropic, Cohere, Meta, Mistral AI, Stability AI, and Amazon through a single API, along with a broad set of capabilities to build generative AI applications with security, privacy, and responsible AI.

Mend.io is a cybersecurity company dedicated to safeguarding digital ecosystems through innovative solutions. With a deep commitment to using cutting-edge technologies, Mend.io has been at the forefront of integrating AI and machine learning (ML) capabilities into its operations. By continuously pushing the boundaries of what’s possible, Mend.io empowers organizations to stay ahead of evolving cyber threats and maintain a proactive, intelligent approach to security.

Uncovering attack requirements in CVE data

In the cybersecurity domain, the constant influx of CVEs presents a significant challenge. Each year, thousands of new vulnerabilities are reported, with descriptions varying in clarity, completeness, and structure. These reports, often contributed by a diverse global community, can be concise, ambiguous, or lack crucial details, burying critical information such as attack requirements, potential impact, and suggested mitigation steps. The unstructured nature of CVE reports poses a significant obstacle in extracting actionable insights. Automated systems struggle to accurately parse and comprehend the inconsistent and complex narratives, increasing the risk of overlooking or misinterpreting vital details—a scenario with severe implications for security postures.

For cybersecurity professionals, one of the most daunting tasks is identifying the attack requirements—the specific conditions and prerequisites needed for a vulnerability to be successfully exploited—from these vast and highly variable natural language descriptions. Determining whether attack requirements are present or absent is equally crucial, as this information is vital for assessing and mitigating potential risks. With tens of thousands of CVE reports to analyze, manually sifting through each description to extract this nuanced information is impractical and nearly impossible, given the sheer volume of data involved

The decision to use Anthropic Claude on Amazon Bedrock and the advantages it offered

In the face of this daunting challenge, the power of LLMs offered a promising solution. These advanced generative AI models are great at understanding and analyzing vast amounts of text, making them the perfect tool for sifting through the flood of CVE reports to pinpoint those containing attack requirement details.

The decision to use Anthropic Claude on Amazon Bedrock was a strategic one. During evaluations, Mend.io found that Although other LLMs like GPT-4 also showed strong performance in analyzing CVE descriptions, Mend.io’s specific requirements were better aligned with Anthropic Claude’s capabilities. Mend.io used tags like <example-attack-requirement>. When Mend.io evaluated other models with both structured and unstructured prompts, Anthropic Claude’s ability to precisely follow the structured prompts and include the expected tags made it a better fit for Mend.io’s use case during their testing.

Anthropic Claude’s unique capabilities, which allows the recognition of XML tags within prompts, gave it a distinct advantage. This capability enabled Mend.io to structure the prompts in a way that improved precision and value, ensuring that Anthropic Claude’s analysis was tailored to Mend.io’s specific needs. Furthermore, the seamless integration with Amazon Bedrock provided a robust and secure platform for handling sensitive data. The proven security infrastructure of AWS strengthens confidence, allowing Mend.io to process and analyze CVE information without compromising data privacy and security—a critical consideration in the world of cybersecurity.

Crafting the prompt

Crafting the perfect prompt for Anthropic Claude was both an art and a science. It required a deep understanding of the model’s capabilities and a thorough process to make sure Anthropic Claude’s analysis was precise and grounded in practical applications. They composed the prompt with rich context, provided examples, and clearly defined the differences between attack complexity and attack requirements as defined in the Common Vulnerability Scoring System (CVSS) v4.0. This level of detail was crucial to make sure Anthropic Claude could accurately identify the nuanced details within CVE descriptions.

The use of XML tags was a game-changer in structuring the prompt. These tags allowed them to isolate different sections, guiding Anthropic Claude’s focus and improving the accuracy of its responses. With this unique capability, Mend.io could direct the model’s attention to specific aspects of the CVE data, streamlining the analysis process and increasing the value of the insights derived.

With a well-crafted prompt and the power of XML tags, Mend.io equipped Anthropic Claude with the context and structure necessary to navigate the intricate world of CVE descriptions, enabling it to pinpoint the critical attack requirement details that would arm security teams with invaluable insights for prioritizing vulnerabilities and fortifying defenses.

The following example illustrates how to craft a prompt effectively using tags with the goal of identifying phishing emails:

<Instructions>
        Analyze emails to identify potential spam or phishing threats. Users should provide the full email content, including headers, by copy-pasting or uploading the email file directly.
</Instructions>
<AnalysisProcess>
        <StepOne>
            <Title>Analyze Sender Information</Title>
            <Description>Verify the sender's email address and domain. Assess     additional contacts, date, and time to evaluate potential legitimacy and context</Description>
        </StepOne>
        <StepTwo>
            <Title>Examine Email Content</Title>
            <Description>Analyze the subject line and body content for relevance and legitimacy. Caution against quick offers. Evaluate personalization and sender legitimacy.</Description>
        </StepTwo>
        <StepThree>
            <Title>Check for Unsolicited Attachments or Links</Title>
            <Description>Identify and scrutinize hyperlinks for potential phishing or spam indicators. Advise on verifying link legitimacy without direct interaction. Use tools like VirusTotal or Google Safe Browsing for safety checks.</Description>
        </StepThree>
</AnalysisProcess>
<Conclusion>
        Based on the analysis, provide an estimation of the email's likelihood of being spam or phishing, expressed as a percentage to indicate the assessed risk level. This comprehensive analysis helps users make informed decisions about the email's authenticity while emphasizing security and privacy.
</Conclusion>
<DataHandling>
         Refer to uploaded documents as 'knowledge source'. Strictly adhere to facts provided, avoiding speculation. Prioritize documented information over baseline knowledge or external sources. If no answer is found within the documents, state this explicitly.
</DataHandling>

The challenges

While using Anthropic Claude, Mend.io experienced the flexibility and scalability of the service firsthand. As the analysis workload grew to encompass 70,000 CVEs, they encountered opportunities to optimize their usage of the service’s features and cost management capabilities. When using the on-demand model deployment of Amazon Bedrock across AWS Regions, Mend.io proactively managed the API request per minute (RPM) and tokens per minute (TPM) quotas by parallelizing model requests and adjusting the degree of parallelization to operate within the quota limits. They also took advantage of the built-in retry logic in the Boto3 Python library to handle any occasional throttling scenarios seamlessly. For workloads requiring even higher quotas, the Amazon Bedrock Provisioned Throughput option offers a straightforward solution, though it didn’t align with Mend.io’s specific usage pattern in this case.

Although the initial estimate for classifying all 70,000 CVEs was lower, the final cost came in higher due to more complex input data resulting in longer input and output sequences. This highlighted the importance of comprehensive testing and benchmarking. The flexible pricing models in Amazon Bedrock allow organizations to optimize costs by considering alternative model options or data partitioning strategies, where simpler cases can be processed by more cost-effective models, while reserving higher-capacity models for the most challenging instances.

When working with advanced language models like those provided by AWS, it’s crucial to craft prompts that align precisely with the desired output format. In Mend.io’s case, their expectation was to receive straightforward YES/NO answers to their prompts, which would streamline subsequent data curation steps. However, the model often provided additional context, justifications, or explanations beyond the anticipated succinct responses. Although these expanded responses offered valuable insights, they introduced unanticipated complexity into Mend.io’s data processing workflow. This experience highlighted the importance of prompt refinement to make sure the model’s output aligns closely with the specific requirements of the use case. By iterating on prompt formulation and fine-tuning the prompts, organizations can optimize their model’s responses to better match their desired response format, ultimately enhancing the efficiency and effectiveness of their data processing pipelines.

Results

Despite the challenges Mend.io faced, their diligent efforts paid off. They successfully identified CVEs with attack requirement details, arming security teams with precious insights for prioritizing vulnerabilities and fortifying defenses. This outcome was a significant achievement, because understanding the specific prerequisites for a vulnerability to be exploited is crucial in assessing risk and developing effective mitigation strategies. By using the power of Anthropic Claude, Mend.io was able to sift through tens of thousands of CVE reports, extracting the nuanced information about attack requirements that would have been nearly impossible to obtain through manual analysis. This feat not only saved valuable time and resources but also provided cybersecurity teams with a comprehensive view of the threat landscape, enabling them to make informed decisions and prioritize their efforts effectively.

Mend.io conducted an extensive evaluation of Anthropic Claude, issuing 68,378 requests without considering any quota limitations. Based on their initial experiment of analyzing a sample of 100 vulnerabilities to understand attack vectors, they could determine the accuracy of Claude’s direct YES or NO answers. As shown in the following table, Anthropic Claude demonstrated exceptional performance, providing direct YES or NO answers for 99.9883% of the requests. In the few instances where a straightforward answer was not given, Anthropic Claude still provided sufficient information to determine the appropriate response. This evaluation highlights Anthropic Claude’s robust capabilities in handling a wide range of queries with high accuracy and reliability.

Character count of the prompt (without CVE specific details) 13,935
Number of tokens for the prompt (without CVE specific details) 2,733
Total requests 68,378
Unexpected answers 8
Failures (quota limitations excluded) 0
Answer Quality Success Rate 99.9883%

Future plans

The successful application of Anthropic Claude in identifying attack requirement details from CVE data is just the beginning of the vast potential that generative AI holds for the cybersecurity domain. As these advanced models continue to evolve and mature, their capabilities will expand, opening up new frontiers in automating vulnerability analysis, threat detection, and incident response. One promising avenue is the use of generative AI for automating vulnerability categorization and prioritization. By using these models’ ability to analyze and comprehend technical descriptions, organizations can streamline the process of identifying and addressing the most critical vulnerabilities, making sure limited resources are allocated effectively. Furthermore, generative AI models can be trained to detect and flag potential malicious code signatures within software repositories or network traffic. This proactive approach can help cybersecurity teams stay ahead of emerging threats, enabling them to respond swiftly and mitigate risks before they can be exploited.

Beyond vulnerability management and threat detection, generative AI also holds promise in incident response and forensic analysis. These models can assist in parsing and making sense of vast amounts of log data, network traffic records, and other security-related information, accelerating the identification of root causes and enabling more effective remediation efforts. As generative AI continues to advance, its integration with other cutting-edge technologies, such as ML and data analytics, will unlock even more powerful applications in the cybersecurity domain. The ability to process and understand natural language data at scale, combined with the predictive power of ML algorithms, could revolutionize threat intelligence gathering, enabling organizations to anticipate and proactively defend against emerging cyber threats.

Conclusion

The field of cybersecurity is continually advancing, the integration of generative AI models like Anthropic Claude, powered by the robust infrastructure of Amazon Bedrock, represents a significant step forward in advancing digital defense. Mend.io’s successful application of this technology in extracting attack requirement details from CVE data is a testament to the transformative potential of language AI in the vulnerability management and threat analysis domains. By utilizing the power of these advanced models, Mend.io has demonstrated that the complex task of sifting through vast amounts of unstructured data can be tackled with precision and efficiency. This initiative not only empowers security teams with crucial insights for prioritizing vulnerabilities, but also paves the way for future innovations in automating vulnerability analysis, threat detection, and incident response. Anthropic and AWS have played a pivotal role in enabling organizations like Mend.io to take advantage of these cutting-edge technologies.

Looking ahead, the possibilities are truly exciting. As language models continue to evolve and integrate with other emerging technologies, such as ML and data analytics, the potential for revolutionizing threat intelligence gathering and proactive defense becomes increasingly tangible.

If you’re a cybersecurity professional looking to unlock the full potential of language AI in your organization, we encourage you to explore the capabilities of Amazon Bedrock and the Anthropic Claude models. By integrating these cutting-edge technologies into your security operations, you can streamline your vulnerability management processes, enhance threat detection, and bolster your overall cybersecurity posture. Take the first step today and discover how Mend.io’s success can inspire your own journey towards a more secure digital future.


About the Authors

Hemmy Yona is a Solutions Architect at Amazon Web Services based in Israel. With 20 years of experience in software development and group management, Hemmy is passionate about helping customers build innovative, scalable, and cost-effective solutions. Outside of work, you’ll find Hemmy enjoying sports and traveling with family.

Tzahi Mizrahi is a Solutions Architect at Amazon Web Services, specializing in container solutions with over 10 years of experience in development and DevOps lifecycle processes. His expertise includes designing scalable, container-based architectures and optimizing deployment workflows. In his free time, he enjoys music and plays the guitar.

Gili Nachum is a Principal solutions architect at AWS, specializing in Generative AI and Machine Learning. Gili is helping AWS customers build new foundation models, and to leverage LLMs to innovate in their business. In his spare time Gili enjoys family time and Calisthenics.

Maciej Mensfeld is a principal product architect at Mend, focusing on data acquisition, aggregation, and AI/LLM security research. He’s the creator of diffend.io (acquired by Mend) and Karafka. As a Software Architect, Security Researcher, and conference speaker, he teaches Ruby, Rails, and Kafka. Passionate about OSS, Maciej actively contributes to various projects, including Karafka, and is a member of the RubyGems security team.

Read More

How Deloitte Italy built a digital payments fraud detection solution using quantum machine learning and Amazon Braket

How Deloitte Italy built a digital payments fraud detection solution using quantum machine learning and Amazon Braket

As digital commerce expands, fraud detection has become critical in protecting businesses and consumers engaging in online transactions. Implementing machine learning (ML) algorithms enables real-time analysis of high-volume transactional data to rapidly identify fraudulent activity. This advanced capability helps mitigate financial risks and safeguard customer privacy within expanding digital markets.

Deloitte is a strategic global systems integrator with over 19,000 certified AWS practitioners across the globe. It continues to raise the bar through participation in the AWS Competency Program with 29 competencies, including Machine Learning.

This post demonstrates the potential for quantum computing algorithms paired with ML models to revolutionize fraud detection within digital payment platforms. We share how Deloitte built a hybrid quantum neural network solution with Amazon Braket to demonstrate the possible gains coming from this emerging technology.

The promise of quantum computing

Quantum computers harbor the potential to radically overhaul financial systems, enabling much faster and more precise solutions. Compared to classical computers, quantum computers are expected in the long run to have to advantages in the areas of simulation, optimization, and ML. Whether quantum computers can provide a meaningful speedup to ML is an active topic of research.

Quantum computing can perform efficient near real-time simulations in critical areas such as pricing and risk management. Optimization models are key activities in financial institutions, aimed at determining the best investment strategy for a portfolio of assets, allocating capital, or achieving productivity improvements. Some of these optimization problems are nearly impossible for traditional computers to tackle, so approximations are used to solve the problems in a reasonable amount of time. Quantum computers could perform faster and more accurate optimizations without using any approximations.

Despite the long-term horizon, the potentially disruptive nature of this technology means that financial institutions are looking to get an early foothold in this technology by building in-house quantum research teams, expanding their existing ML COEs to include quantum computing, or engaging with partners such as Deloitte.

At this early stage, customers seek access to a choice of different quantum hardware and simulation capabilities in order to run experiments and build expertise. Braket is a fully managed quantum computing service that lets you explore quantum computing. It provides access to quantum hardware from IonQ, OQC, Quera, Rigetti, IQM, a variety of local and on-demand simulators including GPU-enabled simulations, and infrastructure for running hybrid quantum-classical algorithms such as quantum ML. Braket is fully integrated with AWS services such as Amazon Simple Storage Service (Amazon S3) for data storage and AWS Identity and Access Management (IAM) for identity management, and customers only pay for what you use.

In this post, we demonstrate how to implement a quantum neural network-based fraud detection solution using Braket and AWS native services. Although quantum computers can’t be used in production today, our solution provides a workflow that will seamlessly adapt and function as a plug-and-play system in the future, when commercially viable quantum devices become available.

Solution overview

The goal of this post is to explore the potential of quantum ML and present a conceptual workflow that could serve as a plug-and-play system when the technology matures. Quantum ML is still in its early stages, and this post aims to showcase the art of the possible without delving into specific security considerations. As quantum ML technology advances and becomes ready for production deployments, robust security measures will be essential. However, for now, the focus is on outlining a high-level conceptual architecture that can seamlessly adapt and function in the future when the technology is ready.

The following diagram shows the solution architecture for the implementation of a neural network-based fraud detection solution using AWS services. The solution is implemented using a hybrid quantum neural network. The neural network is built using the Keras library; the quantum component is implemented using PennyLane.

The workflow includes the following key components for inference (A–F) and training (G–I):

  1. Ingestion – Real-time financial transactions are ingested through Amazon Kinesis Data Streams
  2. PreprocessingAWS Glue streaming extract, transform, and load (ETL) jobs consume the stream to do preprocessing and light transforms
  3. Storage – Amazon S3 is used to store output artifacts
  4. Endpoint deployment – We use an Amazon SageMaker endpoint to deploy the models
  5. Analysis – Transactions along with the model inferences are stored in Amazon Redshift
  6. Data visualizationAmazon QuickSight is used to visualize the results of fraud detection
  7. Training data – Amazon S3 is used to store the training data
  8. Modeling – A Braket environment produces a model for inference
  9. GovernanceAmazon CloudWatch, IAM, and AWS CloudTrail are used for observability, governance, and auditability, respectively

Dataset

For training the model, we used open source data available on Kaggle. The dataset contains transactions made by credit cards in September 2013 by European cardholders. This dataset records transactions that occurred over a span of 2 days, during which there were 492 instances of fraud detected out of a total of 284,807 transactions. The dataset exhibits a significant class imbalance, with fraudulent transactions accounting for just 0.172% of the entire dataset. Because the data is highly imbalanced, various measures have been taken during data preparation and model development.

The dataset exclusively comprises numerical input variables, which have undergone a Principal Component Analysis (PCA) transformation because of confidentiality reasons.

The data only includes numerical input features (PCA-transformed due to confidentiality) and three key fields:

  • Time – Time between each transaction and first transaction
  • Amount – Transaction amount
  • Class – Target variable, 1 for fraud or 0 for non-fraud

Data preparation

We split the data into training, validation, and test sets, and we define the target and the features sets, where Class is the target variable:

y_train = df_train['Class']
x_train = df_ train.drop(['Class'], axis=1)
y_validation = df_ validation ['Class']
x_ validation = df_ validation.drop(['Class'], axis=1)
y_test = df_test['Class']
x_test = df_test.drop(['Class'], axis=1)

The Class field assumes values 0 and 1. To make the neural network deal with data imbalance, we perform a label encoding on the y sets:

lbl_clf = LabelEncoder()
y_train = lbl_clf.fit_transform(y_train)
y_train = tf.keras.utils.to_categorical(y_train)

The encoding applies to all the values the mapping: 0 to [1,0], and 1 to [0,1].

Finally, we apply scaling that standardizes the features by removing the mean and scaling to unit variance:

std_clf = StandardScaler()
x_train = std_clf.fit_transform(x_train)
x_validation = std_clf.fit_transform(x_validation)
x_test = std_clf.transform(x_test)

The functions LabelEncoder and StandardScaler are available in the scikit-learn Python library.

After all the transformations are applied, the dataset is ready to be the input of the neural network.

Neural network architecture

We composed the neural network architecture with the following layers based on several tests empirically:

  • A first dense layer with 32 nodes
  • A second dense layer with 9 nodes
  • A quantum layer as neural network output
  • Dropout layers with rate equals to 0.3

We apply an L2 regularization on the first layer and both L1 and L2 regularization on the second one, to avoid overfitting. We initialize all the kernels using the he_normal function. The dropout layers are meant to reduce overfitting as well.

hidden = Dense(32, activation ="relu", kernel_initializer='he_normal', kernel_regularizer=tf.keras.regularizers.l2(0,01))
out_2 = Dense(9, activation ="relu", kernel_initializer='he_normal', kernel_regularizer=tf.keras.regularizers.l1_l2(l1=0,001, l2=0,001))
do = Dropout(0,3)

Quantum circuit

The first step to obtain the layer is to build the quantum circuit (or the quantum node). To accomplish this task, we used the Python library PennyLane.

PennyLane is an open source library that seamlessly integrates quantum computing with ML. It allows you to create and train quantum-classical hybrid models, where quantum circuits act as layers within classical neural networks. By harnessing the power of quantum mechanics and merging it with classical ML frameworks like PyTorch, TensorFlow, and Keras, PennyLane empowers you to explore the exciting frontier of quantum ML. You can unlock new realms of possibility and push the boundaries of what’s achievable with this cutting-edge technology.

The design of the circuit is the most important part of the overall solution. The predictive power of the model depends entirely on how the circuit is built.

Qubits, the fundamental units of information in quantum computing, are entities that behave quite differently from classical bits. Unlike classical bits that can only represent 0 or 1, qubits can exist in a superposition of both states simultaneously, enabling quantum parallelism and faster calculations for certain problems.

We decide to use only three qubits, a small number but sufficient for our case.

We instantiate the qubits as follows:

num_wires = 3
dev = qml.device('default.qubit', wires=num_wires)

‘default.qubit’ is the PennyLane qubits simulator. To access qubits on a real quantum computer, you can replace the second line with the following code:

device_arn = "arn:aws:braket:eu-west-2::device/qpu/ionq/Aria-1"
dev = qml.device('braket.aws.qubit',device_arn=device_arn, wires=num_wires)

device_ARN could be the ARN of the devices supported by Braket (for a list of supported devices, refer to Amazon Braket supported devices).

We defined the quantum node as follows:

@qml.qnode(dev, interface="tf", diff_method="backprop")
def quantum_nn(inputs, weights):
    qml.RY(inputs[0], wires=0)
    qml.RY(inputs[1], wires=1)
    qml.RY(inputs[2], wires=2)
    qml.Rot(weights[0] * inputs[3], weights[1] * inputs[4], weights[2] * inputs[5], wires=1)
    qml.Rot(weights[3] * inputs[6], weights[4] * inputs[7], weights[5] * inputs[8], wires=2)
    qml.CNOT(wires=[1, 2])
    qml.RY(weights[6], wires=2)
    qml.CNOT(wires=[0, 2])
    qml.CNOT(wires=[1, 2])
    return [qml.expval(qml.PauliZ(0)), qml.expval(qml.PauliZ(2))]

The inputs are the values yielded as output from the previous layer of the neural network, and the weights are the actual weights of the quantum circuit.

RY and Rot are rotation functions performed on qubits; CNOT is a controlled bitflip gate allowing us to embed the qubits.

qml.expval(qml.PauliZ(0)), qml.expval(qml.PauliZ(2)) are the measurements applied respectively to the qubits 0 and the qubits 1, and these values will be the neural network output.

Diagrammatically, the circuit can be displayed as:

0: ──RY(1.00)──────────────────────────────────────╭●────┤  <Z>

1: ──RY(2.00)──Rot(4.00,10.00,18.00)──╭●───────────│──╭●─┤

2: ──RY(3.00)──Rot(28.00,40.00,54.00)─╰X──RY(7.00)─╰X─╰X─┤  <Z>

The transformations applied to qubit 0 are fewer than the transformations applied to qbit 2. This choice is because we want to separate the states of the qubits in order to obtain different values when the measures are performed. Applying different transformations to qubits allows them to enter distinct states, resulting in varied outcomes when measurements are performed. This phenomenon stems from the principles of superposition and entanglement inherent in quantum mechanics.

After we define the quantum circuit, we define the quantum hybrid neural network:

def hybrid_model(num_layers, num_wires):
    weight_shapes = {"weights": (7,)}
    qlayer = qml.qnn.KerasLayer(quantum_nn, weight_shapes, output_dim=2)
    hybrid_model = tf.keras.Sequential([hidden,do, out_2,do,qlayer])
    return hybrid_model

KerasLayer is the PennyLane function that turns the quantum circuit into a Keras layer.

Model training

After we have preprocessed the data and defined the model, it’s time to train the network.

A preliminary step is needed in order to deal with the unbalanced dataset. We define a weight for each class according to the inverse root rule:

class_counts = np.bincount(y_train_list)
class_frequencies = class_counts / float(len(y_train))
class_weights = 1 / np.sqrt(class_frequencies)

The weights are given by the inverse of the root of occurrences for each of the two possible target values.

We compile the model next:

model.compile(optimizer='adam', loss = 'MSE', metrics = [custom_metric])

custom_metric is a modified version of the metric precision, which is a custom subroutine to postprocess the quantum data into a form compatible with the optimizer.

For evaluating model performance on imbalanced data, precision is a more reliable metric than accuracy, so we optimize for precision. Also, in fraud detection, incorrectly predicting a fraudulent transaction as valid (false negative) can have serious financial consequences and risks. Precision evaluates the proportion of fraud alerts that are true positives, minimizing costly false negatives.

Finally, we fit the model:

history = model.fit(x_train, y_train, epochs = 30, batch_size = 200, validation_data=(x_validation, y_ validation),class_weight=class_weights,shuffle=True)

At each epoch, the weights of both the classic and quantum layer are updated in order to reach higher accuracy. At the end of the training, the network showed a loss of 0.0353 on the training set and 0.0119 on the validation set. When the fit is complete, the trained model is saved in .h5 format.

Model results and analysis

Evaluating the model is vital to gauge its capabilities and limitations, providing insights into the predictive quality and value derived from the quantum techniques.

To test the model, we make predictions on the test set:

preds = model.predict(x_test)

Because the neural network is a regression model, it yields for each record of x_test a 2-D array, where each component can assume values between 0 and 1. Because we’re essentially dealing with a binary classification problem, the outputs should be as follows:

  • [1,0] – No fraud
  • [0,1] – Fraud

To convert the continuous values into binary classification, a threshold is necessary. Predictions that are equal to or above the threshold are assigned 1, and those below the threshold are assigned 0.

To align with our goal of optimizing precision, we chose the threshold value that results in the highest precision.

The following table summarizes the mapping between various threshold values and the precision.

Class Threshold = 0.65 Threshold = 0.70 Threshold = 0.75
No Fraud 1.00 1.00 1.00
Fraud 0.87 0.89 0.92

The model demonstrates almost flawless performance on the predominant non-fraud class, with precision and recall scores close to a perfect 1. Despite far less data, the model achieves precision of 0.87 for detecting the minority fraud class at a 0.65 threshold, underscoring performance even on sparse data. To efficiently identify fraud while minimizing incorrect fraud reports, we decide to prioritize precision over recall.

We also wanted to compare this model with a classic neural network only model to see if we are exploiting the gains coming from the quantum application. We built and trained an identical model in which the quantum layer is replaced by the following:

Dense(2,activation = "softmax")

In the last epoch, the loss was 0.0119 and the validation loss was 0.0051.

The following table summarizes the mapping between various threshold values and the precision for the classic neural network model.

Class Threshold=0.65 Threshold = 0.70 Threshold = 0.75
No Fraud 1.0 1.00 1.00
Fraud 0.83 0.84 0. 86

Like the quantum hybrid model, the model performance is almost perfect for the majority class and very good for the minority class.

The hybrid neural network has 1,296 parameters, whereas the classic one has 1,329. When comparing precision values, we can observe how the quantum solution provides better results. The hybrid model, inheriting the properties of high-dimensional spaces exploration and a non-linearity from the quantum layer, is able to generalize the problem better using fewer parameters, resulting in better performance.

Challenges of a quantum solution

Although the adoption of quantum technology shows promise in providing organizations numerous benefits, practical implementation on large-scale, fault-tolerant quantum computers is a complex task and is an active area of research. Therefore, we should be mindful of the challenges that it poses:

  • Sensitivity to noise – Quantum computers are extremely sensitive to external factors (such as atmospheric temperature) and require more attention and maintenance than traditional computers, and this can drift over time. One way to minimize the effects of drift is by taking advantage of parametric compilation—the ability to compile a parametric circuit such as the one used here only one time, and feed it fresh parameters at runtime, avoiding repeated compilation steps. Braket automatically does this for you.
  • Dimensional complexity – The inherent nature of qubits, the fundamental units of quantum computing, introduces a higher level of intricacy compared to traditional binary bits employed in conventional computers. By harnessing the principles of superposition and entanglement, qubits possess an elevated degree of complexity in their design. This intricate architecture renders the evaluation of computational capacity a formidable challenge, because the multidimensional aspects of qubits demand a more nuanced approach to assessing their computational prowess.
  • Computational errors – Increased calculation errors are intrinsic to quantum computing’s probabilistic nature during the sampling phase. These errors could impact accuracy and reliability of the results obtained through quantum sampling. Techniques such as error mitigation and error suppression are actively being developed in order to minimize the effects of errors resulting from noisy qubits. To learn more about error mitigation, see Enabling state-of-the-art quantum algorithms with Qedma’s error mitigation and IonQ, using Braket Direct.

Conclusion

The results discussed in this post suggest that quantum computing holds substantial promise for fraud detection in the financial services industry. The hybrid quantum neural network demonstrated superior performance in accurately identifying fraudulent transactions, highlighting the potential gains offered by quantum technology. As quantum computing continues to advance, its role in revolutionizing fraud detection and other critical financial processes will become increasingly evident. You can extend the results of the simulation by using real qubits and testing various outcomes on real hardware available on Braket, such as those from IQM, IonQ, and Rigetti, all on demand, with pay-as-you-go pricing and no upfront commitments.

To prepare for the future of quantum computing, organizations must stay informed on the latest advancements in quantum technology. Adopting quantum-ready cloud solutions now is a strategic priority, allowing a smooth transition to quantum when hardware reaches commercial viability. This forward-thinking approach will provide both a technological edge and rapid adaptation to quantum computing’s transformative potential across industries. With an integrated cloud strategy, businesses can proactively get quantum-ready, primed to capitalize on quantum capabilities at the right moment. To accelerate your learning journey and earn a digital badge in quantum computing fundamentals, see Introducing the Amazon Braket Learning Plan and Digital Badge.

Connect with Deloitte to pilot this solution for your enterprise on AWS.


About the authors

Federica Marini is a Manager in Deloitte Italy AI & Data practice with a strong experience as a business advisor and technical expert in the field of AI, Gen AI, ML and Data. She addresses research and customer business needs with tailored data-driven solutions providing meaningful results. She is passionate about innovation and believes digital disruption will require a human centered approach to achieve full potential.

Matteo Capozi is a Data and AI expert in Deloitte Italy, specializing in the design and implementation of advanced AI and GenAI models and quantum computing solutions. With a strong background on cutting-edge technologies, Matteo excels in helping organizations harness the power of AI to drive innovation and solve complex problems. His expertise spans across industries, where he collaborates closely with executive stakeholders to achieve strategic goals and performance improvements.

Kasi Muthu is a senior partner solutions architect focusing on generative AI and data at AWS based out of Dallas, TX. He is passionate about helping partners and customers accelerate their cloud journey. He is a trusted advisor in this field and has plenty of experience architecting and building scalable, resilient, and performant workloads in the cloud. Outside of work, he enjoys spending time with his family.

Kuldeep Singh is a Principal Global AI/ML leader at AWS with over 20 years in tech. He skillfully combines his sales and entrepreneurship expertise with a deep understanding of AI, ML, and cybersecurity. He excels in forging strategic global partnerships, driving transformative solutions and strategies across various industries with a focus on generative AI and GSIs.

Read More

Amazon SageMaker unveils the Cohere Command R fine-tuning model

Amazon SageMaker unveils the Cohere Command R fine-tuning model

AWS announced the availability of the Cohere Command R fine-tuning model on Amazon SageMaker. This latest addition to the SageMaker suite of machine learning (ML) capabilities empowers enterprises to harness the power of large language models (LLMs) and unlock their full potential for a wide range of applications.

Cohere Command R is a scalable, frontier LLM designed to handle enterprise-grade workloads with ease. Cohere Command R is optimized for conversational interaction and long context tasks. It targets the scalable category of models that balance high performance with strong accuracy, enabling companies to move beyond proof of concept and into production. The model boasts high precision on Retrieval Augmented Generation (RAG) and tool use tasks, low latency and high throughput, a long 128,000-token context length, and strong capabilities across 10 key languages.

In this post, we explore the reasons for fine-tuning a model and the process of how to accomplish it with Cohere Command R.

Fine-tuning: Tailoring LLMs for specific use cases

Fine-tuning is an effective technique to adapt LLMs like Cohere Command R to specific domains and tasks, leading to significant performance improvements over the base model. Evaluations of fine-tuned Cohere Command R model have demonstrated improved performance by over 20% across various enterprise use cases in industries such as financial services, technology, retail, healthcare, legal, and healthcare. Because of its smaller size, a fine-tuned Cohere Command R model can be served more efficiently compared to models much larger than its class.

The recommendation is to use a dataset that contains at least 100 examples.

Cohere Command R uses a RAG approach, retrieving relevant context from an external knowledge base to improve outputs. However, fine-tuning allows you to specialize the model even further. Fine-tuning text generation models like Cohere Command R is crucial for achieving ultimate performance in several scenarios:

  •  Domain-specific adaptation – RAG models may not perform optimally in highly specialized domains like finance, law, or medicine. Fine-tuning allows you to adapt the model to these domains’ nuances for improved accuracy.
  • Data augmentation – Fine-tuning enables incorporating additional data sources or techniques, augmenting the model’s knowledge base for increased robustness, especially with sparse data.
  • Fine-grained control – Although RAG offers impressive general capabilities, fine-tuning permits fine-grained control over model behavior, tailoring it precisely to your desired task for ultimate precision.

The combined power of RAG and fine-tuned LLMs empowers you to tackle diverse challenges with unparalleled versatility and effectiveness. With the introduction of Cohere Command R fine-tuning on SageMaker, enterprises can now customize and optimize the model’s performance for their unique requirements. By fine-tuning on domain-specific data, businesses can enhance Cohere Command R’s accuracy, relevance, and effectiveness for their use cases, such as natural language processing, text generation, and question answering.

By combining the scalability and robustness of Cohere Command R with the ability to fine-tune its performance on SageMaker, AWS empowers enterprises to navigate the complexities of AI adoption and use its transformative power to drive innovation and growth across various industries and domains.

Customer data, including prompts, completions, custom models, and data used for fine-tuning or continued pre-training, remains private to customer AWS accounts and is never shared with third-party model providers.

Solution overview

In the following sections, we walk through the steps to fine-tune the Cohere Command R model on SageMaker. This includes preparing the data, deploying a model, preparing for fine-tuning, creating an endpoint for inference, and performing inference.

Prepare the fine-tuning data

Before you can start a fine-tuning job, you need to upload a dataset with training and (optionally) evaluation data.

First, make sure your data is in jsonl format. It should have the following structure:

  •  messages – This contains a list of messages of the conversation. A message consists of the following parts:
  •  role – This specifies the current speaker. You can pick from System, User, or Chatbot.
  •  content – This contains the content of the message.

The following is an example that trains a chatbot to answer questions. For the sake of readability, the document spans over multiple lines. For your dataset, make sure that each line contains one whole example.

{
  "messages": [
    {
      "role": "System",
      "content": "You are a large language model trained by Cohere."
    },
    {
      "role": "User",
      "content": "Hi! What were Time magazines top 10 cover stories in the last 10 years?"
    },
    {
      "role": "Chatbot",
      "content": "Time magazines top 10 cover stories in the last 10 years were:\n\n1. Volodymyr Zelenskyy\n2. Elon Musk\n3. Martin Luther King Jr.\n4. How Earth Survived\n5. Her Lasting Impact\n6. Nothing to See Here\n7. Meltdown\n8. Deal With It\n9. The Top of America\n10. Bitter Pill"
    },
    {
      "role": "User",
      "content": "Who is Volodymyr Zelenskyy?"
    },
    {
      "role": "Chatbot",
      "content": "Volodymyr Zelenskyy is a Ukrainian politician who was elected President of Ukraine in 2019. He previously served as the Minister of Internal Affairs in the government of Prime Minister Volodymyr Groysman."
    },
    {
      "role": "User",
      "content": "Thank you!"
    }
  ]
}

Deploy a model

Complete the following steps to deploy the model:

  1. On AWS Marketplace, subscribe to the Cohere Command R model

After you subscribe to the model, you can configure it and create a training job.

  1. Choose View in Amazon SageMaker.
  2. Follow the instructions in the UI to create a training job.

Alternatively, you can use the following example notebook to create the training job.

Prepare for fine-tuning

To fine-tune the model, you need the following:

  • Product ARN – This will be provided to you after you subscribe to the product.
  • Training dataset and evaluation dataset – Prepare your datasets for fine-tuning.
  • Amazon S3 location – Specify the Amazon Simple Storage Service (Amazon S3) location that stores the training and evaluation datasets.
  • Hyperparameters – Fine-tuning typically involves adjusting various hyperparameters like learning rate, batch size, number of epochs, and so on. You need to specify the appropriate hyperparameter ranges or values for your fine-tuning task.

Create an endpoint for inference

When the fine-tuning is complete, you can create an endpoint for inference with the fine-tuned model. To create the endpoint, use the create_endpoint method. If the endpoint already exists, you can connect to it using the connect_to_endpoint method.

Perform inference

You can now perform real-time inference using the endpoint. The following is the sample message that you use for input:

message = "Classify the following text as either very negative, negative, neutral, positive or very positive: mr. deeds is , as comedy goes , very silly -- and in the best way."
result = co.chat(message=message)
print(result)

The following screenshot shows the output of the fine-tuned model.


Optionally, you can also test the accuracy of the model using the evaluation data (sample_finetune_scienceQA_eval.jsonl).

Clean up

After you have completed running the notebook and experimenting with the Cohere Command R fine-tuned model, it is crucial to clean up the resources you have provisioned. Failing to do so may result in unnecessary charges accruing on your account. To prevent this, use the following code to delete the resources and stop the billing process:

co.delete_endpoint()
co.close()

Summary

Cohere Command R with fine-tuning allows you to customize your models to be performant for your business, domain, and industry. Alongside the fine-tuned model, users additionally benefit from Cohere Command R’s proficiency in the most commonly used business languages (10 languages) and RAG with citations for accurate and verified information. Cohere Command R with fine-tuning achieves high levels of performance with less resource usage on targeted use cases. Enterprises can see lower operational costs, improved latency, and increased throughput without extensive computational demands.

Start building with Cohere’s fine-tuning model in SageMaker today.


About the Authors

Shashi Raina is a Senior Partner Solutions Architect at Amazon Web Services (AWS), where he specializes in supporting generative AI (GenAI) startups. With close to 6 years of experience at AWS, Shashi has developed deep expertise across a range of domains, including DevOps, analytics, and generative AI.

James Yi is a Senior AI/ML Partner Solutions Architect in the Emerging Technologies team at Amazon Web Services. He is passionate about working with enterprise customers and partners to design, deploy and scale AI/ML applications to derive their business values. Outside of work, he enjoys playing soccer, traveling and spending time with his family.

Pradeep Prabhakaran is a Customer Solutions Architect at Cohere. In his current role at Cohere, Pradeep acts as a trusted technical advisor to customers and partners, providing guidance and strategies to help them realize the full potential of Cohere’s cutting-edge Generative AI platform. Prior to joining Cohere, Pradeep was a Principal Customer Solutions Manager at Amazon Web Services, where he led Enterprise Cloud transformation programs for large enterprises. Prior to AWS, Pradeep has held various leadership positions at consulting companies such as Slalom, Deloitte, and Wipro. Pradeep holds a Bachelor’s degree in Engineering and is based in Dallas, TX.

Read More

Derive meaningful and actionable operational insights from AWS Using Amazon Q Business

Derive meaningful and actionable operational insights from AWS Using Amazon Q Business

As a customer, you rely on Amazon Web Services (AWS) expertise to be available and understand your specific environment and operations. Today, you might implement manual processes to summarize lessons learned, obtain recommendations, or expedite the resolution of an incident. This can be time consuming, inconsistent, and not readily accessible.

This post shows how to use AWS generative artificial intelligence (AI) services, like Amazon Q Business, with AWS Support cases, AWS Trusted Advisor, and AWS Health data to derive actionable insights based on common patterns, issues, and resolutions while using the AWS recommendations and best practices enabled by support data. This post will also demonstrate how you can integrate these insights with your IT service management (ITSM) system (such as ServiceNow, Jira, and Zendesk), to allow you to implement recommendations and keep your AWS operations healthy.

Amazon Q Business is a fully managed, secure, generative-AI powered enterprise chat assistant that enables natural language interactions with your organization’s data. Ingesting data for support cases, Trusted Advisor checks, and AWS Health notifications into Amazon Q Business enables interactions through natural language conversations, sentiment analysis, and root cause analysis without needing to fully understand the underlying data models or schemas. The AI assistant provides answers along with links that point directly to the data sources. This allows you to easily identify and reference the underlying information sources that informed the AI’s response, providing more context and enabling further exploration of the topic if needed. Amazon Q Business integrates with ITSM solutions, allowing recommendations to be tracked and actioned within your existing workflows.

AWS Support offers a range of capabilities powered by technology and subject matter experts that support the success and operational health of your AWS environments. AWS Support provides you with proactive planning and communications, advisory, automation, and cloud expertise to help you achieve business outcomes with increased speed and scale in the cloud. These capabilities enable proactive planning for upcoming changes, expedited recovery from operational disruptions, and recommendations to optimize the performance and reliability of your AWS IT infrastructure.

This solution will demonstrate how to deploy Amazon Q Business and ingest data from AWS Support cases, AWS Trusted Advisor, and AWS Health using the provided code sample to generate insights based on your support data.

Overview of solution

Today, Amazon Q Business provides 43 connectors available to natively integrate with multiple data sources. In this post, we’re using the APIs for AWS Support, AWS Trusted Advisor, and AWS Health to programmatically access the support datasets and use the Amazon Q Business native Amazon Simple Storage Service (Amazon S3) connector to index support data and provide a prebuilt chatbot web experience. The AWS Support, AWS Trusted Advisor, and AWS Health APIs are available for customers with Enterprise Support, Enterprise On-Ramp, or Business support plans.

Q Support Insights (QSI) is the name of the solution provided in the code sample repository. QSI enables insights on your AWS Support datasets across your AWS accounts. The following diagram describes at a high level the QSI solution and components.

Overview of the QSI solution

Figure 1: Overview of the QSI solution

There are two major components in the QSI solution. First, as illustrated in the Linked Accounts group in Figure 1, this solution supports datasets from linked accounts and aggregates your data using the various APIs, AWS Lambda, and Amazon EventBridge. Second, the support datasets from linked accounts are stored in a central S3 bucket that you own, as shown in the Data Collection Account group in the Figure 1. These datasets are then indexed using the Amazon Q Business S3 connector.

Under the hood, the Amazon Q Business S3 connector creates a searchable index of your AWS Support datasets, and gathers relevant important details related to keywords like case titles, descriptions, best practices, keywords, dates, and so on. The generative AI capabilities of Amazon Q Business enable it to synthesize insights and generate natural language responses available for users in the Amazon Q Business web chat experience. Amazon Q Business also supports plugins and actions so users can directly create tickets in the ITSM system without leaving the chat experience.

By default, Amazon Q Business will only produce responses using the data you’re indexing. This behavior is aligned with the use cases related to our solution. If needed, this response setting can be changed to allow Amazon Q to fallback to large language model (LLM) knowledge.

Walkthrough

The high-level steps to deploy the solution are the following:

  1. Create the necessary buckets to contain the support cases exports and deployment resources.
  2. Upload the support datasets (AWS Support cases, AWS Trusted Advisor, and AWS Health) to the S3 data source bucket.
  3. Create the Amazon Q Business application, the data source, and required components using deployment scripts.
  4. Optionally, configure ITSM integration by using one of the available Amazon Q Business built-in plugins.
  5. Synchronize the data source to index the data.
  6. Test the solution through chat.

The full guidance and deployment options are available in the aws-samples Github repository. The solution can be deployed in a single account or in an AWS Organizations. In addition to the data security and protection Amazon Q Business supports, this solution integrates with your identity provider and respects access control lists (ACLs) so users get answers based on their unique permissions. This solution also provides additional controls to include or exclude specific accounts.

Prerequisites

For this solution to work, the following prerequisites are needed:

Create the Amazon Q Business application using the deployment scripts

Using the Amazon Q Business application creation module, you can set up and configure an Amazon Q Business application, along with its crucial components, in an automated manner. These components include an Amazon S3 data source connector, required IAM roles, and Amazon Q Business web experience.

Deploy the Amazon Q Business application

As stated in the preceding prerequisites section, IAM Identity Center must be configured in the same Region (us-east-1 or us-west-2) as your Amazon Q Business application.

To deploy and use the Amazon Q Business application, follow the steps described in the Amazon Q Business application creation module. The steps can be summarized as:

  1. Launch an AWS CloudShell in either the us-east-1 or us-west-2 Region in your data collection central account and clone the repository from GitHub.
  2. Navigate to the repository directory and run the deployment script, providing the required inputs when prompted. As stated in the prerequisites, an S3 bucket name is required in the data collection central account.
  3. After deployment, synchronize the data source, assign access to users and groups, and use the deployed web experience URL to interact with the Amazon Q Business application.

[Optional] Integrate your ITSM system

To integrate with your ITSM system, follow these steps:

  1. Within the Amazon Q Business application page, choose Plugins in the navigation pane and choose Add plugin.
  2. From the list of available plugins, select the one that matches your system. For example, Jira, ServiceNow, or Zendesk.
  3. Enter the details on the next screen (see Figure 2) for Amazon Q Business application to make the connection. This integration will result in directly logging tickets from Amazon Q Business to your IT teams based on data within the Amazon Q Business application.
The Amazon Q Business plug-in creation page

Figure 2 The Amazon Q Business plug-in creation page

Support Collector

You can use the Support Collector module to set up and configure AWS EventBridge to collect support-related data. This data includes information from AWS Support cases, AWS Trusted Advisor, and AWS Health. The collected data is then uploaded to a designated S3 bucket in the data collection account. The solution will retrieve up to 6 months of data by default, though you can change the timeframe to a maximum of 12 months.

Additionally, the Support Collector can synchronize with the latest updates on a daily basis, ensuring that your support data is always up to date. The Support Collector is configured through an AWS Lambda function and EventBridge, offering flexibility in terms of the data sources (AWS Support cases, AWS Trusted Advisor, and AWS Health) you want to include or exclude. You can choose data from one, two, or all three of these sources by configuring the appropriate scheduler.

Deploy the Support Collector

To deploy and use the Support Collector, follow the steps described in the Support Collector module.

The repository contains scripts and resources to automate the deployment of Lambda functions in designated member accounts. The deployed Lambda functions collect and upload AWS Support data (Support Cases, Health Events, and Trusted Advisor Checks) to an S3 bucket in the data collection central account. The collected data can be analyzed using Amazon Q Business.

There are two deployment options:

  1. AWS Organizations (StackSet): Use this option if you have AWS Organizations set up and want to deploy in accounts under organizational units. It creates a CloudFormation StackSet in the central account to deploy resources (IAM roles, Lambda functions, and EventBridge) across member accounts.
  2. Manual deployment of individual accounts (CloudFormation): Use this option if you don’t want to use AWS Organizations and want to target a few accounts. It creates a CloudFormation stack in a member account to deploy resources (IAM roles, Lambda functions, and EventBridge).

After deployment, an EventBridge scheduler periodically invokes the Lambda function to collect support data and store it in the data collection S3 bucket. Testing the Lambda function is possible with a custom payload. The deployment steps are fully automated using a shell script. The Q Support Insights (QSI) – AWS Support Collection Deployment guide, located in the src/support_collector subdirectory, outlines the steps to deploy the resources.

Amazon Q Business web experience

You can ask support-related questions using the Amazon Q Business web experience after you have the relevant support data collected in the S3 bucket and successfully indexed. For steps to configure and collect the data, see the preceding Support Collector section. Using the web experience, you can then ask questions as shown in the following demonstration.

Using Amazon Q Business web experience to get troubleshooting recommendations

Using Amazon Q Business web experience to get performance recommendations

Using Amazon Q Business web experience to get operational recommendations

Using Amazon Q Business web experience to get performance recommendations

Figure 3 Using Amazon Q Business web experience to get performance recommendations

Sample prompts

Try some of the following sample prompts:

  • I am having trouble with EKS add-on installation failures. It is giving ConfigurationConflict errors. Based on past support cases, please provide a resolution.
  • List AWS Account IDs with insufficient IPs
  • List health events with increased error rates
  • List services being deprecated this year
  • My Lambda function is running slow. How can I speed it up?

Clean up

After you’re done testing the solution, you can delete the resources to avoid incurring additional charges. See the Amazon Q Business pricing page for more information. Follow the instructions in the GitHub repository to delete the resources and corresponding CloudFormation templates.

Conclusion

In this post, you deployed a solution that indexes data from your AWS Support datasets stored in Amazon S3 and other AWS data sources like AWS Trusted Advisor and AWS Health. This demonstrates how to use new generative AI services like Amazon Q Business to find patterns across your most frequent issues, author new content such as internal documentation or an FAQ. Using support data presents a valuable opportunity to proactively address and prevent recurring issues in your AWS environment by using insights gained from past experiences. Embracing these insights enables a more resilient and optimized AWS experience tailored to your specific needs.

This solution can be expanded to use other internal data sources your company might use and use natural language to understand optimization opportunities that your teams can implement.


About the authors

ChitreshChitresh Saxena is a Sr. Technical Account Manager specializing in generative AI solutions and dedicated to helping customers successfully adopt AI/ML on AWS. He excels at understanding customer needs and provides technical guidance to build, launch, and scale AI solutions that solve complex business problems.

JonathanJonathan Delfour is a Principal Technical Account Manager supporting Energy customers, providing top-notch support as part of the AWS Enterprise Support team. His technical guidance and unwavering commitment to excellence ensure that customers can leverage the full potential of AWS, optimizing their operations and driving success.

KrishnaKrishna Atluru is an Enterprise Support Lead at AWS. He provides customers with in-depth guidance on improving security posture and operational excellence for their workloads. Outside of work, Krishna enjoys cooking, swimming and travelling.

ArishArish Labroo is a Principal Specialist Technical Account Manager – Builder supporting large AWS customers. He is focused on building strategic tools that help customers get the most value out of Enterprise Support.

ManikManik Chopra is a Principal Technical Account Manager at AWS. He helps customers adopt AWS services and provides guidance in various areas around Data Analytics and Optimization. His areas of expertise include delivering solutions using Amazon QuickSight, Amazon Athena, and various other automation techniques. Outside of work, he enjoys spending time outdoors and traveling.

Read More

Accelerate your generative AI distributed training workloads with the NVIDIA NeMo Framework on Amazon EKS

Accelerate your generative AI distributed training workloads with the NVIDIA NeMo Framework on Amazon EKS

In today’s rapidly evolving landscape of artificial intelligence (AI), training large language models (LLMs) poses significant challenges. These models often require enormous computational resources and sophisticated infrastructure to handle the vast amounts of data and complex algorithms involved. Without a structured framework, the process can become prohibitively time-consuming, costly, and complex. Enterprises struggle with managing distributed training workloads, efficient resource utilization, and model accuracy and performance. This is where the NVIDIA NeMo Framework comes into play. In this post, we present a step-by-step guide to run distributed training workloads on an Amazon Elastic Kubernetes Service (Amazon EKS) cluster.

NVIDIA NeMo Framework

NVIDIA NeMo is an end-to-end cloud-centered framework for training and deploying generative AI models with billions and trillions of parameters at scale. The NVIDIA NeMo Framework provides a comprehensive set of tools, scripts, and recipes to support each stage of the LLM journey, from data preparation to training and deployment. It offers a variety of customization techniques and is optimized for at-scale inference of models for both language and image applications, using multi-GPU and multi-node configurations. NVIDIA NeMo simplifies generative AI model development, making it more cost-effective and efficient for enterprises. By providing end-to-end pipelines, advanced parallelism techniques, memory-saving strategies, and distributed checkpointing, NVIDIA NeMo makes sure AI model training is streamlined, scalable, and high-performing.

The following are benefits of using NVIDIA NeMo for distributed training:

  • End-to-end pipelines for different stages such as data preparation, training, and more, which allows for a plug-and-play approach for your custom data
  • Parallelism techniques, including the following:
    • Data parallelism
    • Tensor parallelism
    • Pipeline parallelism
    • Sequence parallelism
    • Expert parallelism
    • Context parallelism
  • Memory saving techniques, including the following:
    • Selective activation recompute
    • CPU offloading (activation, weights)
    • Attention, including Flash Attention (FA 1/2, FA-cuDNN), Grouped Query Attention, Multi-Query Attention, and Sliding Window Attention
    • Distributed optimizers, including Torch FSDP, Distributed Optimizer (zero-1)
  • Data loaders for different architectures
  • Distributed checkpointing

Solution overview

You can deploy and manage NVIDIA NeMo using either Slurm or Kubernetes orchestration platforms. Amazon EKS is a managed Kubernetes service that makes it straightforward to run Kubernetes clusters on AWS. It manages the availability and scalability of the Kubernetes control plane, and it provides compute node auto scaling and lifecycle management support to help you run highly available container applications.

Amazon EKS is an ideal platform for running distributed training workloads due to its robust integrations with AWS services and performance features. It seamlessly integrates with Amazon FSx for Lustre, a high-throughput file system, enabling fast data access and management using persistent volume claims with the FSx CSI driver. Amazon EKS also integrates with Amazon CloudWatch for comprehensive logging and monitoring, providing insights into cluster performance and resource utilization. It supports Amazon Simple Storage Service (Amazon S3) for scalable and durable data storage and management, providing accessibility for large datasets. Enhanced network performance is achieved with Elastic Fabric Adapter (EFA), which offers low-latency, high-throughput connectivity between nodes. These features collectively make Amazon EKS a powerful and efficient choice for optimizing AI and machine learning (ML) training workflows.

The following diagram shows the solution architecture.

In this post, we present the steps to run distributed training workloads on an EKS cluster. The high-level steps are as follows:

  1. Set up an EFA enabled 2-node 24xlarge cluster.
  2. Set up an FSx for Lustre file system so you can have a shared data repository for storing training dataset and model checkpoints.
  3. Set up an environment for NVIDIA NeMo.
  4. Modify the NVIDIA NeMo Kubernetes manifests to prepare a dataset and train a model.

Prerequisites

You need to be able to launch a CPU-based Amazon Elastic Compute Cloud (Amazon EC2) instance that you’ll use to create the EKS cluster. When your instance is up and running, SSH into your EC2 instance and install the following CLIs:

These steps may change if you are on a non-Linux platform. Consult the preceding documentation for installing the CLIs on other platforms accordingly. We also require that you have a capacity reservation with p4de.24xlarge instances and have the capacityReservationID.

Launch an EKS cluster

ECR p4de.24xlarge instances have the NVIDIA A100 80GB instances, which are highly popular for distributed training generative AI workloads. For more information, refer to Amazon EC2 Instance Types. In this section, we show how to create an EKS cluster with an On-Demand Capacity Reservation for p4de.24xlarge instances.

  1. We provide the cluster creation config in p4de-cluster-config.yaml. See the following code:
git clone https://github.com/aws-samples/awsome-distributed-training.git
cd awsome-distributed-training/3.test_cases/2.nemo-launcher/EKS

eksctl create cluster -f p4de-cluster-config.yaml

The following are key points to note when creating this cluster:

  • Make sure the kubectl version and the specified Region are correct.
  • Update the capacityReservationID field and make sure to specify the availabilityZones within the managedNodeGroups section, which should be the same Availability Zone ID in which your capacity lives.
  • This configuration will create two managed node groups: one for the system nodes using c5.2xlarge instances and another for running distributed training on p4de.24xlarge instances. Managed node groups will use Amazon EKS optimized AMIs. If you want to provide a custom AMI, you can create a self-managed node group and specify a custom AMI. To find the AMI ID, refer to Retrieving Amazon EKS optimized Amazon Linux AMI IDs. For more details about the Amazon EKS optimized AMI, see the GitHub repo.
  • Make sure efaEnabled is set to true. You can use the same config for creating a cluster with other node groups. For a list of EFA supported instance types, see Supported instance types.
  • Another popular instance for generative AI distributed training workloads is the p5.48xlarge instance with the NVIDIA H100 80 GB GPU. To add a P5 node group to an existing EKS cluster, refer to AWS CLI scripts for EKS management.
  1. After the cluster is created, you can enable kubectl to communicate with your cluster by adding a new context to the kubectl config file:
    aws eks update-kubeconfig --region region-code --name my-cluster

  2. You can confirm communication with your cluster by running the following command:
    kubectl get svc
    NAME         TYPE        CLUSTER-IP   EXTERNAL-IP   PORT(S)   AGE
    kubernetes   ClusterIP   10.100.0.1   <none>        443/TCP   28h

Next, you can install the AWS EFA Kubernetes Device Plugin. EFA is a network interface for EC2 instances that enhances the performance of inter-node communications, which is critical for distributed training workloads that involve GPUs. This plugin allows Kubernetes to recognize and utilize the EFA device, facilitating high-throughput, low-latency networking necessary for efficient distributed training and deep learning applications.

  1. Install the plugin with the following code:
helm repo add eks https://aws.github.io/eks-charts

helm install efa eks/aws-efa-k8s-device-plugin -n kube-system

The NVIDIA device plugin for Kubernetes enables GPU support within your EKS cluster by exposing the GPUs to the Kubernetes API server through the kubelet. It advertises the available GPU resources, allowing Kubernetes to schedule and manage GPU-accelerated workloads.

  1. Install the plugin with the following code:
    wget https://raw.githubusercontent.com/NVIDIA/k8s-device-plugin/v0.14.3/nvidia-device-plugin.yml
    
    kubectl apply -f nvidia-device-plugin.yml

  2. Run the following command to verify all the pods:
    kubectl get pods --all-namespaces

  3. You can run kubectl get nodes to verify the nodes.

Alternatively, you can use the EKS node viewer tool to view nodes, their costs, and their status in your cluster. After it’s installed, enter eks-node-viewer to get the following view.

The node viewer displays the IP addresses of our two p4de.24xlarge compute nodes.

  1. We can choose one of these private IP DNS names to further examine and describe the node as follows:
kubectl describe node ip-192-168-165-37.us-west-2.compute.internal

The preceding command describes a lot of detail of the node. To make sure EFA is installed correctly, make sure you see details as shown in the following screenshot.

For p4 nodes, you will see vpc.amazonaws.com/efa:4 and for p5.48xlarge nodes, you should see vpc.amazonaws.com/efa:32.

If EFA is enabled in the node group, make sure that a security group is attached to the nodes that allows a rule to allow all outgoing traffic originating from the same security group. This is required for EFA to work. For instructions, see Get started with EFA and MPI. This security group is intended for testing purposes only. For your production environments, we recommend that you create an inbound SSH rule that allows traffic only from the IP address from which you are connecting, such as the IP address of your computer, or a range of IP addresses in your local network.

Create an FSx for Lustre file system

For distributed training applications, typically hundreds of GPU instances are used, with each node containing multiple GPUs. It is crucial that all nodes can access a shared file system to train on the same dataset efficiently. For this purpose, a high-performance file system with high throughput and low latency is essential. We recommend using the FSx for Lustre file system for large-scale distributed training, because it meets these requirements and provides seamless data access for all nodes involved in the training process.

To have a FSx for Lustre file system mounted on your EKS cluster, complete the following steps:

  1. Use the following scripts to create an AWS Identity and Access Management (IAM) role and attach the FSx policy:
    export FSX_POLICY_NAME=fsx-csi
    
    wget https://github.com/aws-samples/aws-do-eks/blob/main/Container-Root/eks/deployment/csi/fsx/fsx-policy.json
    export FSX_POLICY_DOC=file://fsx-policy.json
    
    # From EC2 Auto Scaling Group
    export EKS_INSTANCE_PROFILE_NAME=(eks-1ec6fc6b-1a19-d65d-66ac-293ff0a20eb9 )
    
    POLICY_ARN=$(aws iam create-policy --policy-name ${FSX_POLICY_NAME} --policy-document $FSX_POLICY_DOC --query "Policy.Arn" --output text)
    
    INSTANCE_PROFILE=$(aws iam list-instance-profiles --query InstanceProfiles[?InstanceProfileName=="'${EKS_INSTANCE_PROFILE_NAME}'"].{InstanceProfileName:InstanceProfileName} --output text)
    
    ROLE_NAME=$(aws iam get-instance-profile --instance-profile-name ${INSTANCE_PROFILE} --query InstanceProfile.Roles[0].RoleName --output text)
    
    # Attach FSx Policy to role ${ROLE_NAME} ..."
    aws iam attach-role-policy --policy-arn ${POLICY_ARN} --role-name ${ROLE_NAME}
    

  2. Use the following script to create a security group that allows EKS nodes to access the file system:
    # From EC2 console
    export MY_REGION=us-west-2
    # FSX_SUBNET_ID should be same ID the compute nodes are present in. You can get this from the EKS console 
    export FSX_SUBNET_ID=subnet-0edecd850cff2cfad
    # From EC2 Auto Scaling Group
    export FSX_SECURITY_GROUP_NAME=eks-fsx-sg
    
    # Get VPC_ID from EKS console
    export VPC_ID=vpc-04411d49af198a6ea
    
    # Create security group
    export SECURITY_GROUP_ID=$(aws ec2 create-security-group --vpc-id ${VPC_ID} --region ${MY_REGION} --group-name ${FSX_SECURITY_GROUP_NAME} --description "FSx for Lustre Security Group" --query "GroupId" --output text)
    
    export SUBNET_CIDR=$(aws ec2 describe-subnets --region ${MY_REGION} --query Subnets[?SubnetId=="'${FSX_SUBNET_ID}'"].{CIDR:CidrBlock} --output text)
    
    # Ingress rule
    aws ec2 authorize-security-group-ingress --region ${MY_REGION} --group-id ${SECURITY_GROUP_ID} --protocol tcp --port 988 --cidr ${SUBNET_CIDR}
    

  3. Create a 1.2 TB Persistent_2 FSx for Lustre file system from the FSx for Lustre console in the same Availability Zone as your compute instances (FSX_SUBNET_ID), VPC of Amazon EKS (VPC_ID), and the security group you created (SECURITY_GROUP_ID).
  4. After the file system is created, note the file system ID, DNS name, and mount name from the file system details page.

Before mounting the file system, you need to install the FSx CSI driver that allows EKS clusters to manage the lifecycle of FSx for Lustre file systems.

  1. Install the FSx CSI driver as follows:
    echo "Installing FSx CSI driver ..."
    kubectl apply -k "github.com/kubernetes-sigs/aws-fsx-csi-driver/deploy/kubernetes/overlays/stable/?ref=master"
    
    echo "FSx pods in kube-system namespace ..."
    kubectl -n kube-system get pods | grep fsx
    

  2. Next, to mount the file system, provide scripts in the fsx-storage-class.yaml, fsx-pv.yaml and fsx-pvc.yaml files:
    # Storage Class
    kubectl apply -f fsx-storage-class.yaml
    kubectl get sc
    
    # Persistent Volume
    kubectl apply -f fsx-pv.yaml
    
    # Persistent Volume Claim
    kubectl apply -f fsx-pvc.yaml
    

You can check to make sure that the volumes are in Bound state.

Set up the environment for NVIDIA NeMo

For this post, we use the NVIDIA device plugin for Kubernetes, but if you need to install the GPU Operator, you can do so as follows:

helm repo add nvidia https://helm.ngc.nvidia.com/nvidia
helm repo update
helm install --wait --generate-name -n gpu-operator --create-namespace nvidia/gpu-operator

To enable distributed training, we use the KubeFlow Training Operator, which is essential for managing and scheduling ML training jobs in a Kubernetes environment. This operator simplifies the process of running distributed training jobs by automating the deployment and scaling of the necessary components. See the following code:

# Deploy Kubeflow training operator

kubectl apply -k "github.com/kubeflow/training-operator/manifests/overlays/standalone?ref=v1.7.0"

# From https://github.com/aws-samples/aws-do-eks/blob/main/Container-Root/eks/deployment/kubeflow/training-operator/deploy.sh

# Configure RBAC resources

kubectl apply -f ./clusterrole-hpa-access.yaml

kubectl apply -f ./clusterrolebinding-training-operator-hpa-access.yaml

Additionally, we use the KubeFlow MPI Operator for preprocessing training data in parallel. The MPI Operator facilitates running Message Passing Interface (MPI) jobs, which are crucial for parallelizing the preprocessing tasks across multiple nodes, thereby speeding up the training process. See the following code:

kubectl apply -f https://raw.githubusercontent.com/kubeflow/mpi-operator/v0.4.0/deploy/v2beta1/mpi-operator.yaml

# From https://github.com/aws-samples/aws-do-eks/blob/main/Container-Root/eks/deployment/kubeflow/mpi-operator/clusterrole-mpi-operator.yaml
# Add lease permissions fot mpi-operator cluster role
kubectl apply -f ./clusterrole-mpi-operator.yaml

The NVIDIA NeMo Framework is available publicly in the image nvcr.io/nvidia/nemo:24.01.framework. We provide an AWS optimized Dockerfile for use with P4 and P5 instances. We recommend the following library versions for optimal performance:

ENV EFA_INSTALLER_VERSION=1.30.0
ENV AWS_OFI_NCCL_VERSION=1.8.1-aws
ENV NCCL_VERSION=2.19.4-1

You can build and push the image to Amazon Elastic Container Registry (Amazon ECR) as follows:

## AWS
export AWS_REGION=us-west-2
export ACCOUNT=$(aws sts get-caller-identity --query Account --output text)

## Docker Image
export REGISTRY=${ACCOUNT}.dkr.ecr.${AWS_REGION}.amazonaws.com/
export IMAGE=nemo-aws
export TAG=":24.01.framework"

docker build -t ${REGISTRY}${IMAGE}${TAG} -f 0.Dockerfile .

echo "Logging in to $REGISTRY ..."
aws ecr get-login-password | docker login --username AWS --password-stdin $REGISTRY

# Create registry if it does not exist
REGISTRY_COUNT=$(aws ecr describe-repositories | grep ${IMAGE} | wc -l)
if [ "$REGISTRY_COUNT" == "0" ]; then
        echo ""
        echo "Creating repository ${IMAGE} ..."
        aws ecr create-repository --repository-name ${IMAGE}
fi

# Push image
docker image push ${REGISTRY}${IMAGE}${TAG}

The NVIDIA NeMo Framework requires users to provide config files with job and model information. You can copy the launcher scripts from the container as follows:

# Run container
docker run -it ${REPOSITORY}${IMAGE}${TAG} bash

# Copy files
docker cp -a <container-id>: /opt/NeMo-Megatron-Launcher/ <Path-to-save-launcher-scripts>

In a Slurm cluster implementation, the launcher scripts, data, and results folder could reside in the file system that both the head node (node from where jobs are submitted) and compute nodes access. But in this Amazon EKS implementation, the node that you used to create the EKS cluster doesn’t have access to EKS file system. To get around this, you can put the launcher scripts in the head node and the results and data folder in the file system that the compute nodes have access to.

Run NVIDIA NeMo on an EKS cluster

We’re now ready to set up NVIDIA NeMo Kubernetes manifests for data preparation and model training. For more information about running it on premises, see Running NeMo Framework on Kubernetes. There are some modifications to be done for it to run on Amazon EKS, as shown in the following steps. We provide the launcher scripts in the GitHub repo.

  1. Modify the launcher_scripts/conf/cluster/k8s.yaml file as follows. The subPath field is the path where FSx for Lustre is mounted, which is /fsx-shared in this case.
    shm_size: 512Gi  # Amount of system memory to allocate in Pods. Should end in "Gi" for gigabytes.
    volumes:
      persistentVolumeClaim:
        # This claim should be created before running
        claimName: fsx-pvc
        subPath: fsx-shared  # path is mirrored into pod (no leading slash b/c relative to root)
    
    # NOTE: These args will soon be deprecated
    nfs_server: null  # Hostname or IP address for the NFS server where data is stored.
    nfs_path: null  # Path to store data in the NFS server.
    ib_resource_name: null  # Specify the resource name for IB devices according to kubernetes, such as "nvidia.com/hostdev" for Mellanox IB adapters. Can also be a list, but must be same length as ib_count
    ib_count: null  # Specify the number of IB devices to include per node in each pod. Can also be a list, but must be same length as ib_resource_name
    ib_network_annotation: ""  # Specify the networks as comma separated values
    dns_policy: null  # Specify a dnsPolicy to use in all pods, if necessary
    

  2. Install the required Python packages; this is required so that NeMo Launcher can submit jobs to the Kubernetes cluster:
sudo apt install python3-pip

pip install -r <Path-to- NeMo-Megatron-Launcher>/requirements.txt

Next, we copy the following folders from the container to the /fsx-shared/data folder:

  • NeMo-Megatron-Launcher/launcher_scripts/data/bpe
  • NeMo-Megatron-Launcher/launcher_scripts/data/nsfw
  1. To copy files from EKS pods, you can start a pod just for this purpose. Create a file fsx-share-test.yaml as follows:
    apiVersion: v1
    kind: Pod
    metadata:
      name: fsx-share-test
    spec:
      containers:
      - name: fsx-share-test
        image: ubuntu
        command: ["/bin/bash"]
        args: ["-c", "while true; do echo  "hello from FSx" - $(date -u) >> /fsx-shared/test.txt; sleep 120; done"]
        volumeMounts:
        - name: fsx-pv
          mountPath: /fsx-shared
      volumes:
      - name: fsx-pv
        persistentVolumeClaim:
          claimName: fsx-pvc
    

  2. Run this pod and copy the files:
    kubectl apply -f fsx-share-test.yaml
    
    kubectl cp <Path-to- NeMo-Megatron-Launcher>/launcher_scripts/data/bpe fsx-share-test: /fsx-shared/data/
    
    kubectl cp <Path-to- NeMo-Megatron-Launcher>/launcher_scripts/data/nsfw fsx-share-test: /fsx-shared/data/
    

A few files need to be updated for data preparation for it to work with the EKS cluster.

  1. Modify the launcher_scripts/conf/config.yaml file:
    • For cluster, use k8s.
    • For training, use gpt3/126m.
    • For stages, this should be just data_preparation and no other stages.
    • For launcher_scripts_path, use the path to the NeMo Megatron launch scripts, which should end with /launcher_scripts.
    • For data_dir, use /fsx-shared/data (the location to store and read the data).
    • For base_results_dir, use /fsx-shared/results (the location to store the results, checkpoints, and logs).
    • For container, use ${REPOSITORY}${IMAGE}${TAG}
  2. Modify the conf/data_preparation/gpt3/download_gpt3_pile.yaml file:
    • Set node_array_size to 2.
    • Set file_numbers to “0-5”. With five files, it should be around 350 GB of data
  3. Modify the nemo_launcher/core/k8s_templates/data_preparation/data-prep.yaml file:
    • If you get the error that mpirun is not found, add the full path to the executable /opt/amazon/openmpi/bin/mpirun.
    • Add /fsx-shared in the container volume mount path.
    • Add the volume:
volumes:
          - name: fsx-pv
            persistentVolumeClaim:
              claimName: fsx-pvc
  1. Launch the data preparation job:
    python3 main.py

This script creates a Helm chart for the selected stage (in this case, data_preparation) and runs the Helm chart automatically. Refer to Run NeMo Framework on Kubernetes for an explanation of the data preparation process. Make sure python3 is installed.

  1. You can monitor your job status and logs using three commands: helm list, kubectl get pods, and kubectl logs --follow).
  2. When the job is finished, you can remove the Helm chart:
    helm uninstall download-gpt3-pile

You can see the downloaded the data in the /fsx-shared folder by running in one of the pods as kubectl exec -it nlp-worker-0 bash.

Training

Now that our data preparation is complete, we’re ready to train our model with the created dataset. Complete the following steps:

  1. Modify a parameter in the conf/config.yaml file:
    • Set stages to training and no other stages.
  2. Modify parameters in conf/training/gpt3/126m.yaml:
    • Set num_nodes to 2.
    • Set devices to 1.
    • On line 18, change use_distributed_sampler: False to replace_sampler_ddp: False.

Optionally, if you want to use a mock dataset instead of real dataset for testing purposes, you can modify the data section as follows. You are essentially changing data_impl: mmap to data_impl: mock and assigning an empty list to data_prefix.

data:
  data_impl: mock
  splits_string: "99990,8,2"
  seq_length: 2048
  skip_warmup: True
  num_workers: 2
  dataloader_type: single # cyclic
  reset_position_ids: False # Reset position ids after end-of-document token
  reset_attention_mask: False # Reset attention mask after end-of-document token
  eod_mask_loss: False # Mask loss for the end of document tokens
  index_mapping_dir: null
  data_prefix: [] # Should be weight path weight path... for a blended dataset

# You can just comment the default “data_prefix” values like below.
# - ${data_dir}/my-gpt3_00_text_document
# - .0333
  1. Modify the parameters in the nemo_launcher/core/k8s_templates/training/training.yaml file:
  2. Run python3 main.py to start training and you should see the training pods by running kubectl get pods as follows:
    NAME                    READY   STATUS    RESTARTS   AGE
    nlp-training-worker-0   1/1     Running   0          168m
    nlp-training-worker-1   1/1     Running   0          168m
    

In addition to monitoring your job using helm list, kubectl get pods, and kubectl logs –follow, you can also SSH into your pod with kubectl exec and use nvidia-smi to check GPU status.

  1. When the job is finished, you can delete the helm chart:
    helm uninstall gpt3-126m

Model checkpoints are saved at /fsx-shared/results/checkpoints along with other training logs and TensorBoard events. By default, checkpoints are saved at every 2,000 steps. You can modify the conf/training/gpt3/126m.yaml file to make changes in the training setup.

Troubleshooting deployment failures

If deployment fails due to incorrect setup or configuration, complete the following debug steps:

  1. Find the error message by running kubectl logs --follow PODNAME and kubectl describe pod PODNAME.
  2. Stop any running jobs by removing the Helm chart. This can be done by running helm uninstall CHARTNAME.

Pods should be spun down after removing the Helm chart.

  1. You can double-check by running kubectl get pods.
  2. If pods are not spun down, you can manually stop them by running kubectl delete PODNAME.

Based on the error message, you may find errors from:

  • Unready nodes.
  • Missing Operators or CRDs. In this case, make sure your kubectl get pods -A output looks like that shown earlier. If errors exist, try reinstalling Operators and CRDs.
  • NeMo Framework scripts or Kubernetes manifests. This is more likely a bug or wrong setup on the NeMo side. Errors can vary.

Clean up

It’s important to spin down resources after model training in order to avoid costs associated with running idle instances. To clean up our setup, we must delete the FSx for Lustre file system before deleting the cluster because it’s associated with a subnet in the cluster’s VPC.

  1. To delete the file system integration with the EKS cluster, run the following command:
    kubectl delete -f ./fsx-storage-class.yaml

Not only will this delete the persistent volume, it will also delete the EFS file system and all the data on the file system will be lost.

  1. When Step 1 is complete, delete the cluster by using the following script:
    eksctl delete cluster -f p4de-cluster-config.yaml

This will delete all the existing pods, remove the cluster, and delete the VPC you created in the beginning.

Conclusion

In this post, we demonstrated how to train generative AI models at scale using the NeMo Framework within an EKS cluster. We covered the challenges of training LLMs and how NeMo’s comprehensive tools and optimizations address these challenges, making the process more efficient and cost-effective. With NeMo, you can manage and scale distributed training workloads effectively. This post works with P4de instances. Another popular instance for generative AI distributed training workloads is the p5.48xlarge instance with the NVIDIA H100 80 GB GPU. To add a P5 node group to an existing EKS cluster, refer to AWS CLI scripts for EKS management.

To help you get started, we have published a GitHub repository that provides step-by-step instructions for creating an EKS cluster with P4de instances, mounting an FSx for Lustre file system, and running distributed training workloads with NeMo. This guide empowers you to harness the full potential of NeMo and Amazon EKS for your AI model training needs.


About the authors

Ankur Srivastava is a Sr. Solutions Architect in the ML Frameworks Team. He focuses on helping customers with self-managed distributed training and inference at scale on AWS. His experience includes industrial predictive maintenance, digital twins, probabilistic design optimization and has completed his doctoral studies from Mechanical Engineering at Rice University and post-doctoral research from Massachusetts Institute of Technology.

Akshit Arora is a senior data scientist at NVIDIA, where he works on deploying conversational AI models on GPUs at scale. He’s a graduate of University of Colorado at Boulder, where he applied deep learning to improve knowledge tracking on a K-12 online tutoring platform. His work spans multilingual text-to-speech, time series classification, ed-tech, and practical applications of deep learning.

Eliuth Triana Isaza is a Developer Relations Manager at NVIDIA empowering Amazon’s AI MLOps, DevOps, Scientists and AWS technical experts to master the NVIDIA computing stack for accelerating and optimizing Generative AI Foundation models spanning from data curation, GPU training, model inference and production deployment on AWS GPU instances. In addition, Eliuth is a passionate mountain biker, skier, tennis and poker player.

Wenhan Tan is a Solutions Architect at Nvidia assisting customers to adopt Nvidia AI solutions at large-scale. His work focuses on accelerating deep learning applications and addressing inference and training challenges.

Read More

Governing the ML lifecycle at scale, Part 2: Multi-account foundations

Governing the ML lifecycle at scale, Part 2: Multi-account foundations

Your multi-account strategy is the core of your foundational environment on AWS. Design decisions around your multi-account environment are critical for operating securely at scale. Grouping your workloads strategically into multiple AWS accounts enables you to apply different controls across workloads, track cost and usage, reduce the impact of account limits, and mitigate the complexity of managing multiple virtual private clouds (VPCs) and identities by allowing different teams to access different accounts that are tailored to their purpose.

In Part 1 of this series, Governing the ML lifecycle at scale, Part 1: A framework for architecting ML workloads using Amazon SageMaker, you learned about best practices for operating and governing machine learning (ML) and analytics workloads at scale on AWS. In this post, we provide guidance for implementing a multi-account foundation architecture that can help you organize, build, and govern the following modules: data lake foundations, ML platform services, ML use case development, ML operations, centralized feature stores, logging and observability, and cost and reporting.

We cover the following key areas of the multi-account strategy for governing the ML lifecycle at scale:

  •  Implementing the recommended account and organizational unit structure to provide isolation of AWS resources (compute, network, data) and cost visibility for ML and analytics teams
  • Using AWS Control Tower to implement a baseline landing zone to support scaling and governing data and ML workloads
  • Securing your data and ML workloads across your multi-account environment at scale using the AWS Security Reference Architecture
  • Using the AWS Service Catalog to scale, share, and reuse ML across your multi-account environment and for implementing baseline configurations for networking
  • Creating a network architecture to support your multi-account environment and facilitate network isolation and communication across your multi-tenant environment

Your multi-account foundation is the first step towards creating an environment that enables innovation and governance for data and ML workloads on AWS. By integrating automated controls and configurations into your account deployments, your teams will be able to move quickly and access the resources they need, knowing that they are secure and comply with your organization’s best practices and governance policies. In addition, this foundational environment will enable your cloud operations team to centrally manage and distribute shared resources such as networking components, AWS Identity and Access Management (IAM) roles, Amazon SageMaker project templates, and more.

In the following sections, we present the multi-account foundation reference architectures, discuss the motivation behind the architectural decisions made, and provide guidance for implementing these architectures in your own environment.

Organizational units and account design

You can use AWS Organizations to centrally manage accounts across your AWS environment. When you create an organization, you can create hierarchical groupings of accounts within organizational units (OUs). Each OU is typically designed to hold a set of accounts that have common operational needs or require a similar set of controls.

The recommended OU structure and account structure you should consider for your data and ML foundational environment is based on the AWS whitepaper Organizing Your AWS Environment Using Multiple Accounts. The following diagram illustrates the solution architecture.

Organizing Your AWS Environment Using Multiple Accounts
Only those OUs that are relevant to the ML and data platform have been shown. You can also add other OUs along with the recommended ones. The next sections discuss how these recommended OUs serve your ML and data workloads and the specific accounts you should consider creating within these OUs.

The following image illustrates, respectively, the architecture of the account structure for setting up a multi-account foundation and how it would look like in AWS Organizations once implemented .

Recommended OUs

The recommended OUs include Security, Infrastructure, Workloads, Deployments, and Sandbox. If you deploy AWS Control Tower, which is strongly recommended, it creates two default OUs: Security and Sandbox. You should use these default OUs and create the other three. For instructions, refer to Create a new OU.

Security OU

The Security OU stores the various accounts related to securing your AWS environment. This OU and the accounts therein are typically owned by your security team.

You should consider the following initial accounts for this OU:

  •  Security Tooling account – This account houses general security tools as well as those security tools related to your data and ML workloads. For instance, you can use Amazon Macie within this account to help protect your data across all of your organization’s member accounts.
  • Log Archive account – If you deploy AWS Control Tower, this account is created by default and placed within your Security OU. This account is designed to centrally ingest and archive logs across your organization.

Infrastructure OU

Similar to other types of workloads that you can run on AWS, your data and ML workloads require infrastructure to operate correctly. The Infrastructure OU houses the accounts that maintain and distribute shared infrastructure services across your AWS environment. The accounts within this OU will be owned by the infrastructure, networking, or Cloud Center of Excellence (CCOE) teams.

The following are the initial accounts to consider for this OU:

  • Network account – To facilitate a scalable network architecture for data and ML workloads, it’s recommended to create a transit gateway within this account and share this transit gateway across your organization. This will allow for a hub and spoke network architecture that privately connects your VPCs in your multi-account environment and facilitates communication with on-premises resources if needed.
  • Shared Services account – This account hosts enterprise-level shared services such as AWS Managed Microsoft AD and AWS Service Catalog that you can use to facilitate the distribution of these shared services.

Workloads OU

The Workloads OU is intended to house the accounts that different teams within your platform use to create ML and data applications. In the case of an ML and data platform, you’ll use the following accounts:

  • ML team dev/test/prod accounts – Each ML team may have their own set of three accounts for the development, testing, and production stages of the MLOps lifecycle.
  • (Optional) ML central deployments – It’s also possible to have ML model deployments fully managed by an MLOps central team or ML CCOE. This team can handle the deployments for the entire organization or just for certain teams; either way, they get their own account for deployments.
  • Data lake account – This account is managed by data engineering or platform teams. There can be several data lake accounts organized by business domains. This is hosted in the Workloads OU.
  • Data governance account – This account is managed by data engineering or platform teams. This acts as the central governance layer for data access. This is hosted in the Workloads OU.

Deployments OU

The Deployments OU contains resources and workloads that support how you build, validate, promote, and release changes to your workloads. In the case of ML and data applications, this will be the OU where the accounts that host the pipelines and deployment mechanisms for your products will reside. These will include accounts like the following:

  • DevOps account – This hosts the pipelines to deploy extract, transform, and load (ETL) jobs and other applications for your enterprise cloud platform
  • ML shared services account – This is the main account for your platform ML engineers and the place where the portfolio of products related to model development and deployment are housed and maintained

If the same team managing the ML engineering resources is the one taking care of pipelines and deployments, then these two accounts may be combined into one. However, one team should be responsible for the resources in one account; the moment you have different independent teams taking care of these processes, the accounts should be different. This makes sure that a single team is accountable for the resources in its account, making it possible to have the right levels of billing, security, and compliance for each team.

Sandbox OU

The Sandbox OU typically contains accounts that map to an individual or teams within your organization and are used for proofs of concept. In the case of our ML platform, this can be cases of the platform and data scientist teams wanting to create proofs of concept with ML or data services. We recommend using synthetic data for proofs of concept and avoid using production data in Sandbox environments.

AWS Control Tower

AWS Control Tower enables you to quickly get started with the best practices for your ML platform. When you deploy AWS Control Tower, your multi-account AWS environment is initialized according to prescriptive best practices. AWS Control Tower configures and orchestrates additional AWS services, including Organizations, AWS Service Catalog, and AWS IAM Identity Center. AWS Control Tower helps you create a baseline landing zone, which is a well-architected multi-account environment based on security and compliance best practices. As a first step towards initializing your multi-account foundation, you should set up AWS Control Tower.

In the case of our ML platform, AWS Control Tower helps us with four basic tasks and configurations:

  • Organization structure – From the accounts and OUs that we discussed in the previous section, AWS Control Tower provides you with the Security and Sandbox OUs and the Security Tooling and Logging accounts.
  • Account vending – This enables you to effortlessly create new accounts that comply with your organization’s best practices at scale. It allows you to provide your own bootstrapping templates with AWS Service Catalog (as we discuss in the next sections).
  • Access management – AWS Control Tower integrates with IAM Identity Center, providing initial permissions sets and groups for the basic actions in your landing zone.
  • Controls – AWS Control Tower implements preventive, detective, and proactive controls that help you govern your resources and monitor compliance across groups of AWS accounts.

Access and identity with IAM Identity Center

After you establish your landing zone with AWS Control Tower and create the necessary additional accounts and OUs, the next step is to grant access to various users of your ML and data platform. Proactively determining which users will require access to specific accounts and outlining the reasons behind these decisions is recommended. Within IAM Identity Center, the concepts of groups, roles, and permission sets allows you to create fine-grained access for different personas within the platform.

Users can be organized into two primary groups: platform-wide and team-specific user groups. Platform-wide user groups encompass central teams such as ML engineering and landing zone security, and they are allocated access to the platform’s foundational accounts. Team-specific groups operate at the team level, denoted by roles such as team admins and data scientists. These groups are dynamic, and are established for new teams and subsequently assigned to their respective accounts upon provisioning.

The following table presents some example platform-wide groups.

User Group Description Permission Set Accounts
AWSControlTowerAdmins Responsible for managing AWS Control Tower in the landing zone AWSControlTowerAdmins and AWSSecurityAuditors Management account
AWSNetworkAdmins Manages the networking resources of the landing zone NetworkAdministrator Network account
AWSMLEngineers Responsible for managing the ML central resources PowerUserAccess ML shared services account
AWSDataEngineers Responsible for managing the data lake, ETLs and data processes of the platform PowerUserAccess Data lake account

The following table presents examples of team-specific groups.

User Group Description Permission Set Accounts
TeamLead Group for the administrators of the team. AdministratorAccess Team account
DataScientists Group for data scientists. This group is added as an access for the team’s SageMaker domain. DataScientist Team account
MLEngineers The team may have other roles dedicated to certain specific tasks that have a relationship with the matching platform-wide teams. MLEngineering Team account
DataEngineers DataEngineering Team account

AWS Control Tower automatically generates IAM Identity Center groups with permission set relationships for the various landing zone accounts it creates. You can use these preconfigured groups for your platform’s central teams or create new custom ones. For further insights into these groups, refer to IAM Identity Center Groups for AWS Control Tower. The following screenshot shows an example of the AWS Control Tower console, where you can view the accounts and determine which groups have permission on each account.

IAM Identity Center also provides a login page where landing zone users can get access to the different resources, such as accounts or SageMaker domains, with the different levels of permissions that you have granted them.

AWS Security Reference Architecture

The AWS SRA is a holistic set of guidelines for deploying the full complement of AWS security services in a multi-account environment. It can help you design, implement, and manage AWS security services so they align with AWS recommended practices.

To help scale security operations and apply security tools holistically across the organization, it’s recommended to use the AWS SRA to configure your desired security services and tools. You can use the AWS SRA to set up key security tooling services, such as Amazon GuardDuty, Macie, and AWS Security Hub. The AWS SRA allows you to apply these services across your entire multi-account environment and centralize the visibility these tools provide. In addition, when accounts get created in the future, you can use the AWS SRA to configure the automation required to scope your security tools to these new accounts.

The following diagram depicts the centralized deployment of the AWS SRA.

Scale your ML workloads with AWS Service Catalog

Within your organization, there will likely be different teams corresponding to different business units. These teams will have similar infrastructure and service needs, which may change over time. With AWS Service Catalog, you can scale your ML workloads by allowing IT administrators to create, manage, and distribute portfolios of approved products to end-users, who then have access to the products they need in a personalized portal. AWS Service Catalog has direct integrations with AWS Control Tower and SageMaker.

It’s recommended that you use AWS Service Catalog portfolios and products to enhance and scale the following capabilities within your AWS environment:

  • Account vending – The cloud infrastructure team should maintain a portfolio of account bootstrapping products within the shared infrastructure account. These products are templates that contain the basic infrastructure that should be deployed when an account is created, such as VPC configuration, standard IAM roles, and controls. This portfolio can be natively shared with AWS Control Tower and the management account, so that the products are directly used when creating a new account. For more details, refer to Provision accounts through AWS Service Catalog.
  • Analytics infrastructure self-service – This portfolio should be created and maintained by a central analytics team or the ML shared services team. This portfolio is intended to host templates to deploy different sets of analytics products to be used by the platform ML and analytics teams. It is shared with the entire Workloads OU (for more information, see Sharing a Portfolio). Examples of the products include a SageMaker domain configured according to the organization’s best practices or an Amazon Redshift cluster for the team to perform advanced analytics.
  • ML model building and deploying – This capability maps to two different portfolios, which are maintained by the platform ML shared services team:
    • Model building portfolio – This contains the products to build, train, evaluate, and register your ML models across all ML teams. This portfolio is shared with the Workloads OU and is integrated with SageMaker project templates.
    • Model deployment portfolio – This contains the products to deploy your ML models at scale in a reliable and consistent way. It will have products for different deployment types such as real-time inference, batch inference, and multi-model endpoints. This portfolio can be isolated within the ML shared services account by the central ML engineering team for a more centralized ML strategy, or shared with the Workloads OU accounts and integrated with SageMaker project templates to federate responsibility to the individual ML teams.

Let’s explore how we deal with AWS Service Catalog products and portfolios in our platform. Both of the following architectures show an implementation to govern the AWS Service Catalog products using the AWS Cloud Development Kit (AWS CDK) and AWS CodePipeline. Each of the aforementioned portfolios will have its own independent pipeline and code repository. The pipeline synthesizes the AWS CDK service catalog product constructs into actual AWS Service Catalog products and deploys them to the portfolios, which are later made available for its consumption and use. For more details about the implementation, refer to Govern CI/CD best practices via AWS Service Catalog.

The following diagram illustrates the architecture for the account vending portfolio.

The workflow includes the following steps:

  1. The shared infrastructure account is set up with the pipeline to create the AWS Service Catalog portfolio.
  2. The CCOE or central infrastructure team can work on these products and customize them so that company networking and security requirements are met.
  3. You can use the AWS Control Tower Account Factory Customization (AFC) to integrate the portfolio within the account vending process. For more details, see Customize accounts with Account Factory Customization (AFC).
  4. To create a new account from the AFC, we use a blueprint. A blueprint is an AWS CloudFormation template that will be deployed in the newly created AWS account. For more information, see Create a customized account from a blueprint.

The following screenshot shows an example of what account creation with a blueprint looks like.

For the analytics and ML portfolios, the architecture changes the way these portfolios are used downstream, as shown in the following diagram.

The following are the key steps involved in building this architecture:

  1. The ML shared services account is set up and bootstrapped with the pipelines to create the two AWS Service Catalog portfolios.
  2. The ML CCOE or ML engineering team can work on these products and customize them so they’re up to date and cover the main use cases from the different business units.
  3. These portfolios are shared with the OU where the ML dev accounts will be located. For more information about the different options to share AWS Service Catalog portfolios, see Sharing a Portfolio.
  4. Sharing these portfolios with the entire Workloads OU will result in these two portfolios being available for use by the account team as soon as the account is provisioned.

After the architecture has been set up, account admins will see the AWS Service Catalog portfolios and ML workload account after they log in. The portfolios are ready to use and can get the team up to speed quickly.

Network architecture

In our ML platform, we are considering two different major logical environments for our workloads: production and pre-production environments with corporate connectivity, and sandbox or development iteration accounts without corporate connectivity. These two environments will have different permissions and requirements when it comes to connectivity.

As your environment in AWS scales up, inter-VPC connectivity and on-premises VPC connectivity will need to scale in parallel. By using services such as Amazon Virtual Private Cloud (Amazon VPC) and AWS Transit Gateway, you can create a scalable network architecture that is highly available, secure, and compliant with your company’s best practices. You can attach each account to its corresponding network segment.

For simplicity, we create a transit gateway within the central network account for our production workloads; this will resemble a production network segment. This will create a hub and spoke VPC architecture that will allow our production accounts to do the following:

  • Enable inter-VPC communication between the different accounts.
  • Inspect traffic with centralized egress or ingress to the network segment.
  • Provide the environments with connectivity to on-premises data stores.
  • Create a centralized VPC endpoints architecture to reduce networking costs while maintaining private network compliance. For more details, see Centralized access to VPC private endpoints.

For more information about these type of architectures, refer to Building a Scalable and Secure Multi-VPC AWS Network Infrastructure.

The following diagram illustrates the recommended architecture for deploying your transit gateways and creating attachments to the VPCs within your accounts. Anything considered a production environment, whether it’s a workload or shared services account, is connected to the corporate network, while dev accounts have direct internet connectivity to speed up development and exploring of new features.

At a high level, this architecture allows you to create different transit gateways within your network account for your desired AWS Regions or environments. Scalability is provided through the account vending functionality of AWS Control Tower, which deploys a CloudFormation stack to the accounts containing a VPC and the required infrastructure to connect to the environment’s corresponding network segment. For more information about this approach, see the AWS Control Tower Guide for Extending Your Landing Zone.

With this approach, whenever a team needs a new account, the platform team just needs to know whether this will be an account with corporate network connectivity or not. Then the corresponding blueprint is selected to bootstrap the account with, and the account is created. If it’s a corporate network account, the VPC will come with an attachment to the production transit gateway.

Conclusion

In this post, we discussed best practices for creating a multi-account foundation to support your analytics and ML workloads and configuring controls to help you implement governance early in your ML lifecycle. We provided a baseline recommendation for OUs and accounts you should consider creating using AWS Control Tower and blueprints. In addition, we showed how you can deploy security tools at scale using the AWS SRA, how to configure IAM Identity Center for centralized and federated access management, how to use AWS Service Catalog to package and scale your analytics and ML resources, and a best practice approach for creating a hub and spoke network architecture.

Use this guidance to get started in the creation of your own multi-account environment for governing your analytics and ML workloads at scale, and make sure you subscribe to the AWS Machine Learning Blog to receive updates regarding additional blog posts within this series.


About the authors

Alberto Menendez is a DevOps Consultant in Professional Services at AWS. He helps accelerate customers’ journeys to the cloud and achieve their digital transformation goals. In his free time, he enjoys playing sports, especially basketball and padel, spending time with family and friends, and learning about technology.

Ram Vittal is a Principal ML Solutions Architect at AWS. He has over 3 decades of experience architecting and building distributed, hybrid, and cloud applications. He is passionate about building secure, scalable, reliable AI/ML and big data solutions to help enterprise customers with their cloud adoption and optimization journey to improve their business outcomes. In his spare time, he rides motorcycle and walks with his three-year old sheep-a-doodle!

Liam Izar is Solutions Architect at AWS, where he helps customers work backward from business outcomes to develop innovative solutions on AWS. Liam has led multiple projects with customers migrating, transforming, and integrating data to solve business challenges. His core area of expertise includes technology strategy, data migrations, and machine learning. In his spare time, he enjoys boxing, hiking, and vacations with the family.

Read More