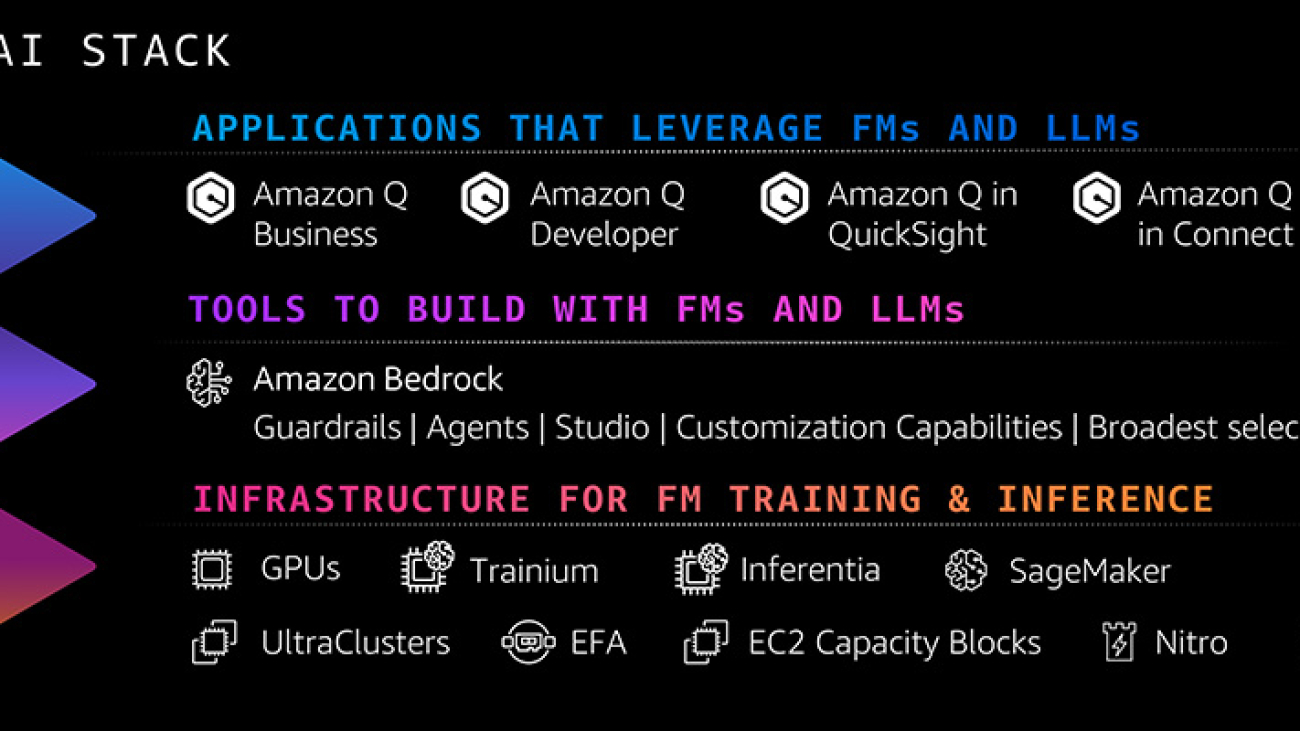
Imagine this—all employees relying on generative artificial intelligence (AI) to get their work done faster, every task becoming less mundane and more innovative, and every application providing a more useful, personal, and engaging experience. To realize this future, organizations need more than a single, powerful large language model (LLM) or chat assistant. They need a full range of capabilities to build and scale generative AI applications that are tailored to their business and use case —including apps with built-in generative AI, tools to rapidly experiment and build their own generative AI apps, a cost-effective and performant infrastructure, and security controls and guardrails. That’s why we are investing in a comprehensive generative AI stack. At the top layer, which includes generative AI-powered applications, we have Amazon Q, the most capable generative AI-powered assistant. The middle layer has Amazon Bedrock, which provides tools to easily and rapidly build, deploy, and scale generative AI applications leveraging LLMs and other foundation models (FMs). And at the bottom, there’s our resilient, cost-effective infrastructure layer, which includes chips purpose-built for AI, as well as Amazon SageMaker to build and run FMs. All of these services are secure by design, and we keep adding features that are critical to deploying generative AI applications tailored to your business. During the last 18 months, we’ve launched more than twice as many machine learning (ML) and generative AI features into general availability than the other major cloud providers combined. That’s another reason why hundreds of thousands of customers are now using our AI services.

Today at the AWS New York Summit, we announced a wide range of capabilities for customers to tailor generative AI to their needs and realize the benefits of generative AI faster. We’re enabling anyone to build generative AI applications with Amazon Q Apps by writing a simple natural language prompt—in seconds. We’re making it easier to leverage your data, supercharge agents, and quickly, securely, and responsibly deploy generative AI into production with new features in Amazon Bedrock. And we announced new partnerships with innovators like Scale AI to help you customize your applications quickly and easily.
Generative AI-powered apps transform business as usual
Generative AI democratizes information, gives more people the ability to create and innovate, and provides access to productivity-enhancing assistance that was never available before. That’s why we’re building generative AI-powered applications for everyone.
Amazon Q, which includes Amazon Q Developer and Amazon Q Business, is the most capable generative AI-powered assistant for software development and helping employees make better decisions—faster—leveraging their company’s data. Not only does Amazon Q generate the industry’s most accurate coding suggestions, it can also autonomously perform multistep tasks like upgrading Java applications and generating and implementing new features. Amazon Q is where developers need it on the AWS Management Console and in popular integrated development environments, including IntelliJ IDEA, Visual Studio, VS Code, and Amazon SageMaker Studio. You can securely customize Amazon Q Developer with your internal code base to get more relevant and useful recommendations for in-line coding and save even more time. For instance, National Australia Bank has seen increased acceptance rates of 60%, up from 50% and Amazon Prime developers have already seen a 30% increase in acceptance rates. Amazon Q can also help employees do more with the vast troves of data and information contained in their company’s documents, systems, and applications by answering questions, providing summaries, generating business intelligence (BI) dashboards and reports, and even generating applications that automate key tasks. We’re super excited about the productivity gains customers and partners have seen, with early signals that Amazon Q could help their employees become over 80% more productive at their jobs.
To enable all employees to create their own generative AI applications to automate tasks, today we announced the general availability of Amazon Q Apps, a feature of Amazon Q Business. With Amazon Q Apps employees can go from conversation to generative AI-powered app based on their company data in seconds. Users simply describe the application they want in a prompt and Amazon Q instantly generates it. Amazon Q also gives employees the option to generate an app from an existing conversation with a single click. During preview, we saw users generate applications for diverse tasks, including summarizing feedback, creating onboarding plans, writing copy, drafting memos, and many more. For instance, Druva, a data security provider, created an Amazon Q App to support their request for proposal (RFP) process by summarizing the required information almost instantly, reducing RFP response times by up to 25%.

In addition to Amazon Q Apps, which makes it easy for any employee to automate their individual tasks, today we announced AWS App Studio (preview), a generative AI-powered service that enables technical professionals such as IT project managers, data engineers, and enterprise architects to use natural language to create, deploy, and manage enterprise applications across an organization. With App Studio, a user simply describes the application they want, what they want it to do, and the data sources they want to integrate with, and App Studio builds an application in minutes that could have taken a professional developer days to build a similar application from scratch. App Studio’s generative AI-powered assistant eliminates the learning curve of typical low-code tools, accelerating the application creation process and simplifying common tasks like designing the UI, building workflows, and testing the application. Each application can be immediately scaled to thousands of users and is secure and fully managed by AWS, eliminating the need for any operational expertise.
New features and capabilities supercharge Amazon Bedrock—speeding development of generative AI apps
Amazon Bedrock is the fastest and easiest way to build and scale secure generative AI applications with the broadest selection of leading LLMs and FMs as well as easy-to-use capabilities for developers. Tens of thousands of customers are already using Amazon Bedrock, and it’s one of AWS’s fastest growing services over the last decade. For example, Ferrari is rapidly introducing new experiences for customers, dealers, and internal teams to run faster simulations, create new knowledge bases that assist dealers and technical users, enhance the racing fan experience, and create hyper-personalized vehicle recommendations for customers from the millions of options offered by Ferrari in seconds.
Since the start of 2024, we have announced the general availability of more features and capabilities in Amazon Bedrock than comparable services from other leading cloud providers to help customers get generative AI apps from proof of concept to production faster. This includes support for new industry-leading models from Anthropic, Meta, Mistral, and more, as well as the recent addition of Anthropic Claude 3.5 Sonnet, their most advanced model to date, which was made available immediately for Amazon Bedrock customers. Thousands of customers have already used Anthropic’s Claude 3.5 since its release.
Today, we announced some major new Amazon Bedrock innovations that enable you to:
Customize generative AI applications with your data. You can customize generative AI applications with your data to make them specific to your use case, your organization, and your industry:
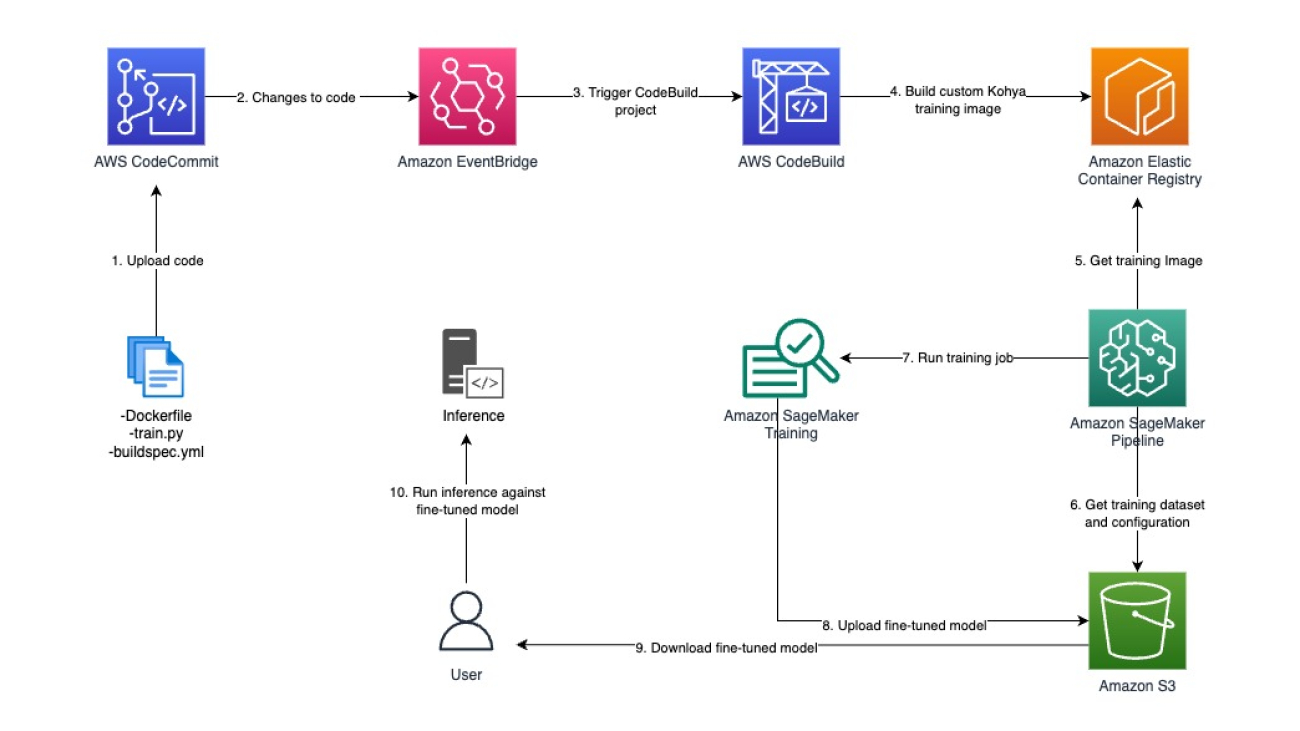
- Fine tune Anthropic’s Claude 3 Haiku in Amazon Bedrock – With Amazon Bedrock, you can privately and securely fine tune Amazon Titan, Cohere Command and Command Lite, and Meta Llama 2 models by providing labeled data in Amazon Simple Storage Service (Amazon S3) to specialize the model for your business and use case. Starting today, Amazon Bedrock is also the only fully managed service that provides you with the ability to fine tune Anthropic’s Claude 3 Haiku (in preview). Read more in the News Blog.
- Leverage even more data sources for Retrieval Augmented Generation (RAG) – With RAG, you can provide a model with new knowledge or up-to-date info from multiple sources, including document repositories, databases, and APIs. For example, the model might use RAG to retrieve search results from Amazon OpenSearch Service or documents from Amazon S3. Knowledge Bases for Amazon Bedrock fully manages this experience by connecting to your private data sources, including Amazon Aurora, Amazon OpenSearch Serverless, MongoDB, Pinecone, and Redis Enterprise Cloud. Today, we’ve expanded the list to include connectors for Salesforce, Confluence, and SharePoint (in preview), so organizations can leverage more business data to customize models for their specific needs. More knowledge base updates can be found in the News Blog.
- Get the fastest vector search available – To further enhance your RAG workflows, we’ve added vector search to some of our most popular data services, including OpenSearch Service and OpenSearch Serverless, Aurora, Amazon Relational Database Service (Amazon RDS), and more. Customers can co-locate vector data with operational data, reducing the overhead of managing another database. Today, we’re also excited to announce the general availability of vector search for Amazon MemoryDB. Amazon MemoryDB delivers the fastest vector search performance at the highest recall rates among popular vector databases on AWS, making it a great fit for use cases that require single-digit millisecond latency. For example, Amazon Advertising, IBISWorld, Mediaset, and other organizations are using it to deliver real-time semantic search, and Broadridge Financial is running RAG while delivering the same real-time response rates that their customers are accustomed to. You can use MemoryDB vector search standalone today, and soon, you’ll be able to access it through Knowledge Bases for Amazon Bedrock. Read more about MemoryDB in the News Blog.
Create more advanced, personalized customer experiences. With Agents for Amazon Bedrock, applications can take action, executing multistep tasks using company systems and data sources, making generative AI applications substantially more useful. Today, we’re adding key capabilities to Agents for Amazon Bedrock. Previously, agents were limited to taking action based on information from within a single session. Now agents can retain memory across multiple interactions to remember where you last left off and provide better recommendations based on prior interactions. For instance, in a flight booking application, a developer can create an agent that can remember the last time you traveled or that you opt for a vegetarian meal. Agents can also now interpret code to tackle complex data-driven use cases, such as data analysis, data visualization, text processing, solving equations, and optimization problems. For instance, an application user can ask to analyze the historical real estate prices across various zip codes to identify investment opportunities. Check out the News Blogs for more on these capabilities.

De-risk generative AI with Guardrails for Amazon Bedrock. Customers are concerned about hallucinations, where LLMs generate incorrect responses by conflating multiple pieces of information, providing incorrect information, or inventing new information. These results can misinform employees and customers and harm brands, limiting the usefulness of generative AI. Today, we’re adding contextual grounding checks in Guardrails for Amazon Bedrock to detect hallucinations in model responses for applications using RAG and summarization applications. Contextual grounding checks add to the industry-leading safety protection in Guardrails for Amazon Bedrock to make sure the LLM response is based on the right enterprise source data and evaluates the LLM response to confirm that it’s relevant to the user’s query or instruction. Contextual grounding checks can detect and filter over 75% hallucinated responses for RAG and summarization workloads. Read more about our commitments to responsible AI on the AWS Machine Learning Blog.

We’re excited to see how our customers leverage these ever-expanding capabilities of Amazon Bedrock to customize their generative AI applications for vertical industries and business functions. For example, Deloitte is using Amazon Bedrock’s advanced customization capabilities to build their C-Suite AI solution, designed specifically for CFOs. It leverages Deloitte’s proprietary data and industry depth across the finance function. C-Suite AI provides customized AI models tailored to the needs of CFOs, with applications that span critical finance areas, generative analytics for data-driven insights, contract intelligence, and investor relations support.
New partners and trainings help customers along the AI journey
Our extensive partner network helps our customers along the journey to realizing the potential of generative AI. For example, BrainBox AI—which worked with our generative AI competency partner, Caylent—developed its AI assistant ARIA on AWS to help reduce energy costs and emissions in buildings. We have been building out our partner network and training offerings to help customers move quickly from experiment to broad usage. Our AWS Generative AI Competency Partner Program is designed to identify, validate, and promote AWS Partners with demonstrated AWS technical expertise and proven customer success. Today 19 new partners joined the program, giving customers access to 60 Generative AI Competency Partners across the globe. New partners include C3.ai, Cognizant, IBM, and LG CNS, and we have significantly expanded customer offerings into Korea, Greater China, and LATAM, and Saudi Arabia.
We’re also announcing a new partnership with Scale AI, our first model customization and evaluation partner. Through this collaboration, enterprise and public sector organizations can use Scale GenAI Platform and Scale Donovan to evaluate their generative AI applications and further customize, configure, and fine tune models to ensure trust and high performance in production, all built on Amazon Bedrock. Scale AI upholds the highest standards of privacy and regulatory compliance working with some of the most stringent government customers, such as the US Department of Defense. Customers can access Scale AI through an engagement with the AWS Generative AI Innovation Center, a program offered by AWS that pairs you with AWS science and strategy experts, or through the AWS Marketplace.
To help upskill your workforce, we’re making a new interactive online learning experience available, AWS SimuLearn, that pairs generative AI-powered simulations and hands-on training, to help people learn how to translate business problems into technical solutions. This is part of our broader commitment to provide free cloud computing skills training to 29 million people worldwide by 2025. Today, we announced that we surpassed this milestone, more than a year ahead of schedule.
We’re giving customers tools that put the power of generative AI into all employees’ hands, providing more ways to create personalized and relevant generative AI-powered applications, and working on the tough problems like reducing hallucinations so more companies can gain benefits from generative AI. We’re energized by the progress our customers have already made in making generative AI a reality for their organizations and will continue to innovate on their behalf. To watch the New York Summit keynote for an in-depth look at these announcements, visit our AWS New York Summit page or learn more about our generative AI services.
About the author
 Swami Sivasubramanian is Vice President of Data and Machine Learning at AWS. In this role, Swami oversees all AWS Database, Analytics, and AI & Machine Learning services. His team’s mission is to help organizations put their data to work with a complete, end-to-end data solution to store, access, analyze, and visualize, and predict.

 Vasi Philomin is VP of Generative AI at AWS. He leads generative AI efforts, including Amazon Bedrock and Amazon Titan.
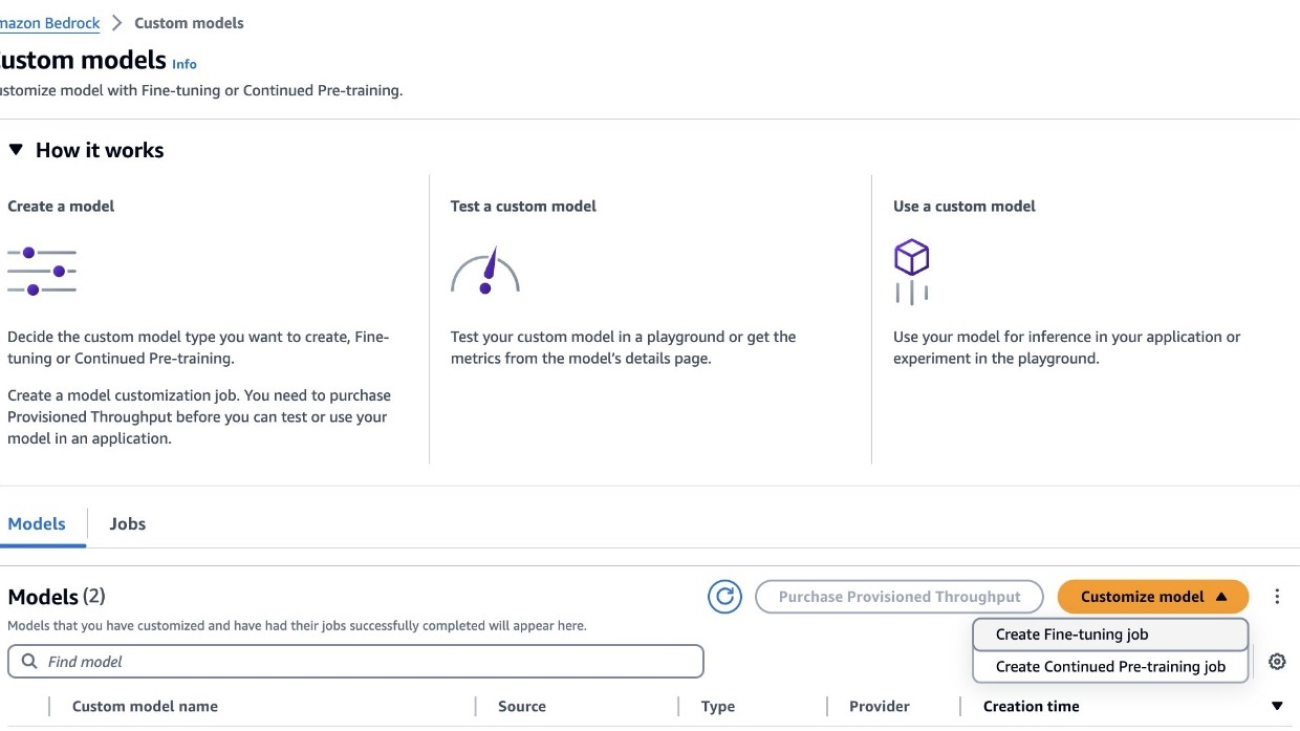


 Yanyan Zhang is a Senior Generative AI Data Scientist at Amazon Web Services, where she has been working on cutting-edge AI/ML technologies as a Generative AI Specialist, helping customers use generative AI to achieve their desired outcomes. Yanyan graduated from Texas A&M University with a PhD in Electrical Engineering. Outside of work, she loves traveling, working out, and exploring new things.
 Sovik Kumar Nath is an AI/ML and Generative AI Senior Solutions Architect with AWS. He has extensive experience designing end-to-end machine learning and business analytics solutions in finance, operations, marketing, healthcare, supply chain management, and IoT. He has double master’s degrees from the University of South Florida and University of Fribourg, Switzerland, and a bachelor’s degree from the Indian Institute of Technology, Kharagpur. Outside of work, Sovik enjoys traveling, taking ferry rides, and going on adventures.
 Carrie Wu is an Applied Scientist at Amazon Web Services, working on fine-tuning large language models for alignment to custom tasks and responsible AI. She graduated from Stanford University with a PhD in Management Science and Engineering. Outside of work, she loves reading, traveling, aerial yoga, ice skating, and spending time with her dog.
 Fang Liu is a principal machine learning engineer at Amazon Web Services, where he has extensive experience in building AI/ML products using cutting-edge technologies. He has worked on notable projects such as Amazon Transcribe and Amazon Bedrock. Fang Liu holds a master’s degree in computer science from Tsinghua University.


 Qingwei Li is a Machine Learning Specialist at Amazon Web Services. He received his Ph.D. in Operations Research after he broke his advisor’s research grant account and failed to deliver the Nobel Prize he promised. Currently he helps customers in the financial service and insurance industry build machine learning solutions on AWS. In his spare time, he likes reading and teaching.
 Joe Dunn is an AWS Principal Solutions Architect in Financial Services with over 20 years of experience in infrastructure architecture and migration of business-critical loads to AWS. He helps financial services customers to innovate on the AWS Cloud by providing solutions using AWS products and services.
 Raghvender Arni (Arni) is a part of the AWS Generative AI GTM team and leads the Cross-Portfolio team which is a multidisciplinary group of AI specialists dedicated to accelerating and optimizing generative AI adoption across industries.
 Simon Zamarin is an AI/ML Solutions Architect whose main focus is helping customers extract value from their data assets. In his spare time, Simon enjoys spending time with family, reading sci-fi, and working on various DIY house projects.
 Scott Mullins is Managing Director and General Manger of AWS’ Worldwide Financial Services organization. In this role, Scott is responsible for AWS’ relationships with systemically important financial institutions, and for leading the development and execution of AWS’ strategic initiatives across Banking, Payments, Capital Markets, and Insurance around the world. Prior to joining AWS in 2014, Scott’s 28-year career in financial services included roles at JPMorgan Chase, Nasdaq, Merrill Lynch, and Penson Worldwide. At Nasdaq, Scott was the Product Manager responsible for building the exchange’s first cloud-based solution, FinQloud. Before joining NASDAQ, Scott ran Surveillance and Trading Compliance for one of the nation’s largest clearing broker-dealers, with responsibility for regulatory response, emerging regulatory initiatives, and compliance matters related to the firm’s trading and execution services divisions. Prior to his roles in regulatory compliance, Scott spent 10 years as an equity trader. A graduate of Texas A&M University, Scott is a subject matter expert quoted in industry media, and a recognized speaker at industry events..


 Qaish Kanchwala is a ML Engineering Manager and ML Architect at The Weather Company. He has worked on every step of the machine learning lifecycle and designs systems to enable AI use cases. In his spare time, Qaish likes to cook new food and watch movies.
 Chezsal Kamaray is a Senior Solutions Architect within the High-Tech Vertical at Amazon Web Services. She works with enterprise customers, helping to accelerate and optimize their workload migration to the AWS Cloud. She is passionate about management and governance in the cloud and helping customers set up a landing zone that is aimed at long-term success. In her spare time, she does woodworking and tries out new recipes while listening to music.
 Anila Joshi has more than a decade of experience building AI solutions. As an Applied Science Manager at the AWS Generative AI Innovation Center, Anila pioneers innovative applications of AI that push the boundaries of possibility and guides customers to strategically chart a course into the future of AI.
 Kamran Razi is a Machine Learning Engineer at the Amazon Generative AI Innovation Center. With a passion for creating use case-driven solutions, Kamran helps customers harness the full potential of AWS AI/ML services to address real-world business challenges. With a decade of experience as a software developer, he has honed his expertise in diverse areas like embedded systems, cybersecurity solutions, and industrial control systems. Kamran holds a PhD in Electrical Engineering from Queen’s University.
 Shuja Sohrawardy is a Senior Manager at AWS’s Generative AI Innovation Center. For over 20 years, Shuja has utilized his technology and financial services acumen to transform financial services enterprises to meet the challenges of a highly competitive and regulated industry. Over the past 4 years at AWS, Shuja has used his deep knowledge in machine learning, resiliency, and cloud adoption strategies, which has resulted in numerous customer success journeys. Shuja holds a BS in Computer Science and Economics from New York University and an MS in Executive Technology Management from Columbia University.
 Francisco Calderon is a Data Scientist at the Generative AI Innovation Center (GAIIC). As a member of the GAIIC, he helps discover the art of the possible with AWS customers using generative AI technologies. In his spare time, Francisco likes playing music and guitar, playing soccer with his daughters, and enjoying time with his family.


 Sathya Paduchuri is a Senior Partner Solution Architect(PSA) at Amazon Web Services. Sathya helps partners run optimised workloads on AWS, build and develop their cloud practice(s) and develop new offerings.
 Mark Ross is a Chief Architect at Eviden and has specialised in AWS for the past 8 years, gaining and maintaining all AWS certifications since 2021. Mark is passionate about helping customers build, migrate to and exploit AWS. Mark has created and grown a large AWS community within Eviden.