Method enables machine-checkable proofs of SAT solvers’ decisions on incremental SAT problems, in which problem constraints are gradually imposed over time.Read More
Announcing Rekogniton Custom Moderation: Enhance accuracy of pre-trained Rekognition moderation models with your data
Companies increasingly rely on user-generated images and videos for engagement. From ecommerce platforms encouraging customers to share product images to social media companies promoting user-generated videos and images, using user content for engagement is a powerful strategy. However, it can be challenging to ensure that this user-generated content is consistent with your policies and fosters a safe online community for your users.
Many companies currently depend on human moderators or respond reactively to user complaints to manage inappropriate user-generated content. These approaches don’t scale to effectively moderate millions of images and videos at sufficient quality or speed, which leads to a poor user experience, high costs to achieve scale, or even potential harm to brand reputation.
In this post, we discuss how to use the Custom Moderation feature in Amazon Rekognition to enhance the accuracy of your pre-trained content moderation API.
Content moderation in Amazon Rekognition
Amazon Rekognition is a managed artificial intelligence (AI) service that offers pre-trained and customizable computer vision capabilities to extract information and insights from images and videos. One such capability is Amazon Rekognition Content Moderation, which detects inappropriate or unwanted content in images and videos. Amazon Rekognition uses a hierarchical taxonomy to label inappropriate or unwanted content with 10 top-level moderation categories (such as violence, explicit, alcohol, or drugs) and 35 second-level categories. Customers across industries such as ecommerce, social media, and gaming can use content moderation in Amazon Rekognition to protect their brand reputation and foster safe user communities.
By using Amazon Rekognition for image and video moderation, human moderators have to review a much smaller set of content, typically 1–5% of the total volume, already flagged by the content moderation model. This enables companies to focus on more valuable activities and still achieve comprehensive moderation coverage at a fraction of their existing cost.
Introducing Amazon Rekognition Custom Moderation
You can now enhance the accuracy of the Rekognition moderation model for your business-specific data with the Custom Moderation feature. You can train a custom adapter with as few as 20 annotated images in less than 1 hour. These adapters extend the capabilities of the moderation model to detect images used for training with higher accuracy. For this post, we use a sample dataset containing both safe images and images with alcoholic beverages (considered unsafe) to enhance the accuracy of the alcohol moderation label.
The unique ID of the trained adapter can be provided to the existing DetectModerationLabels API operation to process images using this adapter. Each adapter can only be used by the AWS account that was used for training the adapter, ensuring that the data used for training remains safe and secure in that AWS account. With the Custom Moderation feature, you can tailor the Rekognition pre-trained moderation model for improved performance on your specific moderation use case, without any machine learning (ML) expertise. You can continue to enjoy the benefits of a fully managed moderation service with a pay-per-use pricing model for Custom Moderation.
Solution overview
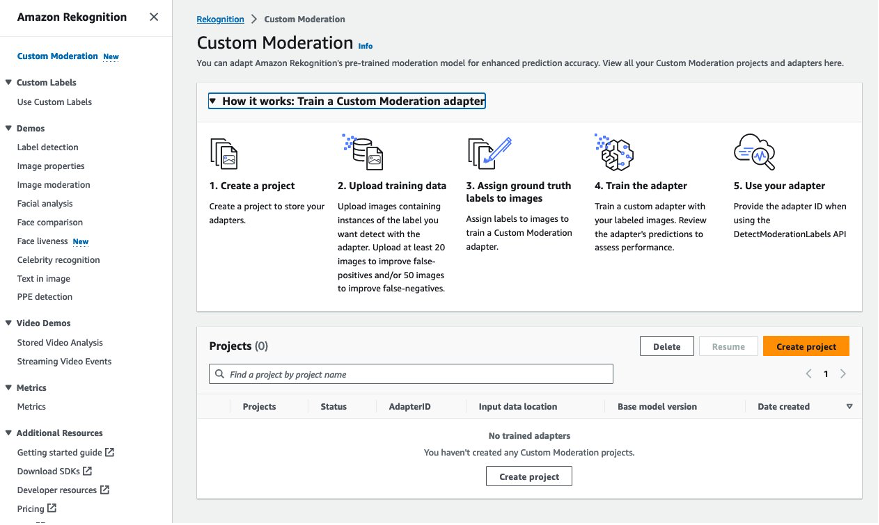
Training a custom moderation adapter involves five steps that you can complete using the AWS Management Console or the API interface:
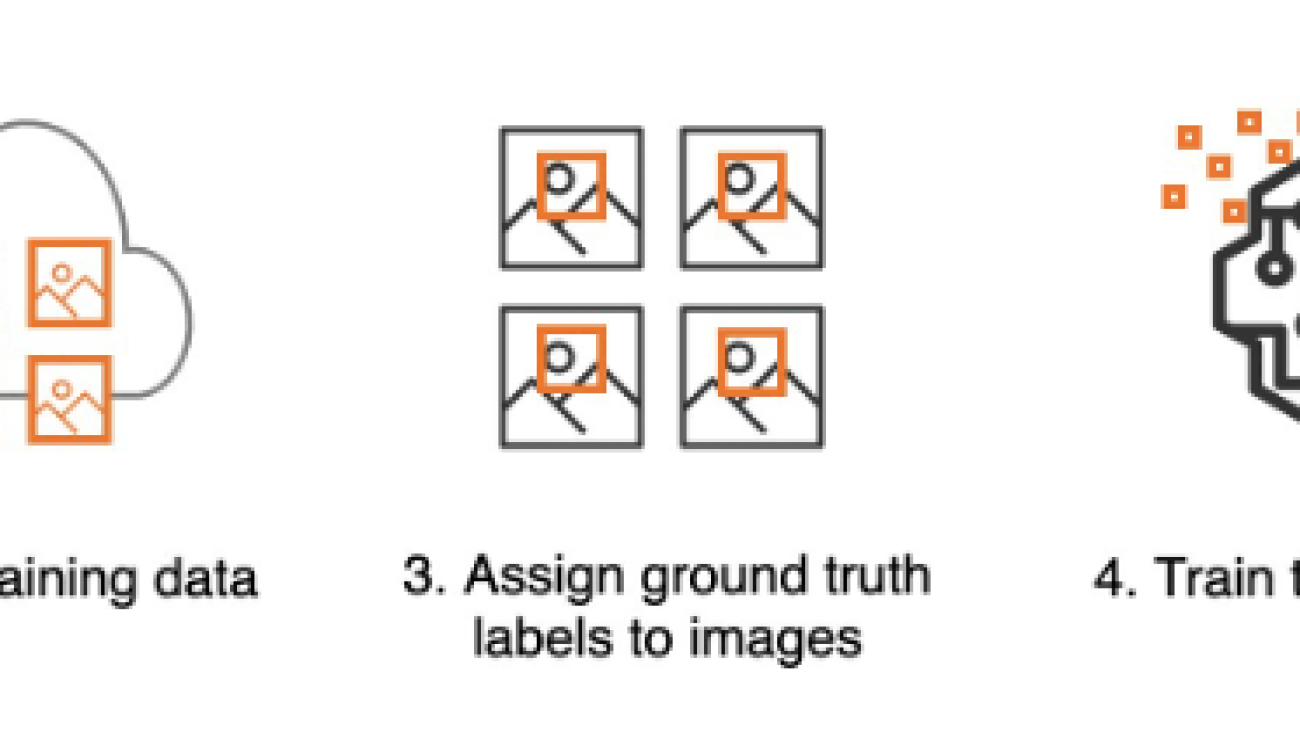
- Create a project
- Upload the training data
- Assign ground truth labels to images
- Train the adapter
- Use the adapter
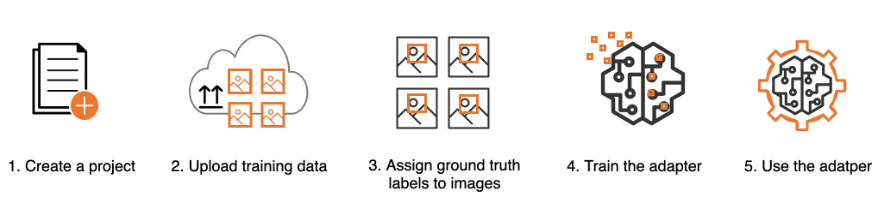
Let’s walk through these steps in more detail using the console.
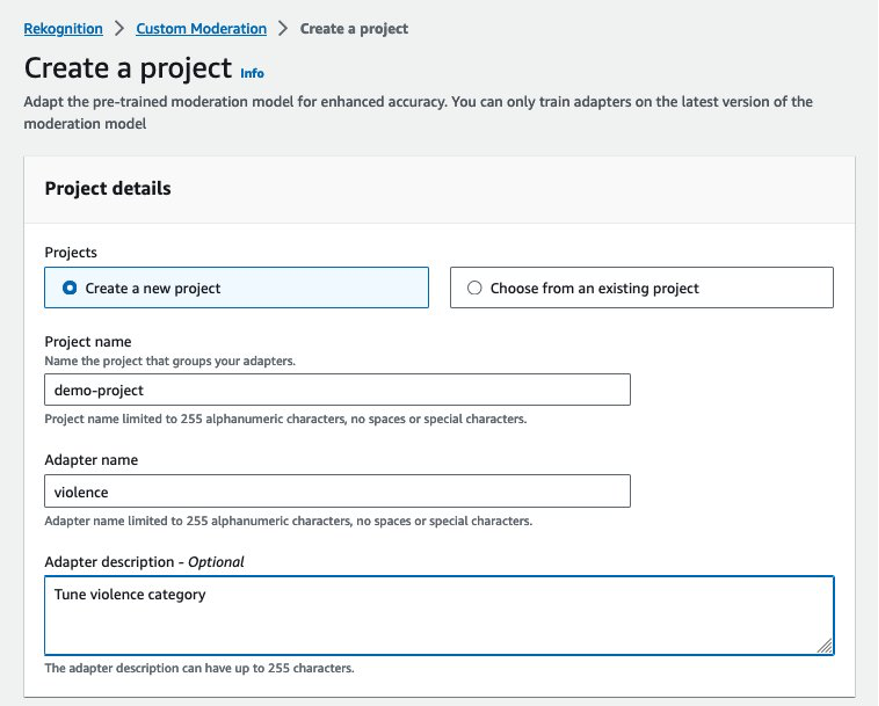
Create a project
A project is a container to store your adapters. You can train multiple adapters within a project with different training datasets to assess which adapter performs best for your specific use case. To create your project, complete the following steps:
- On the Amazon Rekognition console, choose Custom Moderation in the navigation pane.
- Choose Create project.
- For Project name, enter a name for your project.
- For Adapter name, enter a name for your adapter.
- Optionally, enter a description for your adapter.
Upload training data
You can begin with as few as 20 sample images to adapt the moderation model to detect fewer false positives (images that are appropriate for your business but are flagged by the model with a moderation label). To reduce false negatives (images that are inappropriate for your business but don’t get flagged with a moderation label), you are required to start with 50 sample images.
You can select from the following options to provide the image datasets for adapter training:
- Import a manifest file with labeled images as per the Amazon Rekognition content moderation taxonomy.
- Import images from an Amazon Simple Storage Service (Amazon S3) bucket and provide labels. Make sure that the AWS Identity and Access Management (IAM) user or role has the appropriate access permissions to the specified S3 bucket folder.
- Upload images from your computer and provide labels.
Complete the following steps:
- For this post, select Import images from S3 bucket and enter your S3 URI.
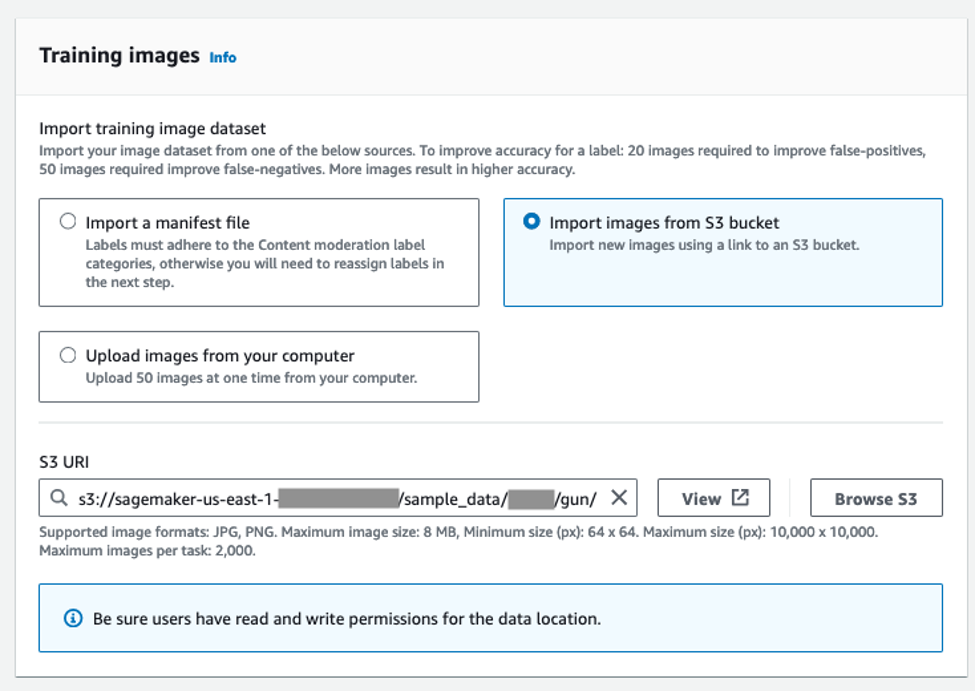
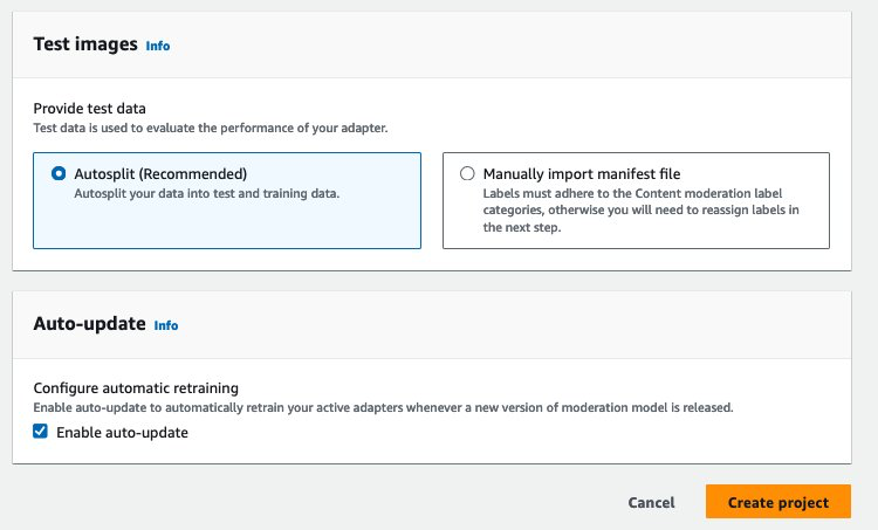
Like any ML training process, training a Custom Moderation adapter in Amazon Rekognition requires two separate datasets: one for training the adapter and another for evaluating the adapter. You can either upload a separate test dataset or choose to automatically split your training dataset for training and testing.
- For this post, select Autosplit.
- Select Enable auto-update to ensure that the system automatically retrains the adapter when a new version of the content moderation model is launched.
- Choose Create project.
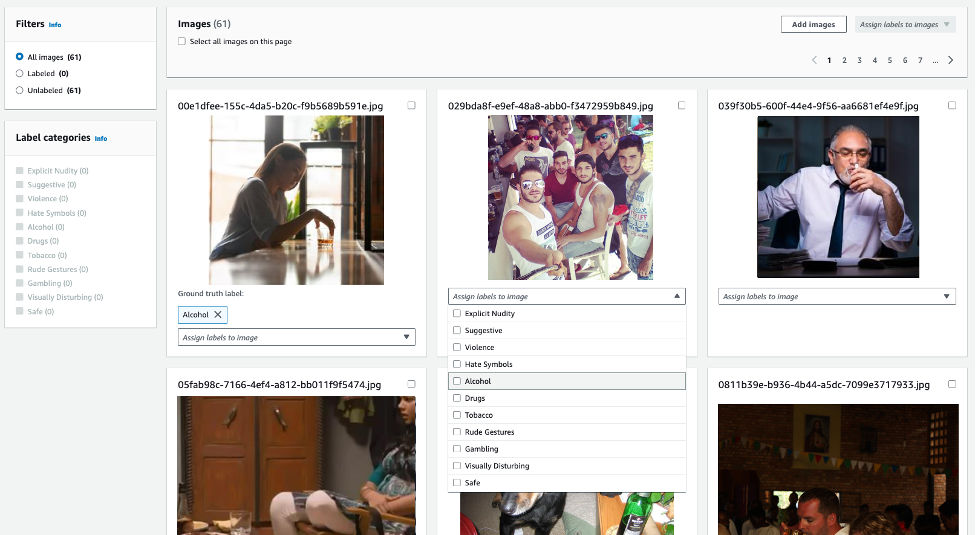
Assign ground truth labels to images
If you uploaded unannotated images, you can use the Amazon Rekognition console to provide image labels as per the moderation taxonomy. In the following example, we train an adapter to detect hidden alcohol with higher accuracy, and label all such images with the label alcohol. Images not considered inappropriate can be labeled as Safe.
Train the adapter
After you label all the images, choose Start training to initiate the training process. Amazon Rekognition will use the uploaded image datasets to train an adapter model for enhanced accuracy on the specific type of images provided for training.
After the custom moderation adapter is trained, you can view all the adapter details (adapterID, test and training manifest files) in the Adapter performance section.
The Adapter performance section displays improvements in false positives and false negatives when compared to the pre-trained moderation model. The adapter we trained to enhance the detection of the alcohol label reduces the false negative rate in test images by 73%. In other words, the adapter now accurately predicts the alcohol moderation label for 73% more images compared to the pre-trained moderation model. However, no improvement is observed in false positives, as no false positive samples were used for training.

Use the adapter
You can perform inference using the newly trained adapter to achieve enhanced accuracy. To do this, call the Amazon Rekognition DetectModerationLabel API with an additional parameter, ProjectVersion, which is the unique AdapterID of the adapter. The following is a sample command using the AWS Command Line Interface (AWS CLI):
The following is a sample code snippet using the Python Boto3 library:
Best practices for training
To maximize the performance of your adapter, the following best practices are recommended for training the adapter:
- The sample image data should capture the representative errors that you want to improve the moderation model accuracy for
- Instead of only bringing in error images for false positives and false negatives, you can also provide true positives and true negatives for improved performance
- Supply as many annotated images as possible for training
Conclusion
In this post, we presented an in-depth overview of the new Amazon Rekognition Custom Moderation feature. Furthermore, we detailed the steps for performing training using the console, including best practices for optimal results. For additional information, visit the Amazon Rekognition console and explore the Custom Moderation feature.
Amazon Rekognition Custom Moderation is now generally available in all AWS Regions where Amazon Rekognition is available.
Learn more about content moderation on AWS. Take the first step towards streamlining your content moderation operations with AWS.
About the Authors
 Shipra Kanoria is a Principal Product Manager at AWS. She is passionate about helping customers solve their most complex problems with the power of machine learning and artificial intelligence. Before joining AWS, Shipra spent over 4 years at Amazon Alexa, where she launched many productivity-related features on the Alexa voice assistant.
 Aakash Deep is a Software Development Engineering Manager based in Seattle. He enjoys working on computer vision, AI, and distributed systems. His mission is to enable customers to address complex problems and create value with AWS Rekognition. Outside of work, he enjoys hiking and traveling.
 Lana Zhang is a Senior Solutions Architect at AWS WWSO AI Services team, specializing in AI and ML for Content Moderation, Computer Vision, Natural Language Processing and Generative AI. With her expertise, she is dedicated to promoting AWS AI/ML solutions and assisting customers in transforming their business solutions across diverse industries, including social media, gaming, e-commerce, media, advertising & marketing.
Defect detection in high-resolution imagery using two-stage Amazon Rekognition Custom Labels models
High-resolution imagery is very prevalent in today’s world, from satellite imagery to drones and DLSR cameras. From this imagery, we can capture damage due to natural disasters, anomalies in manufacturing equipment, or very small defects such as defects on printed circuit boards (PCBs) or semiconductors. Building anomaly detection models using high-resolution imagery can be challenging because modern computer vision models typically resize images to a lower resolution to fit into memory for training and running inference. Reducing the image resolution significantly means that visual information relating to the defect is degraded or completely lost.
One approach to overcome these challenges is to build two-stage models. Stage 1 models detect a region of interest, and Stage 2 models detect defects on the cropped region of interest, thereby maintaining sufficient resolution for small detects.
In this post, we go over how to build an effective two-stage defect detection system using Amazon Rekognition Custom Labels and compare results for this specific use case with one-stage models. Note that several one-stage models are effective even at lower or resized image resolutions, and others may accommodate large images in smaller batches.
Solution overview
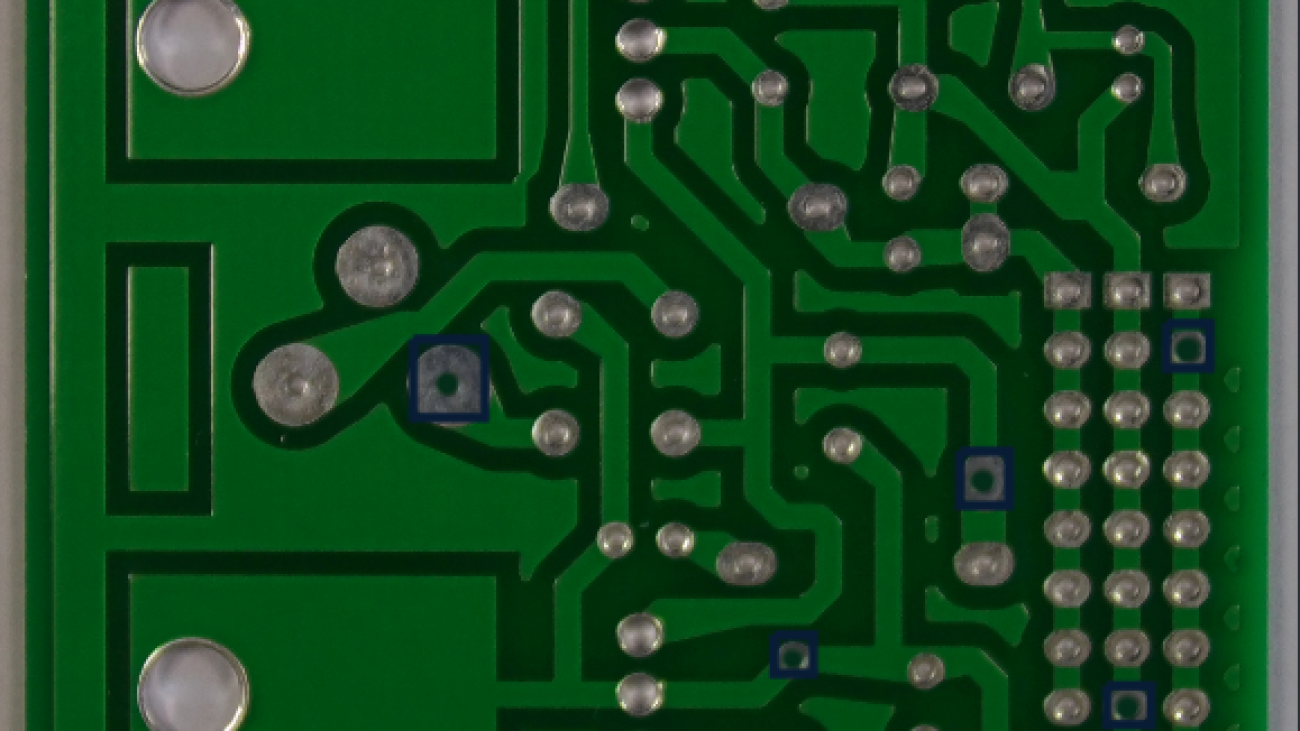
For our use case, we use a dataset of images of PCBs with synthetically generated missing hole pins, as shown in the following example.


We use this dataset to demonstrate that a one-stage approach using object detection results in subpar detection performance for the missing hole pin defects. A two-step model is preferred, in which we use Rekognition Custom Labels first for object detection to identify the pins and then a second-stage model to classify cropped images of the pins into pins with missing holes or normal pins.
The training process for a Rekognition Custom Labels model consists of several steps, as illustrated in the following diagram.

First, we use Amazon Simple Storage Service (Amazon S3) to store the image data. The data is ingested in Amazon Sagemaker Jupyter notebooks, where typically a data scientist will inspect the images and preprocess them, removing any images that are of poor quality such as blurred images or poor lighting conditions, and resize or crop the images. Then data is split into training and test sets, and Amazon SageMaker Ground Truth labeling jobs are run to label the sets of images and output a train and test manifest file. The manifest files are used by Rekognition Custom Labels for training.
One-stage model approach
The first approach we take to identifying missing holes on the PCB is to label the missing holes and train an object detection model to identify the missing holes. The following is an image example from the dataset.

We train a model with a dataset with 95 images used as training and 20 images used for testing. The following table summarizes our results.
| Evaluation Results | |||||
| F1 Score | Average Precision | Overall Recall | |||
| 0.468 | 0.750 | 0.340 | |||
| Training Time | Training Dataset | Testing Dataset | |||
| Trained in 1.791 hours | 1 label, 95 images | 1 label, 20 images | |||
| Per Label Performance | |||||
| Label Name | F1 Score | Test Images | Precision | Recall | Assumed Threshold |
missing_hole |
0.468 | 20 | 0.750 | 0.340 | 0.053 |
The resulting model has high precision but low recall, meaning that when we localize a region for a missing hole, we’re usually correct, but we’re missing a lot of missing holes that are present on the PCB. To build an effective defect detection system, we need to improve recall. The low performance of this model may be due to the defects being small on this high-resolution image of the PCB, so the model has no reference of a healthy pin.
Next, we explore splitting the image into four or six crops depending on the PCB size and labeling both healthy and missing holes. The following is an example of the resulting cropped image.
We train a model with 524 images used as training and 106 images used for testing. We maintain the same PCBs used in train and test as the full board model. The results for cropped healthy pins vs. missing holes are shown in the following table.
| Evaluation Results | |||||
| F1 Score | Average Precision | Overall Recall | |||
| 0.967 | 0.989 | 0.945 | |||
| Training Time | Training Dataset | Testing Dataset | |||
| Trained in 2.118 hours | 2 labels, 524 images | 2 labels, 106 images | |||
| Per Label Performance | |||||
| Label Name | F1 Score | Test Images | Precision | Recall | Assumed Threshold |
missing_hole |
0.949 | 42 | 0.980 | 0.920 | 0.536 |
pin |
0.984 | 106 | 0.998 | 0.970 | 0.696 |
Both precision and recall have improved significantly. Training the model with zoomed-in cropped images and a reference to the model for healthy pins helped. However, recall is still at 92%, meaning that we would still miss 8% of the missing holes and let defects go by unnoticed.
Next, we explore a two-stage model approach in which we can improve the model performance further.
Two-stage model approach
For the two-stage model, we train two models: one for detecting pins and one for detecting if the pin is missing or not on zoomed-in cropped images of the pin. The following is an image from the pin detection dataset.

The data is similar to our previous experiment, in which we cropped the PCB into four or six cropped images. This time, we label all pins and don’t make any distinctions if the pin has a missing hole or not. We train this model with 522 images and test with 108 images, maintaining the same train/test split as previous experiments. The results are shown in the following table.
| Evaluation Results | |||||
| F1 Score | Average Precision | Overall Recall | |||
| 1.000 | 0.999 | 1.000 | |||
| Training Time | Training Dataset | Testing Dataset | |||
| Trained in 1.581 hours | 1 label, 522 images | 1 label, 108 images | |||
| Per Label Performance | |||||
| Label Name | F1 Score | Test Images | Precision | Recall | Assumed Threshold |
pin |
1.000 | 108 | 0.999 | 1.000 | 0.617 |
The model detects the pins perfectly on this synthetic dataset.
Next, we build the model to make the distinction for missing holes. We use cropped images of the holes to train the second stage of the model, as shown in the following examples. This model is separate from the previous models because it’s a classification model and will be focused on the narrow task of determining if the pin has a missing hole.


We train this second-stage model on 16,624 images and test on 3,266, maintaining the same train/test splits as the previous experiments. The following table summarizes our results.
| Evaluation Results | |||||
| F1 Score | Average Precision | Overall Recall | |||
| 1.000 | 1.000 | 1.000 | |||
| Training Time | Training Dataset | Testing Dataset | |||
| Trained in 6.660 hours | 2 labels, 16,624 images | 2 labels, 3,266 images | |||
| Per Label Performance | |||||
| Label Name | F1 Score | Test Images | Precision | Recall | Assumed Threshold |
anomaly |
1.000 | 88 | 1.000 | 1.000 | 0.960 |
normal |
1.000 | 3,178 | 1.000 | 1.000 | 0.996 |
Again, we receive perfect precision and recall on this synthetic dataset. Combining the previous pin detection model with this second-stage missing hole classification model, we can build a model that outperforms any single-stage model.
The following table summarizes the experiments we conducted.
| Experiment | Type | Description | F1 Score | Precision | Recall |
| 1 | One-stage model | Object detection model to detect missing holes on full images | 0.468 | 0.75 | 0.34 |
| 2 | One-stage model | Object detection model to detect healthy pins and missing holes on cropped images | 0.967 | 0.989 | 0.945 |
| 3 | Two-stage model | Stage 1: Object detection on all pins | 1.000 | 0.999 | 1.000 |
| Stage 2: Image classification of healthy pin or missing holes | 1.000 | 1.000 | 1.000 | ||
| End-to-end average | 1.000 | 0.9995 | 1.000 |
Inference pipeline
You can use the following architecture to deploy the one-stage and two-stage models that we described in this post. The following main components are involved:
- Amazon API Gateway
- AWS Lambda
- An Amazon Rekognition custom endpoint
For one-stage models, you can send an input image to the API Gateway endpoint, followed by Lambda for any basic image preprocessing, and route to the Rekognition Custom Labels trained model endpoint. In our experiments, we explored one-stage models that can detect only missing holes, and missing holes and healthy pins.

For two-stage models, you can similarly send an image to the API Gateway endpoint, followed by Lambda. Lambda acts as an orchestrator that first calls the object detection model (trained using Rekognition Custom Labels), which generates the region of interest. The original image is then cropped in the Lambda function, and sent to another Rekognition Custom Labels classification model for detecting defects in each cropped image.

Conclusion
In this post, we trained one- and two-stage models to detect missing holes in PCBs using Rekognition Custom Labels. We reported results for various models; in our case, two-stage models outperformed other variants. We encourage customers with high-resolution imagery from other domains to test model performance with one- and two-stage models. Additionally, consider the following ways to expand the solution:
- Sliding window crops for your actual datasets
- Reusing your object detection models in the same pipeline
- Pre-labeling workflows using bounding box predictions
About the authors
 Andreas Karagounis is a Data Science Manager at Accenture. He holds a masters in Computer Science from Brown University. He has a background in computer vision and works with customers to solve their business challenges using data science and machine learning.
 Yogesh Chaturvedi is a Principal Solutions Architect at AWS with a focus in computer vision. He works with customers to address their business challenges using cloud technologies. Outside of work, he enjoys hiking, traveling, and watching sports.
 Shreyas Subramanian is a Principal Data Scientist, and helps customers by using machine learning to solve their business challenges using the AWS platform. Shreyas has a background in large-scale optimization and machine learning, and in the use of machine learning and reinforcement learning for accelerating optimization tasks.
 Selimcan “Can” Sakar is a cloud-first developer and Solutions Architect at AWS Accenture Business Group with a focus on emerging technologies such as GenAI, ML, and blockchain. When he isn’t watching models converge, he can be seen biking or playing the clarinet.

Automatically redact PII for machine learning using Amazon SageMaker Data Wrangler
Customers increasingly want to use deep learning approaches such as large language models (LLMs) to automate the extraction of data and insights. For many industries, data that is useful for machine learning (ML) may contain personally identifiable information (PII). To ensure customer privacy and maintain regulatory compliance while training, fine-tuning, and using deep learning models, it’s often necessary to first redact PII from source data.
This post demonstrates how to use Amazon SageMaker Data Wrangler and Amazon Comprehend to automatically redact PII from tabular data as part of your machine learning operations (ML Ops) workflow.
Problem: ML data that contains PII
PII is defined as any representation of information that permits the identity of an individual to whom the information applies to be reasonably inferred by either direct or indirect means. PII is information that either directly identifies an individual (name, address, social security number or other identifying number or code, telephone number, email address, and so on) or information that an agency intends to use to identify specific individuals in conjunction with other data elements, namely, indirect identification.
Customers in business domains such as financial, retail, legal, and government deal with PII data on a regular basis. Due to various government regulations and rules, customers have to find a mechanism to handle this sensitive data with appropriate security measures to avoid regulatory fines, possible fraud, and defamation. PII redaction is the process of masking or removing sensitive information from a document so it can be used and distributed, while still protecting confidential information.
Businesses need to deliver delightful customer experiences and better business outcomes by using ML. Redaction of PII data is often a key first step to unlock the larger and richer data streams needed to use or fine-tune generative AI models, without worrying about whether their enterprise data (or that of their customers) will be compromised.
Solution overview
This solution uses Amazon Comprehend and SageMaker Data Wrangler to automatically redact PII data from a sample dataset.
Amazon Comprehend is a natural language processing (NLP) service that uses ML to uncover insights and relationships in unstructured data, with no managing infrastructure or ML experience required. It provides functionality to locate various PII entity types within text, for example names or credit card numbers. Although the latest generative AI models have demonstrated some PII redaction capability, they generally don’t provide a confidence score for PII identification or structured data describing what was redacted. The PII functionality of Amazon Comprehend returns both, enabling you to create redaction workflows that are fully auditable at scale. Additionally, using Amazon Comprehend with AWS PrivateLink means that customer data never leaves the AWS network and is continuously secured with the same data access and privacy controls as the rest of your applications.
Similar to Amazon Comprehend, Amazon Macie uses a rules-based engine to identify sensitive data (including PII) stored in Amazon Simple Storage Service (Amazon S3). However, its rules-based approach relies on having specific keywords that indicate sensitive data located close to that data (within 30 characters). In contrast, the NLP-based ML approach of Amazon Comprehend uses sematic understanding of longer chunks of text to identify PII, making it more useful for finding PII within unstructured data.
Additionally, for tabular data such as CSV or plain text files, Macie returns less detailed location information than Amazon Comprehend (either a row/column indicator or a line number, respectively, but not start and end character offsets). This makes Amazon Comprehend particularly helpful for redacting PII from unstructured text that may contain a mix of PII and non-PII words (for example, support tickets or LLM prompts) that is stored in a tabular format.
Amazon SageMaker provides purpose-built tools for ML teams to automate and standardize processes across the ML lifecycle. With SageMaker MLOps tools, teams can easily prepare, train, test, troubleshoot, deploy, and govern ML models at scale, boosting productivity of data scientists and ML engineers while maintaining model performance in production. The following diagram illustrates the SageMaker MLOps workflow.
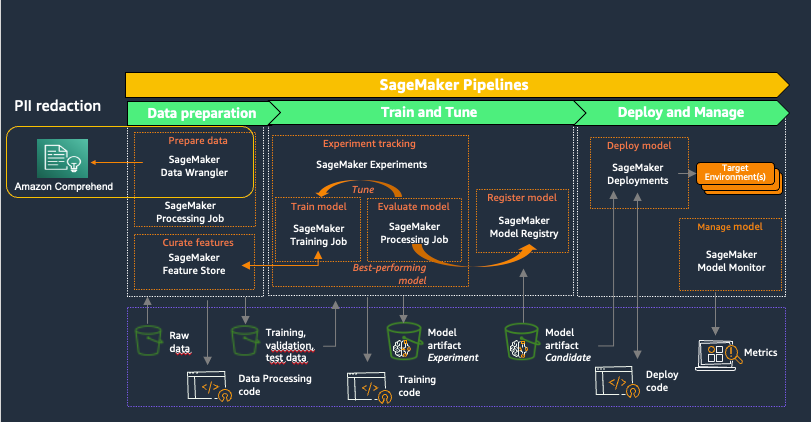
SageMaker Data Wrangler is a feature of Amazon SageMaker Studio that provides an end-to-end solution to import, prepare, transform, featurize, and analyze datasets stored in locations such as Amazon S3 or Amazon Athena, a common first step in the ML lifecycle. You can use SageMaker Data Wrangler to simplify and streamline dataset preprocessing and feature engineering by either using built-in, no-code transformations or customizing with your own Python scripts.
Using Amazon Comprehend to redact PII as part of a SageMaker Data Wrangler data preparation workflow keeps all downstream uses of the data, such as model training or inference, in alignment with your organization’s PII requirements. You can integrate SageMaker Data Wrangler with Amazon SageMaker Pipelines to automate end-to-end ML operations, including data preparation and PII redaction. For more details, refer to Integrating SageMaker Data Wrangler with SageMaker Pipelines. The rest of this post demonstrates a SageMaker Data Wrangler flow that uses Amazon Comprehend to redact PII from text stored in tabular data format.
This solution uses a public synthetic dataset along with a custom SageMaker Data Wrangler flow, available as a file in GitHub. The steps to use the SageMaker Data Wrangler flow to redact PII are as follows:
- Open SageMaker Studio.
- Download the SageMaker Data Wrangler flow.
- Review the SageMaker Data Wrangler flow.
- Add a destination node.
- Create a SageMaker Data Wrangler export job.
This walkthrough, including running the export job, should take 20–25 minutes to complete.
Prerequisites
For this walkthrough, you should have the following:
- An AWS account.
- A SageMaker Studio domain and user. For details on setting these up, refer to Onboard to Amazon SageMaker Domain Using Quick setup. The SageMaker Studio execution role must have permission to call the Amazon Comprehend DetectPiiEntities action.
- An S3 bucket for the redacted results.
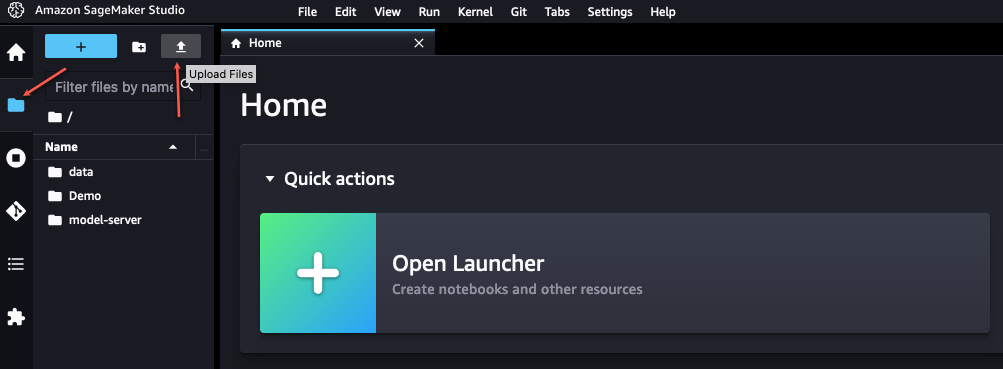
Open SageMaker Studio
To open SageMaker Studio, complete the following steps:
- On the SageMaker console, choose Studio in the navigation pane.
- Choose the domain and user profile
- Choose Open Studio.
To get started with the new capabilities of SageMaker Data Wrangler, it’s recommended to upgrade to the latest release.
Download the SageMaker Data Wrangler flow
You first need to retrieve the SageMaker Data Wrangler flow file from GitHub and upload it to SageMaker Studio. Complete the following steps:
- Navigate to the SageMaker Data Wrangler
redact-pii.flowfile on GitHub. - On GitHub, choose the download icon to download the flow file to your local computer.
- In SageMaker Studio, choose the file icon in the navigation pane.
- Choose the upload icon, then choose
redact-pii.flow.
Review the SageMaker Data Wrangler flow
In SageMaker Studio, open redact-pii.flow. After a few minutes, the flow will finish loading and show the flow diagram (see the following screenshot). The flow contains six steps: an S3 Source step followed by five transformation steps.

On the flow diagram, choose the last step, Redact PII. The All Steps pane opens on the right and shows a list of the steps in the flow. You can expand each step to view details, change parameters, and potentially add custom code.
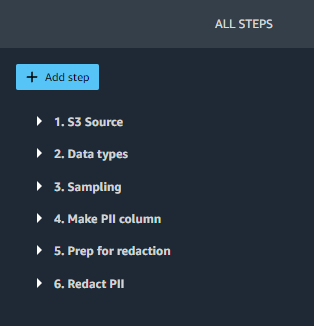
Let’s walk through each step in the flow.
Steps 1 (S3 Source) and 2 (Data types) are added by SageMaker Data Wrangler whenever data is imported for a new flow. In S3 Source, the S3 URI field points to the sample dataset, which is a CSV file stored in Amazon S3. The file contains roughly 116,000 rows, and the flow sets the value of the Sampling field to 1,000, which means that SageMaker Data Wrangler will sample 1,000 rows to display in the user interface. Data types sets the data type for each column of imported data.
Step 3 (Sampling) sets the number of rows SageMaker Data Wrangler will sample for an export job to 5,000, via the Approximate sample size field. Note that this is different from the number of rows sampled to display in the user interface (Step 1). To export data with more rows, you can increase this number or remove Step 3.
Steps 4, 5, and 6 use SageMaker Data Wrangler custom transforms. Custom transforms allow you to run your own Python or SQL code within a Data Wrangler flow. The custom code can be written in four ways:
- In SQL, using PySpark SQL to modify the dataset
- In Python, using a PySpark data frame and libraries to modify the dataset
- In Python, using a pandas data frame and libraries to modify the dataset
- In Python, using a user-defined function to modify a column of the dataset
The Python (pandas) approach requires your dataset to fit into memory and can only be run on a single instance, limiting its ability to scale efficiently. When working in Python with larger datasets, we recommend using either the Python (PySpark) or Python (user-defined function) approach. SageMaker Data Wrangler optimizes Python user-defined functions to provide performance similar to an Apache Spark plugin, without needing to know PySpark or Pandas. To make this solution as accessible as possible, this post uses a Python user-defined function written in pure Python.
Expand Step 4 (Make PII column) to see its details. This step combines different types of PII data from multiple columns into a single phrase that is saved in a new column, pii_col. The following table shows an example row containing data.
| customer_name | customer_job | billing_address | customer_email |
| Katie | Journalist | 19009 Vang Squares Suite 805 | hboyd@gmail.com |
This is combined into the phrase “Katie is a Journalist who lives at 19009 Vang Squares Suite 805 and can be emailed at hboyd@gmail.com”. The phrase is saved in pii_col, which this post uses as the target column to redact.
Step 5 (Prep for redaction) takes a column to redact (pii_col) and creates a new column (pii_col_prep) that is ready for efficient redaction using Amazon Comprehend. To redact PII from a different column, you can change the Input column field of this step.
There are two factors to consider to efficiently redact data using Amazon Comprehend:
- The cost to detect PII is defined on a per-unit basis, where 1 unit = 100 characters, with a 3-unit minimum charge for each document. Because tabular data often contains small amounts of text per cell, it’s generally more time- and cost-efficient to combine text from multiple cells into a single document to send to Amazon Comprehend. Doing this avoids the accumulation of overhead from many repeated function calls and ensures that the data sent is always greater than the 3-unit minimum.
- Because we’re doing redaction as one step of a SageMaker Data Wrangler flow, we will be calling Amazon Comprehend synchronously. Amazon Comprehend sets a 100 KB (100,000 character) limit per synchronous function call, so we need to ensure that any text we send is under that limit.
Given these factors, Step 5 prepares the data to send to Amazon Comprehend by appending a delimiter string to the end of the text in each cell. For the delimiter, you can use any string that doesn’t occur in the column being redacted (ideally, one that is as few characters as possible, because they’re included in the Amazon Comprehend character total). Adding this cell delimiter allows us to optimize the call to Amazon Comprehend, and will be discussed further in Step 6.
Note that if the text in any individual cell is longer than the Amazon Comprehend limit, the code in this step truncates it to 100,000 characters (roughly equivalent to 15,000 words or 30 single-spaced pages). Although this amount of text is unlikely to be stored in in a single cell, you can modify the transformation code to handle this edge case another way if needed.
Step 6 (Redact PII) takes a column name to redact as input (pii_col_prep) and saves the redacted text to a new column (pii_redacted). When you use a Python custom function transform, SageMaker Data Wrangler defines an empty custom_func that takes a pandas series (a column of text) as input and returns a modified pandas series of the same length. The following screenshot shows part of the Redact PII step.
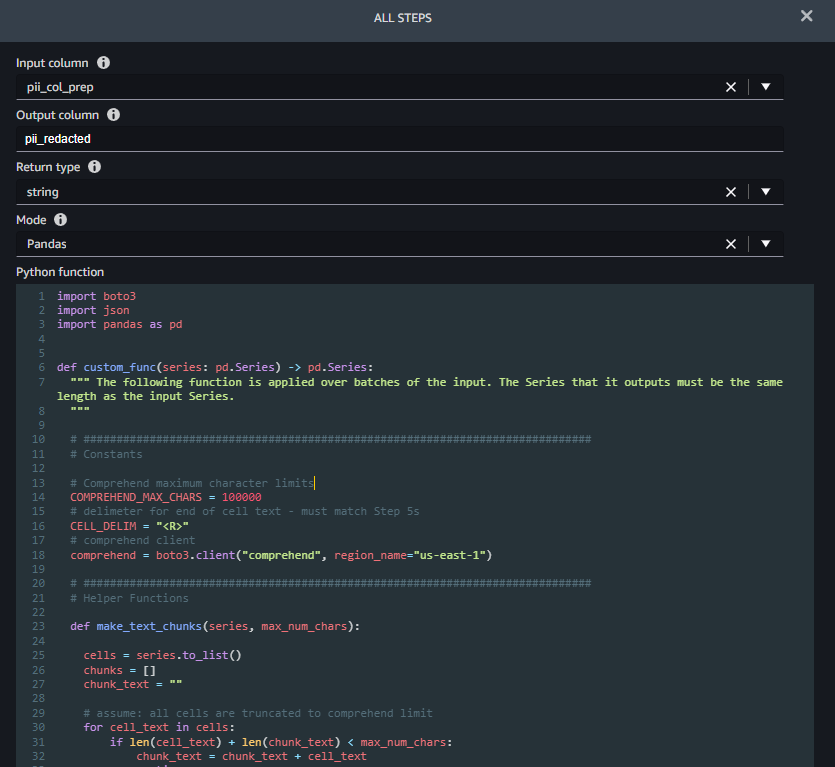
The function custom_func contains two helper (inner) functions:
make_text_chunks– This function does the work of concatenating text from individual cells in the series (including their delimiters) into longer strings (chunks) to send to Amazon Comprehend.redact_pii– This function takes text as input, calls Amazon Comprehend to detect PII, redacts any that is found, and returns the redacted text. Redaction is done by replacing any PII text with the type of PII found in square brackets, for example John Smith would be replaced with [NAME]. You can modify this function to replace PII with any string, including the empty string (“”) to remove it. You also could modify the function to check the confidence score of each PII entity and only redact if it’s above a specific threshold.
After the inner functions are defined, custom_func uses them to do the redaction, as shown in the following code excerpt. When the redaction is complete, it converts the chunks back into original cells, which it saves in the pii_redacted column.
Add a destination node
To see the result of your transformations, SageMaker Data Wrangler supports exporting to Amazon S3, SageMaker Pipelines, Amazon SageMaker Feature Store, and Python code. To export the redacted data to Amazon S3, we first need to create a destination node:
- In the SageMaker Data Wrangler flow diagram, choose the plus sign next to the Redact PII step.
- Choose Add destination, then choose Amazon S3.
- Provide an output name for your transformed dataset.
- Browse or enter the S3 location to store the redacted data file.
- Choose Add destination.
You should now see the destination node at the end of your data flow.
Create a SageMaker Data Wrangler export job
Now that the destination node has been added, we can create the export job to process the dataset:
- In SageMaker Data Wrangler, choose Create job.
- The destination node you just added should already be selected. Choose Next.
- Accept the defaults for all other options, then choose Run.
This creates a SageMaker Processing job. To view the status of the job, navigate to the SageMaker console. In the navigation pane, expand the Processing section and choose Processing jobs. Redacting all 116,000 cells in the target column using the default export job settings (two ml.m5.4xlarge instances) takes roughly 8 minutes and costs approximately $0.25. When the job is complete, download the output file with the redacted column from Amazon S3.
Clean up
The SageMaker Data Wrangler application runs on an ml.m5.4xlarge instance. To shut it down, in SageMaker Studio, choose Running Terminals and Kernels in the navigation pane. In the RUNNING INSTANCES section, find the instance labeled Data Wrangler and choose the shutdown icon next to it. This shuts down the SageMaker Data Wrangler application running on the instance.
Conclusion
In this post, we discussed how to use custom transformations in SageMaker Data Wrangler and Amazon Comprehend to redact PII data from your ML dataset. You can download the SageMaker Data Wrangler flow and start redacting PII from your tabular data today.
For other ways to enhance your MLOps workflow using SageMaker Data Wrangler custom transformations, check out Authoring custom transformations in Amazon SageMaker Data Wrangler using NLTK and SciPy. For more data preparation options, check out the blog post series that explains how to use Amazon Comprehend to react, translate, and analyze text from either Amazon Athena or Amazon Redshift.
About the Authors
 Tricia Jamison is a Senior Prototyping Architect on the AWS Prototyping and Cloud Acceleration (PACE) Team, where she helps AWS customers implement innovative solutions to challenging problems with machine learning, internet of things (IoT), and serverless technologies. She lives in New York City and enjoys basketball, long distance treks, and staying one step ahead of her children.
 Neelam Koshiya is an Enterprise Solutions Architect at AWS. With a background in software engineering, she organically moved into an architecture role. Her current focus is helping enterprise customers with their cloud adoption journey for strategic business outcomes with the area of depth being AI/ML. She is passionate about innovation and inclusion. In her spare time, she enjoys reading and being outdoors.
 Adeleke Coker is a Global Solutions Architect with AWS. He works with customers globally to provide guidance and technical assistance in deploying production workloads at scale on AWS. In his spare time, he enjoys learning, reading, gaming and watching sport events.
Optimize pet profiles for Purina’s Petfinder application using Amazon Rekognition Custom Labels and AWS Step Functions
Purina US, a subsidiary of Nestle, has a long history of enabling people to more easily adopt pets through Petfinder, a digital marketplace of over 11,000 animal shelters and rescue groups across the US, Canada, and Mexico. As the leading pet adoption platform, Petfinder has helped millions of pets find their forever homes.
Purina consistently seeks ways to make the Petfinder platform even better for both shelters and rescue groups and pet adopters. One challenge they faced was adequately reflecting the specific breed of animals up for adoption. Because many shelter animals are mixed breed, identifying breeds and attributes correctly in the pet profile required manual effort, which was time consuming. Purina used artificial intelligence (AI) and machine learning (ML) to automate animal breed detection at scale.
This post details how Purina used Amazon Rekognition Custom Labels, AWS Step Functions, and other AWS Services to create an ML model that detects the pet breed from an uploaded image and then uses the prediction to auto-populate the pet attributes. The solution focuses on the fundamental principles of developing an AI/ML application workflow of data preparation, model training, model evaluation, and model monitoring.
Solution overview
Predicting animal breeds from an image needs custom ML models. Developing a custom model to analyze images is a significant undertaking that requires time, expertise, and resources, often taking months to complete. Additionally, it often requires thousands or tens of thousands of hand-labeled images to provide the model with enough data to accurately make decisions. Setting up a workflow for auditing or reviewing model predictions to validate adherence to your requirements can further add to the overall complexity.
With Rekognition Custom Labels, which is built on the existing capabilities of Amazon Rekognition, you can identify the objects and scenes in images that are specific to your business needs. It is already trained on tens of millions of images across many categories. Instead of thousands of images, you can upload a small set of training images (typically a few hundred images or less per category) that are specific to your use case.
The solution uses the following services:
- Amazon API Gateway is a fully managed service that makes it easy for developers to publish, maintain, monitor, and secure APIs at any scale.
- The AWS Cloud Development Kit (AWS CDK) is an open-source software development framework for defining cloud infrastructure as code with modern programming languages and deploying it through AWS CloudFormation.
- AWS CodeBuild is a fully managed continuous integration service in the cloud. CodeBuild compiles source code, runs tests, and produces packages that are ready to deploy.
- Amazon DynamoDB is a fast and flexible nonrelational database service for any scale.
- AWS Lambda is an event-driven compute service that lets you run code for virtually any type of application or backend service without provisioning or managing servers.
- Amazon Rekognition offers pre-trained and customizable computer vision (CV) capabilities to extract information and insights from your images and videos. With Amazon Rekognition Custom Labels, you can identify the objects and scenes in images that are specific to your business needs.
- AWS Step Functions is a fully managed service that makes it easier to coordinate the components of distributed applications and microservices using visual workflows.
- AWS Systems Manager is a secure end-to-end management solution for resources on AWS and in multicloud and hybrid environments. Parameter Store, a capability of Systems Manager, provides secure, hierarchical storage for configuration data management and secrets management.
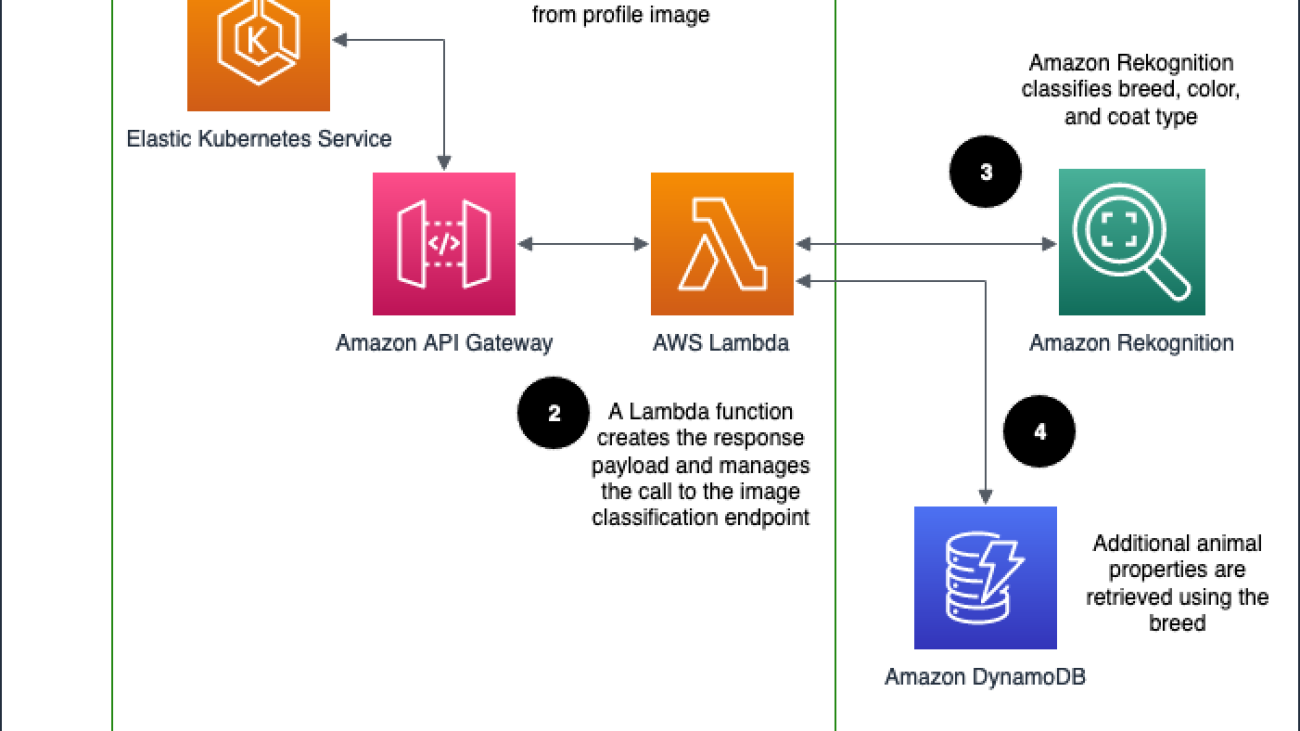
Purina’s solution is deployed as an API Gateway HTTP endpoint, which routes the requests to obtain pet attributes. It uses Rekognition Custom Labels to predict the pet breed. The ML model is trained from pet profiles pulled from Purina’s database, assuming the primary breed label is the true label. DynamoDB is used to store the pet attributes. Lambda is used to process the pet attributes request by orchestrating between API Gateway, Amazon Rekognition, and DynamoDB.
The architecture is implemented as follows:
- The Petfinder application routes the request to obtain the pet attributes via API Gateway.
- API Gateway calls the Lambda function to obtain the pet attributes.
- The Lambda function calls the Rekognition Custom Label inference endpoint to predict the pet breed.
- The Lambda function uses the predicted pet breed information to perform a pet attributes lookup in the DynamoDB table. It collects the pet attributes and sends it back to the Petfinder application.
The following diagram illustrates the solution workflow.

The Petfinder team at Purina wants an automated solution that they can deploy with minimal maintenance. To deliver this, we use Step Functions to create a state machine that trains the models with the latest data, checks their performance on a benchmark set, and redeploys the models if they have improved. The model retraining is triggered from the number of breed corrections made by users submitting profile information.
Model training
Developing a custom model to analyze images is a significant undertaking that requires time, expertise, and resources. Additionally, it often requires thousands or tens of thousands of hand-labeled images to provide the model with enough data to accurately make decisions. Generating this data can take months to gather and requires a large effort to label it for use in machine learning. A technique called transfer learning helps produce higher-quality models by borrowing the parameters of a pre-trained model, and allows models to be trained with fewer images.
Our challenge is that our data is not perfectly labeled: humans who enter the profile data can and do make mistakes. However, we found that for large enough data samples, the mislabeled images accounted for a sufficiently small fraction and model performance was not impacted more than 2% in accuracy.
ML workflow and state machine
The Step Functions state machine is developed to aid in the automatic retraining of the Amazon Rekognition model. Feedback is gathered during profile entry—each time a breed that has been inferred from an image is modified by the user to a different breed, the correction is recorded. This state machine is triggered from a configurable threshold number of corrections and additional pieces of data.
The state machine runs through several steps to create a solution:
- Create train and test manifest files containing the list of Amazon Simple Storage Service (Amazon S3) image paths and their labels for use by Amazon Rekognition.
- Create an Amazon Rekognition dataset using the manifest files.
- Train an Amazon Rekognition model version after the dataset is created.
- Start the model version when training is complete.
- Evaluate the model and produce performance metrics.
- If performance metrics are satisfactory, update the model version in Parameter Store.
- Wait for the new model version to propagate in the Lambda functions (20 minutes), then stop the previous model.
Model evaluation
We use a random 20% holdout set taken from our data sample to validate our model. Because the breeds we detect are configurable, we don’t use a fixed dataset for validation during training, but we do use a manually labeled evaluation set for integration testing. The overlap of the manually labeled set and the model’s detectable breeds is used to compute metrics. If the model’s breed detection accuracy is above a specified threshold, we promote the model to be used in the endpoint.
The following are a few screenshots of the pet prediction workflow from Rekognition Custom Labels.


Deployment with the AWS CDK
The Step Functions state machine and associated infrastructure (including Lambda functions, CodeBuild projects, and Systems Manager parameters) are deployed with the AWS CDK using Python. The AWS CDK code synthesizes a CloudFormation template, which it uses to deploy all infrastructure for the solution.
Integration with the Petfinder application
The Petfinder application accesses the image classification endpoint through the API Gateway endpoint using a POST request containing a JSON payload with fields for the Amazon S3 path to the image and the number of results to be returned.
KPIs to be impacted
To justify the added cost of running the image inference endpoint, we ran experiments to determine the value that the endpoint adds for Petfinder. The use of the endpoint offers two main types of improvement:
- Reduced effort for pet shelters who are creating the pet profiles
- More complete pet profiles, which are expected to improve search relevance
Metrics for measuring effort and profile completeness include the number of auto-filled fields that are corrected, total number of fields filled, and time to upload a pet profile. Improvements to search relevance are indirectly inferred from measuring key performance indicators related to adoption rates. According to Purina, after the solution went live, the average time for creating a pet profile on the Petfinder application was reduced from 7 minutes to 4 minutes. That is a huge improvement and time savings because in 2022, 4 million pet profiles were uploaded.
Security
The data that flows through the architecture diagram is encrypted in transit and at rest, in accordance with the AWS Well-Architected best practices. During all AWS engagements, a security expert reviews the solution to ensure a secure implementation is provided.
Conclusion
With their solution based on Rekognition Custom Labels, the Petfinder team is able to accelerate the creation of pet profiles for pet shelters, reducing administrative burden on shelter personnel. The deployment based on the AWS CDK deploys a Step Functions workflow to automate the training and deployment process. To start using Rekognition Custom Labels, refer to Getting Started with Amazon Rekognition Custom Labels. You can also check out some Step Functions examples and get started with the AWS CDK.
About the Authors
 Mason Cahill is a Senior DevOps Consultant with AWS Professional Services. He enjoys helping organizations achieve their business goals, and is passionate about building and delivering automated solutions on the AWS Cloud. Outside of work, he loves spending time with his family, hiking, and playing soccer.
 Matthew Chasse is a Data Science consultant at Amazon Web Services, where he helps customers build scalable machine learning solutions. Matthew has a Mathematics PhD and enjoys rock climbing and music in his free time.
 Rushikesh Jagtap is a Solutions Architect with 5+ years of experience in AWS Analytics services. He is passionate about helping customers to build scalable and modern data analytics solutions to gain insights from the data. Outside of work, he loves watching Formula1, playing badminton, and racing Go Karts.
 Tayo Olajide is a seasoned Cloud Data Engineering generalist with over a decade of experience in architecting and implementing data solutions in cloud environments. With a passion for transforming raw data into valuable insights, Tayo has played a pivotal role in designing and optimizing data pipelines for various industries, including finance, healthcare, and auto industries. As a thought leader in the field, Tayo believes that the power of data lies in its ability to drive informed decision-making and is committed to helping businesses leverage the full potential of their data in the cloud era. When he’s not crafting data pipelines, you can find Tayo exploring the latest trends in technology, hiking in the great outdoors, or tinkering with gadgetry and software.

Learn how Amazon Pharmacy created their LLM-based chat-bot using Amazon SageMaker
Amazon Pharmacy is a full-service pharmacy on Amazon.com that offers transparent pricing, clinical and customer support, and free delivery right to your door. Customer care agents play a crucial role in quickly and accurately retrieving information related to pharmacy information, including prescription clarifications and transfer status, order and dispensing details, and patient profile information, in real time. Amazon Pharmacy provides a chat interface where customers (patients and doctors) can talk online with customer care representatives (agents). One challenge that agents face is finding the precise information when answering customers’ questions, because the diversity, volume, and complexity of healthcare’s processes (such as explaining prior authorizations) can be daunting. Finding the right information, summarizing it, and explaining it takes time, slowing down the speed to serve patients.
To tackle this challenge, Amazon Pharmacy built a generative AI question and answering (Q&A) chatbot assistant to empower agents to retrieve information with natural language searches in real time, while preserving the human interaction with customers. The solution is HIPAA compliant, ensuring customer privacy. In addition, agents submit their feedback related to the machine-generated answers back to the Amazon Pharmacy development team, so that it can be used for future model improvements.
In this post, we describe how Amazon Pharmacy implemented its customer care agent assistant chatbot solution using AWS AI products, including foundation models in Amazon SageMaker JumpStart to accelerate its development. We start by highlighting the overall experience of the customer care agent with the addition of the large language model (LLM)-based chatbot. Then we explain how the solution uses the Retrieval Augmented Generation (RAG) pattern for its implementation. Finally, we describe the product architecture. This post demonstrates how generative AI is integrated into an already working application in a complex and highly regulated business, improving the customer care experience for pharmacy patients.
The LLM-based Q&A chatbot
The following figure shows the process flow of a patient contacting Amazon Pharmacy customer care via chat (Step 1). Agents use a separate internal customer care UI to ask questions to the LLM-based Q&A chatbot (Step 2). The customer care UI then sends the request to a service backend hosted on AWS Fargate (Step 3), where the queries are orchestrated through a combination of models and data retrieval processes, collectively known as the RAG process. This process is the heart of the LLM-based chatbot solution and its details are explained in the next section. At the end of this process, the machine-generated response is returned to the agent, who can review the answer before providing it back to the end-customer (Step 4). It should be noted that agents are trained to exercise judgment and use the LLM-based chatbot solution as a tool that augments their work, so they can dedicate their time to personal interactions with the customer. Agents also label the machine-generated response with their feedback (for example, positive or negative). This feedback is then used by the Amazon Pharmacy development team to improve the solution (through fine-tuning or data improvements), forming a continuous cycle of product development with the user (Step 5).

The following figure shows an example from a Q&A chatbot and agent interaction. Here, the agent was asking about a claim rejection code. The Q&A chatbot (Agent AI Assistant) answers the question with a clear description of the rejection code. It also provides the link to the original documentation for the agents to follow up, if needed.

Accelerating the ML model development
In the previous figure depicting the chatbot workflow, we skipped the details of how to train the initial version of the Q&A chatbot models. To do this, the Amazon Pharmacy development team benefited from using SageMaker JumpStart. SageMaker JumpStart allowed the team to experiment quickly with different models, running different benchmarks and tests, failing fast as needed. Failing fast is a concept practiced by the scientist and developers to quickly build solutions as realistic as possible and learn from their efforts to make it better in the next iteration. After the team decided on the model and performed any necessary fine-tuning and customization, they used SageMaker hosting to deploy the solution. The reuse of the foundation models in SageMaker JumpStart allowed the development team to cut months of work that otherwise would have been needed to train models from scratch.
The RAG design pattern
One core part of the solution is the use of the Retrieval Augmented Generation (RAG) design pattern for implementing Q&A solutions. The first step in this pattern is to identify a set of known question and answer pairs, which is the initial ground truth for the solution. The next step is to convert the questions to a better representation for the purpose of similarity and searching, which is called embedding (we embed a higher-dimensional object into a hyperplane with less dimensions). This is done through an embedding-specific foundation model. These embeddings are used as indexes to the answers, much like how a database index maps a primary key to a row. We’re now ready to support new queries coming from the customer. As explained previously, the experience is that customers send their queries to agents, who then interface with the LLM-based chatbot. Within the Q&A chatbot, the query is converted to an embedding and then used as a search key for a matching index (from the previous step). The matching criteria is based on a similarity model, such as FAISS or Amazon Open Search Service (for more details, refer to Amazon OpenSearch Service’s vector database capabilities explained). When there are matches, the top answers are retrieved and used as the prompt context for the generative model. This corresponds to the second step in the RAG pattern—the generative step. In this step, the prompt is sent to the LLM (generator foundation modal), which composes the final machine-generated response to the original question. This response is provided back through the customer care UI to the agent, who validates the answer, edits it if needed, and sends it back to the patient. The following diagram illustrates this process.

Managing the knowledge base
As we learned with the RAG pattern, the first step in performing Q&A consists of retrieving the data (the question and answer pairs) to be used as context for the LLM prompt. This data is referred to as the chatbot’s knowledge base. Examples of this data are Amazon Pharmacy internal standard operating procedures (SOPs) and information available in Amazon Pharmacy Help Center. To facilitate the indexing and the retrieval process (as described previously), it’s often useful to gather all this information, which may be hosted across different solutions such as in wikis, files, and databases, into a single repository. In the particular case of the Amazon Pharmacy chatbot, we use Amazon Simple Storage Service (Amazon S3) for this purpose because of its simplicity and flexibility.
Solution overview
The following figure shows the solution architecture. The customer care application and the LLM-based Q&A chatbot are deployed in their own VPC for network isolation. The connection between the VPC endpoints is realized through AWS PrivateLink, guaranteeing their privacy. The Q&A chatbot likewise has its own AWS account for role separation, isolation, and ease of monitoring for security, cost, and compliance purposes. The Q&A chatbot orchestration logic is hosted in Fargate with Amazon Elastic Container Service (Amazon ECS). To set up PrivateLink, a Network Load Balancer proxies the requests to an Application Load Balancer, which stops the end-client TLS connection and hands requests off to Fargate. The primary storage service is Amazon S3. As mentioned previously, the related input data is imported into the desired format inside the Q&A chatbot account and persisted in S3 buckets.

When it comes to the machine learning (ML) infrastructure, Amazon SageMaker is at the center of the architecture. As explained in the previous sections, two models are used, the embedding model and the LLM model, and these are hosted in two separate SageMaker endpoints. By using the SageMaker data capture feature, we can log all inference requests and responses for troubleshooting purposes, with the necessary privacy and security constraints in place. Next, the feedback taken from the agents is stored in a separate S3 bucket.
The Q&A chatbot is designed to be a multi-tenant solution and support additional health products from Amazon Health Services, such as Amazon Clinic. For example, the solution is deployed with AWS CloudFormation templates for infrastructure as a code (IaC), allowing different knowledge bases to be used.
Conclusion
This post presented the technical solution for Amazon Pharmacy generative AI customer care improvements. The solution consists of a question answering chatbot implementing the RAG design pattern on SageMaker and foundation models in SageMaker JumpStart. With this solution, customer care agents can assist patients more quickly, while providing precise, informative, and concise answers.
The architecture uses modular microservices with separate components for knowledge base preparation and loading, chatbot (instruction) logic, embedding indexing and retrieval, LLM content generation, and feedback supervision. The latter is especially important for ongoing model improvements. The foundation models in SageMaker JumpStart are used for fast experimentation with model serving being done with SageMaker endpoints. Finally, the HIPAA-compliant chatbot server is hosted on Fargate.
In summary, we saw how Amazon Pharmacy is using generative AI and AWS to improve customer care while prioritizing responsible AI principles and practices.
You can start experimenting with foundation models in SageMaker JumpStart today to find the right foundation models for your use case and start building your generative AI application on SageMaker.
About the author
 Burak Gozluklu is a Principal AI/ML Specialist Solutions Architect located in Boston, MA. He helps global customers adopt AWS technologies and specifically AI/ML solutions to achieve their business objectives. Burak has a PhD in Aerospace Engineering from METU, an MS in Systems Engineering, and a post-doc in system dynamics from MIT in Cambridge, MA. Burak is passionate about yoga and meditation.
 Jangwon Kim is a Sr. Applied Scientist at Amazon Health Store & Tech. He has expertise in LLM, NLP, Speech AI, and Search. Prior to joining Amazon Health, Jangwon was an applied scientist at Amazon Alexa Speech. He is based out of Los Angeles.
 Alexandre Alves is a Sr. Principal Engineer at Amazon Health Services, specializing in ML, optimization, and distributed systems. He helps deliver wellness-forward health experiences.
 Nirvay Kumar is a Sr. Software Dev Engineer at Amazon Health Services, leading architecture within Pharmacy Operations after many years in Fulfillment Technologies. With expertise in distributed systems, he has cultivated a growing passion for AI’s potential. Nirvay channels his talents into engineering systems that solve real customer needs with creativity, care, security, and a long-term vision. When not hiking the mountains of Washington, he focuses on thoughtful design that anticipates the unexpected. Nirvay aims to build systems that withstand the test of time and serve customers’ evolving needs.
Keeping an eye on your cattle using AI technology
At Amazon Web Services (AWS), not only are we passionate about providing customers with a variety of comprehensive technical solutions, but we’re also keen on deeply understanding our customers’ business processes. We adopt a third-party perspective and objective judgment to help customers sort out their value propositions, collect pain points, propose appropriate solutions, and create the most cost-effective and usable prototypes to help them systematically achieve their business goals.
This method is called working backwards at AWS. It means putting aside technology and solutions, starting from the expected results of customers, confirming their value, and then deducing what needs to be done in reverse order before finally implementing a solution. During the implementation phase, we also follow the concept of minimum viable product and strive to quickly form a prototype that can generate value within a few weeks, and then iterate on it.
Today, let’s review a case study where AWS and New Hope Dairy collaborated to build a smart farm on the cloud. From this blog post, you can have a deep understanding about what AWS can provide for building a smart farm and how to build smart farm applications on the cloud with AWS experts.
Project background
Milk is a nutritious beverage. In consideration of national health, China has been actively promoting the development of the dairy industry. According to data from Euromonitor International, the sale of dairy products in China reached 638.5 billion RMB in 2020 and is expected to reach 810 billion RMB in 2025. In addition, the compound annual growth rate in the past 14 years has also reached 10 percent, showing rapid development.
On the other hand, as of 2022, most of the revenue in the Chinese dairy industry still comes from liquid milk. Sixty percent of the raw milk is used for liquid milk and yogurt, and another 20 percent is milk powder—a derivative of liquid milk. Only a very small amount is used for highly processed products such as cheese and cream.
Liquid milk is a lightly processed product and its output, quality, and cost are closely linked to raw milk. This means that if the dairy industry wants to free capacity to focus on producing highly processed products, create new products, and conduct more innovative biotechnology research, it must first improve and stabilize the production and quality of raw milk.
As a dairy industry leader, New Hope Dairy has been thinking about how to improve the efficiency of its ranch operations and increase the production and quality of raw milk. New Hope Dairy hopes to use the third-party perspective and technological expertise of AWS to facilitate innovation in the dairy industry. With support and promotion from Liutong Hu, VP and CIO of New Hope Dairy, the AWS customer team began to organize operations and potential innovation points for the dairy farms.
Dairy farm challenges
AWS is an expert in the field of cloud technology, but to implement innovation in the dairy industry, professional advice from dairy subject matter experts is necessary. Therefore, we conducted several in-depth interviews with Liangrong Song, the Deputy Director of Production Technology Center of New Hope Dairy, the ranch management team, and nutritionists to understand some of the issues and challenges facing the farm.
First is taking inventory of reserve cows
The dairy cows on the ranch are divided into two types: dairy cows and reserve cows. Dairy cows are mature and continuously produce milk, while reserve cows are cows that have not yet reached the age to produce milk. Large and medium-sized farms usually provide reserve cows with a larger open activity area to create a more comfortable growing environment.
However, both dairy cows and reserve cows are assets of the farm and need to be inventoried monthly. Dairy cows are milked every day, and because they are relatively still during milking, inventory tracking is easy. However, reserve cows are in an open space and roam freely, which makes it inconvenient to inventory them. Each time inventory is taken, several workers count the reserve cows repeatedly from different areas, and finally, the numbers are checked. This process consumes one to two days for several workers, and often there are problems with aligning the counts or uncertainties about whether each cow has been counted.
Significant time can be saved if we have a way to inventory reserve cows quickly and accurately.
Second is identifying lame cattle
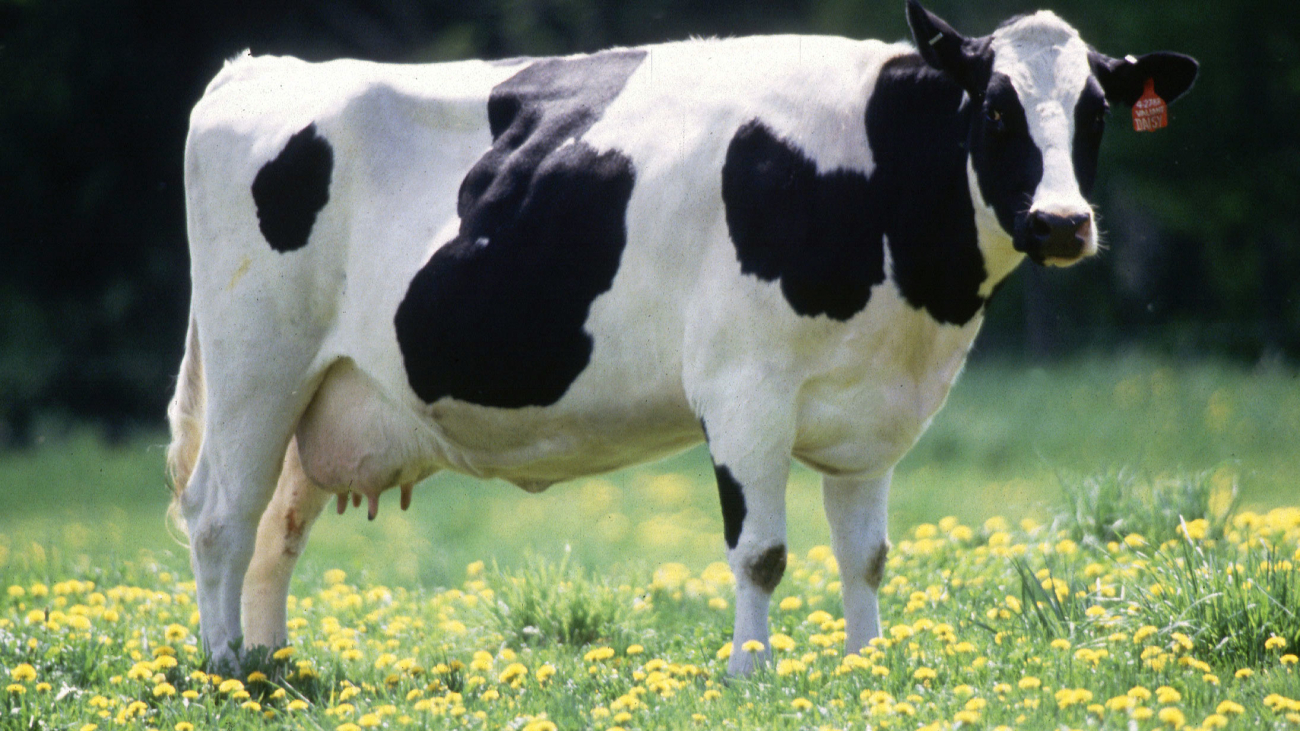
Currently, most dairy companies use a breed named Holstein to produce milk. Holsteins are the black and white cows most of us are familiar with. Despite most dairy companies using the same breed, there are still differences in milk production quantity and quality among different companies and ranches. This is because the health of dairy cows directly affects milk production.
However, cows cannot express discomfort on their own like humans can, and it isn’t practical for veterinarians to give thousands of cows physical examinations regularly. Therefore, we have to use external indicators to quickly judge the health status of cows.
The external indicators of a cow’s health include body condition score and lameness degree. Body condition score is largely related to the cow’s body fat percentage and is a long-term indicator, while lameness is a short-term indicator caused by leg problems or foot infections and other issues that affect the cow’s mood, health, and milk production. Additionally, adult Holstein cows can weigh over 500 kg, which can cause significant harm to their feet if they aren’t stable. Therefore, when lameness occurs, veterinarians should intervene as soon as possible.
According to a 2014 study, the proportion of severely lame cows in China can be as high as 31 percent. Although the situation might have improved since the study, the veterinarian count on farms is extremely limited, making it difficult to monitor cows regularly. When lameness is detected, the situation is often severe, and treatment is time-consuming and difficult, and milk production is already affected.
If we have a way to timely detect lameness in cows and prompt veterinarians to intervene at the mild lameness stage, the overall health and milk production of the cows will increase, and the performance of the farm will improve.
Lastly, there is feed cost optimization
Within the livestock industry, feed is the biggest variable cost. To ensure the quality and inventory of feed, farms often need to purchase feed ingredients from domestic and overseas suppliers and deliver them to feed formulation factories for processing. There are many types of modern feed ingredients, including soybean meal, corn, alfalfa, oat grass, and so on, which means that there are many variables at play. Each type of feed ingredient has its own price cycle and price fluctuations. During significant fluctuations, the total cost of feed can fluctuate by more than 15 percent, causing a significant impact.
Feed costs fluctuate, but dairy product prices are relatively stable over the long term. Consequently, under otherwise unchanged conditions, the overall profit can fluctuate significantly purely due to feed cost changes.
To avoid this fluctuation, it’s necessary to consider storing more ingredients when prices are low. But stocking also needs to consider whether the price is genuinely at the trough and what quantity of feed should be purchased according to the current consumption rate.
If we have a way to precisely forecast feed consumption and combine it with the overall price trend to suggest the best time and quantity of feed to purchase, we can reduce costs and increase efficiency on the farm.
It’s evident that these issues are directly related to the customer’s goal of improving farm operational efficiency, and the methods are respectively freeing up labor, increasing production and reducing costs. Through discussions on the difficulty and value of solving each issue, we chose increasing production as the starting point and prioritized solving the problem of lame cows.
Research
Before discussing technology, research had to be conducted. The research was jointly conducted by the AWS customer team, the AWS Generative AI Innovation Center, which managed the machine learning algorithm models, and AWS AI Shanghai Lablet, which provides algorithm consultation on the latest computer vision research and the expert farming team from New Hope Dairy. The research was divided into several parts:
- Understanding the traditional paper-based identification method of lame cows and developing a basic understanding of what lame cows are.
- Confirming existing solutions, including those used in farms and in the industry.
- Conducting farm environment research to understand the physical situation and limitations.
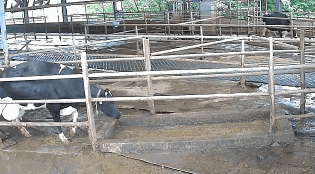
Through studying materials and observing on-site videos, the teams gained a basic understanding of lame cows. Readers can also get a basic idea of the posture of lame cows through the animated image below.
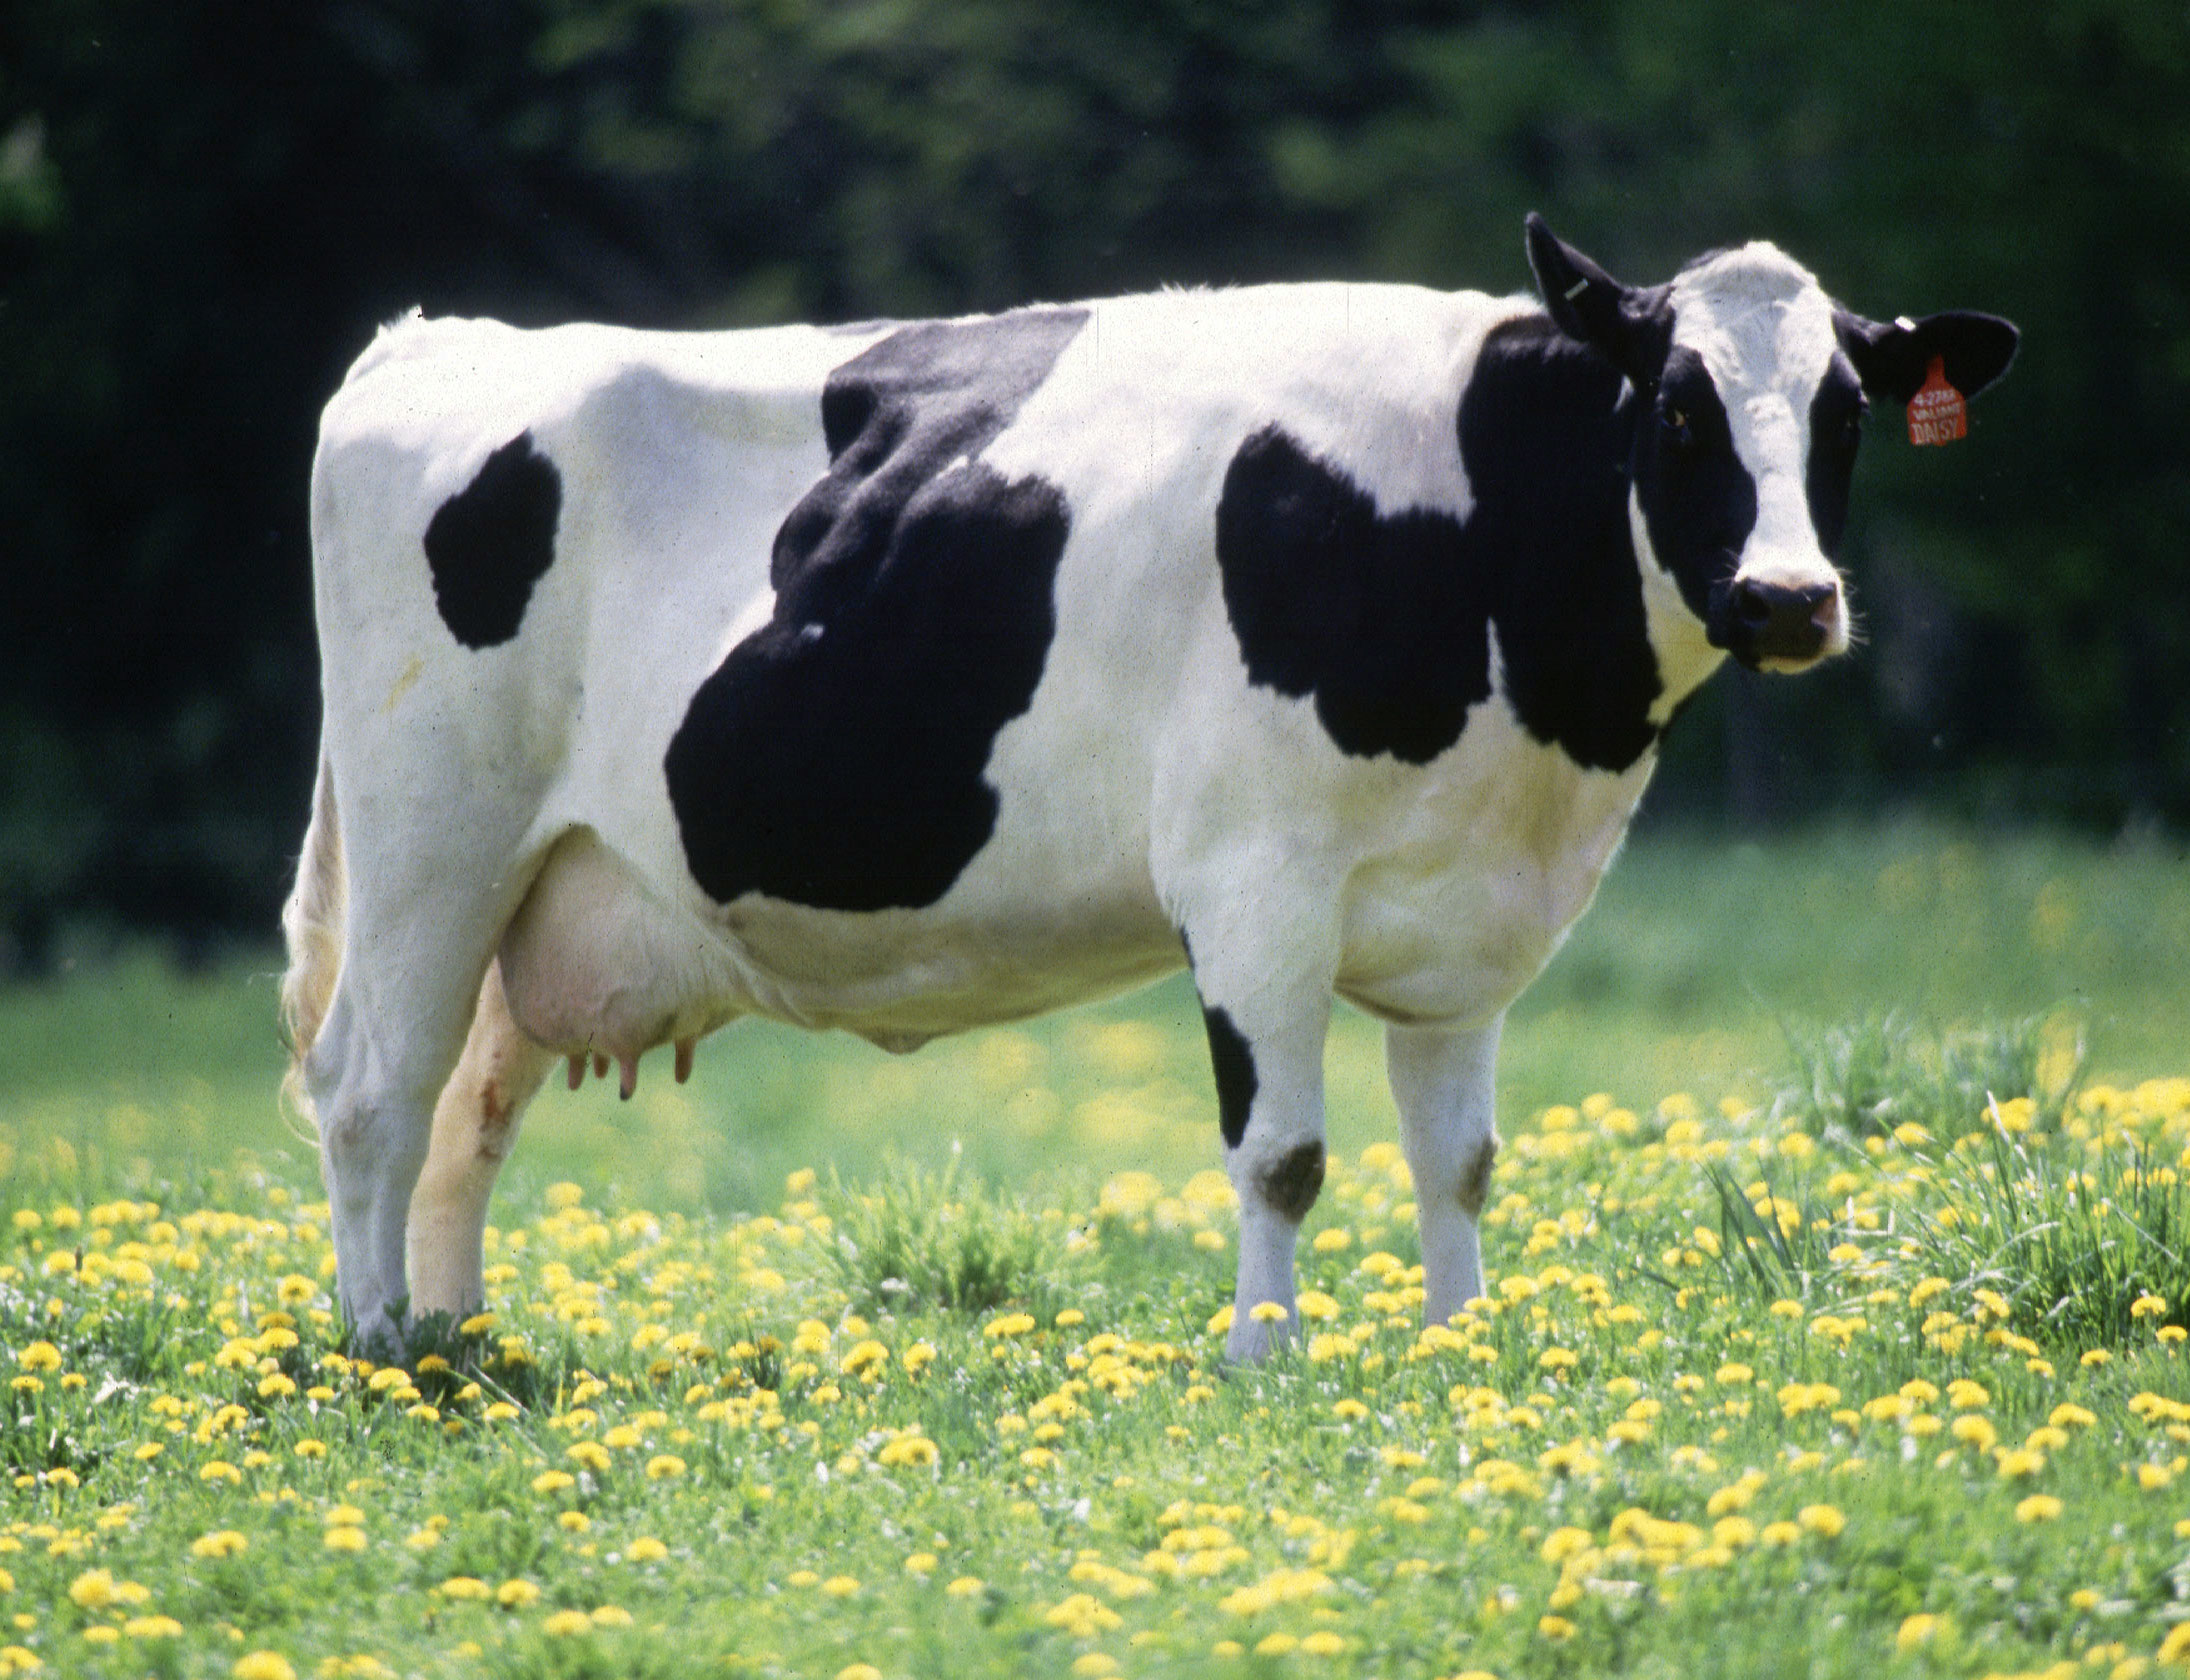
In contrast to a relatively healthy cow.
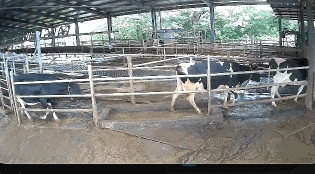
Lame cows have visible differences in posture and gait compared to healthy cows.
Regarding existing solutions, most ranches rely on visual inspection by veterinarians and nutritionists to identify lame cows. In the industry, there are solutions that use wearable pedometers and accelerometers for identification, as well as solutions that use partitioned weighbridges for identification, but both are relatively expensive. For the highly competitive dairy industry, we need to minimize identification costs and the costs and dependence on non-generic hardware.
After discussing and analyzing the information with ranch veterinarians and nutritionists, the AWS Generative AI Innovation Center experts decided to use computer vision (CV) for identification, relying only on ordinary hardware: civilian surveillance cameras, which don’t add any additional burden to the cows and reduce costs and usage barriers.
After deciding on this direction, we visited a medium-sized farm with thousands of cows on site, investigated the ranch environment, and determined the location and angle of camera placement.
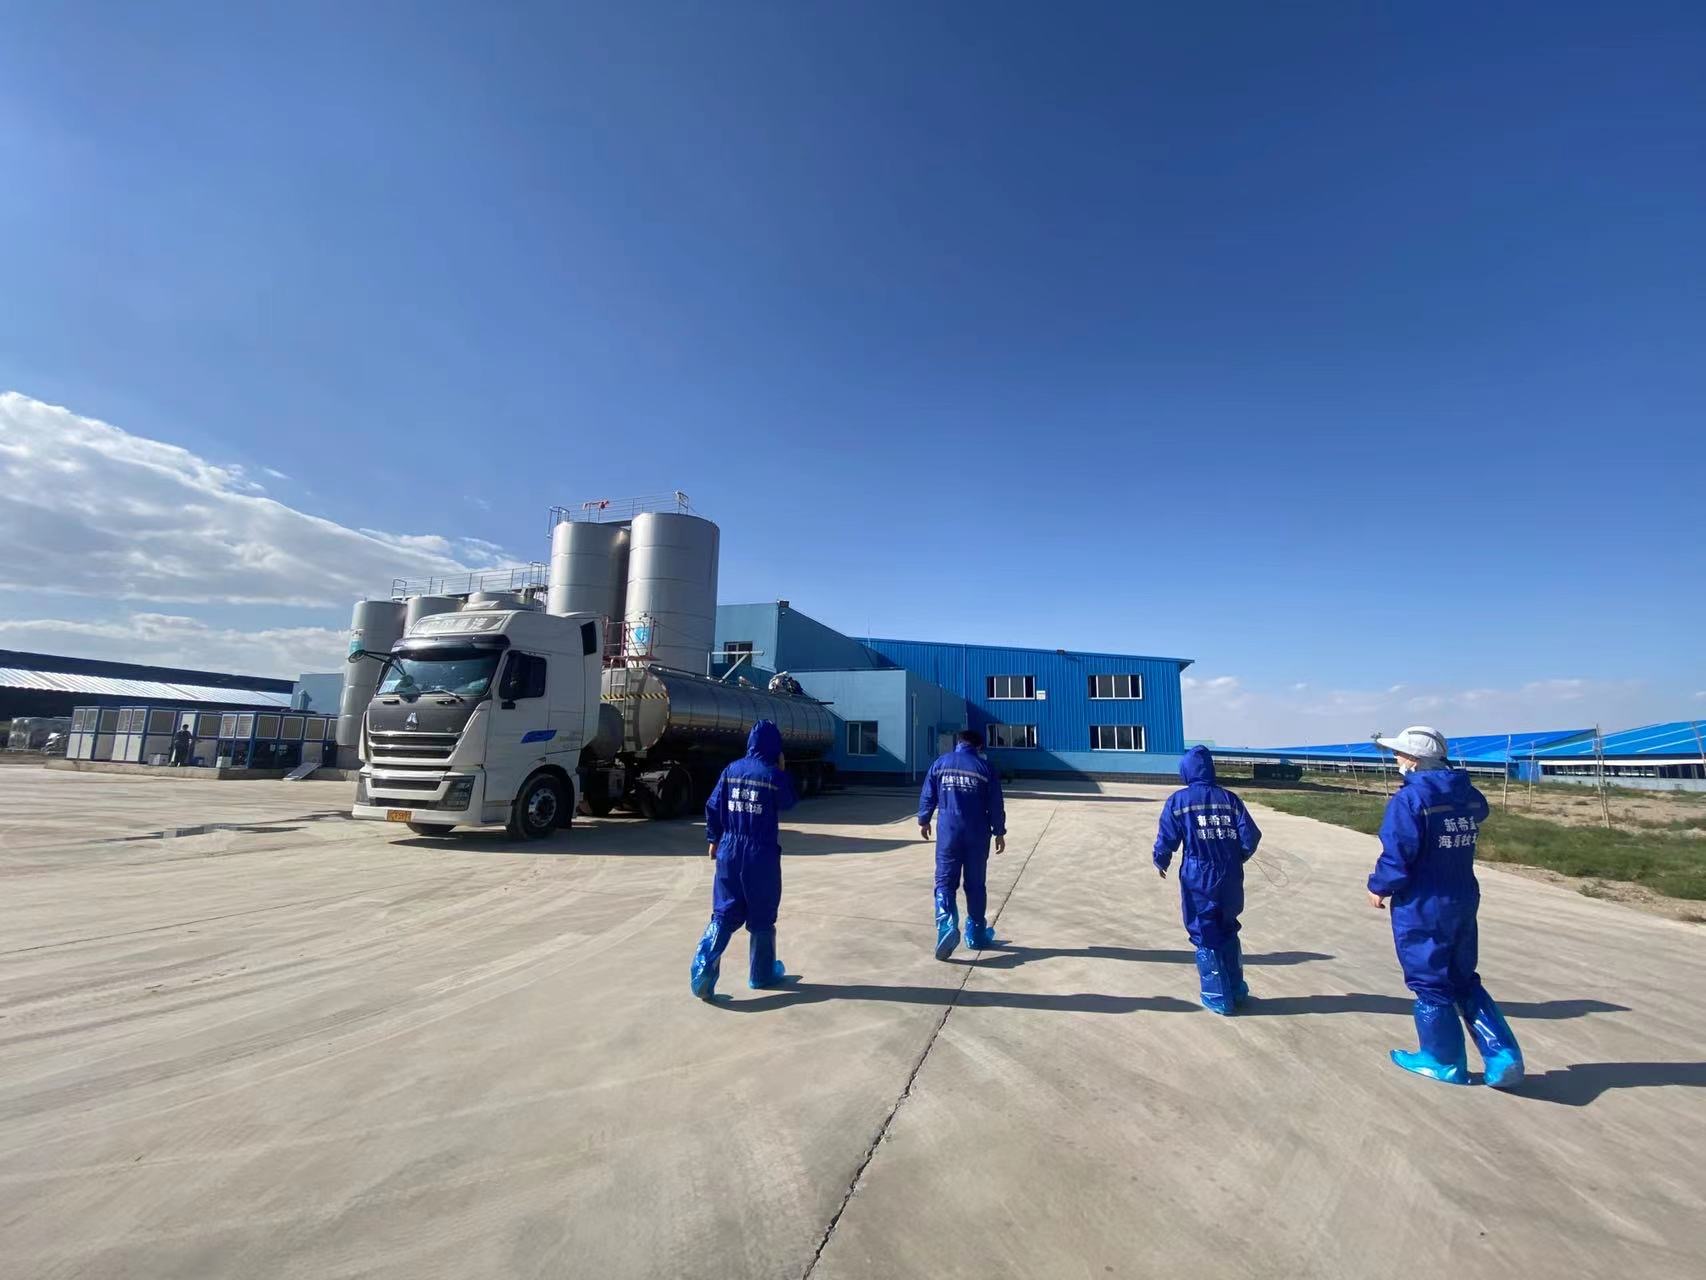
Initial proposal
Now, for the solution. The core of our CV-based solution consists of the following steps:
- Cow identification: Identify multiple cows in a single frame of video and mark the position of each cow.
- Cow tracking: While video is recording, we need to continuously track cows as the frames change and assign a unique number to each cow.
- Posture marking: Reduce the dimensionality of cow movements by converting cow images to marked points.
- Anomaly identification: Identify anomalies in the marked points’ dynamics.
- Lame cow algorithm: Normalize the anomalies to obtain a score to determine the degree of cow lameness.
- Threshold determination: Obtain a threshold based on expert inputs.
According to the judgment of the AWS Generative AI Innovation Center experts, the first few steps are generic requirements that can be solved using open-source models, while the latter steps require us to use mathematical methods and expert intervention.
Difficulties in the solution
To balance cost and performance, we chose the yolov5l model, a medium-sized pre-trained model for cow recognition, with an input width of 640 pixels, which provides good value for this scene.
While YOLOv5 is responsible for recognizing and tagging cows in a single image, in reality, videos consist of multiple images (frames) that change continuously. YOLOv5 cannot identify that cows in different frames belong to the same individual. To track and locate a cow across multiple images, another model called SORT is needed.
SORT stands for simple online and realtime tracking, where online means it considers only the current and previous frames to track without consideration of any other frames, and realtime means it can identify the object’s identity immediately.
After the development of SORT, many engineers implemented and optimized it, leading to the development of OC-SORT, which considers the appearance of the object, DeepSORT (and its upgraded version, StrongSORT), which includes human appearance, and ByteTrack, which uses a two-stage association linker to consider low-confidence recognition. After testing, we found that for our scene, DeepSORT’s appearance tracking algorithm is more suitable for humans than for cows, and ByteTrack’s tracking accuracy is slightly weaker. As a result, we ultimately chose OC-SORT as our tracking algorithm.
Next, we use DeepLabCut (DLC for short) to mark the skeletal points of the cows. DLC is a markerless model, which means that although different points, such as the head and limbs, might have different meanings, they are all just points for DLC, which only requires us to mark the points and train the model.
This leads to a new question: how many points should we mark on each cow and where should we mark them? The answer to this question affects the workload of marking, training, and subsequent inference efficiency. To solve this problem, we must first understand how to identify lame cows.
Based on our research and the inputs of our expert clients, lame cows in videos exhibit the following characteristics:
- An arched back: The neck and back are curved, forming a triangle with the root of the neck bone (arched-back).
- Frequent nodding: Each step can cause the cow to lose balance or slip, resulting in frequent nodding (head bobbing).
- Unstable gait: The cow’s gait changes after a few steps, with slight pauses (gait pattern change).
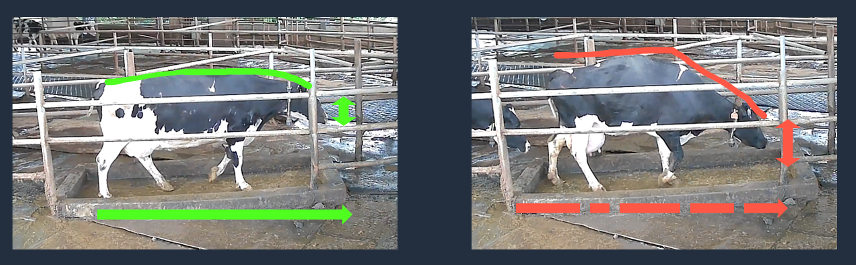
With regards to neck and back curvature as well as nodding, experts from AWS Generative AI Innovation Center have determined that marking only seven back points (one on the head, one at the base of the neck, and five on the back) on cattle can result in good identification. Since we now have a frame of identification, we should also be able to recognize unstable gait patterns.
Next, we use mathematical expressions to represent the identification results and form algorithms.
Human identification of these problems isn’t difficult, but precise algorithms are required for computer identification. For example, how does a program know the degree of curvature of a cow’s back given a set of cow back coordinate points? How does it know if a cow is nodding?
In terms of back curvature, we first consider treating the cow’s back as an angle and then we find the vertex of that angle, which allows us to calculate the angle. The problem with this method is that the spine might have bidirectional curvature, making the vertex of the angle difficult to identify. This requires switching to other algorithms to solve the problem.
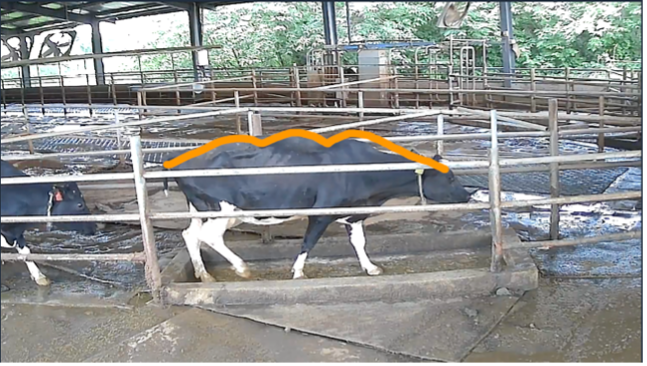
In terms of nodding, we first considered using the Fréchet distance to determine if the cow is nodding by comparing the difference in the curve of the cow’s overall posture. However, the problem is that the cow’s skeletal points might be displaced, causing significant distance between similar curves. To solve this problem, we need to take out the position of the head relative to the recognition box and normalize it.
After normalizing the position of the head, we encountered a new problem. In the image that follows, the graph on the left shows the change in the position of the cow’s head. We can see that due to recognition accuracy issues, the position of the head point will constantly shake slightly. We need to remove these small movements and find the relatively large movement trend of the head. This is where some knowledge of signal processing is needed. By using a Savitzky-Golay filter, we can smooth out a signal and obtain its overall trend, making it easier for us to identify nodding, as shown by the orange curve in the graph on the right.
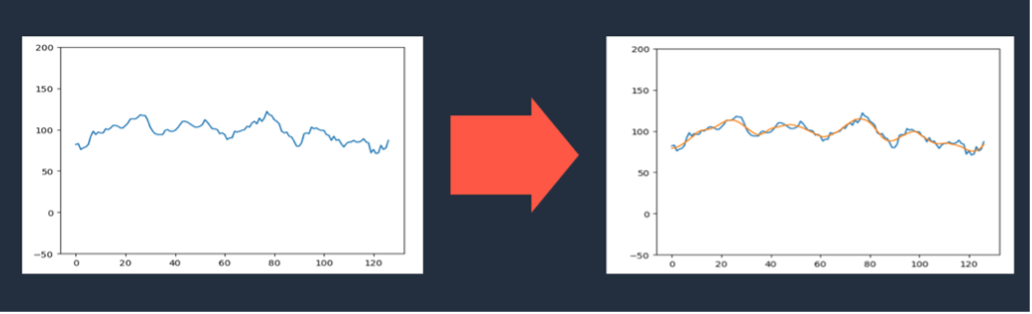
Additionally, after dozens of hours of video recognition, we found that some cows with extremely high back curvature actually did not have a hunched back. Further investigation revealed that this was because most of the cows used to train the DLC model were mostly black or black and white, and there weren’t many cows that were mostly white or close to pure white, resulting in the model recognizing them incorrectly when they had large white areas on their bodies, as shown by the red arrow in the figure below. This can be corrected through further model training.
In addition to solving the preceding problems, there were other generic problems that needed to be solved:
- There are two paths in the video frame, and cows in the distance might also be recognized, causing problems.
- The paths in the video also have a certain curvature, and the cow’s body length becomes shorter when the cow is on the sides of the path, making the posture easy to identify incorrectly.
- Due to the overlap of multiple cows or occlusion from the fence, the same cow might be identified as two cows.
- Due to tracking parameters and occasional frame skipping of the camera, it’s impossible to correctly track the cows, resulting in ID confusion issues.
In the short term, based on the alignment with New Hope Dairy on delivering a minimum viable product and then iterate on it, these problems can usually be solved by outlier judgment algorithms combined with confidence filtering, and if they cannot be solved, they will become invalid data, which requires us to perform additional training and continuously iterate our algorithms and models.
In the long term, AWS AI Shanghai Lablet provided future experiment suggestions to solve the preceding problems based on their object-centric research: Bridging the Gap to Real-World Object-Centric Learning and Self-supervised Amodal Video Object Segmentation. Besides invalidating those outlier data, the issues can also be addressed by developing more precise object-level models for pose estimation, amodal segmentation, and supervised tracking. However, traditional vision pipelines for these tasks typically require extensive labeling. Object-centric learning focuses on tackling the binding problem of pixels to objects without additional supervision. The binding process not only provides information on the location of objects but also results in robust and adaptable object representations for downstream tasks. Because the object-centric pipeline focuses on self-supervised or weakly-supervised settings, we can improve performance without significantly increasing labeling costs for our customers.
After solving a series of problems and combining the scores given by the farm veterinarian and nutritionist, we have obtained a comprehensive lameness score for cows, which helps us identify cows with different degrees of lameness such as severe, moderate, and mild, and can also identify multiple body posture attributes of cows, helping further analysis and judgment.
Within weeks, we developed an end-to-end solution for identifying lame cows. The hardware camera for this solution cost only 300 RMB, and the Amazon SageMaker batch inference, when using the g4dn.xlarge instance, took about 50 hours for 2 hours of video, totaling only 300 RMB. When it enters production, if five batches of cows are detected per week (assuming about 10 hours), and including the rolling saved videos and data, the monthly detection cost for a medium-sized ranch with several thousand cows is less than 10,000 RMB.
Currently, our machine learning model process is as follows:
- Raw video is recorded.
- Cows are detected and identified.
- Each cow is tracked, and key points are detected.
- Each cow’s movement is analyzed.
- A lameness score is determined.
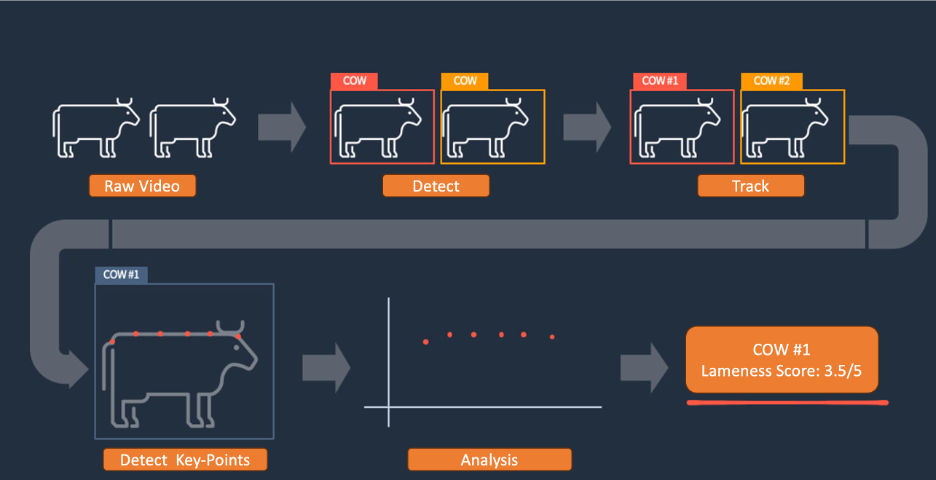
Model deployment
We’ve described the solution for identifying lame cows based on machine learning before. Now, we need to deploy these models on SageMaker. As shown in the following figure:
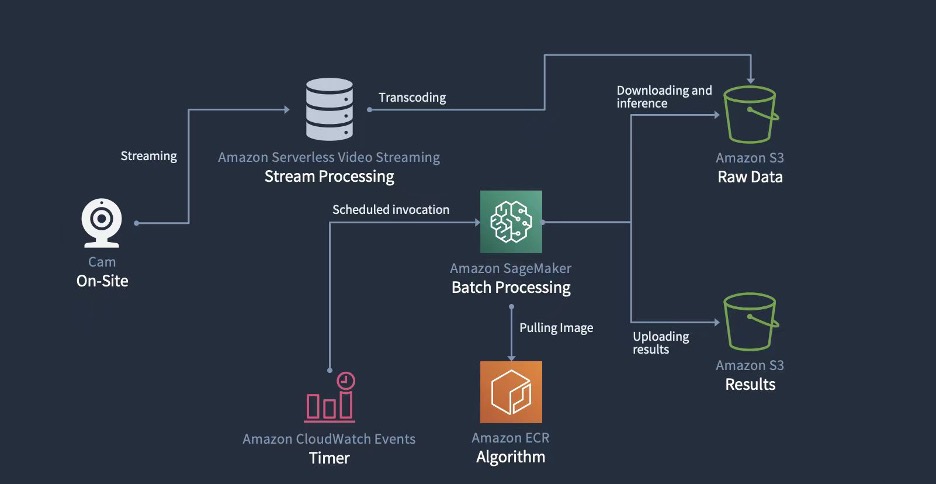
- We first used the AWS Serverless Video Streaming Solution to obtain the real time video and saved it to Amazon Simple Storage Service (Amazon S3).
- Then, we used Amazon EventBridge to set scheduled tasks for the SageMaker Batch Processing. The customer doesn’t need real time results, so batch processing can further improve efficiency of the GPU instance and decrease the cost.
- During batch processing, SageMaker obtains the docker image from Amazon Elastic Container Registry (Amazon ECR) and the video data from an S3 bucket. Then, the inference process begins and the results are saved in an S3 bucket.
Business implementation
Of course, what we’ve discussed so far is just the core of our technical solution. To integrate the entire solution into the business process, we also must address the following issues:
- Data feedback: For example, we must provide veterinarians with an interface to filter and view lame cows that need to be processed and collect data during this process to use as training data.
- Cow identification: After a veterinarian sees a lame cow, they also need to know the cow’s identity, such as its number and pen.
- Cow positioning: In a pen with hundreds of cows, quickly locate the target cow.
- Data mining: For example, find out how the degree of lameness affects feeding, rumination, rest, and milk production.
- Data-driven: For example, identify the genetic, physiological, and behavioral characteristics of lame cows to achieve optimal breeding and reproduction.
Only by addressing these issues can the solution truly solve the business problem, and the collected data can generate long-term value. Some of these problems are system integration issues, while others are technology and business integration issues. We will share further information about these issues in future articles.
Summary
In this article, we briefly explained how the AWS Customer Solutions team innovates quickly based on the customer’s business. This mechanism has several characteristics:
- Business led: Prioritize understanding the customer’s industry and business processes on site and in person before discussing technology, and then delve into the customer’s pain points, challenges, and problems to identify important issues that can be solved with technology.
- Immediately available: Provide a simple but complete and usable prototype directly to the customer for testing, validation, and rapid iteration within weeks, not months.
- Minimal cost: Minimize or even eliminate the customer’s costs before the value is truly validated, avoiding concerns about the future. This aligns with the AWS frugality leadership principle.
In our collaborative innovation project with the dairy industry, we not only started from the business perspective to identify specific business problems with business experts, but also conducted on-site investigations at the farm and factory with the customer. We determined the camera placement on site, installed and deployed the cameras, and deployed the video streaming solution. Experts from AWS Generative AI Innovation Center dissected the customer’s requirements and developed an algorithm, which was then engineered by a solution architect for the entire algorithm.
With each inference, we could obtain thousands of decomposed and tagged cow walking videos, each with the original video ID, cow ID, lameness score, and various detailed scores. The complete calculation logic and raw gait data were also retained for subsequent algorithm optimization.
Lameness data can not only be used for early intervention by veterinarians, but also combined with milking machine data for cross-analysis, providing an additional validation dimension and answering some additional business questions, such as: What are the physical characteristics of cows with the highest milk yield? What is the effect of lameness on milk production in cows? What is the main cause of lame cows, and how can it be prevented? This information will provide new ideas for farm operations.
The story of identifying lame cows ends here, but the story of farm innovation has just begun. In subsequent articles, we will continue to discuss how we work closely with customers to solve other problems.
About the Authors
 Hao Huang is an applied scientist at the AWS Generative AI Innovation Center. He specializes in Computer Vision (CV) and Visual-Language Model (VLM). Recently, he has developed a strong interest in generative AI technologies and has already collaborated with customers to apply these cutting-edge technologies to their business. He is also a reviewer for AI conferences such as ICCV and AAAI.
 Peiyang He is a senior data scientist at the AWS Generative AI Innovation Center. She works with customers across a diverse spectrum of industries to solve their most pressing and innovative business needs leveraging GenAI/ML solutions. In her spare time, she enjoys skiing and traveling.
 Xuefeng Liu leads a science team at the AWS Generative AI Innovation Center in the Asia Pacific and Greater China regions. His team partners with AWS customers on generative AI projects, with the goal of accelerating customers’ adoption of generative AI.
 Tianjun Xiao is a senior applied scientist at the AWS AI Shanghai Lablet, co-leading the computer vision efforts. Presently, his primary focus lies in the realms of multimodal foundation models and object-centric learning. He is actively investigating their potential in diverse applications, including video analysis, 3D vision and autonomous driving.
 Zhang Dai is a an AWS senior solution architect for China Geo Business Sector. He helps companies of various sizes achieve their business goals by providing consultancy on business processes, user experience and cloud technology. He is a prolific blog writer and also author of two books: The Modern Autodidact and Designing Experience.
 Jianyu Zeng is a senior customer solutions manager at AWS, whose responsibility is to support customers, such as New Hope group, during their cloud transition and assist them in realizing business value through cloud-based technology solutions. With a strong interest in artificial intelligence, he is constantly exploring ways to leverage AI to drive innovative changes in our customer’s businesses.
 Carol Tong Min is a senior business development manager, responsible for Key Accounts in GCR GEO West, including two important enterprise customers: Jiannanchun Group and New Hope Group. She is customer obsessed, and always passionate about supporting and accelerating customers’ cloud journey.
 Nick Jiang is a senior specialist sales at AIML SSO team in China. He is focus on transferring innovative AIML solutions and helping with customer to build the AI related workloads within AWS.

Personalize your search results with Amazon Personalize and Amazon OpenSearch Service integration
Amazon Personalize has launched a new integration with Amazon OpenSearch Service that enables you to personalize search results for each user and assists in predicting their search needs. The Amazon Personalize Search Ranking plugin within OpenSearch Service allows you to improve the end-user engagement and conversion from your website and app search by taking advantage of the deep learning capabilities offered by Amazon Personalize. This feature is also available with self-managed OpenSearch.
Search is crucial in engaging users because it brings high-intent traffic from individuals seeking specific products or categories. Previously, customers found it challenging to capitalize on this traffic and provide relevant search results to their users due to infrastructure limitations or lack of ML expertise. This led to increased instances of users failing to find the items they were searching for. With the Amazon Personalize Search Ranking plugin, customers of OpenSearch Service version 2.9.0 or later can go beyond the traditional keyword matching approach and boost relevant items in an individual user’s search results based on their interests, context, and past interactions in real time. You can also fine-tune the level of personalization for every search query to ensure flexibility and control over the search experience.
AWS Partners like Cognizant are excited by the personalization possibilities that the Amazon Personalize Search Ranking plugin will unlock for their media and retail customers.
“Amazon Personalize has been proven to be highly impactful for many businesses with its cost-effective and streamlined implementation. With the release of the new Amazon Personalize Search Ranking plugin within Amazon OpenSearch Service, we can now rapidly deploy and implement real-time user personalization to search results. We are highly confident that it will deliver improved customer experience and satisfaction as well as increase conversion and clickthrough rates by two to three times. Personalized search is a differentiator, especially for media and retail platforms. We are really excited to be a launch partner with AWS on this release and are looking forward to helping businesses deliver personalized search solutions powered by Amazon Personalize.”
– Andy Huang, Head of AI/ML at Cognizant Servian.
In this post, we show you how search results get personalized based on the user and how they vary when you adjust the personalization weight. We specify a value closer to zero to place less emphasis on personalization, and specify a value closer to 1 to re-rank search results based on a higher level of personalization.
Example use cases
To explore the impact of this new feature in greater detail, let’s review an example using a dataset from the Retail Demo Store.
First, we use OpenSearch Service to get search results for the search query “Grooming.” When the personalization weight is set to 0.0, no personalization takes place. As shown in the following table, the top five search results from OpenSearch Service show the grooming items with a higher gender affinity towards women (refer to the Gender_Affinity column, where M stands for male and F stands for female).
| Rank | Item_ID | Item_Name | Description | Gender_Affinity |
| 1 | 1bcb66c4-ee9d-4c0c-ba53-168cb243569f | Women’s Grooming Kit | A must-have in every bathroom | F |
| 2 | f91ec34f-a08e-4408-8bb0-592bdd09375c | Besto Hairbrush for Women | Soft brush for everyday use | F |
| 3 | 4296626c-fbb0-42b4-9a50-b6c6c16095f3 | Makeup Brush Kit | This nifty makeup brush kit is essential in ev… | F |
| 4 | 09920b2e-4e07-41f7-aca6-47744777a2a7 | Trendy Razor | A must-have in every bathroom | F |
| 5 | 39945ad0-57c9-4c28-a69c-532d5d167202 | Makeup Brushes | Makeup brushes for every bathroom | F |
| 6 | 1bfbe5c7-6f02-4465-82f1-6083a4b302c0 | Premium Men’s Razor | Razor for every bathroom | M |
| 7 | 6d5b3f03-ade6-42f7-969d-acd1f2162332 | 5-Blade Razor for Men | Razor for every bathroom | M |
| 8 | 83095a08-2968-4275-a375-4fab404df7ac | Fusion5 Razers for Men | Razor for every bathroom | M |
| 9 | afdd9c41-2762-45bf-b6a7-e3fb8f1b34ba | Minimalistic Razor | A must-have in every bathroom | M |
| 10 | 5dbc7cb7-39c5-4795-9064-d1655d78b3ca | Razor Brand for Men | Razor for every bathroom | M |
Let’s suppose that a user with gender M (male) performs a search using the same query for “Grooming.” When the personalization weight is set to 0.3, the items with a gender affinity towards men get a subtle boost in ranking. In this example, Premium Men’s Razor, which was originally ranked number 6 in the previous table by OpenSearch Service, gets boosted to rank 2 in the updated table. Similarly, Razor Brand for Men shows up higher in position (rank 6) despite being the lowest-ranked item in the previous table.
| Rank | Item_ID | Item_Name | Description | Gender_Affinity |
| 1 | 1bcb66c4-ee9d-4c0c-ba53-168cb243569f | Women’s Grooming Kit | A must-have in every bathroom | F |
| 2 | 1bfbe5c7-6f02-4465-82f1-6083a4b302c0 | Premium Men’s Razor | Razor for every bathroom | M |
| 3 | f91ec34f-a08e-4408-8bb0-592bdd09375c | Besto Hairbrush for Women | Soft brush for everyday use | F |
| 4 | 4296626c-fbb0-42b4-9a50-b6c6c16095f3 | Makeup Brush Kit | This nifty makeup brush kit is essential in ev… | F |
| 5 | 09920b2e-4e07-41f7-aca6-47744777a2a7 | Trendy Razor | A must-have in every bathroom | F |
| 6 | 5dbc7cb7-39c5-4795-9064-d1655d78b3ca | Razor Brand for Men | Razor for every bathroom | M |
| 7 | 39945ad0-57c9-4c28-a69c-532d5d167202 | Makeup Brushes | Makeup brushes for every bathroom | F |
| 8 | afdd9c41-2762-45bf-b6a7-e3fb8f1b34ba | Minimalistic Razor | A must-have in every bathroom | M |
| 9 | 83095a08-2968-4275-a375-4fab404df7ac | Fusion5 Razers for Men | Razor for every bathroom | M |
| 10 | 6d5b3f03-ade6-42f7-969d-acd1f2162332 | 5-Blade Razor for Men | Razor for every bathroom | M |
Next, we fine-tune the personalization weight to a value of 0.8 to get more personalized search results for “Grooming.” In the following table, the top four items in the search results are highly suited for men. Premium Men’s Razor and Razor Brand for Men shoot up further in rank. We also see other grooming items such as Minimalistic Razor and Fusion5 Razers for Men surfaced at the top of the search results even though they had a lower ranking in our first query.
| Rank | Item_ID | Item_Name | Description | Gender_Affinity |
| 1 | 1bfbe5c7-6f02-4465-82f1-6083a4b302c0 | Premium Men’s Razor | Razor for every bathroom | M |
| 2 | 5dbc7cb7-39c5-4795-9064-d1655d78b3ca | Razor Brand for Men | Razor for every bathroom | M |
| 3 | afdd9c41-2762-45bf-b6a7-e3fb8f1b34ba | Minimalistic Razor | A must-have in every bathroom | M |
| 4 | 83095a08-2968-4275-a375-4fab404df7ac | Fusion5 Razers for Men | Razor for every bathroom | M |
| 5 | 1bcb66c4-ee9d-4c0c-ba53-168cb243569f | Women’s Grooming Kit | A must-have in every bathroom | F |
| 6 | f91ec34f-a08e-4408-8bb0-592bdd09375c | Besto Hairbrush for Women | Soft brush for everyday use | F |
| 7 | 6d5b3f03-ade6-42f7-969d-acd1f2162332 | 5-Blade Razor for Men | Razor for every bathroom | M |
| 8 | 09920b2e-4e07-41f7-aca6-47744777a2a7 | Trendy Razor | A must-have in every bathroom | F |
| 9 | 39945ad0-57c9-4c28-a69c-532d5d167202 | Makeup Brushes | Makeup brushes for every bathroom | F |
| 10 | 4296626c-fbb0-42b4-9a50-b6c6c16095f3 | Makeup Brush Kit | This nifty makeup brush kit is essential in ev… | F |
For more details on how to implement personalized search with OpenSearch Service, refer to Personalizing search results from OpenSearch.
Conclusion
With the new Amazon Personalize Search Ranking plugin, customers of both self-managed OpenSearch and OpenSearch Service v2.9 and above can boost relevant items in their search results by including signals from each user’s history, context, and preferences. The plugin enables you to exercise greater control over the level of personalization for each user and query type, and improve the overall search experience for your users.
For more details on Amazon Personalize, refer to the Amazon Personalize Developer Guide.
About the Authors
 Shreeya Sharma is a Sr. Technical Product Manager working with AWS AI/ML on the Amazon Personalize team. She has a background in computer science engineering, technology consulting, and data analytics
 Ketan Kulkarni is a Software Development Engineer with the Amazon Personalize team focused on building AI-powered recommender systems at scale. In his spare time, he enjoys reading and traveling.
 Prashant Mishra is a Software Development Engineer on the Amazon Personalize team.
 Branislav Kveton is a Principal Scientist at AWS AI Labs. He proposes, analyzes, and applies algorithms that learn incrementally, run in real time, and converge to near optimal solutions as the number of observations increases.
Johns Hopkins and Amazon announce new AI2AI research awards
Research award recipients named as part of the JHU + Amazon Initiative for Interactive AI (AI2AI), now in its second year.Read More
“I want to help people automate boring tasks”
Former Amazon applied science intern Margarida Ferreira conducts research to make complex cloud resources easier to manage.Read More