In the rapidly evolving world of AI and machine learning (ML), foundation models (FMs) have shown tremendous potential for driving innovation and unlocking new use cases. However, as organizations increasingly harness the power of FMs, concerns surrounding data privacy, security, added cost, and compliance have become paramount. Regulated and compliance-oriented industries, such as financial services, healthcare and life sciences, and government institutes, face unique challenges in ensuring the secure and responsible consumption of these models. To strike a balance between agility, innovation, and adherence to standards, a robust platform becomes essential. In this post, we propose Generative AI Gateway as platform for an enterprise to allow secure access to FMs for rapid innovation.
In this post, we define what a Generative AI Gateway is, its benefits, and how to architect one on AWS. A Generative AI Gateway can help large enterprises control, standardize, and govern FM consumption from services such as Amazon Bedrock, Amazon SageMaker JumpStart, third-party model providers (such as Anthropic and their APIs), and other model providers outside of the AWS ecosystem.
What is a Generative AI Gateway?
For traditional APIs (such as REST or gRPC), API Gateway has established itself as a design pattern that enables enterprises to standardize and control how APIs are externalized and consumed. In addition, API Registries enabled centralized governance, control, and discoverability of APIs.
Similarly, Generative AI Gateway is a design pattern that aims to expand on API Gateway and Registry patterns with considerations specific to serving and consuming foundation models in large enterprise settings. For example, handling hallucinations, managing company-specific IPs and EULAs (End User License Agreements), as well as moderating generations are new responsibilities that go beyond the scope of traditional API Gateways.
In addition to requirements specific for generative AI, the technological and regulatory landscape for foundation models is changing fast. This creates unique challenges for organizations to balance innovation speed and compliance. For example:
- The state-of-the-art (SOTA) of models, architectures, and best practices are constantly changing. This means companies need loose coupling between app clients (model consumers) and model inference endpoints, which ensures easy switch among large language model (LLM), vision, or multi-modal endpoints if needed. An abstraction layer over model inference endpoints provides such loose coupling.
- Regulatory uncertainty, especially over IP and data privacy, requires observability, monitoring, and trace of generations. For example, if Retrieval Augmented Generation (RAG)-based applications accidentally include personally identifiable information (PII) data in context, such issues need to be detected in real time. This becomes challenging if large enterprises with multiple data science teams use bespoke, distributed platforms for deploying foundation models.
Generative AI Gateway aims to solve for these new requirements while providing the same benefits of traditional API Gateways and Registries, such as centralized governance and observability, and reuse of common components.
Solution overview
Specifically, Generative AI Gateway provides the following key components:
- A model abstraction layer for approved FMs
- An API Gateway for FMs (AI Gateway)
- A playground for FMs for internal model discoverability
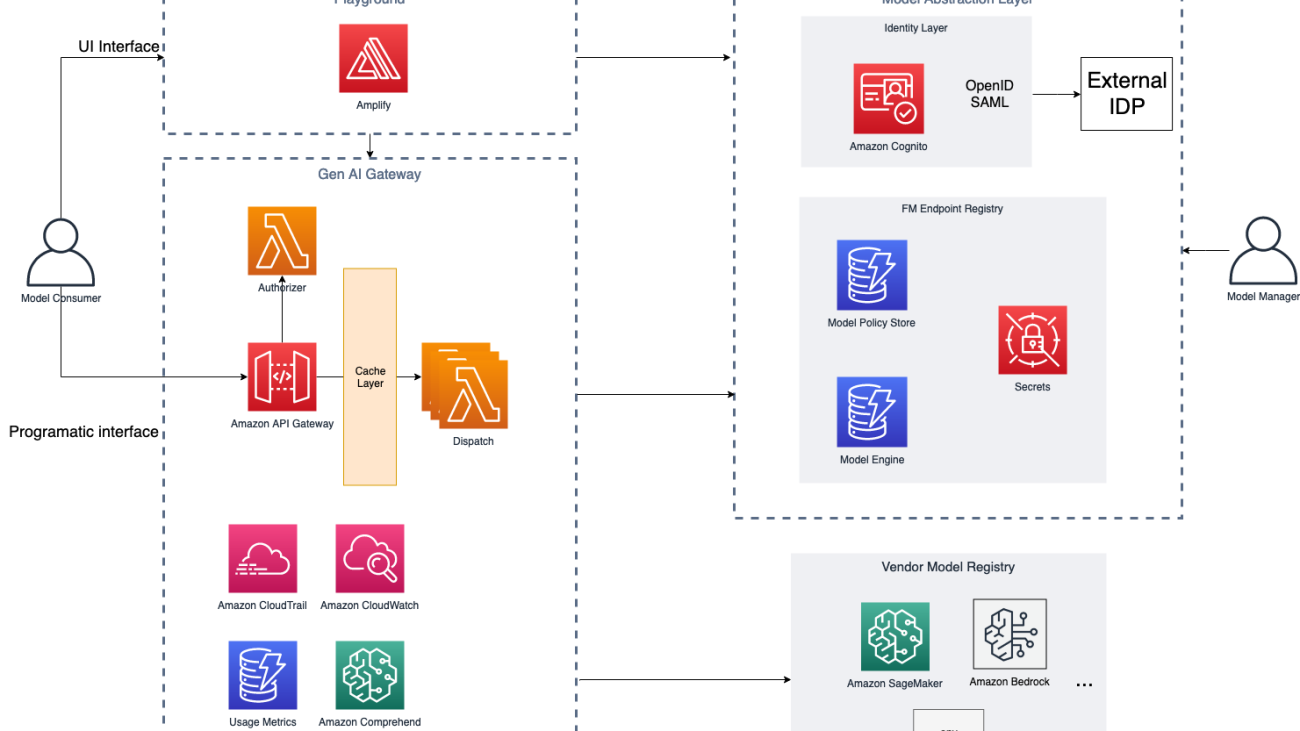
The following diagram illustrates the solution architecture.
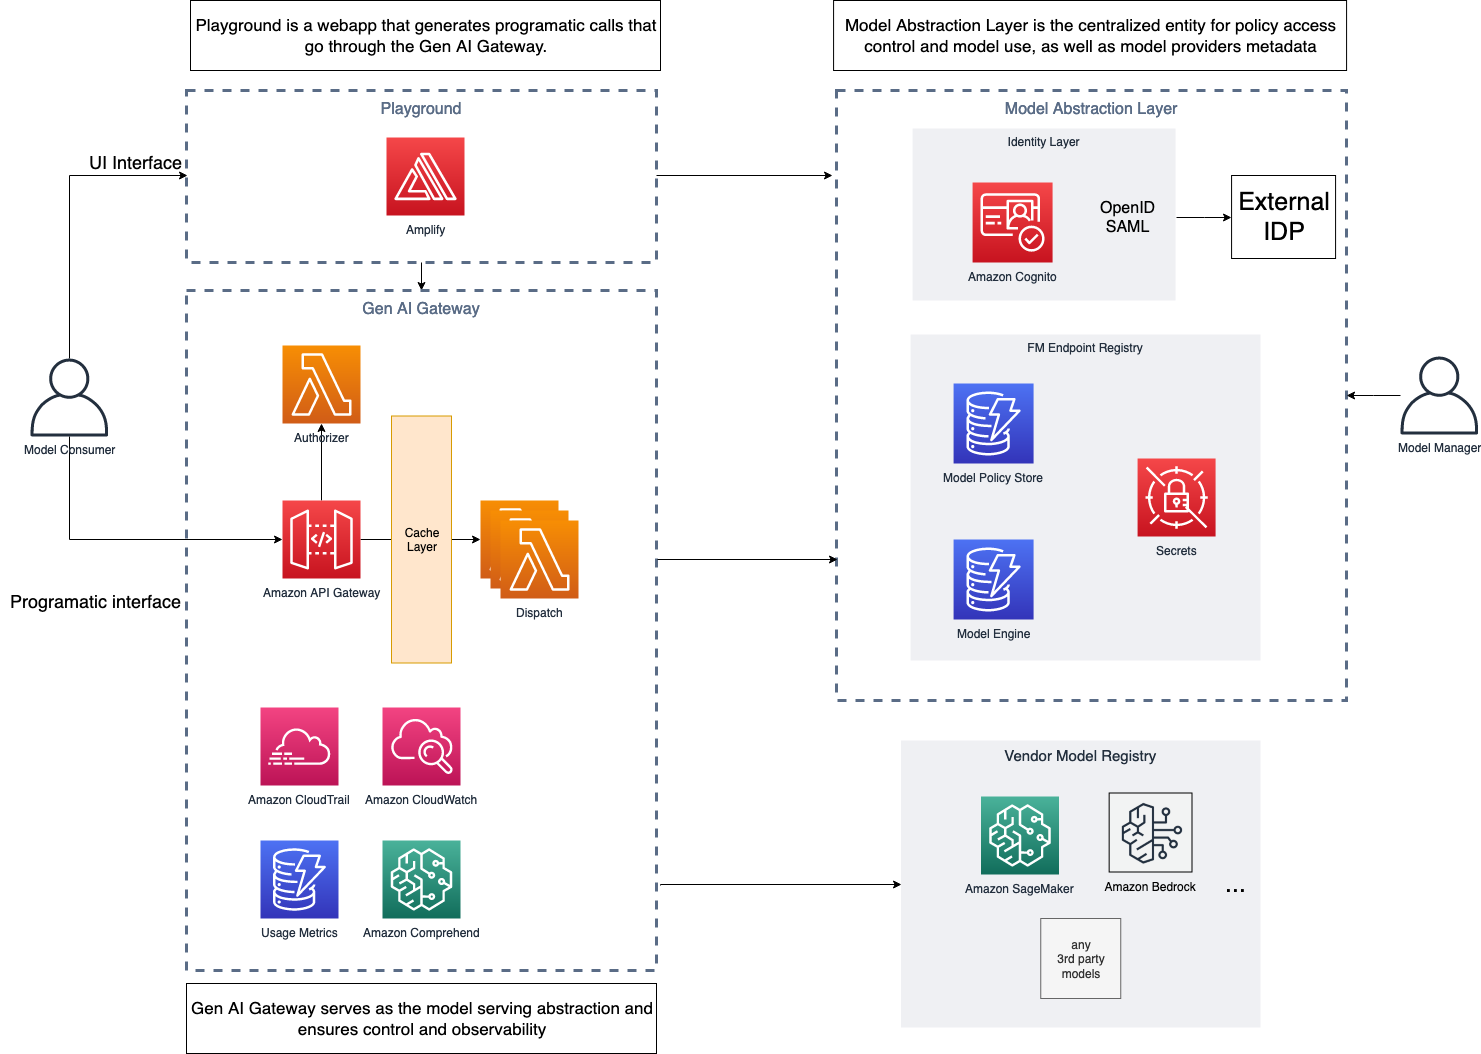
For added resilience, the suggested solution can be deployed in a Multi-AZ environment. The dotted lines in the preceding diagram represent network boundaries, although the entire solution can be deployed in a single VPC.
Model abstraction layer
The model abstraction layer serves as the foundation for secure and controlled access to the organization’s pool of FMs. The layer serves a single source of truth on which models are available to the company, team, and employee, as well as how to access each model by storing endpoint information for each model.
This layer serves as the cornerstone for secure, compliant, and agile consumption of FMs through the Generative AI Gateway, promoting responsible AI practices within the organization.
The layer itself consists of four main components:
- FM endpoint registry – After the FMs are evaluated, approved, and deployed for usage, their endpoints are added to the FM endpoint registry—a centralized repository of all deployed or externally accessible API endpoints. The registry contains metadata about generative AI service endpoints that an organization consumes, whether it’s an internally deployed FM or an externally provided generative AI API from a vendor. The metadata includes information such as service endpoint information for each foundation model and their configuration, and access policies (based on role, team, and so on).
- Model policy store and engine – For FMs to be consumed in a compliant manner, the model abstraction layer must track qualitative and quantitative rules for model generations. For example, some generations might be subject to certain regulations such as CCPA (California Consumer Privacy Act), which requires custom generation behavior per geo. Therefore, the policies should be country and geo aware, to ensure compliance across changing regulatory environments across locales.
- Identity layer – After the models are available to be consumed, the identity layer plays a pivotal role in access management, ensuring that only authorized users or roles within the organization can interact with specific FMs through the AI Gateway. Role-based access control (RBAC) mechanisms help define granular access permissions, ensuring that users can access models based on their roles and responsibilities.
- Integration with vendor model registries – FMS can be available in different ways, either deployed in organization accounts under VPCs or available as APIs through different vendors. After passing the initial checks mentioned earlier, the endpoint registry holds the necessary information about these models from vendors and their versions exposed via APIs. This abstracts way the underlying complexities from the end-user.
To populate the AI model endpoint registry, the Generative AI Gateway team collaborates with a cross-function team of domain experts and business line stakeholders to carefully select and onboard FMs to the platform. During this onboarding phase, factors like model performance, cost, ethical alignment, compliance with industry regulations, and the vendor’s reputation are carefully considered. By conducting thorough evaluations, organizations ensure that the selected FMs align with their specific business needs and adhere to security and privacy requirements.
The following diagram illustrates the architecture of this layer.

AWS services can help in building a model abstraction layer (MAL) as follows:
- The generative AI manager creates a registry table using Amazon DynamoDB. This table is populated with information about the FMs either deployed internally in the organization account or accessible via an API from vendors. This table will hold the endpoint, metadata, and configuration parameters for the model. It can also store the information if a custom AWS Lambda function is needed to invoke the underlying FM with vendor-specific API clients.
- The generative AI manager then determines access for the user, adds limits, adds a policy for what type of generations the user can perform (images, text, multi-modality, and so on), and adds other organization specific policies such as responsible AI and content filters that will be added as a separate policy table in DynamoDB.
- When the user makes a request using the AI Gateway, it’s routed to Amazon Cognito to determine access for the client. A Lambda authorizer helps determine the access from the identity layer, which will be managed by the DynamoDB table policy. If the client has access, the relevant access such as the AWS Identity and Access Management (IAM) role or API key for the FM endpoint are fetched from AWS Secrets Manager. Also, the registry is explored to find the relevant endpoint and configuration at this stage.
- After all the necessary information related to the request is fetched, such as the endpoint, configuration, access keys, and custom function, it’s handed back to the AI Gateway to be used with the dispatcher Lambda function that calls a specific model endpoint.
AI Gateway
The AI Gateway serves as a crucial component that facilitates secure and efficient consumption of FMs within the organization. It operates on top of the model abstraction layer, providing an API-based interface to internal users, including developers, data scientists, and business analysts.
Through this user-friendly interface (programmatic and playground UI-based), internal users can seamlessly access, interact with, and use the organization’s curated models, ensuring relevant models are made available based on their identities and responsibilities. An AI Gateway can comprise the following:
- A unified API interface across all FMs – The AI Gateway presents a unified API interface and SDK that abstracts the underlying technical complexities, enabling internal users to interact with the organization’s pool of FMs effortlessly. Users can use the APIs to invoke different models and send in their prompts to get model generation.
- API quota, limits, and usage management – This includes the following:
- Consumed quota – To enable efficient resource allocation and cost control, the AI Gateway provides users with insights into their consumed quota for each model. This transparency allows users to manage their AI resource usage effectively, ensuring optimal utilization and preventing resource waste.
- Request for dedicated hosting – Recognizing the importance of resource allocation for critical use cases, the AI Gateway allows users to request dedicated hosting of specific models. Users with high-priority or latency-sensitive applications can use this feature to ensure a consistent and dedicated environment for their model inference needs.
- Access control and model governance – Using the identity layer from the model abstraction layer, the AI Gateway enforces stringent access controls. Each user’s identity and assigned roles determine the models they can access. This granular access control ensures that users are presented with only the models relevant to their domains, maintaining data security and privacy while promoting responsible AI usage.
- Content, privacy, and responsible AI policy enforcement – The API Gateway employs both the preprocessing and postprocessing of all inputs to the model as well as the model generations to filter and moderate for toxicity, violence, harmfulness, PII data, and more that are specified by the model abstraction layer for filtering. Centralizing this function in the AI Gateway ensures enforcement and easy audit.
By integrating the AI Gateway with the model abstraction layer and incorporating features such as identity-based access control, model listing and metadata display, consumed quota monitoring, and dedicated hosting requests, organizations can create a powerful AI consumption platform.
In addition, the AI Gateway provides the standard benefits of API Gateways, such as the following:
- Cost control mechanism – To optimize resource allocation and manage costs effectively, a robust cost control mechanism can be implemented. This mechanism monitors resource usage, model inference costs, and data transfer expenses. It allows organizations to gain insights into generative AI resource expenditure, identify cost-saving opportunities, and make informed decisions on resource allocation.
- Cache – Inference from FMs can become expensive, especially during testing and development phases of the application. A cache layer can help reduce that cost and even improve the speed by maintaining a cache for frequent requests. The cache also offloads the inference burden on the endpoint, which makes room for other requests.
- Observability – This plays a crucial role in capturing activities performed on the AI Gateway and the Discovery Playground. Detailed logs record user interactions, model requests, and system responses. These logs provide valuable information for troubleshooting, tracking user behavior, and reinforcing transparency and accountability.
- Quotas, rate limits, and throttling – The governance aspect of this layer can incorporate the application of quotas, rate limits, and throttling to manage and control AI resource usage. Quotas define the maximum number of requests a user or team can make within a specific time frame, ensuring fair resource distribution. Rate limits prevent excessive usage of resources by enforcing a maximum request rate. Throttling mitigates the risk of system overload by controlling the frequency of incoming requests, preventing service disruptions.
- Audit trails and usage monitoring – The team assumes responsibility of maintaining detailed audit trails of the entire ecosystem. These logs enable comprehensive usage monitoring, allowing the central team to track user activities, identify potential risks, and maintain transparency in AI consumption.
The following diagram illustrates this architecture.

AWS services can help in building an AI Gateway as follows:
- The user makes the request using Amazon API Gateway, which is routed to the model abstraction layer after the request has been authenticated and authorized.
- The AI Gateway enforces usage limits for each user’s request using usage limit policies returned by the MAL. For easy enforcement, we use the native capability of API Gateway to enforce metering. In addition, we perform standard API Gateway validations on request using a JSON schema.
- After the usage limits are validated, both the endpoint configuration and credentials received from the MAL form the actual inference payload using native interfaces provided by each of the approved model vendors. The dispatch layer normalizes the differences across vendors’ SDKs and API interfaces to provide a unified interface to the client. Issues such as DNS changes, load balancing, and caching could also be handled by a more sophisticated dispatch service.
- After the response is received from the underlying model endpoints, postprocessing Lambda functions use the policies from the MAL pertaining to content (toxicity, nudity, and so on) as well as compliance (CCPA, GDPR, and so on) to filter or mask generations as a whole or in part.
- Throughout the lifecycle of the request, all generations and inference payloads are logged through Amazon CloudWatch Logs, which can be organized via log groups depending on tags as well as policies retrieved from MAL. For example, logs can be separated per model vendor and geo. This allows for further model improvement and troubleshooting.
- Finally, a retroactive audit is available through AWS CloudTrail.
Discovery Playground
The last component is to introduce a Discovery Playground, which presents a user-friendly interface built on top of the model abstraction layer and the AI Gateway, offering a dynamic environment for users to explore, test, and unleash the full potential of available FMs. Beyond providing access to AI capabilities, the playground empowers users to interact with models using a rich UI interface, provide valuable feedback, and share their discoveries with other users within the organization. It offers the following key features:
- Playground interface – You can effortlessly input prompts and receive model outputs in real time. The UI streamlines the interaction process, making generative AI exploration accessible to users with varying levels of technical expertise.
- Model cards – You can access a comprehensive list of available models along with their corresponding metadata. You can explore detailed information about each model, such as its capabilities, performance metrics, and supported use cases. This feature facilitates informed decision-making, empowering you to select the most suitable model for your specific needs.
- Feedback mechanism – A differentiating aspect of the playground would be its feedback mechanism, allowing you to provide insights on model outputs. You can report issues like hallucination (fabricated information), inappropriate language, or any unintended behavior observed during interactions with the models.
- Recommendations for use cases – The Discovery Playground can be designed to facilitate learning and understanding of FMs’ capabilities for different use cases. You can experiment with various prompts and discover which models excel in specific scenarios.
By offering a rich UI interface, model cards, feedback mechanism, use case recommendations, and the optional Example Store, the Discovery Playground becomes a powerful platform for generative AI exploration and knowledge sharing within the organization.
Process considerations
Whereas the previous modules of the Generative AI Gateway offer a platform, this layer is more practical, ensuring the responsible and compliant consumption of FMs within the organization. It encompasses additional measures that go beyond the technical aspects, focusing on legal, practical, and regulatory considerations. This layer presents crucial responsibilities for the central team to address data security, licenses, organizational regulations, and audit trails, fostering a culture of trust and transparency:
- Data security and privacy – Because FMs can process vast amounts of data, data security and privacy become paramount concerns. The central team is responsible for implementing robust data security measures, including encryption, access controls, and data anonymization. Compliance with data protection regulations, such as GDPR, HIPAA, or other industry-specific standards, is diligently ensured to safeguard sensitive information and user privacy.
- Data monitoring – A comprehensive data monitoring system should be established to track incoming and outgoing information through the AI Gateway and Discovery Playground. This includes monitoring the prompts provided by users and the corresponding model outputs. The data monitoring mechanism enables the organization to observe data patterns, detect anomalies, and ensure that sensitive information remains secure.
- Model licenses and agreements – The central team should take the lead in managing licenses and agreements associated with the use of models. Vendor-provided models may come with specific usage agreements, usage restrictions, or licensing terms. The team ensures compliance with these agreements and maintains a comprehensive repository of all licenses, ensuring a clear understanding of the rights and limitations pertaining to each model.
- Ethical considerations – As AI systems become increasingly sophisticated, the central team assumes the responsibility of ensuring ethical alignment in AI usage. They assess models for potential biases, harmful outputs, or unethical behavior. Steps are taken to mitigate such issues and foster responsible AI development and deployment within the organization.
- Proactive adaptation – To stay ahead of emerging challenges and ever-changing regulations, the central team takes a proactive approach to governance. They continuously update policies, model standards, and compliance measures to align with the latest industry practices and legal requirements. This ensures the organization’s AI ecosystem remains in compliance and upholds ethical standards.
Conclusion
The Generative AI Gateway enables organizations to use foundation models responsibly and securely. Through the integration of the model abstraction layer, AI Gateway, and Discovery Playground powered with monitoring, observability, governance, and security, compliance, and audit layers, organizations can strike a balance between innovation and compliance. The AI Gateway empowers you with seamless access to curated models, while the Discovery Playground fosters exploration and feedback. Monitoring and governance provide insights for optimized resource allocation and proactive decision-making. With a focus on security, compliance, and ethical AI practices, the Generative AI Gateway opens doors to a future where AI-driven applications thrive responsibly, unlocking new realms of possibilities for organizations.
About the Authors
 Talha Chattha is an AI/ML Specialist Solutions Architect at Amazon Web Services, based in Stockholm, serving Nordic enterprises and digital native businesses. Talha holds a deep passion for Generative AI technologies, He works tirelessly to deliver innovative, scalable and valuable ML solutions in the space of Large Language Models and Foundation Models for his customers. When not shaping the future of AI, he explores the scenic European landscapes and delicious cuisines.
 John Hwang is a Generative AI Architect at AWS with special focus on Large Language Model (LLM) applications, vector databases, and generative AI product strategy. He is passionate about helping companies with AI/ML product development, and the future of LLM agents and co-pilots. Prior to joining AWS, he was a Product Manager at Alexa, where he helped bring conversational AI to mobile devices, as well as a derivatives trader at Morgan Stanley. He holds a B.S. in Computer Science from Stanford University.
 Paolo Di Francesco is a Senior Solutions Architect at Amazon Web Services (AWS). He holds a PhD in Telecommunication Engineering and has experience in software engineering. He is passionate about machine learning and is currently focusing on using his experience to help customers reach their goals on AWS, in particular in discussions around MLOps. Outside of work, he enjoys playing football and reading.


 Charles Laughlin is a Principal AI/ML Specialist Solution Architect and works in the Amazon SageMaker service team at AWS. He helps shape the service roadmap and collaborates daily with diverse AWS customers to help transform their businesses using cutting-edge AWS technologies and thought leadership. Charles holds a M.S. in Supply Chain Management and a Ph.D. in Data Science.


 Yunfei Bai is a Senior Solutions Architect at AWS. With a background in AI/ML, data science, and analytics, Yunfei helps customers adopt AWS services to deliver business results. He designs AI/ML and data analytics solutions that overcome complex technical challenges and drive strategic objectives. Yunfei has a PhD in Electronic and Electrical Engineering. Outside of work, Yunfei enjoys reading and music.
 Burak Gozluklu is a Principal ML Specialist Solutions Architect located in Boston, MA. Burak has over 15 years of industry experience in simulation modeling, data science, and ML technology. He helps global customers adopt AWS technologies and specifically AI/ML solutions to achieve their business objectives. Burak has a PhD in Aerospace Engineering from METU, an MS in Systems Engineering, and a post-doc in system dynamics from MIT in Cambridge, MA. Burak is passionate about yoga and meditation.


 Praveen Chamarthi is a Senior AI/ML Specialist with Amazon Web Services. He is passionate about AI/ML and all things AWS. He helps customers across the Americas to scale, innovate, and operate ML workloads efficiently on AWS. In his spare time, Praveen loves to read and enjoys sci-fi movies.


 Jun Zhang is a Solutions Architect based in Zurich. He helps Swiss customers architect cloud-based solutions to achieve their business potential. He has a passion for sustainability and strives to solve current sustainability challenges with technology. He is also a huge tennis fan and enjoys playing board games a lot.
 Mohan Gowda leads Machine Learning team at AWS Switzerland. He works primarily with Automotive customers to develop innovative AI/ML solutions and platforms for next generation vehicles. Before working with AWS, Mohan worked with a Global Management Consulting firm with a focus on Strategy & Analytics. His passion lies in connected vehicles and autonomous driving.
 Matthias Egli is the Head of Education in Switzerland. He is an enthusiastic Team Lead with a broad experience in business development, sales, and marketing.
 Kemeng Zhang is an ML Engineer based in Zurich. She helps global customers design, develop, and scale ML-based applications to empower their digital capabilities to increase business revenue and reduce cost. She is also very passionate about creating human-centric applications by leveraging knowledge from behavioral science. She likes playing water sports and walking dogs.
 Daniele Chiappalupi is a recent graduate from ETH Zürich. He enjoys every aspect of software engineering, from design to implementation, and from deployment to maintenance. He has a deep passion for AI and eagerly anticipates exploring, utilizing, and contributing to the latest advancements in the field. In his free time, he loves going snowboarding during colder months and playing pick-up basketball when the weather warms up.


 Gagan Singh is a Senior Technical Account Manager at AWS, where he partners with digital native startups to pave their path to heightened business success. With a niche in propelling Machine Learning initiatives, he leverages Amazon SageMaker, particularly emphasizing on Deep Learning and Generative AI solutions. In his free time, Gagan finds solace in trekking on the trails of the Himalayas and immersing himself in diverse music genres.
 Dhawal Patel is a Principal Machine Learning Architect at AWS. He has worked with organizations ranging from large enterprises to mid-sized startups on problems related to distributed computing, and Artificial Intelligence. He focuses on Deep learning including NLP and Computer Vision domains. He helps customers achieve high performance model inference on SageMaker.
 Venugopal Pai is a Solutions Architect at AWS. He lives in Bengaluru, India, and helps digital native customers scale and optimize their applications on AWS.
 Weifeng Chen is an Applied Scientist in the AWS Human-in-the-loop science team. He develops machine-assisted labeling solutions to help customers obtain drastic speedups in acquiring groundtruth spanning the Computer Vision, Natural Language Processing and Generative AI domain.
 Erran Li is the applied science manager at humain-in-the-loop services, AWS AI, Amazon. His research interests are 3D deep learning, and vision and language representation learning. Previously he was a senior scientist at Alexa AI, the head of machine learning at Scale AI and the chief scientist at Pony.ai. Before that, he was with the perception team at Uber ATG and the machine learning platform team at Uber working on machine learning for autonomous driving, machine learning systems and strategic initiatives of AI. He started his career at Bell Labs and was adjunct professor at Columbia University. He co-taught tutorials at ICML’17 and ICCV’19, and co-organized several workshops at NeurIPS, ICML, CVPR, ICCV on machine learning for autonomous driving, 3D vision and robotics, machine learning systems and adversarial machine learning. He has a PhD in computer science at Cornell University. He is an ACM Fellow and IEEE Fellow.
 Koushik Kalyanaraman is a Software Development Engineer on the Human-in-the-loop science team at AWS. In his spare time, he plays basketball and spends time with his family.
 Xiong Zhou is a Senior Applied Scientist at AWS. He leads the science team for Amazon SageMaker geospatial capabilities. His current area of research includes computer vision and efficient model training. In his spare time, he enjoys running, playing basketball and spending time with his family.
 Alex Williams is an applied scientist at AWS AI where he works on problems related to interactive machine intelligence. Before joining Amazon, he was a professor in the Department of Electrical Engineering and Computer Science at the University of Tennessee . He has also held research positions at Microsoft Research, Mozilla Research, and the University of Oxford. He holds a PhD in Computer Science from the University of Waterloo.
 Ammar Chinoy is the General Manager/Director for AWS Human-In-The-Loop services. In his spare time, he works on positivereinforcement learning with his three dogs: Waffle, Widget and Walker.