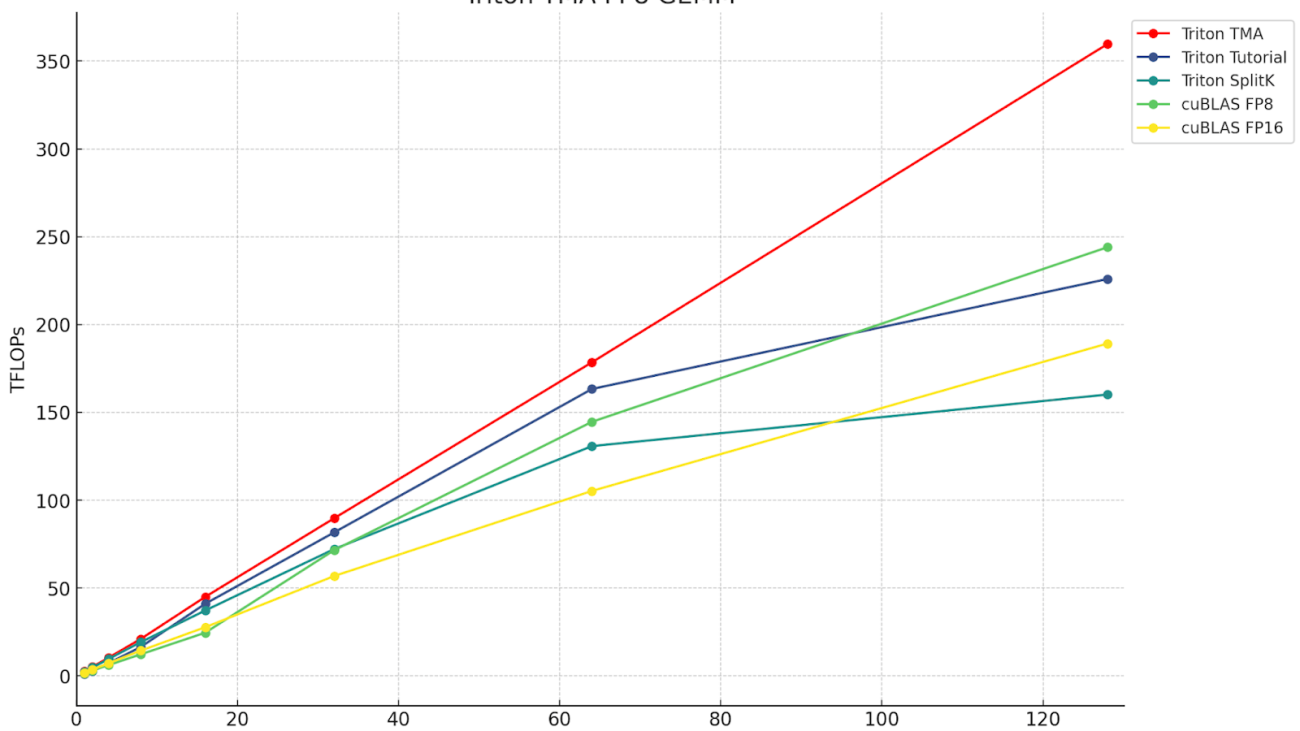
Accelerate AI models on GPU using Amazon SageMaker multi-model endpoints with TorchServe, saving up to 75% on inference costs

Accelerate AI models on GPU using Amazon SageMaker multi-model endpoints with TorchServe, saving up to 75% on inference costs

Multi-model endpoints (MMEs) are a powerful feature of Amazon SageMaker designed to simplify the deployment and operation of machine learning (ML) models. With MMEs, you can host multiple models on a single serving container and host all the models behind a single endpoint. The SageMaker platform automatically manages the loading and unloading of models and scales resources based on traffic patterns, reducing the operational burden of managing a large quantity of models. This feature is particularly beneficial for deep learning and generative AI models that require accelerated compute. The cost savings achieved through resource sharing and simplified model management makes SageMaker MMEs an excellent choice for you to host models at scale on AWS.

Recently, generative AI applications have captured widespread attention and imagination. Customers want to deploy generative AI models on GPUs but at the same time are conscious of costs. SageMaker MMEs support GPU instances and is a great option for these types of applications. Today, we are excited to announce TorchServe support for SageMaker MMEs. This new model server support gives you the advantage of all the benefits of MMEs while still using the serving stack that TorchServe customers are most familiar with. In this post, we demonstrate how to host generative AI models, such as Stable Diffusion and Segment Anything Model, on SageMaker MMEs using TorchServe and build a language-guided editing solution that can help artists and content creators develop and iterate their artwork faster.

Solution overview

Language-guided editing is a common cross-industry generative AI use case. It can help artists and content creators work more efficiently to meet content demand by automating repetitive tasks, optimizing campaigns, and providing a hyper-personalized experience for the end customer. Businesses can benefit from increased content output, cost savings, improved personalization, and enhanced customer experience. In this post, we demonstrate how you can build language-assisted editing features using MME TorchServe that allow you to erase any unwanted object from an image and modify or replace any object in an image by supplying a text instruction.

The user experience flow for each use case is as follows:

  • To remove an unwanted object, the select the object from the image to highlight it. This action sends the pixel coordinates and the original image to a generative AI model, which generates a segmentation mask for the object. After confirming the correct object selection, you can send the original and mask images to a second model for removal. The detailed illustration of this user flow is demonstrated below.

Dog on a bench with mouse pointer clicking the dog

Dog on a bench highlighted

A bench without the dog

Step 1: Select an object (“dog”) from the image Step 2: Confirm the correct object is highlighted Step 3: Erase the object from the image
  • To modify or replace an object, the select and highlight the desired object, following the same process as described above. Once you confirm the correct object selection, you can modify the object by supplying the original image, the mask, and a text prompt. The model will then change the highlighted object based on the provided instructions. A detailed illustration of this second user flow is as follows.

A vase with a cactus and mouse pointer

A vase highlighted

A rounded vase with a cactus

Step 1: Select an object (“vase”) from the image Step 2: Confirm the correct object is highlighted Step 3: Provide a text prompt (“futuristic vase”) to modify the object

To power this solution, we use three generative AI models: Segment Anything Model (SAM), Large Mask Inpainting Model (LaMa), and Stable Diffusion Inpaint (SD). Here are how these models been utilized in the user experience workflow:

To remove an unwanted object To modify or replace an object

flow diagram

flow diagram

  1. Segment Anything Model (SAM) is used to generate a segment mask of the object of interest. Developed by Meta Research, SAM is an open-source model that can segment any object in an image. This model has been trained on a massive dataset known as SA-1B, which comprises over 11 million images and 1.1 billion segmentation masks. For more information on SAM, refer to their website and research paper.
  2. LaMa is used to remove any undesired objects from an image. LaMa is a Generative Adversarial Network (GAN) model specializes in fill missing parts of images using irregular masks. The model architecture incorporates image-wide global context and a single-step architecture that uses Fourier convolutions, enabling it to achieve state-of-the-art results at a faster speed. For more details on LaMa, visit their website and research paper.
  3. SD 2 inpaint model from Stability AI is used to modify or replace objects in an image. This model allows us to edit the object in the mask area by providing a text prompt. The inpaint model is based on the text-to-image SD model, which can create high-quality images with a simple text prompt. It provides additional arguments such as original and mask images, allowing for quick modification and restoration of existing content. To learn more about Stable Diffusion models on AWS, refer to Create high-quality images with Stable Diffusion models and deploy them cost-efficiently with Amazon SageMaker.

All three models are hosted on SageMaker MMEs, which reduces the operational burden from managing multiple endpoints. In addition to that, using MME eliminates concerns about certain models being underutilized because resources are shared. You can observe the benefit from improved instance saturation, which ultimately leads to cost savings. The following architecture diagram illustrates how all three models are served using SageMaker MMEs with TorchServe.

flow diagram

We have published the code to implement this solution architecture in our GitHub repository. To follow along with the rest of the post, use the notebook file. It is recommended to run this example on a SageMaker notebook instance using the conda_python3 (Python 3.10.10) kernel.

Extend the TorchServe container

The first step is to prepare the model hosting container. SageMaker provides a managed PyTorch Deep Learning Container (DLC) that you can retrieve using the following code snippet:

# Use SageMaker PyTorch DLC as base image
baseimage = sagemaker.image_uris.retrieve(
    framework="pytorch",
    region=region,
    py_version="py310",
    image_scope="inference",
    version="2.0.0",
    instance_type="ml.g5.2xlarge",
)
print(baseimage)

Because the models require resources and additional packages that are not on the base PyTorch DLC, you need to build a Docker image. This image is then uploaded to Amazon Elastic Container Registry (Amazon ECR) so we can access directly from SageMaker. The custom installed libraries are listed in the Docker file:

ARG BASE_IMAGE

FROM $BASE_IMAGE

#Install any additional libraries
RUN pip install segment-anything-py==1.0
RUN pip install opencv-python-headless==4.7.0.68
RUN pip install matplotlib==3.6.3
RUN pip install diffusers
RUN pip install tqdm
RUN pip install easydict
RUN pip install scikit-image
RUN pip install xformers
RUN pip install tensorflow
RUN pip install joblib
RUN pip install matplotlib
RUN pip install albumentations==0.5.2
RUN pip install hydra-core==1.1.0
RUN pip install pytorch-lightning
RUN pip install tabulate
RUN pip install kornia==0.5.0
RUN pip install webdataset
RUN pip install omegaconf==2.1.2
RUN pip install transformers==4.28.1
RUN pip install accelerate
RUN pip install ftfy

Run the shell command file to build the custom image locally and push it to Amazon ECR:

%%capture build_output

reponame = "torchserve-mme-demo"
versiontag = "genai-0.1"

# Build our own docker image
!cd workspace/docker && ./build_and_push.sh {reponame} {versiontag} {baseimage} {region} {account}

Prepare the model artifacts

The main difference for the new MMEs with TorchServe support is how you prepare your model artifacts. The code repo provides a skeleton folder for each model (models folder) to house the required files for TorchServe. We follow the same four-step process to prepare each model .tar file. The following code is an example of the skeleton folder for the SD model:

workspace
|--sd
   |-- custom_handler.py
   |-- model-config.yaml

The first step is to download the pre-trained model checkpoints in the models folder:

import diffusers
import torch
import transformers

pipeline = diffusers.StableDiffusionInpaintPipeline.from_pretrained(
    "stabilityai/stable-diffusion-2-inpainting", torch_dtype=torch.float16
)

sd_dir = "workspace/sd/model"
pipeline.save_pretrained(sd_dir)

The next step is to define a custom_handler.py file. This is required to define the behavior of the model when it receives a request, such as loading the model, preprocessing the input, and postprocessing the output. The handle method is the main entry point for requests, and it accepts a request object and returns a response object. It loads the pre-trained model checkpoints and applies the preprocess and postprocess methods to the input and output data. The following code snippet illustrates a simple structure of the custom_handler.py file. For more detail, refer to the TorchServe handler API.

def initialize(self, ctx: Context):

def preprocess(self, data):

def inference(self, data):

def handle(self, data, context):
    requests = self.preprocess(data)
    responses = self.inference(requests)

    return responses

The last required file for TorchServe is model-config.yaml. The file defines the configuration of the model server, such as number of workers and batch size. The configuration is at a per-model level, and an example config file is shown in the following code. For a complete list of parameters, refer to the GitHub repo.

minWorkers: 1
maxWorkers: 1
batchSize: 1
maxBatchDelay: 200
responseTimeout: 300

The final step is to package all the model artifacts into a single .tar.gz file using the torch-model-archiver module:

!torch-model-archiver --model-name sd --version 1.0 --handler workspace/sd/custom_handler.py --extra-files workspace/sd/model --config-file workspace/sam/model-config.yaml --archive-format no-archive!cd sd && tar cvzf sd.tar.gz .

Create the multi-model endpoint

The steps to create a SageMaker MME are the same as before. In this particular example, you spin up an endpoint using the SageMaker SDK. Start by defining an Amazon Simple Storage Service (Amazon S3) location and the hosting container. This S3 location is where SageMaker will dynamically load the models base on invocation patterns. The hosting container is the custom container you built and pushed to Amazon ECR in the earlier step. See the following code:

# This is where our MME will read models from on S3.
multi_model_s3uri = output_path

Then you want to define a MulitDataModel that captures all the attributes like model location, hosting container, and permission access:

print(multi_model_s3uri)
model = Model(
    model_data=f"{multi_model_s3uri}/sam.tar.gz",
    image_uri=container,
    role=role,
    sagemaker_session=smsess,
    env={"TF_ENABLE_ONEDNN_OPTS": "0"},
)

mme = MultiDataModel(
    name="torchserve-mme-genai-" + datetime.now().strftime("%Y-%m-%d-%H-%M-%S"),
    model_data_prefix=multi_model_s3uri,
    model=model,
    sagemaker_session=smsess,
)
print(mme)

The deploy() function creates an endpoint configuration and hosts the endpoint:

mme.deploy(
    initial_instance_count=1,
    instance_type="ml.g5.2xlarge",
    serializer=sagemaker.serializers.JSONSerializer(),
    deserializer=sagemaker.deserializers.JSONDeserializer(),
)

In the example we provided, we also show how you can list models and dynamically add new models using the SDK. The add_model() function copies your local model .tar files into the MME S3 location:

# Only sam.tar.gz visible!
list(mme.list_models())

models = ["sd/sd.tar.gz", "lama/lama.tar.gz"]
for model in models:
    mme.add_model(model_data_source=model)

Invoke the models

Now that we have all three models hosted on an MME, we can invoke each model in sequence to build our language-assisted editing features. To invoke each model, provide a target_model parameter in the predictor.predict() function. The model name is just the name of the model .tar file we uploaded. The following is an example code snippet for the SAM model that takes in a pixel coordinate, a point label, and dilate kernel size, and generates a segmentation mask of the object in the pixel location:

img_file = "workspace/test_data/sample1.png"
img_bytes = None

with Image.open(img_file) as f:
    img_bytes = encode_image(f)

gen_args = json.dumps(dict(point_coords=[750, 500], point_labels=1, dilate_kernel_size=15))

payload = json.dumps({"image": img_bytes, "gen_args": gen_args}).encode("utf-8")

response = predictor.predict(data=payload, target_model="/sam.tar.gz")
encoded_masks_string = json.loads(response.decode("utf-8"))["generated_image"]
base64_bytes_masks = base64.b64decode(encoded_masks_string)

with Image.open(io.BytesIO(base64_bytes_masks)) as f:
    generated_image_rgb = f.convert("RGB")
    generated_image_rgb.show()

To remove an unwanted object from an image, take the segmentation mask generated from SAM and feed that into the LaMa model with the original image. The following images show an example.

Dog on a bench

White mask of dog on black background

Just a bench

Sample image Segmentation mask from SAM Erase the dog using LaMa

To modify or replace any object in an image with a text prompt, take the segmentation mask from SAM and feed it into SD model with the original image and text prompt, as shown in the following example.

Dog on a bench White mask of dog on black background Hamster on a bench
Sample image Segmentation mask from SAM Replace using SD model with text prompt

“a hamster on a bench”

Cost savings

The benefits of SageMaker MMEs increase based on the scale of model consolidation. The following table shows the GPU memory usage of the three models in this post. They are deployed on one g5.2xlarge instance by using one SageMaker MME.

Model GPU Memory (MiB)
Segment Anything Model 3,362
Stable Diffusion In Paint 3,910
Lama 852

You can see cost savings when hosting the three models with one endpoint, and for use cases with hundreds or thousands of models, the savings are much greater.

For example, consider 100 Stable Diffusion models. Each of the models on its own could be served by an ml.g5.2xlarge endpoint (4 GiB memory), costing $1.52 per instance hour in the US East (N. Virginia) Region. To provide all 100 models using their own endpoint would cost $218,880 per month. With a SageMaker MME, a single endpoint using ml.g5.2xlarge instances can host four models simultaneously. This reduces production inference costs by 75% to only $54,720 per month. The following table summarizes the differences between single-model and multi-model endpoints for this example. Given an endpoint configuration with sufficient memory for your target models, steady state invocation latency after all models have been loaded will be similar to that of a single-model endpoint.

Single-model endpoint Multi-model endpoint
Total endpoint price per month $218,880 $54,720
Endpoint instance type ml.g5.2xlarge ml.g5.2xlarge
CPU Memory capacity (GiB) 32 32
GPU Memory capacity (GiB) 24 24
Endpoint price per hour $1.52 $1.52
Number of instances per endpoint 2 2
Endpoints needed for 100 models 100 25

Clean up

After you are done, please follow the instructions in the cleanup section of the notebook to delete the resources provisioned in this post to avoid unnecessary charges. Refer to Amazon SageMaker Pricing for details on the cost of the inference instances.

Conclusion

This post demonstrates the language-assisted editing capabilities made possible through the use of generative AI models hosted on SageMaker MMEs with TorchServe. The example we shared illustrates how we can use resource sharing and simplified model management with SageMaker MMEs while still utilizing TorchServe as our model serving stack. We utilized three deep learning foundation models: SAM, SD 2 Inpainting, and LaMa. These models enable us to build powerful capabilities, such as erasing any unwanted object from an image and modifying or replacing any object in an image by supplying a text instruction. These features can help artists and content creators work more efficiently and meet their content demands by automating repetitive tasks, optimizing campaigns, and providing a hyper-personalized experience. We invite you to explore the example provided in this post and build your own UI experience using TorchServe on a SageMaker MME.

To get started, see Supported algorithms, frameworks, and instances for multi-model endpoints using GPU backed instances.


About the authors

James Wu James Wu is a Senior AI/ML Specialist Solution Architect at AWS. helping customers design and build AI/ML solutions. James’s work covers a wide range of ML use cases, with a primary interest in computer vision, deep learning, and scaling ML across the enterprise. Prior to joining AWS, James was an architect, developer, and technology leader for over 10 years, including 6 years in engineering and 4 years in marketing & advertising industries.
Li Ning

Li Ning is a senior software engineer at AWS with a specialization in building large-scale AI solutions. As a tech lead for TorchServe, a project jointly developed by AWS and Meta, her passion lies in leveraging PyTorch and AWS SageMaker to help customers embrace AI for the greater good. Outside of her professional endeavors, Li enjoys swimming, traveling, following the latest advancements in technology, and spending quality time with her family.

Ankith Gunapal Ankith Gunapal is an AI Partner Engineer at Meta (PyTorch). He is passionate about model optimization and model serving, with experience ranging from RTL verification, embedded software, computer vision, to PyTorch. He holds a Master’s in Data Science and a Master’s in Telecommunications. Outside of work, Ankith is also an electronic dance music producer.

Saurabh Trikande Saurabh Trikande is a Senior Product Manager for Amazon SageMaker Inference. He is passionate about working with customers and is motivated by the goal of democratizing machine learning. He focuses on core challenges related to deploying complex ML applications, multi-tenant ML models, cost optimizations, and making deployment of deep learning models more accessible. In his spare time, Saurabh enjoys hiking, learning about innovative technologies, following TechCrunch and spending time with his family.

Subhash Talluri Subhash Talluri is a Lead AI/ML solutions architect of the Telecom Industry business unit at Amazon Web Services. He’s been leading development of innovative AI/ML solutions for Telecom customers and partners worldwide. He brings interdisciplinary expertise in engineering and computer science to help build scalable, secure, and compliant AI/ML solutions via cloud-optimized architectures on AWS.

Read More

Accelerating Generative AI Part III: Diffusion, Fast

Accelerating Generative AI Part III: Diffusion, Fast

This post is the third part of a multi-series blog focused on how to accelerate generative AI models with pure, native PyTorch. We are excited to share a breadth of newly released PyTorch performance features alongside practical examples to see how far we can push PyTorch native performance. In part one, we showed how to accelerate Segment Anything over 8x using only pure, native PyTorch. In part two, we showed how to accelerate Llama-7B by almost 10x using only native PyTorch optimizations. In this blog, we’ll focus on speeding up text-to-image diffusion models by upto 3x.

We will leverage an array of optimizations including:

  • Running with the bfloat16 precision
  • scaled_dot_product_attention (SPDA)
  • torch.compile
  • Combining q,k,v projections for attention computation
  • Dynamic int8 quantization

We will primarily focus on Stable Diffusion XL (SDXL), demonstrating a latency improvement of 3x. These techniques are PyTorch-native, which means you don’t have to rely on any third-party libraries or any C++ code to take advantage of them.

Enabling these optimizations with the 🤗Diffusers library takes just a few lines of code. If you’re already feeling excited and cannot wait to jump to the code, check out the accompanying repository here: https://github.com/huggingface/diffusion-fast.

SDXL Chart

(The discussed techniques are not SDXL-specific and can be used to speed up other text-to-image diffusion systems, as shown later.)

Below, you can find some blog posts on similar topics:

Setup

We will demonstrate the optimizations and their respective speed-up gains using the 🤗Diffusers library. Apart from that, we will make use of the following PyTorch-native libraries and environments:

  • Torch nightly (to benefit from the fastest kernels for efficient attention; 2.3.0.dev20231218+cu121)
  • 🤗 PEFT (version: 0.7.1)
  • torchao (commit SHA: 54bcd5a10d0abbe7b0c045052029257099f83fd9)
  • CUDA 12.1

For an easier reproduction environment, you can also refer to this Dockerfile. The benchmarking numbers presented in this post come from a 400W 80GB A100 GPU (with its clock rate set to its maximum capacity).

Since we use an A100 GPU (Ampere architecture) here, we can specify torch.set_float32_matmul_precision("high") to benefit from the TF32 precision format.

Run inference using a reduced precision

Running SDXL in Diffusers just takes a few lines of code:

from diffusers import StableDiffusionXLPipeline

## Load the pipeline in full-precision and place its model components on CUDA.
pipe = StableDiffusionXLPipeline.from_pretrained("stabilityai/stable-diffusion-xl-base-1.0").to("cuda")

## Run the attention ops without efficiency.
pipe.unet.set_default_attn_processor()
pipe.vae.set_default_attn_processor()

prompt = "Astronaut in a jungle, cold color palette, muted colors, detailed, 8k"
image = pipe(prompt, num_inference_steps=30).images[0]

But this isn’t very practical as it takes 7.36 seconds to generate a single image with 30 steps. This is our baseline which we will try to optimize one step at a time.

SDXL Chart

Here, we’re running the pipeline with the full precision. We can immediately cut down the inference time by using a reduced precision such as bfloat16. Besides, modern GPUs come with dedicated cores for running accelerated computation benefiting from reduced precision. To run the computations of the pipeline in the bfloat16 precision, we just need to specify the data type while initializing the pipeline:

from diffusers import StableDiffusionXLPipeline

pipe = StableDiffusionXLPipeline.from_pretrained(
	"stabilityai/stable-diffusion-xl-base-1.0", torch_dtype=torch.bfloat16
).to("cuda")

## Run the attention ops without efficiency.
pipe.unet.set_default_attn_processor()
pipe.vae.set_default_attn_processor()
prompt = "Astronaut in a jungle, cold color palette, muted colors, detailed, 8k"
image = pipe(prompt, num_inference_steps=30).images[0]

SDXL Chart

By using a reduced precision, we’re able to cut down the inference latency from 7.36 seconds to 4.63 seconds.

Some notes on the use of bfloat16

  • Using a reduced numerical precision (such as float16, bfloat16) to run inference doesn’t affect the generation quality but significantly improves latency.
  • The benefits of using the bfloat16 numerical precision as compared to float16 are hardware-dependent. Modern generations of GPUs tend to favor bfloat16.
  • Furthermore, in our experiments, we bfloat16 to be much more resilient when used with quantization in comparison to float16.

(We later ran the experiments in float16 and found out that the recent versions of torchao do not incur numerical problems from float16.)

Use SDPA for performing attention computations

By default, Diffusers uses scaled_dot_product_attention (SDPA) for performing attention-related computations when using PyTorch 2. SDPA provides faster and more efficient kernels to run intensive attention-related operations. To run the pipeline SDPA, we simply don’t set any attention processor like so:

from diffusers import StableDiffusionXLPipeline

pipe = StableDiffusionXLPipeline.from_pretrained(
	"stabilityai/stable-diffusion-xl-base-1.0", torch_dtype=torch.bfloat16
).to("cuda")

prompt = "Astronaut in a jungle, cold color palette, muted colors, detailed, 8k"
image = pipe(prompt, num_inference_steps=30).images[0]

SDPA gives a nice boost from 4.63 seconds to 3.31 seconds.

SDXL Chart

Compiling the UNet and VAE

We can ask PyTorch to perform some low-level optimizations (such as operator fusion and launching faster kernels with CUDA graphs) by using torch.compile. For the StableDiffusionXLPipeline, we compile the denoiser (UNet) and the VAE:

from diffusers import StableDiffusionXLPipeline
import torch

pipe = StableDiffusionXLPipeline.from_pretrained(
    "stabilityai/stable-diffusion-xl-base-1.0", torch_dtype=torch.bfloat16
).to("cuda")

## Compile the UNet and VAE.
pipe.unet = torch.compile(pipe.unet, mode="max-autotune", fullgraph=True)
pipe.vae.decode = torch.compile(pipe.vae.decode, mode="max-autotune", fullgraph=True)

prompt = "Astronaut in a jungle, cold color palette, muted colors, detailed, 8k"

## First call to `pipe` will be slow, subsequent ones will be faster.
image = pipe(prompt, num_inference_steps=30).images[0]

Using SDPA attention and compiling both the UNet and VAE reduces the latency from 3.31 seconds to 2.54 seconds.

SDXL Chart

Notes on torch.compile

torch.compile offers different backends and modes. As we’re aiming for maximum inference speed, we opt for the inductor backend using the “max-autotune”. “max-autotune” uses CUDA graphs and optimizes the compilation graph specifically for latency. Using CUDA graphs greatly reduces the overhead of launching GPU operations. It saves time by using a mechanism to launch multiple GPU operations through a single CPU operation.

Specifying fullgraph to be True ensures that there are no graph breaks in the underlying model, ensuring the fullest potential of torch.compile. In our case, the following compiler flags were also important to be explicitly set:

torch._inductor.config.conv_1x1_as_mm = True
torch._inductor.config.coordinate_descent_tuning = True
torch._inductor.config.epilogue_fusion = False
torch._inductor.config.coordinate_descent_check_all_directions = True

For the full list of compiler flags, refer to this file.

We also change the memory layout of the UNet and the VAE to “channels_last” when compiling them to ensure maximum speed:

pipe.unet.to(memory_format=torch.channels_last)
pipe.vae.to(memory_format=torch.channels_last)

In the next section, we’ll show how to improve the latency even further.

Additional optimizations

No graph breaks during torch.compile

Ensuring that the underlying model/method can be fully compiled is crucial for performance (torch.compile with fullgraph=True). This means having no graph breaks. We did this for the UNet and VAE by changing how we access the returning variables. Consider the following example:

code example

Getting rid of GPU syncs after compilation

During the iterative reverse diffusion process, we call step() on the scheduler each time after the denoiser predicts the less noisy latent embeddings. Inside step(), the sigmas variable is indexed. If the sigmas array is placed on the GPU, indexing causes a communication sync between the CPU and GPU. This causes a latency, and it becomes more evident when the denoiser has already been compiled.

But if the sigmas array always stays on the CPU (refer to this line), this sync doesn’t take place, hence improved latency. In general, any CPU <-> GPU communication sync should be none or be kept to a bare minimum as it can impact inference latency.

Using combined projections for attention ops

Both the UNet and the VAE used in SDXL make use of Transformer-like blocks. A Transformer block consists of attention blocks and feed-forward blocks.

In an attention block, the input is projected into three sub-spaces using three different projection matrices – Q, K, and V. In the naive implementation, these projections are performed separately on the input. But we can horizontally combine the projection matrices into a single matrix and perform the projection in one shot. This increases the size of the matmuls of the input projections and improves the impact of quantization (to be discussed next).

Enabling this kind of computation in Diffusers just takes a single line of code:

pipe.fuse_qkv_projections()

This will make the attention operations for both the UNet and the VAE take advantage of the combined projections. For the cross-attention layers, we only combine the key and value matrices. To learn more, you can refer to the official documentation here. It’s worth noting that we leverage PyTorch’s scaled_dot_product_attention here internally.

These additional techniques improved the inference latency from 2.54 seconds to 2.52 seconds.

SDXL Chart

Dynamic int8 quantization

We selectively apply dynamic int8 quantization to both the UNet and the VAE. This is because quantization adds additional conversion overhead to the model that is hopefully made up for by faster matmuls (dynamic quantization). If the matmuls are too small, these techniques may degrade performance.

Through experimentation, we found that certain linear layers in the UNet and the VAE don’t benefit from dynamic int8 quantization. You can check out the full code for filtering those layers here (referred to as dynamic_quant_filter_fn below).

We leverage the ultra-lightweight pure PyTorch library torchao to use its user-friendly APIs for quantization:

from torchao.quantization import apply_dynamic_quant

apply_dynamic_quant(pipe.unet, dynamic_quant_filter_fn)
apply_dynamic_quant(pipe.vae, dynamic_quant_filter_fn)

Since this quantization support is limited to linear layers only, we also turn suitable pointwise convolution layers into linear layers to maximize the benefit. We also specify the following compiler flags when using this option:

torch._inductor.config.force_fuse_int_mm_with_mul = True
torch._inductor.config.use_mixed_mm = True

To prevent any numerical issues stemming from quantization, we run everything in the bfloat16 format.

Applying quantization this way improved the latency from 2.52 seconds to 2.43 seconds.

SDXL Chart

Resources

We welcome you to check out the following codebases to reproduce these numbers and extend the techniques to other text-to-image diffusion systems as well:

Other links

Improvements in other pipelines

We applied these techniques to other pipelines to test the generality of our approach. Below are our findings:

SSD-1B

SSD-1B Chart

Stable Diffusion v1-5

Stable Diffusion v1-5 chart

PixArt-alpha/PixArt-XL-2-1024-MS

It’s worth noting that PixArt-Alpha uses a Transformer-based architecture as its denoiser for the reverse diffusion process instead of a UNet.

PixArt-alpha/PixArt-XL-2-1024-MS chart

Note that for Stable Diffusion v1-5 and PixArt-Alpha, we didn’t explore the best shape combination criteria for applying dynamic int8 quantization. It might be possible to get better numbers with a better combination.

Collectively, the methods we presented offer substantial speedup over the baseline without degradation in the generation quality. Furthermore, we believe that these methods should complement other optimization methods popular in the community (such as DeepCache, Stable Fast, etc.).

Conclusion and next steps

In this post, we presented a basket of simple yet effective techniques that can help improve the inference latency of text-to-image Diffusion models in pure PyTorch. In summary:

  • Using a reduced precision to perform our computations
  • Scaled-dot product attention for running the attention blocks efficiently
  • torch.compile with “max-autotune” to improve for latency
  • Combining the different projections together for computing attention
  • Dynamic int8 quantization

We believe there’s a lot to be explored in terms of how we apply quantization to a text-to-image diffusion system. We didn’t exhaustively explore which layers in the UNet and the VAE tend to benefit from dynamic quantization. There might be opportunities to further speed things up with a better combination of the layers being targeted for quantization.

We kept the text encoders of SDXL untouched other than just running them in bfloat16. Optimizing them might also lead to improvements in latency.

Acknowledgements

Thanks to Ollin Boer Bohan whose VAE was used throughout the benchmarking process as it is numerically more stable under reduced numerical precisions.

Thanks to Hugo Larcher from Hugging Face for helping with infrastructure.

Read More

Understanding GPU Memory 2: Finding and Removing Reference Cycles

Understanding GPU Memory 2: Finding and Removing Reference Cycles

This is part 2 of the Understanding GPU Memory blog series. Our first post Understanding GPU Memory 1: Visualizing All Allocations over Time shows how to use the memory snapshot tool. In this part, we will use the Memory Snapshot to visualize a GPU memory leak caused by reference cycles, and then locate and remove them in our code using the Reference Cycle Detector.

Sometimes when we were using the Memory Snapshot, we saw plots of GPU memory that looked similar to this.

GPU memory

In this snapshot, each peak shows GPU tensors building up over time and then several tensors getting released at once. In addition, a CUDA OOM happens on the right side causing all the tensors to be released. Seeing the tensors accumulate like this is a clear indication of a problem, but it doesn’t immediately suggest why.

Tensors in Reference Cycles

During early debugging, we dug in further to find that this **pattern happens a lot when your Python code has objects with reference cycles. ** Python will clean up non-cyclic objects immediately using reference counting. However objects in reference cycles are only cleaned up later by a cycle collector. If these cycles refer to a GPU tensor, the GPU tensor will stay alive until that cycle collector runs and removes the reference cycle. Let’s take a look at a simplified example.

Simple reference cycle

Code Snippet behind the snapshot (full code in Appendix A):

    def leak(tensor_size, num_iter=100000, device="cuda:0"):
      class Node:
        def __init__(self, T):
          self.tensor = T
          self.link = None

      for _ in range(num_iter):
        A = torch.zeros(tensor_size, device=device)
        B = torch.zeros(tensor_size, device=device)
        a, b = Node(A), Node(B)

        # A reference cycle will force refcounts to be non-zero.
        a.link, b.link = b, a
        # Python will eventually garbage collect a & b, but will
        # OOM on the GPU before that happens (since python
        # runtime doesn't know about CUDA memory usage).

In this code example, the tensors A and B are created, where A has a link to B and vice versa. This forces a non-zero reference count when A and B go out of scope. When we run this for 100,000 iterations, we expect the automatic garbage collection to free the reference cycles when going out of scope. However, this will actually CUDA OOM.

Why doesn’t automatic garbage collection work?

The automatic garbage collection works well when there is a lot of extra memory as is common on CPUs because it amortizes the expensive garbage collection by using Generational Garbage Collection. But to amortize the collection work, it defers some memory cleanup making the maximum memory usage higher, which is less suited to memory constrained environments. The Python runtime also has no insights into CUDA memory usage, so it cannot be triggered on high memory pressure either. It’s even more challenging as GPU training is almost always memory constrained because we will often raise the batch size to use any additional free memory.

The CPython’s garbage collection frees unreachable objects held in reference cycles via the mark-and-sweep. The garbage collection is automatically run when the number of objects exceeds certain thresholds. There are 3 generations of thresholds to help amortize the expensive costs of running garbage collection on every object. The later generations are less frequently run. This would explain why automatic collections will only clear several tensors on each peak, however there are still tensors that leak resulting in the CUDA OOM. Those tensors were held by reference cycles in later generations.

Explicitly calling gc.collect()

One way to fix this is by explicitly calling the garbage collector frequently. Here we can see that the GPU memory for tensors out of scope gets cleaned up when we explicitly call the garbage collector every 100 iterations. This also controls the maximum GPU peak memory held by leaking tensors.

memory leak

Although this works and fixes the CUDA OOM issue, calling gc.collect() too frequently can cause other issues including QPS regressions. Therefore we cannot simply increase the frequency of garbage collection on every training job. It’s best to just avoid creating reference cycles in the first place. More on this in section, Reference Cycle Detector.

Sneaky Memory Leak in Callback

Real examples are more complicated, so let’s look at a more realistic example that has a similar behavior. In this snapshot, we can observe the same behavior of tensors being accumulated and freed during automatic garbage collection, until we hit a CUDA OOM.

memory leak

Code Snippet behind this snapshot (full code sample in Appendix A):

    class AwaitableTensor:
      def __init__(self, tensor_size):
        self._tensor_size = tensor_size
        self._tensor = None

      def wait(self):
        self._tensor = torch.zeros(self._tensor_size, device="cuda:0")
        return self._tensor

    class AwaitableTensorWithViewCallback:
      def __init__(self, tensor_awaitable, view_dim):
        self._tensor_awaitable = tensor_awaitable
        self._view_dim = view_dim
        # Add a view filter callback to the tensor.
        self._callback = lambda ret: ret.view(-1, self._view_dim)

      def wait(self):
        return self._callback(self._tensor_awaitable.wait())

    async def awaitable_leak(
      tensor_size=2**27, num_iter=100000,
    ):
      for _ in range(num_iter):
        A = AwaitableTensor(tensor_size)
        AwaitableTensorWithViewCallBack(A, 4).wait()

In this code, we define two classes. The class AwaitableTensor will create a tensor when waited upon. Another class AwaitableTensorWithViewCallback will apply a view filter on the AwaitableTensor via callback lambda.

When running awaitable_leak, which creates tensor A (512 MB) and applies a view filter for 100,000 iterations, we expect that A should be reclaimed each time it goes out of scope because the reference count should reach 0. However, this will actually OOM!

While we know there is a reference cycle here, it isn’t clear from the code where the cycle is created. To help with these situations, we have created a tool to locate and report these cycles.

Reference Cycle Detector

Introducing the Reference Cycle Detector, which helps us find reference cycles keeping GPU tensors alive. The API is fairly simple:

  • During model initialization:
    • Import: from torch.utils.viz._cycles import warn_tensor_cycles
    • Start: warn_tensor_cycles()

The Reference Cycle Detector will issue warnings every time that the cycle collector runs and finds a CUDA tensor that gets freed. The warning provides an object graph showing how the reference cycle refers to the GPU tensor.

object graph

For instance in this object graph, we can easily observe that there is a circular dependency on the outer circle of the graph, and highlighted in red is the GPU tensor kept alive.

Most cycles are pretty easy to fix once they are discovered. For instance here we can remove the reference to self created by self._view_dim in the callback.

code snippet

We’ve spent some time fixing cycles in existing models using these tools. For example in TorchRec, we’ve found and removed a reference cycle in PR#1226.

code snippet

Once we’ve removed the reference cycles, the code will no longer issue a CUDA OOM nor show any memory leaks in their snapshots.

What are the other benefits of using the Reference Cycle Detector?

Removing these cycles will also directly lower the maximum GPU memory usage as well as make it less likely for memory to fragment because the allocator returns to the same state after each iteration.

Where can I find these tools?

We hope that the Reference Cycle Detector will greatly improve your ability to find and remove memory leaks caused by reference cycles. The Reference Cycle Detector is available in the v2.1 release of PyTorch as experimental features and More information about the Reference Cycle Detector can be found in the PyTorch Memory docs here.

Feedback

We look forward to hearing from you about any enhancements, bugs or memory stories that our tools helped to solve! As always, please feel free to open new issues on PyTorch’s Github page.

We are also open to contributions from the OSS community, feel free to tag Aaron Shi and Zachary DeVito in any Github PRs for reviews.

Acknowledgements

Really appreciate the content reviewers, Mark Saroufim, Gregory Chanan, and Adnan Aziz for reviewing this post and improving its readability.

Appendix

Appendix A – Code Sample

This code snippet was used to generate the plots and examples shown. Here are the arguments to reproduce the sections:

  • Introduction: python sample.py
  • Explicitly calling gc.collect(): python sample.py --gc_collect_interval=100
  • Sneaky Memory Leak in Callback: python sample.py --workload=awaitable
  • Ref Cycle Detector: python sample.py --workload=awaitable --warn_tensor_cycles

sample.py:

# (c) Meta Platforms, Inc. and affiliates. 
import argparse
import asyncio
import gc
import logging
import socket
from datetime import datetime, timedelta

import torch

logging.basicConfig(
   format="%(levelname)s:%(asctime)s %(message)s",
   level=logging.INFO,
   datefmt="%Y-%m-%d %H:%M:%S",
)
logger: logging.Logger = logging.getLogger(__name__)
logger.setLevel(level=logging.INFO)

TIME_FORMAT_STR: str = "%b_%d_%H_%M_%S"

# Keep a max of 100,000 alloc/free events in the recorded history
# leading up to the snapshot.
MAX_NUM_OF_MEM_EVENTS_PER_SNAPSHOT: int = 100000

def start_record_memory_history() -> None:
   if not torch.cuda.is_available():
       logger.info("CUDA unavailable. Not recording memory history")
       return

   logger.info("Starting snapshot record_memory_history")
   torch.cuda.memory._record_memory_history(
       max_entries=MAX_NUM_OF_MEM_EVENTS_PER_SNAPSHOT
   )

def stop_record_memory_history() -> None:
   if not torch.cuda.is_available():
       logger.info("CUDA unavailable. Not recording memory history")
       return

   logger.info("Stopping snapshot record_memory_history")
   torch.cuda.memory._record_memory_history(enabled=None)

def export_memory_snapshot() -> None:
   if not torch.cuda.is_available():
       logger.info("CUDA unavailable. Not exporting memory snapshot")
       return

   # Prefix for file names.
   host_name = socket.gethostname()
   timestamp = datetime.now().strftime(TIME_FORMAT_STR)
   file_prefix = f"{host_name}_{timestamp}"

   try:
       logger.info(f"Saving snapshot to local file: {file_prefix}.pickle")
       torch.cuda.memory._dump_snapshot(f"{file_prefix}.pickle")
   except Exception as e:
       logger.error(f"Failed to capture memory snapshot {e}")
       return

# This function will leak tensors due to the reference cycles.
def simple_leak(tensor_size, gc_interval=None, num_iter=30000, device="cuda:0"):
    class Node:
        def __init__(self, T):
            self.tensor = T
            self.link = None

    for i in range(num_iter):
        A = torch.zeros(tensor_size, device=device)
        B = torch.zeros(tensor_size, device=device)
        a, b = Node(A), Node(B)
        # A reference cycle will force refcounts to be non-zero, when
        # a and b go out of scope.
        a.link, b.link = b, a
        # Python will eventually gc a and b, but may OOM on the CUDA
        # device before that happens (since python runtime doesn't
        # know about CUDA memory usage).

        # Since implicit gc is not called frequently enough due to
        # generational gc, adding an explicit gc is necessary as Python
        # runtime does not know about CUDA memory pressure.
        # https://en.wikipedia.org/wiki/Tracing_garbage_collection#Generational_GC_(ephemeral_GC)
        if gc_interval and i % int(gc_interval) == 0:
            gc.collect()

async def awaitable_leak(
    tensor_size, gc_interval=None, num_iter=100000, device="cuda:0"
):
    class AwaitableTensor:
        def __init__(self, tensor_size, device) -> None:
            self._tensor_size = tensor_size
            self._device = device
            self._tensor = None

        def wait(self) -> torch.Tensor:
            self._tensor = torch.zeros(self._tensor_size, device=self._device)
            return self._tensor

    class AwaitableTensorWithViewCallBack:
        def __init__(
            self,
            tensor_awaitable: AwaitableTensor,
            view_dim: int,
        ) -> None:
            self._tensor_awaitable = tensor_awaitable
            self._view_dim = view_dim
            # Add a view filter callback to the tensor.
            self._callback = lambda ret: ret.view(-1, self._view_dim)

        def wait(self) -> torch.Tensor:
            return self._callback(self._tensor_awaitable.wait())

    for i in range(num_iter):
        # Create an awaitable tensor
        a_tensor = AwaitableTensor(tensor_size, device)

        # Apply a view filter callback on the awaitable tensor.
        AwaitableTensorWithViewCallBack(a_tensor, 4).wait()

        # a_tensor will go out of scope.

        if gc_interval and i % int(gc_interval) == 0:
            gc.collect()

if __name__ == "__main__":
    parser = argparse.ArgumentParser(description="A memory_leak binary instance")
    parser.add_argument(
        "--gc_collect_interval",
        default=None,
        help="Explicitly call GC every given interval. Default is off.",
    )
    parser.add_argument(
        "--workload",
        default="simple",
        help="Toggle which memory leak workload to run. Options are simple, awaitable.",
    )
    parser.add_argument(
        "--warn_tensor_cycles",
        action="store_true",
        default=False,
        help="Toggle whether to enable reference cycle detector.",
    )
    args = parser.parse_args()

    if args.warn_tensor_cycles:
        from tempfile import NamedTemporaryFile

        from torch.utils.viz._cycles import observe_tensor_cycles

        logger.info("Enabling warning for Python reference cycles for CUDA Tensors.")

        def write_and_log(html):
            with NamedTemporaryFile("w", suffix=".html", delete=False) as f:
                f.write(html)
                logger.warning(
                    "Reference cycle includes a CUDA Tensor see visualization of cycle %s",
                    f.name,
                )

        observe_tensor_cycles(write_and_log)
    else:
        # Start recording memory snapshot history
        start_record_memory_history()

    # Run the workload with a larger tensor size.
    # For smaller sizes, we will not CUDA OOM as gc will kick in often enough
    # to reclaim reference cycles before an OOM occurs.
    size = 2**26  # 256 MB
    try:
        if args.workload == "awaitable":
            size *= 2
            logger.info(f"Running tensor_size: {size*4/1024/1024} MB")
            asyncio.run(
                awaitable_leak(tensor_size=size, gc_interval=args.gc_collect_interval)
            )
        elif args.workload == "simple":
            logger.info(f"Running tensor_size: {size*4/1024/1024} MB")
            simple_leak(tensor_size=size, gc_interval=args.gc_collect_interval)
        else:
            raise Exception("Unknown workload.")
    except Exception:
        logger.exception(f"Failed to allocate {size*4/1024/1024} MB")

    # Create the memory snapshot file
    export_memory_snapshot()

    # Stop recording memory snapshot history
    stop_record_memory_history()

Read More

Training Production AI Models with PyTorch 2.0

Training Production AI Models with PyTorch 2.0

1. Introduction

PyTorch 2.0 (abbreviated as PT2) can significantly improve the training and inference performance of an AI model using a compiler called_ torch.compile_ while being 100% backward compatible with PyTorch 1.x. There have been reports on how PT2 improves the performance of common benchmarks (e.g., huggingface’s diffusers). In this blog, we discuss our experiences in applying PT2 to production _AI models _at Meta.

2. Background

2.1 Why is automatic performance optimization important for production?

Performance is particularly important for production—e.g, even a 5% reduction in the training time of a heavily used model can translate to substantial savings in GPU cost and data-center power. Another important metric is development efficiency, which measures how many engineer-months are required to bring a model to production. Typically, a significant part of this bring-up effort is spent on manual _performance tuning such as rewriting GPU kernels to improve the training speed. By providing _automatic _performance optimization, PT2 can improve _both cost and development efficiency.

2.2 How PT2 improves performance

As a compiler, PT2 can view_ multiple_ operations in the training graph captured from a model (unlike in PT1.x, where only one operation is executed at a time). Consequently, PT2 can exploit a number of performance optimization opportunities, including:

  • Fusing multiple operations into a single GPU kernel:
    • A typical type of performance overhead in running a GPU program is the CPU overhead of launching small GPU kernels. By fusing multiple operations into a single GPU kernel, PT2 can significantly reduce the kernel-launching overhead on the CPU. For instance, consider the PyTorch program in Figure 1(a). When it is executed on GPU with PT1, it has three GPU kernels (two for the two sin() ops and one for the addition op). With PT2, there is only one kernel generated, which fuses all three ops.
    • After fusing some operations, certain operations in the graph may become dead and hence can be optimized away. This can save both compute and memory bandwidth on the GPU. For instance, in Figure 1(b), one of the duplicated sin() ops can be optimized away.
    • In addition, fusion can also reduce GPU device memory reads/writes (by composing pointwise kernels) and help improve hardware utilization.

Fig.1  How PT2 improves performance with fusion and dead-code elimination.

Fig. 1: How PT2 improves performance with fusion and dead-code elimination.

  • Reducing the type conversion overhead for using lower-precision data types:
    • PyTorch 1.x supports Automatic Mixed Precision (AMP). While AMP can reduce the compute time of an op, it introduces type conversion overhead before and after the op. PT2 can increase AMP performance by optimizing away unnecessary type conversion code, significantly reducing its overhead. As an example, Figure 2(a) converts three 32-bit input tensors (a32, b32, c32) to bf16 before doing the matrix multiplications. Nevertheless, in this example, a32 and c32 are actually the same tensor (a_float32). So, there is no need to convert a_float32 twice, as shown in the code generated by torch.compile in Figure 2(b). Note that while both this example and the previous one optimize away redundant computations, they are different in the sense that the type conversion code in this example is implicit via torch.autocast, unlike in the previous example where the torch.sin(x).cuda() is explicit in user code.

Fig.2  How PT2 reduces type conversion overhead when using AMP.

Fig. 2: How PT2 reduces type conversion overhead when using AMP.

  • Reusing buffers on the GPU:
    • With a global view, the scheduler in torch.compile can reuse buffers on the GPU, thereby reducing both memory allocation time and memory consumption. Figure 3 shows the driver program that calls the Triton kernels generated for the program in Figure 2(a). We can see that buf1 is reused as buf4.

Fig.3  Reuse of buffers.

Fig. 3: Reuse of buffers.

  • Autotuning:
    • PT2 has options to enable autotuning (via Triton) on matrix-multiply ops, pointwise ops, and reduction ops. Tunable parameters include block size, number of stages, and number of warps. With autotuning, the most performant implementation of an op can be found empirically.

3. Production environment considerations

In this section, we describe a number of important considerations in applying PT2 to production.

3.1 Ensuring no model quality degradation with torch.compile

Applying torch.compile to a model will cause numerical changes because of (1) reordering of floating-point ops during various optimizations such as fusion and (2) use of lower precision data types like bf16 if AMP is enabled. Therefore 100% bitwise compatibility with PT 1.x is not expected. Nevertheless, we still need to make sure that the model quality (measured in some form of numeric scores) is preserved after applying torch.compile. Typically, each production model will have its own range of acceptable scores (e.g., percentage change must be within 0.01%).

In case of a model-quality drop caused by torch.compile, we need to do a deep-dive debug.

One useful technique for debugging a torch.compile-related numeric issue is to apply torch.compile with different backends, in particular “eager” and “aot_eager”, in addition to “inductor”:

  • If the numeric issue happens with the “eager” backend, then the forward graph constructed by torch.compile is likely incorrect;
  • If the numeric issue doesn’t happen with “eager” but happens with “aot_eager”, then the backward graph constructed by torch.compile is likely incorrect;
  • If the numeric issue doesn’t happen with either “eager” or “aot_eager” but happens with “inductor”, then the code generation inside the inductor is likely incorrect.

3.2 Autotuning in production

By default, the autotuning in torch.inductor is done online _while the model is executed. For some production models, we find that the autotuning time can take several hours, which is not acceptable for production. Therefore, we add _offline autotuning which works as depicted in Figure 4. The very first time that a model is run, the details (e.g., input tensor shape, data type etc) on all ops that require tuning will be logged to a database. Then, a tuning process for these ops is run overnight to search for the most performant implementation of each op; the search result is updated to a persistent cache (implemented as a source file of torch.inductor). Next time when the model is run again, the tuned implementation of each op will be found in the cache and chosen for execution.

Fig.4  The offline autotuning used in production.

Fig. 4: The offline autotuning used in production.

As we previously discussed in this blog, a profiler is essential for debugging the performance of production models. We have enhanced the profiler to display torch.compile related events on the timeline. The most useful ones are marking which parts of the model are running compiled code so that we can quickly validate if the parts of the model that are supposed to be compiled are actually compiled by torch.compile. For example, the trace in Figure 5 has two compiled regions (with the label “CompiledFunction”). Other useful events are time spent on the compilation and that spent on accessing the compiler’s code-cache.

Fig.5  A trace with two compiled regions.

Fig. 5: A trace with two compiled regions.

3.4 Controlling just-in-time compilation time

torch.compile uses just-in-time compilation. The compilation happens when the first batch of data is trained. In our production setting, there is an upper limit on how much time is allowed for a training job to reach its first batch, aka Time-To-First-Batch (TTFB). We need to make sure that enabling torch.compile will not increase TTFB to over the limit. This could be challenging because production models are large and~~ ~~torch.compile can take substantial compilation time. We enable parallel compilation to keep the compile time under control (this is controlled by the global variable compile_threads inside torch/_inductor/config.py, which is already set to the CPU count on OSS Linux). A model is decomposed into one or more computational graphs; each graph is decomposed into multiple Triton kernels. If parallel compilation is enabled, all the Triton kernels in the same graph can be compiled simultaneously (nevertheless, kernels from different graphs are still compiled in serial). Figure 6 illustrates how parallel compilation helps.

Fig.6  Using parallel compilation in production.

Fig. 6: Using parallel compilation in production.

4. Results

In this section, we use three production models to evaluate PT2. First we show the training time speedups with PT2, using different optimization configs. Second, we show the importance of parallel compilation on the compilation time.

4.1 Training-time speedup with torch.compile

Figure 7 reports the training-time speedup with PT2. For each model, we show four cases: (i) no-compile with bf16, (ii) compile with fp32, (iii) compile with bf16, (iv) compile with bf16 and autotuning. The y-axis is the speedup over the baseline, which is no-compile with fp32. Note that no-compile with bf16 is actually slower than no-compile with fp32, due to the type conversion overhead. In contrast, compiling with bf16 achieves much larger speedups by reducing much of this overhead. Overall, given that these models are already heavily optimized by hand, we are excited to see that torch.compile can still provide 1.14-1.24x speedup.

Fig.7 Training-time speedup with torch.compile (note: the baseline, no-compile/fp32, is_ omitted _in this figure).

Fig. 7: Training-time speedup with torch.compile (note: the baseline, no-compile/fp32, is_ omitted _in this figure).

4.2 Compilation-time reduction with parallel compilation

Figure 8 shows the compilation time with and without parallel compilation. While there is still room for improvement on the serial compilation time, parallel compilation has reduced the compilation overhead on TTFB to an acceptable level. Models B and C benefit more from parallel compilation than Model A does because they have more distinct Triton kernels per graph.

Fig.8 PT2 compilation time.

Fig. 8: PT2 compilation time.

5. Concluding Remarks

In this blog, we demonstrate that PT2 can significantly accelerate the training of large and complex production AI models with reasonable compilation time. In our next blog, we will discuss how PT2 can do general graph transformations.

6. Acknowledgements

Many thanks to Mark Saroufim, Adnan Aziz, and Gregory Chanan for their detailed and insightful reviews.

Read More

Empowering Models with Performance: The Art of Generalized Model Transformation Approach

Empowering Models with Performance: The Art of Generalized Model Transformation Approach

Introduction

PyTorch 2.0 (PT2) offers a compiled execution mode which rewrites Python bytecode to extract sequences of PyTorch operations, translating them into a Graph IR. The IR is then just-in-time compiled through a customizable back end, improving training performance without user interference. Often, production models may go through multiple stages of optimization/lowering to hit performance targets. Therefore, having a compiled mode is desirable as it can separate the work of improving model performance from direct modification of the PyTorch model implementation. Thus, the compiled mode becomes more important, enabling Pytorch users to enhance model performance without modifying the PyTorch code implementation. This feature is particularly valuable for optimizing complex models, including large-scale and production-ready ones.

In our previous blog post , we outlined how heuristic model transformation rules are employed to optimize intricate production models. While these rules enabled substantial performance gains for some pilot models, they lacked universal adaptability; they don’t consistently perform well across different models or sometimes even within different sections of a single model.

Fig.1 PT1 Graph mode vs PT2 Compile mode.

Fig. 1: PT1 Graph mode vs PT2 Compile mode.

In this blog post, we propose a more generalized model transformation solution, serving as a plugin to the PT2 compiler as shown in Fig.1 which is more general, performant and user-friendly, bringing performance improvements to both model training and inference without manual efforts. As illustrated in Fig.2, by incorporating the previously user-defined transformations into the compiler, we have streamlined the production stack. These changes bring advantages to a broader range of PyTorch models, extending beyond just Meta models, which has already been incorporated in PT2 and is ready for use to benefit all Pytorch models.

Fig.2 Simplified stack with PT2 compile mode.

Fig. 2: Simplified stack with PT2 compile mode.

Guiding Principle: Atomic Rules

Traditionally, people might use predefined heuristic rules to replace a model subgraph with another more performant subgraph toreduce launch overhead, minimize memory bw, and fully occupy SMs. However, this approach doesn’t scale well as it is hard to craft a set of rules that fits all models perfectly.

Instead of grappling with bulky, complex rules, we can actually break them down into smaller, more digestible pieces – what we call ‘atomic rules’. These tiny powerhouses of efficiency target the transformation of individual operators, to conduct one step of the fusion/transformation. This makes them easy to handle and apply, offering a straightforward path to optimizing models. So, with these atomic rules in hand, optimizing any model for top-tier performance becomes a breeze!

We will walk through some simple examples to demonstrate how we use a chain of atomic rules to replace complicated heuristic rules.

Case 1: Horizontal fusion of computation chains started with accesses to embedding tables

Horizontal fusion means fusing parallel operators into one so as to reduce the number of kernels to be launched and improve performance. In our previous blog (Section 3.2), we described model transformations that fused layernorm and activation functions after embedding bags, as shown in the figure provided. However, this method, had limitations:

  1. It only worked with layernorm and activation functions after embedding.
  2. It was restricted to models with specific architecture rules, causing various issues in our production stack, including parameter changes and inference disruptions.

To improve, we can use three atomic rules as shown in Fig.3 to replace the complicated heuristic rule:

  • Fuse layernorms that follow the same split nodes horizontally.
  • Then, fuse tanh functions following the same split nodes horizontally.
  • Lastly, fuse vertical split-cat nodes.

These atomic rules offer a clean and streamlined way for model simplification and optimization.

Fig.3 Before, we optimized the model in one go by replacing subgraphs. Now, with atomic rules, we optimize step-by-step, covering more cases.

Fig. 3: Before, we optimized the model in one go by replacing subgraphs. Now, with atomic rules, we optimize step-by-step, covering more cases.

Case 2: Fuse horizontal MLP

MLPs (Multilayer Perceptrons) are fundamental components of deep neural networks, often consisting of linear, normalization, and activation functions. In complex models, there’s often a need to fuse many horizontal MLPs. Traditional methods find and replace parallel MLPs with a fused module as shown in Fig.4, but this isn’t always straightforward. Some models might not have normalization, or they might use different activation functions, making it hard to apply a one-size-fits-all rule.

This is where our atomic rules come in handy. These simplified rules target individual operators one at a time, making the process easier and more manageable. We use the following atomic rules for horizontal MLP fusion:

  • Fusing horizontal linear operators
  • Fusing horizontal layernorms.
  • Fusing horizontal activation functions.

Fig.4 Pseudocode for fusing MLP. Traditional optimizations need manual Python code changes.

Fig. 4: Pseudocode for fusing MLP. Traditional optimizations need manual Python code changes.

The beauty of these rules is that they’re not limited to one case. They can be applied broadly. Since PyTorch models are built with torch operators, focusing on a smaller set of operators simplifies the process. This approach is not only more manageable but also more general compared to writing a specific large pattern replacement rule, making it easier to optimize various models efficiently.

Compile-time Graph Search

Our principle is to use chained atomic rules to replace heuristic rules. While this approach covers a wider range of cases, it does entail a longer time for graph search and pattern matching. The next question is: how can we minimize compilation time while performing compile-time graph searches efficiently?

We design a two-step greedy algorithm as illustrated in Fig. 5. The first step in this process is to identify the target nodes, which we follow certain rules, e.g., identifying all linear operations with the same input shapes. Once identified, we use a Breadth-First Search (BFS) strategy to separate these nodes into different sets, so that nodes within a set don’t have data dependency. The nodes within each of these sets are independent and can be fused horizontally.

Fig.5 Process of model transformation with graph IR.

Fig. 5: Process of model transformation with graph IR.

With our approach, the search time is roughly 60 seconds for one of our largest internal models. It is manageable for on-the-fly tasks and

In the End

In our tests with internal ranking models, we observed approximately 5% to 15% training performance improvement across five models on top of the performance gain brought by torch.compile. We have enabled the optimization in PT2 compiler stack and landed it as default when users choose Inductor as the backend (config). We expect our generalized transformation approach could benefit models beyond Meta, and look forward to more discussion and improvement through this compiler level transformation framework.

Acknowledgements

Many thanks to Mark Saroufim, Gregory Chanan, Adnan Aziz, and Rocky Liu for their detailed and insightful reviews.

Read More

Understanding GPU Memory 1: Visualizing All Allocations over Time

Understanding GPU Memory 1: Visualizing All Allocations over Time

During your time with PyTorch on GPUs, you may be familiar with this common error message:

torch.cuda.OutOfMemoryError: CUDA out of memory. Tried to allocate 512.00 MiB. GPU 0 has a total capacity of 79.32 GiB of which 401.56 MiB is free.

In this series, we show how to use memory tooling, including the Memory Snapshot, the Memory Profiler, and the Reference Cycle Detector to debug out of memory errors and improve memory usage.

Memory Timeline

The Memory Snapshot tool provides a fine-grained GPU memory visualization for debugging GPU OOMs. Captured memory snapshots will show memory events including allocations, frees and OOMs, along with their stack traces.

In a snapshot, each tensor’s memory allocation is color coded separately. The x axis is over time, and the y axis is the amount of GPU memory in MB. The snapshot is interactive, so we can observe the stack trace for any allocation by mousing over.

In this snapshot, there are 3 peaks showing the memory allocations over 3 training iterations. When looking at the peaks, it is easy to see the rise of memory in the forward pass and the fall during the backward pass as the gradients are computed. It is also possible to see that the program has the same pattern of memory use iteration to iteration. One thing that stands out is the many tiny spikes in memory, by mousing over them, we see that they are buffers used temporarily by convolution operators.

Capturing Memory Snapshots

The API to capture memory snapshots is fairly simple and available in torch.cuda.memory:

  • Start: torch.cuda.memory._record_memory_history(max_entries=100000)
  • Save: torch.cuda.memory._dump_snapshot(file_name)
  • Stop: torch.cuda.memory._record_memory_history(enabled=None)

Code Snippet (for full code sample, see Appendix A):

   # Start recording memory snapshot history, initialized with a buffer
   # capacity of 100,000 memory events, via the `max_entries` field.
   torch.cuda.memory._record_memory_history(
       max_entries=MAX_NUM_OF_MEM_EVENTS_PER_SNAPSHOT
   )

   # Run your PyTorch Model.
   # At any point in time, save a snapshot to file for later.
   for _ in range(5):
       pred = model(inputs)
       loss_fn(pred, labels).backward()
       optimizer.step()
       optimizer.zero_grad(set_to_none=True)

   # In this sample, we save the snapshot after running 5 iterations.
   #   - Save as many snapshots as you'd like.
   #   - Snapshots will save last `max_entries` number of memory events
   #     (100,000 in this example).
   try:
       torch.cuda.memory._dump_snapshot(f"{file_prefix}.pickle")
   except Exception as e:
       logger.error(f"Failed to capture memory snapshot {e}")

   # Stop recording memory snapshot history.
   torch.cuda.memory._record_memory_history(enabled=None)

To visualize the snapshot file, we have a tool hosted at https://pytorch.org/memory_viz. There, you can drag and drop your saved snapshot file and it will plot each allocation over time.

Memory Timeline

Alternatively, you can generate an HTML from a .pickle by using the script at pytorch/torch/cuda/_memory_viz.py, here is an example:

python torch/cuda/_memory_viz.py trace_plot snapshot.pickle -o snapshot.html

Debugging CUDA OOMs

Let’s look at how we can use the memory snapshot tool to answer:

  1. Why did a CUDA OOM happen?
  2. Where is the GPU Memory being used?

ResNet50 with a bug

We’ve taken a look at a properly working model in the first snapshot. Now, let’s take a look at a training example with a bug, see snapshot:

Memory Timeline

Notice how the second iteration uses far more memory than the first iteration. If this model were much larger, it could have CUDA OOM’d in the second iteration without much more insight into why.

Memory Timeline

When examining this snapshot further, we can clearly see that several tensors are staying alive from the first iteration to the second and later iterations. If we mouse over one of these tensors, it would show a stack trace suggesting that these were gradient tensors.

And indeed if we go to the code, we can see that it doesn’t clear the gradient tensors, when it could have cleared them before the forward.

Before:

        for _ in range(num_iters):
          pred = model(inputs)
          loss_fn(pred, labels).backward()
          optimizer.step()

After:

        for _ in range(num_iters):
          pred = model(inputs)
          loss_fn(pred, labels).backward()
          optimizer.step()
          # Add this line to clear grad tensors
          optimizer.zero_grad(set_to_none=True)

We can simply add an optimizer.zero_grad(set_to_none=True) instruction to clear the gradient tensors from iteration to iteration (more details about why we need to zero the gradients here: https://pytorch.org/tutorials/recipes/recipes/zeroing_out_gradients.html).

This is a simplification of a bug we’ve found in more complicated programs using this tool. We encourage you to try out the Memory Snapshot on your GPU memory problems and let us know how it goes.

ResNet50 after bug fix

After applying the fix, the snapshot seems to be clearing the gradients now.

Memory Timeline

We now have the snapshot of a properly working ResNet50 model. Try out the code yourself (see code sample in Appendix A).

But you may be wondering, why is there still an increase in memory after the first iteration? To answer this, let’s visit the Memory Profiler in the next section.

Categorized Memory Usage

The Memory Profiler is an added feature of the PyTorch Profiler that categorizes memory usage over time. We still rely on the Memory Snapshot for stack traces for deep dives into memory allocations.

To generate a memory timeline, here is a code snippet (full code sample in Appendix B):

   # Initialize the profiler context with record_shapes, profile_memory,
   # and with_stack set to True.
   with torch.profiler.profile(
       activities=[
           torch.profiler.ProfilerActivity.CPU,
           torch.profiler.ProfilerActivity.CUDA,
       ],
       schedule=torch.profiler.schedule(wait=0, warmup=0, active=6, repeat=1),
       record_shapes=True,
       profile_memory=True,
       with_stack=True,
       on_trace_ready=trace_handler,
   ) as prof:
       # Run the PyTorch Model inside the profile context.
       for _ in range(5):
           prof.step()
           with record_function("## forward ##"):
               pred = model(inputs)

           with record_function("## backward ##"):
               loss_fn(pred, labels).backward()

           with record_function("## optimizer ##"):
               optimizer.step()
               optimizer.zero_grad(set_to_none=True)

   # Construct the memory timeline HTML plot.
   prof.export_memory_timeline(f"{file_prefix}.html", device="cuda:0")

For further reference, see https://pytorch.org/docs/main/profiler.html.

The Memory Profiler automatically generates categories based on the graph of tensor operations recorded during profiling.

Memory Timeline

In this Memory Timeline collected using the Memory Profiler, we have the same training example as before. We can observe the gradients in blue are now being cleared from iteration to iteration. We can also notice that the optimizer state in yellow is allocated after the first iteration, and is kept constant for the rest of the job.

This optimizer state is the reason behind the increase of GPU memory from the first iteration to the second. Try out the code yourself (see code sample in Appendix B). The Memory Profiler helps to improve training memory understanding so that model authors can figure out which categories are using the most GPU memory.

Where can I find these tools?

We hope that these tools will greatly improve your ability to debug CUDA OOMs and to understand your memory usage by category.

The Memory Snapshot and the Memory Profiler are available in the v2.1 release of PyTorch as experimental features.

Feedback

We look forward to hearing from you about any enhancements, bugs or memory stories that our tools helped to solve! As always, please feel free to open new issues on PyTorch’s Github page.

We are also open to contributions from the OSS community, feel free to tag Aaron Shi and Zachary DeVito in any Github PRs for reviews.

Acknowledgements

Really appreciate the content reviewers, Mark Saroufim, Gregory Chanan, and Adnan Aziz for reviewing this post and improving its readability.

Appendix

Appendix A – ResNet50 Memory Snapshot Code Example

# (c) Meta Platforms, Inc. and affiliates. 
import logging
import socket
from datetime import datetime, timedelta

import torch

from torchvision import models

logging.basicConfig(
   format="%(levelname)s:%(asctime)s %(message)s",
   level=logging.INFO,
   datefmt="%Y-%m-%d %H:%M:%S",
)
logger: logging.Logger = logging.getLogger(__name__)
logger.setLevel(level=logging.INFO)

TIME_FORMAT_STR: str = "%b_%d_%H_%M_%S"

# Keep a max of 100,000 alloc/free events in the recorded history
# leading up to the snapshot.
MAX_NUM_OF_MEM_EVENTS_PER_SNAPSHOT: int = 100000

def start_record_memory_history() -> None:
   if not torch.cuda.is_available():
       logger.info("CUDA unavailable. Not recording memory history")
       return

   logger.info("Starting snapshot record_memory_history")
   torch.cuda.memory._record_memory_history(
       max_entries=MAX_NUM_OF_MEM_EVENTS_PER_SNAPSHOT
   )

def stop_record_memory_history() -> None:
   if not torch.cuda.is_available():
       logger.info("CUDA unavailable. Not recording memory history")
       return

   logger.info("Stopping snapshot record_memory_history")
   torch.cuda.memory._record_memory_history(enabled=None)

def export_memory_snapshot() -> None:
   if not torch.cuda.is_available():
       logger.info("CUDA unavailable. Not exporting memory snapshot")
       return

   # Prefix for file names.
   host_name = socket.gethostname()
   timestamp = datetime.now().strftime(TIME_FORMAT_STR)
   file_prefix = f"{host_name}_{timestamp}"

   try:
       logger.info(f"Saving snapshot to local file: {file_prefix}.pickle")
       torch.cuda.memory._dump_snapshot(f"{file_prefix}.pickle")
   except Exception as e:
       logger.error(f"Failed to capture memory snapshot {e}")
       return

# Simple Resnet50 example to demonstrate how to capture memory visuals.
def run_resnet50(num_iters=5, device="cuda:0"):
   model = models.resnet50().to(device=device)
   inputs = torch.randn(1, 3, 224, 224, device=device)
   labels = torch.rand_like(model(inputs))
   optimizer = torch.optim.SGD(model.parameters(), lr=1e-2, momentum=0.9)
   loss_fn = torch.nn.CrossEntropyLoss()

   # Start recording memory snapshot history
   start_record_memory_history()

   for _ in range(num_iters):
       pred = model(inputs)
       loss_fn(pred, labels).backward()
       optimizer.step()
       optimizer.zero_grad(set_to_none=True)

   # Create the memory snapshot file
   export_memory_snapshot()

   # Stop recording memory snapshot history
   stop_record_memory_history()

if __name__ == "__main__":
    # Run the resnet50 model
    run_resnet50()

Appendix B – ResNet50 Memory Profiler Code Example

# (c) Meta Platforms, Inc. and affiliates. 
import logging
import socket
from datetime import datetime, timedelta

import torch

from torch.autograd.profiler import record_function
from torchvision import models

logging.basicConfig(
   format="%(levelname)s:%(asctime)s %(message)s",
   level=logging.INFO,
   datefmt="%Y-%m-%d %H:%M:%S",
)
logger: logging.Logger = logging.getLogger(__name__)
logger.setLevel(level=logging.INFO)

TIME_FORMAT_STR: str = "%b_%d_%H_%M_%S"

def trace_handler(prof: torch.profiler.profile):
   # Prefix for file names.
   host_name = socket.gethostname()
   timestamp = datetime.now().strftime(TIME_FORMAT_STR)
   file_prefix = f"{host_name}_{timestamp}"

   # Construct the trace file.
   prof.export_chrome_trace(f"{file_prefix}.json.gz")

   # Construct the memory timeline file.
   prof.export_memory_timeline(f"{file_prefix}.html", device="cuda:0")

def run_resnet50(num_iters=5, device="cuda:0"):
   model = models.resnet50().to(device=device)
   inputs = torch.randn(1, 3, 224, 224, device=device)
   labels = torch.rand_like(model(inputs))
   optimizer = torch.optim.SGD(model.parameters(), lr=1e-2, momentum=0.9)
   loss_fn = torch.nn.CrossEntropyLoss()

   with torch.profiler.profile(
       activities=[
           torch.profiler.ProfilerActivity.CPU,
           torch.profiler.ProfilerActivity.CUDA,
       ],
       schedule=torch.profiler.schedule(wait=0, warmup=0, active=6, repeat=1),
       record_shapes=True,
       profile_memory=True,
       with_stack=True,
       on_trace_ready=trace_handler,
   ) as prof:
       for _ in range(num_iters):
           prof.step()
           with record_function("## forward ##"):
               pred = model(inputs)

           with record_function("## backward ##"):
               loss_fn(pred, labels).backward()

           with record_function("## optimizer ##"):
               optimizer.step()
               optimizer.zero_grad(set_to_none=True)

if __name__ == "__main__":
    # Warm up
    run_resnet50()
    # Run the resnet50 model
    run_resnet50()

Read More

From PyTorch Conference 2023: From Dinosaurs to Seismic Imaging with Intel

From PyTorch Conference 2023: From Dinosaurs to Seismic Imaging with Intel

Dinosaur fossil

Lightning Talk 1: Seismic Data to Subsurface Models with OpenFWI

Speaker: Benjamin Consolvo, AI Software Engineering Manager, Intel, LinkedIn

Session Overview

In this session, Ben begins with an overview of seismic imaging and full waveform inversion (FWI). Seismic imaging and FWI helps us to explore land for important subsurface minerals necessary for human thriving. To find those crucial subsurface minerals, we need to image the subsurface with a high degree of accuracy at a low cost, which involves two main challenges. He explains the solutions for those challenges using AI, which are summarized below.

Challenges Solutions using AI
Traditional physics based FWI requires an accurate starting model. Data-driven deep learning solutions do not require an accurate starting model.
GPUs are typically used for fine-tuning neural networks but are often unavailable and expensive. CPUs are highly available, inexpensive, and viable for AI fine-tuning. The new 4th Gen Intel® Xeon® Scalable processor has the built-in AI accelerator engine called Intel® AMX (Intel® Advanced Matrix Extensions) that helps to accelerate AI training and inference performance.

Next, he shows the wave propagation for the subsurface model and corresponding seismic shot gathers. In his example, the shot gathers are synthetically generated time-sampled records of sounds recordings from a shot (like a dynamite explosion or vibroseis truck) recorded by geophones spread across a large area. For this application, the training data consists of a pair of subsurface model image and seismic shot gather images, where the model from the shot gather is predicted.

Number of Seismic Shot Images Number of subsurface model images
Train 120,000 24,000
Test 25,000 5,000
Validation 5,000 1,000

In this application, the algorithm used during training was InversionNET (encoder-decoder convolutional neural network). Check out the implementation details for InversionNET architecture in Deng et al. (2021).

He then shows the results:

  1. Prediction versus ground truth model after one epoch and at 50 epochs. After training InversionNET, the predicted model is much closer to the ground truth image.
  2. Training loss and validation loss curves decreasing over time across 50 epochs.

Finally, Ben concludes his talk by highlighting that he was able to successfully fine-tune a deep neural network without an accurate starting model to obtain subsurface model on a 4th generation Intel® Xeon® Scalable processor.

Watch the full video recording here and download the presentation. More details can be found in this blog.

About the Speaker

Ben Consolvo

Ben Consolvo is an AI Solutions Engineering Manager at Intel. He has been building a team and a program around Intel’s AI technology paired with Intel’s hardware offerings. He brings a background and passion in data science, particularly in deep learning (DL) and computer vision. He has applied his skills in DL in the cybersecurity industry to automatically identify phishing websites, as well as to the oil and gas industry to identify subsurface features for geophysical imaging.

Lightning Talk 2: Dinosaur Bone Hunt

Speaker: Bob Chesebrough, Sr Solution Architect, Intel, LinkedIn

Session Overview

In this session, Bob starts the presentation by explaining his interest in collecting dinosaur bones and gives an overview of Intel AI Software portfolio.

He then explains the steps to create a dinosaur site treasure map or dinosaur bone likelihood map:

  1. Collect data and create training data (New Mexico aerial photos of the Morrison Formation – a famous dinosaur bone bed in the Western United States and the GPS coordinates for small bone fragments discovered)
  2. Train a simple ResNet 18 model using Intel® Extension for PyTorch
  3. Score the model on Utah photos and create a heat map

Finally, Bob shows the results that dinosaur bones were discovered in Utah using dinosaur bone likelihood map. Go to the GitHub repository to access the code sample and try out the sample using Intel Extension for PyTorch.

Watch the full video recording here and download the presentation. More details can be found in this blog.

About the Speaker

Bob Chesebrough

Bob Chesebrough’s industry experience is software development/AI solution engineering for fortune 100 companies and national laboratories for over three decades. He is also a hobbyist who has logged over 800 miles and 1000 hours in the field finding dinosaur bones. He and his sons discovered an important fossil of the only known crocodilian from the Jurassic in New Mexico, they have also discovered and logged into the museum 2000+ bones localities and described a new mass bone bed in New Mexico.

Read More

Snowflake logo

Snowflake Joins the PyTorch Foundation as a General Member

Snowflake logo

The PyTorch Foundation, a neutral home for the deep learning community to collaborate on the open source PyTorch framework and ecosystem, is announcing today that Snowflake has joined as a general member.

Snowflake enables thousands of organizations to unite siloed data, discover and securely share data, power data applications, and execute diverse AI/ML and analytic workloads across multiple clouds and geographies.

“By joining the PyTorch community, we know that Snowflake will help accelerate data warehousing solutions and cutting-edge AI frameworks. This showcases the commitment to advancing innovation for data and artificial intelligence,” said Ibrahim Haddad, Executive Director, PyTorch Foundation. “We are thrilled to have Snowflake join the PyTorch Foundation, marking a significant stride in the convergence of data management and deep learning technologies.”

Snowflake enables collaboration with AI technologies to handle the storage and analysis of large datasets generated by machine learning and AI applications through scalability and SQL support.

With the integrated repository of Python libraries from Anaconda in Snowpark, Snowflake users have always had a streamlined experience to deploy pre-trained PyTorch models in Snowflake to easily and securely make them a part of applications. Now with the addition of GPU instances in Snowpark Container Services (in private preview), training and other computationally intensive processing using PyTorch will also be streamlined, providing teams with an end-to-end solution for AI development and deployment.

“Most if not all of our customers incorporate open source software as part of their data stacks, so it is critical for us to work with open source ecosystems like the PyTorch Foundation, alongside incorporating open source to meet the needs of our customers,” said Adrien Treuille, Co-Founder of Streamlit, Director of Product Management at Snowflake. “As AI developers continue to integrate their models as part of applications, the power of Snowflake and PyTorch — coupled with Streamlit as the powerful front-end — creates near-limitless innovation for developers looking to build next-generation apps and unlock even more use cases.”

To learn more about the power of Snowflake and PyTorch, tune into Snowflake’s developer conference for AI and apps, BUILD.

To learn more about how you can be a part of the PyTorch Foundation, visit our website.

About Snowflake

Snowflake enables every organization to mobilize their data with Snowflake’s Data Cloud. Customers use the Data Cloud to unite siloed data, discover and securely share data, power data applications, and execute diverse AI/ML and analytic workloads. Wherever data or users live, Snowflake delivers a single data experience that spans multiple clouds and geographies. Thousands of customers across many industries, including 639 of the 2023 Forbes Global 2000 (G2K) as of July 31, 2023, use Snowflake Data Cloud to power their businesses. Learn more at snowflake.com.

About PyTorch Foundation

The PyTorch Foundation is a neutral home for the deep learning community to collaborate on the open source PyTorch framework and ecosystem. The PyTorch Foundation is supported by its members and leading contributors to the PyTorch open source project. The Foundation leverages resources provided by members and contributors to enable community discussions and collaboration.

About The Linux Foundation

The Linux Foundation is the world’s leading home for collaboration on open source software, hardware, standards, and data. Linux Foundation projects are critical to the world’s infrastructure including Linux, Kubernetes, Node.js, ONAP, PyTorch, RISC-V, SPDX, OpenChain, and more. The Linux Foundation focuses on leveraging best practices and addressing the needs of contributors, users, and solution providers to create sustainable models for open collaboration. For more information, please visit us at linuxfoundation.org. The Linux Foundation has registered trademarks and uses trademarks. For a list of trademarks of The Linux Foundation, please see its trademark usage page. Linux is a registered trademark of Linus Torvalds.

Read More

Accelerating Generative AI with PyTorch II: GPT, Fast

Accelerating Generative AI with PyTorch II: GPT, Fast

This post is the second part of a multi-series blog focused on how to accelerate generative AI models with pure, native PyTorch. We are excited to share a breadth of newly released PyTorch performance features alongside practical examples to see how far we can push PyTorch native performance. In part one, we showed how to accelerate Segment Anything over 8x using only pure, native PyTorch. In this blog we’ll focus on LLM optimization.

Over the past year, generative AI use cases have exploded in popularity. Text generation has been one particularly popular area, with lots of innovation among open-source projects such as llama.cpp, vLLM, and MLC-LLM.

While these projects are performant, they often come with tradeoffs in ease of use, such as requiring model conversion to specific formats or building and shipping new dependencies. This begs the question: how fast can we run transformer inference with only pure, native PyTorch?

As announced during our recent PyTorch Developer Conference, the PyTorch team wrote a from-scratch LLM almost 10x faster than baseline, with no loss of accuracy, all using native PyTorch optimizations. We leverage a breadth of optimizations including:

And, even better, we can do it in less than 1000 lines of native PyTorch code.

If this excites you enough to jump straight into the code, check it out at https://github.com/pytorch-labs/gpt-fast!

Screen recording

Note: We will be focusing on latency (i.e. batch size=1) for all of these benchmarks. Unless otherwise specified, all benchmarks are run on an A100-80GB, power limited to 330W.

Starting Point (25.5 tok/s)

Let’s start off with an extremely basic and simple implementation.

simple implementation

Sadly, this does not perform very well. But why? Looking at a trace reveals the answer – it’s heavily CPU overhead bound! What this means is that our CPU is not able to tell the GPU what to do fast enough for the GPU to be fully utilized.

trace

Imagine the GPU as this super massive factory with a ridiculous amount of compute available. Then, imagine the CPU as some messenger shuttling instructions back and forth to the GPU. Remember, in large scale deep learning systems, the GPU is responsible for doing 100% of the work! In such systems, the only role of the CPU is to tell the GPU what work it should be doing.

factory

So, the CPU runs over and tells the GPU to do an “add”, but by the time the CPU can give the GPU another chunk of work, the GPU has long finished the previous chunk of work.

Despite the fact that the GPU needs to perform thousands of computations while the CPU only needs to do orchestration work, this is surprisingly common! There’s a variety of reasons for this, ranging from the fact that the CPU is likely running some single-threaded Python to the fact that GPUs are just incredibly fast nowadays.

Regardless of the reason, we now find ourselves in the overhead-bound regime. So, what can we do? One, we could rewrite our implementation in C++, perhaps even eschew frameworks entirely and write raw CUDA. Or…. we could just send more work to the GPU at once.

factory

By just sending a massive chunk of work at once, we can keep our GPU busy! Although during training, this may just be accomplished by increasing your batch size, how do we do this during inference?

Enter torch.compile.

Step 1: Reducing CPU overhead through torch.compile and a static kv-cache (107.0 tok/s)

Torch.compile allows us to capture a larger region into a single compiled region, and particularly when run with mode=”reduce-overhead”, is very effective at reducing CPU overhead. Here, we also specify fullgraph=True, which validates that there are no “graph breaks” in your model (i.e. portions that torch.compile cannot compile). In other words, it ensures that torch.compile is running to its fullest potential.

To apply it, we simply wrap a function (or a module) with it.

torch.compile(decode_one_token, mode="reduce-overhead", fullgraph=True)

However, there are a couple of nuances here that make it somewhat nontrivial for folks to get significant performance boosts from applying torch.compile to text generation.

The first obstacle is the kv-cache. The kv-cache is an inference-time optimization that caches the activations computed for the previous tokens (see here for a more in-depth explanation). However, as we generate more tokens, the “logical length” of the kv-cache grows. This is problematic for two reasons. One is that reallocating (and copying!) the kv-cache every time the cache grows is simply expensive. The other one is that this dynamism makes it harder to reduce the overhead, as we are no longer able to leverage approaches like cudagraphs.

To resolve this, we use a “static” kv-cache, which means that we statically allocate the maximum size of the kv-cache, and then mask out the unused values in the attention portion of the computation.

code

The second obstacle is the prefill phase. Transformer text generation is best thought of as a two phase process: 1. The prefill where the entire prompt is processed, and 2. Decoding where each token is generated autoregressively.

Although decoding can be made entirely static once the kv-cache is made static, the prefill stage still requires significantly more dynamism, due to having a variable prompt length. Thus, we actually need to compile the two stages with separate compilation strategies.

compile

Although these details are a bit tricky, the actual implementation is not very difficult at all (see gpt-fast)! And the performance boost is dramatic.

chart

All of a sudden, our performance improves by more than 4x! Such performance gains are often common when one’s workload is overhead bound.

Sidenote: How is torch.compile helping?

It is worth disentangling how exactly torch.compile is improving performance. There’s 2 main factors leading to torch.compile’s performance.

The first factor, like mentioned above, is overhead reduction. Torch.compile is able to reduce overhead through a variety of optimizations, but one of the most effective ones is called CUDAGraphs. Although torch.compile applies this automatically for you when “reduce-overhead” is set, saving the extra work and code you need to write when doing this yourself manually without torch.compile.

The second factor, however, is that torch.compile simply generates faster kernels. In the decoding benchmark above, torch.compile actually generates every single kernel from scratch, including both the matrix multiplications and the attention! And even cooler, these kernels are actually faster than the built in alternatives (CuBLAS and FlashAttention2)!

This may sound implausible to many of you, considering how hard it is to write efficient matrix multiplication/attention kernels, and how much manpower has been put into CuBLAS and FlashAttention. The key here, however, is that transformer decoding has very unusual computational properties. In particular, because of the KV-cache, for BS=1 every single matrix multiplication in a transformer is actually a matrix vector multiplication.

This means that the computations are completely memory-bandwidth bound, and as such, are well within the range of compilers to automatically generate. And in fact, when we benchmark torch.compile’s matrix-vector multiplications against CuBLAS, we find that torch.compile’s kernels are actually quite a bit faster!

code

code

Step 2: Alleviating memory bandwidth bottleneck through int8 weight-only quantization (157.4 tok/s)

So, given that we’ve already seen massive speedups from applying torch.compile, is it possible to do even better? One way to think about this problem is to compute how close we are to the theoretical peak. In this case, the largest bottleneck is the cost of loading the weights from GPU global memory to registers. In other words, each forward pass requires us to “touch” every single parameter on the GPU. So, how fast can we theoretically “touch” every single parameter in a model?

weights

To measure this, we can use Model Bandwidth Utilization (MBU). This measures what percentage of our memory bandwidth we’re able to use during inference.

Computing it is pretty simple. We simply take the total size of our model (# params * bytes per param) and multiply it by the number of inferences we can do per second. Then, we divide this by the peak bandwidth of the GPU to get our MBU.

MBU

For example, for our above case, we have a 7B parameter model. Each parameter is stored in fp16 (2 bytes per parameter), and we achieved 107 tokens/s. Finally, our A100-80GB has a theoretical 2 TB/s of memory bandwidth.

MBU

Putting this all together, we get **72% MBU! **This is quite good, considering that even just copying memory struggles to break 85%.

But… it does mean that we’re pretty close to the theoretical limit here, and that we’re clearly bottlenecked on just loading our weights from memory. It doesn’t matter what we do – without changing the problem statement in some manner, we might only be able to eek out another 10% in performance.

Let’s take another look at the above equation. We can’t really change the number of parameters in our model. We can’t really change the memory bandwidth of our GPU (well, without paying more money). But, we can change how many bytes each parameter is stored in!

MBU

Thus, we arrive at our next technique – int8 quantization. The idea here is simple. If loading our weights from memory is our main bottleneck, why don’t we just make the weights smaller?

MBU

Note that this is quantizing only the weights – the computation itself is still done in bf16. This makes this form of quantization easy to apply with very little to no accuracy degradation.

Moreover, torch.compile can also easily generate efficient code for int8 quantization. Let’s look again at the above benchmark, this time with int8 weight-only quantization included.

code

code

As you can see from the dark blue line (torch.compile + int8), there is a significant performance improvement when using torch.compile + int8 weight-only quantization! Moreover, the light-blue line (no torch.compile + int8) is actually much worse than even the fp16 performance! This is because in order to take advantage of the perf benefits of int8 quantization, we need the kernels to be fused. This shows one of the benefits of torch.compile – these kernels can be automatically generated for the user!

Applying int8 quantization to our model, we see a nice 50% performance improvement, bringing us up to 157.4 tokens/s!

chart

Step 3: Reframing the problem using speculative decoding

Even after using techniques like quantization, we’re still faced with another problem. In order to generate 100 tokens, we must load our weights 100 times.

diagram

Even if the weights are quantized, we still must load our weights over and over, once for each token we generate! Is there any way around this?

At first glance, the answer might seem like no – there’s a strict serial dependency in our autoregressive generation. However, as it turns out, by utilizing speculative decoding, we’re able to break this strict serial dependency and obtain speedups!

engineers

Imagine you had a senior engineer (called Verity), who makes the right technical decisions but is rather slow at writing code. However, you also have a junior engineer (called Drake), who doesn’t always make the right technical decisions but can write code much faster (and cheaper!) than Verity. How can we take advantage of Drake (the junior engineer) to write code faster while ensuring that we are still making the right technical decisions?

engineers

First, Drake goes through the labor-intensive process of writing the code, making technical decisions along the way. Next, we give the code to Verity to review.

engineers

Upon reviewing the code, Verity might decide that the first 3 technical decisions Drake made are correct, but the last 2 need to be redone. So, Drake goes back, throws away his last 2 decisions, and restarts coding from there.

Notably, although Verity (the senior engineer) has only looked at the code once, we are able to generate 3 pieces of validated code identical to what she would have written! Thus, assuming Verity is able to review the code faster than it would have taken her to write those 3 pieces herself, this approach comes out ahead.

In the context of transformer inference, Verity would be played by the role of the larger model whose outputs we want for our task, called the verifier model. Similarly, Drake would be played by a smaller model that’s able to generate text much faster than the larger model, called the draft model. So, we would generate 8 tokens using the draft model, and then process all eight tokens in parallel using the verifier model, throwing out the ones that don’t match.

Like mentioned above, one crucial property of speculative decoding is that it does not change the quality of the output. As long as the time it takes for generating the tokens using the draft model + verifying the tokens is less than it would have taken to generate those tokens, we come out ahead.

One of the great things about doing this all in native PyTorch is that this technique is actually really easy to implement! Here’s the entirety of the implementation, in about 50 lines of native PyTorch.

code

Although speculative decoding guarantees that we have mathematically identical results compared to regular generation, it does have the property that the runtime performance varies depending on the generated text, as well as how aligned the draft and verifier model are. For example, when running CodeLlama-34B + CodeLlama-7B, we’re able to obtain a 2x boost in tokens/s for generating code. On the other hand, when using Llama-7B + TinyLlama-1B, we’re only able to obtain about a 1.3x boost in tokens/s.

Sidenote: Running this on AMD

Like mentioned above, every single kernel in decoding is generated from scratch by torch.compile, and is converted into OpenAI Triton. As AMD has a torch.compile backend (and also a Triton backend), we can simply go through all of the optimizations above… but on an AMD GPU! With int8 quantization, we’re able to achieve 102.5 tokens/s with one GCD (i.e. one half) of a MI250x!

chart

Step 4: Reducing the size of the weights even more with int4 quantization and GPTQ (202.1 tok/s)

Of course, if reducing the weights down from 16 bits to 8 bits allows for speedups by reducing the number of bytes we need to load, reducing the weights down to 4 bits would result in even larger speedups!

Unfortunately, when reducing weights down to 4-bits, the accuracy of the model starts to become a much larger concern. From our preliminary evals, we see that although using int8 weight-only quantization has no perceptible accuracy degradation, using int4 weight-only quantization does.

table

There are 2 main tricks we can use to limit the accuracy degradation of int4 quantization.

The first one is to have a more granular scaling factor. One way to think about the scaling factor is that when we have a quantized tensor representation, it is on a sliding scale between a floating point tensor (each value has a scaling factor) and an integer tensor (no values have a scaling factor). For example, with int8 quantization, we had one scaling factor per row. If we want higher accuracy, however, we can change that to “one scaling factor per 32 elements”. We choose a group size of 32 to minimize accuracy degradation, and this is also a common choice among the community.

The other one is to use a more advanced quantization strategy than simply rounding the weights. For example, approaches like GPTQ leverage example data in order to calibrate the weights more accurately. In this case, we prototype an implementation of GPTQ in the repository based off of PyTorch’s recently released torch.export.

In addition, we need kernels that fuse int4 dequantize with the matrix vector multiplication. In this case, torch.compile is unfortunately not able to generate these kernels from scratch, so we leverage some handwritten CUDA kernels in PyTorch.

These techniques require some additional work, but putting them all together results in even better performance!

chart

Step 5: Combining everything together (244.7 tok/s)

Finally, we can compose all of the techniques together to achieve even better performance!

chart

Step 6: Using Tensor Parallelism

So far, we’ve been restricting ourselves to minimizing latency while on a single GPU. In many settings, however, we have access to multiple GPUs. This allows us to improve our latency further!

To get an intuitive sense of why this would allow us to improve our latency, let’s take a look at the prior equation for MBU, particularly the denominator. Running on multiple GPUs gives us access to more memory bandwidth, and thus, higher potential performance.

MBU

As for which parallelism strategy to pick, note that in order to reduce our latency for one example, we need to be able to leverage our memory bandwidth across more devices simultaneously. This means that we need to split the processing of one token across multiple devices. In other words, we need to use tensor parallelism.

Luckily, PyTorch also provides low-level tools for tensor-parallelism that compose with torch.compile. We are also working on higher-level APIs for expressing tensor parallelism, stay tuned for those!

However, even without a higher-level API, it’s actually still quite easy to add tensor parallelism. Our implementation comes in at 150 lines of code, and doesn’t require any model changes.

code

We are still able to take advantage of all the optimizations mentioned previously, which all can continue to compose with tensor parallelism. Combining these together, we’re able to serve Llama-70B at 55 tokens/s with int8 quantization!

chart

Conclusion

Let’s take a look at what we’re able to accomplish.

  1. Simplicity: Ignoring quantization, model.py (244 LOC) + generate.py (371 LOC) + tp.py (151 LOC) comes out to 766 LOC to implement fast inference + speculative decoding + tensor-parallelism.
  2. Performance: With Llama-7B, we’re able to use compile + int4 quant + speculative decoding to reach 241 tok/s. With llama-70B, we’re able to also throw in tensor-parallelism to reach 80 tok/s. These are both close to or surpassing SOTA performance numbers!

PyTorch has always allowed for simplicity, ease of use, and flexibility. However, with torch.compile, we can throw in performance as well.

The code can be found here: https://github.com/pytorch-labs/gpt-fast. We hope that the community finds it useful. Our goal with this repo is not to provide another library or framework for people to import. Instead, we encourage users to copy-paste, fork, and modify the code in the repo.

Acknowledgements

We would like to thank the vibrant open source community for their continual support of scaling LLMs, including:

  • Lightning AI for supporting pytorch and work in flash attention, int8 quantization, and LoRA fine-tuning.
  • GGML for driving forward fast, on device inference of LLMs
  • Andrej Karpathy for spearheading simple, interpretable and fast LLM implementations
  • MLC-LLM for pushing 4-bit quantization performance on heterogenous hardware

Read More

PyTorch 2.1 Contains New Performance Features for AI Developers

We are excited to see the release of PyTorch 2.1. In this blog, we discuss the five features for which Intel made significant contributions to PyTorch 2.1:

  1. TorchInductor-CPU optimizations including Bfloat16 inference path for torch.compile
  2. CPU dynamic shape inference path for torch.compile
  3. C++ wrapper (prototype)
  4. Flash-attention-based scaled dot product algorithm for CPU
  5. PyTorch 2 export post-training auantization with an x86 back end through an inductor

At Intel, we are delighted to be part of the PyTorch community and appreciate the collaboration with and feedback from our colleagues at Meta* as we co-developed these features.

Let’s get started.

TorchInductor-CPU Optimizations

This feature optimizes bfloat16 inference performance for TorchInductor. The 3rd and 4th generation Intel® Xeon® Scalable processors have built-in hardware accelerators for speeding up dot-product computation with the bfloat16 data type. Figure 1 shows a code snippet of how to specify the BF16 inference path.

user_model = ...

user_model.eval()
with torch.no_grad(), torch.autocast("cpu"):
	compiled_model = torch.compile(user_model)
	y = compiled_model(x)

Figure 1. Code snippet showing the use of BF16 inference with TorchInductor

We measured the performance on three TorchInductor benchmark suites—TorchBench, Hugging Face, and TIMM—and the results are as follows in Table 1. Here we see that performance in graph mode (TorchInductor) outperforms eager mode by factors ranging from 1.25x to 2.35x.

Table 1. Bfloat16 performance geometric mean speedup in graph mode, compared with eager mode

Bfloat16 Geometric Mean Speedup (Single-Socket Multithreads)
Compiler torchbench huggingface timm_models
inductor 1.81x 1.25x 2.35x
Bfloat16 Geometric Mean Speedup (Single-Core Single Thread)
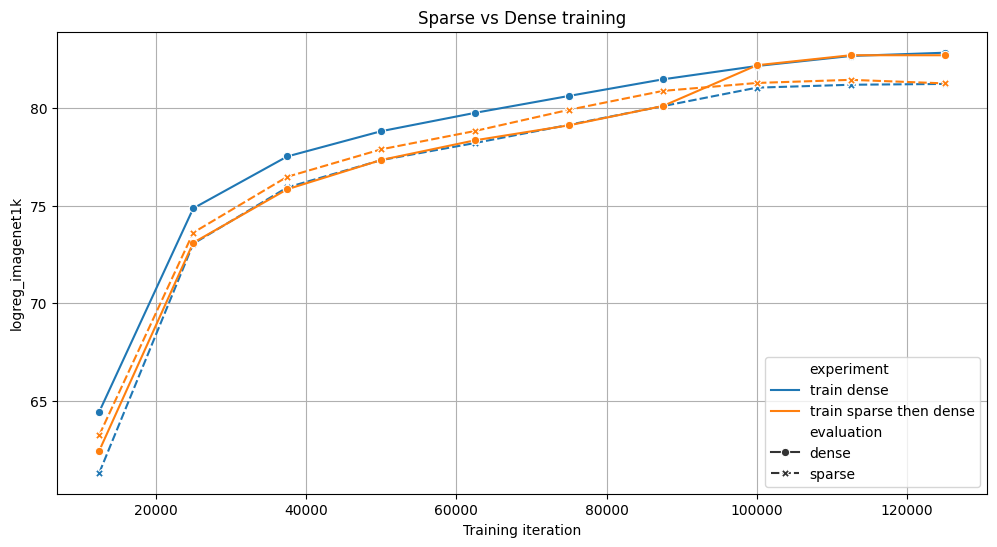
Compiler torchbench huggingface timm_models
inductor 1.74x 1.28x 1.29x

Developers can fully deploy their models on 4th generation Intel Xeon processors to take advantage of the Intel® Advanced Matrix Extensions (Intel® AMX) feature to get peak performance for torch.compile. Intel AMX has two primary components: tiles and tiled matrix multiplication (TMUL). The tiles store large amounts of data in eight two-dimensional registers, each one kilobyte in size. TMUL is an accelerator engine attached to the tiles that contain instructions to compute larger matrices in a single operation.
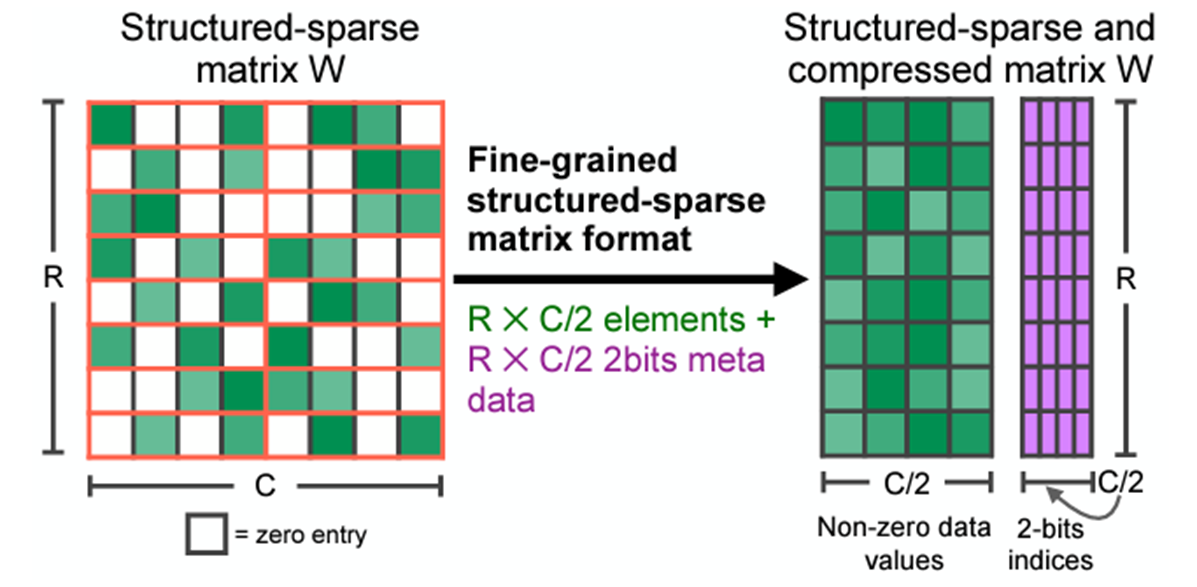
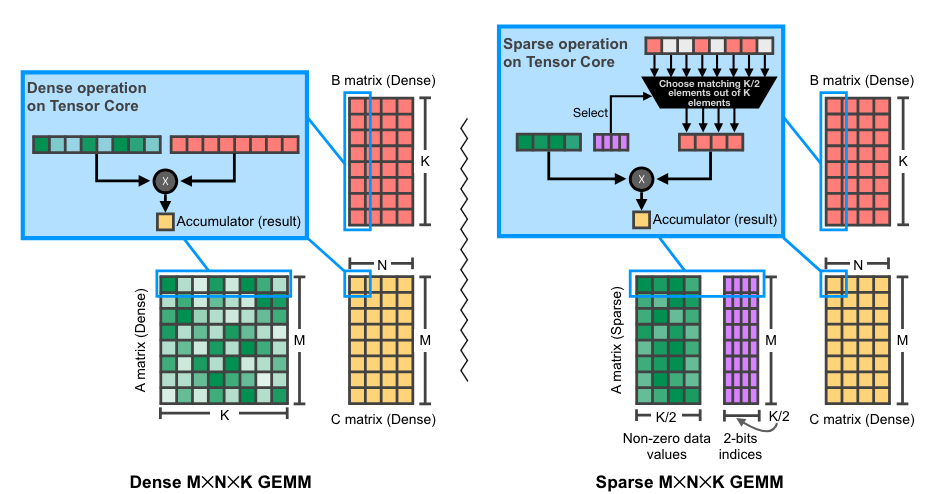
CPU Dynamic Shapes Inference Path for torch.compile

Dynamic shapes is one of the key features in PyTorch 2.0. PyTorch 2.0 assumes everything is static by default. If we recompile because a size changed, we will instead attempt to recompile that size as being dynamic (sizes that have changed are likely to change in the future). Dynamic shapes support is required for popular models like large language models (LLM). Dynamic shapes that provide support for a broad scope of models can help users get more benefit from torch.compile. For dynamic shapes, we provide the post-op fusion for conv/gemm operators and vectorization code-gen for non-conv/gemm operators.

Dynamic shapes is supported by both the inductor Triton back end for CUDA* and the C++ back end for CPU. The scope covers improvements for both functionality (as measured by model passing rate) and performance (as measured by inference latency/throughput). Figure 2 shows a code snippet for the use of dynamic shape inference with TorchInductor.

user_model = ...

# Training example
compiled_model = torch.compile(user_model)
y = compiled_model(x_size1)
# Here trigger the recompile because the input size changed
y = compiled_model(x_size2)


# Inference example
user_model.eval()
compiled_model = torch.compile(user_model)
with torch.no_grad():
	y = compiled_model(x_size1)
 # Here trigger the recompile because the input size changed
 y = compiled_model(x_size2)

Figure 2. Code snippet showing the use of dynamic shape inference with TorchInductor

We again measured the performance on the three TorchInductor benchmark suites—TorchBench, Hugging Face, and TIMM—and the results are in Table 2. Here we see that performance in graph mode outperforms eager mode by factors ranging from 1.15x to 1.79x.

Table 2. Dynamic shape geometric mean speedup compared with Eager mode

Dynamic Shape Geometric Mean Speedup (Single-Socket Multithreads)
Compiler torchbench huggingface timm_models
inductor 1.35x 1.15x 1.79x
Dynamic Shape Geometric Mean Speedup (Single-Core Single-Thread)
Compiler torchbench huggingface timm_models
inductor 1.48x 1.15x 1.48x

C++ Wrapper (Prototype)

The feature generates C++ code instead of Python* code to invoke the generated kernels and external kernels in TorchInductor to reduce Python overhead. It is also an intermediate step to support deployment in environments without Python.

To enable this feature, use the following configuration:

import torch
import torch._inductor.config as config
config.cpp_wrapper = True

For light workloads where the overhead of the Python wrapper is more dominant, C++ wrapper demonstrates a higher performance boost ratio. We grouped the models in TorchBench, Hugging Face, and TIMM per the average inference time of one iteration and categorized them into small, medium, and large categories. Table 3 shows the geometric mean speedups achieved by the C++ wrapper in comparison to the default Python wrapper.

Table 3. C++ wrapper geometric mean speedup compared with Eager mode

FP32 Static Shape Mode Geometric Mean Speedup (Single-Socket Multithreads)
Compiler Small (t <= 0.04s) Medium (0.04s < t <= 1.5s) Large (t > 1.5s)
inductor 1.06x 1.01x 1.00x
FP32 Static Shape Mode Geometric Mean Speedup (Single-Core Single-Thread)
Compiler Small (t <= 0.04s) Medium (0.04s < t <= 1.5s) Large (t > 1.5s)
inductor 1.13x 1.02x 1.01x
FP32 Dynamic Shape Mode Geometric Mean Speedup (Single-Socket Multithreads)
Compiler Small (t <= 0.04s) Medium (0.04s < t <= 1.5s) Large (t > 1.5s)
inductor 1.05x 1.01x 1.00x
FP32 Dynamic Shape Mode Geometric Mean Speedup (Single-Core Single-Thread)
Compiler Small (t <= 0.04s) Medium (0.04s < t <= 1.5s) Large (t > 1.5s)
inductor 1.14x 1.02x 1.01x
BF16 Static Shape Mode Geometric Mean Speedup (Single-Socket Multithreads)
Compiler Small (t <= 0.04s) Medium (0.04s < t <= 1.5s) Large (t > 1.5s)
inductor 1.09x 1.03x 1.04x
BF16 Static Shape Mode Geometric Mean Speedup (Single-Core Single-Thread)
Compiler Small (t <= 0.04s) Medium (0.04s < t <= 1.5s) Large (t > 1.5s)
inductor 1.17x 1.04x 1.03x

Flash-Attention-Based Scaled Dot Product Algorithm for CPU

Scaled dot product attention (SDPA) is one of the flagship features of PyTorch 2.0 that helps speed up transformer models. It is accelerated with optimal CUDA kernels while still lacking optimized CPU kernels. This flash-attention implementation targets both training and inference, with both FP32 and Bfloat16 data types supported. There is no front-end use change for users to leverage this SDPA optimization. When calling SDPA, a specific implementation will be chosen automatically, including this new implementation.

We have measured the SDPA-related models in Hugging Face, and they are proven effective when compared to the unfused SDPA. Shown in Table 4 are the geometric mean speedups for SDPA optimization.

Table 4. SDPA optimization performance geometric mean speedup

SDPA Geometric Mean Speedup (Single-Socket Multithreads)
Compiler Geometric Speedup FP32 Geometric Speedup BF16
inductor 1.15x, 20/20 1.07x, 20/20
SDPA Geometric Mean Speedup (Single-Core Single-Thread)
Compiler Geometric Speedup FP32 Geometric Speedup BF16
inductor 1.02x, 20/20 1.04x, 20/20

PyTorch 2 Export Post-Training Quantization with x86 Back End through Inductor

PyTorch provides a new quantization flow in the PyTorch 2.0 export. This feature uses TorchInductor with an x86 CPU device as the back end for post-training static quantization with this new quantization flow. An example code snippet is shown in Figure 3.

import torch
import torch._dynamo as torchdynamo
from torch.ao.quantization.quantize_pt2e import convert_pt2e, prepare_pt2e
import torch.ao.quantization.quantizer.x86_inductor_quantizer as xiq

model = ... 

model.eval()
with torch.no_grad():
 # Step 1: Trace the model into an FX graph of flattened ATen operators
 exported_graph_module, guards = torchdynamo.export(
	 model,
	 *copy.deepcopy(example_inputs),
	 aten_graph=True,
 )

 # Step 2: Insert observers or fake quantize modules
 quantizer = xiq.X86InductorQuantizer()
 operator_config = xiq.get_default_x86_inductor_quantization_config()
 quantizer.set_global(operator_config)
 prepared_graph_module = prepare_pt2e(exported_graph_module, quantizer)

 # Doing calibration here.

 # Step 3: Quantize the model
 convert_graph_module = convert_pt2e(prepared_graph_module)

 # Step 4: Lower Quantized Model into the backend
 compile_model = torch.compile(convert_graph_module)

Figure 3. Code snippet showing the use of Inductor as back end for PyTorch 2 export post-training quantization

All convolutional neural networks (CNN) models from the TorchBench test suite have been measured and proven effective when compared with the Inductor FP32 inference path. Performance metrics are shown in Table 5.

Compiler Geometric Speedup Geometric Related Accuracy Loss
inductor 3.25x, 12/12 0.44%, 12/12

Next Steps

Get the Software

Try out PyTorch 2.1 and realize the performance benefits for yourself from these features contributed by Intel.

We encourage you to check out Intel’s other AI Tools and framework optimizations and learn about the open, standards-based oneAPI multiarchitecture, multivendor programming model that forms the foundation of Intel’s AI software portfolio.

For more details about the 4th generation Intel Xeon Scalable processor, visit the AI platform where you can learn how Intel is empowering developers to run high-performance, efficient end-to-end AI pipelines.

PyTorch Resources

Product and Performance Information

1 Amazon EC2* m7i.16xlarge: 1-node, Intel Xeon Platinum 8488C processor with 256 GB memory (1 x 256 GB DDR5 4800 MT/s), microcode 0x2b000461, hyperthreading on, turbo on, Ubuntu* 22.04.3 LTS, kernel 6.2.0-1011-aws, GCC* 11.3.0, Amazon Elastic Block Store 200 GB, BIOS Amazon EC2 1.0 10/16/2017; Software: PyTorch 2.1.0_rc4, Intel® oneAPI Deep Neural Network Library (oneDNN) version 3.1.1, TorchBench, TorchVision, TorchText, TorchAudio, TorchData, TorchDynamo Benchmarks, tested by Intel on 9/12/2023.

2 Amazon EC2 c6i.16xlarge: 1-node, Intel Xeon Platinum 8375C processor with 128 GB memory (1 x 128 GB DDR4 3200 MT/s), microcode 0xd0003a5, hyperthreading on, turbo on, Ubuntu 22.04.2 LTS, kernel 6.2.0-1011-aws, gcc 11.3.0, Amazon Elastic Block Store 200 GB, BIOS Amazon EC2 1.010/16/2017; Software: PyTorch 2.1.0_rc4, oneDNN version 3.1.1, TorchBench, TorchVision, TorchText, TorchAudio, TorchData, TorchDynamo Benchmarks, TorchBench cpu userbenchmark, tested by Intel on 9/12/2023.

Read More